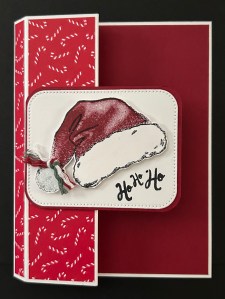
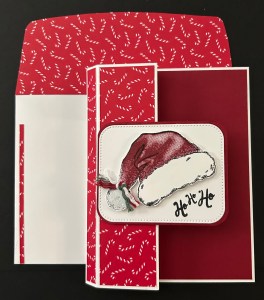
Good morning all you peeps! We have a theme challenge today – Christmas – and I’m using Santa’s Hat in a new for me fun fold (super easy too.) If you’ve come from Tara’s page, thank you for stopping by. If you hopped right in here – it’s good to have you. Be sure you make the rounds to see what everyone has created.
Dimensions & instructions:
Card base is Thick Basic White – 8 ½ x 5 ½ scored ¼, 1 ¾, 2 ¼, 3 ¾, 4 ¼ Burnish well.
DSP is A Stitched Season – 3 ½ x 5 3/8 then cut in this order – 3/8, 1 3/8, 3/8, 1 3/8
Attach DSP to scored areas, then add adhesive to smallest score, fold in @ 4 ¼ fold & close card. The box is now created. 😀
Add coordinating card stock to right side 4 1/8 x 5 3/8. Here I used Cherry Cobbler.
Decorate card front: For this card I used the largest rectangle in the Nested Essentials Dies w/ a Cherry Cobbler card stock layer behind it. I rounded the corners, stamped the sentiment in Memento ink & attached to the card front with dimensionals just on the left side. I stamped Santa’s hat outline in Memento ink, stamped the hat in Cherry Cobbler, then used Wink of Stella on the ball & brim and sprinkled this with White embossing powder before it dried & heat set. This added a really fun element to the hat! I fussy cut the hat & attached with more dimensionals. I cut a short length of the Christmas Baker’s Twine, tied a half knot and attached this with a glue dot.
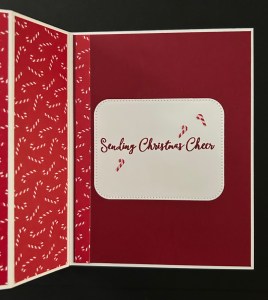
For the inside… another largest rectangle die cut from Nested Essential Dies in Basic White, stamped the sentiment in Cherry Cobbler, added candy canes from the Christmas Epoxy Shapes & attached this to the inside of the card, making certain it is ‘covered’ by the same die on the card front.
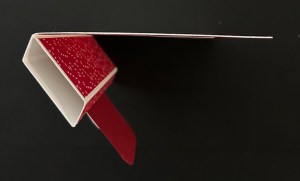
Here’s what the card looks like from the top.
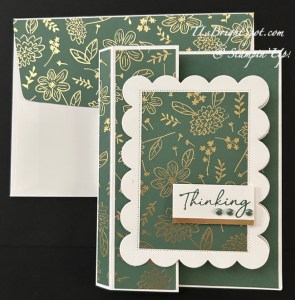
For the envelope… more of the same DSP attached to the flap & trimmed to fit. A very thin strip of the same DSP was added on the left side.
An additional card, same layout… just had to share so you can see how easy it is to ‘change things up’!
See below the list of names how to purchase the products to make Santa’s Hat. If you have questions, please reach out. Beginning Oct. 6 Stampin’ Up! has a joining promotion – I would enjoy having you join my team!
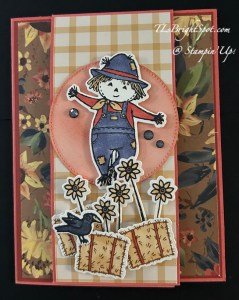
Oh this scarecrow is just too cute! And I’ve used it on this front flap fun fold card. We made this card in class on Thursday & the group loved it. My hubby called this a card with a tongue! 😀
I’ve used several products to make this card… the Gingham Vellum paper in Golden Glow on the flap (2 3/8 x 5 3/8), the beautiful Sunflower Fields DSP on the card front, inside strip and the envelope, Stitched Circles Dies, Radiant Gems in Secret Sea and all the fun elements in the Fun For Fall bundle, plus Stampin’ Blends to color the circle & the stamped & die cut pieces.
To color the scarecrow: Light Misty Moonlight, Calypso Coral & Golden Glow; the sunflowers are Golden Glow & Pecan Pie center; the crow is light Basic Black & Golden Glow on the beak; and finally the bales of hay are stamped in Pecan Pie ink then colored with Golden Glow & Calypso Coral. The circle die cut was created with a Blending Brush Calypso Coral first then Cajun Craze – the scarecrow is standing out in the field in the hot sun! He looks as though he’s enjoying his job!
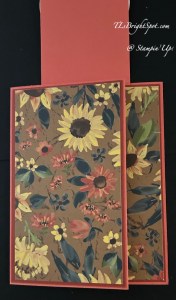
Here’s the card front with the ‘flap’ up, showing off that beautiful Sunflower Fields DSP. It’s layered on Cajun Craze and the card base is Calypso Coral. The DSP is cut 3 x 5 1/4 with the Cajun Craze 3 1/8 x 5 3/8. The card base is 7 1/2 x 5 1/2 scored at 3 1/2. The flap is 2 1/2 x 6 1/4 scored at 5 1/2 and attached to the inside of the card (covered by the sentiment panel (see below)
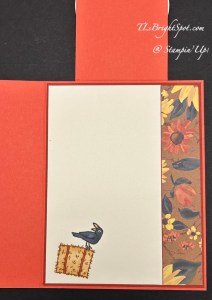
And here’s the inside of the card with the bail of hay and the sassy crow. The hay bail is stamped in Pecan Pie & colored with Golden Glow & the ‘twine’ is Calypso Coral. The crow is Light Basic Black and Golden Glow on the beak. The DSP on the side is 1 x 5 1/4.
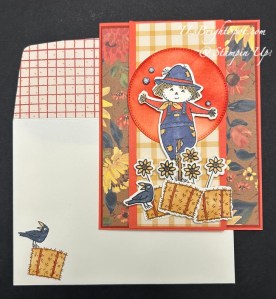
For the envelope… more Sunflower Fields DSP on the flap 2 1/4 x 6 & trimmed to fit. On the front, the same images as on the inside of the card. Such a fun, fun card! This can be masculine or for a woman or for a child… versatility. Say hello, congrats, or feel better soon in whatever you write.
Want to purchase the products to make this card – see below… and remember 10% off when you purchase a bundle,; when you spend $50 & up, the monthly tutorial shows up in your in-box, purchase over time & add up your Daisy Patch rewards for a free stamp set of choice – see my rewards page for more information.
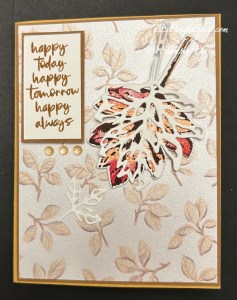
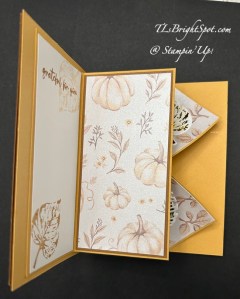
If you have joined me from the incredible Tara – welcome. If you’re just hopping in – great! Welcome to our fabulous hop! And how about the NEW Sep-Dec 2026 Catalog – pretty cool, right? What’s your favorite – or should I ask your ten (10) favorites? I would love to know. Today’s card shows one of my favorites.. the Elegant Leaves bundle. The delicate dies for the leaves are truly special.
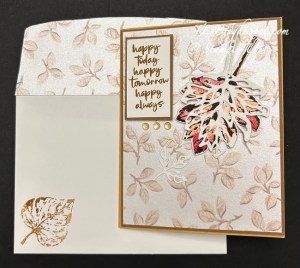
Where to begin??? I’ll begin with the stamps & dies – then move to the ‘how to’ of this fun fold. The above big leaf – I’m calling it a maple leaf – I inked the solid stamp with Timid Tiger, stamped it off, then added Real Red in various places with a sponge dauber and stamped this on Basic White. I then stamped the detail stamp in Early Espresso. I die cut the detail dies of this leaf from Basic White and attached it in various spots with dabs of liquid glue. I put dimensionals on the back & set it aside. I then proceeded to stamp several of the other leaves “just to have, in case’. They are… Lemon Lolly & Old Olive with the detail stamp being Early Espresso. I die cut each along with the detail die of each leaf – and that from Basic White. I adhered each of the intricate die cuts to the same leaf with liquid glue and set them aside. There is an additional very small detail leaf die on the card front that is nearly impossible to see – cut from Basic White – it’s there.
The sentiment for the front comes from the Elegant Leaves stamp set and is stamped in Pecan Pie ink on Basic White, then added to a Pecan Pie panel just 1/8″ larger I put dimensionals on the back & set it aside as well.
The card front… Pecan Pie 4 1/8 x 5 3/8 with a layer of the Glow of Harvest DSP 4 x 5 1/4 from the August POTM (product of the month). I added the maple leaf & the sentiment with the already attached dimensionals; the smallest leaf die cut is attached with liquid glue. I also added three embellishments of Radiant Gems. I set this aside to prepare the rest of the card & fun fold.
The Pop-Out Fun Fold directions… and then I’ll tell more about the ‘decorative parts’ of the card.
Card base: 8 1/2 x 5 1/2 scored @ 4 1/4. For this card – Golden Glow
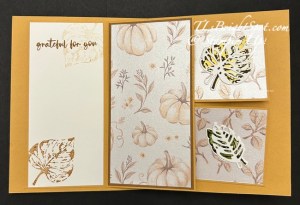
Inside layer: 5 1/4 x 5 1/4 scored @ 2 1/2 – Golden Glow. Layers for this on the inside… left – Basic White for stamping 2 1/4 x 5; right – DSP 2 1/4 x 5 (I added an additional layer of card stock 2 3/8 x 5 1/8 in Pecan Pie)
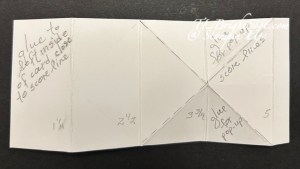
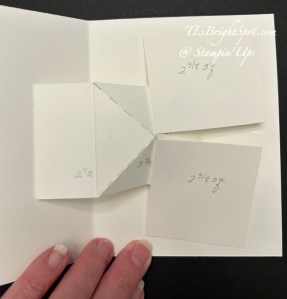
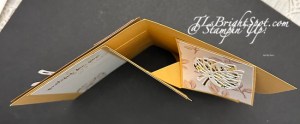
Pop-Up mechanism: 2 3/8 x 5 3/8 scored @ 1 1/4, 2 1/2, 3 3/4 & 5 Burnish well mountain, mountain, valley, valley. Make cross score lines creating an ‘x’ between score lines 2 1/2 & 5 & burnish well.
Pop-Out Squares: 2 3/8 x 2 3/8 (2) mine are Golden Glow card stock.
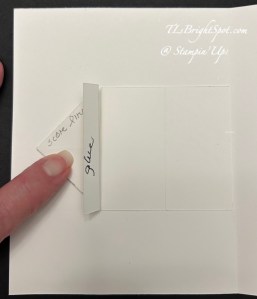
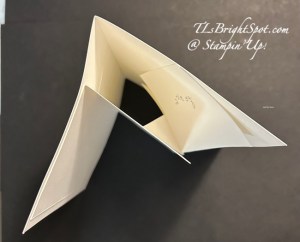
Attach the left end of the mechanism to the left inside of the card base, close to but not touching the center score, centering it top to bottom. See photo below.
Fold mechanism flat with small tab facing up. Add glue to tab & close right side of card over this. Rub well to secure.
Attach the two 2 3/8″ squares to the mechanism, these will be the pop-ups. Refer to the mechanism photo for proper glue area.
See the area in the photo above with the triangle & rectangle? Add adhesive to this and align the INSIDE LAYER – the right back side so the score line is close to the area where the glue is. Close the card, press firmly and allow glue to adhere well. Open & close the card several times to make certain it does so smoothly. Now add glue to the left side of the INSIDE LAYER and close card, rubbing to attach well. Now everything is secure.
Finish the card front by attaching the panels in place.
From the top, the card should look like this… remember, this is a template!
Below is my finished inside of the card… Glow of Harvest DSP on the squares are 2 1/4 x 2 14. The leaves on the squares (the pop-ups) are stamped in Lemon Lolly & Early Espresso for the top leaf, Old Olive and Early Espresso for the bottom leaf. The die cuts are Basic White – everything on these squares is added with liquid glue. The sentiment panel on the Basic White Inside Layer is Pecan Pie ink. The leaf is stamped off once.
The envelope… more of the Glow of Harvest DSP on the fl;ap & trimmed to fit. On the front is a leaf from the Elegant Leaves stamp set, stamped in Early Espresso after stamping off once – and… done!
Want to see more fall cards – treasures for sure. Click the next button or click on a name.
You may find all the items to make this card in my shop & below is a list. Order these – and more from me soon!
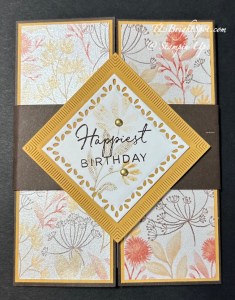
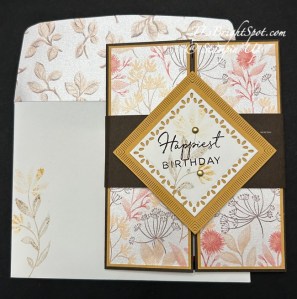
It’s Friday – where did the week go? It’s been hot & humid in NJ this week, a perfect time to be inside & create 😀. In card class yesterday we made this fun gatefold card that has a ‘springy’ inside. It’s so fun to open! And I used the September Product of the Month – the Glow of Harvest SDSP – it’s sparkly!
This is a traditional gatefold card – 8 1/2 x 5 1/2 scored at 2 1/8 on one end then the other side brought over to meet it. The card base is Early Espresso with a layer of Golden Glow 2 x 5 3/8 on each front panel, then a layer of the Glow of Harvest SDSP 1 7/8 x 5 1/4.
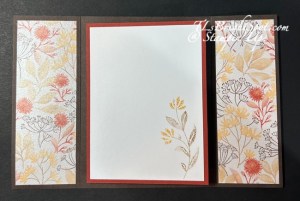
And here’s the finished inside. The center section is the ‘springy’ part. The inside panels are more of the same pattern of Glow of Harvest SDSP cut 1 7/8 x 5 1/4.
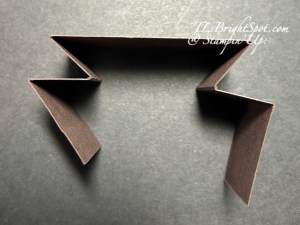
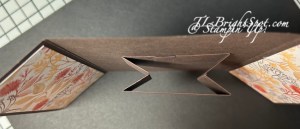
To create the mechanism, cut a strip 8 x 1 1/2 and scored @ 1 ¼, 2, 2 ¾, 5 ¼, 6 & 6 ¾. Burnish all score lines making certain the strip edges are even. After scoring, fold it as shown above in the left photo. Attach this to the inside panel, centering it, and with the ends touching. It should look like the photo on the right.
The center panels are Cajun Craze 3 ¾ x 5 and Basic White 3 1/2 x 4 3/4. Stamp the Basic White panel prior to adhering it. I used Crumb Cake stamped off once for the leaves and Golden Glow stamped off once for the small flowers. These are from the NEW Sep-Dec 2026 Catalog that can be ordered from Sep 1! Don’t have a catalog? Let me know & I can fix that. 😀
The belly band is 1 3/4 x 10 (Early Espresso) and wrapped around the card to the front. Keep it loose enough so it easily slips on & off. Secure the ends of the belly band together while it is around the card – just be careful with the amount of adhesive!
Remove the belly band & create the front decor…I used the NEW Tile Garden Dies to create these two panels – Golden Glow (this is about 2 3/4 square) and Basic White (less than 2 1/4″ square) Stamp the sentiment in Early Espresso using the stamp in the Tile Garden stamp set, then stamp the floral image sort of as a background… again stamping off first each time – Crumb Cake for the leaves and Golden Glow for the flowers. Final touch – Gold Adhesive-Backed Dots also from the new catalog. I used them as centers to the flowers.
For the envelope, I used another pattern of the Glow of Harvest SDSP to attach to the flap & trimmed to fit. And on the front this same flower image from the Tile Garden stamp set – Crumb Cake for the leaves and Golden Glow for the flowers, stamped off each time.
The Product of the Month is available for purchase when placing an order of $75 – and it’s only $5! This is stunning pearlized paper & will be available Sep 1 – same day you can order from the Sep-Dec 2026 Catalog.
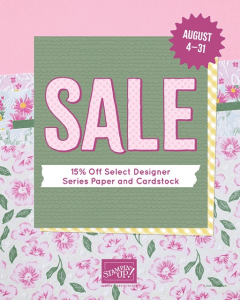
While you wait for the new catalog to go live, today is the last day for Stampin’ Up! Double Rewards with a $25 & up purchase. With the current sale on paper products – 15% off select card stock & DSP + Last Chance Products – it’s easy to find items wanted & needed.
Good morning, good morning! We have a fun sketch challenge today and i’m so glad you have joined us! You may have come from the fabulous Tara or hopped right in nhere. Haowever you arrived, I hope you’ll check out what everyone has created.
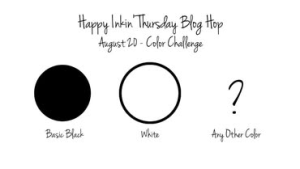
Our challenge today, as you can see is to create using Black & White plus one other color. I chose to work with Crisp Cantaloupe for this card & the wonderful Artisan Sketched Garden DSP from the May-Aug Catalog. The other big item is the NEW Tile Garden bundle from the Stampin’ Up! Sep-Dec 2026 Catalog that goes live Sep. 1! The dies in this bundle are all squares and haqve the same pattern as the Spotlight on Nature Dies, which are circles. Very cool!
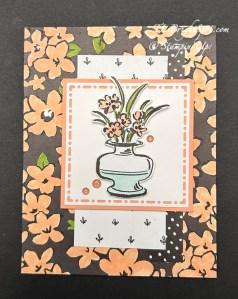
The Artisan Sketched Garden DSP is all black & white – the whole package of papers. And of course it can be used as is – or colored. As you can see, I colored the main front panel using the Crisp Cantaloup Shimmer brush. While the shiny doesn’t show in the photo, it does in real life. 😀 After coloring I added this to a Basic Black 4 1/4 x 11 scored at 5 1/2. To that I added a 3/4 x 4 3/4 polka dot strip to the much more white panel 2 x 4 1/4, & attached those to the card front. Next I die cut the white piece using the NEW Tile Garden Dies & added a Crisp Cantaloupe behind it 2 7/8 x 2 7/8. These were added to the card front with dimensionals. I already had this vase of flowers sitting on my desk that I had fussy cut after coloring with Stampin’ Blends: Crisp Cantaloup. Granny Apple Green & Pool Party. I added this to the front again with dimensionals then three Glossy Garden Dots (also from the new Sep-Dec 2026 catalog.)
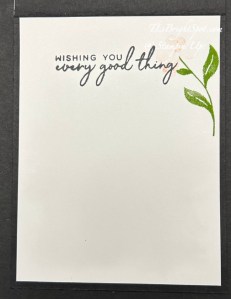
For the inside of the card I used the NEW Tile Garden stamp set for the sentiment (stamped in Memento ink) and the floral image (stamped in Granny Apple Green and Crisp Cantaloupe (this one stamped off once) This is such a sweet delicate flower. I’m loving the images in this set.
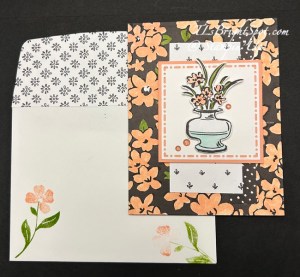
The envelope… more of the Tile Garden stamp set used on the front, stamping the leaves min Granny Apple Green and the flowers in stamped off Crisp Cantaloupe. The flap has yet another panel of the Artisan Sketched Garden DSP adhered & trimmed to fit.
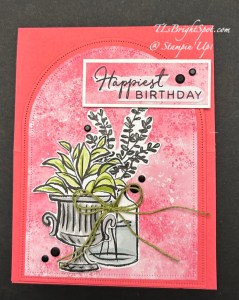
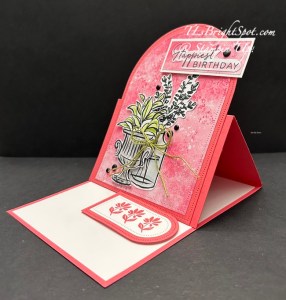
I made another card while I was at it – this time making an easel card with Strawberry Slush, the Everyday Arches Dies, Tile Garden stamp set for the sentiment and tiny flowers, more Artisan Sketched Garden DSP (for the black & white plus theme) and a couple of retired products 🥴 The point is, products can coordinate! It’s the Stampin’ Up! way!!!
Speaking of the Stampin’ Up! way – right now, today & tomorrow, Stampin’ Up! is offering DOUBLE REWARDS when making your purchases – the 19th-21st of August, 2026. See more information about that below.
Click the link below to see what others on the team have created!
Earn double Stampin’ Rewards (2x Rewards) for 3 days only, starting August 19 and ending August 21. That means 20% instead of the standard 10%! All orders qualify once the Stampin’ Rewards threshold of $20 USD | $25 CAD is met. Some exclusions apply. View the Stampin’ Rewards page to learn more.
This offer applies to ALL commissionable products! (Excludes existing Paper Pumpkin subscriptions.)
To participate, customers must have a Stampin’ Up! account and be opted in to the Stampin’ Rewards program. Encourage them to complete these steps before the offer begins.
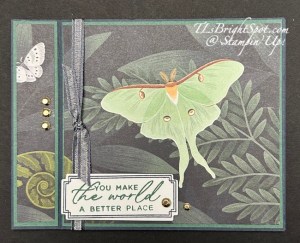
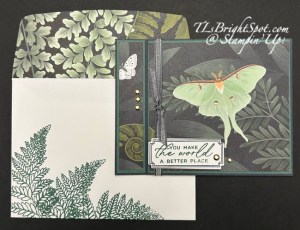
Good morning, good morning. The Moonlit Flora DSP has been super popular & I’m using it today to make a book fold card. That luna moth is in it’s glory & the focal point for this card.
Layer: Peaceful Pine 7/8 x 4 1/8; 4 3/8 x 4 1/8; inside 4 3/8 x 4 1/8
DSP: Moonlit Flora 3/4 x 4; 4 1/4 x 4; inside – 4 1/4 x 4 1/8; flap – 2 1/4 x 6
Basic White: inside – 4 1/4 x 4
When cutting the DSP, it’s helpful to have the ‘scene’ go all the way across., therefore the initial cut of the DSP should be 5 x 4, then trim left end to 3/4 leaving 4 1/4 for the right side. I added the 1/4″ Satin Ribbon in Secret Sea & Gold (available Sep to customers!) for focus and prior to adding the inside layer of DSP. The sentiment is from the Fern & Flora stamp set with the border in Secret Sea & the sentiment in Peaceful Pine. It was die cut with the coordinating Fern & Flora Dies and added with dimensionals. The extra elements are the Adhesive-backed Metallic Gems in gold – and there are five of them.
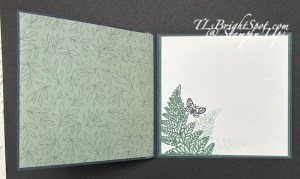
The inside… DSP on the left is from Moonlit Flora & just adds a nice touch to this card. On the right, the Basic White panel is with the fern leaf three times without re-inking – in Peaceful Pine. The butterfly is stamped in Secret Sea. Both are from the Fern & Flora stamp set.
For the envelope… more Moonlit Flora DSP on the flap & trimmed to fit. The stamping on the front is in Peaceful Pine – the same fern stamp as on the inside, but this time re-inked each time before stamping again.
These products are all from the May-Aug 2026 Catalog (except for the ribbon).
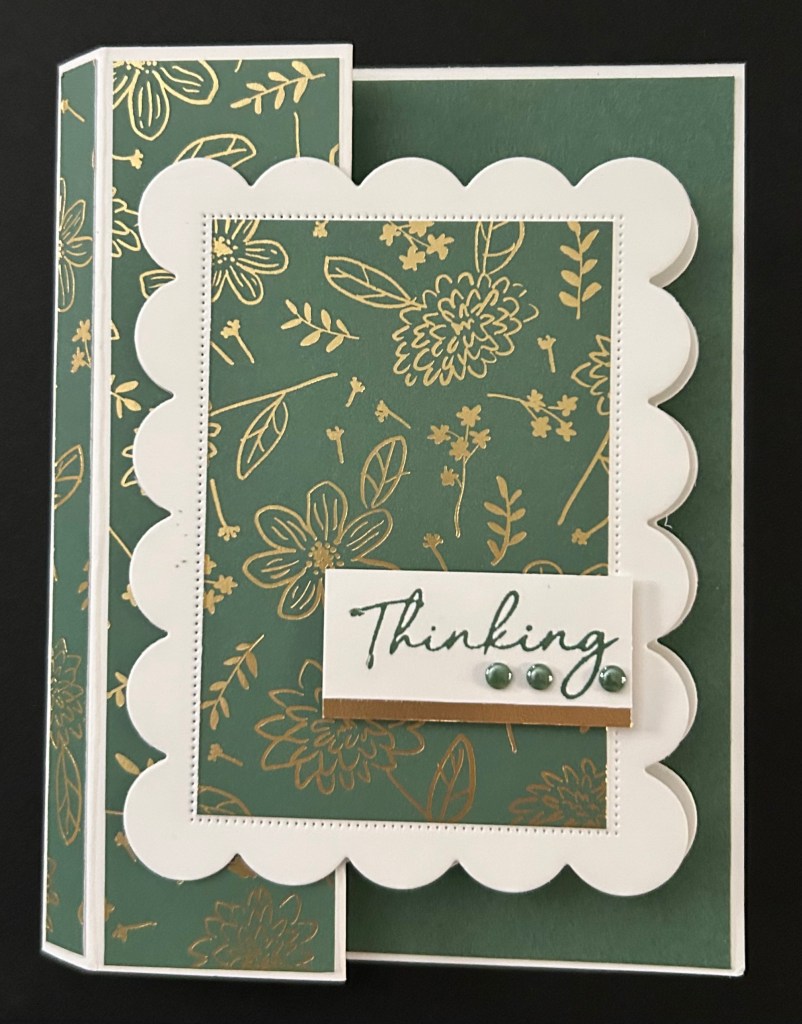
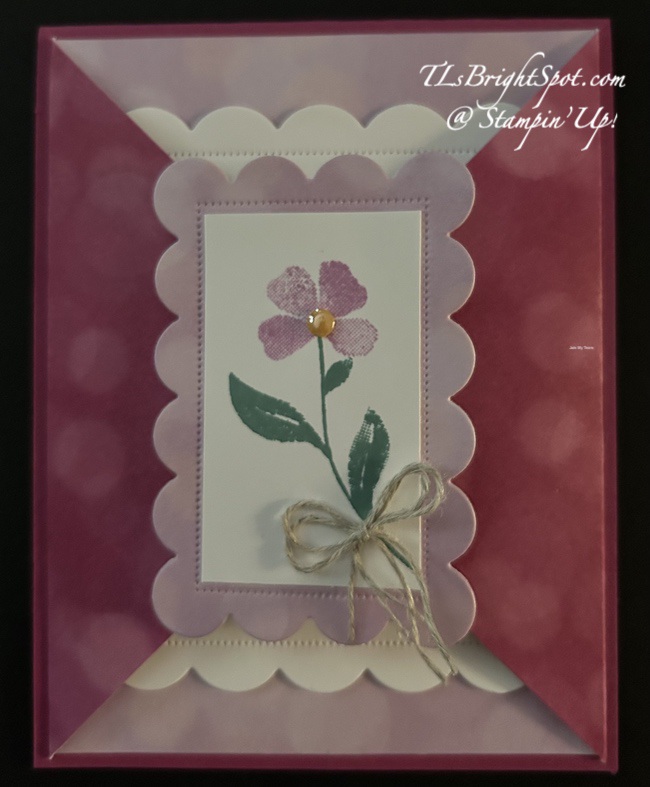
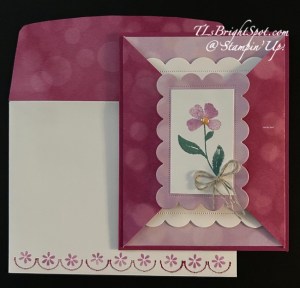
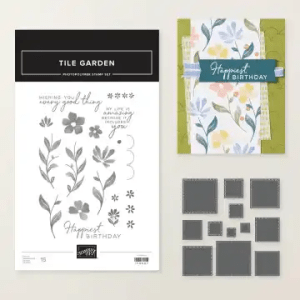
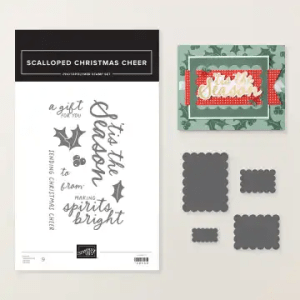
Happy Friday! Golly the week has gone f-a-s-t… I have a sneaky peek of two new items in the Sep-Dec 2026 Catalog: the Scalloped Christmas Cheer Dies AND the Tile Garden stamp set. Both of these come as separate bundles but this is how I paired them for this card – and it’s a fun fold too!
I used an old set of 6×6 papers called Bokeh, but you could use any papers that would compliment the dies and the stamp set – or change the stamp set!
Card cuts & how to:
Card base 4 1/4 x 11 scored at 5 1/2 – I used Berry Burst
mat: I used the Bokeh 6×6 DSP ~ 4 x 5 1/4
Cut 2 panels of Bokeh 6×6 DSP 3 3/4 x 3 3/4,
score on the diagonal, burnish folds and attach to backside of the 4 x 5 14 piece
Add to front of card base
Add Basic White (2 1/2 x 3 1/2) to back of another piece of Bokeh 6×6 DSP for sturdiness (2 1/2 x 3 1/2) ~ die cut with 2nd smallest die in the Scalloped Christmas Cheer Dies
Cut Basic White (1 1/2 x 2 12) for stamping images from the Tile Garden stamp set ~ stamp leaves in Lost Lagoon and flower in Fresh Freesia. Add to die cut piece. Embellish w/ 2026-2028 In Color Dots in Golden Glow & a double Linen Thread bow; set aside
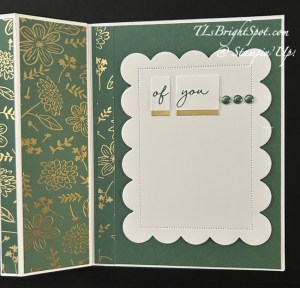
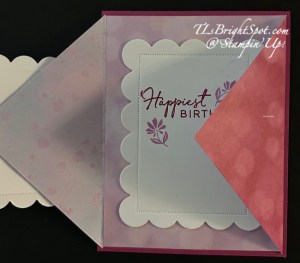
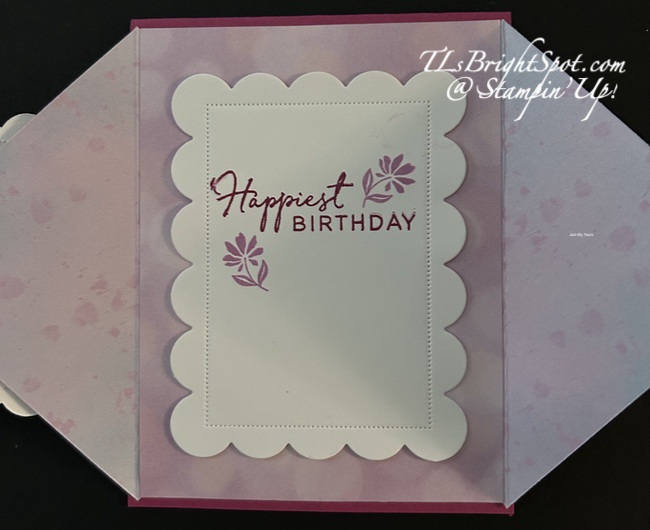
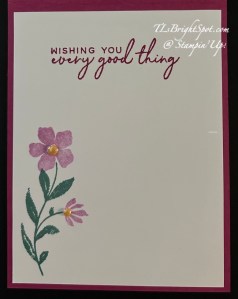
On the inside... cut another piece of Basic White w/ the 2nd largest Scalloped Christmas Cheer Dies: stamp the sentiment in Berry Burst ink and the flowers in Fresh Freesia ink from the Tile Garden stamp set; add to inside of gatefold on the large DSP panel
Add the set aside front die cut all stamped & ready – to the left side of the DSP triangle gatefold – with dimensionals, centering so it is centered with the inside Basic White scalloped piece
Flip the card open to create the final Basic White panel (4 x 5 1/4) … stamp the sentiment in Berry Burst ink, the leaves in Lost Lagoon and the flowers in Fresh Freesia – all using the Tile Garden stamp set. Add Golden Glow accents from the 2026-2028 In Color Dots. Attach to the inside of the card.
Envelope…
Add the 2 12/4 x 6 strip of Bokeh 6×6 DSP to the flap, trimming to fit
Stamp the scallop stamp in Berry Burst ink three times, re-inking each time
Stamp the Flowers in Fresh Freesia ink three times, re-inking each time.
Both these stamps are from the Tile Garden stamp set
Yay! This card is ready to be sent to my grand niece! It’s such a feminine & lovely card. The stamp bundle and the die bundles are in the Sep-Dec. 2026 Catalog – available Sep 1. If you do not have a demonstrator, I would very much like to send a catalog to you so you can order from me. Please let me know how I can help with that opportunity.
Going on right now – Stampin’ Up! has a card stock & Designer Paper Sale through Aug 31, 2026. Shop the sale by clicking on the image below.
Last chance Stampin’ Up! products are also available. Click the image below to shop those items with me.
When shopping with me… when your purchase is over $50 before shipping & taxes, you will receive the current monthly tutorial. For the month of August, that tutorial using the Flowering Meadow Suite of products. See my customer rewards page for more benefits!
Thanks for shopping with me! Make one, share one, send one! Make someones day by sending them a handmade card made with ❤️
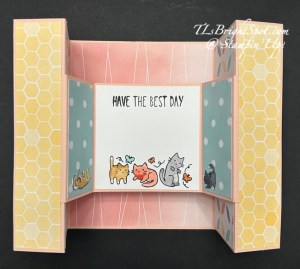
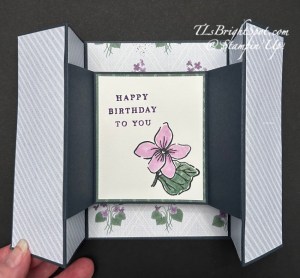
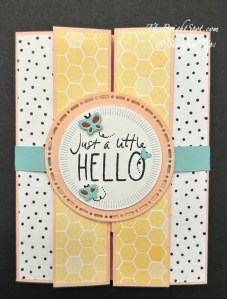
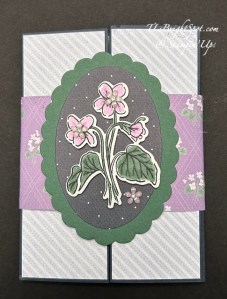
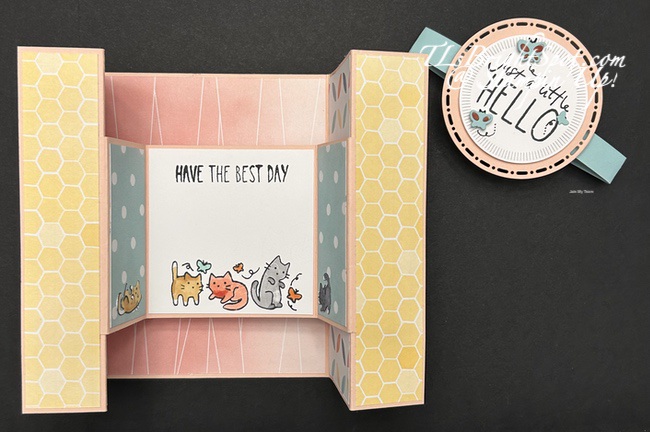
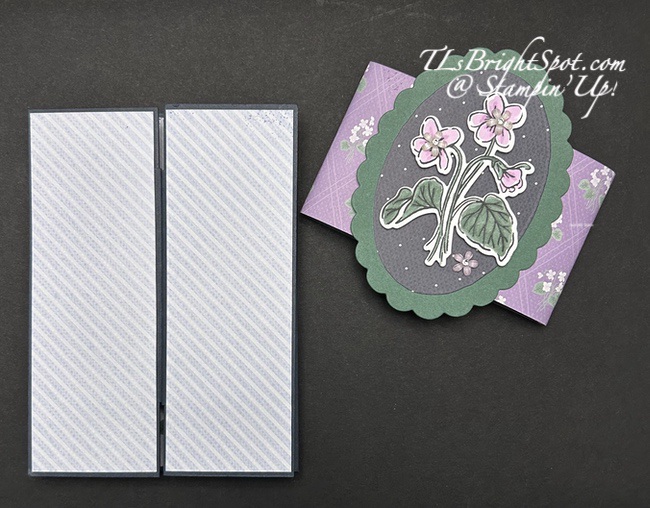
Good morning! Today is such a FUN FOLD blog hop 😀, I can’t wait to see what others on the team have created. I have two versions of the floating gatefold and will give you measurements for both. One is made with the Framed Violets bundle and it’s coordinating DSP called Violet Dreams. The other is with a bundle from an ONLINE EXCLUSIVE that is older and just too cute.. Cutest Crew – and Beautiful Ordinary Life 12×12 DSP. You can use so many different papers or bundles for this fun fold.
Card 1 – Cutest Crew/ Beautiful Ordinary Life DSP
Card 2 – Framed Violets/ Violet Dreams DSP
Card 1 – Cutest Crew w/ belly band
Card 2 – closed w/ belly band
Notice how very different the fold lines are and the width of the belly band on each card.
And here’s a photo taken from the top of this gatefold card. Both cards are the same in a top-down look, so only one photo is shown.
Dimensions for card #1:
Card base: 11 x 5 1/2 scored @ 1 1/4 & 3 3/8 from each end
inside panels on either side of center piece: (2) 2 x 5 3/8
front: (2) 1 1/8 x 5 3/8
front outside: (2) 2 x 5 3/8
floating elements pieces: (2) 1 3/8 x 2 7/8
Basic White:
floating section center: 2 7/8 x 2 7/8
back: 4 1/8 x 5 3/8
Additional pieces for belly band decor
Dimensions for card #2:
Card base: 10 x 5 1/2 + 2 1/2 x 5 1/2 ~ score larger section @ 2, 4, & 8; score additional section@ 1/2 on long side. Attach this panel to the main section with the score on the inside of the end. This makes your final card base 12 x 5 1/2 with the scores @ 2, 4, 8 & 10
Floating element 8 x 3 1/2 ~ score @ 2 1/2, 5 1/2, 7 & 8
Belly band pieces as needed
DSP:
inside center panel of card base: 3 7/8 x 5 3/8
panels on either side of card base: (4) 1 7/8 x 5 3/8 (adhere only the 1st panel on either side of the center piece until after the floating panel is attached)
floating panel center: 2 3/4 x 3 1/4
belly band 10 x 2 1/2
Basic white:
floating panel center: 2 1/2 x 3
back: 4 1/8 x 5 3/8
Directions for putting this gate fold together…
Adhere DSP panels to both the card base & the floating section EXCEPT FOR FRONT PANELS (for card 1, that is the yellow strips/ for card 2 that is the very front panels)
Do stamping prior to attaching the Basic White pieces ~ for center panels & back (for writing your stuff!)
Burnish all score lines: card base ~ mountain, valley, valley, mountain; floating section ~ mountain, valley, valley, mountain.
Centering floating piece top to bottom, add to the last fold on right butting fold of floating section against fold of card base.
Do the same on the left side, centering top to bottom.
Add final piece of DSP over this attached floating element
Wrap belly band around closed card and add glue to each end to attach together. DO NOT LET IT STICK TO THE CARD!!! 😀
Decorate belly band
We’re making these two cards in card class today ~ both really quite easy & they give a real bang to the receiver. If you make this Floating gatefold – please share a photo with me!
Now on with the hop… be sure you note below all the fun goodies Stampin’ Up! has going on right now & how to purchase the products to make this card – from me of course!
Click the next button or click on a name to continue the hop.
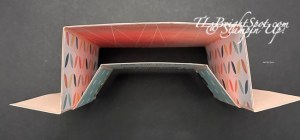
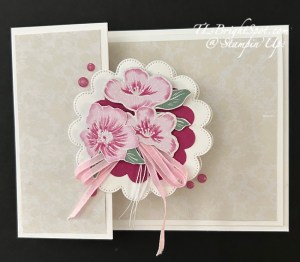
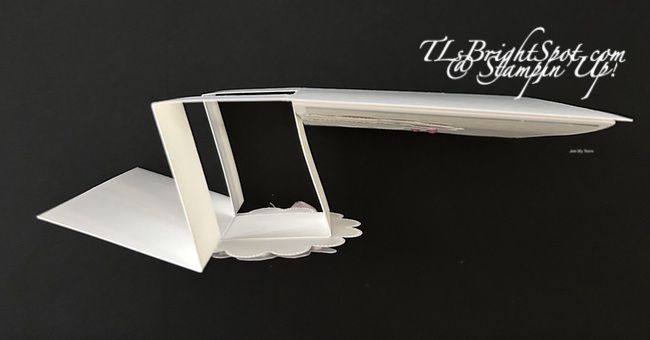
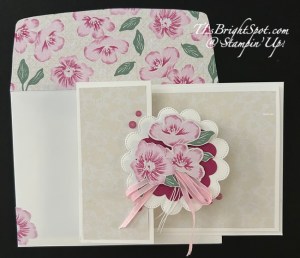
Had a card class just yesterday and we made a very pretty fun fold that I want to share with you. It has a wonderful focal point by die cutting from the gorgeous Velvet Meadow SDSP with the coordinating Flowering Meadow Dies – and using the Scalloped Blooms Dies for background. I hope you like 😊
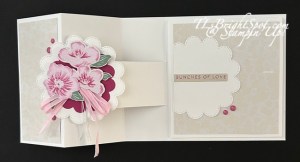
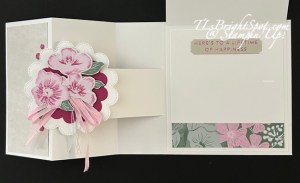
And here’s the inside… and the photo beside it shows the flap raised
The sentiments on the inside and on the flap are made with thew hot foil system & the Sweetly Sentimental hot foil dies. LOVE, LOVE.
And here are the deets for making this card…
The card base is 9 1/2 x 4 1/4 scored at 4 & 7 1/2 (Thick Basic White)
With the short side at the top with the last score line near top, place the paper at the 1 1/4 mark on the right side of the trimmer and CUT BETWEEN THE SCORE LINES
Without removing the paper, simply move it to the 1 1/2 mark on the left of the trimmer & CUT BETWEEN SCORE LINES
Turn the paper 90 degrees to the LEFT and score at 4″ both ABOVE AND BELOW THE CUT LINES
Leaving the paper in place but moving to the 3 1/2″ mark, SCORE THE CENTER SECTION
Burnish & fold score lines like this: with the 7 1/2″ score line on the left, mountain fold (folding back on itself); the 3 1/2 score (center section) is also a mountain fold; the two 4″ score lines above & below the cut sections are valley folds; the last is the center section only as a valley. From the top it should look like the photo below
Add a 1 3/4 x 4″ strip of DSP to the end section (I used the back side of a piece of the Velvet Meadow that has a Basic Beige design)
Cut a panel of Basic White 3 3/4 x 8 & score at 4; with the fold at the top, add this panel to the wide side section of the card base; decorate it’s front with the same DSP from Velvet Meadow SDSP – 3 1/2 x 3 3/4
Next step is to decorate:
Die cut two scallop pieces using the Scalloped Blooms dies & Basic White: maybe 3rd from smallest (approx. 2 3/4″)
Die cut one scallop piece from Berry Burst: maybe 2nd from smallest (approx 2″)
Adhere the berry burst piece to one of the larger Basic White scallops.
Die cut the double flowers from the Velvet Meadow SDSP using the appropriate die in Flowering Meadows Dies. Fussy cut at least one more flower – adhere these to the Scallop pieces with dimensionals. Fussy cut several leaves to add to the back of the flowers with liquid glue.
Tie a double bow with the Bubble Bath 1/8″ ribbpn (ONLINE EXCLUSIVE) and use Baker’s Twine in White to make a knot. Secure in place with a glue dot slipping it under the flowers.
Add this to the center section of the fold with liquid glue – see photo above for placement
Add five embellishments in Berry Burst
Add additional scallop to the front of the ‘flap’, trimming one side so the card closes properly
Do the hot foil for the sentiments using the pink foil, Basic Beige card stock and the Sweetly sentimental hot foil dies. Add sentiments appropriate to your occasion – there are several in this from which to choose! I trimmed and added one to the scallop on the flap, then added another to the inside of the flap portion of the card. I also added a trim at the bottom of the inside flap – from the Velvet Meadow SDSP
For the envelope… more Velvet Meadow SDSP (2 1/4 x 6) cut, adhered & trimmed to fit the flap. For the front of the envelope, I adhered a fussy cut flower from the SDSP to the edge.
To order from me – click here This will take you to ONLINE EXCLUSIVES, kits, current catalogues, the amazing new Hot Foil System – all Stampin’ Up! Have questions? Connect with me! Below is a list of the products used to make this card – and some standard items as well.
Hello & happy Tuesday! Welcome to our hop… the theme is a fun fold card so you’ll see lots of creativity today. If this little snail doesn’t make you smile, I don’t know what will! It’s just plain c-u-t-e! So this is really a Bookmark Side Panel Card. And that bookmark is on the right with the 3/8″ Bordered Ribbon in Hydrangea Hue. It slips in & out of that small embossed ‘sleeve’ (this was as scrap I had from …..) The card base is Hydrangea Hue & the DSP is Painted Patterns 2026-2028 In Color, Hydrangea Hue.
How to make this card…
card base is 8 1/4 x 5 1/2
with short side at the top at the 1″ mark on the right side of the paper trimmer, cut from 1 to 5 1/4″; repeat on opposite side
with long side at top, score in between the cut lines 1, 2, & 5 1/4. Burnish score lines
with same long side at top, score @ 4 1/4 on the outside edges of the cut lines.
with same long side at top, score @ 6 1/4 the full 5 1/2″ (the bookmark will fit between 6 1/4 & 8 1/4 area)
cut & scored, it will look as in the top/down photo below
To decorate with DSP:
cut DSP 4 x 5 1/4 & 1 3/4 x 5 1/4 – trim these leaving 3/4″ in shape of squared C – (with short side @ top & line up @ 3/4″ on right side of trimmer, cut from 3/4 to 4 1/2; repeat for the other two sides
cut 2 – 3 x 3 1/4 for panel insert on front & back of card
cut 1 1/2 x 5 for bookmark
3/4 x 1 3/4 ‘sleeve’ for bookmark (mine is an embossed strip)
2 1/4 x I 6 for envelope flap
Basic White panels:
cut 2 – 2 3/4 x 3 for stamping (front) or for your own words (back)
1 1/2 x 5 for bookmark
The above photo is the back of this card.
To decorate the small Basic White panels: stamp the snail in Memento black ink and color with Stampin’ Blends with Crumb Cake. The sentiment is stamped in Hydrangea Hue and comes from the same stamp set as the snail – Wild Bunch – a SU! June POTM (Product of the month). The checkered portion is also in Crumb Cake ink and from the Wild Bunch stamp set. The front of the envelope is stamped the same way, all across the bottom. This is just so friendly and could be masaculine or feminine – and could be for a child also!
OK – want to make this card? See the product list below & be sure to order from me here. See more info below the list of those participating today, about SU” products, new stuff going on in the SU! world, how to join my team – like that.
Time to follow the hop participants. Thanks for joining me today – appreciate any comments too. Next on the list Ann – let’s see what she’s doing today by clicking the ‘next’ button or by clicking on a name.
Included in the Stampin’ Hot Foil System & Craft Class:
– Metallic Magic Craft Class ($30 value—limited time only!) – Stampin’ Hot Foil platform – Stampin’ Hot Foil Shim & Spacer – Stampin’ Hot Foil Magnetic Pick-Up Tool – Silicone platform station – Silicone cooling pad – Power cord – Instructions on how to use the system
– Hot Foil results are best with either White Willow or Two-Tone Cardstock. Smoother card stocks like the Two-Tone Cardstock and White Willow will achieve the best results when using the system, but you can use the regular card stocks too.
– The Hot Foil System, foil rolls and new hot foil dies and bundles will be available Friday, 10 July 2026 in the online Stampin’ Up! store.
– A FREE Hot Foil Online Class from Stampin’ Up! is included with your hot foil system purchase (a $30 value!), do not add the class separately to your cart (you’ll be charged for it if youdo!). You’ll automatically get a link to it after you purchase the Stampin’ Hot Foil System.
– The Stampin’ Hot Foil system is $160. Dies & foil are sold separately.
– Stampin’ Up! has let us know that if the Stampin’ Hot Foil system goes on backorder, it may take longer than normal to restock. So if you would like to order the system, order sooner rather than later!
– IMPORTANT NOTE: Cutting dies are not designed to be used with hot foiling. You cannot die cut using foiling dies. Doing so risks damaging the dies and the system.
AND… while I had ended the double Daisy Rewards – I’m re-instituting that – so double your fun. DOUBLE REWARDS through July 13, 2026 + for orders $50 & up, the monthly tutorial.
All first-time demonstrators (beginning July 1, 2026) will receive a surprise Welcome Box—a gesture of appreciation and a warm welcome into the global Stampin’ Up! creative community.



![Santa's Hat Photopolymer Stamp Set (English) [ 168408 ]](https://assets1.tamsnetwork.com/images/EC042017NF/168408s.jpg "Santa's Hat Photopolymer Stamp Set (English) [ 168408 ]")
![A Stitched Season 12" X 12" (30.5 X 30.5 Cm) Designer Series Paper [ 168223 ]](https://assets1.tamsnetwork.com/images/EC042017NF/168223s.jpg "A Stitched Season 12\" X 12\" (30.5 X 30.5 Cm) Designer Series Paper [ 168223 ]")
![Nested Essentials Dies [ 161597 ]](https://assets1.tamsnetwork.com/images/EC042017NF/161597s.jpg "Nested Essentials Dies [ 161597 ]")
![Multicolor Christmas Baker's Twine [ 168426 ]](https://assets1.tamsnetwork.com/images/EC042017NF/168426s.jpg "Multicolor Christmas Baker's Twine [ 168426 ]")
![Christmas Epoxy Shapes [ 168425 ]](https://assets1.tamsnetwork.com/images/EC042017NF/168425s.jpg "Christmas Epoxy Shapes [ 168425 ]")
![Basic White 8 1/2" X 11" Cardstock [ 166780 ]](https://assets1.tamsnetwork.com/images/EC042017NF/166780s.jpg "Basic White 8 1/2\" X 11\" Cardstock [ 166780 ]")
![Cherry Cobbler 8-1/2" X 11" Cardstock [ 119685 ]](https://assets1.tamsnetwork.com/images/EC042017NF/119685s.jpg "Cherry Cobbler 8-1/2\" X 11\" Cardstock [ 119685 ]")
![Cherry Cobbler Classic Stampin' Pad [ 147083 ]](https://assets1.tamsnetwork.com/images/EC042017NF/147083s.jpg "Cherry Cobbler Classic Stampin' Pad [ 147083 ]")
![Clear Wink Of Stella Glitter Brush [ 141897 ]](https://assets1.tamsnetwork.com/images/EC042017NF/141897s.jpg "Clear Wink Of Stella Glitter Brush [ 141897 ]")
![Basics Wow! Embossing Powder [ 165679 ]](https://assets1.tamsnetwork.com/images/EC042017NF/165679s.jpg "Basics Wow! Embossing Powder [ 165679 ]")
![Embossing Additions Tool Kit [ 159971 ]](https://assets1.tamsnetwork.com/images/EC042017NF/159971s.jpg "Embossing Additions Tool Kit [ 159971 ]")
![Heat Tool (Us And Canada) [ 129053 ]](https://assets1.tamsnetwork.com/images/EC042017NF/129053s.jpg "Heat Tool (Us And Canada) [ 129053 ]")
![Basic White Medium Envelopes [ 159236 ]](https://assets1.tamsnetwork.com/images/EC042017NF/159236s.jpg "Basic White Medium Envelopes [ 159236 ]")
![Take Your Pick [ 144107 ]](https://assets1.tamsnetwork.com/images/EC042017NF/144107s.jpg "Take Your Pick [ 144107 ]")
![Paper Trimmer [ 152392 ]](https://assets1.tamsnetwork.com/images/EC042017NF/152392s.jpg "Paper Trimmer [ 152392 ]")
![Paper Snips [ 103579 ]](https://assets1.tamsnetwork.com/images/EC042017NF/103579s.jpg "Paper Snips [ 103579 ]")
![Tuxedo Black Memento Ink Pad [ 132708 ]](https://assets1.tamsnetwork.com/images/EC042017NF/132708s.jpg "Tuxedo Black Memento Ink Pad [ 132708 ]")
![Versamark Pad [ 102283 ]](https://assets1.tamsnetwork.com/images/EC042017NF/102283s.jpg "Versamark Pad [ 102283 ]")
![Stampin' Dimensionals [ 104430 ]](https://assets1.tamsnetwork.com/images/EC042017NF/104430s.jpg "Stampin' Dimensionals [ 104430 ]")
![Multipurpose Liquid Glue [ 110755 ]](https://assets1.tamsnetwork.com/images/EC042017NF/110755s.jpg "Multipurpose Liquid Glue [ 110755 ]")
![Mini Glue Dots [ 103683 ]](https://assets1.tamsnetwork.com/images/EC042017NF/103683s.jpg "Mini Glue Dots [ 103683 ]")
![Stampin' Positioner [ 167768 ]](https://assets1.tamsnetwork.com/images/EC042017NF/167768s.jpg "Stampin' Positioner [ 167768 ]")
![Stampin' Cut & Emboss Machine [ 149653 ]](https://assets1.tamsnetwork.com/images/EC042017NF/149653s.jpg "Stampin' Cut & Emboss Machine [ 149653 ]")
![Very Vanilla 8 1/2" X 11" Cardstock [ 166784 ]](https://assets1.tamsnetwork.com/images/EC042017NF/166784s.jpg "Very Vanilla 8 1/2\" X 11\" Cardstock [ 166784 ]")
![Very Vanilla Medium Envelopes [ 107300 ]](https://assets1.tamsnetwork.com/images/EC042017NF/107300s.jpg "Very Vanilla Medium Envelopes [ 107300 ]")
![Metallics Wow! Embossing Powder [ 165678 ]](https://assets1.tamsnetwork.com/images/EC042017NF/165678s.jpg "Metallics Wow! Embossing Powder [ 165678 ]")
![Small Blending Brushes [ 160518 ]](https://assets1.tamsnetwork.com/images/EC042017NF/160518s.jpg "Small Blending Brushes [ 160518 ]")
![Fun For Fall Bundle (English) [ 168139 ]](https://assets1.tamsnetwork.com/images/EC042017NF/168139s.jpg "Fun For Fall Bundle (English) [ 168139 ]")
![Sunflower Fields 12" X 12" (30.5 X 30.5 Cm) Designer Series Paper [ 168351 ]](https://assets1.tamsnetwork.com/images/EC042017NF/168351s.jpg "Sunflower Fields 12\" X 12\" (30.5 X 30.5 Cm) Designer Series Paper [ 168351 ]")
![Stitched Shapes Dies [ 152323 ]](https://assets1.tamsnetwork.com/images/EC042017NF/152323s.jpg "Stitched Shapes Dies [ 152323 ]")
![Radiant Gems [ 168363 ]](https://assets1.tamsnetwork.com/images/EC042017NF/168363s.jpg "Radiant Gems [ 168363 ]")
![Calypso Coral 8-1/2" X 11" Cardstock [ 122925 ]](https://assets1.tamsnetwork.com/images/EC042017NF/122925s.jpg "Calypso Coral 8-1/2\" X 11\" Cardstock [ 122925 ]")
![Cajun Craze 8-1/2" X 11" Cardstock [ 119684 ]](https://assets1.tamsnetwork.com/images/EC042017NF/119684s.jpg "Cajun Craze 8-1/2\" X 11\" Cardstock [ 119684 ]")
![Misty Moonlight Stampin' Blends Combo Pack [ 153108 ]](https://assets1.tamsnetwork.com/images/EC042017NF/153108s.jpg "Misty Moonlight Stampin' Blends Combo Pack [ 153108 ]")
![Golden Glow Stampin’ Blends Combo Pack [ 167682 ]](https://assets1.tamsnetwork.com/images/EC042017NF/167682s.jpg "Golden Glow Stampin’ Blends Combo Pack [ 167682 ]")
![Pecan Pie Stampin’ Blends Combo Pack [ 161674 ]](https://assets1.tamsnetwork.com/images/EC042017NF/161674s.jpg "Pecan Pie Stampin’ Blends Combo Pack [ 161674 ]")
![Pecan Pie Classic Stampin' Pad [ 161665 ]](https://assets1.tamsnetwork.com/images/EC042017NF/161665s.jpg "Pecan Pie Classic Stampin' Pad [ 161665 ]")
![White Gel Pens [ 166642 ]](https://assets1.tamsnetwork.com/images/EC042017NF/166642s.jpg "White Gel Pens [ 166642 ]")


![Elegant Leaves Bundle (English) [ 168303 ]](https://assets1.tamsnetwork.com/images/EC042017NF/168303s.jpg "Elegant Leaves Bundle (English) [ 168303 ]")
![Glow Of Harvest 12" X 12" (30.5 X 30.5 Cm) Specialty Designer Series Paper [ 168598 ]](https://assets1.tamsnetwork.com/images/EC042017NF/168598s.jpg "Glow Of Harvest 12\" X 12\" (30.5 X 30.5 Cm) Specialty Designer Series Paper [ 168598 ]")
![Timid Tiger Classic Stampin' Pad [ 165278 ]](https://assets1.tamsnetwork.com/images/EC042017NF/165278s.jpg "Timid Tiger Classic Stampin' Pad [ 165278 ]")
![Real Red Classic Stampin' Pad [ 147084 ]](https://assets1.tamsnetwork.com/images/EC042017NF/147084s.jpg "Real Red Classic Stampin' Pad [ 147084 ]")
![Sponge Daubers [ 133773 ]](https://assets1.tamsnetwork.com/images/EC042017NF/133773s.jpg "Sponge Daubers [ 133773 ]")
![Lemon Lolly Classic Stampin' Pad [ 161666 ]](https://assets1.tamsnetwork.com/images/EC042017NF/161666s.jpg "Lemon Lolly Classic Stampin' Pad [ 161666 ]")
![Old Olive Classic Stampin' Pad [ 147090 ]](https://assets1.tamsnetwork.com/images/EC042017NF/147090s.jpg "Old Olive Classic Stampin' Pad [ 147090 ]")
![Early Espresso Classic Stampin' Pad [ 147114 ]](https://assets1.tamsnetwork.com/images/EC042017NF/147114s.jpg "Early Espresso Classic Stampin' Pad [ 147114 ]")
![Golden Glow 8 1/2" X 11" Cardstock [ 167685 ]](https://assets1.tamsnetwork.com/images/EC042017NF/167685s.jpg "Golden Glow 8 1/2\" X 11\" Cardstock [ 167685 ]")
![Pecan Pie 8 1/2" X 11" Cardstock [ 161717 ]](https://assets1.tamsnetwork.com/images/EC042017NF/161717s.jpg "Pecan Pie 8 1/2\" X 11\" Cardstock [ 161717 ]")





![Fern & Flora Bundle (English) [ 167745 ]](https://assets1.tamsnetwork.com/images/EC042017NF/167745s.jpg "Fern & Flora Bundle (English) [ 167745 ]")
![Moonlit Flora 12" X 12" (30.5 X 30.5 Cm) Designer Series Paper [ 167737 ]](https://assets1.tamsnetwork.com/images/EC042017NF/167737s.jpg "Moonlit Flora 12\" X 12\" (30.5 X 30.5 Cm) Designer Series Paper [ 167737 ]")
![Moonlit Flora Suite Collection (English) [ 167749 ]](https://assets1.tamsnetwork.com/images/EC042017NF/167749s.jpg "Moonlit Flora Suite Collection (English) [ 167749 ]")
![Secret Sea 8 1/2" X 11" Cardstock [ 165624 ]](https://assets1.tamsnetwork.com/images/EC042017NF/165624s.jpg "Secret Sea 8 1/2\" X 11\" Cardstock [ 165624 ]")
![Peaceful Pine 8 1/2" X 11" Cardstock [ 167691 ]](https://assets1.tamsnetwork.com/images/EC042017NF/167691s.jpg "Peaceful Pine 8 1/2\" X 11\" Cardstock [ 167691 ]")
![Secret Sea Classic Stampin' Pad [ 165285 ]](https://assets1.tamsnetwork.com/images/EC042017NF/165285s.jpg "Secret Sea Classic Stampin' Pad [ 165285 ]")
![Peaceful Pine Classic Stampin Pad [ 167679 ]](https://assets1.tamsnetwork.com/images/EC042017NF/167679s.jpg "Peaceful Pine Classic Stampin Pad [ 167679 ]")
![Adhesive Backed Metallic Gems [ 163780 ]](https://assets1.tamsnetwork.com/images/EC042017NF/163780s.jpg "Adhesive Backed Metallic Gems [ 163780 ]")

![Berry Burst 8-1/2" X 11" Cardstock [ 144243 ]](https://assets1.tamsnetwork.com/images/EC042017NF/144243s.jpg "Berry Burst 8-1/2\" X 11\" Cardstock [ 144243 ]")
![Beautiful Bokeh 6" X 6" (15.2 X 15.2 Cm) Designer Series Paper [ 164607 ]](https://assets1.tamsnetwork.com/images/EC042017NF/164607s.jpg "Beautiful Bokeh 6\" X 6\" (15.2 X 15.2 Cm) Designer Series Paper [ 164607 ]")
![2026–2028 In Color™ Dots [ 167546 ]](https://assets1.tamsnetwork.com/images/EC042017NF/167546s.jpg "2026–2028 In Color™ Dots [ 167546 ]")
![Linen Thread [ 104199 ]](https://assets1.tamsnetwork.com/images/EC042017NF/104199s.jpg "Linen Thread [ 104199 ]")
![Basic White 12" X 12" (30.5 X 30.5 Cm) Thick Cardstock [ 166782 ]](https://assets1.tamsnetwork.com/images/EC042017NF/166782s.jpg "Basic White 12\" X 12\" (30.5 X 30.5 Cm) Thick Cardstock [ 166782 ]")


![Cutest Crew Bundle (English) [ 167149 ]](https://assets1.tamsnetwork.com/images/EC042017NF/167149s.jpg "Cutest Crew Bundle (English) [ 167149 ]")
![Beautiful Ordinary Life 12" X 12" (30.5 X 30.5 Cm) Designer Series Paper [ 167553 ]](https://assets1.tamsnetwork.com/images/EC042017NF/167553s.jpg "Beautiful Ordinary Life 12\" X 12\" (30.5 X 30.5 Cm) Designer Series Paper [ 167553 ]")
![Petal Pink 8-1/2" X 11" Cardstock [ 146985 ]](https://assets1.tamsnetwork.com/images/EC042017NF/146985s.jpg "Petal Pink 8-1/2\" X 11\" Cardstock [ 146985 ]")
![Spotlight On Nature Dies [ 163580 ]](https://assets1.tamsnetwork.com/images/EC042017NF/163580s.jpg "Spotlight On Nature Dies [ 163580 ]")
![Timid Tiger Stampin’ Blends Combo Pack [ 165291 ]](https://assets1.tamsnetwork.com/images/EC042017NF/165291s.jpg "Timid Tiger Stampin’ Blends Combo Pack [ 165291 ]")
![Pool Party Stampin' Blends Combo Pack [ 154894 ]](https://assets1.tamsnetwork.com/images/EC042017NF/154894s.jpg "Pool Party Stampin' Blends Combo Pack [ 154894 ]")
![Smoky Slate Stampin' Blends Markers Combo Pack [ 145058 ] (Retired)](https://assets1.tamsnetwork.com/images/EC042017NF/145058s.jpg "Smoky Slate Stampin' Blends Markers Combo Pack [ 145058 ] (Retired)")
![Cajun Craze Stampin' Blends Combo Pack [ 154879 ]](https://assets1.tamsnetwork.com/images/EC042017NF/154879s.jpg "Cajun Craze Stampin' Blends Combo Pack [ 154879 ]")
![Calypso Coral Stampin' Blends Combo Pack [ 154881 ]](https://assets1.tamsnetwork.com/images/EC042017NF/154881s.jpg "Calypso Coral Stampin' Blends Combo Pack [ 154881 ]")
![Framed Violets Bundle (English) [ 168194 ]](https://assets1.tamsnetwork.com/images/EC042017NF/168194s.jpg "Framed Violets Bundle (English) [ 168194 ]")
![Violet Dreams 12" X 12" (30.5 X 30.5 Cm) Specialty Designer Series Paper [ 168186 ]](https://assets1.tamsnetwork.com/images/EC042017NF/168186s.jpg "Violet Dreams 12\" X 12\" (30.5 X 30.5 Cm) Specialty Designer Series Paper [ 168186 ]")
![Adhesive Backed Blooms [ 168198 ]](https://assets1.tamsnetwork.com/images/EC042017NF/168198s.jpg "Adhesive Backed Blooms [ 168198 ]")
![Fresh Freesia Stampin' Blends Combo Pack [ 155518 ]](https://assets1.tamsnetwork.com/images/EC042017NF/155518s.jpg "Fresh Freesia Stampin' Blends Combo Pack [ 155518 ]")
![Peaceful Pine Shimmer Brush [ 167665 ]](https://assets1.tamsnetwork.com/images/EC042017NF/167665s.jpg "Peaceful Pine Shimmer Brush [ 167665 ]")
![Flowering Meadow Bundle (English) [ 167912 ]](https://assets1.tamsnetwork.com/images/EC042017NF/167912s.jpg "Flowering Meadow Bundle (English) [ 167912 ]")
![Velvet Meadow 12" X 12" (30.5 X 30.5 Cm) Specialty Designer Series Paper [ 167904 ]](https://assets1.tamsnetwork.com/images/EC042017NF/167904s.jpg "Velvet Meadow 12\" X 12\" (30.5 X 30.5 Cm) Specialty Designer Series Paper [ 167904 ]")
![Charming Shimmer Faceted Dots [ 166139 ]](https://assets1.tamsnetwork.com/images/EC042017NF/166139s.jpg "Charming Shimmer Faceted Dots [ 166139 ]")
![Bubble Bath 1/8" (3.2 Mm) Faux Linen Ribbon [ 167075 ]](https://assets1.tamsnetwork.com/images/EC042017NF/167075s.jpg "Bubble Bath 1/8\" (3.2 Mm) Faux Linen Ribbon [ 167075 ]")
![Baker's Twine Essentials Pack [ 155475 ]](https://assets1.tamsnetwork.com/images/EC042017NF/155475s.jpg "Baker's Twine Essentials Pack [ 155475 ]")



![Wild Bunch Photopolymer Stamp Set (English) [ 167987 ]](https://assets1.tamsnetwork.com/images/EC042017NF/167987s.jpg "Wild Bunch Photopolymer Stamp Set (English) [ 167987 ]")
![2026–2028 In Color™ Painted Patterns 12" X 12" (30.5 X 30.5 Cm) Designer Series Paper [ 167755 ]](https://assets1.tamsnetwork.com/images/EC042017NF/167755s.jpg "2026–2028 In Color™ Painted Patterns 12\" X 12\" (30.5 X 30.5 Cm) Designer Series Paper [ 167755 ]")
![Crumb Cake Stampin' Blends Combo Pack [ 154882 ]](https://assets1.tamsnetwork.com/images/EC042017NF/154882s.jpg "Crumb Cake Stampin' Blends Combo Pack [ 154882 ]")
![Hydrangea Hue Classic Stampin' Pad [ 167677 ]](https://assets1.tamsnetwork.com/images/EC042017NF/167677s.jpg "Hydrangea Hue Classic Stampin' Pad [ 167677 ]")
![Hydrangea Hue 3/8" (1 Cm) Bordered Ribbon [ 167549 ]](https://assets1.tamsnetwork.com/images/EC042017NF/167549s.jpg "Hydrangea Hue 3/8\" (1 Cm) Bordered Ribbon [ 167549 ]")

