Good morning folks – it’s Sunday August 30 – and almost time for the new ONLINE EXCLUSIVES and Sep-Dec 2026 Catalog. There are some very pretty items in the ONLINE EXCLUSIVES and in this catalog & I’m sharing this new bundle and a Specialty DSP called Radiant Foils.
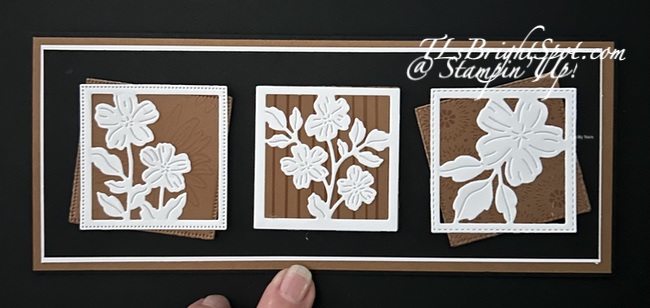
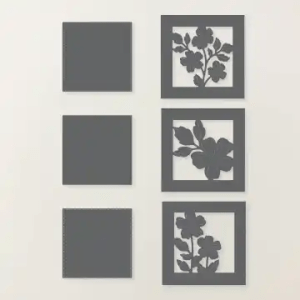
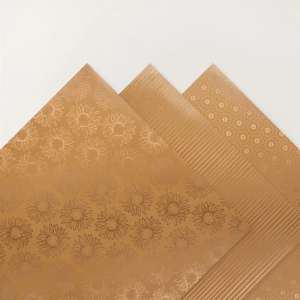
Each of the white floral squares on this card is an individual die. The square behind each flower is cut with another die in the Poetic Petals Dies. Gorgeous, right? The papers in the Radiant Foils pack are a Pecan Pie background and on this card each flower uses a different paper in the pack.
The layers on this card are Basic Black 8 1/2 x 7 scored at 3 1/2 to create a slimline card and show off all three floral dies; Pecan Pie 8 3/8 x 3 3/8; White Willow 8 1/8 x 3 1/8; Basic Black 8 x 3. The die cuts were adhered together then added to the card front with dimensionals.
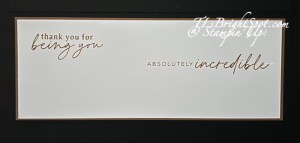
The inside of the card is White Willow (8 x 3) stamped with the Poetic Petals stamp set in Pecan Pie ink. This is layered on Pecan Pie 8 1/8 x 3 1/8.
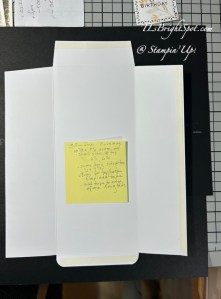
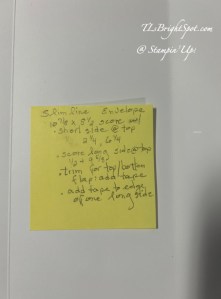
I didn’t want to use a standard business envelope for this pretty card – so I made my own 😀 See photos below for dimensions & cutting.
Below are photos of this stunning new Poetic Petals bundle coming Sep 1 in the ONLINE EXCLUSIVES.
And below is a photo of the Radiant Foils SDSP available Sep 1 in the Sep-Dec 2026 Catalog!
Happy belated fourth! It has been beastly hot here on the East Coast – 104 yesterday with a heat index of 111. I’ve been playing again… more shaped cards; one of which we made in card class Jul 2.
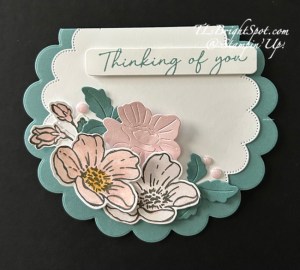
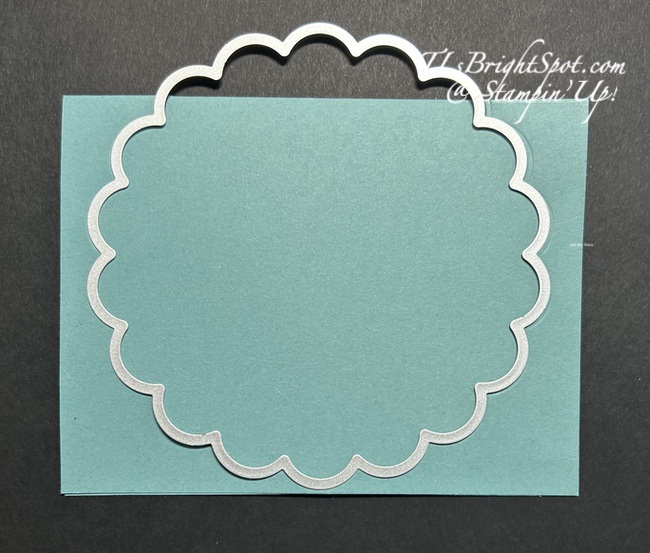
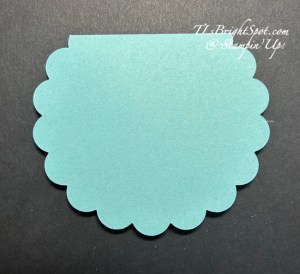
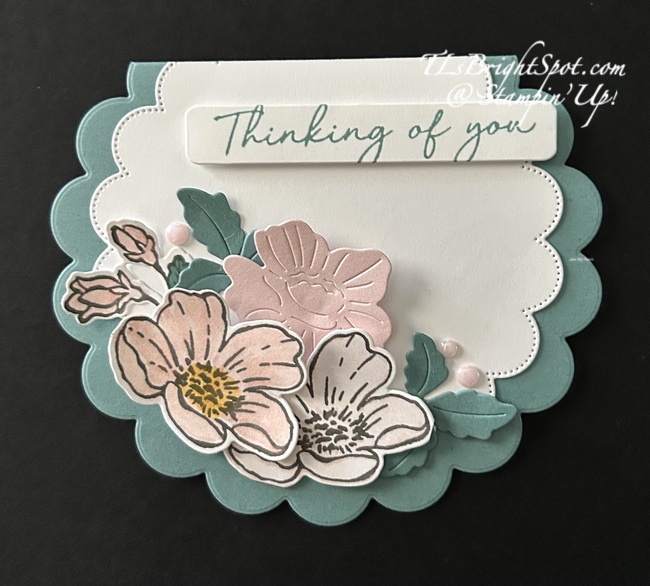
This first card begins with the Scalloped Blooms Dies, the largest & next to largest.The card stock is Lost Lagoon 5 1/2 x 8 1/2 scored at 4 14. This could make a portrait or a landscape card depending on where you place the flowers & leaves, sentiment. As you can see I chose landscape. With the fold at the top, lay the die so it uses most of the card – with maybe 5 of the scallops not on the card stock. (see photo) Run it through the die cutting machine twice so it cuts through both layers of card stock. Now cut the next layer with the next smaller Scalloped Blooms Die – here I used Basic White and about three of the scallops are off the panel. Layer these together with liquid glue – and decorate.
With Bouquet Blossoms stamp set, I stamped two of the same flower & the smaller buds with Basic Gray ink then colored with Barely Blush for one & The Shimmer Brush in Barely Blush for the other. I also used Golden Glow on that same flower for the center, then die cut these. I then die cut two three-section leaves from Lost Lagoon, then one more flower from Shimmer Paper in Barely Blush (that die cut is different!) I stamped a sentiment from the Bouquet Blossoms stamp set in Lost Lagoon ink & set it aside. The darker flower got dimensionals, the lighter stamped flower was attached with liquid glue then a dimensional on the right side. The bud die cut was slipped under & attached with a dab of liquid glue, then the leaves were added, also with liquid glue. The Shimmer paper flower was added last – liquid glue and a dimensional at the top to make it raised – this gives the card lots of dimension. I added the sentiment with dimensionals. Final touch – three 2026-2028 In Color Dots in Barely Blush.
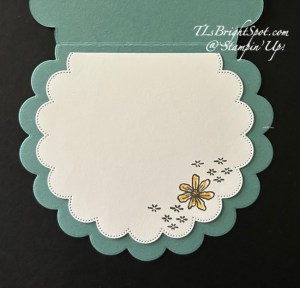
For the inside… this die cut was centered, and not all the way to the fold. You can do it either way. Two more stamps from Bouquet Blossoms stamped in Basic Gray ink. The single flower is colored with the Shimmer Brush in Golden Glow. Simple – attached the inside panel – done!
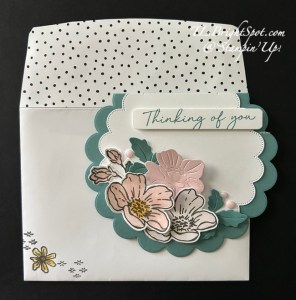
For the envelope… same images from the Bouquet Blossoms stamp set in Basic Gray ink stamped on the front. A 2 1/4 x 6 strip of … DSP was added to the flap & trimmed to fit. This is a very feminine kind of card – but could easily be a wedding or anniversary card, just by changing the sentiment.
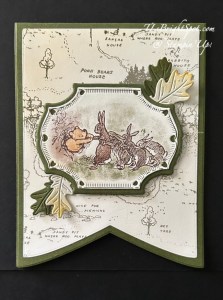
And here’s my 2nd shaped card… using the Banner Dies: 5th, 6th & 7th from the largest. It features the Silly Old Bear 12×12 DSP, Silly Old Friends bundle & the Sweet Words & Labels bundle.
The card stock base is 4 1/4 x 11 scored at 5 1/2 – Mossy Meadow. Lay the short flat edge close to the closed card base & run through the die cutting machine twice. With the 6th from largest banner die, cut the DSP two times (one for front & one for inside.) Adhere one to the card front & the other to the inside. Die cut two leaves from Mossy Meadow & two from Basic Beige using the Sweet Words & Labels Dies. Die cut the two banners: Mossy Meadow & the other from the Silly Old Bear DSP. Layer these together with liquid glue then attached over the card front with dimensionals. Add a touch of color to the leaves with Golden Glow & a sponge dauber, then slip them under the banner adhering with liquid glue. You can easily add dimensionals to the leaf ends to give them aa bit of flair.
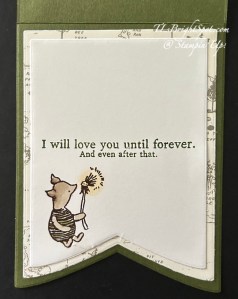
For the inside… with the 7th largest Banner Die, die cut the Basic White sentiment panel. With the Sweet Old Friends stamp set, stamp the Piglet image in Memento ink & color with Blends: Old Olive Crumb Cake & Golden Glow. Stamp the sentiment in Mossy Meadow ink using the same Silly Old Bear stamp set. Adhere the panel to the inside.
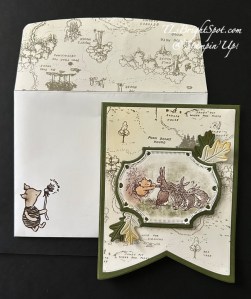
For the envelope… more of the Silly Old Bear 12×12 DSP attached to the flap & trimmed to fit. On the front – stamp the same image as inside the card & color similarly. My grandson loves Winnie the Pooh stuff & I think I need to send this to him to give to his fiancee’ – what do you think?!
And the two cards…
Thanks for stopping by. May you have a beautiful day. Make someone happy by sending them a handmade card filled with ❤️
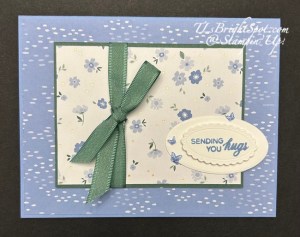
Oh my – June is almost gone – what happened to the days??? I have a sympathy card for you today using the pretty Phrases & Frames Bundle with the Bloom Boutique 12×12 DSP.
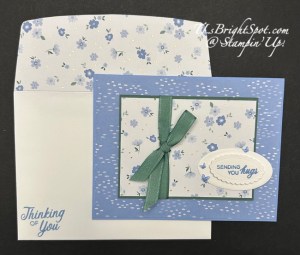
The card base is Hydrangea Hue with a layer of Bloom Boutique 12×12 DSP just slightly smaller than the card front. The double layer is Peaceful Pine 4 x 3 with another pattern of the Bloom Boutique DSP 3 7/8 x 2 7/8. I wrapped a Peaceful Pine 3/8″ Bordered Ribbon around and secured in back, then took another length to tie a half bow. I secured this under the knot with a glue dot then affixed the panel to the card front with dimensionals. The sentiment ovals are die cuts using the Phrases & Frames Dies – so delicate & sweet. The sentiment is from the coordinating stamp set in Hydrangea Hue ink. The larger oval is affixed with liquid adhesive and the smaller one is on dimensionals. Final touch – those wonderful 2026-2028 In Color Butterflies – in Hydrangea Hue.
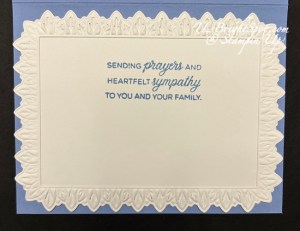
For the inside… another stunning die cut using the Phrases & Frames Dies – the largest one. I adhered a panel of Basic White behind it 4 3/4 x 3 3/8. This sentiment is also from the coordinating stamp set – in Hydrangea Hue ink.
For the envelope… a piece of the Bloom Boutique 12 x 12 DSP adhered to the flap & trimmed to fit. And another sentiment from the Phrases & Frames stamp set stamped in Hydrangea Hue ink. This card will be sent today… to a dear friend who lost her hubby.
Today is the next to last day before the end of June and the possibility of the monthly tutorial with a $50 or above order. See below for a way to order from me. To order the products to make this card, see the list below. When purchasing from me… And don’t forget all the benefits of being a demonstrator or ordering from me… When ordering from me, you get Daisy Patch Rewards for every order. (See my REWARDS PAGE for details) and with those points comes an opportunity for a FREE STAMP SET or items valued up to $40. You will also receive the monthly online tutorial – which this month uses this fabulous Lily of the Valley suite of products.
Want to JOIN MY TEAM and become a part of this fun crafty group? Lots of benefits there too. JOIN WITH ME HERE
Thanks for stopping by – may you have a beautiful day! Make someone happy by sending them a handmade card filled with ❤️
Good morning… I’ve two cards for you today using the Sunset Coast suite of products – and they are another quick & easy fun fold. Pictures of this suite may be found in the May-August 2026 Catalog on pages 26-27.
Since both of therse are made the same way, it’s easy to make a few at the same time.The card base is Night of Navy 8 1/2 x 5 12 scored at 1 1/2 & 4 1/4. Burnish these folds as a mountain, valley. In other words, that first score folds back on itself, making the card look like a backwards Z. The Scenic Coast 6×6 SDSP is cut 2 3/4 x 5 1/4, 1 1/8 x 5 1/4 , &non the lighthouse card an additional 2 7/8 x 5 1/4. The Basic White sentiment panels are 2 3/4 x 5 1/4 or 1 7/8 x 5 1/4.
For the die cuts: a 3 1/4″ square will die cut the lighthouse, or the Sailboat or the sun rays. An additional die was used to die cut the outside circle for the lighthouse – a Stitched Shapes Die, the largest.The birds were die cut from a scrap – it’s just one die for all three birds. The netting was cut from a Basic White about 2 1/2 x 2 3/4 and the seashells were die cut from Lemon Lolly and a Blending Brush with Pecan Pie ink to give them some dimension. The Sailboats were stamped in Melon Mambo and the waters in Balmy Blue. The sequins are the wonderful Sunset Sparkle Sequins that are part of the suite, matching the colors of the Scenic Coast 6×6 SDSP.
Aren’t these fun? Two cards so quickly created & masculine at that!
To order the products to make this card, see the list below. When purchasing from me… And don’t forget all the benefits of being a demonstrator or ordering from me… When ordering from me, you get Daisy Patch Rewards for every order. (See my REWARDS PAGE for details) and with those points comes an opportunity for a FREE STAMP SET or items valued up to $40. You will also receive the monthly online tutorial – which this month uses this fabulous Lily of the Valley suite of products.
Want to JOIN MY TEAM and become a part of this fun crafty group? Lots of benefits there too. JOIN WITH ME HERE
Thanks for stopping by – may you have a beautiful day! Make someone happy by sending them a handmade card filled with ❤️
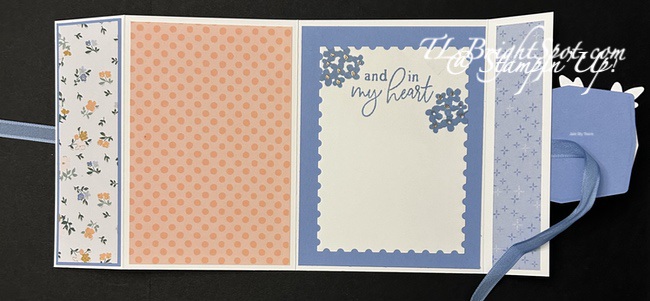
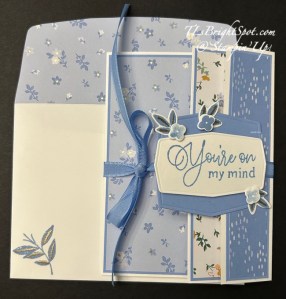
Oh I love this fun fold – it’s so easy & just pops with elegance or fun, depending on the Designer Series Paper used. As in the heading, I’ve used the soft colors of the Bloom Boutique DSP from the March ONLNE EXCLUSIVES. The paper is all in the new 2026-2028 In Colors and I primarily focused on Hydrangea Hue. I also used one pattern in the 2026-2028 In Color Painted Patterns DSP.
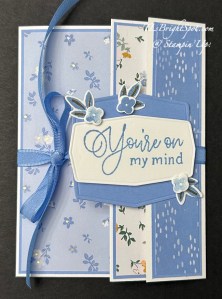
I began with Thick Basic White 11 x 5 1/2 scored @ 1 3/4, 5 1/2, and 9 3/4. Burnish these mountain(it folds back), valley, valley(this one folds over). Layer for front: 3 5/8 x 5 3/8; layer for the fold back panel 1 5/8 x 5 3/8 & layer for the fold over panel: 1 1/8 x 5 3/8 (I used Hydrangea Hue in each case). DSP pieces are coordinating but all different: 3 1/2 x 5 14, 1 1/2 x 5 14, & 1 x 5 1/4. Attach to the card base. Now cut for the inside of the card… 3 1/2 x 5 1/4 & 1 x 5 1/4; the sentiment panel has a layer 3 7/8 x 5 1/4 + Basic White 3 3/4 x 5 1/8 or cut with the 2nd largest Perennial Postage Dies. Stamp the Basic White with a sentiment – I used Forever Florals stamp set (also a March ONLINE EXCLUSIVE) & Hydrangea Hue ink + WOW! Metallic embossing powder in gold (heat set of course)
Now let’s decorate the front. Sometimes, this quick fun fold card uses a belly band, this one uses a ribbon instead – 3/8″ Bordered Ribbon in Hydrangea Hue, about 21″ worth. It’s attached to the front fold-over panel with Stampin’ Seal and under the sentiment banner. Sentiment banner: using the largest of the banner dies in the Forever Floral Dies, cut from Hydrangea Hue. Using the rectangular banner die from Forever Florals Dies, cut from Basic White & stamp the sentiment from the Forever Florals stamp set in Hydrangea Hue ink. Stamp a couple of small leaves from this same stamp set in Hydrangea Hue, stamp the veins in VersaMark ink and sprinkle with WOW! Metallic Gold embossing powder & heat set. Die cut with the appropriate leaf die in Forever Florals Dies. Add the Basic White sentiment banner to the blue banner with dimensionals. Position the die cut leaves & adhere. Now stamp three flowers in Hydrangea Hue ink on a Basic White scrap & die cut. Add these with dimensionals to the leaves. Add the banner with liquid glue over the ribbon on the fold over panel. Tie the ribbon in a bow & done! Stunningly beautiful, easy on the eyes. With these particular colors and this DSP, this could not only be a thinking of you kind of card, but also a sympathy card.
Envelope… more of the Bloom Boutique DSP on the flap & trimmed to fit. On the front, another leaf stamp in the Forever Florals stamp set stamped in Hydrangea Hue, then the veins stamped in VersaMark ink, sprinkled with WOW! Metallic Gold embossing powder & heat set. YES! This card is ready to send!!!
YAY – love this card… gentle on the eyes & quick & easy fun fold. Want to make this card – you may order the supplies from me listed below to do that. And don’t forget all the benefits of being a demonstrator or ordering from me… When ordering from me, you get Daisy Patch Rewards for every order. (See my REWARDS PAGE for details) and with those points comes an opportunity for a FREE STAMP SET or items valued up to $40. You will also receive the monthly online tutorial – which this month uses this fabulous Lily of the Valley suite of products.
Want to JOIN MY TEAM and become a part of this fun crafty group? Lots of benefits there too. JOIN WITH ME HERE
Thanks for stopping by – may you have a beautiful day! Make someone happy by sending them a handmade card filled with ❤️
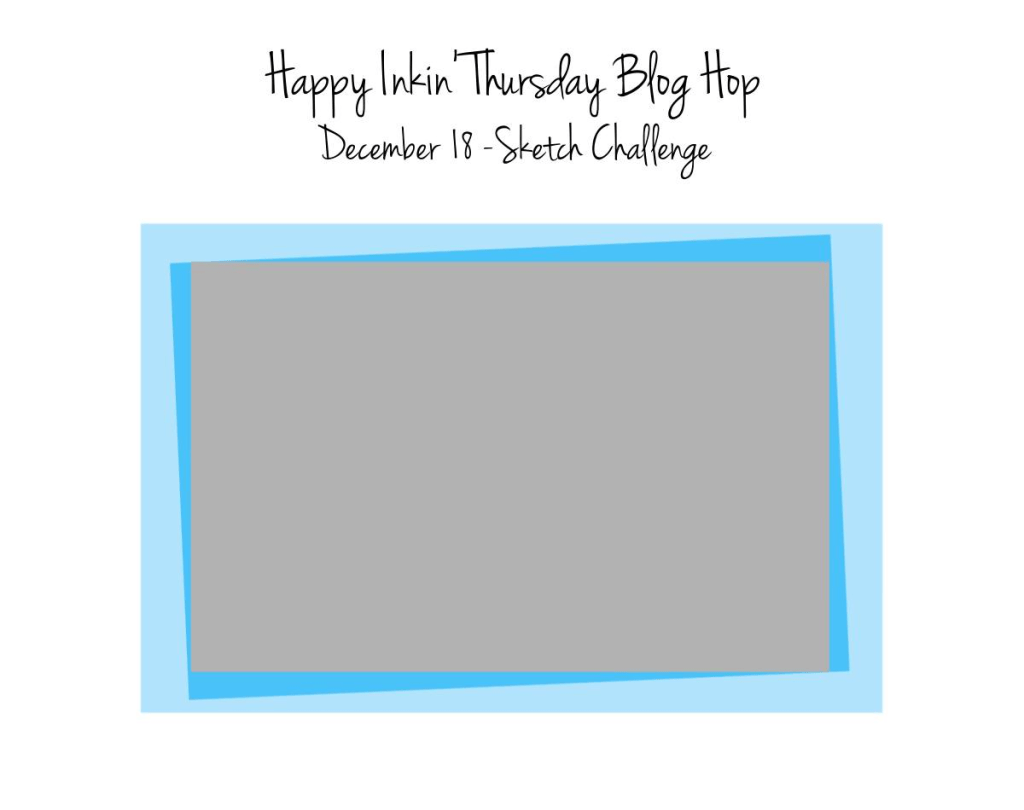
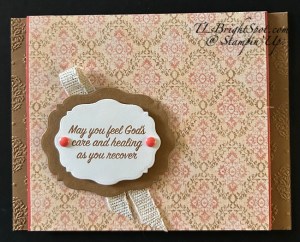
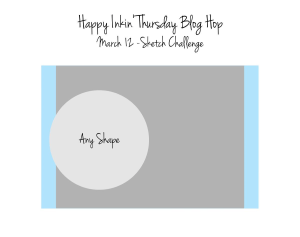
Welcome, welcome to the Happy Inkin’ Thursday Blog Hop! We have a sketch challenge today & I’m using the Beautiful Gallery 6×6 DSP to show off. This one does not have a scene, but it does have this beautiful pattern of light Calypso Coral & Pecan Pie. I’ve paired this with Beautifully Celebrated Dies from the Jan-Apr 2026 Mini Catalog. This bundle of stamps & dies is very versatile! I’ve also brought in the stamp set Prayers & Promises from the same Jan-Apr – 2026 Mini Catalog.
In looking closely to the card, I hope you see the Damask Designs 3D embossing behind the Beautiful Gallery 6×6 DSP. Those wonderfully scalloped ovals are from the Beautifully Celebrated Dies. I die cut these from Pecan Pie card stock and Basic White. The stamping was done with Pecan Pie ink prior to die cutting. The embellishments are Pearls of Beauty in Calypso Coral. And the ribbon – 3/8″ Gold & White ribbon from the Jan-Apr 2026 Mini Catalog. 😀
Directions:
The card base is 4 1/4 x 5 1/2 Pecan Pie with a Layer of the same color & same size, embossed with damask Designs EF & attached to the card base.
The Calypso Coral portion of the card is 8 1/2 x 4 3/4 scored at 4 1/4 on the long side & attached to the card front.
Layer a panel of Beautiful Gallery 6×6 DSP (from the Annual Catalog!) 4 1/4 x 4 5/8 to the Calypso Coral
Stamp the sentiment in Pecan Pie ink on Basic White 2 x 2 1/2 & die cut using the Beautifully Celebrated Dies. Add with dimesnionals to a Pecan Pie piece die cut with the Beautifully Celebrated Dies
Loop a length of the 3/8″ Gold & White ribbon and attach to the back of the Pecan Pie die cut, add these to the card front with dimensionals.
Final touch… two Pearls of Beauty embellishments in calypso Coral
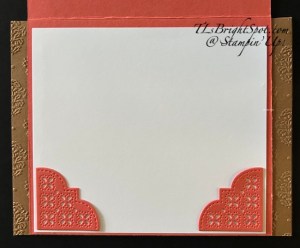
For the inside of the card… on the panel of Basic White I added die cuts of these two corner pieces, die cut from Calypso Coral using the Beautifully Celebrated Dies. They add such a fun texture & ‘eye candy’ to the inside of the card, nothing else is needed.
Now – time to visit others participating in today’s blog hop. See the list below & click on the next button to see what Nicole has created. Enjoy the hop!
Good Tuesday! It’s March 3 and do you know what that means… new ONLINE EXCLUSIVES AVAILABLE! This bundle & papers are simply stunning and perfect for either masculine or feminine cards.
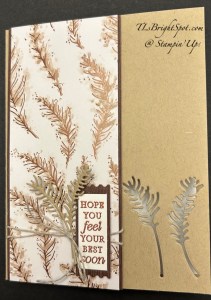
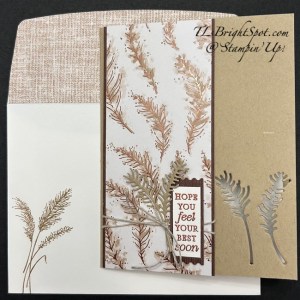
I began with a Crumb Cake card base 8 1/2 x 5 1/2 scored at 4 1/4. I used two dies from the Delicate Whispers Dies to die cut these two images. I added a strip of the Delicate Designs Specialty Designer Series Paper to a Wood Grain Wonders, wrapped Linen Thread around the two papers, twice, & tied a bow. I attached these to the card front. On a scrap of Basic White, I stamped the sentiment in VersaMark ink, sprinkled Wow! Metallic Embossing Powder in Copper & heat set. Once this was cool, I attached it to a piece of Wood Grain Wonders DSP cut with Perennial Postage Dies and attached it with dimensionals over the Linen Thread. I then added the two die cuts under the bow & secured with a glue dot.
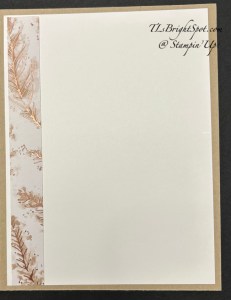
For the inside, an additional styrip of the Delicate Designs SDSP was added to the edge of the Basic White 4 x 5 1/4 panel and attached to the inside of the card. I’ve stamped no inside sentiment as this card is being signed by lots of folks to let them know we’re thinking of them. I love this card and I think the person receiving it will also!
For the envelope, another piece of the Delicate Designs SDSP was attached to the flap & trimmed to fit. On the front another image from Delicate Wishes stamp set stamped in Crumb Cake ink to bring everything together.
Want to purchase this bundle & Designer Series Paper? There are several new products available today in the online exclusives – so check them out. Remember that when shopping with me and your purchased is $50 & up, you will receive my monthly tutorial, Daisy Patch Rewards from me and more. Visit my Rewardes Page for more details!
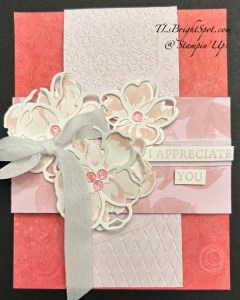
Today is card class and we are making a fun & easy double flap card. I’m always watching card videos and this idea came from those many views. I’m using one of my favorite floral bundles to make this card – Petals of Beauty, an ONLINE EXCLUSIVE bundle released in November.
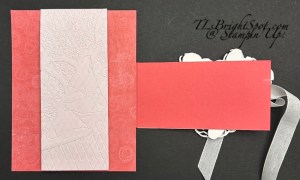
Are those stamped & die cut florals gorgeous or what! And, stamped in Bubble Bath ink is just so soft and delicate, and that overlay in Basic White just adds to the charm. The card base is Strawberry Slush 4 1/4 x 11 scored at 5 1/2. I then trimmed 1″ from each side of the card front, (cutting it to the score line) & removing those pieces. This allows us to see the beauty of the DSP underneath – Mixed Up Patterns, also an ONLINE EXCLUSIVE item. Before adding DSP panels we need that extra flap that folds over (this holds the flower die cuts & sentiment). This panel can really be any width, but because of the large flowers this panel is 2 1/4 x 6, then scored at one end at 4 1/4. This will be attached to the card base, centering it so the scorer line is at the right edge of the card base.Now add a panel of DSP 4 1/4 x 5 1/2. Here I used a Strawberry Slush pattern from this delicious Mixed Up Patterns paper. Now we decorate!
Cut a piece of coordinating DSP (here I chose a Bubble Bath pattern from Mixed Up Patterns 12×12 pack) 2 1/4 x 5 1/2. I embossed this panel prior to adhering it, using the Kintsugi Embossing folder, then attached it to that upper flap. For the side flap I cut a panel of Bubble Bath 2 1/4 x 4 1/4 and stamped it using the Petals of Beauty stamp set and stamped the leaves.. I wrapped this with a 1/2″ Basic White Woven Ribbon from the Everyday Skies suite collection, also an ONLINE EXCLUSIVE. I love this ribbon! It ties bows so beautifully. Once that ribbon was in place around the Bubble Bath stamped panel, I adhered it to that other front flap. I stamped the flowers from Petals of Beauty in Bubble Bath ink on Basic White. This is a two-step stamp: the outline stamp and the filler stamp (that’s what I call it anyway). The outline stamp is full strength Bubble Bath; the filler stamp is stamped off once Bubble Bath. I die cut these from the Petal of Beauty Dies, then die cut the ‘overlay’ from Basic White – two large flowers and one smaller one. I stamped my sentiment in Bubble Bath ink and cut it apart, putting both portions on dimensionals and added them to this ribboned panel. Then I placed my flowers, putting dimensionals on those as well. Final touch… Strawberry Slush & Pretty in Pink Gems, another ONLINE EXCLUSIVE.
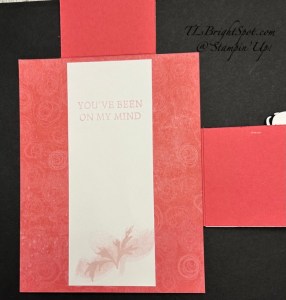
The inside panel is 2 x 5 1/4 stamped in Bubble Bath ink. The sentiment if from Words of Beauty, a coordinating stamp set in the Suite Collection. The leaves at the bottom are the same as on the front flap: stamped in Bubble Bath ink.
Completed card once more…
Want to purchase the products to make this card? See info below. And remember… now is REDEMPTION time for those coupons you earned!!! Don’t lose them. You have until the end of February to redeem thos coupons – or… you can give them to a teammate. How cool is that gift?!
Redemption Period: February 3–28, 2026There is no limit to the number of coupon codes you can redeem on an order during the redemption period. If you’re redeeming multiple codes, you must put a space between each code.
You may only redeem coupon codes one time. You cannot redeem them after February 28.
You can redeem Bonus Days coupon codes for month-to-month Paper Pumpkin subscriptions and new prepaid subscriptions.
Some restrictions apply. Coupons can’t be redeemed towards Starter Kits and you cannot use them on exchanges.
Redemption period ends: February 28, 2026, at 11:59 p.m. (MT)
This is my birth month – February – and with that in mind and all the awesome SU! promotions, I’m also offering Daisy Birthday Bash Bonuses …For all orders of $50 or greater (before shipping and taxes and after coupons) placed through me between now and Saturday, February 14, you’ll get your choice of a free adhesive! This can be anything that Stampin’ Up! sells that could be used as an adhesive! And for the adhesives that are $5 or under, two packs will equal one choice (see the items with the (2) on the list below) so if you select those, you’ll get double!!
Here is a list of the adhesives to choose:Adhesive Sheets – 152334
Multipurpose Liquid Glue – 110755
Mini Glue Dots – 103683
Tear & Tape Adhesive – 154031
Stampin’ Seal – 152813
Stampin’ Seal Refill – 152814
Stampin’ Seal + – 149699
Stampin’ Seal + Refill – 152812
Fine-Tip Glue Pen – 138309
Foam Adhesive Strips – 141825
Stampin’ Dimensionals (2) – 104430
Mini Stampin’ Dimensionals (2) – 144108
Black Stampin’ Dimensionals Combo Pack – 150893
Foam Adhesive Sheets – 152815
Silicone Craft Sheet– 127853 (although it’s not an adhesive, it’s one of my favorite tools for keeping my surface clean & free of ‘sticky’)
I’ll be placing the order the following Monday, that’s Feb 16, so be sure to let me know your item of choice – or… I’ll pick one for you 🥴 With Stampin’ Up!’s backorder policy where numbers are turned off for ordering if they go on backorder, if the adhesive that you pick is turned off for ordering when I place the order on the 16th, I’ll order Stampin’ Dimensionals for you instead. Deal?
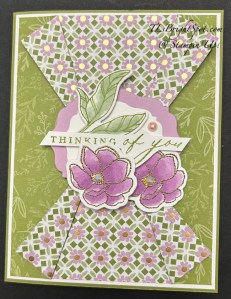
Good Friday morning! It’s 18 degrees this morning but nice & brightly sunny 😀 My inspiration came from one of my card class students who passed along info about making this cute fun fold. That led me to watch a video by Rachel Tessman. Let’s look at my creation.
This begins with a Basic White panel 4 x 5 14 and adhering a strip of the Lovely & Beautiful SDSP 2 1/2 x 5 1/4 to the center of the panel. Now cut two more strips from the same pattern 1 3/4 x 5 1/4. Adhere those strips in this fashion: the left strip – add adhesive only to the left edge & attach; the right strip – add adhesive to the right edge and attach.
Folding: fold back the top right side of the left strip to approximately the center of the card, but the fold should not allow any of the Basic White to show. Turn the card upside down and do the same for that same panel to create the bottom fold. Now, do the same for the right strip; fold back the top left side of the right strip just to the edge of the center strip pattern to a center point. Turn the card upside down again and do the same on the bottom right side. Burnish those folded back sections.
TIP: this folding back does not necessarily have to be to the center; it could be more toward the top or toward the bottom, but both sides do need to be uniform – to the same point.
Create the center pieces to cover where the papers come together. I pulled out my Beautifully Celebrated Dies, Fresh Freesia card stock and Basic White, die cut the two pieces and adhered them together. ( I used the smallest & next size up). I then stamped this sweet leaf image in Old Olive ink from the Beautifully Celebrated stamp set and colored it with Soft Sea Foam Stampin’ Blends. I die cut it with coordinating dies (Beautifully Celebrated) and set it aside. I used the Simply Beautiful stamp set and Old Olive ink for the sentiment and fussy cut it, adhered the leaf to the back of the sentiment then attached the sentiment with mini dimentionals to the two die cut banners. W ith the Simply Beautiful stamp set, I stamped the small flower in VersaMark ink (twice) on a Basic White piece, sprinkled those with WOW? Metallic Gold embossing Powder & heat set them. I colored both with Fresh Freesia Stampin’ Blends for the flowers and Daffodil Delight for the center of the flowers. I die cut these with the coordinating die from Simply Beautiful Dies and adhered them to the same banner: one adhered directly to the and one on dimensionals (yes, it slightly covers some of the sentiment) I attached the banners to the front of the card with dimensionals and added three Pearlized Faceted Circles.
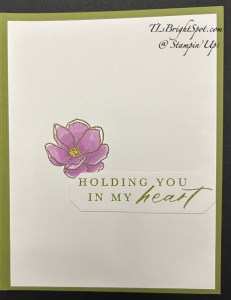
For the inside of the card, I stamped the same small flower from Simply Beautiful stamp set in VersaMark ink on a 4 x 5 1/4 Basic White panel, sprinkled it with WOW! Metallic Gold embossing powder & heat set it. Again I colored it with Stampin’ Blends Fresh Freesia and Daffodil Delight. I stamped the sentiment in Old Olive ink on a nother piece of Basic White and die cut it with Words of Beauty Dies. I adhered this just beneath the flower – and finis! This could easily be a sympathy card or get well card or simply ‘hello friend’ kind of card. But I love the simplicity of the fun fold and the extra charm it creates. Hope you like!
Wasnt to purchase the products to make this card? They may be found in the Jan-Apr 2026 Mini Catalog and you may SHOP WITH ME HERE!
Thanks for stopping by. May you have a beautiful day. Make someone happy by sending them a handmade card filled with ❤️
Stampin’ Up! is currently sponsoring BONUS DAYS: Because do you know what’s a great deal? Getting rewarded for all the crafting supplies you’re already going to buy! When you shop between January 6 and February 2 and spend $50 USD | $60 CAD, you will earn a $5 USD | $6 CAD coupon! Make sure you save all your coupons because you can redeem them (and we mean ALL of them) between February 3 and 28. During the earning period, a shopping-cart notification will appear when an order qualifies for a Bonus Days coupon—an online store feature on both the demonstrator and customer websites.
PRODUCT OF THE MONTH – only $5 with a $75 order (before shipping & taxes)
167972
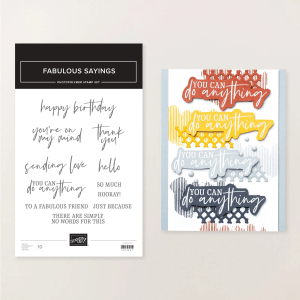
FABULOUS SAYINGS PHOTOPOLYMER STAMP SET (ENGLISH)
$5.00
The Fabulous Sayings Stamp Set is the exclusive Product of the Month for January 2026! Only available until stocks run out—don’t wait to get yours! This is a Two-Step Stampin’ set; it allows you to layer two or more images to create one final image with extra texture and dimension in the colors you want.
Jan-Apr 2026 Mini Catalog – click the image below to view the catalog
ONLINE EXCLUSIVES Several new stamp sets, dies, Designer Series Papers, embellishments and ribbons are available online that are not in any SU! Catalog. SHOP WITH ME HERE
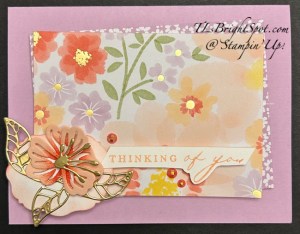
Welcome to the week before Christmas – and this fun blog hop with the Happy Inkin’ Thursday Blog Hop! We have a sketch challenge today… I’ve chosen to use the Simply Beautiful bundle & other products in the Lovely & Beautiful Suite in the Jan-Apr 2026 Mini Catalog.
I began with a Fresh Freesia card base and added two layers of the Lovely & Beautiful Special DSP, off-setting them for the challenge and attached them with dimensionals. I then pulled out Petal Pink to die cut the two flower pieces and Gold Foil for the stems & leaves. I used a sponge dauber & Calypso Coral ink to add dimension to the flower centers. Using the Beautifully Celebrated Dies, I also die cut the sweet label under the flower from Basic White and used the same sponge dauber to sponge the edges. I stamped the sentiment in Petal Pink ink and fussy cut along the bottom. This was attached with dimesnionals. Final touch… the awesome Pearlized Faceted Circles. Let me explain the flower layers a bit more… I added the two petal layers with a single cut in half mini dimensional, but it didn’t quite ‘sit’ the way I wanted, so I rolled a glue dot and attached that to one of the petals and it did the trick. The gold foil stamen is added with a glue dot.
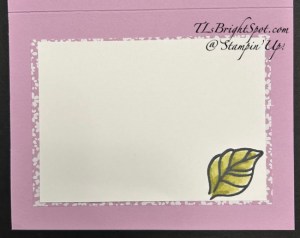
For the inside… The leaf is stamped with Memento ink – my ink pad is way juicy and the image is quite strong 😦 But I colored the leaf with Stampin’ Blends in Old Olive. I added the Basic White panel to another piece of the Lovely & Beautiful SDSP and attached them to the inside of the card.
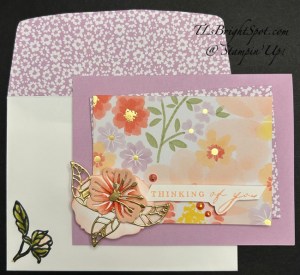
For the envelope… another stamped image in Memento ink Simply Beautiful stamp set & colored with Stampin’ Blends Petal Pink & Old Olive. The flap has the same Fresh Freesia Lovely & Beautiful SDSP trimmed to fit. For information about shopping with me or joining my team, see below.
Now it’s time to follow my hop buddies… click the next button or click on a name – you’re going to want to see what everyone has created. Enjoy the hop!
When shopping through me & Stampin’ Up! you will earn 10% of your retail amount on all orders of $20 or greater – that’s deal #1! You will also be earning Daisy Patch Rewards from me – one Daisy Patch reward for each $25 of your order through my online store – that’s deal #2! When you have a total of 16 Daisy Patch Rewards – you will be able to select a $40 gift from me – that’s deal #3! 😀 When your order is $50 or greater, you will receive the monthly tutorial – and for December it’s the Pop-Up Petals tutorial – deal #4! See below for more fantastic deals.
167970
TRUE BLUE FLORALS 12″ X 12″ (30.5 X 30.5 CM) DESIGNER SERIES PAPER
$5.00
If you love exclusive products, you’re going to love Product of the Month, a promotion centered around a special product release every month. The Product of the Month items are specially designed to be some of the best items Stampin’ Up! has to offer that aren’t available in any of our catalogs or our Online Exclusives. Every month we’ll release a new item that is only available for purchase once per account. These items will be limited quantity and are likely to sell out quickly—once they’re sold out, they’re gone for good! The True Blue Florals 12″ x 12″ (30.5 x 30.5 cm) Designer Series Paper is the exclusive Product of the Month for December 2025! Only available until supplies run out—don’t wait to get yours! This product can be unlocked for just $5 with a single order over $75 (after discounts and rewards).


![Scalloped Blooms Bundle (English) [ 167647 ]](https://assets1.tamsnetwork.com/images/EC042017NF/167647s.jpg "Scalloped Blooms Bundle (English) [ 167647 ]")
![Boutique Blossoms Bundle [ 167654 ]](https://assets1.tamsnetwork.com/images/EC042017NF/167654s.jpg "Boutique Blossoms Bundle [ 167654 ]")
![Lost Lagoon 8-1/2" X 11" Cardstock [ 133679 ]](https://assets1.tamsnetwork.com/images/EC042017NF/133679s.jpg "Lost Lagoon 8-1/2\" X 11\" Cardstock [ 133679 ]")
![Basic Gray Classic Stampin' Pad [ 149165 ]](https://assets1.tamsnetwork.com/images/EC042017NF/149165s.jpg "Basic Gray Classic Stampin' Pad [ 149165 ]")
![2026–2028 In Color™ 12" X 12" (30.5 X 30.5 Cm) Pearlized Specialty Paper [ 167766 ]](https://assets1.tamsnetwork.com/images/EC042017NF/167766s.jpg "2026–2028 In Color™ 12\" X 12\" (30.5 X 30.5 Cm) Pearlized Specialty Paper [ 167766 ]")
![2026–2028 In Color™ Dots [ 167546 ]](https://assets1.tamsnetwork.com/images/EC042017NF/167546s.jpg "2026–2028 In Color™ Dots [ 167546 ]")
![Barely Blush Classic Stampin Pad [ 167678 ]](https://assets1.tamsnetwork.com/images/EC042017NF/167678s.jpg "Barely Blush Classic Stampin Pad [ 167678 ]")
![Clear Wink Of Stella Glitter Brush [ 141897 ]](https://assets1.tamsnetwork.com/images/EC042017NF/141897s.jpg "Clear Wink Of Stella Glitter Brush [ 141897 ]")
![Silly Old Bear Suite Collection [ 167634 ]](https://assets1.tamsnetwork.com/images/EC042017NF/167634s.jpg "Silly Old Bear Suite Collection [ 167634 ]")
![Mossy Meadow 8-1/2" X 11" Cardstock [ 133676 ]](https://assets1.tamsnetwork.com/images/EC042017NF/133676s.jpg "Mossy Meadow 8-1/2\" X 11\" Cardstock [ 133676 ]")
![Mossy Meadow Classic Stampin' Pad [ 147111 ]](https://assets1.tamsnetwork.com/images/EC042017NF/147111s.jpg "Mossy Meadow Classic Stampin' Pad [ 147111 ]")
![Crumb Cake Stampin' Blends Combo Pack [ 154882 ]](https://assets1.tamsnetwork.com/images/EC042017NF/154882s.jpg "Crumb Cake Stampin' Blends Combo Pack [ 154882 ]")
![Golden Glow Classic Stampin' Pad [ 167676 ]](https://assets1.tamsnetwork.com/images/EC042017NF/167676s.jpg "Golden Glow Classic Stampin' Pad [ 167676 ]")
![Sponge Daubers [ 133773 ]](https://assets1.tamsnetwork.com/images/EC042017NF/133773s.jpg "Sponge Daubers [ 133773 ]")
![Basic White 12" X 12" (30.5 X 30.5 Cm) Thick Cardstock [ 166782 ]](https://assets1.tamsnetwork.com/images/EC042017NF/166782s.jpg "Basic White 12\" X 12\" (30.5 X 30.5 Cm) Thick Cardstock [ 166782 ]")
![Basic White Medium Envelopes [ 159236 ]](https://assets1.tamsnetwork.com/images/EC042017NF/159236s.jpg "Basic White Medium Envelopes [ 159236 ]")
![Basic White 8 1/2" X 11" Cardstock [ 166780 ]](https://assets1.tamsnetwork.com/images/EC042017NF/166780s.jpg "Basic White 8 1/2\" X 11\" Cardstock [ 166780 ]")
![Stampin' Cut & Emboss Machine [ 149653 ]](https://assets1.tamsnetwork.com/images/EC042017NF/149653s.jpg "Stampin' Cut & Emboss Machine [ 149653 ]")
![Paper Trimmer [ 152392 ]](https://assets1.tamsnetwork.com/images/EC042017NF/152392s.jpg "Paper Trimmer [ 152392 ]")
![Stampin' Dimensionals [ 104430 ]](https://assets1.tamsnetwork.com/images/EC042017NF/104430s.jpg "Stampin' Dimensionals [ 104430 ]")
![Multipurpose Liquid Glue [ 110755 ]](https://assets1.tamsnetwork.com/images/EC042017NF/110755s.jpg "Multipurpose Liquid Glue [ 110755 ]")
![Mini Glue Dots [ 103683 ]](https://assets1.tamsnetwork.com/images/EC042017NF/103683s.jpg "Mini Glue Dots [ 103683 ]")
![Paper Snips [ 103579 ]](https://assets1.tamsnetwork.com/images/EC042017NF/103579s.jpg "Paper Snips [ 103579 ]")
![Take Your Pick [ 144107 ]](https://assets1.tamsnetwork.com/images/EC042017NF/144107s.jpg "Take Your Pick [ 144107 ]")
![Metallics Wow! Embossing Powder [ 165678 ]](https://assets1.tamsnetwork.com/images/EC042017NF/165678s.jpg "Metallics Wow! Embossing Powder [ 165678 ]")
![Small Blending Brushes [ 160518 ]](https://assets1.tamsnetwork.com/images/EC042017NF/160518s.jpg "Small Blending Brushes [ 160518 ]")
![Heat Tool (Us And Canada) [ 129053 ]](https://assets1.tamsnetwork.com/images/EC042017NF/129053s.jpg "Heat Tool (Us And Canada) [ 129053 ]")
![Embossing Additions Tool Kit [ 159971 ]](https://assets1.tamsnetwork.com/images/EC042017NF/159971s.jpg "Embossing Additions Tool Kit [ 159971 ]")
![Phrases & Frames Bundle (English) [ 167587 ]](https://assets1.tamsnetwork.com/images/EC042017NF/167587s.jpg "Phrases & Frames Bundle (English) [ 167587 ]")
![Bloom Boutique 12" X 12" (30.5 X 30.5 Cm) Specialty Designer Series Paper [ 167637 ]](https://assets1.tamsnetwork.com/images/EC042017NF/167637s.jpg "Bloom Boutique 12\" X 12\" (30.5 X 30.5 Cm) Specialty Designer Series Paper [ 167637 ]")
![2026–2028 In Color™ Butterflies [ 167656 ]](https://assets1.tamsnetwork.com/images/EC042017NF/167656s.jpg "2026–2028 In Color™ Butterflies [ 167656 ]")
![Hydrangea Hue 3/8" (1 Cm) Bordered Ribbon [ 167549 ]](https://assets1.tamsnetwork.com/images/EC042017NF/167549s.jpg "Hydrangea Hue 3/8\" (1 Cm) Bordered Ribbon [ 167549 ]")
![Hydrangea Hue 8 1/2" X 11" Cardstock [ 167687 ]](https://assets1.tamsnetwork.com/images/EC042017NF/167687s.jpg "Hydrangea Hue 8 1/2\" X 11\" Cardstock [ 167687 ]")
![Hydrangea Hue Classic Stampin' Pad [ 167677 ]](https://assets1.tamsnetwork.com/images/EC042017NF/167677s.jpg "Hydrangea Hue Classic Stampin' Pad [ 167677 ]")
![Peaceful Pine 8 1/2" X 11" Cardstock [ 167691 ]](https://assets1.tamsnetwork.com/images/EC042017NF/167691s.jpg "Peaceful Pine 8 1/2\" X 11\" Cardstock [ 167691 ]")


![Scenic Coast Suite Collection (English) [ 167786 ]](https://assets1.tamsnetwork.com/images/EC042017NF/167786s.jpg "Scenic Coast Suite Collection (English) [ 167786 ]")
![Night Of Navy 8-1/2" X 11" Cardstock [ 100867 ]](https://assets1.tamsnetwork.com/images/EC042017NF/100867s.jpg "Night Of Navy 8-1/2\" X 11\" Cardstock [ 100867 ]")
![Night Of Navy Classic Stampin' Pad [ 147110 ]](https://assets1.tamsnetwork.com/images/EC042017NF/147110s.jpg "Night Of Navy Classic Stampin' Pad [ 147110 ]")
![Melon Mambo Classic Stampin' Pad [ 147051 ]](https://assets1.tamsnetwork.com/images/EC042017NF/147051s.jpg "Melon Mambo Classic Stampin' Pad [ 147051 ]")
![Balmy Blue Classic Stampin' Pad [ 147105 ]](https://assets1.tamsnetwork.com/images/EC042017NF/147105s.jpg "Balmy Blue Classic Stampin' Pad [ 147105 ]")
![Lemon Lolly 8 1/2" X 11" Cardstock [ 161720 ]](https://assets1.tamsnetwork.com/images/EC042017NF/161720s.jpg "Lemon Lolly 8 1/2\" X 11\" Cardstock [ 161720 ]")
![Pecan Pie Classic Stampin' Pad [ 161665 ]](https://assets1.tamsnetwork.com/images/EC042017NF/161665s.jpg "Pecan Pie Classic Stampin' Pad [ 161665 ]")
![Forever Florals Bundle (English) [ 167444 ]](https://assets1.tamsnetwork.com/images/EC042017NF/167444s.jpg "Forever Florals Bundle (English) [ 167444 ]")
![2026–2028 In Color™ Painted Patterns 12" X 12" (30.5 X 30.5 Cm) Designer Series Paper [ 167755 ]](https://assets1.tamsnetwork.com/images/EC042017NF/167755s.jpg "2026–2028 In Color™ Painted Patterns 12\" X 12\" (30.5 X 30.5 Cm) Designer Series Paper [ 167755 ]")


![Beautiful Gallery 6" X 6" (15.2 X 15.2 Cm) Designer Series Paper [ 165196 ]](https://assets1.tamsnetwork.com/images/EC042017NF/165196s.jpg "Beautiful Gallery 6\" X 6\" (15.2 X 15.2 Cm) Designer Series Paper [ 165196 ]")
![Beautifully Celebrated Dies [ 166974 ]](https://assets1.tamsnetwork.com/images/EC042017NF/166974s.jpg "Beautifully Celebrated Dies [ 166974 ]")
![Pearls Of Beauty [ 167098 ]](https://assets1.tamsnetwork.com/images/EC042017NF/167098s.jpg "Pearls Of Beauty [ 167098 ]")
![Calypso Coral 8-1/2" X 11" Cardstock [ 122925 ]](https://assets1.tamsnetwork.com/images/EC042017NF/122925s.jpg "Calypso Coral 8-1/2\" X 11\" Cardstock [ 122925 ]")
![Pecan Pie 8 1/2" X 11" Cardstock [ 161717 ]](https://assets1.tamsnetwork.com/images/EC042017NF/161717s.jpg "Pecan Pie 8 1/2\" X 11\" Cardstock [ 161717 ]")
![Delicate Whispers Photopolymer Stamp Set (English) [ 167500 ]](https://assets1.tamsnetwork.com/images/EC042017NF/167500s.jpg "Delicate Whispers Photopolymer Stamp Set (English) [ 167500 ]")
![Wood Grain Wonders 12" X 12" (30.5 X 30.5 Cm) Designer Series Paper [ 167428 ]](https://assets1.tamsnetwork.com/images/EC042017NF/167428s.jpg "Wood Grain Wonders 12\" X 12\" (30.5 X 30.5 Cm) Designer Series Paper [ 167428 ]")
![Delicate Designs 12" X 12" (30.5 X 30.5 Cm) Specialty Designer Series Paper [ 167509 ]](https://assets1.tamsnetwork.com/images/EC042017NF/167509s.jpg "Delicate Designs 12\" X 12\" (30.5 X 30.5 Cm) Specialty Designer Series Paper [ 167509 ]")
![Perennial Postage Dies [ 162607 ]](https://assets1.tamsnetwork.com/images/EC042017NF/162607s.jpg "Perennial Postage Dies [ 162607 ]")
![Linen Thread [ 104199 ]](https://assets1.tamsnetwork.com/images/EC042017NF/104199s.jpg "Linen Thread [ 104199 ]")
![Crumb Cake 8-1/2" X 11" Cardstock [ 120953 ]](https://assets1.tamsnetwork.com/images/EC042017NF/120953s.jpg "Crumb Cake 8-1/2\" X 11\" Cardstock [ 120953 ]")
![Crumb Cake Classic Stampin' Pad [ 147116 ]](https://assets1.tamsnetwork.com/images/EC042017NF/147116s.jpg "Crumb Cake Classic Stampin' Pad [ 147116 ]")


![Petals Of Beauty Bundle (English) [ 167096 ]](https://assets1.tamsnetwork.com/images/EC042017NF/167096s.jpg "Petals Of Beauty Bundle (English) [ 167096 ]")
![Words Of Beauty Bundle (English) [ 167090 ]](https://assets1.tamsnetwork.com/images/EC042017NF/167090s.jpg "Words Of Beauty Bundle (English) [ 167090 ]")
![Mixed Up Patterns 12" X 12" (30.5 X 30.5 Cm) Mix In Designer Series Paper [ 166992 ]](https://assets1.tamsnetwork.com/images/EC042017NF/166992s.jpg "Mixed Up Patterns 12\" X 12\" (30.5 X 30.5 Cm) Mix In Designer Series Paper [ 166992 ]")
![Joined Together 3 D Embossing Folder [ 165170 ]](https://assets1.tamsnetwork.com/images/EC042017NF/165170s.jpg "Joined Together 3 D Embossing Folder [ 165170 ]")
![White 1/2" (1.3 Cm) Woven Ribbon [ 164634 ]](https://assets1.tamsnetwork.com/images/EC042017NF/164634s.jpg "White 1/2\" (1.3 Cm) Woven Ribbon [ 164634 ]")
![Strawberry Slush & Pretty In Pink Gems [ 165615 ]](https://assets1.tamsnetwork.com/images/EC042017NF/165615s.jpg "Strawberry Slush & Pretty In Pink Gems [ 165615 ]")
![Strawberry Slush 8 1/2" X 11" Cardstock [ 165625 ]](https://assets1.tamsnetwork.com/images/EC042017NF/165625s.jpg "Strawberry Slush 8 1/2\" X 11\" Cardstock [ 165625 ]")
![Bubble Bath 8 1/2" X 11" Cardstock [ 161718 ]](https://assets1.tamsnetwork.com/images/EC042017NF/161718s.jpg "Bubble Bath 8 1/2\" X 11\" Cardstock [ 161718 ]")
![Bubble Bath Classic Stampin' Pad [ 161664 ]](https://assets1.tamsnetwork.com/images/EC042017NF/161664s.jpg "Bubble Bath Classic Stampin' Pad [ 161664 ]")

![Lovely & Beautiful 12" X 12" (30.5 X 30.5 Cm) Specialty Designer Series Paper [ 166957 ]](https://assets1.tamsnetwork.com/images/EC042017NF/166957s.jpg "Lovely & Beautiful 12\" X 12\" (30.5 X 30.5 Cm) Specialty Designer Series Paper [ 166957 ]")
![Beautifully Celebrated Bundle (English) [ 166975 ]](https://assets1.tamsnetwork.com/images/EC042017NF/166975s.jpg "Beautifully Celebrated Bundle (English) [ 166975 ]")
![Lovely & Beautiful Suite Collection (English) [ 166981 ]](https://assets1.tamsnetwork.com/images/EC042017NF/166981s.jpg "Lovely & Beautiful Suite Collection (English) [ 166981 ]")
![Simply Beautiful Bundle (English) [ 166965 ]](https://assets1.tamsnetwork.com/images/EC042017NF/166965s.jpg "Simply Beautiful Bundle (English) [ 166965 ]")
![Pearlized Faceted Circles [ 166978 ]](https://assets1.tamsnetwork.com/images/EC042017NF/166978s.jpg "Pearlized Faceted Circles [ 166978 ]")
![Words Of Beauty Dies (English) [ 167089 ]](https://assets1.tamsnetwork.com/images/EC042017NF/167089s.jpg "Words Of Beauty Dies (English) [ 167089 ]")
![Fresh Freesia 8 1/2" X 11" Cardstock [ 155613 ]](https://assets1.tamsnetwork.com/images/EC042017NF/155613s.jpg "Fresh Freesia 8 1/2\" X 11\" Cardstock [ 155613 ]")
![Fresh Freesia Stampin' Blends Combo Pack [ 155518 ]](https://assets1.tamsnetwork.com/images/EC042017NF/155518s.jpg "Fresh Freesia Stampin' Blends Combo Pack [ 155518 ]")
![Soft Sea Foam Stampin' Blends Combo Pack [ 154902 ]](https://assets1.tamsnetwork.com/images/EC042017NF/154902s.jpg "Soft Sea Foam Stampin' Blends Combo Pack [ 154902 ]")
![Old Olive Classic Stampin' Pad [ 147090 ]](https://assets1.tamsnetwork.com/images/EC042017NF/147090s.jpg "Old Olive Classic Stampin' Pad [ 147090 ]")
![Versamark Pad [ 102283 ]](https://assets1.tamsnetwork.com/images/EC042017NF/102283s.jpg "Versamark Pad [ 102283 ]")