Stampin’ Up! Noel Tidings for the ZHappy Inkin’ Thursday Blog Hop

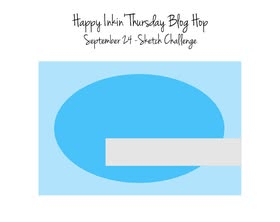
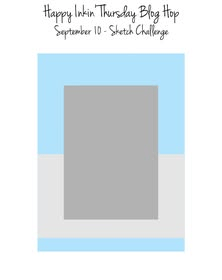
Good Thursday & WELCOME to our hop! It’s definitely fall here on the East Coast & here I have a Christmas card – the time moves on rapidly… If you’ve joined me from the fabulous Tara, I’m glad you linked in. If you jumped right in here first, thank you – be sure you see the other wonderful creations for this hop. We have a sketch challenge today and mine is a bit of a stretch, but here ya go..

Stampin' Up! hop sketch challenge

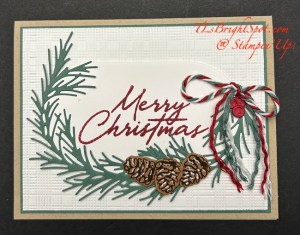
You will notice, this card doesn’t ‘perfectly fit’ the sketch, but I’m claiming it as is! My card base is Crumb Cake with alayer of Peaceful Pine 1/4″ smaller than the A2 card front and Basic. White, embossed with the Softly Woven 3D embossing folder.

Stampin' Up! Noel Tidings card front

I die cut several items from the Noel Tidings Dies: the oval in Basic White, the pine boughs in Peaceful Pine, the acorns stamped in Early Espresso on Pecan Pie and berries in Cherry Cobbler. I stamped the sentiment in Cherry Cobbler then cut apart the pine boughs & adhered just portions of them to the edge of the oval. I tied a bow using the Multipack Christmas Baker’s Twine then untwirled the ends to give it more freedom. I then added the berries with dabs of liquid glue and a trimmed black dimensional on the last berry. The pinecones are donesimilarly – 2 adhered with liquid glue and the center on a black dimensional. The oval was added to the card front with dimensionals. All images are from the Noel Tidings bundle.

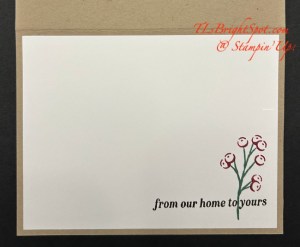
Stampin' Up! Noel Tidings card inside

For the inside… I stamped the berry stem in Peaceful Pine ink then the berries in Cherry Cobbler on a Basic White 5 14 x 4 panel. The sentiment is stamped in Early Espresso. Everything comes from the Noel Tidings stamp set.

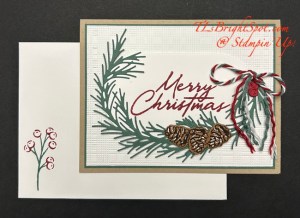
Stampin' Up! Noel Tidings card & envelope

For the envelope… I recreated the berry stem same as the inside of the card: Peaceful Pine and Cherry Cobbler inks. On the flap is another piece of Basic White run through the Softly Woven 3D embossing folder, attached & trimmed to fit.

I love making cards, especially Christmas Cards. It just makes my heart sing. Maybe it’s the reconnection with folks I haven’t been in contact with for a bit. At any rate – it’s me. If you like what you see, let me know. There’s info below in how to shop with me.

Take a gander at the other creative ideas by teammates – click the link below to get you there. Enjoy the hop!

Stampin' Up! hop button

Amy Koenders

Mary Deatherage

Karen Ksenzakovic

Tara Carpenter

Terry Lynn Bright – this is me 😀

Charlene Tackvic

The November ONLINE EXCLUSIVES are going to be available pretty soon – and as a demonstrator I was able to order some fun new items. Stay tuned as I’ll be showing them off pretty soon. Want to be a demonstrator? Have you considered it? If so, connect with me & I’ll share information on how to JOIN MY TEAM 👍 See below for the list of products to make this card or SHOP WITH ME HERE to see ALL the items Stampin’ has available – new kits, ONLINE EXCLUSIVES, LOTS!

Thanks for stopping by. May you have a beautiful day. Make someone happy by sending them a handmade card filled with ❤️

Product List

Stampin’ Up! Pop-Out Card in a Card Fun Fold

Woopeee – it’s FALL! And you would think I would have a fall card for you today, but I don’t. Instead I have this fun fold that I’m excited to share with you.

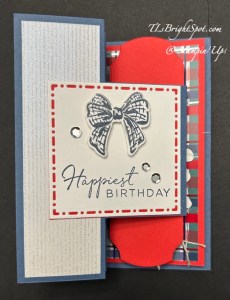
Stampin' Up! Pop-Out Card in a Card front view

I used Tile Garden Dies to create the Basic White square and Elegantly Wrapped bundle for the bow. The sentiment is also from Tile Garden stamp set.

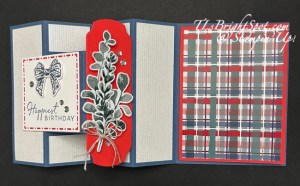
Stampin' Up! Pop-Out Card in a Card first open

I’ve used two different DSP packages : Shimmering Stripes SDSP & All Wrapped Up SDSP for the plaid on the right as well as the die cut leaves, die cut straight from the All wrapped Up Paper. The Real Red background behind those die cut leaves uses a die from Life In Bloom Dies (I cut two and adhered them together then attached them to the card.

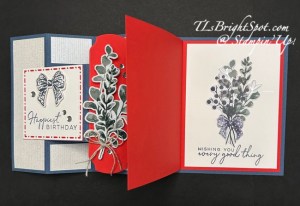
Stampin' Up! Pop-Out Card in a Card second open

And here’s the card fully open, showing off the card in a card 😀 This image is fussy cut from the All Wrapped Up SDSP adhered to a Basic White panel and the sentiment is stamped in Misty Moonlight ink from the Tile Garden stamp set. The Real Red card is Real Red 7 1/2 x 5 scored at 3 3/4.

DIRECTIONS & MEASUREMENTS TO MAKE THIS CARD

  • CARD BASE – 11 X 5 1/4 SCORED @ 1 3/4, 3 1/2, 5 1/4 & 7 (Misty Moonlight)
  • With short side at top, measure 1 1/4 & cut from 1st score to 3rd score. Turn over with short side at top & do the same, measuring 1 1/4 from bottom & cut from 1st score to 3rd score.
  • Cut 3 DSP strips 1 1/2 x 5 (Shimmering Stripes DSDP) Burnish score lines mountain, valley, mountain, valley – EXCEPT the center section – the ‘floating’ section – that score is a mountain
    • 2 of these will be used as full length strips adhering on the 1st & 4th panels
    • Use the last strip to cut into 4 pieces 1 1/2 x 1. Attach these to the areas above the cut areas at the card top & below the cut areas at the bottom
  • Add the Real Red ‘notecard’ with score on the left to the last section of the card. The ‘notecard’ is 7 x 5 scored at 3 3/4
    • Add DSP to the front of the notecard: 3 1/2 x 4 3/4
  • Die cut a square (Basic White in this case) approximately 2 3/4 x 2 3/4 from the Tile Garden Dies. Add a Real Red square behind it, same size & attach to the ‘floating’ panel & 1st section.
    • Stamp the sentiment in Misty Moonlight ink (Tile Garden stamp set)
    • Stamp the bow in Misty Moonlight ink & die cut ( Elegantly Wrapped stamp set & dies). Attach with dimensionals.
    • Add Adhesive-Backed Sparkle Sequins to the square
  • For the back side of the ‘floating’ panel, I die cut these elements from the All-Wrapped Up SDSP using coordinating dies from Elegantly Wrapped Dies. I was going to add them directly to this panel but they showed outside the border & I didn’t like that. I needed something long enough & wide enough for a nice background and pulled out the Life In Bloom Dies and cut 2 in Real Red, attaching them back to back then adding them to the card panel & attaching the die cuts with dimensionals. Yes, this does make this card a bit ‘fat’ but I intend to hand deliver this card!
  • For the inside of the notecard, I fussy cut the element from the All Wrapped Up SDSP & attached it with liquid glue to the Basic White panel (3 1/2 x 4 3/4) I stamped the sentiment in Misty Moonlight, attached the panel & the card was complete… I love this!!!
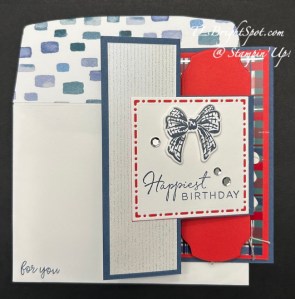
Stampin' Up! Pop-Out Card in a Card & Envelope

For the envelope, I found a different paper – Whispering Woods 12 1/4 x 6 – for the flap and trimmed it to fit. On the front… the sentiment is stamped in Misty Moonlight using the Elegantly Wrapped stamp set.

Want to purchase the products to make today’s card? See the list below. And to see all the products Stampin’ Up! has to offer, click SHOP WITH ME HERE

Product List

Stampin’ Up! Front Flap Dun Fold w/Fun for Fall Bundle

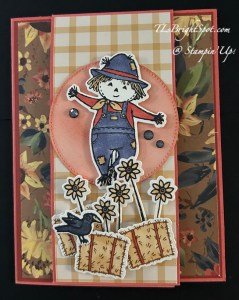
Oh this scarecrow is just too cute! And I’ve used it on this front flap fun fold card. We made this card in class on Thursday & the group loved it. My hubby called this a card with a tongue! 😀

Stampin' Up! Fun for Fall Front Flap Fun Fold card front

I’ve used several products to make this card… the Gingham Vellum paper in Golden Glow on the flap (2 3/8 x 5 3/8), the beautiful Sunflower Fields DSP on the card front, inside strip and the envelope, Stitched Circles Dies, Radiant Gems in Secret Sea and all the fun elements in the Fun For Fall bundle, plus Stampin’ Blends to color the circle & the stamped & die cut pieces.

To color the scarecrow: Light Misty Moonlight, Calypso Coral & Golden Glow; the sunflowers are Golden Glow & Pecan Pie center; the crow is light Basic Black & Golden Glow on the beak; and finally the bales of hay are stamped in Pecan Pie ink then colored with Golden Glow & Calypso Coral. The circle die cut was created with a Blending Brush Calypso Coral first then Cajun Craze – the scarecrow is standing out in the field in the hot sun! He looks as though he’s enjoying his job!

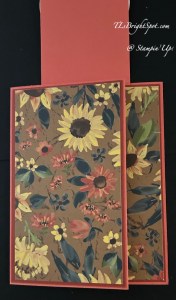
Stampin' Up Fun for Fall Front Flap Fun Fold first layer

Here’s the card front with the ‘flap’ up, showing off that beautiful Sunflower Fields DSP. It’s layered on Cajun Craze and the card base is Calypso Coral. The DSP is cut 3 x 5 1/4 with the Cajun Craze 3 1/8 x 5 3/8. The card base is 7 1/2 x 5 1/2 scored at 3 1/2. The flap is 2 1/2 x 6 1/4 scored at 5 1/2 and attached to the inside of the card (covered by the sentiment panel (see below)

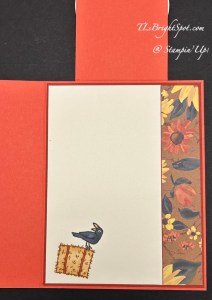
Stampin' Up! Fun for Fall Front Flap fun fold inside

And here’s the inside of the card with the bail of hay and the sassy crow. The hay bail is stamped in Pecan Pie & colored with Golden Glow & the ‘twine’ is Calypso Coral. The crow is Light Basic Black and Golden Glow on the beak. The DSP on the side is 1 x 5 1/4.

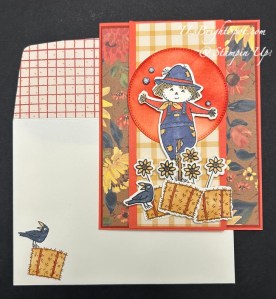
Stampin' Up! Fun for Fall card & envelope

For the envelope… more Sunflower Fields DSP on the flap 2 1/4 x 6 & trimmed to fit. On the front, the same images as on the inside of the card. Such a fun, fun card! This can be masculine or for a woman or for a child… versatility. Say hello, congrats, or feel better soon in whatever you write.

Want to purchase the products to make this card – see below… and remember 10% off when you purchase a bundle,; when you spend $50 & up, the monthly tutorial shows up in your in-box, purchase over time & add up your Daisy Patch rewards for a free stamp set of choice – see my rewards page for more information.

SHOP WITH ME HERE!

Thanks for stopping by. May you have a beautiful day. Make someone happy by sending them a card made with ❤️

Product List

Stampin’ Up! Winter Dreams SDSP & Festive Cheer Bundle for the Happy Inkin’ Thursday Blog Hop

Good Thursday & WELCOME to our hop! We have a sketch challenge today that I’ve taken some liberties to create. I hope you like the result 😀 If you’ve come from the fabulous & creative Tara, I’m glad you stopped by. If you hopped right in here – yay! Enjoy the hop.

Stampin' Up! Blog hop logo
Stampin' Up! Hop Sketch Challenge
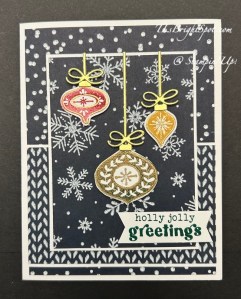
Stampin' Up! Winter Dreams SDSP & Festive Cheer card front

Gosh this is gorgeous flocked paper! I love the feel AND the images AND the flocking. My card base is a standard A2 with the fold on the left in Thick Basic White. The various layers of the SDSP are 4 x 5 1/4, 4 x 2 1/2, & 3 x 4. Thin strips of Basic White are behind the 4 x 2 1/2 panel; 3 1/8 x 4 1/8 Basic White is attached to the 3 x 4 and attached with dimensionals. The ornaments are stamped and WOW! Metallic gold heat embossed on Basic White scraps and also attached with dimensionals. The hangars & bows for the ornaments are die cut from Gold Foil and attached with liquid glue. The sentiment is stamped with Shaded Spruce ink on Basic White 2 x 5/8 and attached with dimensionals. The ornaments are also stamped with ink… stamped off Cherry Cobbler and full strength Golden Glow. Everything is from the phenomenal Festive Cheer stamp set and dies.

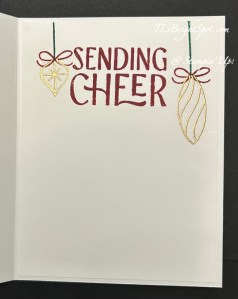
Stampin' Up! Festive Cheer inside card

For the inside, I started by stamping the sentiment in Cherry Cobbler on a Basic White 4 x 5 1/4 panel. I then stamped the ornaments with VersaMark and sprinkled them with Wow! Metallic embossing powder, gold, and heat set. I stamped the ‘strings’ in Shaded Spruce and the bows in Cherry Cobbler.

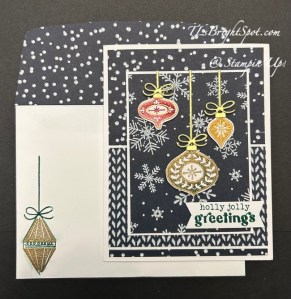
Stampin' Up! Winter Dreams SDSP & Festive Cheer card & envekope

For the envelope, more of the Winter Dream SDSP on the flap & trimmed to fit. On the front I stamped the ornament with VersaMark, sprinkled it with Wow! Metallic embossing powder in gold and heat set. The string & bow are stamped in Shaded Spruce ink. These images are from the Festive Cheer stamp set.

To purchase these items from me, see the images below with a link. Both the SDSP & the bundle are ONLINE EXCLUSIVES and fun products!

To continue on the hop, click the next button or click on a name. Enjoy the all the creativity!

Stampin' Up! Hop button

Amy Koenders

Mary Deatherage

Karen Ksenzakovic

Tara Carpenter

Terry Lynn Bright

Charlene Tackvic

Thanks for stopping by. May you have a beautiful day. Make someone happy by sending them a handmade card filled with ❤️

Product List

Stampin’ Up! Elegant Leaves Fun Fold for the Happy Inkin’ Thursday Blog Hop

If you have joined me from the incredible Tara – welcome. If you’re just hopping in – great! Welcome to our fabulous hop! And how about the NEW Sep-Dec 2026 Catalog – pretty cool, right? What’s your favorite – or should I ask your ten (10) favorites? I would love to know. Today’s card shows one of my favorites.. the Elegant Leaves bundle. The delicate dies for the leaves are truly special.

Stampin' Up! Happy Inkin' Thursday blog Hop
Stampin' Up! hop Theme challenge
Stampin' Up! Elegant Leaves Po-Up fun fold card front

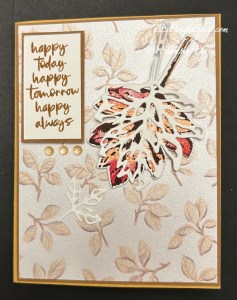
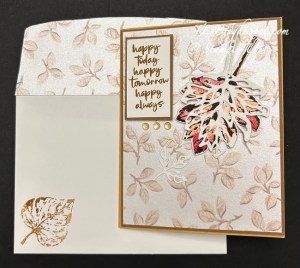
Where to begin??? I’ll begin with the stamps & dies – then move to the ‘how to’ of this fun fold. The above big leaf – I’m calling it a maple leaf – I inked the solid stamp with Timid Tiger, stamped it off, then added Real Red in various places with a sponge dauber and stamped this on Basic White. I then stamped the detail stamp in Early Espresso. I die cut the detail dies of this leaf from Basic White and attached it in various spots with dabs of liquid glue. I put dimensionals on the back & set it aside. I then proceeded to stamp several of the other leaves “just to have, in case’. They are… Lemon Lolly & Old Olive with the detail stamp being Early Espresso. I die cut each along with the detail die of each leaf – and that from Basic White. I adhered each of the intricate die cuts to the same leaf with liquid glue and set them aside. There is an additional very small detail leaf die on the card front that is nearly impossible to see – cut from Basic White – it’s there.

The sentiment for the front comes from the Elegant Leaves stamp set and is stamped in Pecan Pie ink on Basic White, then added to a Pecan Pie panel just 1/8″ larger I put dimensionals on the back & set it aside as well.

The card front… Pecan Pie 4 1/8 x 5 3/8 with a layer of the Glow of Harvest DSP 4 x 5 1/4 from the August POTM (product of the month). I added the maple leaf & the sentiment with the already attached dimensionals; the smallest leaf die cut is attached with liquid glue. I also added three embellishments of Radiant Gems. I set this aside to prepare the rest of the card & fun fold.

The Pop-Out Fun Fold directions… and then I’ll tell more about the ‘decorative parts’ of the card.

Card base: 8 1/2 x 5 1/2 scored @ 4 1/4. For this card – Golden Glow

Inside layer: 5 1/4 x 5 1/4 scored @ 2 1/2 – Golden Glow. Layers for this on the inside… left – Basic White for stamping 2 1/4 x 5; right – DSP 2 1/4 x 5 (I added an additional layer of card stock 2 3/8 x 5 1/8 in Pecan Pie)

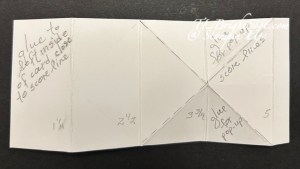
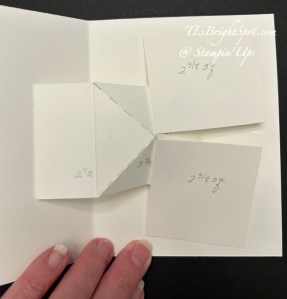
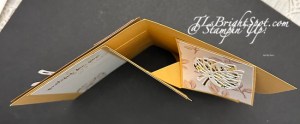
Pop-Up mechanism: 2 3/8 x 5 3/8 scored @ 1 1/4, 2 1/2, 3 3/4 & 5 Burnish well mountain, mountain, valley, valley. Make cross score lines creating an ‘x’ between score lines 2 1/2 & 5 & burnish well.

Pop-Out Squares: 2 3/8 x 2 3/8 (2) mine are Golden Glow card stock.

Stampin' Up! mechanism for double pop-up

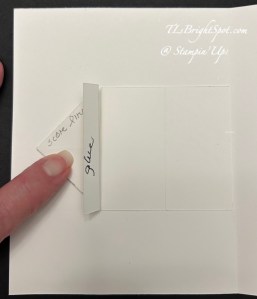
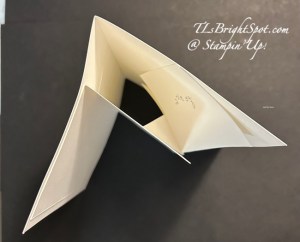
Attach the left end of the mechanism to the left inside of the card base, close to but not touching the center score, centering it top to bottom. See photo below.

Stampin' Up! stages of mechanism attachment

Fold mechanism flat with small tab facing up. Add glue to tab & close right side of card over this. Rub well to secure.

Attach the two 2 3/8″ squares to the mechanism, these will be the pop-ups. Refer to the mechanism photo for proper glue area.

Stampin' Up! mechanism + pop-ups

See the area in the photo above with the triangle & rectangle? Add adhesive to this and align the INSIDE LAYER – the right back side so the score line is close to the area where the glue is. Close the card, press firmly and allow glue to adhere well. Open & close the card several times to make certain it does so smoothly. Now add glue to the left side of the INSIDE LAYER and close card, rubbing to attach well. Now everything is secure.

Finish the card front by attaching the panels in place.

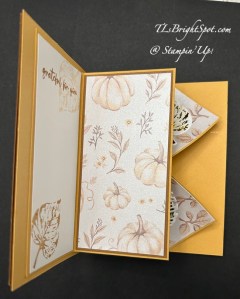
From the top, the card should look like this… remember, this is a template!

Stampin' Up template for double pop-up - from the top

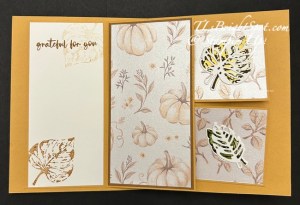
Below is my finished inside of the card… Glow of Harvest DSP on the squares are 2 1/4 x 2 14. The leaves on the squares (the pop-ups) are stamped in Lemon Lolly & Early Espresso for the top leaf, Old Olive and Early Espresso for the bottom leaf. The die cuts are Basic White – everything on these squares is added with liquid glue. The sentiment panel on the Basic White Inside Layer is Pecan Pie ink. The leaf is stamped off once.

Stampin' Up! inside of Pop-Up fun fold

Stampin' Up! mechanism & all in place
Stampin' Up! from the top view Pop-Up Fun fold

The envelope… more of the Glow of Harvest DSP on the fl;ap & trimmed to fit. On the front is a leaf from the Elegant Leaves stamp set, stamped in Early Espresso after stamping off once – and… done!

Stampin' Up! Pop-Up Fun fold card  envelope

Want to see more fall cards – treasures for sure. Click the next button or click on a name.

You may find all the items to make this card in my shop & below is a list. Order these – and more from me soon!

Stampin' Up! blog hop button

Amy Koenders

Mary Deatherage

Karen Ksenzakovic

Tara Carpenter

Terry Lynn Bright

Charlene Tackvic

Shop with me here or see the list below of items to make this card.

Thanks for stopping by. May you have a beautiful day. Make someone happy by sending them a handmade card filled with ❤️

Stampin’ Up! NEW Poetic Petals Reveal

Good morning folks – it’s Sunday August 30 – and almost time for the new ONLINE EXCLUSIVES and Sep-Dec 2026 Catalog. There are some very pretty items in the ONLINE EXCLUSIVES and in this catalog & I’m sharing this new bundle and a Specialty DSP called Radiant Foils.

Stampin' Up! Poetic Petals Slimline card front

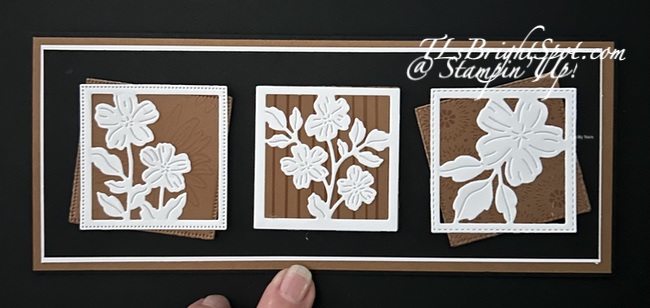
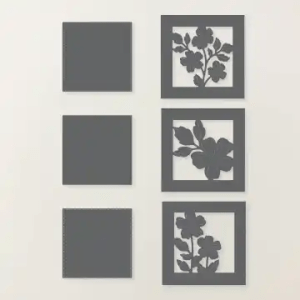
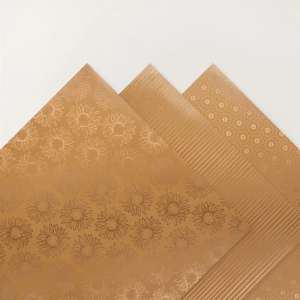
Each of the white floral squares on this card is an individual die. The square behind each flower is cut with another die in the Poetic Petals Dies. Gorgeous, right? The papers in the Radiant Foils pack are a Pecan Pie background and on this card each flower uses a different paper in the pack.

The layers on this card are Basic Black 8 1/2 x 7 scored at 3 1/2 to create a slimline card and show off all three floral dies; Pecan Pie 8 3/8 x 3 3/8; White Willow 8 1/8 x 3 1/8; Basic Black 8 x 3. The die cuts were adhered together then added to the card front with dimensionals.

Stampin' Up! Poetic Petals Slimline card inside

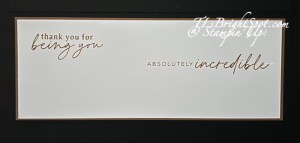
The inside of the card is White Willow (8 x 3) stamped with the Poetic Petals stamp set in Pecan Pie ink. This is layered on Pecan Pie 8 1/8 x 3 1/8.

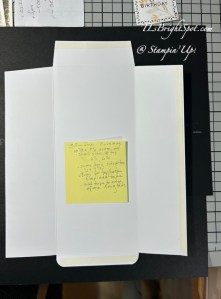
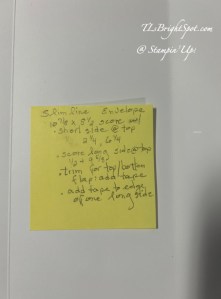
I didn’t want to use a standard business envelope for this pretty card – so I made my own 😀 See photos below for dimensions & cutting.

Stampin' Up! Slimline envelope
Stampin' Up! Slimline envelope instructions

Below are photos of this stunning new Poetic Petals bundle coming Sep 1 in the ONLINE EXCLUSIVES.

Stampin' Up! Poetic Petals stamp set
Stampin' Up! Poetic Petals Dies

And below is a photo of the Radiant Foils SDSP available Sep 1 in the Sep-Dec 2026 Catalog!

Stampin' Up! Radiant Foils SDSP

SHOP WITH ME HERE!

Stampin’ Up! Springy Inside Gatefold with Glow of Harvest DSP & NEW Tile Garden Bundle

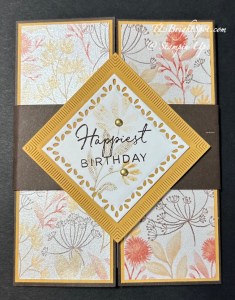
It’s Friday – where did the week go? It’s been hot & humid in NJ this week, a perfect time to be inside & create 😀. In card class yesterday we made this fun gatefold card that has a ‘springy’ inside. It’s so fun to open! And I used the September Product of the Month – the Glow of Harvest SDSP – it’s sparkly!

Stampin' Up! Springy inside gatefold w/ Glow of Harvest SDSP card front

This is a traditional gatefold card – 8 1/2 x 5 1/2 scored at 2 1/8 on one end then the other side brought over to meet it. The card base is Early Espresso with a layer of Golden Glow 2 x 5 3/8 on each front panel, then a layer of the Glow of Harvest SDSP 1 7/8 x 5 1/4.

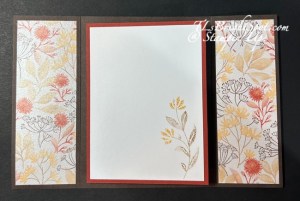
Stampin' Up! Springy inside Gatefold card inside

And here’s the finished inside. The center section is the ‘springy’ part. The inside panels are more of the same pattern of Glow of Harvest SDSP cut 1 7/8 x 5 1/4.

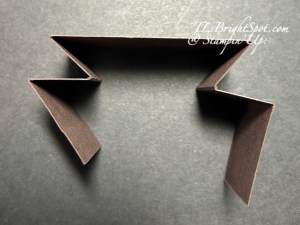
Stampin' Up! mechanism for 'springy' inside of gatefold

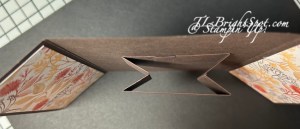
Stampin' Up! 'springy' mechanism  attached to inside card

To create the mechanism, cut a strip 8 x 1 1/2 and scored @ 1 ¼, 2, 2 ¾, 5 ¼, 6 & 6 ¾. Burnish all score lines making certain the strip edges are even. After scoring, fold it as shown above in the left photo. Attach this to the inside panel, centering it, and with the ends touching. It should look like the photo on the right.

The center panels are Cajun Craze 3 ¾ x 5 and Basic White 3 1/2 x 4 3/4. Stamp the Basic White panel prior to adhering it. I used Crumb Cake stamped off once for the leaves and Golden Glow stamped off once for the small flowers. These are from the NEW Sep-Dec 2026 Catalog that can be ordered from Sep 1! Don’t have a catalog? Let me know & I can fix that. 😀

The belly band is 1 3/4 x 10 (Early Espresso) and wrapped around the card to the front. Keep it loose enough so it easily slips on & off. Secure the ends of the belly band together while it is around the card – just be careful with the amount of adhesive!

Remove the belly band & create the front decor…I used the NEW Tile Garden Dies to create these two panels – Golden Glow (this is about 2 3/4 square) and Basic White (less than 2 1/4″ square) Stamp the sentiment in Early Espresso using the stamp in the Tile Garden stamp set, then stamp the floral image sort of as a background… again stamping off first each time – Crumb Cake for the leaves and Golden Glow for the flowers. Final touch – Gold Adhesive-Backed Dots also from the new catalog. I used them as centers to the flowers.

Stampin' Up! Springy inside Gatefold w/ Tile Garden & Glow of Harvest SDSP, card & envelope

For the envelope, I used another pattern of the Glow of Harvest SDSP to attach to the flap & trimmed to fit. And on the front this same flower image from the Tile Garden stamp set – Crumb Cake for the leaves and Golden Glow for the flowers, stamped off each time.

The Product of the Month is available for purchase when placing an order of $75 – and it’s only $5! This is stunning pearlized paper & will be available Sep 1 – same day you can order from the Sep-Dec 2026 Catalog.

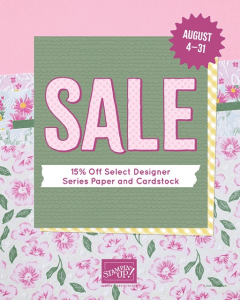
While you wait for the new catalog to go live, today is the last day for Stampin’ Up! Double Rewards with a $25 & up purchase. With the current sale on paper products – 15% off select card stock & DSP + Last Chance Products – it’s easy to find items wanted & needed.

SHOP WITH ME HERE!

Stampin' Up! Double rewards
Stampin' Up! DSP & card stock sale
Stampin' Up! Last Chance Products

Thanks for stopping by. May you have a beautiful day! Make someone happy by sending them a handmade card filled with ❤️

Stampin’ Up! Tile Garden Sneak Peek with Rtisan Sketched Garden for the Happy Inkin’ Thursday Blog Hop

Good morning, good morning! We have a fun sketch challenge today and i’m so glad you have joined us! You may have come from the fabulous Tara or hopped right in nhere. Haowever you arrived, I hope you’ll check out what everyone has created.

Stampin' Up! Blog hop Group
Stampin' Up! Blog Hop sketch challenge

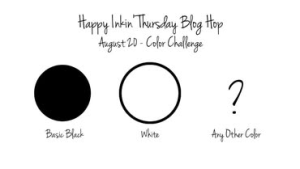
Our challenge today, as you can see is to create using Black & White plus one other color. I chose to work with Crisp Cantaloupe for this card & the wonderful Artisan Sketched Garden DSP from the May-Aug Catalog. The other big item is the NEW Tile Garden bundle from the Stampin’ Up! Sep-Dec 2026 Catalog that goes live Sep. 1! The dies in this bundle are all squares and haqve the same pattern as the Spotlight on Nature Dies, which are circles. Very cool!

Stampin' Up! Tile Garden + Artisan Sketched Garden card front

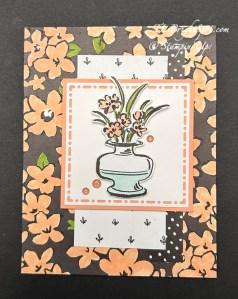
The Artisan Sketched Garden DSP is all black & white – the whole package of papers. And of course it can be used as is – or colored. As you can see, I colored the main front panel using the Crisp Cantaloup Shimmer brush. While the shiny doesn’t show in the photo, it does in real life. 😀 After coloring I added this to a Basic Black 4 1/4 x 11 scored at 5 1/2. To that I added a 3/4 x 4 3/4 polka dot strip to the much more white panel 2 x 4 1/4, & attached those to the card front. Next I die cut the white piece using the NEW Tile Garden Dies & added a Crisp Cantaloupe behind it 2 7/8 x 2 7/8. These were added to the card front with dimensionals. I already had this vase of flowers sitting on my desk that I had fussy cut after coloring with Stampin’ Blends: Crisp Cantaloup. Granny Apple Green & Pool Party. I added this to the front again with dimensionals then three Glossy Garden Dots (also from the new Sep-Dec 2026 catalog.)

Stampin' Up! Tile Garden inside card

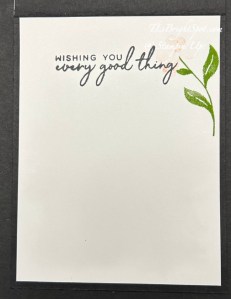
For the inside of the card I used the NEW Tile Garden stamp set for the sentiment (stamped in Memento ink) and the floral image (stamped in Granny Apple Green and Crisp Cantaloupe (this one stamped off once) This is such a sweet delicate flower. I’m loving the images in this set.

Stampin' Up! Tile Garden + Artisan Sketched Garden card & envelope

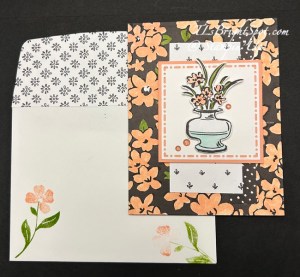
The envelope… more of the Tile Garden stamp set used on the front, stamping the leaves min Granny Apple Green and the flowers in stamped off Crisp Cantaloupe. The flap has yet another panel of the Artisan Sketched Garden DSP adhered & trimmed to fit.

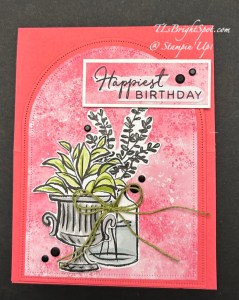
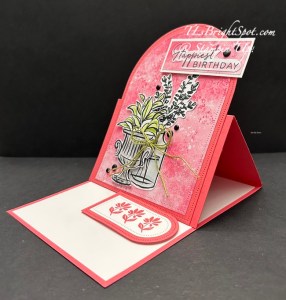
I made another card while I was at it – this time making an easel card with Strawberry Slush, the Everyday Arches Dies, Tile Garden stamp set for the sentiment and tiny flowers, more Artisan Sketched Garden DSP (for the black & white plus theme) and a couple of retired products 🥴 The point is, products can coordinate! It’s the Stampin’ Up! way!!!

Stampin' Up! Artisan Sketched Garden fun fold
Stampin' Up! Artisan Sketched Garden easel card
Stampin' Up! Artisan Sketched Garden easel fold card & envelope

Speaking of the Stampin’ Up! way – right now, today & tomorrow, Stampin’ Up! is offering DOUBLE REWARDS when making your purchases – the 19th-21st of August, 2026. See more information about that below.

Click the link below to see what others on the team have created!

Stampin' Up! Blog Hop button

Amy Koenders

Mary Deatherage

Karen Ksenzakovic

Tara Carpenter

Terry Lynn Bright

Charlene Tackvic

  • Earn double Stampin’ Rewards (2x Rewards) for 3 days only, starting August 19 and ending August 21. That means 20% instead of the standard 10%! All orders qualify once the Stampin’ Rewards threshold of $20 USD | $25 CAD is met. Some exclusions apply. View the Stampin’ Rewards page to learn more.
  • This offer applies to ALL commissionable products! (Excludes existing Paper Pumpkin subscriptions.)
  • To participate, customers must have a Stampin’ Up! account and be opted in to the Stampin’ Rewards program. Encourage them to complete these steps before the offer begins.

SHOP WITH ME HERE

Thanks for stopping by. May you have a beautiful day! Make someone happy by sending them a handmade card filled with ❤️

Stampin’ Up! Show off for the Happy Inkin’ Thursday Blog Hop

Welcome to today’s hop! We have a sketch challenge today and it was really hard for me to decide just what to showcase – so many new products I want to share. I had recently played with this DSP & well, it tugged at me.

Stampin' Up! Blog Hop logo
Stampin' Up! Hop Sketch challenge

This DSP is just so pretty! I love the colors, flowers (sunflowers & more) and checks – so perfectly fall. These are from a suite of products on page ___ in the Sep-Dec 2026 Catalog. The other product in the suite that I used are the Radiant Gems (there are 3). The sentiment is stamped in Pecan Pie on Very Vanilla then fussy cut w/ my paper snips. The backgrounds for all the designer series papers is Cajun Craze and the card base is Pecan Pie. Measurements may be found at the end of this post.

Stampin' Up! Sunflower Fields card front

And here’s the inside… look at that beautiful sunflower – that’s from the coordinating stamp set called Radiant Sunflowers – all from the Sep-Dec 2026 Catalog. The stamp set has coordinating dies but I did not use them on this card. The layers are Cajun Craze & Very Vanilla.

Stampin' Up! Sunflower Fields card inside

For the envelope… Here’s that beautiful sunflower again – on the envelope front. I stamped it in Pecan Pie then used the Golden Glow Shimmer Brush on the petals & light Pecan Pie for the center – same as the sunflower on the inside of the card.

Stampin' Up! Sunflower Fields card & envelope

This could so easily be a masculine card even though there are flowers. The colors just fit! It could be sympathy or it could be birthday – just add the appropriate sentiment. 😀

Today is a hop – so check out what others on the team have created. Click on the next button to visit Charlene or click on a name to visit that post. Measurements for this card & how to order from me are listed below.

Stampin' Up! hop next button

Amy Koenders

Mary Deatherage

Karen Ksenzakovic

Tara Carpenter

Terry Lynn Bright

Charlene Tackvic

Stampin' Up! Sunflower Fields Suite
Sunflower Fields Suite 168365

Measurements:

  • Card base: Pecan Pie 8 1/2 x 5 12 scored @ 4 1/4
  • front Layers + DSP
    • Cajun Craze – 3 1/8 x 4 1/8 + DSP 3 x 4 (dots); 2 7/8 x 4 3/8 + DSP 2 3/4 x 4 1/4 (checks); 3 x 4 + DSP 2 7/8 x 3 7/8 (flowers)
    • Very Vanilla – 2 1/4 x 1 1/2 – sentiment
  • Inside: Cajun Craze – 4 x 5 1/4; Very Vanilla – 3 7/8 x 5 1/8

Product List

Stampin’ Up! has a wonder DSP & Card stock sale right now through the end of August. Click on the image below to see what’s on the sale list.

Stampin' Up! DSP & Card Stock Sale

Remember that when shopping with me, there is the opportunity for customer benefits – like the monthly tutorial when your purchase exceeds $50 before shipping & taxes, qualifying for Daisy Patch rewards, and like that. See my Rewards Page for up to date info! And Stampin’ Up! has LAST CHANCE PRODUCTS available right now and there are some awesome items you may not want to miss. Click the image to see what all is on the list!

Stampin' Up! Last Chance Products

Thanks for stopping by. May you have a beautiful day. Make someone happy by sending them a handmade card filled with ❤️

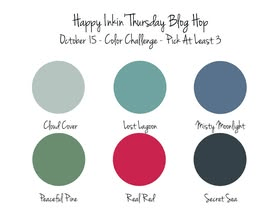
Stampin’ Up! Sneak Peek Scalloped Christmas Cheer Dies on Triangle Gatefold Flip-Up Card

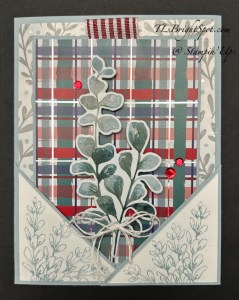
Happy Friday! Golly the week has gone f-a-s-t… I have a sneaky peek of two new items in the Sep-Dec 2026 Catalog: the Scalloped Christmas Cheer Dies AND the Tile Garden stamp set. Both of these come as separate bundles but this is how I paired them for this card – and it’s a fun fold too!

Stampin' Up! Scalloped Christmas Cheer Dies w/ Triangle Gatefold Flip-Up card & envelope

I used an old set of 6×6 papers called Bokeh, but you could use any papers that would compliment the dies and the stamp set – or change the stamp set!

Card cuts & how to:

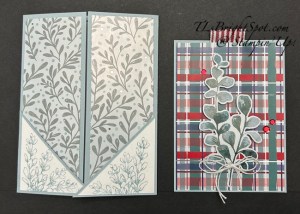
  • Card base 4 1/4 x 11 scored at 5 1/2 – I used Berry Burst
  • mat: I used the Bokeh 6×6 DSP ~ 4 x 5 1/4
  • Cut 2 panels of Bokeh 6×6 DSP 3 3/4 x 3 3/4,
    • score on the diagonal, burnish folds and attach to backside of the 4 x 5 14 piece
    • Add to front of card base
  • Add Basic White (2 1/2 x 3 1/2) to back of another piece of Bokeh 6×6 DSP for sturdiness (2 1/2 x 3 1/2) ~ die cut with 2nd smallest die in the Scalloped Christmas Cheer Dies
    • Cut Basic White (1 1/2 x 2 12) for stamping images from the Tile Garden stamp set ~ stamp leaves in Lost Lagoon and flower in Fresh Freesia. Add to die cut piece. Embellish w/ 2026-2028 In Color Dots in Golden Glow & a double Linen Thread bow; set aside
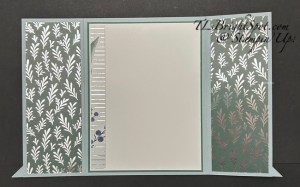
  • On the inside... cut another piece of Basic White w/ the 2nd largest Scalloped Christmas Cheer Dies: stamp the sentiment in Berry Burst ink and the flowers in Fresh Freesia ink from the Tile Garden stamp set; add to inside of gatefold on the large DSP panel
  • Add the set aside front die cut all stamped & ready – to the left side of the DSP triangle gatefold – with dimensionals, centering so it is centered with the inside Basic White scalloped piece
  • Flip the card open to create the final Basic White panel (4 x 5 1/4) … stamp the sentiment in Berry Burst ink, the leaves in Lost Lagoon and the flowers in Fresh Freesia – all using the Tile Garden stamp set. Add Golden Glow accents from the 2026-2028 In Color Dots. Attach to the inside of the card.
  • Envelope…
    • Add the 2 12/4 x 6 strip of Bokeh 6×6 DSP to the flap, trimming to fit
    • Stamp the scallop stamp in Berry Burst ink three times, re-inking each time
    • Stamp the Flowers in Fresh Freesia ink three times, re-inking each time.
    • Both these stamps are from the Tile Garden stamp set

Yay! This card is ready to be sent to my grand niece! It’s such a feminine & lovely card. The stamp bundle and the die bundles are in the Sep-Dec. 2026 Catalog – available Sep 1. If you do not have a demonstrator, I would very much like to send a catalog to you so you can order from me. Please let me know how I can help with that opportunity.

Stampin' Up! Tile Garden bundle

Going on right now – Stampin’ Up! has a card stock & Designer Paper Sale through Aug 31, 2026. Shop the sale by clicking on the image below.

Last chance Stampin’ Up! products are also available. Click the image below to shop those items with me.

When shopping with me… when your purchase is over $50 before shipping & taxes, you will receive the current monthly tutorial. For the month of August, that tutorial using the Flowering Meadow Suite of products. See my customer rewards page for more benefits!

Thanks for shopping with me! Make one, share one, send one! Make someones day by sending them a handmade card made with ❤️

Product List