
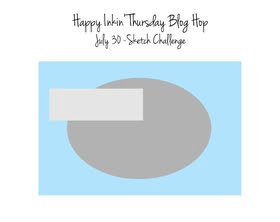
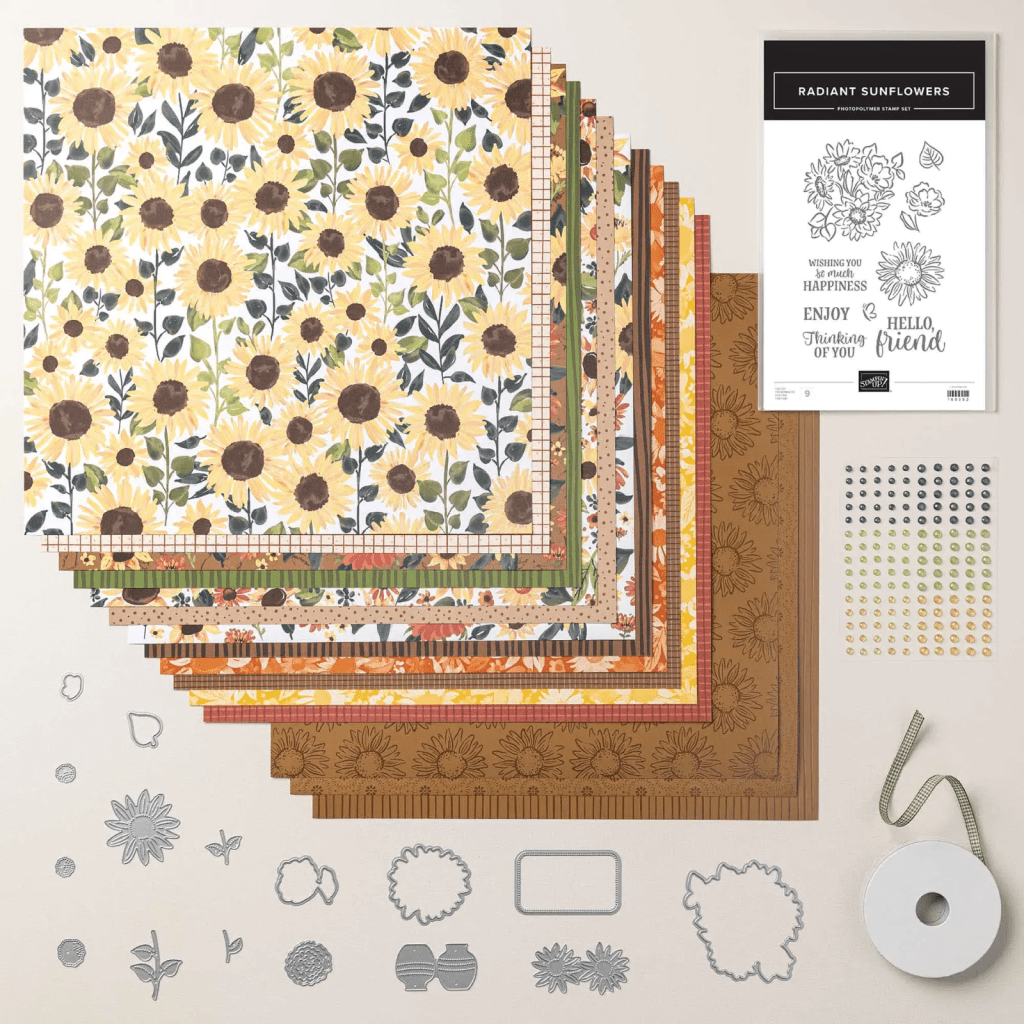
Welcome to Thursday & the wonderful Happy Inkin’ Thursday Blog Hop! If you hopped right in, hello, hello. If you’ve joined me after visiting Tara, I’m glad you are making the rounds. We have a sketch challenge today and I had everything planned as to what I wanted to share… then my pre-order for the 2026 Sep-Dec Catalog arrived on my doorstep. 😀 I simply could not wait to share. This Designer Series Paper – the Sunflower Fields 12 x 12 is stunning… I love every piece, both front & back.

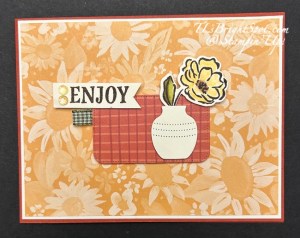
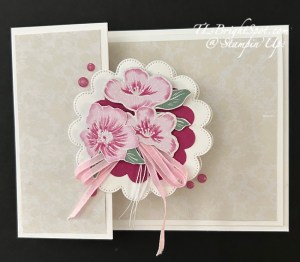
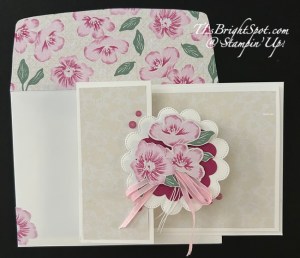
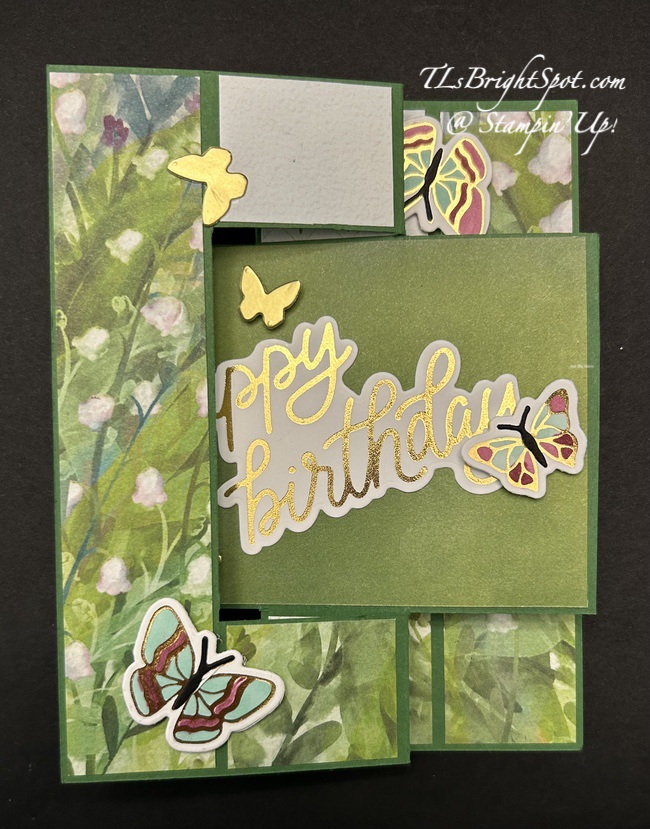
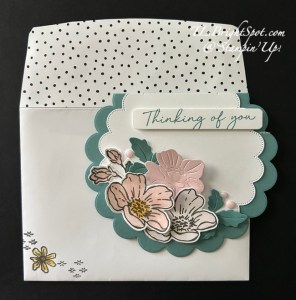
The card base is Cajun Craze with a layer of Very Vanilla then a layer of one of one the papers in the pack. Next I turned the paper over & using a die in the Radiant Sunflowers Dies, cut the rectangle. On a scrap of Very Vanilla I die cut the vase using the Radiant Sunflower Dies then stamped the flower using the coordinating Radiant Sunflowers stamp set. I colored the flower with Old Olive Stampin’ Blends on the leaf and the Shimmer brush in Golden Glow on the flower. The vase & flower were lightly attached to the rectangle with dimensionals and the rectangle was added to the card front with dimensionals. I stamped the sentiment on a scrap of Very Vanilla in Early Espresso ink using the same Radiant Sunflowers stamp set, cut a banner end and attached it with dimensionals. I slipped a Gingham Ribbon to bring out the green on the leaves, then added Radiant Gems to the sentiment. Everything from the Sunflower Fields Suite in the new 2026 Sep-Dec Catalog – items available beginning of Sep. Stay tuned!

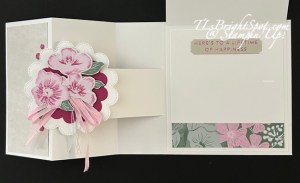
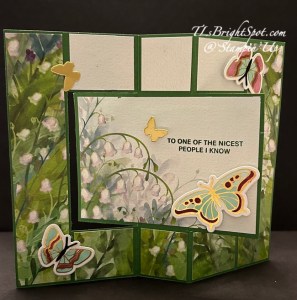
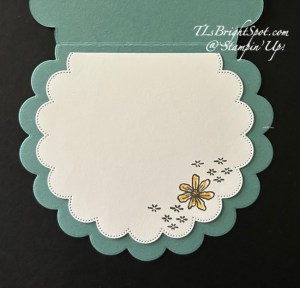
For the inside… On a Very Vanilla panel I stamped the sunflower in Golden Glow then the sentiment over it in Early Espresso.
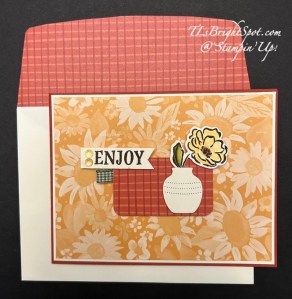
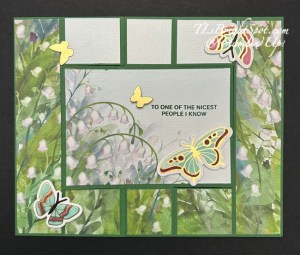
For the envelope – more of the Sunflower Fields 12×12 on the flap and another sunflower stamped on the front in Golden Glow. What a gorgeous suite of products! You are going to love it!
Want to be able to order early, have some fringe benefits to being a Demonstrator? See information below in how to JOIN MY TEAM. Now.. on with the hop. Let’s see what Amy has to share today – and all the others too. Amy is next on the sequence though 😀 Click on the next button or… click on a name.

Below is an image of the suite, Radiant Sunflowers. Gorgeous papers – did I mention that already??? 👍 Want to be able to pre-order ONLINE EXCLUSIVES, or from the newest catalog, or attend SU! conventions? These are amazing opportunities to learn more, create more, meet more folks who are encouraging and sharing their ideas & designs. Feel free to connect with me about JOINING MY TEAM – click the link to learn more.
Want to just shop… you can do that too… same link will allow you to see all the goodies Stampin’ Up! has to offer – do that here When shopping with me and when your order is $50 & up, you will receive the monthly tutorial – for July it is all about Fern & Flora. There are other benefits too – see my page for more info.

Stamp. Create. Share. Make a difference in someones life. Send a card filled with ❤️
Thanks for stopping by!

![Flowering Meadow Bundle (English) [ 167912 ]](https://assets1.tamsnetwork.com/images/EC042017NF/167912s.jpg "Flowering Meadow Bundle (English) [ 167912 ]")
![Velvet Meadow 12" X 12" (30.5 X 30.5 Cm) Specialty Designer Series Paper [ 167904 ]](https://assets1.tamsnetwork.com/images/EC042017NF/167904s.jpg "Velvet Meadow 12\" X 12\" (30.5 X 30.5 Cm) Specialty Designer Series Paper [ 167904 ]")
![Berry Burst 8-1/2" X 11" Cardstock [ 144243 ]](https://assets1.tamsnetwork.com/images/EC042017NF/144243s.jpg "Berry Burst 8-1/2\" X 11\" Cardstock [ 144243 ]")
![Charming Shimmer Faceted Dots [ 166139 ]](https://assets1.tamsnetwork.com/images/EC042017NF/166139s.jpg "Charming Shimmer Faceted Dots [ 166139 ]")
![Bubble Bath 1/8" (3.2 Mm) Faux Linen Ribbon [ 167075 ]](https://assets1.tamsnetwork.com/images/EC042017NF/167075s.jpg "Bubble Bath 1/8\" (3.2 Mm) Faux Linen Ribbon [ 167075 ]")
![Baker's Twine Essentials Pack [ 155475 ]](https://assets1.tamsnetwork.com/images/EC042017NF/155475s.jpg "Baker's Twine Essentials Pack [ 155475 ]")
![Basic White 12" X 12" (30.5 X 30.5 Cm) Thick Cardstock [ 166782 ]](https://assets1.tamsnetwork.com/images/EC042017NF/166782s.jpg "Basic White 12\" X 12\" (30.5 X 30.5 Cm) Thick Cardstock [ 166782 ]")
![Basic White 8 1/2" X 11" Cardstock [ 166780 ]](https://assets1.tamsnetwork.com/images/EC042017NF/166780s.jpg "Basic White 8 1/2\" X 11\" Cardstock [ 166780 ]")
![Basic White Medium Envelopes [ 159236 ]](https://assets1.tamsnetwork.com/images/EC042017NF/159236s.jpg "Basic White Medium Envelopes [ 159236 ]")
![Stampin' Positioner [ 167768 ]](https://assets1.tamsnetwork.com/images/EC042017NF/167768s.jpg "Stampin' Positioner [ 167768 ]")
![Stampin' Cut & Emboss Machine [ 149653 ]](https://assets1.tamsnetwork.com/images/EC042017NF/149653s.jpg "Stampin' Cut & Emboss Machine [ 149653 ]")
![Paper Trimmer [ 152392 ]](https://assets1.tamsnetwork.com/images/EC042017NF/152392s.jpg "Paper Trimmer [ 152392 ]")
![Stampin' Dimensionals [ 104430 ]](https://assets1.tamsnetwork.com/images/EC042017NF/104430s.jpg "Stampin' Dimensionals [ 104430 ]")
![Multipurpose Liquid Glue [ 110755 ]](https://assets1.tamsnetwork.com/images/EC042017NF/110755s.jpg "Multipurpose Liquid Glue [ 110755 ]")
![Mini Glue Dots [ 103683 ]](https://assets1.tamsnetwork.com/images/EC042017NF/103683s.jpg "Mini Glue Dots [ 103683 ]")
![Paper Snips [ 103579 ]](https://assets1.tamsnetwork.com/images/EC042017NF/103579s.jpg "Paper Snips [ 103579 ]")
![Take Your Pick [ 144107 ]](https://assets1.tamsnetwork.com/images/EC042017NF/144107s.jpg "Take Your Pick [ 144107 ]")
![White Gel Pens [ 166642 ]](https://assets1.tamsnetwork.com/images/EC042017NF/166642s.jpg "White Gel Pens [ 166642 ]")
![Clear Wink Of Stella Glitter Brush [ 141897 ]](https://assets1.tamsnetwork.com/images/EC042017NF/141897s.jpg "Clear Wink Of Stella Glitter Brush [ 141897 ]")
![Metallics Wow! Embossing Powder [ 165678 ]](https://assets1.tamsnetwork.com/images/EC042017NF/165678s.jpg "Metallics Wow! Embossing Powder [ 165678 ]")
![Basics Wow! Embossing Powder [ 165679 ]](https://assets1.tamsnetwork.com/images/EC042017NF/165679s.jpg "Basics Wow! Embossing Powder [ 165679 ]")
![Heat Tool (Us And Canada) [ 129053 ]](https://assets1.tamsnetwork.com/images/EC042017NF/129053s.jpg "Heat Tool (Us And Canada) [ 129053 ]")
![Embossing Additions Tool Kit [ 159971 ]](https://assets1.tamsnetwork.com/images/EC042017NF/159971s.jpg "Embossing Additions Tool Kit [ 159971 ]")
![Small Blending Brushes [ 160518 ]](https://assets1.tamsnetwork.com/images/EC042017NF/160518s.jpg "Small Blending Brushes [ 160518 ]")


![Peaceful Pine 8 1/2" X 11" Cardstock [ 167691 ]](https://assets1.tamsnetwork.com/images/EC042017NF/167691s.jpg "Peaceful Pine 8 1/2\" X 11\" Cardstock [ 167691 ]")
![Berry Burst Classic Stampin' Pad [ 147143 ]](https://assets1.tamsnetwork.com/images/EC042017NF/147143s.jpg "Berry Burst Classic Stampin' Pad [ 147143 ]")
![Daffodil Delight Classic Stampin' Pad [ 147094 ]](https://assets1.tamsnetwork.com/images/EC042017NF/147094s.jpg "Daffodil Delight Classic Stampin' Pad [ 147094 ]")
![Peaceful Pine Classic Stampin Pad [ 167679 ]](https://assets1.tamsnetwork.com/images/EC042017NF/167679s.jpg "Peaceful Pine Classic Stampin Pad [ 167679 ]")
![Linen Thread [ 104199 ]](https://assets1.tamsnetwork.com/images/EC042017NF/104199s.jpg "Linen Thread [ 104199 ]")


![Festive Cheer Bundle (English) [ 168133 ]](https://assets1.tamsnetwork.com/images/EC042017NF/168133s.jpg "Festive Cheer Bundle (English) [ 168133 ]")
![2026–2028 In Color™ Gingham Gallery 12" X 12" (30.5 X 30.5 Cm) Designer Series Paper [ 168218 ]](https://assets1.tamsnetwork.com/images/EC042017NF/168218s.jpg "2026–2028 In Color™ Gingham Gallery 12\" X 12\" (30.5 X 30.5 Cm) Designer Series Paper [ 168218 ]")
![Velveteen Assortment 12" X 12" (30.5 X 30.5 Cm) Specialty Paper [ 167915 ]](https://assets1.tamsnetwork.com/images/EC042017NF/167915s.jpg "Velveteen Assortment 12\" X 12\" (30.5 X 30.5 Cm) Specialty Paper [ 167915 ]")
![Gold Foil Sheets [ 132622 ]](https://assets1.tamsnetwork.com/images/EC042017NF/132622s.jpg "Gold Foil Sheets [ 132622 ]")
![Cherry Cobbler 8-1/2" X 11" Cardstock [ 119685 ]](https://assets1.tamsnetwork.com/images/EC042017NF/119685s.jpg "Cherry Cobbler 8-1/2\" X 11\" Cardstock [ 119685 ]")
![Cherry Cobbler Classic Stampin' Pad [ 147083 ]](https://assets1.tamsnetwork.com/images/EC042017NF/147083s.jpg "Cherry Cobbler Classic Stampin' Pad [ 147083 ]")
![Pecan Pie Classic Stampin' Pad [ 161665 ]](https://assets1.tamsnetwork.com/images/EC042017NF/161665s.jpg "Pecan Pie Classic Stampin' Pad [ 161665 ]")


![Wild Bunch Photopolymer Stamp Set (English) [ 167987 ]](https://assets1.tamsnetwork.com/images/EC042017NF/167987s.jpg "Wild Bunch Photopolymer Stamp Set (English) [ 167987 ]")
![2026–2028 In Color™ Painted Patterns 12" X 12" (30.5 X 30.5 Cm) Designer Series Paper [ 167755 ]](https://assets1.tamsnetwork.com/images/EC042017NF/167755s.jpg "2026–2028 In Color™ Painted Patterns 12\" X 12\" (30.5 X 30.5 Cm) Designer Series Paper [ 167755 ]")
![Tuxedo Black Memento Ink Pad [ 132708 ]](https://assets1.tamsnetwork.com/images/EC042017NF/132708s.jpg "Tuxedo Black Memento Ink Pad [ 132708 ]")
![Crumb Cake Stampin' Blends Combo Pack [ 154882 ]](https://assets1.tamsnetwork.com/images/EC042017NF/154882s.jpg "Crumb Cake Stampin' Blends Combo Pack [ 154882 ]")
![Hydrangea Hue Classic Stampin' Pad [ 167677 ]](https://assets1.tamsnetwork.com/images/EC042017NF/167677s.jpg "Hydrangea Hue Classic Stampin' Pad [ 167677 ]")
![Hydrangea Hue 3/8" (1 Cm) Bordered Ribbon [ 167549 ]](https://assets1.tamsnetwork.com/images/EC042017NF/167549s.jpg "Hydrangea Hue 3/8\" (1 Cm) Bordered Ribbon [ 167549 ]")

![Woodland Wishes Photopolymer Stamp Set (English) [ 168243 ]](https://assets1.tamsnetwork.com/images/EC042017NF/168243s.jpg "Woodland Wishes Photopolymer Stamp Set (English) [ 168243 ]")
![Crumb Cake 8-1/2" X 11" Cardstock [ 120953 ]](https://assets1.tamsnetwork.com/images/EC042017NF/120953s.jpg "Crumb Cake 8-1/2\" X 11\" Cardstock [ 120953 ]")
![Forever Plaid 3 D Embossing Folder [ 164049 ]](https://assets1.tamsnetwork.com/images/EC042017NF/164049s.jpg "Forever Plaid 3 D Embossing Folder [ 164049 ]")
![Real Red 8-1/2" X 11" Cardstock [ 102482 ]](https://assets1.tamsnetwork.com/images/EC042017NF/102482s.jpg "Real Red 8-1/2\" X 11\" Cardstock [ 102482 ]")
![Pecan Pie Stampin’ Blends Combo Pack [ 161674 ]](https://assets1.tamsnetwork.com/images/EC042017NF/161674s.jpg "Pecan Pie Stampin’ Blends Combo Pack [ 161674 ]")
![Petal Pink Stampin' Blends Combo Pack [ 154893 ]](https://assets1.tamsnetwork.com/images/EC042017NF/154893s.jpg "Petal Pink Stampin' Blends Combo Pack [ 154893 ]")
![Smoky Slate Stampin' Blends Combo Pack [ 154904 ]](https://assets1.tamsnetwork.com/images/EC042017NF/154904s.jpg "Smoky Slate Stampin' Blends Combo Pack [ 154904 ]")
![Pumpkin Pie Stampin' Blends Combo Pack [ 154897 ]](https://assets1.tamsnetwork.com/images/EC042017NF/154897s.jpg "Pumpkin Pie Stampin' Blends Combo Pack [ 154897 ]")
![Poppy Parade Stampin' Blends Combo Pack [ 154958 ]](https://assets1.tamsnetwork.com/images/EC042017NF/154958s.jpg "Poppy Parade Stampin' Blends Combo Pack [ 154958 ]")
![Cloud Cover Stampin’ Blends Combo Pack [ 165287 ]](https://assets1.tamsnetwork.com/images/EC042017NF/165287s.jpg "Cloud Cover Stampin’ Blends Combo Pack [ 165287 ]")
![Old Olive Stampin' Blends Combo Pack [ 154892 ]](https://assets1.tamsnetwork.com/images/EC042017NF/154892s.jpg "Old Olive Stampin' Blends Combo Pack [ 154892 ]")
![Bronze & Ivory Stampin' Blends Combo Pack [ 154922 ]](https://assets1.tamsnetwork.com/images/EC042017NF/154922s.jpg "Bronze & Ivory Stampin' Blends Combo Pack [ 154922 ]")
![Golden Glow Shimmer Brush [ 167662 ]](https://assets1.tamsnetwork.com/images/EC042017NF/167662s.jpg "Golden Glow Shimmer Brush [ 167662 ]")
![Mossy Meadow Stampin' Blends Combo Pack [ 154890 ]](https://assets1.tamsnetwork.com/images/EC042017NF/154890s.jpg "Mossy Meadow Stampin' Blends Combo Pack [ 154890 ]")


![Stampin' Hot Foil System Na & Craft Class [ 170009 ]](https://assets1.tamsnetwork.com/images/EC042017NF/170009s.jpg "Stampin' Hot Foil System Na & Craft Class [ 170009 ]")
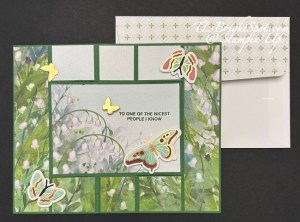
![Butterfly Flight Bundle [ 170065 ]](https://assets1.tamsnetwork.com/images/EC042017NF/170065s.jpg "Butterfly Flight Bundle [ 170065 ]")
![Gold Stampin' Hot Foil Rolls [ 170066 ]](https://assets1.tamsnetwork.com/images/EC042017NF/170066s.jpg "Gold Stampin' Hot Foil Rolls [ 170066 ]")
![Pool Party 8-1/2" X 11" Cardstock [ 122924 ]](https://assets1.tamsnetwork.com/images/EC042017NF/122924s.jpg "Pool Party 8-1/2\" X 11\" Cardstock [ 122924 ]")
![Basic Gray Classic Stampin' Pad [ 149165 ]](https://assets1.tamsnetwork.com/images/EC042017NF/149165s.jpg "Basic Gray Classic Stampin' Pad [ 149165 ]")
![Granny Apple Green Stampin' Blends Combo Pack [ 154885 ]](https://assets1.tamsnetwork.com/images/EC042017NF/154885s.jpg "Granny Apple Green Stampin' Blends Combo Pack [ 154885 ]")

![Granny Apple Green Stampin' Pad [ 147095 ]](https://assets1.tamsnetwork.com/images/EC042017NF/147095s.jpg "Granny Apple Green Stampin' Pad [ 147095 ]")
![Pool Party Classic Stampin' Pad [ 147107 ]](https://assets1.tamsnetwork.com/images/EC042017NF/147107s.jpg "Pool Party Classic Stampin' Pad [ 147107 ]")
![Rhinestone Basic Jewels [ 144220 ]](https://assets1.tamsnetwork.com/images/EC042017NF/144220s.jpg "Rhinestone Basic Jewels [ 144220 ]")


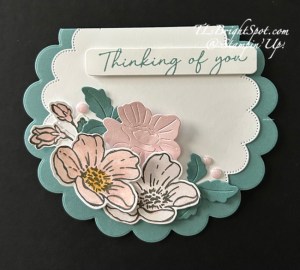


![Scalloped Blooms Bundle (English) [ 167647 ]](https://assets1.tamsnetwork.com/images/EC042017NF/167647s.jpg "Scalloped Blooms Bundle (English) [ 167647 ]")
![Boutique Blossoms Bundle [ 167654 ]](https://assets1.tamsnetwork.com/images/EC042017NF/167654s.jpg "Boutique Blossoms Bundle [ 167654 ]")
![2026–2028 In Color™ 12" X 12" (30.5 X 30.5 Cm) Pearlized Specialty Paper [ 167766 ]](https://assets1.tamsnetwork.com/images/EC042017NF/167766s.jpg "2026–2028 In Color™ 12\" X 12\" (30.5 X 30.5 Cm) Pearlized Specialty Paper [ 167766 ]")
![2026–2028 In Color™ Dots [ 167546 ]](https://assets1.tamsnetwork.com/images/EC042017NF/167546s.jpg "2026–2028 In Color™ Dots [ 167546 ]")
![Barely Blush Classic Stampin Pad [ 167678 ]](https://assets1.tamsnetwork.com/images/EC042017NF/167678s.jpg "Barely Blush Classic Stampin Pad [ 167678 ]")
![Silly Old Bear Suite Collection [ 167634 ]](https://assets1.tamsnetwork.com/images/EC042017NF/167634s.jpg "Silly Old Bear Suite Collection [ 167634 ]")
![Mossy Meadow 8-1/2" X 11" Cardstock [ 133676 ]](https://assets1.tamsnetwork.com/images/EC042017NF/133676s.jpg "Mossy Meadow 8-1/2\" X 11\" Cardstock [ 133676 ]")
![Mossy Meadow Classic Stampin' Pad [ 147111 ]](https://assets1.tamsnetwork.com/images/EC042017NF/147111s.jpg "Mossy Meadow Classic Stampin' Pad [ 147111 ]")
![Golden Glow Classic Stampin' Pad [ 167676 ]](https://assets1.tamsnetwork.com/images/EC042017NF/167676s.jpg "Golden Glow Classic Stampin' Pad [ 167676 ]")
![Sponge Daubers [ 133773 ]](https://assets1.tamsnetwork.com/images/EC042017NF/133773s.jpg "Sponge Daubers [ 133773 ]")
