
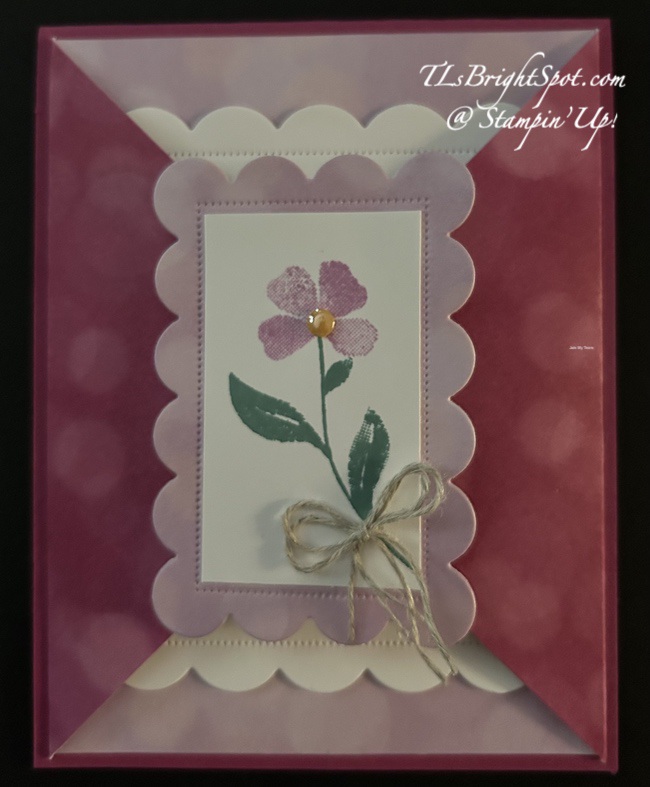
Woopeee – it’s FALL! And you would think I would have a fall card for you today, but I don’t. Instead I have this fun fold that I’m excited to share with you.
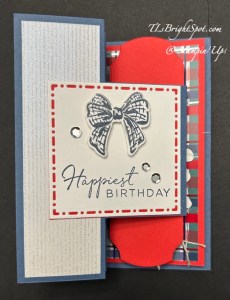
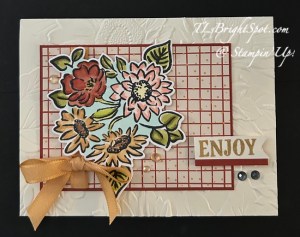
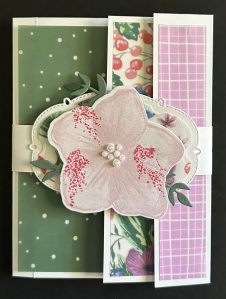
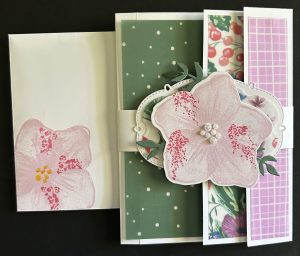
I used Tile Garden Dies to create the Basic White square and Elegantly Wrapped bundle for the bow. The sentiment is also from Tile Garden stamp set.
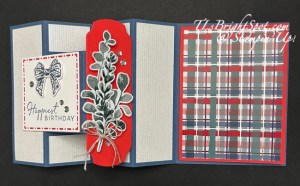
I’ve used two different DSP packages : Shimmering Stripes SDSP & All Wrapped Up SDSP for the plaid on the right as well as the die cut leaves, die cut straight from the All wrapped Up Paper. The Real Red background behind those die cut leaves uses a die from Life In Bloom Dies (I cut two and adhered them together then attached them to the card.
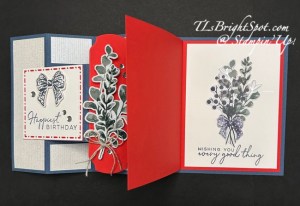
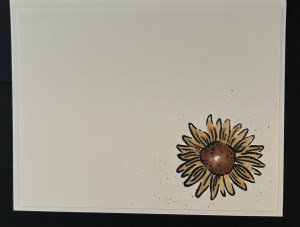
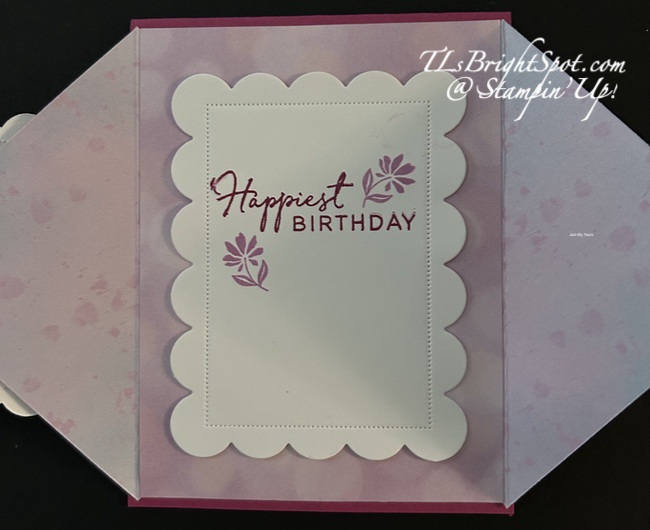
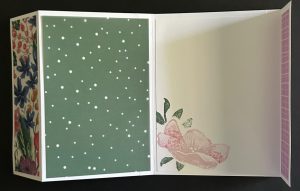
And here’s the card fully open, showing off the card in a card 😀 This image is fussy cut from the All Wrapped Up SDSP adhered to a Basic White panel and the sentiment is stamped in Misty Moonlight ink from the Tile Garden stamp set. The Real Red card is Real Red 7 1/2 x 5 scored at 3 3/4.
DIRECTIONS & MEASUREMENTS TO MAKE THIS CARD
- CARD BASE – 11 X 5 1/4 SCORED @ 1 3/4, 3 1/2, 5 1/4 & 7 (Misty Moonlight)
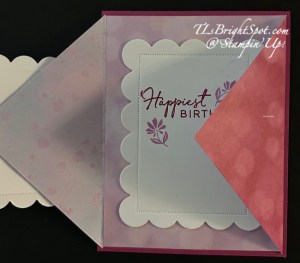
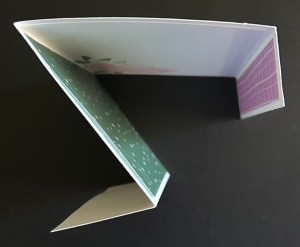
- With short side at top, measure 1 1/4 & cut from 1st score to 3rd score. Turn over with short side at top & do the same, measuring 1 1/4 from bottom & cut from 1st score to 3rd score.
- Cut 3 DSP strips 1 1/2 x 5 (Shimmering Stripes DSDP) Burnish score lines mountain, valley, mountain, valley – EXCEPT the center section – the ‘floating’ section – that score is a mountain
- 2 of these will be used as full length strips adhering on the 1st & 4th panels
- Use the last strip to cut into 4 pieces 1 1/2 x 1. Attach these to the areas above the cut areas at the card top & below the cut areas at the bottom
- Add the Real Red ‘notecard’ with score on the left to the last section of the card. The ‘notecard’ is 7 x 5 scored at 3 3/4
- Add DSP to the front of the notecard: 3 1/2 x 4 3/4
- Die cut a square (Basic White in this case) approximately 2 3/4 x 2 3/4 from the Tile Garden Dies. Add a Real Red square behind it, same size & attach to the ‘floating’ panel & 1st section.
- Stamp the sentiment in Misty Moonlight ink (Tile Garden stamp set)
- Stamp the bow in Misty Moonlight ink & die cut ( Elegantly Wrapped stamp set & dies). Attach with dimensionals.
- Add Adhesive-Backed Sparkle Sequins to the square
- For the back side of the ‘floating’ panel, I die cut these elements from the All-Wrapped Up SDSP using coordinating dies from Elegantly Wrapped Dies. I was going to add them directly to this panel but they showed outside the border & I didn’t like that. I needed something long enough & wide enough for a nice background and pulled out the Life In Bloom Dies and cut 2 in Real Red, attaching them back to back then adding them to the card panel & attaching the die cuts with dimensionals. Yes, this does make this card a bit ‘fat’ but I intend to hand deliver this card!
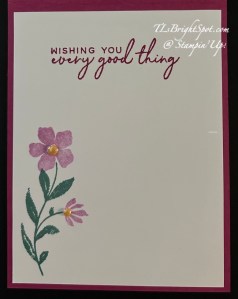
- For the inside of the notecard, I fussy cut the element from the All Wrapped Up SDSP & attached it with liquid glue to the Basic White panel (3 1/2 x 4 3/4) I stamped the sentiment in Misty Moonlight, attached the panel & the card was complete… I love this!!!
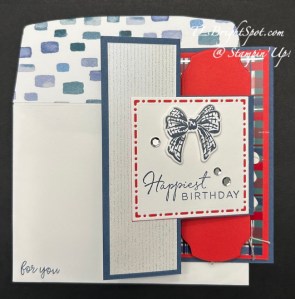
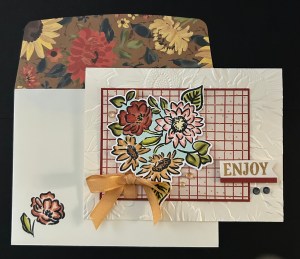
For the envelope, I found a different paper – Whispering Woods 12 1/4 x 6 – for the flap and trimmed it to fit. On the front… the sentiment is stamped in Misty Moonlight using the Elegantly Wrapped stamp set.
Want to purchase the products to make today’s card? See the list below. And to see all the products Stampin’ Up! has to offer, click SHOP WITH ME HERE
Product List![Tile Garden Bundle (English) [ 168574 ]](https://assets1.tamsnetwork.com/images/EC042017NF/168574s.jpg "Tile Garden Bundle (English) [ 168574 ]")
![Elegantly Wrapped Bundle (English) [ 168481 ]](https://assets1.tamsnetwork.com/images/EC042017NF/168481s.jpg "Elegantly Wrapped Bundle (English) [ 168481 ]")
![All Wrapped Up 12" X 12" (30.5 X 30.5 Cm) Specialty Designer Series Paper [ 168473 ]](https://assets1.tamsnetwork.com/images/EC042017NF/168473s.jpg "All Wrapped Up 12\" X 12\" (30.5 X 30.5 Cm) Specialty Designer Series Paper [ 168473 ]")
![Life In Bloom Dies [ 167869 ]](https://assets1.tamsnetwork.com/images/EC042017NF/167869s.jpg "Life In Bloom Dies [ 167869 ]")
![Shimmering Stripes 12" X 12" (30.5 X 30.5 Cm) Specialty Paper [ 168197 ]](https://assets1.tamsnetwork.com/images/EC042017NF/168197s.jpg "Shimmering Stripes 12\" X 12\" (30.5 X 30.5 Cm) Specialty Paper [ 168197 ]")
![Whispering Woods 12" X 12" (30.5 X 30.5 Cm) Designer Series Paper [ 168368 ]](https://assets1.tamsnetwork.com/images/EC042017NF/168368s.jpg "Whispering Woods 12\" X 12\" (30.5 X 30.5 Cm) Designer Series Paper [ 168368 ]")
![Adhesive Backed Sparkle Sequins [ 168488 ]](https://assets1.tamsnetwork.com/images/EC042017NF/168488s.jpg "Adhesive Backed Sparkle Sequins [ 168488 ]")
![Poppy Parade 8-1/2" X 11" Cardstock [ 119793 ]](https://assets1.tamsnetwork.com/images/EC042017NF/119793s.jpg "Poppy Parade 8-1/2\" X 11\" Cardstock [ 119793 ]")
![Poppy Parade Classic Stampin' Pad [ 147050 ]](https://assets1.tamsnetwork.com/images/EC042017NF/147050s.jpg "Poppy Parade Classic Stampin' Pad [ 147050 ]")
![Misty Moonlight 8-1/2" X 11" Cardstock [ 153081 ]](https://assets1.tamsnetwork.com/images/EC042017NF/153081s.jpg "Misty Moonlight 8-1/2\" X 11\" Cardstock [ 153081 ]")
![Misty Moonlight Classic Stampin' Pad [ 153118 ]](https://assets1.tamsnetwork.com/images/EC042017NF/153118s.jpg "Misty Moonlight Classic Stampin' Pad [ 153118 ]")
![Basic White 8 1/2" X 11" Cardstock [ 166780 ]](https://assets1.tamsnetwork.com/images/EC042017NF/166780s.jpg "Basic White 8 1/2\" X 11\" Cardstock [ 166780 ]")
![Basic White Medium Envelopes [ 159236 ]](https://assets1.tamsnetwork.com/images/EC042017NF/159236s.jpg "Basic White Medium Envelopes [ 159236 ]")
![Take Your Pick [ 144107 ]](https://assets1.tamsnetwork.com/images/EC042017NF/144107s.jpg "Take Your Pick [ 144107 ]")
![Paper Trimmer [ 152392 ]](https://assets1.tamsnetwork.com/images/EC042017NF/152392s.jpg "Paper Trimmer [ 152392 ]")
![Paper Snips [ 103579 ]](https://assets1.tamsnetwork.com/images/EC042017NF/103579s.jpg "Paper Snips [ 103579 ]")
![Tuxedo Black Memento Ink Pad [ 132708 ]](https://assets1.tamsnetwork.com/images/EC042017NF/132708s.jpg "Tuxedo Black Memento Ink Pad [ 132708 ]")
![Very Vanilla 8 1/2" X 11" Cardstock [ 166784 ]](https://assets1.tamsnetwork.com/images/EC042017NF/166784s.jpg "Very Vanilla 8 1/2\" X 11\" Cardstock [ 166784 ]")
![Very Vanilla Medium Envelopes [ 107300 ]](https://assets1.tamsnetwork.com/images/EC042017NF/107300s.jpg "Very Vanilla Medium Envelopes [ 107300 ]")
![Basics Wow! Embossing Powder [ 165679 ]](https://assets1.tamsnetwork.com/images/EC042017NF/165679s.jpg "Basics Wow! Embossing Powder [ 165679 ]")
![Embossing Additions Tool Kit [ 159971 ]](https://assets1.tamsnetwork.com/images/EC042017NF/159971s.jpg "Embossing Additions Tool Kit [ 159971 ]")
![Heat Tool (Us And Canada) [ 129053 ]](https://assets1.tamsnetwork.com/images/EC042017NF/129053s.jpg "Heat Tool (Us And Canada) [ 129053 ]")
![Metallics Wow! Embossing Powder [ 165678 ]](https://assets1.tamsnetwork.com/images/EC042017NF/165678s.jpg "Metallics Wow! Embossing Powder [ 165678 ]")
![Versamark Pad [ 102283 ]](https://assets1.tamsnetwork.com/images/EC042017NF/102283s.jpg "Versamark Pad [ 102283 ]")
![Small Blending Brushes [ 160518 ]](https://assets1.tamsnetwork.com/images/EC042017NF/160518s.jpg "Small Blending Brushes [ 160518 ]")
![Stampin' Dimensionals [ 104430 ]](https://assets1.tamsnetwork.com/images/EC042017NF/104430s.jpg "Stampin' Dimensionals [ 104430 ]")
![Multipurpose Liquid Glue [ 110755 ]](https://assets1.tamsnetwork.com/images/EC042017NF/110755s.jpg "Multipurpose Liquid Glue [ 110755 ]")
![Stampin' Positioner [ 167768 ]](https://assets1.tamsnetwork.com/images/EC042017NF/167768s.jpg "Stampin' Positioner [ 167768 ]")
![Stampin' Cut & Emboss Machine [ 149653 ]](https://assets1.tamsnetwork.com/images/EC042017NF/149653s.jpg "Stampin' Cut & Emboss Machine [ 149653 ]")
![Mini Glue Dots [ 103683 ]](https://assets1.tamsnetwork.com/images/EC042017NF/103683s.jpg "Mini Glue Dots [ 103683 ]")
![White Gel Pens [ 166642 ]](https://assets1.tamsnetwork.com/images/EC042017NF/166642s.jpg "White Gel Pens [ 166642 ]")
![Clear Wink Of Stella Glitter Brush [ 141897 ]](https://assets1.tamsnetwork.com/images/EC042017NF/141897s.jpg "Clear Wink Of Stella Glitter Brush [ 141897 ]")






![Sunset Coast Bundle (English) [ 167781 ]](https://assets1.tamsnetwork.com/images/EC042017NF/167781s.jpg "Sunset Coast Bundle (English) [ 167781 ]")
![Scenic Coast 6" X 6" (15.2 X 15.2 Cm) Specialty Designer Series Paper [ 167773 ]](https://assets1.tamsnetwork.com/images/EC042017NF/167773s.jpg "Scenic Coast 6\" X 6\" (15.2 X 15.2 Cm) Specialty Designer Series Paper [ 167773 ]")
![Sunset Sparkle Sequins [ 167785 ]](https://assets1.tamsnetwork.com/images/EC042017NF/167785s.jpg "Sunset Sparkle Sequins [ 167785 ]")
![Scenic Coast Suite Collection (English) [ 167786 ]](https://assets1.tamsnetwork.com/images/EC042017NF/167786s.jpg "Scenic Coast Suite Collection (English) [ 167786 ]")
![Secret Sea Classic Stampin' Pad [ 165285 ]](https://assets1.tamsnetwork.com/images/EC042017NF/165285s.jpg "Secret Sea Classic Stampin' Pad [ 165285 ]")
![Strawberry Slush Classic Stampin' Pad [ 165286 ]](https://assets1.tamsnetwork.com/images/EC042017NF/165286s.jpg "Strawberry Slush Classic Stampin' Pad [ 165286 ]")
![Crushed Curry Classic Stampin' Pad [ 147087 ]](https://assets1.tamsnetwork.com/images/EC042017NF/147087s.jpg "Crushed Curry Classic Stampin' Pad [ 147087 ]")
![Balmy Blue 8-1/2" X 11" Cardstock [ 146982 ]](https://assets1.tamsnetwork.com/images/EC042017NF/146982s.jpg "Balmy Blue 8-1/2\" X 11\" Cardstock [ 146982 ]")
![Fern & Flora Bundle (English) [ 167745 ]](https://assets1.tamsnetwork.com/images/EC042017NF/167745s.jpg "Fern & Flora Bundle (English) [ 167745 ]")
![Moonlit Flora 12" X 12" (30.5 X 30.5 Cm) Designer Series Paper [ 167737 ]](https://assets1.tamsnetwork.com/images/EC042017NF/167737s.jpg "Moonlit Flora 12\" X 12\" (30.5 X 30.5 Cm) Designer Series Paper [ 167737 ]")
![Moonlit Flora Suite Collection (English) [ 167749 ]](https://assets1.tamsnetwork.com/images/EC042017NF/167749s.jpg "Moonlit Flora Suite Collection (English) [ 167749 ]")
![Secret Sea 8 1/2" X 11" Cardstock [ 165624 ]](https://assets1.tamsnetwork.com/images/EC042017NF/165624s.jpg "Secret Sea 8 1/2\" X 11\" Cardstock [ 165624 ]")
![Peaceful Pine 8 1/2" X 11" Cardstock [ 167691 ]](https://assets1.tamsnetwork.com/images/EC042017NF/167691s.jpg "Peaceful Pine 8 1/2\" X 11\" Cardstock [ 167691 ]")
![Peaceful Pine Classic Stampin Pad [ 167679 ]](https://assets1.tamsnetwork.com/images/EC042017NF/167679s.jpg "Peaceful Pine Classic Stampin Pad [ 167679 ]")
![Adhesive Backed Metallic Gems [ 163780 ]](https://assets1.tamsnetwork.com/images/EC042017NF/163780s.jpg "Adhesive Backed Metallic Gems [ 163780 ]")

![Berry Burst 8-1/2" X 11" Cardstock [ 144243 ]](https://assets1.tamsnetwork.com/images/EC042017NF/144243s.jpg "Berry Burst 8-1/2\" X 11\" Cardstock [ 144243 ]")
![Beautiful Bokeh 6" X 6" (15.2 X 15.2 Cm) Designer Series Paper [ 164607 ]](https://assets1.tamsnetwork.com/images/EC042017NF/164607s.jpg "Beautiful Bokeh 6\" X 6\" (15.2 X 15.2 Cm) Designer Series Paper [ 164607 ]")
![2026–2028 In Color™ Dots [ 167546 ]](https://assets1.tamsnetwork.com/images/EC042017NF/167546s.jpg "2026–2028 In Color™ Dots [ 167546 ]")
![Linen Thread [ 104199 ]](https://assets1.tamsnetwork.com/images/EC042017NF/104199s.jpg "Linen Thread [ 104199 ]")
![Basic White 12" X 12" (30.5 X 30.5 Cm) Thick Cardstock [ 166782 ]](https://assets1.tamsnetwork.com/images/EC042017NF/166782s.jpg "Basic White 12\" X 12\" (30.5 X 30.5 Cm) Thick Cardstock [ 166782 ]")

![Phrases & Frames Bundle (English) [ 167587 ]](https://assets1.tamsnetwork.com/images/EC042017NF/167587s.jpg "Phrases & Frames Bundle (English) [ 167587 ]")
![Bloom Boutique 12" X 12" (30.5 X 30.5 Cm) Specialty Designer Series Paper [ 167637 ]](https://assets1.tamsnetwork.com/images/EC042017NF/167637s.jpg "Bloom Boutique 12\" X 12\" (30.5 X 30.5 Cm) Specialty Designer Series Paper [ 167637 ]")
![2026–2028 In Color™ Butterflies [ 167656 ]](https://assets1.tamsnetwork.com/images/EC042017NF/167656s.jpg "2026–2028 In Color™ Butterflies [ 167656 ]")
![Hydrangea Hue 3/8" (1 Cm) Bordered Ribbon [ 167549 ]](https://assets1.tamsnetwork.com/images/EC042017NF/167549s.jpg "Hydrangea Hue 3/8\" (1 Cm) Bordered Ribbon [ 167549 ]")
![Hydrangea Hue 8 1/2" X 11" Cardstock [ 167687 ]](https://assets1.tamsnetwork.com/images/EC042017NF/167687s.jpg "Hydrangea Hue 8 1/2\" X 11\" Cardstock [ 167687 ]")
![Hydrangea Hue Classic Stampin' Pad [ 167677 ]](https://assets1.tamsnetwork.com/images/EC042017NF/167677s.jpg "Hydrangea Hue Classic Stampin' Pad [ 167677 ]")


![Night Of Navy 8-1/2" X 11" Cardstock [ 100867 ]](https://assets1.tamsnetwork.com/images/EC042017NF/100867s.jpg "Night Of Navy 8-1/2\" X 11\" Cardstock [ 100867 ]")
![Night Of Navy Classic Stampin' Pad [ 147110 ]](https://assets1.tamsnetwork.com/images/EC042017NF/147110s.jpg "Night Of Navy Classic Stampin' Pad [ 147110 ]")
![Melon Mambo Classic Stampin' Pad [ 147051 ]](https://assets1.tamsnetwork.com/images/EC042017NF/147051s.jpg "Melon Mambo Classic Stampin' Pad [ 147051 ]")
![Balmy Blue Classic Stampin' Pad [ 147105 ]](https://assets1.tamsnetwork.com/images/EC042017NF/147105s.jpg "Balmy Blue Classic Stampin' Pad [ 147105 ]")
![Lemon Lolly 8 1/2" X 11" Cardstock [ 161720 ]](https://assets1.tamsnetwork.com/images/EC042017NF/161720s.jpg "Lemon Lolly 8 1/2\" X 11\" Cardstock [ 161720 ]")
![Pecan Pie Classic Stampin' Pad [ 161665 ]](https://assets1.tamsnetwork.com/images/EC042017NF/161665s.jpg "Pecan Pie Classic Stampin' Pad [ 161665 ]")

![Fern & Flora 3 D Embossing Folder [ 167744 ]](https://assets1.tamsnetwork.com/images/EC042017NF/167744s.jpg "Fern & Flora 3 D Embossing Folder [ 167744 ]")
![Dreamy Flowers [ 167916 ]](https://assets1.tamsnetwork.com/images/EC042017NF/167916s.jpg "Dreamy Flowers [ 167916 ]")
![Lemon Lolly Classic Stampin' Pad [ 161666 ]](https://assets1.tamsnetwork.com/images/EC042017NF/161666s.jpg "Lemon Lolly Classic Stampin' Pad [ 161666 ]")
![Granny Apple Green Stampin' Pad [ 147095 ]](https://assets1.tamsnetwork.com/images/EC042017NF/147095s.jpg "Granny Apple Green Stampin' Pad [ 147095 ]")
![Old Olive Classic Stampin' Pad [ 147090 ]](https://assets1.tamsnetwork.com/images/EC042017NF/147090s.jpg "Old Olive Classic Stampin' Pad [ 147090 ]")
![Opulent Oasis Bundle (English) [ 167595 ]](https://assets1.tamsnetwork.com/images/EC042017NF/167595s.jpg "Opulent Oasis Bundle (English) [ 167595 ]")
![Berry Botanical Vellum 12" X 12" (30.5 X 30.5 Cm) Specialty Designer Series Paper [ 167985 ]](https://assets1.tamsnetwork.com/images/EC042017NF/167985s.jpg "Berry Botanical Vellum 12\" X 12\" (30.5 X 30.5 Cm) Specialty Designer Series Paper [ 167985 ]")
![Sweet Words & Labels Dies [ 167627 ]](https://assets1.tamsnetwork.com/images/EC042017NF/167627s.jpg "Sweet Words & Labels Dies [ 167627 ]")
![Sweet Words & Labels Bundle [ 167628 ]](https://assets1.tamsnetwork.com/images/EC042017NF/167628s.jpg "Sweet Words & Labels Bundle [ 167628 ]")
![Iridescent Pearl Basic Jewels [ 158987 ]](https://assets1.tamsnetwork.com/images/EC042017NF/158987s.jpg "Iridescent Pearl Basic Jewels [ 158987 ]")
![Bubble Bath Classic Stampin' Pad [ 161664 ]](https://assets1.tamsnetwork.com/images/EC042017NF/161664s.jpg "Bubble Bath Classic Stampin' Pad [ 161664 ]")
![Strawberry Slush Classic Stampin' Pad [ 131178 ] (Retired)](https://assets1.tamsnetwork.com/images/EC042017NF/131178s.jpg "Strawberry Slush Classic Stampin' Pad [ 131178 ] (Retired)")

