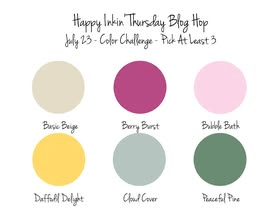
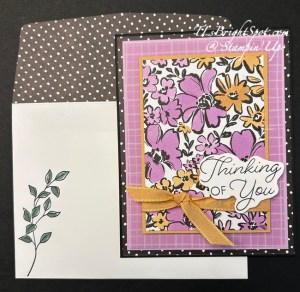
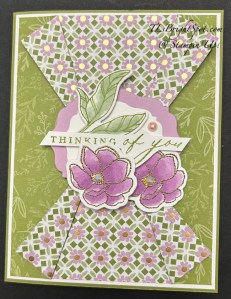
We had quite an unexpected storm Tuesday night – lots of lightening way too close & thunder of course. I love the roll of thunder, but did I mention the lightening was close?! Today is Thursday – Welcome to our hop! We have a color challenge today & I chose to work with the luscious Velvet Meadow Specialty DSP. It’s garden fresh 😀
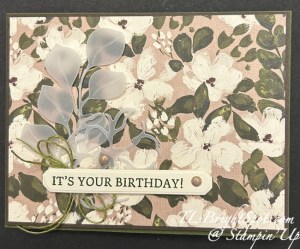
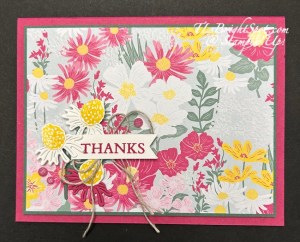
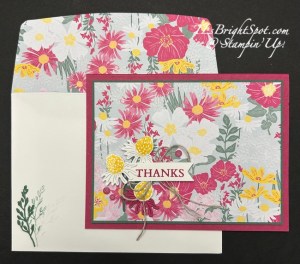
The Velvet Meadow Specialty DSP is so wonderful, it deserves to be center stage. I backed it with a panel of Peaceful Pine then added those with dimensionals to the Berry Burst card base. I made a few die cuts for flowers (Basic White, & Berry Burst) then a stem from Peaceful Pine (it’s hard to see!), then stamped flower centers in Daffodil delight & die cut those. Once the centers were on the flowers I used the White Gel Pen to add some dots for texture emphasis. Flowers were added with dimensionals. I tied a double loop bow from Linen thread & added it to the back of the stamped sentiment punched with the triple punch (ink is Berry Burst & from the Flowering Meadow stamp set). The sentiment was also added with dimensionals. Final touch… Charming Shimmer Faceted Gems – an ONLINE EXCLUSIVE.
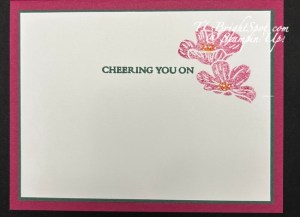
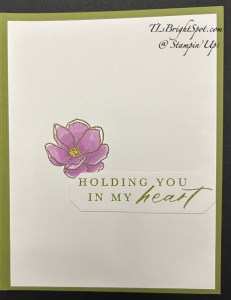
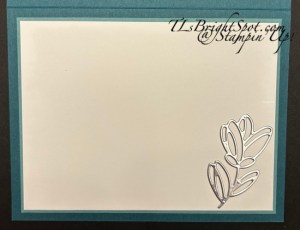
For the inside… the sentiment is again from Flowering Meadow stamp set, stamped in Peaceful Pine on a Basic White panel. The flowers are stamped-off once Berry Burst, flower centers Daffodil Delight – and again using the White Gel Pen to add highlights. The panel was added to Peaceful Pine then attached to the inside of the card.
For the envelope… more of the Velvet Meadow SDSP adhered to the flap & trimmed to fit. On the front, a leaf image stamped three times without re-inking.
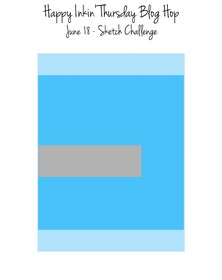
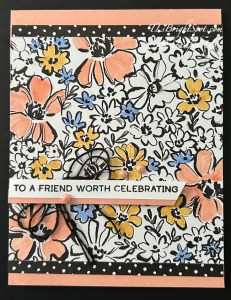
Welcome to Thursday & our fabulous hop! We have a sketch challenge today & I played with the Artisan Sketched Garden DSP to create this beautiful card – that & the Shimmer Brushes to color the flowers.
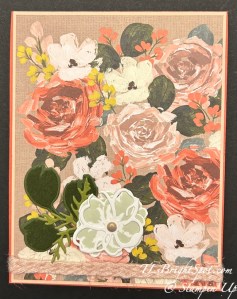
And here’s my card. I took a piece of the Artisan Sketched Garden DSP – it’s an all black & white images pack that I love!- and cut it to 4 1/4 x 4 1/2. Then I set about coloring it with the Shimmer Brushes… Crisp Cantaloupe, Golden Glow and finally Hydrangea Hue. I added this to a Crisp cantaloupe card base 4 1/4 x 11, scored at 5 1/2. I took the backside of this same paper and cut two strips 1/4″ wide and added these top & bottom. I stamped thre sentiment using the Words & Wishes stamp set in Memento ink on a Basic White strip, added a piece of Crisp Cantaloupe to the bottom, and angled the one end, attached dimensionals to the back & set it aside to make a double bow from Black Baker’s Twine (it comes in a pack of 5 different colors). This was attached to the back of the sentiment panel with a glue dot, then the strip was added to the card front. Final touch – three 2026-2028 In Color Dots in Crisp Cantaloupe.
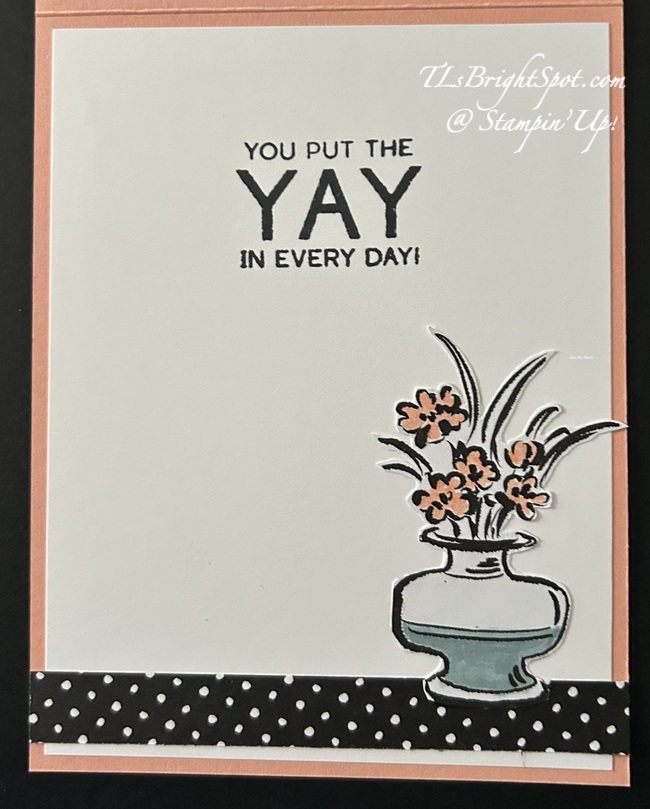
For the inside of the card I stamped another sentiment from Words & Wishes stamp set in Memento ink on the Basic White 4 x 5 1/4 panel, then added another strip of the Artisan Sketched Garden DSP. To finish this off, I cut out a vase from another one of the papers in this fabulous pack & colored it: Cloud Cover for the water and Shimmer Brush in Crisp Cantaloupe for the flowers – then attached as though the polka dot strip were a table.
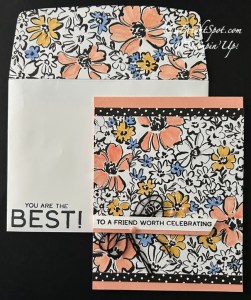
For the envelope – same coloring on the same pattern of flowers from the Artisan Sketched Garden DSP was added to the flap & trimmed to fit. And another sentiment from the same Words & Wishes stamp set was stamped in the lower left front of the envelope. Done & ready to send to someone fabulous!
Before you see what everyone else has created, remember to see below how to order these products from me, see what I offer in the way of benefits when ordering and consider joining my team – that information is below as well.
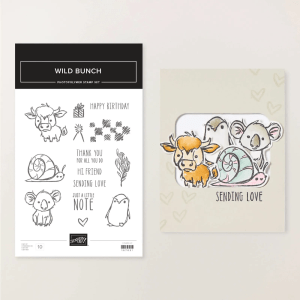
June Product Of The Month – Available Now With Orders of $75+ While Supplies Last
There is a new Product of the Month available to order now for $5 when you place an order of $75+ and it will be available while supplies last!! The Product of the Month for June is the Wild Bunch Stamp Set!
Send smiles with the Wild Bunch Stamp Set! With hand-drawn animals like a koala, penguin, snail, and highland cow, plus versatile sentiments for birthdays, thank-yous, or just because, this set can help brighten anyone’s day. Add hearts, party hats, presents, or scribbled patterns to make each card or scrapbook page even more fun.
The Wild Bunch Stamp Set is the exclusive Product of the Month for June 2026! Only available until stocks run out—don’t wait to get yours! ORDER FROM ME HERE
Here are the details:
14 photopolymer stamps
Suggested clear blocks (sold separately): b, c
Also available in French
Every month Stampin’ Up! will release a new item that is only available for purchase once per account. These items will be limited quantity and are likely to sell out quickly—once they’re sold out, they’re gone for good!
These classes are a great way for you to craft with the latest products. During the virtual classes, you will:
Make unique projects using detailed instructions as you craft along with our Stampin’ Up! product experts.
Learn exciting tips and techniques to further your crafting experience.
Be inspired to continue crafting long after the class is over!
The class will be available for purchase before and after it streams on June 18
Where: An exclusive Facebook group
Language: The class will be presented in English; attendees will have access to supply lists and project instructions in English, French, German, and Dutch
Video on Demand: This class will be available as a video on demand with captions in English, French, German, and Dutch shortly after the event
When ordering from me, you get Daisy Patch Rewards for every order. (See my REWARDS PAGE for details) and with those points comes an opportunity for a FREE STAMP SET or items valued up to $40. You will also receive the monthly online tutorial – which this month uses this fabulous Lily of the Valley suite of products.
Want to JOIN MY TEAM and become a part of this fun crafty group? Lots of benefits there too. JOIN WITH ME HERE
Good morning! Oh my goodness, we have such a beautiful day here on the Jersey coast. It’s only going up to 75 (now 60) and the humidity is low – I’m in heaven. Today’s card is a bit of that as well. So here ya go…
Isn’t this pretty? And so incredibly easy!!! Here are the basics… the card base is 11 x 5 1/2 scored @ ! 3/4, 5 1/2, & 9 3/4 – mountain, valley, valley. Layer W/ DSP: 2 @ 3 1/2 x 5 1/4, 1 1/2 x 5 1/4, & 2 @ 1 x 5 1/4. Basic White panel is 4 x 5 1/4 & stamped with the Opulent Oasis stamp set in Bubble Bath & Strawberry Slush stamped off once, leaves are in Peaceful Pine. The belly band is 1 x 10 & wrapped around loosely and secured in front. I used the Sweet Words Dies, Basic White & another piece of the Vellum to create the background for the flower & adhered over the secured Belly Band. The flower is stamped in Bubble Bath & strawberry Slush stamped off once using the Opulent Oasis stamp set then die cut with the corresponding dies. Leaves were die cut from Peaceful Pine using the Opulent Oasis Dies. The leaves were attached with liquid glue to the back of the flower, and the flower attached to the banners with dimesnionals. In the center are several Iridescent Pearl Basic Jewels.
Here’s how the card looks from the top.
For the envelope front … The same Opulent Oasis flower stamped in Bubble Bath & Strawberry Slush stamped off once. Center color is Daffodil Delight.
Want to purchase the products to make this card – see items below and shop with me here
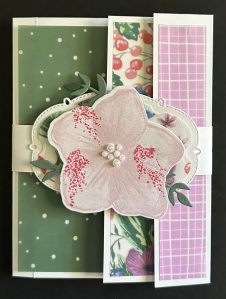
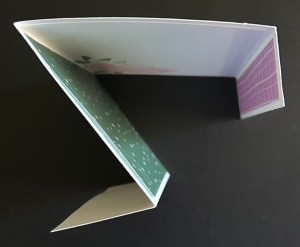
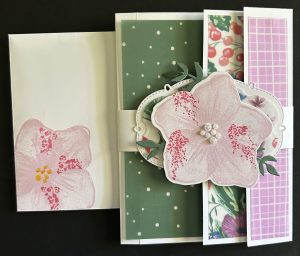
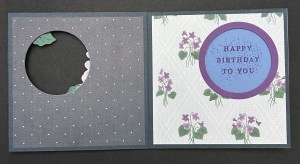
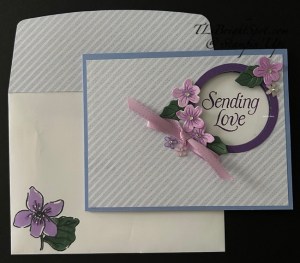
Welcome, welcome. We have a wonderful floral challenge for us today & I’ve chosen a new, soon to be released July ONLINE Exclusive to use in this shutter card. The Framed Violets bundle is part of the Violet Dreams Suite of products: Adhesive-Backed Blooms, 1/4″ Satin Ribbon in Fresh Freesia, Violet Dreams 12×12 DSP & the Framed Violets bundle already mentioned.
When looking at this card, notice the stamped sentiment on Basic White, then notice below the stamped sentiment on Hydrangea Hue – that’s all part of the slider mechanism. It is so cool in person!
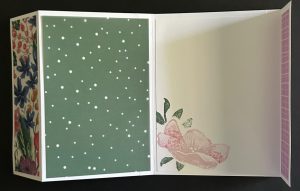
And here’s a top/ down view…
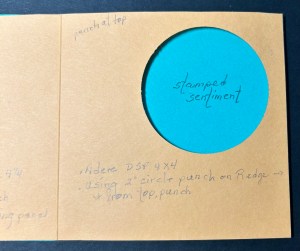
How to make this card… notice there are two colors used on this card, a light color (Hydrangea Hue) & a Basic White and there are two panels of the Hydrangea Hue.
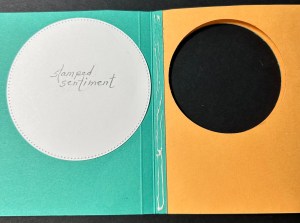
Front Panel: Color 1 – 4 14 x 8 1/4 scored at 5 1/2. The smaller section is what creates the shuttle or ‘slider’ of the card. Cover the larger section with DSP cut 4 x 5 1/4. Use a 2″ hole punch to create the opening on the front side. Center Panel: this is Secret Sea – 4 1/4 x 8 1/2 scored at 4 1/4. Add a 4 x 4 DSP to each side. With the fold to the left, place so this panel is flush with the right edge of the card front; hold in place, trace the 2″ circle, then punch the 2″ circle where marked. Close this Secret Sea piece & trace the circle to the right side of the Secret Sea (see the floral pattern in the open card), punch the 2″ circle again using the tracing to line up.. There should now be three circles: front and both sides of the Secret Sea inside panel. Adhere the backside of the left section of this folded panel to the inside of the front panel, matching edges so they are even. DO NOT TRY TO LINE UP WITH THE FOLD! Back Panel: The color of this panel should match that of the card front. In my case – Hydrangea Hue: 4 1/4 x 5 3/4 score at 5 1/2. Cut a Basic White piece about 3 1/4 x 3 1/4 and adhere close to the score line and that becomes the stamped sentiment we see with the card closed. Do not adhere just yet :O) First, burnish the score line well, fold it inwards and add adhesive along the 1/4″ fold. With the folded edge in, add to the center panel even with the right edge of that panel. It will look like the photo at left, below. Now add the Basic White piece so it fits behind the opening and can be stamped. (yes, mine is a circle cut with the Stitched Shapes Dies). Now add adhesive along that score line as shown in photo at right and close card. This keeps the card from being floppy.
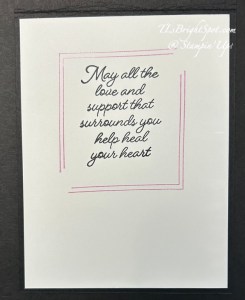
Now you may do your stamping sentiments. With the card closed, stamp on the Basic White panel – that’s what shows when the card is closed. For my car rd I stamped in Gorgeous Grape ink and used the sentiment from the Framed Violets stamp set. Open the card and stamp on the ‘slider’ portion. Again, Gorgeous Grape ink and the sentiment is from Framed Violets stamp set.
Now it’s time to decorate the various layers: To create the ‘frame’ around the circle I used a 2 3/8 circle punch and a 2″ circle punch and adhered it to the front & one on the right inside circle as well. card front: I used the Framed Violets Dies to die cut the violets from Basic White then colored the violets using Stampin’ Blends in Highland Heather. I used the tiniest of the Rhinestone Basic Jewels for the flower centers. The leaves arew die cut using the Framed Violets Dies and Peaceful Pine. I added the flowers & leaves with dabs of glue then added the bow with a glue dot: 1/4″ Satin Ribbon in Fresh Freesia (part of the suite). The additional gems are Adhesive-Backed Blooms that add that final touch of sparkle. Love these!
And below is the card & envelope – this sweet, sweet violet from the Framed Violets stamp set stamped in Memento ink then colored with Highland Heather & Peaceful Pine Stampin’ Blends. The same pattern of DSP from Violet Dreams 12×12 was added to flap & trimmed to fit. This becomes such a beautiful gift to a birthday gal – all by itself. Love!!
See below for information about ordering from me or becoming part of my stampin’ team 😀
Click on the next button to see what others have created for today’s hop!
Free shipping is for three days only. You and your customers must place your orders between June 11 and 13 to qualify.
Free shipping automatically applies to the shopper’s cart after the qualifying amount has been met, which is $75 USD | $100 CAD (before tax).
All orders must meet the qualifying amount to be eligible for free shipping. Coupon codes and Stampin’ Rewards will lower the total amount of an order.
Craft Classes do not have shipping charges. Purchasing a Craft Class will increase the total cart amount but will not contribute to the free shipping qualifying amount.
The additional cost for expedited shipping is NOT covered by this promotion.
Hello Saturday! We are in full rain for the next 48 hours mode… Maybe I can play in my craft room 😀 or… get some other projects completed. Today I have a sympathy card made with Artisan Sketched Garden and some Stampin’ Blends and oh yes, some Berry Botanical Vellum.
I began by coloring the pretty floral images on the Artisan Sketched Garden DSP: Peaceful Pine for the leaves, Fresh Freesia & Golden Glow for the flowers. Interesting combination, right? I took my cue for this combination by looking at the Berry Botanical Vellum which has an even larger mix of colors. I backed this with a panel of Golden Glow card stock then wrapped it with 3/8″ Bordered Ribbon in Golden Glow. I took another short length and slipped it under the ribbon & tied a knot. I stamped the sentiment in Memento Black ink on Basic White scrap & fussy cut it & placed it on the front with dimensionals. I cut a piece of the grid vellum from the Berry Botanical Vellum pack & backed it with Fresh Freesia. This was adhered directly to the polka dot pattern of the Artisan Sketched Garden that was already on a Card base of Basic Black.
For the inside… I stamped the sentiment using the Framed All Around stamp set & Memento Black ink then stamped the ‘frame’ in two places with Fresh Freesia ink. The Basic White was secured to the card base & the card was complete.
For the envelope… I stamped this leaf image in Memento Black ink & colored the leaves with Peaceful Pine Stampin’ Blends. On the flap is another of the Artisan Sketched Garden DSP in the polka dot pattern used for the card front. I love how this card turned out, sweet to look at and gentle thoughts. This card goes in the mail today.
Shopping with me is easy peasy… simply click the link & you’ll find SU! ONLINE EXCLUSIVES (items not in any catalog!), kits of all sorts – for cards or household items, scrapbooking, catalog info & SU! craft classes. When your order is $50 or more you will receive my monthly tutorial & also get Daisy Patc h Rewards (see my rewards page for more info.
Stampin’ Up! has a joining promotion that has awesome benefits though the end of May – jsut days away. Now, just so you know… as a Demonstrator, we have the privilege/ opportunity to preorder from catalogs & ONLINE EXCLUSIVES before they are available to the public. Already the July preorder is available & I’vc made good use of that. You’ll see more new products coming soon. What I’m encouraging of course, is for you to seriously consider becoming a Demonstrator -with all the fabulous benefits… 20-25% off all products once you’re joined, opportunity to attend special workshops & conventions & a fabulous supportive community of crafters. Join as a demonstrator now & you’ll get our new 2026–2028 In Color Stampin’ Pads FREE along with their Starter Kit! Or if you’d rather have different products instead of ink pads, we’ve got that covered there, too—you can add an extra $35 USD | $50 CAD worth of products to your Starter Kit.
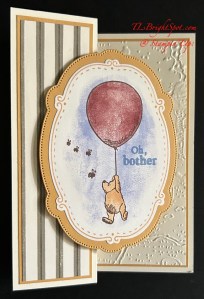
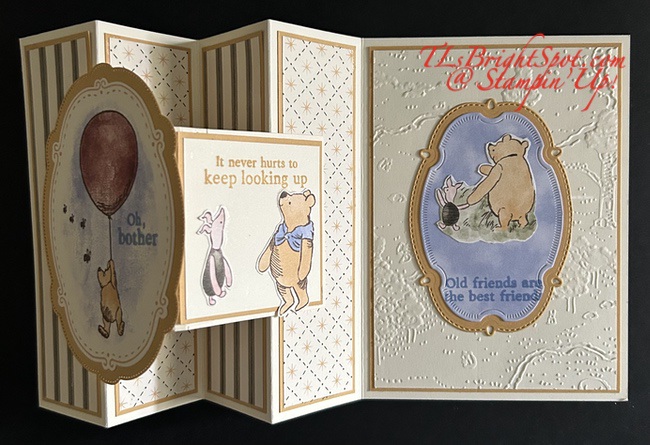
Good morning, good morning! It is a bleak looking day here today – cloudy, overcast, 55 degrees. Of course 2 days ago it was 94! We made this card two weeks ago in card class & I forgot to post it 😖. It is so cute… Silly Old Bear DSP, Hundred Acre Woods embossing Folder & coordinating Sweet Words & Lab els bundle. These are all from the May ONLINE EXCLUSIVES.
I used the dies from Sweet Words & Labels to die cut this image straight from the Silly Old Bear DSP. The layer behind the DSP is Golden Glow card stock, one of the new In Colors for 2026-2028. I used Wink of Stella on the Balloon & Hydrangea Hue for stamping the sentiment from Sweet Words & Labels stamp set. Let’s look at the inside of the card so you can see the whole image.
The DSP layers here are all from the Silly Old Bear DSP – gorgeous aren’t they? And the card stock layers are Golden Glow. The card base is Very Vanilla and the embossed panel is also Very Vanilla, embossed with Hundred Acre Woods 3D embossing Folder as I mentioned earlier. The images for the V panel were fussy cut from the Silly Old Bear DSP & stamped with the Sweet Words & Labels stamp set: either Golden Glow or Hydrangea Hue.
Directions for a W/V fun fold:
The card base is 11 x 5 1/2 scored on the long side @ 1 3/4, 3 1/2, 5 1/4, & 7
Card stock layers 1 1/2 x 5 1/4 – cut 4; 3 3/4 x 5 1/4 + embossed panel 3 5/8 x 5 1/8
DSP layers 1 3/8 x 5 1/8 – cut 4, 2 different patterns
Die cut images from Silly Old Bear DSP using the Sweet Words & Labels Dies; die cut card stock layer for behind each image with next size larger die
Embossed the largest panel for the inside back – Hundred Acre Woods EF
Adhere Layers together & attach to card base
Cut another panel of card stock (here it is Very Vanilla) 6 x 3 & score on long side @ 3″; attache to front panel & last scored panel to create the V – see photo below. Decorate the right panel w/ card stock layer 2 3/4 x 2 3/4 then Very Vanilla layer 2 5/8 x 2 5/8. This last layer is stamped & decorated prior to attaching.
Attach die cuts from DSP; add additional fussy cut layer for inside back panel & stamp sentiment in Hydrangea Hue
I love how this card turned out! And it can used for all kinds of reasons. I’m sending this to a friend who needs a little ‘pick me up’.
Stampin’ Up! has some beautiful new Online Exclusives that are available to order now!! And they’ve created a printable flyer to make it MUCH easier to shop the new products! WOOHOO!! You can get to the flyer for the newest Online Exclusives by clicking here
You won’t find the Online Exclusive products in any catalog, they’ll only be listed in the online store. The Online Exclusive product releases will continue throughout the year so there will be new products to shop from, in addition to new catalogs!
Now, just so you know… as a Demonstrator, we have the privilege/ opportunity to preorder from catalogs & ONLINE EXCLUSIVES before they are available to the public. Already the July preorder is available & I’vc made good use of that. You’ll see more new products coming soon. What I’m encouraging of course, is for you to seriously consider becoming a Demonstrator –
with all the fabulous benefits… 20-25% off all products once you’re joined, opportunity to attend special workshops & conventions & a fabulous supportive community of crafters. Join as a demonstrator now & you’ll get our new 2026–2028 In Color Stampin’ Pads FREE along with their Starter Kit! Or if you’d rather have different products instead of ink pads, we’ve got that covered there, too—you can add an extra $35 USD | $50 CAD worth of products to your Starter Kit.
Thanks for stopping by. May you have a beautiful day. Make someone happy by sending them a handmade card filled with ❤️
Good Friday morning! It’s 18 degrees this morning but nice & brightly sunny 😀 My inspiration came from one of my card class students who passed along info about making this cute fun fold. That led me to watch a video by Rachel Tessman. Let’s look at my creation.
This begins with a Basic White panel 4 x 5 14 and adhering a strip of the Lovely & Beautiful SDSP 2 1/2 x 5 1/4 to the center of the panel. Now cut two more strips from the same pattern 1 3/4 x 5 1/4. Adhere those strips in this fashion: the left strip – add adhesive only to the left edge & attach; the right strip – add adhesive to the right edge and attach.
Folding: fold back the top right side of the left strip to approximately the center of the card, but the fold should not allow any of the Basic White to show. Turn the card upside down and do the same for that same panel to create the bottom fold. Now, do the same for the right strip; fold back the top left side of the right strip just to the edge of the center strip pattern to a center point. Turn the card upside down again and do the same on the bottom right side. Burnish those folded back sections.
TIP: this folding back does not necessarily have to be to the center; it could be more toward the top or toward the bottom, but both sides do need to be uniform – to the same point.
Create the center pieces to cover where the papers come together. I pulled out my Beautifully Celebrated Dies, Fresh Freesia card stock and Basic White, die cut the two pieces and adhered them together. ( I used the smallest & next size up). I then stamped this sweet leaf image in Old Olive ink from the Beautifully Celebrated stamp set and colored it with Soft Sea Foam Stampin’ Blends. I die cut it with coordinating dies (Beautifully Celebrated) and set it aside. I used the Simply Beautiful stamp set and Old Olive ink for the sentiment and fussy cut it, adhered the leaf to the back of the sentiment then attached the sentiment with mini dimentionals to the two die cut banners. W ith the Simply Beautiful stamp set, I stamped the small flower in VersaMark ink (twice) on a Basic White piece, sprinkled those with WOW? Metallic Gold embossing Powder & heat set them. I colored both with Fresh Freesia Stampin’ Blends for the flowers and Daffodil Delight for the center of the flowers. I die cut these with the coordinating die from Simply Beautiful Dies and adhered them to the same banner: one adhered directly to the and one on dimensionals (yes, it slightly covers some of the sentiment) I attached the banners to the front of the card with dimensionals and added three Pearlized Faceted Circles.
For the inside of the card, I stamped the same small flower from Simply Beautiful stamp set in VersaMark ink on a 4 x 5 1/4 Basic White panel, sprinkled it with WOW! Metallic Gold embossing powder & heat set it. Again I colored it with Stampin’ Blends Fresh Freesia and Daffodil Delight. I stamped the sentiment in Old Olive ink on a nother piece of Basic White and die cut it with Words of Beauty Dies. I adhered this just beneath the flower – and finis! This could easily be a sympathy card or get well card or simply ‘hello friend’ kind of card. But I love the simplicity of the fun fold and the extra charm it creates. Hope you like!
Wasnt to purchase the products to make this card? They may be found in the Jan-Apr 2026 Mini Catalog and you may SHOP WITH ME HERE!
Thanks for stopping by. May you have a beautiful day. Make someone happy by sending them a handmade card filled with ❤️
Stampin’ Up! is currently sponsoring BONUS DAYS: Because do you know what’s a great deal? Getting rewarded for all the crafting supplies you’re already going to buy! When you shop between January 6 and February 2 and spend $50 USD | $60 CAD, you will earn a $5 USD | $6 CAD coupon! Make sure you save all your coupons because you can redeem them (and we mean ALL of them) between February 3 and 28. During the earning period, a shopping-cart notification will appear when an order qualifies for a Bonus Days coupon—an online store feature on both the demonstrator and customer websites.
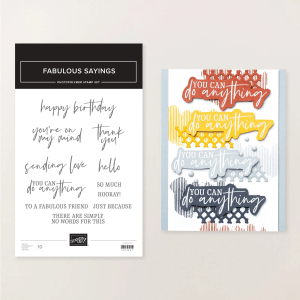
PRODUCT OF THE MONTH – only $5 with a $75 order (before shipping & taxes)
167972
FABULOUS SAYINGS PHOTOPOLYMER STAMP SET (ENGLISH)
$5.00
The Fabulous Sayings Stamp Set is the exclusive Product of the Month for January 2026! Only available until stocks run out—don’t wait to get yours! This is a Two-Step Stampin’ set; it allows you to layer two or more images to create one final image with extra texture and dimension in the colors you want.
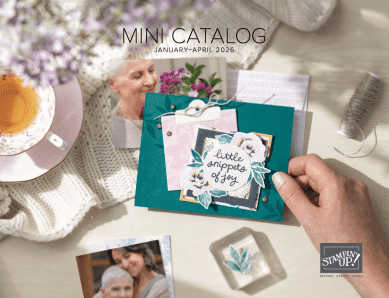
Jan-Apr 2026 Mini Catalog – click the image below to view the catalog
ONLINE EXCLUSIVES Several new stamp sets, dies, Designer Series Papers, embellishments and ribbons are available online that are not in any SU! Catalog. SHOP WITH ME HERE
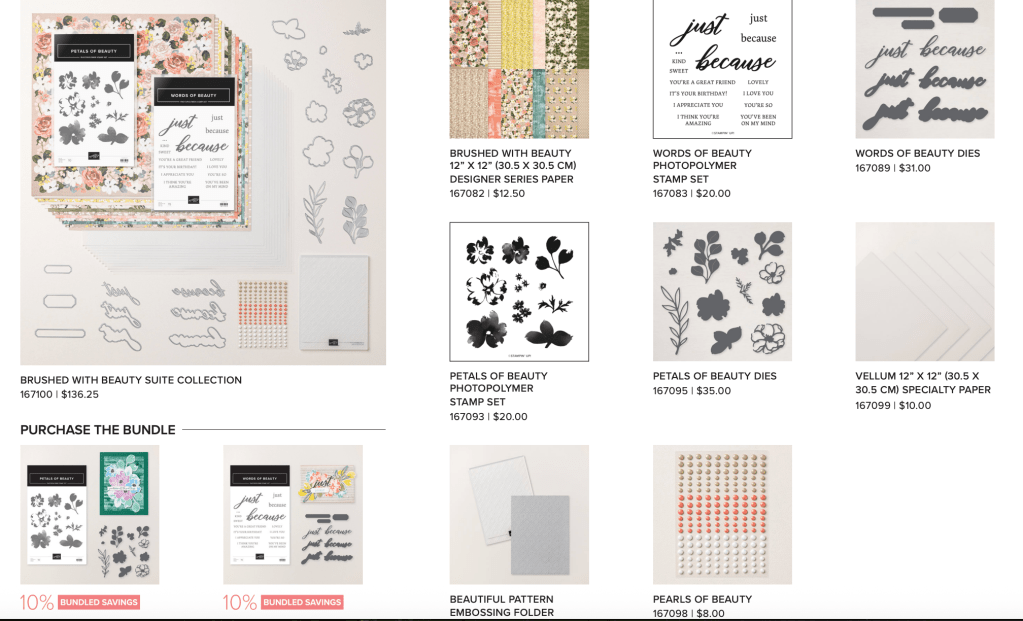
Good day stamping buddies. Yesterday, November 4, Stampin’ Up! did a big release of new ONLINE EXCLUSIVES that you (& I) are going to love. The Brushed with Beauty Suite is one I purchased when it became available to demonstrators – and I just c an’t quite playing with it. The Designer Series Paper is just soooo very pretty and the stamp bundle, well, they are wonderful too. I’ll post some links to cards I’ve made with this suite of products – to give some inspiration. Try here, here and here. Stampin’ Up! is offering a virtual craft class November 20, 2025, with this suite of products and it’s open to customers!!! I think you won’t want to miss this class. The code for the class is 170074 and it’s a very reasonable $30 US. That does not include the suite of products (this is the number for that…167100), just the class. You can place your order through my ONLINE SHOP HERE.
There’s another bundle that I have enjoyed that was released as part of the Nov 4 ONLINE EXCLUSIVES – Swirled Designs. I have not created as many cards with it, but it too is worth pointing out. Check out my card here.
During the night last night I received another package of a couple of new release products & other items – the Friendly Foliage Bundle and the Creative Haven Bundle. Naturally, I haven’t played with either one yet since they arrived during the night 🥴. You’ll just have to wait with baited breath for those. See all the ONLINE EXCLUSIVE PRODUCTS HERE
DETAILS – Makes 9 cards: 3 each of 3 designs – Folded card size: 5-1/2″ x 4-1/4″ (14 x 10.8 cm) – Colors: Basic Beige, gold, Gray Granite, Lost Lagoon, Night of Navy, Petal Pink – Also available in French
Kit includes one of each item listed below. – Everyday Beauty Photopolymer Stamp Set – Clear stamp block – Night of Navy Classic Stampin’ Spot – Step-by-step instructions – 9 printed envelopes – Faux wax seal stickers – Metallic thread – Adhesive
Adventure Awaits Kit – 167235 – $14.00 US
DETAILS – Makes 9 cards: 3 each of 3 designs – Folded card size: 5-1/2″ x 4-1/4″ (14 x 10.8 cm) – Colors: Basic Black, Coastal Cabana, Crushed Curry, Garden Green, Granny Apple Green, Pecan Pie, Petal Pink, Poppy Parade, Pretty Peacock, Timid Tiger – Sentiments printed in English, French, and German
Kit includes one of each item listed below. – Step-by-step instructions – 9 printed envelopes – Vellum – Adhesive
Thanks for stopping by. May you have a beautiful day. Make someone happy by sending them a handmade card filled with ❤️
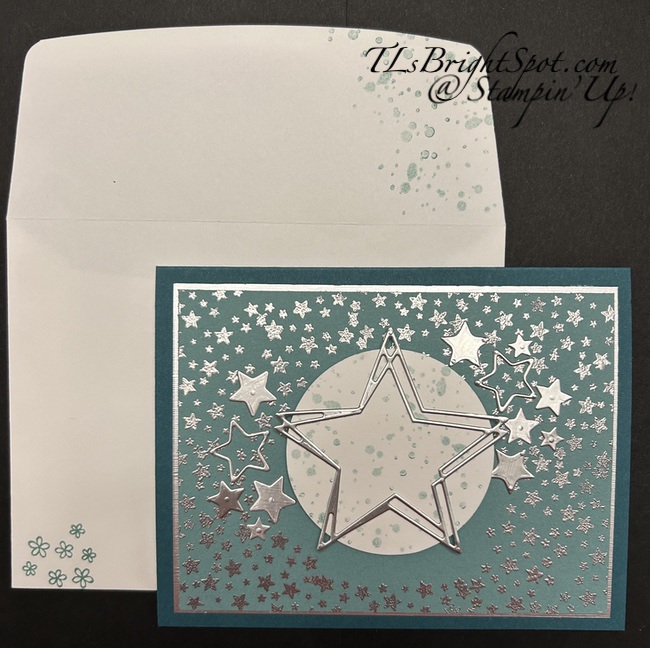
Welcome to the Happy Inkin’ Thursday Blog Hop! You may have come from the fabulous Tara or just hopped in right here… However you got here, welcome! We have a sketch challenge this week and I have chosen to work with a NEW November ONLINE EXC;LUSIVE soon to be released November 4 bundle… called Swirled Designs. The dies are delicate so I encourage you to adhere an Adhesive Sheet to whatever paper you want to use to adhere these detailed dies. They are gorgeous but as I said – delicate.
I began by stamping the small star images from the Swirled Designs stamp set with VersMark ink over most of the Lost Lagoon panel, then sprinkling it with WOW! Metallic Embossing Powder in Polished Silver. I heat set it with my SU! heat tool. I then used the 2 3/8″ circle punch to punch a circle from Basic White, stamped it with Lost Lagoon stamped off once. What that means… ink the stamp, stamp off once then stamp on the circle – do that each time to create the dotted image on the circle. Adhere the stamped circle to the embossed star background with dimensionals. Cut a piece of Silver Foil 3 7/8 x 5 1/8, back it with an Adhesive Sheet. Die cut the single large star & several of the small stars plus the larger floral image from this in the center of the Silver Foil paper using the coordinating Swirled Designs Dies. Attach stars as shown – large star in the center of the circle and remaining small stars to the the embossed Lost Lagoon panel to reflect the challenge. Adhere the embossed panel to the Silver Foil & add to the Pretty Peacock card base with adhesive.
For the inside… adhere the Silver Foil die cut floral image to a Basic White panel (3 3/4 x 5) then attach to a panel of Lost lagoon (3 7/8 x 5 1/8) then to the inside of the card. Done!
For the envelope… stamp the dots from the Swirled Designs stamp set in stamped off Lost Lagoon in k. (ink, stamp off on scrap, then stamp on envelope flap). Stamp the flower design from the Swirled Designs stamp set on the front of the envelope with full strength Lost Lagoon ink. This card is ready to send. No sentiment makes this card great for all occasions… just add your message – it could be Christmas, birthday, silver anniversary,New Years – you name it . And, it could be masculine or feminine 😀 This is really non-generic – and I love that! As I mentioned earlier, this bundle will be released November 4 as an ONLINE EXCLUSIVE. And to remind hyou – as a Demonstrator I have the privilege of preordering items before they become available to the general public. 👍 That’s just a hint to become a Demonstrator!!! See below for moreinformation.
Now it’s time to visit those participating in today’s blog hop… click the next button to visit Nicole or click on a name to take you elsewhere. Whichever you do, do not miss a single creation on this hop.
FREE SHIPPING for orders $75 & up is happening NOW … what’s on your list to order? I don’t have a l-o-n-g list but I do have a list. It’s the perfect time to order those heavy items that add bulk, also adhesives & bundles – so yeah, just about everything! Here are all the details about the Free Shipping.
Sales Period: October 22–24
Ordering Deadlines
Phone: October 24 at 6:59 p.m. (MT)
Online: October 24 at 11:59 p.m. (MT)
All order types qualify for this promotion.
Free shipping is for three days only. Orders must be opened and closed from October 22–24.
Free shipping automatically applies to your cart after the qualifying amount has been met, which is $75 USD | $100 CAD (before tax).
Coupon codes and Stampin’ Rewards will lower your order’s retail amount. Orders must meet the qualifying amount to be eligible for free shipping.
The additional cost for expedited shipping is not covered by this promotion.
Prepaid 3-, 6-, and 12-month Paper Pumpkin subscriptions and month-to-month subscriptions do not qualify for free shipping. Refills, past kits and add-ons do qualify toward free shipping, but you must be a subscriber to purchase. Subscriptions billed and shipped this month will be charged for the normal amount ($27.00 USD | $36.75 CAD shipping included) + tax.
And did you know… when you are a demonstrator, you ALSO participate in these great deals – on top of your discount.. it’s likie double your pleasure, double your fun! 😀 👍 And right now, Stampin’ Up! has a JOINING PROMOTION that is the best ever…
From October 1 to 31, anyone who purchases the Starter Kit can choose between two amazing offers. In addition to FREE shipping, FREE business supplies, and a FREE Paper Pumpkin kit, you can either get $125 worth of products for just $35, an amazing first time ever offer, OR $189 worth of products for just $99!
What are some of the benefits of becoming a demonstrator?
Crafting is even more fun with community
Become a demonstrator and enjoy all the perks that come with that:
1) a 20–25% product discount
2) exclusive early access to the latest releases online and in catalogs
3) the opportunity to earn a modest supplemental income
4) the chance to attend incredible training and crafting events
5) Scrapbooking has never been better in Stampin’ Up! history. Have you seen all the new scrapbook products Stampin’ Up! has? It’s amazing…
6) There’s never an obligation to sell, you can join to enjoy the discount for yourself.
It’s also fun to learn new skills, develop new crafting techniques & share your passion for crafting. If you’re like me, it’s really fun to meet new people & connect with fellow crafters. How can I help & support you – lots of ways… through connection, team meetings, our team facebook page, updates. Feel free to connect with me – ask questions – get excited.
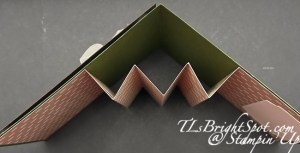
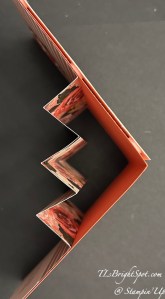
Good morning – it’s Saturday & cool in this part of New Jersey – 40 degrees! Blanket time and possibly time to bring in firewood for a fire tonight. We’ll see. I have two cards for you today, using products from the November ONLINE EXCLUSIVE release. As a Demonstrator, I am privileged to be able to preorder products before they become available to the public. This is a beautiful suite of two bundles, DSP & Vellum, embellishments and an embossing folder. For today’s cards I did not use the embossing folder. I have two cards to share; one in landscape & one in portrait.
Aren’t these papers stunning – Brushed with Beauty DSP. Love, love. On the landscape card are die cuts in vellum, using the Petals of Beauty Dies. The sentiment & banner die cut use items from the two bundles: Petals of Beauty and Words of Beauty. The bow is Old Olive Linen Thread – a September ONLINE EXCLUSIVE that comes in a two pack – Early Espresso is the other color of Linen Thread in the duo pack. The portrait card again shows die cuts, this time in card stock. I love this flower with the delicate edge! I stamped the flower image twice in Basic Beige ink, layered them then added the delicate die cut in Basic White. A single Pearls of Beauty embellishment is in the flower center. The ribbon is Braided Trim from the Floral Charm Suite (July ONLINE EXCLUSIVES) And here’s the inside of each.
In the landscape card above I added a Branching Out die cut, the smallest, and no stamping. (It is available in the September to December 2025 Mini Catalog) The inside looks a bit plain, so I’m going to add something for sure. On the portrait card, I stamped the two step floral image on Basic White, using Petal Pink & Calypso Coral inks, then die cut it with the Petals of Beauty Dies. This comes from the Petals of Beauty stamp set & coordinating dies in the suite of products. The leaf image is die cut from Mossy Meadow. I did add the Pearls of Beauty embellishment to the flower center. It’s fairly flat & doesn’t add a lot of bulk. The sentiment is stamped in Mossy Meadow ink & comes from Words of Beauty stamp set – part of the suite of products. Below is a top down view of each of the cards.
Time for instructions in how to make this fun fold accordion design.
Basic Directions for this Accordion Fun Fold:
cut the card base 4 1/4 x 5 1/2 and score @ 5 1/2
cut the DSP 4 x 12 & score @ 3, 4, 5, 6, 7, 8, & 9
adhere one end of the DSP to the inside of the card base with equal borders on three sides
adhere opposite end in the same fashion
for the front…
cut a card stock panel in a coordinating color 4 1/8 x 5 3/8
cut a DSP layer 4 x 5 1/4 & adhere to coordinating card stock
attach these two with dimensionals to the card front
decorate as desired
Brushed with BeautySuite – November ONLINE EXCLUSIVE
If you are interested in becoming a Demonstrator, NOW IS THE PERFECT TIME! Stampin’ Up! has an exclusive offer/ promotion during the month of October. From October 1 to 31, anyone who purchases the Starter Kit can choose between two amazing offers. In addition to FREE shipping, FREE business supplies, and a FREE Paper Pumpkin kit, you can either get $125 worth of products for just $35, an amazing first time ever offer, OR $189 worth of products for just $99!
What are some of the benefit of becoming a Demo:
Crafting is even more fun with community
Become a demonstrator and enjoy all the perks that come with that:
1) a 20–25% product discount
2) exclusive early access to the latest releases online and in catalogs
3) the opportunity to earn a modest supplemental income
4) the chance to attend incredible training and crafting events
5) Scrapbooking has never been better in Stampin’ Up! history. Have you seen all the new scrapbook products Stampin’ Up! has? It’s amazing…
6) There’s never an obligation to sell, you can join to enjoy the discount for yourself.
It’s also fun to learn new skills, develop new crafting techniques & share your passion for crafting. If you’re like me, it’s really fun to meet new people & connect with fellow crafters. How can I help & support you – lots of ways… through connection, team meetings, our team facebook page, updates. Feel free to connect with me – ask questions – get excited.


![Flowering Meadow Bundle (English) [ 167912 ]](https://assets1.tamsnetwork.com/images/EC042017NF/167912s.jpg "Flowering Meadow Bundle (English) [ 167912 ]")
![Velvet Meadow 12" X 12" (30.5 X 30.5 Cm) Specialty Designer Series Paper [ 167904 ]](https://assets1.tamsnetwork.com/images/EC042017NF/167904s.jpg "Velvet Meadow 12\" X 12\" (30.5 X 30.5 Cm) Specialty Designer Series Paper [ 167904 ]")
![Peaceful Pine 8 1/2" X 11" Cardstock [ 167691 ]](https://assets1.tamsnetwork.com/images/EC042017NF/167691s.jpg "Peaceful Pine 8 1/2\" X 11\" Cardstock [ 167691 ]")
![Berry Burst 8-1/2" X 11" Cardstock [ 144243 ]](https://assets1.tamsnetwork.com/images/EC042017NF/144243s.jpg "Berry Burst 8-1/2\" X 11\" Cardstock [ 144243 ]")
![Basic White 8 1/2" X 11" Cardstock [ 166780 ]](https://assets1.tamsnetwork.com/images/EC042017NF/166780s.jpg "Basic White 8 1/2\" X 11\" Cardstock [ 166780 ]")
![Berry Burst Classic Stampin' Pad [ 147143 ]](https://assets1.tamsnetwork.com/images/EC042017NF/147143s.jpg "Berry Burst Classic Stampin' Pad [ 147143 ]")
![Daffodil Delight Classic Stampin' Pad [ 147094 ]](https://assets1.tamsnetwork.com/images/EC042017NF/147094s.jpg "Daffodil Delight Classic Stampin' Pad [ 147094 ]")
![Peaceful Pine Classic Stampin Pad [ 167679 ]](https://assets1.tamsnetwork.com/images/EC042017NF/167679s.jpg "Peaceful Pine Classic Stampin Pad [ 167679 ]")
![White Gel Pens [ 166642 ]](https://assets1.tamsnetwork.com/images/EC042017NF/166642s.jpg "White Gel Pens [ 166642 ]")
![Linen Thread [ 104199 ]](https://assets1.tamsnetwork.com/images/EC042017NF/104199s.jpg "Linen Thread [ 104199 ]")
![Charming Shimmer Faceted Dots [ 166139 ]](https://assets1.tamsnetwork.com/images/EC042017NF/166139s.jpg "Charming Shimmer Faceted Dots [ 166139 ]")
![Basic White Medium Envelopes [ 159236 ]](https://assets1.tamsnetwork.com/images/EC042017NF/159236s.jpg "Basic White Medium Envelopes [ 159236 ]")
![Stampin' Positioner [ 167768 ]](https://assets1.tamsnetwork.com/images/EC042017NF/167768s.jpg "Stampin' Positioner [ 167768 ]")
![Stampin' Cut & Emboss Machine [ 149653 ]](https://assets1.tamsnetwork.com/images/EC042017NF/149653s.jpg "Stampin' Cut & Emboss Machine [ 149653 ]")
![Paper Trimmer [ 152392 ]](https://assets1.tamsnetwork.com/images/EC042017NF/152392s.jpg "Paper Trimmer [ 152392 ]")
![Stampin' Dimensionals [ 104430 ]](https://assets1.tamsnetwork.com/images/EC042017NF/104430s.jpg "Stampin' Dimensionals [ 104430 ]")
![Multipurpose Liquid Glue [ 110755 ]](https://assets1.tamsnetwork.com/images/EC042017NF/110755s.jpg "Multipurpose Liquid Glue [ 110755 ]")
![Mini Glue Dots [ 103683 ]](https://assets1.tamsnetwork.com/images/EC042017NF/103683s.jpg "Mini Glue Dots [ 103683 ]")
![Paper Snips [ 103579 ]](https://assets1.tamsnetwork.com/images/EC042017NF/103579s.jpg "Paper Snips [ 103579 ]")
![Take Your Pick [ 144107 ]](https://assets1.tamsnetwork.com/images/EC042017NF/144107s.jpg "Take Your Pick [ 144107 ]")
![Clear Wink Of Stella Glitter Brush [ 141897 ]](https://assets1.tamsnetwork.com/images/EC042017NF/141897s.jpg "Clear Wink Of Stella Glitter Brush [ 141897 ]")
![Basic White 12" X 12" (30.5 X 30.5 Cm) Thick Cardstock [ 166782 ]](https://assets1.tamsnetwork.com/images/EC042017NF/166782s.jpg "Basic White 12\" X 12\" (30.5 X 30.5 Cm) Thick Cardstock [ 166782 ]")
![Metallics Wow! Embossing Powder [ 165678 ]](https://assets1.tamsnetwork.com/images/EC042017NF/165678s.jpg "Metallics Wow! Embossing Powder [ 165678 ]")
![Basics Wow! Embossing Powder [ 165679 ]](https://assets1.tamsnetwork.com/images/EC042017NF/165679s.jpg "Basics Wow! Embossing Powder [ 165679 ]")
![Heat Tool (Us And Canada) [ 129053 ]](https://assets1.tamsnetwork.com/images/EC042017NF/129053s.jpg "Heat Tool (Us And Canada) [ 129053 ]")
![Embossing Additions Tool Kit [ 159971 ]](https://assets1.tamsnetwork.com/images/EC042017NF/159971s.jpg "Embossing Additions Tool Kit [ 159971 ]")
![Small Blending Brushes [ 160518 ]](https://assets1.tamsnetwork.com/images/EC042017NF/160518s.jpg "Small Blending Brushes [ 160518 ]")


![Artisan Sketched Garden 12" X 12" (30.5 X 30.5 Cm) Designer Series Paper [ 167752 ]](https://assets1.tamsnetwork.com/images/EC042017NF/167752s.jpg "Artisan Sketched Garden 12\" X 12\" (30.5 X 30.5 Cm) Designer Series Paper [ 167752 ]")
![Words & Wishes Bundle (English) [ 167897 ]](https://assets1.tamsnetwork.com/images/EC042017NF/167897s.jpg "Words & Wishes Bundle (English) [ 167897 ]")
![Crisp Cantaloupe 8 1/2" X 11" Cardstock [ 167693 ]](https://assets1.tamsnetwork.com/images/EC042017NF/167693s.jpg "Crisp Cantaloupe 8 1/2\" X 11\" Cardstock [ 167693 ]")
![2026–2028 In Color™ Dots [ 167546 ]](https://assets1.tamsnetwork.com/images/EC042017NF/167546s.jpg "2026–2028 In Color™ Dots [ 167546 ]")
![Baker's Twine Essentials Pack [ 155475 ]](https://assets1.tamsnetwork.com/images/EC042017NF/155475s.jpg "Baker's Twine Essentials Pack [ 155475 ]")
![Crisp Cantaloupe Shimmer Brush [ 167661 ]](https://assets1.tamsnetwork.com/images/EC042017NF/167661s.jpg "Crisp Cantaloupe Shimmer Brush [ 167661 ]")
![Golden Glow Shimmer Brush [ 167662 ]](https://assets1.tamsnetwork.com/images/EC042017NF/167662s.jpg "Golden Glow Shimmer Brush [ 167662 ]")
![Hydrangea Hue Shimmer Brush [ 167663 ]](https://assets1.tamsnetwork.com/images/EC042017NF/167663s.jpg "Hydrangea Hue Shimmer Brush [ 167663 ]")
![Cloud Cover Stampin’ Blends Combo Pack [ 165287 ]](https://assets1.tamsnetwork.com/images/EC042017NF/165287s.jpg "Cloud Cover Stampin’ Blends Combo Pack [ 165287 ]")
![Opulent Oasis Bundle (English) [ 167595 ]](https://assets1.tamsnetwork.com/images/EC042017NF/167595s.jpg "Opulent Oasis Bundle (English) [ 167595 ]")
![Berry Botanical Vellum 12" X 12" (30.5 X 30.5 Cm) Specialty Designer Series Paper [ 167985 ]](https://assets1.tamsnetwork.com/images/EC042017NF/167985s.jpg "Berry Botanical Vellum 12\" X 12\" (30.5 X 30.5 Cm) Specialty Designer Series Paper [ 167985 ]")
![Sweet Words & Labels Dies [ 167627 ]](https://assets1.tamsnetwork.com/images/EC042017NF/167627s.jpg "Sweet Words & Labels Dies [ 167627 ]")
![Sweet Words & Labels Bundle [ 167628 ]](https://assets1.tamsnetwork.com/images/EC042017NF/167628s.jpg "Sweet Words & Labels Bundle [ 167628 ]")
![Iridescent Pearl Basic Jewels [ 158987 ]](https://assets1.tamsnetwork.com/images/EC042017NF/158987s.jpg "Iridescent Pearl Basic Jewels [ 158987 ]")
![Bubble Bath Classic Stampin' Pad [ 161664 ]](https://assets1.tamsnetwork.com/images/EC042017NF/161664s.jpg "Bubble Bath Classic Stampin' Pad [ 161664 ]")
![Strawberry Slush Classic Stampin' Pad [ 131178 ] (Retired)](https://assets1.tamsnetwork.com/images/EC042017NF/131178s.jpg "Strawberry Slush Classic Stampin' Pad [ 131178 ] (Retired)")


![Golden Glow Stampin’ Blends Combo Pack [ 167682 ]](https://assets1.tamsnetwork.com/images/EC042017NF/167682s.jpg "Golden Glow Stampin’ Blends Combo Pack [ 167682 ]")
![Fresh Freesia Stampin' Blends Combo Pack [ 155518 ]](https://assets1.tamsnetwork.com/images/EC042017NF/155518s.jpg "Fresh Freesia Stampin' Blends Combo Pack [ 155518 ]")
![Peaceful Pine Stampin’ Blends Combo Pack [ 167668 ]](https://assets1.tamsnetwork.com/images/EC042017NF/167668s.jpg "Peaceful Pine Stampin’ Blends Combo Pack [ 167668 ]")
![Framed All Around Photopolymer Stamp Set (English) [ 167221 ]](https://assets1.tamsnetwork.com/images/EC042017NF/167221s.jpg "Framed All Around Photopolymer Stamp Set (English) [ 167221 ]")
![Golden Glow 8 1/2" X 11" Cardstock [ 167685 ]](https://assets1.tamsnetwork.com/images/EC042017NF/167685s.jpg "Golden Glow 8 1/2\" X 11\" Cardstock [ 167685 ]")
![Golden Glow 3/8" (1 Cm) Bordered Ribbon [ 167548 ]](https://assets1.tamsnetwork.com/images/EC042017NF/167548s.jpg "Golden Glow 3/8\" (1 Cm) Bordered Ribbon [ 167548 ]")
![Basic Black 8-1/2" X 11" Cardstock [ 121045 ]](https://assets1.tamsnetwork.com/images/EC042017NF/121045s.jpg "Basic Black 8-1/2\" X 11\" Cardstock [ 121045 ]")
![Fresh Freesia 8 1/2" X 11" Cardstock [ 155613 ]](https://assets1.tamsnetwork.com/images/EC042017NF/155613s.jpg "Fresh Freesia 8 1/2\" X 11\" Cardstock [ 155613 ]")

![Silly Old Bear Suite Collection [ 167634 ]](https://assets1.tamsnetwork.com/images/EC042017NF/167634s.jpg "Silly Old Bear Suite Collection [ 167634 ]")
![Very Vanilla 8 1/2" X 11" Cardstock [ 166784 ]](https://assets1.tamsnetwork.com/images/EC042017NF/166784s.jpg "Very Vanilla 8 1/2\" X 11\" Cardstock [ 166784 ]")
![Golden Glow Classic Stampin' Pad [ 167676 ]](https://assets1.tamsnetwork.com/images/EC042017NF/167676s.jpg "Golden Glow Classic Stampin' Pad [ 167676 ]")
![Hydrangea Hue Classic Stampin' Pad [ 167677 ]](https://assets1.tamsnetwork.com/images/EC042017NF/167677s.jpg "Hydrangea Hue Classic Stampin' Pad [ 167677 ]")
![Very Vanilla Medium Envelopes [ 107300 ]](https://assets1.tamsnetwork.com/images/EC042017NF/107300s.jpg "Very Vanilla Medium Envelopes [ 107300 ]")


![Lovely & Beautiful 12" X 12" (30.5 X 30.5 Cm) Specialty Designer Series Paper [ 166957 ]](https://assets1.tamsnetwork.com/images/EC042017NF/166957s.jpg "Lovely & Beautiful 12\" X 12\" (30.5 X 30.5 Cm) Specialty Designer Series Paper [ 166957 ]")
![Beautifully Celebrated Bundle (English) [ 166975 ]](https://assets1.tamsnetwork.com/images/EC042017NF/166975s.jpg "Beautifully Celebrated Bundle (English) [ 166975 ]")
![Lovely & Beautiful Suite Collection (English) [ 166981 ]](https://assets1.tamsnetwork.com/images/EC042017NF/166981s.jpg "Lovely & Beautiful Suite Collection (English) [ 166981 ]")
![Simply Beautiful Bundle (English) [ 166965 ]](https://assets1.tamsnetwork.com/images/EC042017NF/166965s.jpg "Simply Beautiful Bundle (English) [ 166965 ]")
![Pearlized Faceted Circles [ 166978 ]](https://assets1.tamsnetwork.com/images/EC042017NF/166978s.jpg "Pearlized Faceted Circles [ 166978 ]")
![Words Of Beauty Dies (English) [ 167089 ]](https://assets1.tamsnetwork.com/images/EC042017NF/167089s.jpg "Words Of Beauty Dies (English) [ 167089 ]")
![Soft Sea Foam Stampin' Blends Combo Pack [ 154902 ]](https://assets1.tamsnetwork.com/images/EC042017NF/154902s.jpg "Soft Sea Foam Stampin' Blends Combo Pack [ 154902 ]")
![Old Olive Classic Stampin' Pad [ 147090 ]](https://assets1.tamsnetwork.com/images/EC042017NF/147090s.jpg "Old Olive Classic Stampin' Pad [ 147090 ]")
![Versamark Pad [ 102283 ]](https://assets1.tamsnetwork.com/images/EC042017NF/102283s.jpg "Versamark Pad [ 102283 ]")


![Pretty Peacock 8-1/2" X 11" Cardstock [ 150880 ]](https://assets1.tamsnetwork.com/images/EC042017NF/150880s.jpg "Pretty Peacock 8-1/2\" X 11\" Cardstock [ 150880 ]")
![Lost Lagoon 8-1/2" X 11" Cardstock [ 133679 ]](https://assets1.tamsnetwork.com/images/EC042017NF/133679s.jpg "Lost Lagoon 8-1/2\" X 11\" Cardstock [ 133679 ]")
![Lost Lagoon Classic Stampin' Pad [ 161678 ]](https://assets1.tamsnetwork.com/images/EC042017NF/161678s.jpg "Lost Lagoon Classic Stampin' Pad [ 161678 ]")
![Tuxedo Black Memento Ink Pad [ 132708 ]](https://assets1.tamsnetwork.com/images/EC042017NF/132708s.jpg "Tuxedo Black Memento Ink Pad [ 132708 ]")