
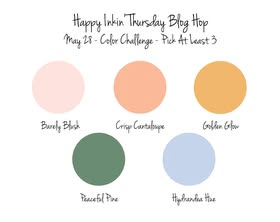
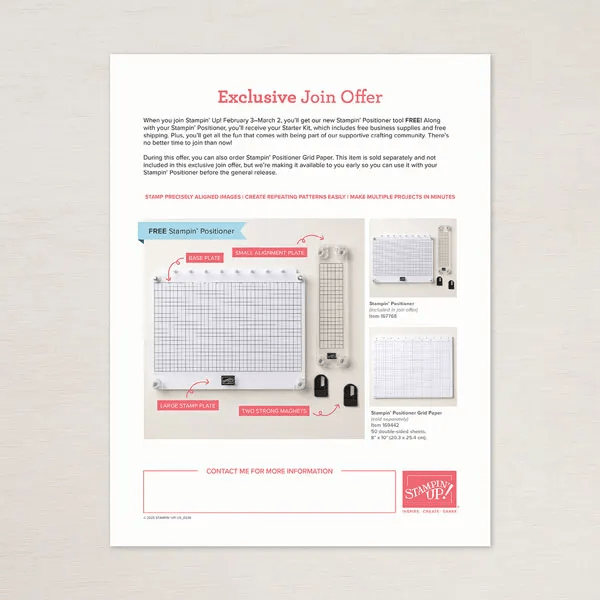
Welcome! It’s Thursday & time for our Happy Inkin’ hop 😀. There are some talented folks in the group so be sure to check out what they have created. We have a color challenge today & I made two very different cards; both use the Bloom Boutique SDSP & the Scalloped Blooms Bundle.

Below are the two cards I created for this color challenge. I would really like to know if you have a favorite!
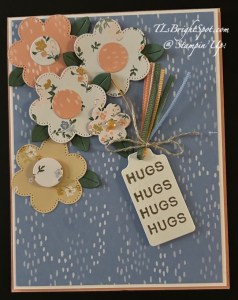
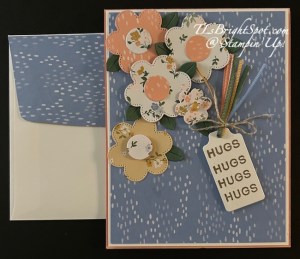
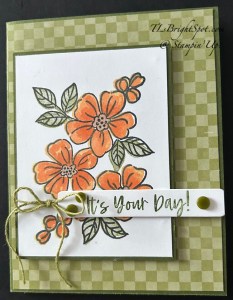
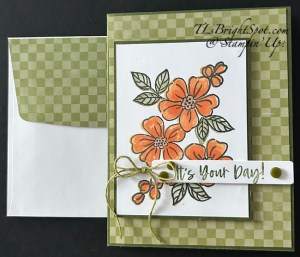
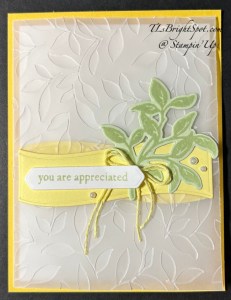
For the card on the left I used the Scalloped Blooms Dies to die cut flowers & centers from various papers in the Bloom Boutique Specialized Designer Series Paper (SDSP). I added them to the created card front: Crisp Cantaloupe card base (4 1/4 x 11 scored at 5 1/2) with a layer of Basic White (4 1/8 x 5 3/8) & Bloom Boutique SDSP (4 x 5 1/4) that were added to the card base with dimensionals. I die cut leaves from Peaceful Pine & slipped them around the flowers. In the smallest flower I added a single 2026-2028 In Color Dot in Golden Glow. The sentiment is stamped with VersaMark ink & sprinkled with Metallic WOW! embossing powder in Gold & heat set. I then die cut it with a die from Scalloped Blooms Dies. I snipped thin strips from each of the 2036-2028 In Color 3/8″ Bordered Ribbon & slipped them through the hole in the die cut, then tied a Linen Thread Bow to secure them in place. The sentiment was added to the front with dimensionals.
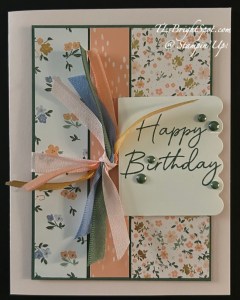
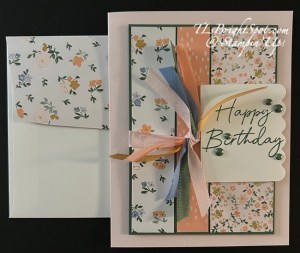
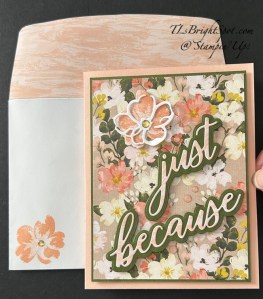
For the card on the right I cut strips from various papers in the Bloom Boutique SDSP: 1 x 4 3/4, 3/4 x 4 3/4 & 1 1/2 x 4 3/4. These were added to a Peaceful Pine laiyer 3 1/2 x 4 7/8. This was added to the Barely Blush card base (8 1/2 x 5 12 scored at 4 1/4). I wrapped a Barely Blush 3/8″ Bordered Ribbon around and secured it in back. I took the remaining bits of ribbon from the first card & tied each one in a kinot on the Barely Blush ribbon. I stamped the sentiment in Peaceful Pine ink from Scalloped Blooms satmp set on a Basic White scrap then die cut it with a Scalloped Blooms Die. I added dimensionals to the back & sdecured it in place. Final touch… five 2026-2028 In Color Dots in Peaceful Pine.
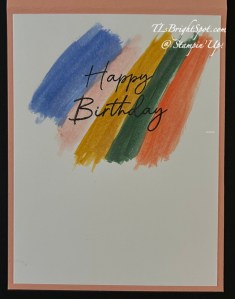
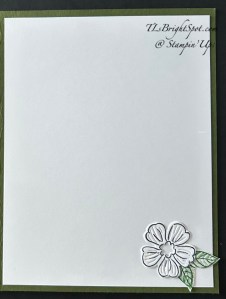
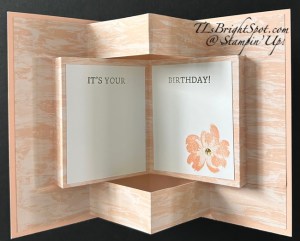
For the insides of these two cards… the card on the left has stripes added with the various In Color Shimmer Brushes found on page 77 in the May-August 2026 Catalog. Once these dried I stamped the sentiment from scalloped Blooms in Black ink. The card on the right has a simple 1/2″ x 4 strip of the Bloom Boutique SDSP at the bottom. The sentiment is stamped in Peaceful Pine ink and is from Scalloped Blooms stamp set.

Envelopes… Each envelope has a 2 1/4 x 6 strip of the Bloom Boutique SDSP added to the flap & trimmed to fit. And that’s it! So… what’s your favorite card? I’d love to know!
OK, time to make the rounds of those participating in today’s hop. More information is below in how to order the products to make these cards & to JOIN MY TEAM 😀 THANKS FOR STOPPING BY!

Shopping with me is easy peasy… simply click the link & you’ll find SU! ONLINE EXCLUSIVES (items not in any catalog!), kits of all sorts – for cards or household items, scrapbooking, catalog info & SU! craft classes. When your order is $50 or more you will receive my monthly tutorial & also get Daisy Patc h Rewards (see my rewards page for more info.
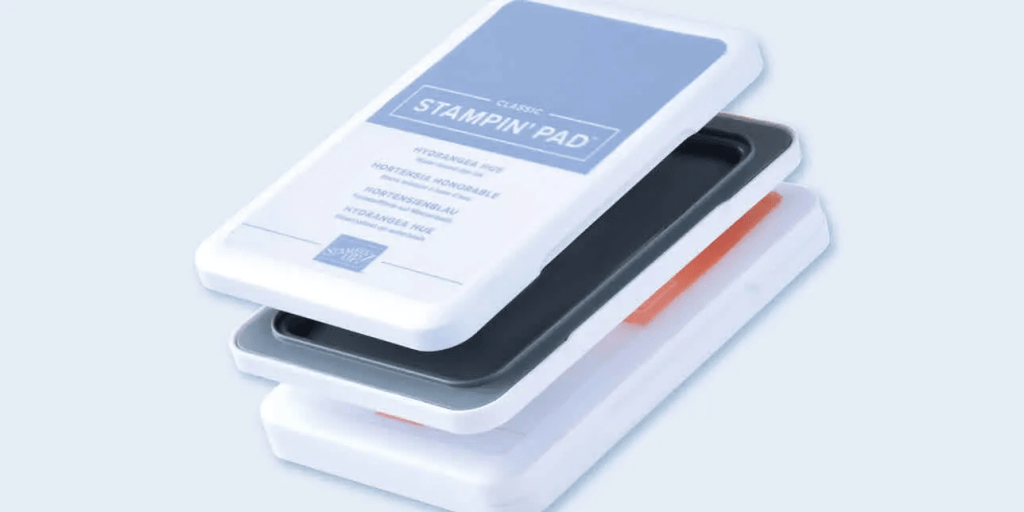
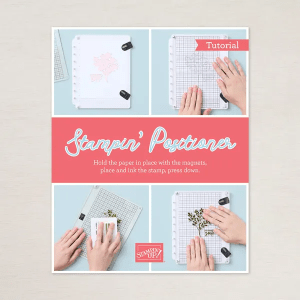
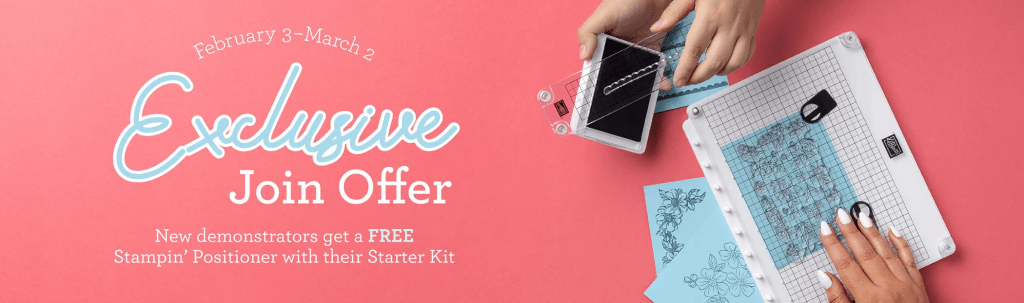
Stampin’ Up! has a joining promotion that has awesome benefits though the end of May – just days away. Now, so you know… as a Demonstrator, we have the privilege/ opportunity to preorder from catalogs & ONLINE EXCLUSIVES before they are available to the public. Already the July preorder is available & I’ve made good use of that. You’ll see more new products coming soon. What I’m encouraging of course, is for you to seriously consider becoming a Demonstrator -with all the fabulous benefits… 20-25% off all products once you’re joined, opportunity to attend special workshops & conventions & a fabulous supportive community of crafters. Join as a demonstrator now & you’ll get our new 2026–2028 In Color Stampin’ Pads FREE along with their Starter Kit! Or if you’d rather have different products instead of ink pads, we’ve got that covered there, too—you can add an extra $35 USD | $50 CAD worth of products to your Starter Kit.

Thanks for stopping by. May you have a beautiful day. Make someone happy by sending them a handmade card filled with ❤️
Product List
![Bloom Boutique Suite Collection (English) [ 167657 ]](https://assets1.tamsnetwork.com/images/EC042017NF/167657s.jpg "Bloom Boutique Suite Collection (English) [ 167657 ]")
![Scalloped Blooms Bundle (English) [ 167647 ]](https://assets1.tamsnetwork.com/images/EC042017NF/167647s.jpg "Scalloped Blooms Bundle (English) [ 167647 ]")
![Bloom Boutique 12" X 12" (30.5 X 30.5 Cm) Specialty Designer Series Paper [ 167637 ]](https://assets1.tamsnetwork.com/images/EC042017NF/167637s.jpg "Bloom Boutique 12\" X 12\" (30.5 X 30.5 Cm) Specialty Designer Series Paper [ 167637 ]")
![Crisp Cantaloupe 8 1/2" X 11" Cardstock [ 167693 ]](https://assets1.tamsnetwork.com/images/EC042017NF/167693s.jpg "Crisp Cantaloupe 8 1/2\" X 11\" Cardstock [ 167693 ]")
![Barely Blush 8 1/2" X 11" Cardstock [ 167689 ]](https://assets1.tamsnetwork.com/images/EC042017NF/167689s.jpg "Barely Blush 8 1/2\" X 11\" Cardstock [ 167689 ]")
![Peaceful Pine 8 1/2" X 11" Cardstock [ 167691 ]](https://assets1.tamsnetwork.com/images/EC042017NF/167691s.jpg "Peaceful Pine 8 1/2\" X 11\" Cardstock [ 167691 ]")
![2026–2028 In Color™ Dots [ 167546 ]](https://assets1.tamsnetwork.com/images/EC042017NF/167546s.jpg "2026–2028 In Color™ Dots [ 167546 ]")
![Barely Blush 3/8" (1 Cm) Bordered Ribbon [ 167550 ]](https://assets1.tamsnetwork.com/images/EC042017NF/167550s.jpg "Barely Blush 3/8\" (1 Cm) Bordered Ribbon [ 167550 ]")
![Crisp Cantaloupe 3/8" (1 Cm) Bordered Ribbon [ 167552 ]](https://assets1.tamsnetwork.com/images/EC042017NF/167552s.jpg "Crisp Cantaloupe 3/8\" (1 Cm) Bordered Ribbon [ 167552 ]")
![Golden Glow 3/8" (1 Cm) Bordered Ribbon [ 167548 ]](https://assets1.tamsnetwork.com/images/EC042017NF/167548s.jpg "Golden Glow 3/8\" (1 Cm) Bordered Ribbon [ 167548 ]")
![Hydrangea Hue 3/8" (1 Cm) Bordered Ribbon [ 167549 ]](https://assets1.tamsnetwork.com/images/EC042017NF/167549s.jpg "Hydrangea Hue 3/8\" (1 Cm) Bordered Ribbon [ 167549 ]")
![Peaceful Pine 3/8" (1 Cm) Bordered Ribbon [ 167551 ]](https://assets1.tamsnetwork.com/images/EC042017NF/167551s.jpg "Peaceful Pine 3/8\" (1 Cm) Bordered Ribbon [ 167551 ]")
![Peaceful Pine Shimmer Brush [ 167665 ]](https://assets1.tamsnetwork.com/images/EC042017NF/167665s.jpg "Peaceful Pine Shimmer Brush [ 167665 ]")
![Hydrangea Hue Shimmer Brush [ 167663 ]](https://assets1.tamsnetwork.com/images/EC042017NF/167663s.jpg "Hydrangea Hue Shimmer Brush [ 167663 ]")
![Golden Glow Shimmer Brush [ 167662 ]](https://assets1.tamsnetwork.com/images/EC042017NF/167662s.jpg "Golden Glow Shimmer Brush [ 167662 ]")
![Crisp Cantaloupe Shimmer Brush [ 167661 ]](https://assets1.tamsnetwork.com/images/EC042017NF/167661s.jpg "Crisp Cantaloupe Shimmer Brush [ 167661 ]")
![Barely Blush Shimmer Brush [ 167664 ]](https://assets1.tamsnetwork.com/images/EC042017NF/167664s.jpg "Barely Blush Shimmer Brush [ 167664 ]")
![Clear Wink Of Stella Glitter Brush [ 141897 ]](https://assets1.tamsnetwork.com/images/EC042017NF/141897s.jpg "Clear Wink Of Stella Glitter Brush [ 141897 ]")
![Basic White Medium Envelopes [ 159236 ]](https://assets1.tamsnetwork.com/images/EC042017NF/159236s.jpg "Basic White Medium Envelopes [ 159236 ]")
![Basic White 8 1/2" X 11" Cardstock [ 166780 ]](https://assets1.tamsnetwork.com/images/EC042017NF/166780s.jpg "Basic White 8 1/2\" X 11\" Cardstock [ 166780 ]")
![Stampin' Cut & Emboss Machine [ 149653 ]](https://assets1.tamsnetwork.com/images/EC042017NF/149653s.jpg "Stampin' Cut & Emboss Machine [ 149653 ]")
![Paper Trimmer [ 152392 ]](https://assets1.tamsnetwork.com/images/EC042017NF/152392s.jpg "Paper Trimmer [ 152392 ]")
![Stampin' Dimensionals [ 104430 ]](https://assets1.tamsnetwork.com/images/EC042017NF/104430s.jpg "Stampin' Dimensionals [ 104430 ]")
![Multipurpose Liquid Glue [ 110755 ]](https://assets1.tamsnetwork.com/images/EC042017NF/110755s.jpg "Multipurpose Liquid Glue [ 110755 ]")
![Mini Glue Dots [ 103683 ]](https://assets1.tamsnetwork.com/images/EC042017NF/103683s.jpg "Mini Glue Dots [ 103683 ]")
![Paper Snips [ 103579 ]](https://assets1.tamsnetwork.com/images/EC042017NF/103579s.jpg "Paper Snips [ 103579 ]")
![Take Your Pick [ 144107 ]](https://assets1.tamsnetwork.com/images/EC042017NF/144107s.jpg "Take Your Pick [ 144107 ]")

![Artisan Sketched Garden 12" X 12" (30.5 X 30.5 Cm) Designer Series Paper [ 167752 ]](https://assets1.tamsnetwork.com/images/EC042017NF/167752s.jpg "Artisan Sketched Garden 12\" X 12\" (30.5 X 30.5 Cm) Designer Series Paper [ 167752 ]")
![Golden Glow Stampin’ Blends Combo Pack [ 167682 ]](https://assets1.tamsnetwork.com/images/EC042017NF/167682s.jpg "Golden Glow Stampin’ Blends Combo Pack [ 167682 ]")
![Fresh Freesia Stampin' Blends Combo Pack [ 155518 ]](https://assets1.tamsnetwork.com/images/EC042017NF/155518s.jpg "Fresh Freesia Stampin' Blends Combo Pack [ 155518 ]")
![Peaceful Pine Stampin’ Blends Combo Pack [ 167668 ]](https://assets1.tamsnetwork.com/images/EC042017NF/167668s.jpg "Peaceful Pine Stampin’ Blends Combo Pack [ 167668 ]")
![Berry Botanical Vellum 12" X 12" (30.5 X 30.5 Cm) Specialty Designer Series Paper [ 167985 ]](https://assets1.tamsnetwork.com/images/EC042017NF/167985s.jpg "Berry Botanical Vellum 12\" X 12\" (30.5 X 30.5 Cm) Specialty Designer Series Paper [ 167985 ]")
![Framed All Around Photopolymer Stamp Set (English) [ 167221 ]](https://assets1.tamsnetwork.com/images/EC042017NF/167221s.jpg "Framed All Around Photopolymer Stamp Set (English) [ 167221 ]")
![Golden Glow 8 1/2" X 11" Cardstock [ 167685 ]](https://assets1.tamsnetwork.com/images/EC042017NF/167685s.jpg "Golden Glow 8 1/2\" X 11\" Cardstock [ 167685 ]")
![Basic Black 8-1/2" X 11" Cardstock [ 121045 ]](https://assets1.tamsnetwork.com/images/EC042017NF/121045s.jpg "Basic Black 8-1/2\" X 11\" Cardstock [ 121045 ]")
![Fresh Freesia 8 1/2" X 11" Cardstock [ 155613 ]](https://assets1.tamsnetwork.com/images/EC042017NF/155613s.jpg "Fresh Freesia 8 1/2\" X 11\" Cardstock [ 155613 ]")


![Silly Old Bear Suite Collection [ 167634 ]](https://assets1.tamsnetwork.com/images/EC042017NF/167634s.jpg "Silly Old Bear Suite Collection [ 167634 ]")
![Very Vanilla 8 1/2" X 11" Cardstock [ 166784 ]](https://assets1.tamsnetwork.com/images/EC042017NF/166784s.jpg "Very Vanilla 8 1/2\" X 11\" Cardstock [ 166784 ]")
![Golden Glow Classic Stampin' Pad [ 167676 ]](https://assets1.tamsnetwork.com/images/EC042017NF/167676s.jpg "Golden Glow Classic Stampin' Pad [ 167676 ]")
![Hydrangea Hue Classic Stampin' Pad [ 167677 ]](https://assets1.tamsnetwork.com/images/EC042017NF/167677s.jpg "Hydrangea Hue Classic Stampin' Pad [ 167677 ]")
![Very Vanilla Medium Envelopes [ 107300 ]](https://assets1.tamsnetwork.com/images/EC042017NF/107300s.jpg "Very Vanilla Medium Envelopes [ 107300 ]")


![Waterside Retreat Suite Collection (English) [ 167932 ]](https://assets1.tamsnetwork.com/images/EC042017NF/167932s.jpg "Waterside Retreat Suite Collection (English) [ 167932 ]")
![Azure Afternoon 8 1/2" X 11" Cardstock [ 161719 ]](https://assets1.tamsnetwork.com/images/EC042017NF/161719s.jpg "Azure Afternoon 8 1/2\" X 11\" Cardstock [ 161719 ]")
![Azure Afternoon Classic Stampin' Pad [ 161663 ]](https://assets1.tamsnetwork.com/images/EC042017NF/161663s.jpg "Azure Afternoon Classic Stampin' Pad [ 161663 ]")
![Old Olive Classic Stampin' Pad [ 147090 ]](https://assets1.tamsnetwork.com/images/EC042017NF/147090s.jpg "Old Olive Classic Stampin' Pad [ 147090 ]")
![Linen Thread [ 104199 ]](https://assets1.tamsnetwork.com/images/EC042017NF/104199s.jpg "Linen Thread [ 104199 ]")


![Gray Granite 8-1/2" X 11" Cardstock [ 146983 ]](https://assets1.tamsnetwork.com/images/EC042017NF/146983s.jpg "Gray Granite 8-1/2\" X 11\" Cardstock [ 146983 ]")
![Pool Party 8-1/2" X 11" Cardstock [ 122924 ]](https://assets1.tamsnetwork.com/images/EC042017NF/122924s.jpg "Pool Party 8-1/2\" X 11\" Cardstock [ 122924 ]")
![Pecan Pie Classic Stampin' Pad [ 161665 ]](https://assets1.tamsnetwork.com/images/EC042017NF/161665s.jpg "Pecan Pie Classic Stampin' Pad [ 161665 ]")
![Pecan Pie Stampin’ Blends Combo Pack [ 161674 ]](https://assets1.tamsnetwork.com/images/EC042017NF/161674s.jpg "Pecan Pie Stampin’ Blends Combo Pack [ 161674 ]")
![Gray Granite Classic Stampin' Pad [ 147118 ]](https://assets1.tamsnetwork.com/images/EC042017NF/147118s.jpg "Gray Granite Classic Stampin' Pad [ 147118 ]")
![Crumb Cake Classic Stampin' Pad [ 147116 ]](https://assets1.tamsnetwork.com/images/EC042017NF/147116s.jpg "Crumb Cake Classic Stampin' Pad [ 147116 ]")
![Balmy Blue Classic Stampin' Pad [ 147105 ]](https://assets1.tamsnetwork.com/images/EC042017NF/147105s.jpg "Balmy Blue Classic Stampin' Pad [ 147105 ]")
![Small Blending Brushes [ 160518 ]](https://assets1.tamsnetwork.com/images/EC042017NF/160518s.jpg "Small Blending Brushes [ 160518 ]")
![Basic White 8 1/2" X 11" Thick Cardstock [ 159229 ]](https://assets1.tamsnetwork.com/images/EC042017NF/159229s.jpg "Basic White 8 1/2\" X 11\" Thick Cardstock [ 159229 ]")


![Lazy Daisy 3 D Embossing Folder [ 167196 ]](https://assets1.tamsnetwork.com/images/EC042017NF/167196s.jpg "Lazy Daisy 3 D Embossing Folder [ 167196 ]")
![Cloud Cover 8 1/2" X 11" Cardstock [ 165621 ]](https://assets1.tamsnetwork.com/images/EC042017NF/165621s.jpg "Cloud Cover 8 1/2\" X 11\" Cardstock [ 165621 ]")
![Cloud Cover 3/8" (1 Cm) Faux Linen Ribbon [ 165271 ]](https://assets1.tamsnetwork.com/images/EC042017NF/165271s.jpg "Cloud Cover 3/8\" (1 Cm) Faux Linen Ribbon [ 165271 ]")


![Scenic Coast Suite Collection (English) [ 167786 ]](https://assets1.tamsnetwork.com/images/EC042017NF/167786s.jpg "Scenic Coast Suite Collection (English) [ 167786 ]")
![Night Of Navy 8-1/2" X 11" Cardstock [ 100867 ]](https://assets1.tamsnetwork.com/images/EC042017NF/100867s.jpg "Night Of Navy 8-1/2\" X 11\" Cardstock [ 100867 ]")
![Night Of Navy Classic Stampin' Pad [ 147110 ]](https://assets1.tamsnetwork.com/images/EC042017NF/147110s.jpg "Night Of Navy Classic Stampin' Pad [ 147110 ]")


![Fragrant Layers Bundle (English) [ 167155 ]](https://assets1.tamsnetwork.com/images/EC042017NF/167155s.jpg "Fragrant Layers Bundle (English) [ 167155 ]")
![Timeless Plaid 6" X 6" (15.2 X 15.2 Cm) Designer Series Paper [ 164678 ]](https://assets1.tamsnetwork.com/images/EC042017NF/164678s.jpg "Timeless Plaid 6\" X 6\" (15.2 X 15.2 Cm) Designer Series Paper [ 164678 ]")
![Mossy Meadow 8-1/2" X 11" Cardstock [ 133676 ]](https://assets1.tamsnetwork.com/images/EC042017NF/133676s.jpg "Mossy Meadow 8-1/2\" X 11\" Cardstock [ 133676 ]")
![Mossy Meadow Classic Stampin' Pad [ 147111 ]](https://assets1.tamsnetwork.com/images/EC042017NF/147111s.jpg "Mossy Meadow Classic Stampin' Pad [ 147111 ]")
![Peach Pie Stampin’ Blends Combo Pack [ 163827 ]](https://assets1.tamsnetwork.com/images/EC042017NF/163827s.jpg "Peach Pie Stampin’ Blends Combo Pack [ 163827 ]")
![Timid Tiger Stampin’ Blends Combo Pack [ 165291 ]](https://assets1.tamsnetwork.com/images/EC042017NF/165291s.jpg "Timid Tiger Stampin’ Blends Combo Pack [ 165291 ]")
![Bronze & Ivory Stampin' Blends Combo Pack [ 154922 ]](https://assets1.tamsnetwork.com/images/EC042017NF/154922s.jpg "Bronze & Ivory Stampin' Blends Combo Pack [ 154922 ]")
![Basic White 12" X 12" (30.5 X 30.5 Cm) Thick Cardstock [ 166782 ]](https://assets1.tamsnetwork.com/images/EC042017NF/166782s.jpg "Basic White 12\" X 12\" (30.5 X 30.5 Cm) Thick Cardstock [ 166782 ]")
![Brushed With Beauty 12" X 12" (30.5 X 30.5 Cm) Designer Series Paper [ 167082 ]](https://assets1.tamsnetwork.com/images/EC042017NF/167082s.jpg "Brushed With Beauty 12\" X 12\" (30.5 X 30.5 Cm) Designer Series Paper [ 167082 ]")
![Petals Of Beauty Bundle (English) [ 167096 ]](https://assets1.tamsnetwork.com/images/EC042017NF/167096s.jpg "Petals Of Beauty Bundle (English) [ 167096 ]")
![Words Of Beauty Bundle (English) [ 167090 ]](https://assets1.tamsnetwork.com/images/EC042017NF/167090s.jpg "Words Of Beauty Bundle (English) [ 167090 ]")
![Early Espresso Classic Stampin' Pad [ 147114 ]](https://assets1.tamsnetwork.com/images/EC042017NF/147114s.jpg "Early Espresso Classic Stampin' Pad [ 147114 ]")
![Opal Rounds Assortment [ 163298 ]](https://assets1.tamsnetwork.com/images/EC042017NF/163298s.jpg "Opal Rounds Assortment [ 163298 ]")
![Petal Pink Classic Stampin' Pad [ 147108 ]](https://assets1.tamsnetwork.com/images/EC042017NF/147108s.jpg "Petal Pink Classic Stampin' Pad [ 147108 ]")
![Low Profile Dots [ 164658 ]](https://assets1.tamsnetwork.com/images/EC042017NF/164658s.jpg "Low Profile Dots [ 164658 ]")


![Vellum 12" X 12" (30.5 X 30.5 Cm) Specialty Paper [ 167099 ]](https://assets1.tamsnetwork.com/images/EC042017NF/167099s.jpg "Vellum 12\" X 12\" (30.5 X 30.5 Cm) Specialty Paper [ 167099 ]")
![Lemon Lolly 8 1/2" X 11" Cardstock [ 161720 ]](https://assets1.tamsnetwork.com/images/EC042017NF/161720s.jpg "Lemon Lolly 8 1/2\" X 11\" Cardstock [ 161720 ]")
![Daffodil Delight 8-1/2" X 11" Cardstock [ 119683 ]](https://assets1.tamsnetwork.com/images/EC042017NF/119683s.jpg "Daffodil Delight 8-1/2\" X 11\" Cardstock [ 119683 ]")
![Daffodil Delight Classic Stampin' Pad [ 147094 ]](https://assets1.tamsnetwork.com/images/EC042017NF/147094s.jpg "Daffodil Delight Classic Stampin' Pad [ 147094 ]")
![Soft Sea Foam Classic Stampin' Pad [ 147102 ]](https://assets1.tamsnetwork.com/images/EC042017NF/147102s.jpg "Soft Sea Foam Classic Stampin' Pad [ 147102 ]")
![Baker's Twine Three Color Pack [ 162759 ]](https://assets1.tamsnetwork.com/images/EC042017NF/162759s.jpg "Baker's Twine Three Color Pack [ 162759 ]")
![Iridescent Pearl Basic Jewels [ 158987 ]](https://assets1.tamsnetwork.com/images/EC042017NF/158987s.jpg "Iridescent Pearl Basic Jewels [ 158987 ]")
