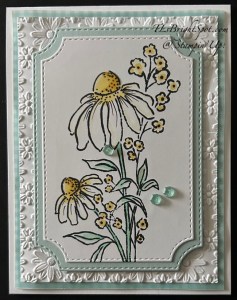
Good Monday! I’ve a pretty daisy card for you that just shouts spring. I’ve been working in my craft room for a while now, purging, cleaning up, reorganizing. It’s coming together but isn’t quite ‘there’ yet. So, back to this card… it uses the new March ONLINE EXCLUSIVE Lazy Daisy 3D embossing folder. Let’s take a peek.
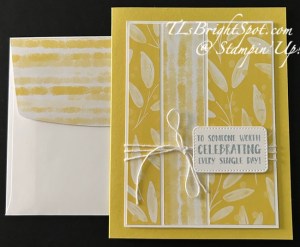
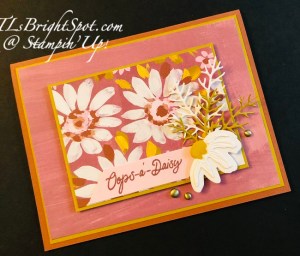
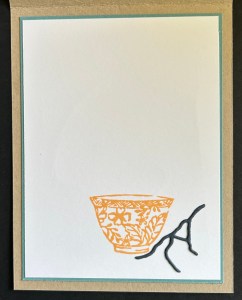
This card has lots of layers 👍 Absolutely love this floral image. I stamped it in Memento ink then added color with Stampin’ Blends: Daffodil Delight & Shy Shamrock, then used my fine tip Basick Black Marker to add lines to the flower petals and dots under the flower center. If your marker tip is of the newer variety and doesn’t have that fine tip, you can use a Journaling Pen. I die cut this image with Branching Out Dies then cut out another from Pool Party card stock & layered them together. I ran a panel of Basic White 3 3/4 x 5 through the new Lazy Daisy 3D embossing folder. I cut a piece of Floral & Gingham Vellum SDSP using the checkered pattern – 4 x 5 1/4 and layered this to a Pool Party same size. I added these to the Thick Basic White card base (4 1/4 x 11 scored @ 5 1/2). The Branching out pieces were attached to the card front with dimensionals. Final step… three Shades of Green Hexagons were added to the card front.
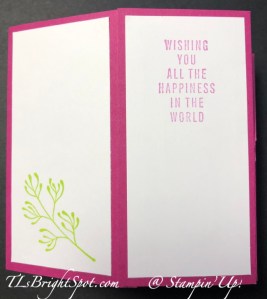
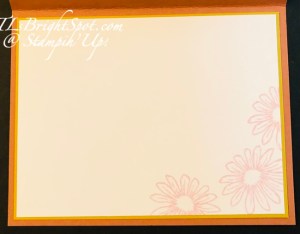
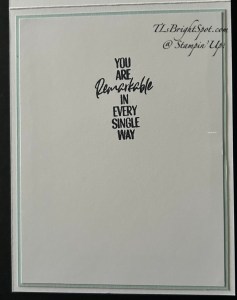
For the inside… I kept this quite simple… only the sentiment stamped in Memento Black ink – and this sentiment is from You Are Remarkable stamp set.
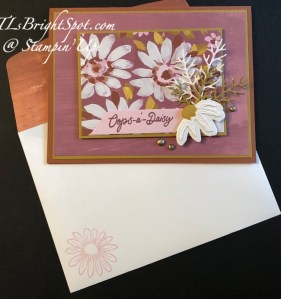
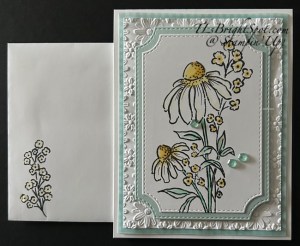
Again using a stamp from the Mixed Florals stamp set & Memento Black ink, I added this sweet floral image to the envelope front and colored the flowers with Stampin’ Blends Light Daffodil Delight.
Let’s discuss for a minute what’s coming soon… changes to that Memento ink pad. It’s going to be new & different & fabulous – no need to have a certain black ink pad for certain processes. This new pad will do it all! No Stazon or cleaner… just this new ink pad. Cannot WAIT!!! This is coming in the new catalog that will be available soon (May 4 to be exact!) – along with lots of other goodies… five new In Colors in all new magnetic ink pads that will be so easy to open – you’re going to love them. In lieu of one new catalog that runs for a full year, Stampin’ Up! will be releasing three catalogs per year beginning with the May-August 2026 Catalog. I’m excited about this change. This new catalog is fewer pages but lots of new products & ideas & I can’t wait to share them with you.
For now… if you want to order items to make the above card, see the products below to do that.
Thanks for stopping by. May you have a beautiful day. Send a card with lots of ❤️
Good morning… it’s Thursday and you KNOW what that means – the wonderful Happy Inkin’ Thursday Blog Hop. We have some very talented folks on this team & it amazes me what folks create. I hope you appreciate all the talent you see on our hops. It is so funny, I was a week ahead of myself & made something for that… so I re-grouped!
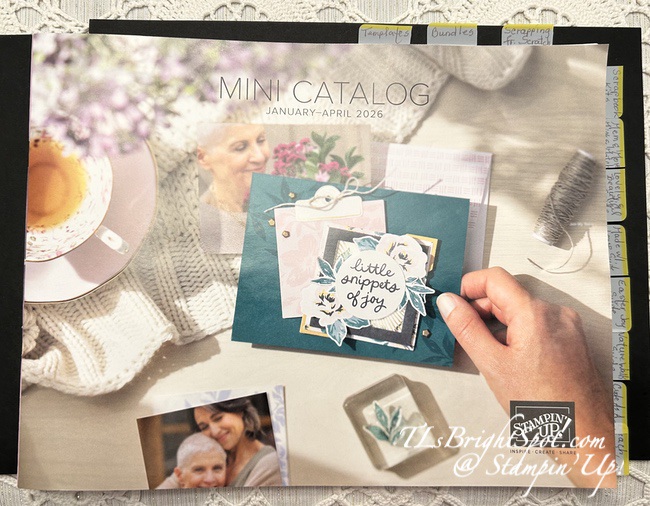
Yesterday I received a Stampin’ Up! package with items from the Jan-April 2026 Mini Catalog, along with my catalog! YAY! So, in re-grouping and with the new items, I created something, well, different for me. My hubby really likes it – so hopefully you will too.
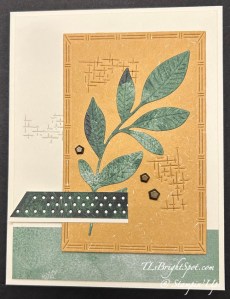
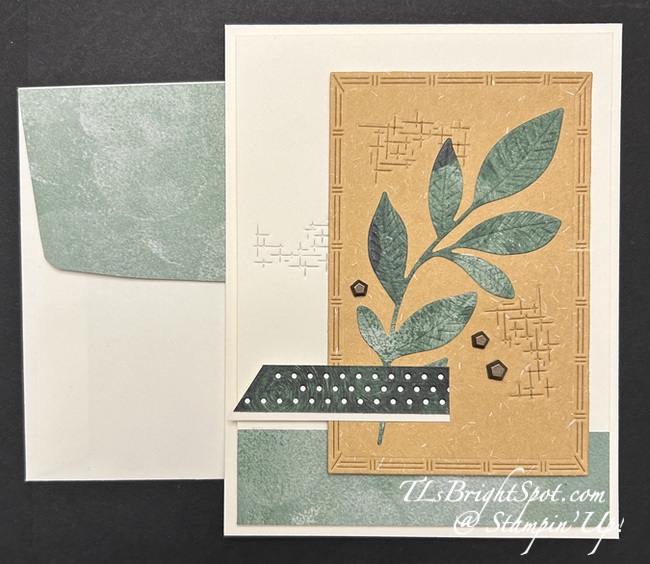
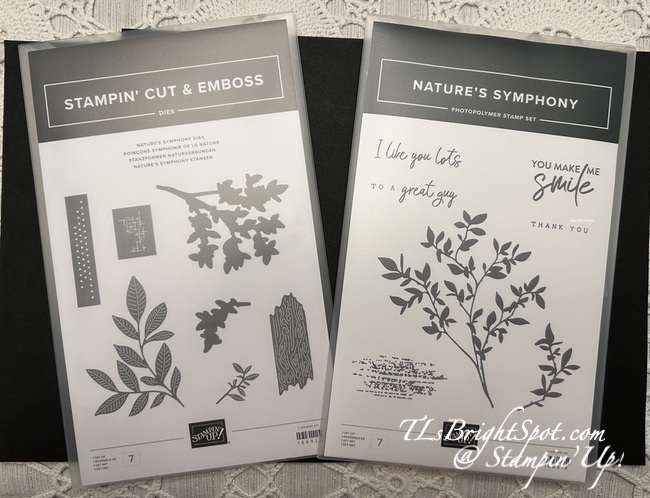
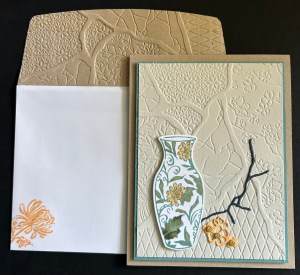
The items on this card are all from the Nature’s Walk Suite Collection in the new January – April 2026 Mini Catalog. First off, I cannot believe we are quickly moving into 2026!!! How did that happen? Secondly – this suite is full of gorgeous Designer Series Paper (2!), embellishments, a bundle & ribbon. I used all but the ribbon for this card. Check the texture on the paper behind the leaf die cut. That’s called Natural Hues Textured Specialty Paper. And the die cut leaf is from one of the Nature Walk DSP; the panel at the bottom is from the same sheet. The odd-shaped cuts in the paper – a die from the Nature’s Symphony Dies. More texture! And the piece with the holes – another die. And of course, it was cut from the same piece of DSP!
I used additional products to make this card… the Textured Notes Dies (third from largest), Very Vanilla card stock & Secret Sea ink.
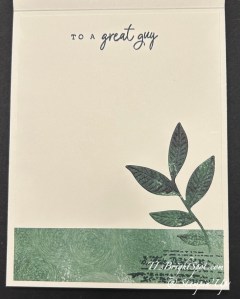
For the inside of the card… Another strip of the Nature Walk DSP across the bottom of a 4 x 5 1/4 panel of Very Vanilla; the leaf is actually a portion of the leaf from the leaf on the card front :O) The sentiment is from Nature’s Symphony stamp set – stamped in Secret Sea ink. There’s another stamp on there too, on the paper under the leaf, it’s just really hard to see, but it comes from this stamp set as well.
Card & envelope… I left this in the ‘large’ size so you can see the texture on the larger panel of Specialty Paper. I will definitely be playing more with this set! You can see more photos below of the products in this suite – the Nature Walk Suite Collection – out in the January- April 2026 Mini Catalog.
Take a ‘walk’ through the folks participating in today’s hop by clicking the link below or clicking on a name. Enjoy!
Here are photos of this suite of products, plus the front of the catalog. You can see I tabbed it already so I can find what I’m looking for more easily.
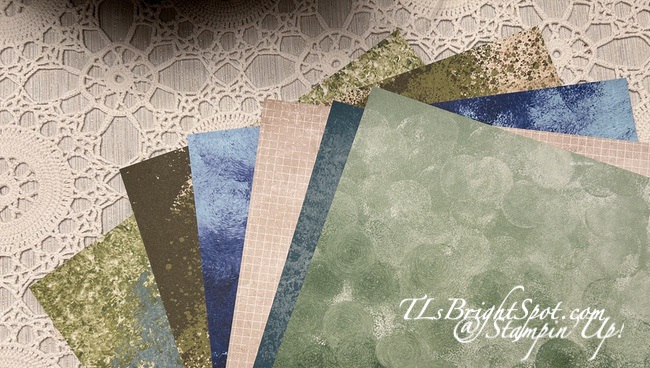
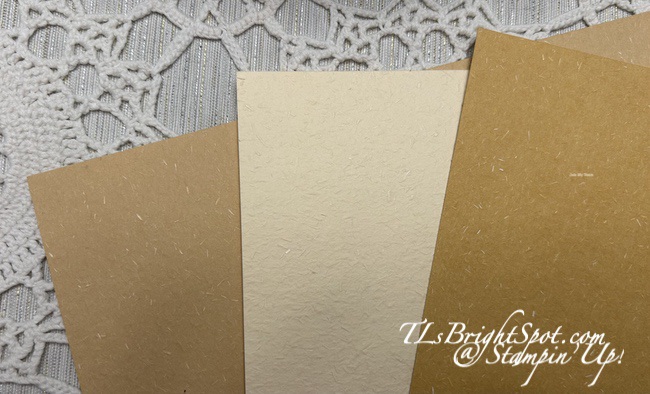
Nature Walk 12 x 12 DSP: coordinating colors in this pretty paper – side A: Cloud Cover, Night of Navy, Old Olive, Pecan Pie, Pretty Peacock & Secret Sea.
Side B of Nature Walk 12 x 12 DSP
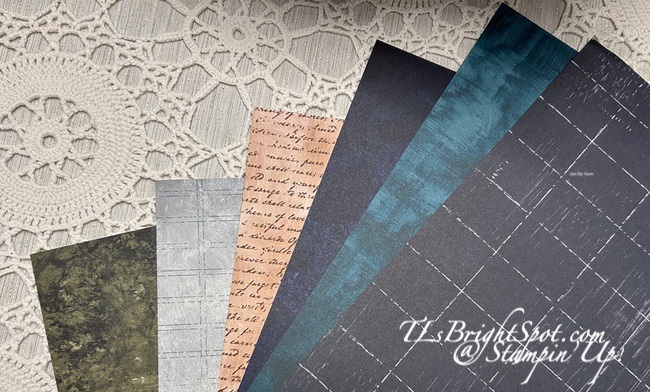
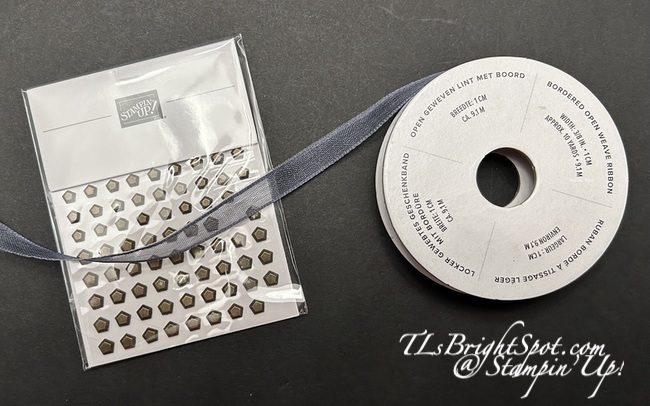
On the left: Natural Hues 12 x 12 Textured Specialty Paper in Cream, Tan & Gold. On the right are the Faux Bronze Pentagons embellishments and the Secret Sea 3/8″ Bordered Open Weave Ribbon.
Other Stampin’ Up! News:
From November 25 to December 1,get up to 40% off select products. 40% OFF
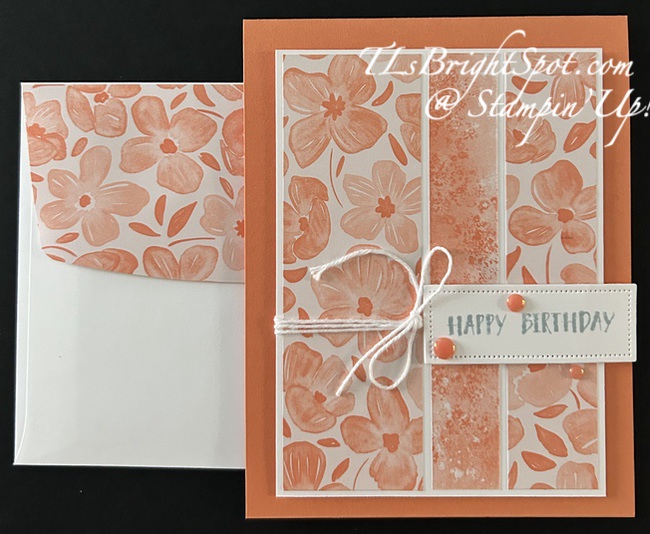
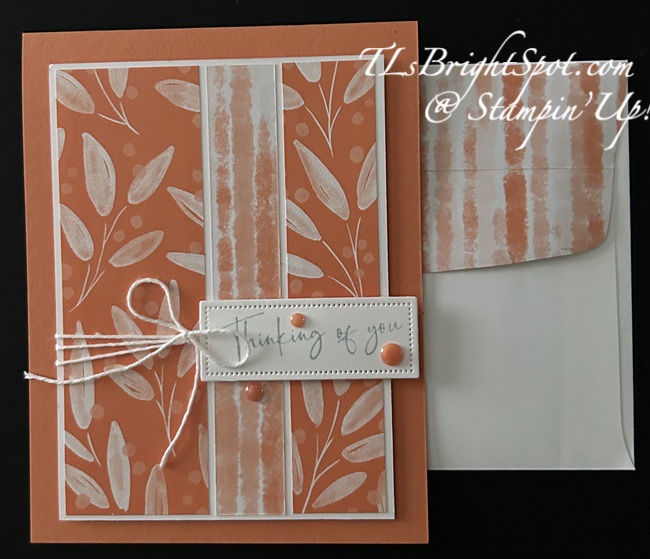
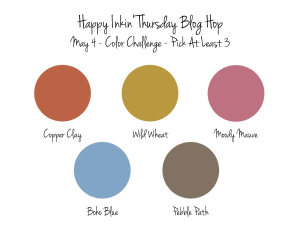
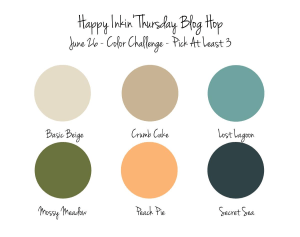
Welcome to our blog hop – it’s Thursday! We have a color challenge today that absolutely stumped me at first. But once I pulled out this bundle of Inspiring Imperfections and coordinating products, it all fell in place.
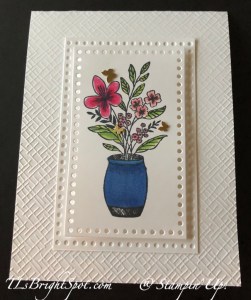
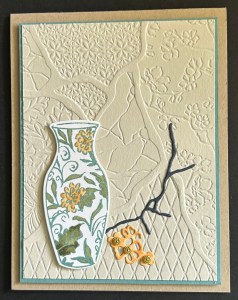
The card base is Crumb Cake cut to 4 1/4 x 11 & scored at 5 1/2. Lost Lagoon is part of the layer on dimensionals and is cut 3 7/8 x 5 1/8 (please cut 2 & save one for the inside of the card. The Basic Beige piece is 3 3/4 x 5 and run through the Joined Together 3D embossing folder, which is part of the Kintsugi Inspirations suite of products in the 2025-2026 Annual Catalog on pages 58-60. I added this panel to the Lost Lagoon and set them aside.
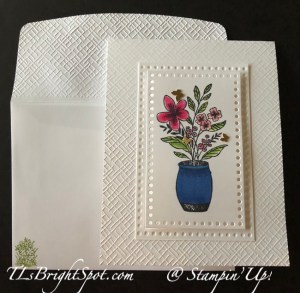
I stamped this gorgeous vase from the Inspiring Imperfections stamp set in Lost Lagoon ink on Basic White scrap, then used Stampin’ Blends in Peach Pie & Mossy Meadow to add additional color. Next I die cut the ‘break’ in Secret Sea and the flower s from Basic White. The flowers I colored with Peach Pie Stampin’ Blends. Once the Vase was in place on the card front (on dimensionals I might add), I attached the ‘break’ and the flowers with dabs of liquid glue. The final touch was to add Wink of Stella to the small flowers and to the flowers & colored leaves on the vase. The final touch was the Flower Accents in the center of each of the flowers.
For the inside … remember the saved Lost Lagoon panel? Attach it to the inside of the card to frame the Basic White stamped panel. 😀. This panel is stamped with another of the vases in the Inspiring Imperfections stamp set and has another of the die cut ‘breaks’ form the coordinating dies in the bundle. And yep – die cut from Secret Sea.
For the envelope, Crumb Cake 2 1/4 x 6 run through the same Joined Together 3D embossing Folder and attached to the flap & trimmed to fit. On the envelope front, this sweet flower stamped in Peach Pie ink. I love it – & hope you approve.
See the product list below to purchase from my ONLINE store. Now – be sure to see what others have created for the hop by clicking the ‘next’ button to take you to Amy, or click on a name to visit someone else. Happy hopping!
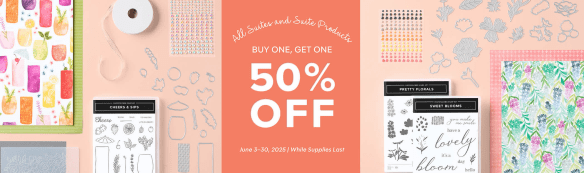
ONLY DAYS LEFT FOR THIS SALE!!! Starting June 3, all available suites and suite products from the 2025–2026 Annual Catalog and Online Exclusives are buy one, get one 50% off! If you’ve had your eye on a new suite from the annual catalog or you really like the look of a stamp set from an Online Exclusives suite, you don’t have to choose—you can get both!
Sales Period: June 3–30, 2025
Ordering Deadlines
Phone: June 30, 2025, at 6:59 p.m. (MT)
Online: June 30, 2025, at 11:59 p.m. (MT)
All available suites and suite products from the 2025–2026 Annual Catalog and Online Exclusives are buy one, get one 50% off.
When you shop the sale, the 50% off discount will apply to the lower-priced item (for example, if you buy a suite collection and a stamp set from a suite, the suite would be full price, and the stamp set would be 50% off).
Suite collections are available if all items are in stock; if all items are not in stock, you can still shop the available suite products.
You don’t have to buy a suite and suite products all from the same suite collection for the discount to apply. You can buy any suite products from any suite.
The discount will appear in your cart once you’ve added two items within the sale parameters to your cart.
Products are available only while supplies last.
See and shop all qualifying suites in the online store.
SHOP LAST CHANCE PRODUCTS HERE… NEW ITEMS ADDED TO THE LIST… MAKE CERTAIN MY NAME IS LISTED AS YOUR DEMONSTRATOR WHEN YOU CHEVCK OUT! :O) REMEMBER…Browse the selection of Last Chance paper crafting products. Additional items are added every other month. These products are available only while supplies last so be sure to buy them before they are discontinued! Discounts vary and are subject to change.
VIRTUAL ALBUM RETREAT!!!
Who: Crafters who love to scrapbook!
When: July 16–18, 2025, 2:00–10:30 p.m. (MT)
Where: Private Facebook Group
Registration: There is no registration for this event! By purchasing the Month by Month Album Retreat 2025 kit, you’ll get access to an exclusive Facebook group where the live event will stream.
Price of Month by Month Album Retreat 2025 kit: $250
Language of Event: This event will be presented in English only.
After the Event: You can access the recorded event videos on the Virtual Album Retreat Facebook group page.
CONTACT ME FOR INFORMATION RE: ADDITIONAL SUPPLY LIST
Click HERE to join with me & create your Starter Kit! What’s to lose – 20% discount/ 20% commission on all orders.
THANKS FOR STOPPING BY. MAY YOU HAVE A BEAUTIFUL DAY. MAKE SOMEONE HAPPY SENDING THEM A HANDMADE CARD FILLED WITH LOVE. ❤️
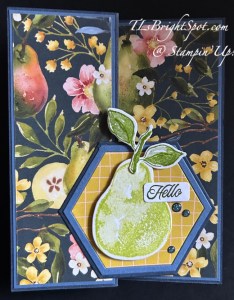
Whew – we are having a m-a-j-o-r heat wave here in NJ, USA. Thank goodness for air conditioning, which we did NOT have when I was growing up in Indiana. But then, the Internet nor cell phones were a thing then either. Sigh. I digress… my card today uses the stunning Painterly Pears 12×12 DSP (available Jul 1 in my online store) and a few other products. Let’s take a look –
That fun hexagon uses the Meant to Bee Dies.
Basic directions to make this fun fold.
Card base is 8 1/2 x 5 1/2 scored at 4 1/4 then the front section folded back on itself in half. NOTE: while you could score at 2 1/8 and 4 1/4, I prefer more precise edges (sometimes it’s off a smidge), and that’s why I simply fold it back on itself. Card base is Secret Sea.
Layered panels – card stock: 2 x 5 3/8 (cut 2) 4 1/8 x 5 3/8. I used Misty Moonlight.
DSP layers – 1 7/8 x 5 1/4 (cut 2 in coordinating patterns), 2 1/4 x 5 1/4
Basic White layer – 2 1/4 x 5 1/4
For the sentiment panel, using the Meant to Be Dies, I die cut three hexagons: Secret Sea, Misty Moonlight and Painterly Pears DSP. What’s fun about these dies is they die cut not only the hexagon, but a fun edge and it’s that edge that I used for the Misty Moonlight piece. The pear is stamped in Lemon Lime Twist ink and the leaves in Old Olive – both using the Perfectly Pears stamp set. I die cut them with the Perfectly Pears Dies, attached dimentionals to the pear and added it to the hexagon, then added the stem /leaves with a bit of liquid glue and a dimensional behind the right leaf. The sweet ‘hello’ comes from the Perfectly Pears stamp set and it is stampedin Mossy Meadow ink and die cut with a die from the Perfectly Pears Dies. It was added with dimensionals behind on the right & a dab of glue on the left. I added three Low Profile Dots from the Painterly Pears Suite Collection, then attached the hexagon just to the left front panel.
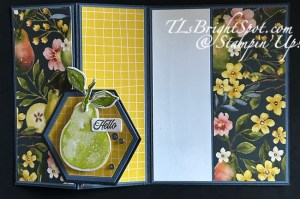
For the envelope, more Painterly Pears 12×12 DSP on the flap & trimmed to fit. The pear is again stamped in Lemon Lime Twist ink and the leaf/stemn in Old Olive ink using appropriate stamps in the Perfectly Pears stamp set. What a friendly, fun looking card and perfect for several occasions. I love the versatility.
Below is a list of products that can be purchased now. Remember the Painterly Pears Suite Collection will be available Jul 1!
Thanks for stopping by. May you have a beautiful day!
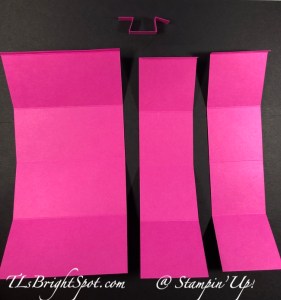
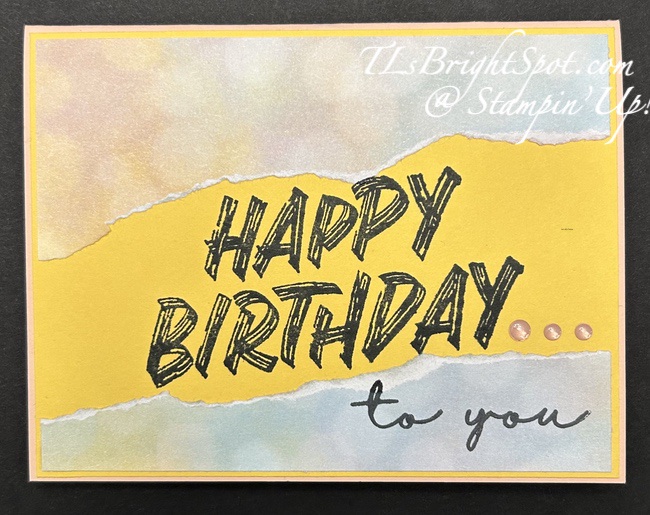
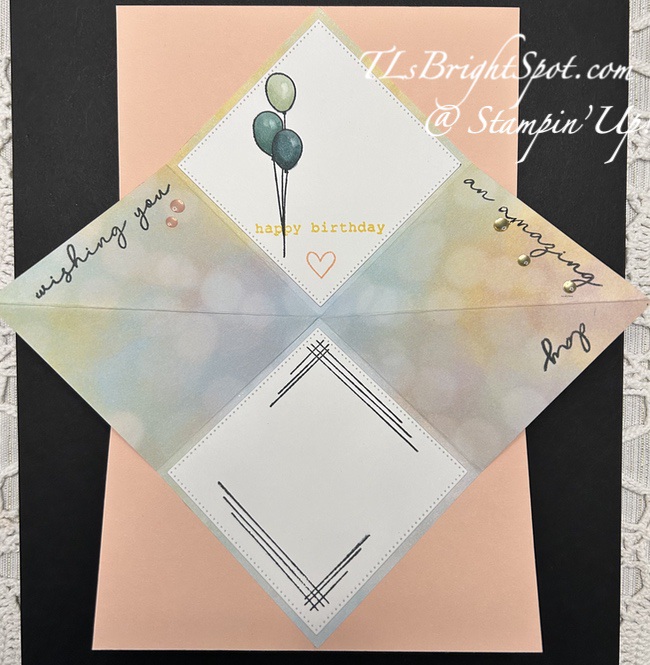
Explosion cards are just that – meant to WOW when opening them. I’ve two of them for you today 0ne is a 4 1/4 square card and the other is a standard A2 card with a finished size of 5 1/2 x 4 1/4. There are advantages to both sizes… both have the same size inside explosion 😀
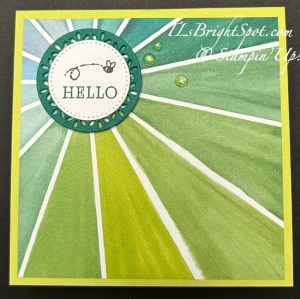
card one – made with Full of Life 6×6 DSP, Spotlight On Nature Dies, Stitched Shapes Dies, You Are Remarkable stamp set, Beautiful Motifs stamp, Tinsel Gems , Lemon Lime Twist card base, Lemon Lime Twist, Shaded Spruce & Memento inks. Card base is 4 1/4 x 8 1/2 scored at 4 1/4
card two – made with Beautiful Bokeh 6×6 DSP, Spring Corners stamp set, Layered Thoughts stamp, Stitched Shapes Dies, Low Profile Dots, Stampin’ Blends Soft Sea Foam, Lost Lagoon & Pretty Peacock, Petal Pink card base with an overlay of Daffodil Delight, Petal Pink & Memento inks. Card base is 5 1/2 x 8 1/2 scored at 4 1/4
Basic directions…
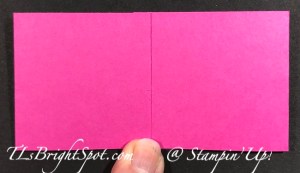
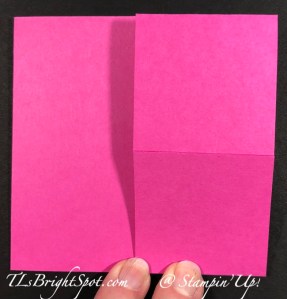
With the side you wish to have showing most, fold a 6×6 piece of DSP in half, open & turn 90 degrees and fold in half again. Burnish well & open
Turn this piece over and fold in half in a diagonal fashion only once. Burnish and open. This creates the fold across the middle
The white panels on this are made with the largest of the Stitched Squares Dies, stamped and attached with adhesive of choice
Be sure to do all stamping, coloring, decorating before attaching to card base
To attach to card base…
Mark the center point both at the bottom of the card base and close to the center fold of the base
With ‘explosion’ piece completely closed, line up points on the diagonal with center points on card base and adhere to bottom half of card base. Make certain the card base will open and close easily.
Add adhesive to remaining portion of closed ‘explosion’ and close card front. Bingo –
NOTE: Decorate card front before attaching the ‘explosion’ piece.
Thanks for stopping by. I hope you give this explosion card a try – super easy and gives a real wow! to a card. May you have a beautiful day!
Products to make these two cards are listed below. Be sure my name is listed as your demonstrator so you get credit (from me) for purchases. 😀
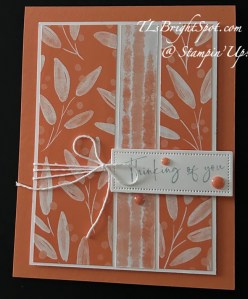
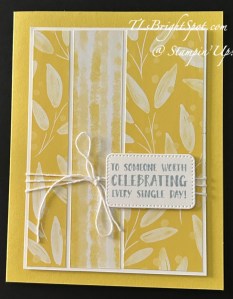
Good Monday morning. How was your weekend.? I’m making progress after knee replacement: can’t drive yet as it’s the right knee, so chauffeuring is the mode of transportation for a while yet. I’ve set up a table on our main floor for card making and was finally able to work at the table for more than 15 minutes! In shifts of time, I’ve made these four cards – all with the 25-27 In Color 6×6 DSP pack Timid Tiger and Darling Duckling. For the sentiments I used the new The Right Words stamp set and cut them out with Nested Essential Dies or the Everyday Details Dies. I added White Bakers Twine from the Twine Essentials Pack and on some, 25-27 In color Flat Pearls. Let’s look.
These two cards are the same except the panels widths were switched, making the largest panel to the right as opposed to the left.
Here I did the same, reversed the largest panel and used another of the fun papers in the 25-27 In Color 6×6 DSP pack with the same colors Timid Tiger and Darling Duckling.
I kept the inside very simple – no stamping, just a strip of the DSP either on the side or at the bottom of the Basic White panel.
Just this little strip dresses up the inside :O) One of the nice aspects of using a layout like this is one full 6×6 will make one card, using the extra pieces for the inside of the card and the envelope flap.
Card cuts…
Begin by cutting a panel 3 1/4 x 4 3/4, then trimming that to: 3/4 x 4 3/4, 1 x 4 3/4 and 1 1/2 by 4 3/4. (this will leave a 2 3/4 x 6 strip for covering the flap and adding a strip to the inside of the card)
Adhere panels, reversing sides of the DSP as desired to a Basic White cut 3 9/16 x 4 7/8
Wrap with Bakers Twine 3 times and tie a bow
Stamp sentiment in Cloud Cover ink on Basic White scraps and die cut, adding to the panel with dimensionals.
Add finished panel to card front with dimensionals: 8 1/2 x 5 1/2 scored at 4 1/4, or 4 1/4 x 11 scored at 5 1/2
Add embellishments
Add 2 1/4 x 6 strip to envelope flap, trim to fit. This will leave about 1/2″ for card inside
Add cut down strip to inside of card
Now you have a small stack of cards for various occasions – and this can be done with the other colors in this pack as well, making certain some can be used for masculine cards.
Want to purchase the products to make these cards? Check the items below as they will take you directly to my shop. Product List
It’s rainy here today and should get to 51 degrees – spring IS in the air… I’m a latecomer to getting the Everyday Details bundle but I couldn’t resist the dies a moment longer. They arrived in the mail yesterday and I made this pretty card.
I paired the stamp set with the Basics 3D Embossing Folder and several Stampin Blends to color the stamped image. What do you think? Here’s how to replicate.
* Run the top half of the Thick Basic White card base through the Basic 3D Embossing folder (Crosshatch)
* Stamp the image from the Everyday Details stamp set on Basic White card stock in Memento ink
Color with Stampin Blends: Petal Pink, Flirty Flamingo, Melon Mambo, Granny Apple Green, Light Shaded Spruce and Blueberry Bushel
* Die cut with the largest of the rectangle dies in Everyday Details Dies. This creates two cuts… the outer one that I adhered directly to the card front and the stamped panel as well. I did have to trim edges of the outer one to the size you see.
* Adhere the stamped image with dimensionals inside the outer ‘frame’
* add Brushed Basics Butterflies for a final touch
The inside..
For the inside of the card I used a stamp from Garden Meadow stamp set in Melon Mambo ink on the Basic White panel. This was adhered to the inside of the card.
On the envelope… run the flap through the same Basics 3D embossing folder (Crosshatch) and stamp the cute grass and flower image in Granny Apple Green ink on the front. This image is from the Garden Meadow stamp set – and the card and envelope are ready to send. This card is specifically for a woman whose hubby has some health issues and she’s struggling to keep up with all the responsibilities. I should make a dozen of these and send to various folks. It seems lots of individuals are having a hard time these days :O(
If you would to purchase these products…
Click here to see the Jan-April 2024 Mini catalog (page 28) to order Everyday Details Bundle
Click here to view the ONLINE EXCLUSIVES (Basic 3D Embossing Folders, set of 3)
Click here for the 2023-2024 Annual Catalog for the Brushed Basics Butterflies
You will be shopping with me when you click that ‘here’ place – so remember, I have generous bonuses when shopping with me. Use my current HOST CODE G4G2CPRB to help me get the Stampin’ Up! giftie to you when making a qualified order of $50 or more before shipping & taxes. If your purchase is over $150, do NOT use the host code as SU! has rewards of it’s own. You STILL receive the FREE ITEM FROM ME. :O) And with that purchase of at least $50 (before shipping & taxes), you will also receive a BONUS fabulous array of “ideas of the month” with card cuts & all the information to make the designs. (The month of March features the Painted Lavender suite of products in the Jan-Apr 2024 Mini Catalog)
I hope you like todays card. I would love to hear from you. Make this day special by sending someone a handmade card filled with with love. Blessings!
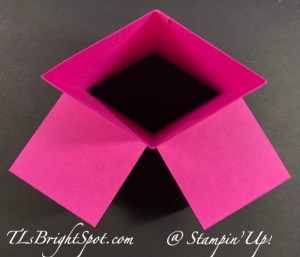
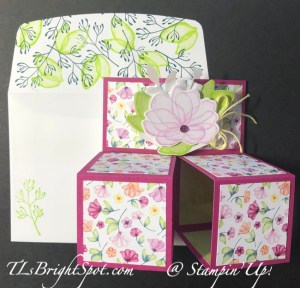
Good morning! I’m still in my birthday week and folks have been so generous, both in sending cards and the giving of gifties. Of course, the best gift of all is the gift of friendship :O) Today’s card is just super cute – a triple box card. I may have done one of these in the past, but some time ago.
Is this cute or what?! The Translucent Florals stamp set is a distinctive stamp set, which means it has lots of dimension in the stamp. And it prefers an ink pad that is not too inky. The flower is stamped in Fresh Freesia ink and the leaves are stamped in Parakeet Party ink – both stamps from the Translucent Florals stamp set. Each was die cut with the coordinating Translucent Florals Dies. I also used the Leaves Punch and Vellum to punch some background for the main flower. These are attached to a Basic White Hexagon Punched background, some with with Stampin’ Seal or liquid glue. The flower is on a dimensional in order to tuck the leaves and Vellum elements behind it. The double bow is made with Baker’s Twine Three Color Pack, Lemon Yellow & attached with a single glue dot to hold it in place.
The box itself is made with Berry Burst for the card base and Delightful Floral 12 x 12 DSP.
Card base: 8 1/4 x 4, scored at 2, 4, 6, & 8
Small boxes for front (2) – same color as card base: 8 1/4 x 2 scored at 2, 4, 6, 8
Mechanism to hold decorated element- same color as card base: 3 x 1/2 scored at 1/2, 1, 2, & 2 1/2
DSP (Designer Series Paper): (2) 3 3/4 x 1 3/4; (10) 1 3/4 x 1 3/4
Directions:
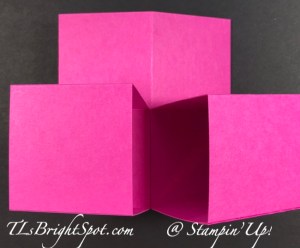
Burnish all score lines. See photos for reference
Add adhesive to smallest scored section, fold over and adhere. Do this for all three boxes.
Add DSP to inside of tallest box sections. This will be the inside back of the box.
Adhere one of the smaller boxes to the tall front box.
Adhere the other smaller box beside it.
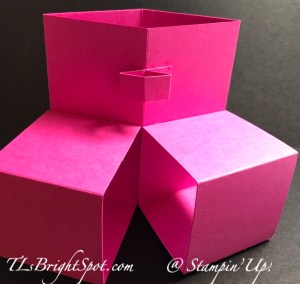
Decorate fronts of all three boxes with the 1 3/4″ DSP – this will use six (6) pieces
Adhere shorter pieces of DSP to inside of smaller boxes – this will use the last four (4) 1 3/4″ squares.
All card stock cut pieces
Step 2
Step 2b
Step 4a
Step 4a complete
Step 4b complete, top view
Step 4b front view
Step 1.8. – mechanism in place
8. Attach mechanism to upper portion on fold line half way up
9. Adhere Hexagon decorated floral piece to mechanism
10. Cut two (2) Basic White panels 1 3/4 x 3 3/4, stamp & adhere to back for writing message
Step. 1.8. writing panels in place on back
Triple Box card & envelope
Decorate envelope… on flap, stamp leaf image from Translucent Florals stamp set in Parakeet Party ink; then stamp frond image from Translucent Florals stamp set in Pretty Peacock ink. On envelope front, stamp frond image from Translucent Florals stamp set in Parakeet Party ink – and done!
This is just such an incredibly sweet Triple Box card and can fit so many special occasions. I hope you try it.
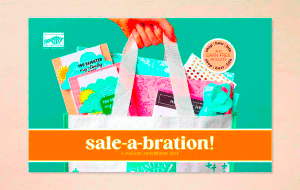
The products to make this card are both in the 2023-2024 Annual Catalog and the ONLINE EXCLUSIVES (the DSP). You may purchase those products here for the Annual Catalog and here for ONLINE EXCLUSIVES. Click here for Sale-a-Bration products. You will be shopping with me :O) and when you do, please use my current host code listed below to receive benefits from me as well. I like to treat my customers…
CURRENT HOST CODE PV2QWYHJ
It is nearing the end of Sale-a-Bration – the Jan-Feb special time of receiving FREE PRODUCT when making qualified purchases. Whats good to know is… it doesn’t matter how you purchase product from Stampin’ Up! during this time period, the FREE PRODUCTS are still available to you when making qualified purchases. Below are some links that just might encourage you to consider purchasing between now and the end of Sale-a-Bration
Must use item number on flyer to receive these products free
Joining Stampin’ Up! as a demonstrator has extra benefits during Sale-a-Bration – but remember those benefits end at midnight Feb 29. Nothing brings people together quite like creativity. As an independent demonstrator, you can share what you love and expand your circle of friends to build a close-knit, collaborative community of crafters. You’ll meet, connect, learn from, and create with other demonstrators from all around the world through virtual events, in-person conventions, support groups, and social media. And don’t forget the importance of hosting your own crafting parties! You can host events with your favorite people and show off your favorite Stampin’ Up! projects. Let’s discover the joy of being a demonstrator together!
Join by 29 February 2024 and choose between two fabulous offers:
Option 1: Get $125 worth of product PLUS our new Stampin’ Glass Mat Studio (a $60 value) for just $99!
Option 2: Get $125 worth of product PLUS an additional $30 worth of product of your choice when you join for $99. That’s a $155 value!
Good Saturday – shop, shop, shop til you drop. Have you done all that? The Stampin’ Up! Mini Catalog and Sale-a-Bration catalogs went live Jan 4. If you do not have those catalogs or a demonstrator, please reach out to me and we’ll get those to you ‘likety split’.
My card today is another one of those that can be used for several different occasions: love you, thinking of you, congratulations, feel better soon, even Valentines – all that.
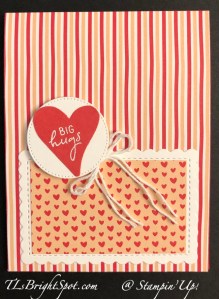
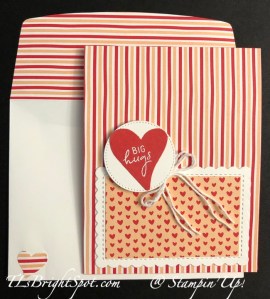
To make this card, I used a Sweet Sorbet card base and covered the front with this wonderful stripe from Bee Mine DSP. I then die cut the Basic White with Scallop Contour Dies and cut another coordinating panel of Bee Mine DSP to fit inside the ‘stitch’ lines of the die cut. These were both adhered to the card front with liquid glue. With the Stitched Shape Dies, I created a circle from Basic White. I punched the heart using the Country Bouquet Punch ‘cuz I like the shape of the heart :O). I stamped the sentiment first with VersaMark then sprinkled it with white embossing powder then heat set it. The sentiment comes from Perennial Postage stamp set. I adhered this with liquid glue to the circle and the circle to the card front with dimensionals. I tied a double bow with White Bakers Twine and attached it with a glue dot.
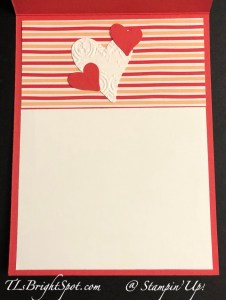
For the inside… I had a scrap of the stripe from Bee Mine DSP and simply added it to the top of the Basic White panel, then punched several hearts – again with the Country Bouquet Punch. The Basic White heart is from a scrap that had been embossed with the Tile 3D embossing folder and i really liked how it made the heart sort of ‘come alive’. These were adhered with liquid glue and the inside was complete.
For the envelope, another punched heart with the Country Bouquet Punch for the envelope front and another piece of the stripe from Bee Mine DSP for the flap – and done!
If you wish to shop with me and don’t have a demonstrator, please connect with me and I’ll get a catalog to you lickety-split. You can also view the catalog online by clicking the image below
For every $50 you spend (prior to shipping and handling) you can receive FREE product from the Sale-a-Bration catalog. Click here to see those products.
Sale-A-Bration is one of our biggest promotions of the year! It’s packed with perks, overflowing with opportunities for customers, and filled with fun for everyone.
For every $50 of purchase, there are opportunities for FREE ITEMS from the Sale-a-bration Catalog. Enjoy the demonstrator perk of having early access to product by redeeming exclusive Sale-A-Bration products for FREE when you reach $50 USD | $60 CAD or $100 USD | $120 CAD spend levels.
While you’re at it, consider checking out the Stampin’ Up! Clearance Rack, the Kits Collection, Paper Pumpkin – and oh yes, consider JOINING MY TEAM to get regular discounts on every order.
Nothing brings people together quite like creativity. As an independent demonstrator, you can share what you love and expand your circle of friends to build a close-knit, collaborative community of crafters. You’ll meet, connect, learn from, and create with other demonstrators from all around the world through virtual events, in-person conventions, support groups, and social media. And don’t forget the importance of hosting your own crafting parties! You can host events with your favorite people and show off your favorite Stampin’ Up! projects. Let’s discover the joy of being a demonstrator together!
JOIN NOW
Become a Stampin’ Up! demonstrator and for just $99, you’ll get your own customized Starter Kit with $125 worth of products. And we’ll include all the business supplies you need to help you get started, plus free shipping. Don’t wait! Talk to me today to begin your creative journey! You may do that here!
Join my Stampin’ Up! team as a demonstrator using one of the options below…
Option #1:
Pay $99 USD for your Starter Kit
Choose $125 worth of products of your choice in your Starter Kit
PLUS receive the Stampin’ Glass Mat Studio for FREE (a $60 value) (Item #163987) I AM LOVING MINE!!!
Option #2:
Pay $99 USD for your Starter Kit
Choose $125 worth of products of your choice in your Starter Kit
PLUS receive an additional $30 worth of products of your choice in your Starter Kit
That’s a total of $155 worth of products for just $99! This is such a great deal!
Of course, there are other great benefits to becoming a Stampin’ Up! Demonstrator, such as free shipping on your Starter Kit, a 20%+ discount on demonstrator orders, early access to new catalogs and promotion information, early ordering of new products, attend conventions and workshops, being part of a team of creativity, no pressure to sell products and my full support as a valued team member!
I would love to talk to you about joining my team and what that means for you. Please connect with me if you have questions: tlsbrightspot@gmail.com There’s no better time to joining as a demonstrator than during Sale-a-Bration
If you’ve made up your mind and are ready to do join my team, you may do that here.
When ordering from me please use my NEW HOST CODETJRE9W6M so that I receive proper notification and YOU GET THE Benefits of a FREE SU! item valued up to $10 :O) AND the Monthly Card Tutorial. (I like to treat my customers!) If your order is over $150, please don’t use the host code as SU! has benefits. I’ll still be notified and you can receive that FREE ITEM!
Note: Make sure that you can see my name on the final checkout page listed as your Demonstrator when you order so that you know that you’re ordering with me and you’ll get my rewards! PLUS… the monthly Online Tutorial when your order is over $50.
Thanks for stopping by. May you have a beautiful day –
Here’s the deal… I lost Internet yesterday – completely for an entire day. Hubby got a new Modem and it still didn’t work for about 2 1/2 hrs. GRRR. I pulled myself out of the blog hop cuz – no Internet until late on Wed. night and didn’t know when it would work, when it magically and finally DID.. I have removed the links below but wanted you to see the challenge – and of course, my card..
I started with a card base of Copper Clay and added a layer of Wild Wheat. Adhered to that is a Designer Series Paper layer of Fresh as a Daisy with the Moody Mauve side up. The top two layers are Wild Wheat & the Moody Mauve background of the Fresh As a Daisy DSP. Together, those were added with dimensionals. Next – die cutting the daisy using the Cheerful Daisy Dies in Basic White, two layers, and attaching them together with dabs of glue. I used the Light Wild Wheat Blends to add color to the center, then attached the daisy to the card front with dimensionals. I stamped the sentiment from Cheerful Daisy stamp set in Moody Mauve ink on a strip of Bubble Bath and slipped under the mounted daisy with a bit of glue on the backside. I added two die cuts of the branchy/twiggy thing, one in Wild Wheat and the other in Basic White. Because they are so thin, I added those with a coupler of glue dots. For a final touch, I added three Brushed Metallic Adhesive-Backed Dots.
For the inside, a layer of Wild Wheat was added to the card base. I then stamped the Basic White panel with this pretty daisy from the Cheerful Daisy stamp set in Bubble Bath ink. I didn’t think I would like this color combination, but I really do :O) The Bubble Bath is really a sweet shade of pink.
For the envelope, more of the Moody Mauve from the Fresh As A Daisy DSP for the flap. For the envelope front, a single sweet daisy from the Cheerful Daisy stamp set in Bubble Bath ink.
Use this HOST CODE MDRCB2RQ today through May 8 to get DOUBLE STAR REWARDS for every $50 or more order (before shipping and taxes.) With every order of $50 you receive a free SU! gift from me valued to $10 + 2 STAR REWARDS. When you get 8 STARS you will receive a free stamp set of your choice valued up to $40. Sound like a deal? It is! And… if you want a little bit of everything, consider seriously joining my team. That gets you 20% off every order + early preorder and more benefits. JOIN MY TEAM here.
When checking out, make sure my name is listed as your demonstrator so you get appropriate credit!
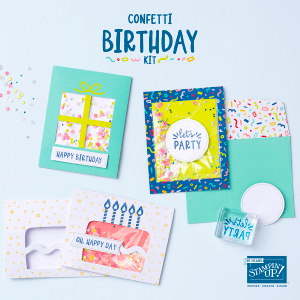
Kits Collections: Confetti Birthday is new to the collection and so vibrant.
This kit includes:
Enough supplies to create 9 cards—3 each of 3 designs
9 coordinating envelopes
Confetti Birthday photopolymer stamp set
One Blueberry Bushel Ink Spot
Printed card bases, card fronts, self-adhesive cellophane shaker bags, die-cut pieces, holographic foil labels, adhesive, embellishments, and a clear block
Finished card size: 5-1/2″ x 4-1/4″ (14 x 10.8 cm)

![Mixed Florals Bundle [ 164642 ]](https://assets1.tamsnetwork.com/images/EC042017NF/164642s.jpg "Mixed Florals Bundle [ 164642 ]")
![Floral & Gingham Vellum 12" X 12" (30.5 X 30.5 Cm) Specialty Designer Series Paper [ 164713 ]](https://assets1.tamsnetwork.com/images/EC042017NF/164713s.jpg "Floral & Gingham Vellum 12\" X 12\" (30.5 X 30.5 Cm) Specialty Designer Series Paper [ 164713 ]")
![Lazy Daisy 3 D Embossing Folder [ 167196 ]](https://assets1.tamsnetwork.com/images/EC042017NF/167196s.jpg "Lazy Daisy 3 D Embossing Folder [ 167196 ]")
![Branching Out Dies [ 165775 ]](https://assets1.tamsnetwork.com/images/EC042017NF/165775s.jpg "Branching Out Dies [ 165775 ]")
![Shades Of Green Hexagons [ 165233 ]](https://assets1.tamsnetwork.com/images/EC042017NF/165233s.jpg "Shades Of Green Hexagons [ 165233 ]")
![Pool Party 8-1/2" X 11" Cardstock [ 122924 ]](https://assets1.tamsnetwork.com/images/EC042017NF/122924s.jpg "Pool Party 8-1/2\" X 11\" Cardstock [ 122924 ]")
![Daffodil Delight Stampin' Blends Markers Combo Pack [ 144603 ] (Retired)](https://assets1.tamsnetwork.com/images/EC042017NF/144603s.jpg "Daffodil Delight Stampin' Blends Markers Combo Pack [ 144603 ] (Retired)")
![Shy Shamrock Stampin’ Blends Combo Pack [ 163825 ]](https://assets1.tamsnetwork.com/images/EC042017NF/163825s.jpg "Shy Shamrock Stampin’ Blends Combo Pack [ 163825 ]")
![Basic White 8 1/2" X 11" Cardstock [ 166780 ]](https://assets1.tamsnetwork.com/images/EC042017NF/166780s.jpg "Basic White 8 1/2\" X 11\" Cardstock [ 166780 ]")
![Basic White 12" X 12" (30.5 X 30.5 Cm) Thick Cardstock [ 166782 ]](https://assets1.tamsnetwork.com/images/EC042017NF/166782s.jpg "Basic White 12\" X 12\" (30.5 X 30.5 Cm) Thick Cardstock [ 166782 ]")
![Basic White Medium Envelopes [ 159236 ]](https://assets1.tamsnetwork.com/images/EC042017NF/159236s.jpg "Basic White Medium Envelopes [ 159236 ]")
![Stampin' Cut & Emboss Machine [ 149653 ]](https://assets1.tamsnetwork.com/images/EC042017NF/149653s.jpg "Stampin' Cut & Emboss Machine [ 149653 ]")
![Paper Trimmer [ 152392 ]](https://assets1.tamsnetwork.com/images/EC042017NF/152392s.jpg "Paper Trimmer [ 152392 ]")
![Stampin' Dimensionals [ 104430 ]](https://assets1.tamsnetwork.com/images/EC042017NF/104430s.jpg "Stampin' Dimensionals [ 104430 ]")
![Multipurpose Liquid Glue [ 110755 ]](https://assets1.tamsnetwork.com/images/EC042017NF/110755s.jpg "Multipurpose Liquid Glue [ 110755 ]")
![Mini Glue Dots [ 103683 ]](https://assets1.tamsnetwork.com/images/EC042017NF/103683s.jpg "Mini Glue Dots [ 103683 ]")
![Paper Snips [ 103579 ]](https://assets1.tamsnetwork.com/images/EC042017NF/103579s.jpg "Paper Snips [ 103579 ]")
![Take Your Pick [ 144107 ]](https://assets1.tamsnetwork.com/images/EC042017NF/144107s.jpg "Take Your Pick [ 144107 ]")
![Clear Wink Of Stella Glitter Brush [ 141897 ]](https://assets1.tamsnetwork.com/images/EC042017NF/141897s.jpg "Clear Wink Of Stella Glitter Brush [ 141897 ]")


![Kintsugi Inspirations Suite Collection (English) [ 165172 ]](https://assets1.tamsnetwork.com/images/EC042017NF/165172s.jpg "Kintsugi Inspirations Suite Collection (English) [ 165172 ]")
![Inspiring Imperfections Bundle (English) [ 165167 ]](https://assets1.tamsnetwork.com/images/EC042017NF/165167s.jpg "Inspiring Imperfections Bundle (English) [ 165167 ]")
![Joined Together 3 D Embossing Folder [ 165170 ]](https://assets1.tamsnetwork.com/images/EC042017NF/165170s.jpg "Joined Together 3 D Embossing Folder [ 165170 ]")
![Flower Accents [ 165171 ]](https://assets1.tamsnetwork.com/images/EC042017NF/165171s.jpg "Flower Accents [ 165171 ]")
![Crumb Cake Classic Stampin' Pad [ 147116 ]](https://assets1.tamsnetwork.com/images/EC042017NF/147116s.jpg "Crumb Cake Classic Stampin' Pad [ 147116 ]")
![Lost Lagoon 8-1/2" X 11" Cardstock [ 133679 ]](https://assets1.tamsnetwork.com/images/EC042017NF/133679s.jpg "Lost Lagoon 8-1/2\" X 11\" Cardstock [ 133679 ]")
![Basic Beige 8 1/2" X 11" Cardstock [ 164511 ]](https://assets1.tamsnetwork.com/images/EC042017NF/164511s.jpg "Basic Beige 8 1/2\" X 11\" Cardstock [ 164511 ]")
![Lost Lagoon Classic Stampin' Pad [ 161678 ]](https://assets1.tamsnetwork.com/images/EC042017NF/161678s.jpg "Lost Lagoon Classic Stampin' Pad [ 161678 ]")
![Peach Pie Classic Stampin Pad [ 163810 ]](https://assets1.tamsnetwork.com/images/EC042017NF/163810s.jpg "Peach Pie Classic Stampin Pad [ 163810 ]")
![Peach Pie Stampin’ Blends Combo Pack [ 163827 ]](https://assets1.tamsnetwork.com/images/EC042017NF/163827s.jpg "Peach Pie Stampin’ Blends Combo Pack [ 163827 ]")
![Mossy Meadow Stampin' Blends Combo Pack [ 148547 ] (Retired)](https://assets1.tamsnetwork.com/images/EC042017NF/148547s.jpg "Mossy Meadow Stampin' Blends Combo Pack [ 148547 ] (Retired)")
![Tuxedo Black Memento Ink Pad [ 132708 ]](https://assets1.tamsnetwork.com/images/EC042017NF/132708s.jpg "Tuxedo Black Memento Ink Pad [ 132708 ]")
![Basic White 8 1/2" X 11" Thick Cardstock [ 159229 ]](https://assets1.tamsnetwork.com/images/EC042017NF/159229s.jpg "Basic White 8 1/2\" X 11\" Thick Cardstock [ 159229 ]")
![Stampin' Seal [ 152813 ]](https://assets1.tamsnetwork.com/images/EC042017NF/152813s.jpg "Stampin' Seal [ 152813 ]")
![Bone Folder [ 102300 ]](https://assets1.tamsnetwork.com/images/EC042017NF/102300s.jpg "Bone Folder [ 102300 ]")

![Meant To Bee Dies [ 166582 ]](https://assets1.tamsnetwork.com/images/EC042017NF/166582s.jpg "Meant To Bee Dies [ 166582 ]")
![Meant To Bee Bundle (English) [ 167243 ]](https://assets1.tamsnetwork.com/images/EC042017NF/167243s.jpg "Meant To Bee Bundle (English) [ 167243 ]")
![Secret Sea 8 1/2" X 11" Cardstock [ 165624 ]](https://assets1.tamsnetwork.com/images/EC042017NF/165624s.jpg "Secret Sea 8 1/2\" X 11\" Cardstock [ 165624 ]")
![Misty Moonlight 8-1/2" X 11" Cardstock [ 153081 ]](https://assets1.tamsnetwork.com/images/EC042017NF/153081s.jpg "Misty Moonlight 8-1/2\" X 11\" Cardstock [ 153081 ]")
![Lemon Lime Twist Classic Stampin' Pad [ 147145 ]](https://assets1.tamsnetwork.com/images/EC042017NF/147145s.jpg "Lemon Lime Twist Classic Stampin' Pad [ 147145 ]")
![Old Olive Classic Stampin' Pad [ 147090 ]](https://assets1.tamsnetwork.com/images/EC042017NF/147090s.jpg "Old Olive Classic Stampin' Pad [ 147090 ]")
![Mossy Meadow Classic Stampin' Pad [ 147111 ]](https://assets1.tamsnetwork.com/images/EC042017NF/147111s.jpg "Mossy Meadow Classic Stampin' Pad [ 147111 ]")
![Full Of Life 6" X 6" (15.2 X 15.2 Cm) Designer Series Paper [ 163357 ]](https://assets1.tamsnetwork.com/images/EC042017NF/163357s.jpg "Full Of Life 6\" X 6\" (15.2 X 15.2 Cm) Designer Series Paper [ 163357 ]")
![Lemon Lime Twist 8-1/2" X 11" Cardstock [ 144245 ]](https://assets1.tamsnetwork.com/images/EC042017NF/144245s.jpg "Lemon Lime Twist 8-1/2\" X 11\" Cardstock [ 144245 ]")
![Spotlight On Nature Dies [ 163580 ]](https://assets1.tamsnetwork.com/images/EC042017NF/163580s.jpg "Spotlight On Nature Dies [ 163580 ]")
![Stitched Shapes Dies [ 152323 ]](https://assets1.tamsnetwork.com/images/EC042017NF/152323s.jpg "Stitched Shapes Dies [ 152323 ]")
![You Are Remarkable Photopolymer Stamp Set (English) [ 165445 ]](https://assets1.tamsnetwork.com/images/EC042017NF/165445s.jpg "You Are Remarkable Photopolymer Stamp Set (English) [ 165445 ]")
![Beautiful Motifs Bundle (English) [ 165206 ]](https://assets1.tamsnetwork.com/images/EC042017NF/165206s.jpg "Beautiful Motifs Bundle (English) [ 165206 ]")
![Tinsel Gems Four Pack [ 161623 ]](https://assets1.tamsnetwork.com/images/EC042017NF/161623s.jpg "Tinsel Gems Four Pack [ 161623 ]")
![Shaded Spruce 8-1/2" X 11" Cardstock [ 146981 ]](https://assets1.tamsnetwork.com/images/EC042017NF/146981s.jpg "Shaded Spruce 8-1/2\" X 11\" Cardstock [ 146981 ]")
![Shaded Spruce Classic Stampin' Pad [ 147088 ]](https://assets1.tamsnetwork.com/images/EC042017NF/147088s.jpg "Shaded Spruce Classic Stampin' Pad [ 147088 ]")
![Spring Corners Photopolymer Stamp Set (English) [ 164738 ]](https://assets1.tamsnetwork.com/images/EC042017NF/164738s.jpg "Spring Corners Photopolymer Stamp Set (English) [ 164738 ]")
![Spring Corners Bundle (English) [ 164743 ]](https://assets1.tamsnetwork.com/images/EC042017NF/164743s.jpg "Spring Corners Bundle (English) [ 164743 ]")
![Beautiful Bokeh 6" X 6" (15.2 X 15.2 Cm) Designer Series Paper [ 164607 ]](https://assets1.tamsnetwork.com/images/EC042017NF/164607s.jpg "Beautiful Bokeh 6\" X 6\" (15.2 X 15.2 Cm) Designer Series Paper [ 164607 ]")
![Layered Thoughts Photopolymer Stamp Set (English) [ 165346 ]](https://assets1.tamsnetwork.com/images/EC042017NF/165346s.jpg "Layered Thoughts Photopolymer Stamp Set (English) [ 165346 ]")
![Low Profile Dots [ 164658 ]](https://assets1.tamsnetwork.com/images/EC042017NF/164658s.jpg "Low Profile Dots [ 164658 ]")
![Soft Sea Foam Stampin' Blends Combo Pack [ 154902 ]](https://assets1.tamsnetwork.com/images/EC042017NF/154902s.jpg "Soft Sea Foam Stampin' Blends Combo Pack [ 154902 ]")
![Lost Lagoon Stampin’ Blends Combo Pack [ 161680 ]](https://assets1.tamsnetwork.com/images/EC042017NF/161680s.jpg "Lost Lagoon Stampin’ Blends Combo Pack [ 161680 ]")
![Pretty Peacock Stampin' Blends Combo Pack [ 149560 ] (Retired)](https://assets1.tamsnetwork.com/images/EC042017NF/149560s.jpg "Pretty Peacock Stampin' Blends Combo Pack [ 149560 ] (Retired)")
![Petal Pink 8-1/2" X 11" Cardstock [ 146985 ]](https://assets1.tamsnetwork.com/images/EC042017NF/146985s.jpg "Petal Pink 8-1/2\" X 11\" Cardstock [ 146985 ]")
![Petal Pink Classic Stampin' Pad [ 147108 ]](https://assets1.tamsnetwork.com/images/EC042017NF/147108s.jpg "Petal Pink Classic Stampin' Pad [ 147108 ]")
![Daffodil Delight 8-1/2" X 11" Cardstock [ 119683 ]](https://assets1.tamsnetwork.com/images/EC042017NF/119683s.jpg "Daffodil Delight 8-1/2\" X 11\" Cardstock [ 119683 ]")
![Daffodil Delight Classic Stampin' Pad [ 147094 ]](https://assets1.tamsnetwork.com/images/EC042017NF/147094s.jpg "Daffodil Delight Classic Stampin' Pad [ 147094 ]")