
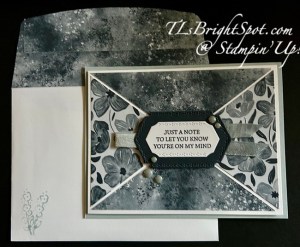
Welcome to our Thursday hop! If yo have joined me from the fabulous tara, glad you stopped by. If you jumped in right here – love that too! We have a theme challenge today – BIRDS… and I have chosen the new & wonderful Peaceful Garden Suite, available in the Sep-Dec Mini Catalog. Visit this post to learn more about this suite of products. The only item I did not use was the ribbon – I substituted the 1/2″ Sheer Ribbon, Silver & White. Let’s take a look-see.


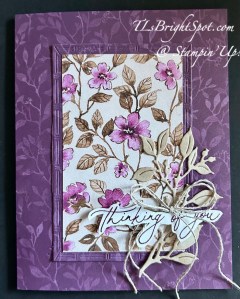
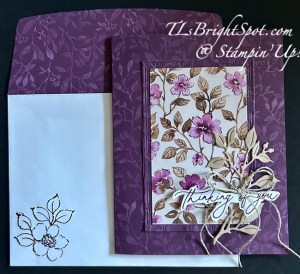
I began with a Misty Moonlight card base 4 1`/4 x 11 scored at 4 1/2 then 5 1/2 – to create a bookfold card.Next I cut a 7/8 x 4 1/8 piece of the Peaceful Garden 12×12 DSP and attached it tot he area between the two score lines. I then used the Silver & White 1/2″ Sheer ribbon to wrap over the DSP, securing with Tear n’ Tape. I then adhered that section to the card base, creating the bookfold. :O) I then tied a length of the same ribbon with a single knot around the ribbon and secured the knot with a glue dot. Next, I took a piece of Basic White 4 1/8 x 4 3/8 & ran it through the Peaceful Greenery 3D embossing folder. Gorgeousness! I adhered this to the remaining card front. With Secret Sea I cut the sentiment panel using the smaller label die in the Peace On Earth Dies. I used an embossing buddy to remove any specks, stamped the sentiment in VersaMark ink with a stamp from the Peace On Earth Stamp set,, sprinkled it with Metallic WOW! Embossing Powder in Polished Silver & heat set with the heat tool. I mounted this to the card front with dimensionals. This stunning dove is cut from Basic White with the Peace on Earth Dies. I used a dauber & Cloud Cover ink to add just a hint of color to the edges of the wings & tail. Attach with dimesnionals under the right wing & the bird body.
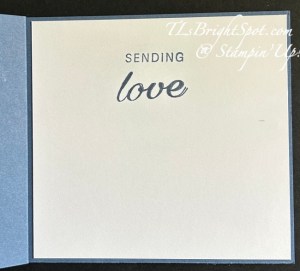
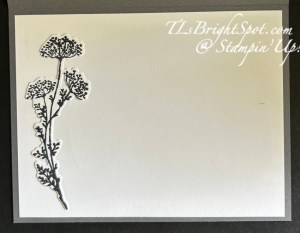
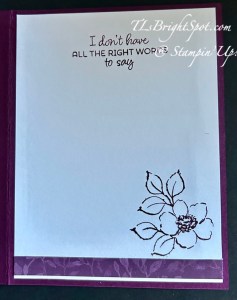
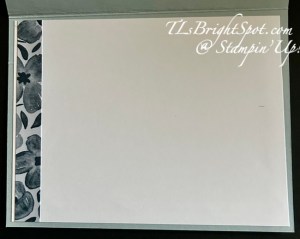
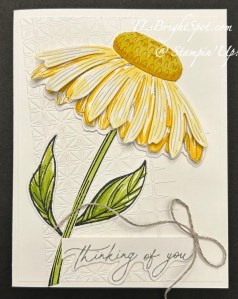
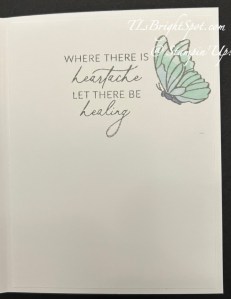
For the inside… I stamped the sentiments in Misty Moonlight ink on top of a bit of color of Cloud Cover added with the sponge dauber – these on a 4 1/8 x 4 3/8 Basic White panel.
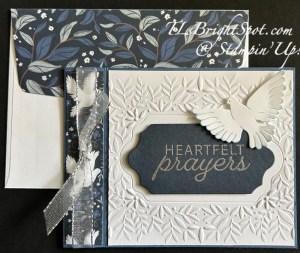
For the envelope, a different pattern from the Peaceful Garden 12×12 DSP adhered to the flap & trimmed to fit. For information on how to order products to make this card, see below.
Thanks for stopping by my blog. Follow along the links below to visit others in this blog hop – click the next button to take you to Amy K or click on a name. Whatever you do – see them all – enjoy the hop!

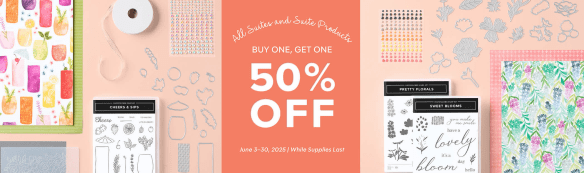
Remember that the SALE IS ON for Two-Tone cardstock, 20% off Jul 9-11 – while supplies last.
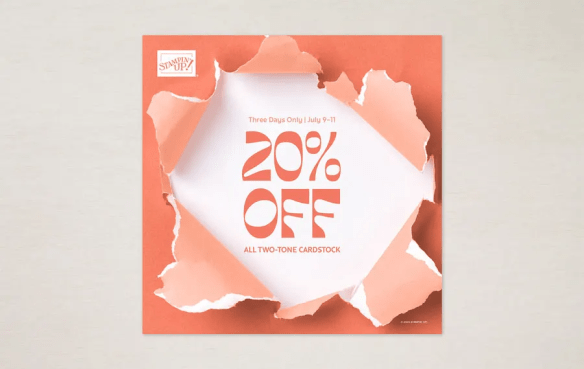
All two-tone cardstock is now 20% off! Now is the time to stock up on this versatile crafting essential that’s perfect for both card making and scrapbooking. This sale only lasts three days, so make sure you visit the online store to shop a wide variety of colors before they’re gone!
106 Color Variations. Our two-tone cardstock offers 53 lighter and darker Stampin’ Up! colors on double-sided sheets. It’s available in single or mixed-color packs for harmonious colorful or monochromatic projects. Encourage your customers to stock up on favorites or try new colors with no regrets!
A Crafting Necessity. Two-tone cardstock has so much to offer! It’s an ideal layering option without adding bulk and its white core means you can tear, crumple, sand, and emboss your way to fun effects whatever your crafting skill level. Its smooth texture is great for stamping, clean cuts, crisp folds, and seamless color applications. And because it’s 12″ x 12″ (30.5 x 30.5 cm), you can use it as a scrapbook base, or you can cut it to use as part of your card-making projects.
Sales Period: July 9–11
– Sale ends: July 11, 2025, at 11:59 p.m. (MT)
– Single-pack and multipack two-tone cardstock is 20% off.
– Some colors might sell out sooner than others.
– Available while supplies last.
Thanks for stopping by. May you have a beautiful day.
Make someone happy sending them a handmade card made with love. ❤️
Product List
![Cloud Cover Classic Stampin' Ink Refill [ 165279 ]](https://assets1.tamsnetwork.com/images/EC042017NF/165279s.jpg "Cloud Cover Classic Stampin' Ink Refill [ 165279 ]")
![Uninked Stampin' Spots [ 141822 ]](https://assets1.tamsnetwork.com/images/EC042017NF/141822s.jpg "Uninked Stampin' Spots [ 141822 ]")
![Sponge Daubers [ 133773 ]](https://assets1.tamsnetwork.com/images/EC042017NF/133773s.jpg "Sponge Daubers [ 133773 ]")
![Silver & White 1/2" (1.3 Cm) Sheer Ribbon [ 162149 ]](https://assets1.tamsnetwork.com/images/EC042017NF/162149s.jpg "Silver & White 1/2\" (1.3 Cm) Sheer Ribbon [ 162149 ]")
![Baker's Twine Essentials Pack [ 155475 ]](https://assets1.tamsnetwork.com/images/EC042017NF/155475s.jpg "Baker's Twine Essentials Pack [ 155475 ]")
![Journaling Pens [ 145480 ]](https://assets1.tamsnetwork.com/images/EC042017NF/145480s.jpg "Journaling Pens [ 145480 ]")
![Linen Thread [ 104199 ]](https://assets1.tamsnetwork.com/images/EC042017NF/104199s.jpg "Linen Thread [ 104199 ]")
![Clear Wink Of Stella Glitter Brush [ 141897 ]](https://assets1.tamsnetwork.com/images/EC042017NF/141897s.jpg "Clear Wink Of Stella Glitter Brush [ 141897 ]")
![Metallics Wow! Embossing Powder [ 165678 ]](https://assets1.tamsnetwork.com/images/EC042017NF/165678s.jpg "Metallics Wow! Embossing Powder [ 165678 ]")
![Versamark Pad [ 102283 ]](https://assets1.tamsnetwork.com/images/EC042017NF/102283s.jpg "Versamark Pad [ 102283 ]")
![Heat Tool (Us And Canada) [ 129053 ]](https://assets1.tamsnetwork.com/images/EC042017NF/129053s.jpg "Heat Tool (Us And Canada) [ 129053 ]")
![Embossing Additions Tool Kit [ 159971 ]](https://assets1.tamsnetwork.com/images/EC042017NF/159971s.jpg "Embossing Additions Tool Kit [ 159971 ]")
![Tuxedo Black Memento Ink Pad [ 132708 ]](https://assets1.tamsnetwork.com/images/EC042017NF/132708s.jpg "Tuxedo Black Memento Ink Pad [ 132708 ]")
![Basic White 8 1/2" X 11" Cardstock [ 166780 ]](https://assets1.tamsnetwork.com/images/EC042017NF/166780s.jpg "Basic White 8 1/2\" X 11\" Cardstock [ 166780 ]")
![Basic White 8 1/2" X 11" Thick Cardstock [ 159229 ]](https://assets1.tamsnetwork.com/images/EC042017NF/159229s.jpg "Basic White 8 1/2\" X 11\" Thick Cardstock [ 159229 ]")
![Basic White Medium Envelopes [ 159236 ]](https://assets1.tamsnetwork.com/images/EC042017NF/159236s.jpg "Basic White Medium Envelopes [ 159236 ]")
![Paper Trimmer [ 152392 ]](https://assets1.tamsnetwork.com/images/EC042017NF/152392s.jpg "Paper Trimmer [ 152392 ]")
![Stampin' Cut & Emboss Machine [ 149653 ]](https://assets1.tamsnetwork.com/images/EC042017NF/149653s.jpg "Stampin' Cut & Emboss Machine [ 149653 ]")
![Stampin' Dimensionals [ 104430 ]](https://assets1.tamsnetwork.com/images/EC042017NF/104430s.jpg "Stampin' Dimensionals [ 104430 ]")
![Multipurpose Liquid Glue [ 110755 ]](https://assets1.tamsnetwork.com/images/EC042017NF/110755s.jpg "Multipurpose Liquid Glue [ 110755 ]")
![Mini Glue Dots [ 103683 ]](https://assets1.tamsnetwork.com/images/EC042017NF/103683s.jpg "Mini Glue Dots [ 103683 ]")
![Stampin' Seal [ 152813 ]](https://assets1.tamsnetwork.com/images/EC042017NF/152813s.jpg "Stampin' Seal [ 152813 ]")
![Bone Folder [ 102300 ]](https://assets1.tamsnetwork.com/images/EC042017NF/102300s.jpg "Bone Folder [ 102300 ]")
![Take Your Pick [ 144107 ]](https://assets1.tamsnetwork.com/images/EC042017NF/144107s.jpg "Take Your Pick [ 144107 ]")

/p>


![Beautiful Gallery Suite Collection (English) [ 165217 ]](https://assets1.tamsnetwork.com/images/EC042017NF/165217s.jpg "Beautiful Gallery Suite Collection (English) [ 165217 ]")
![Beautiful Motifs Bundle (English) [ 165206 ]](https://assets1.tamsnetwork.com/images/EC042017NF/165206s.jpg "Beautiful Motifs Bundle (English) [ 165206 ]")
![Damask Designs Embossing Folder [ 165214 ]](https://assets1.tamsnetwork.com/images/EC042017NF/165214s.jpg "Damask Designs Embossing Folder [ 165214 ]")
![Basic Gray 8-1/2" X 11" Cardstock [ 121044 ]](https://assets1.tamsnetwork.com/images/EC042017NF/121044s.jpg "Basic Gray 8-1/2\" X 11\" Cardstock [ 121044 ]")
![Small Blending Brushes [ 160518 ]](https://assets1.tamsnetwork.com/images/EC042017NF/160518s.jpg "Small Blending Brushes [ 160518 ]")
![Peach Pie Classic Stampin Pad [ 163810 ]](https://assets1.tamsnetwork.com/images/EC042017NF/163810s.jpg "Peach Pie Classic Stampin Pad [ 163810 ]")
![Pecan Pie Classic Stampin' Pad [ 161665 ]](https://assets1.tamsnetwork.com/images/EC042017NF/161665s.jpg "Pecan Pie Classic Stampin' Pad [ 161665 ]")
![Early Espresso Classic Stampin' Pad [ 147114 ]](https://assets1.tamsnetwork.com/images/EC042017NF/147114s.jpg "Early Espresso Classic Stampin' Pad [ 147114 ]")


![Perfectly Pears Bundle (English) [ 166154 ]](https://assets1.tamsnetwork.com/images/EC042017NF/166154s.jpg "Perfectly Pears Bundle (English) [ 166154 ]")
![Sunflower 3 D Embossing Folder [ 166145 ]](https://assets1.tamsnetwork.com/images/EC042017NF/166145s.jpg "Sunflower 3 D Embossing Folder [ 166145 ]")
![Jolly Holly Bundle (English) [ 166120 ]](https://assets1.tamsnetwork.com/images/EC042017NF/166120s.jpg "Jolly Holly Bundle (English) [ 166120 ]")


![Fancy Borders Dies [ 165380 ]](https://assets1.tamsnetwork.com/images/EC042017NF/165380s.jpg "Fancy Borders Dies [ 165380 ]")
![Regal Distressed Patterns 12" X 12" (30.5 X 30.5 Cm) Specialty Designer Series Paper [ 164037 ]](https://assets1.tamsnetwork.com/images/EC042017NF/164037s.jpg "Regal Distressed Patterns 12\" X 12\" (30.5 X 30.5 Cm) Specialty Designer Series Paper [ 164037 ]")
![Gold Foil Sheets [ 132622 ]](https://assets1.tamsnetwork.com/images/EC042017NF/132622s.jpg "Gold Foil Sheets [ 132622 ]")
![Pretty Peacock 8-1/2" X 11" Cardstock [ 150880 ]](https://assets1.tamsnetwork.com/images/EC042017NF/150880s.jpg "Pretty Peacock 8-1/2\" X 11\" Cardstock [ 150880 ]")
![Basic Beige 8 1/2" X 11" Cardstock [ 164511 ]](https://assets1.tamsnetwork.com/images/EC042017NF/164511s.jpg "Basic Beige 8 1/2\" X 11\" Cardstock [ 164511 ]")
![Gold Twisted Thread [ 164603 ]](https://assets1.tamsnetwork.com/images/EC042017NF/164603s.jpg "Gold Twisted Thread [ 164603 ]")
![Blackberry Bliss 8-1/2" X 11" Cardstock [ 133675 ]](https://assets1.tamsnetwork.com/images/EC042017NF/133675s.jpg "Blackberry Bliss 8-1/2\" X 11\" Cardstock [ 133675 ]")
![Blackberry Bliss Classic Stampin' Pad [ 147092 ]](https://assets1.tamsnetwork.com/images/EC042017NF/147092s.jpg "Blackberry Bliss Classic Stampin' Pad [ 147092 ]")
![Comforting Thoughts Photopolymer Stamp Set (English) [ 163691 ]](https://assets1.tamsnetwork.com/images/EC042017NF/163691s.jpg "Comforting Thoughts Photopolymer Stamp Set (English) [ 163691 ]")
![Everyday Greetings Photopolymer Stamp Set (English) [ 165084 ]](https://assets1.tamsnetwork.com/images/EC042017NF/165084s.jpg "Everyday Greetings Photopolymer Stamp Set (English) [ 165084 ]")


![Mixed Labels Bundle (English) [ 164653 ]](https://assets1.tamsnetwork.com/images/EC042017NF/164653s.jpg "Mixed Labels Bundle (English) [ 164653 ]")
![Mixed Media Florals Suite Collection (English) [ 164659 ]](https://assets1.tamsnetwork.com/images/EC042017NF/164659s.jpg "Mixed Media Florals Suite Collection (English) [ 164659 ]")
![2025–2027 In Color™ 6" X 6" (15.2 X 15.2 Cm) Designer Series Paper [ 165300 ]](https://assets1.tamsnetwork.com/images/EC042017NF/165300s.jpg "2025–2027 In Color™ 6\" X 6\" (15.2 X 15.2 Cm) Designer Series Paper [ 165300 ]")
![Cloud Cover 8 1/2" X 11" Cardstock [ 165621 ]](https://assets1.tamsnetwork.com/images/EC042017NF/165621s.jpg "Cloud Cover 8 1/2\" X 11\" Cardstock [ 165621 ]")
![Cloud Cover 3/8" (1 Cm) Faux Linen Ribbon [ 165271 ]](https://assets1.tamsnetwork.com/images/EC042017NF/165271s.jpg "Cloud Cover 3/8\" (1 Cm) Faux Linen Ribbon [ 165271 ]")
![2025–2027 In Color™ Flat Pearls [ 165192 ]](https://assets1.tamsnetwork.com/images/EC042017NF/165192s.jpg "2025–2027 In Color™ Flat Pearls [ 165192 ]")
![Secret Sea Classic Stampin' Pad [ 165285 ]](https://assets1.tamsnetwork.com/images/EC042017NF/165285s.jpg "Secret Sea Classic Stampin' Pad [ 165285 ]")


![Kintsugi Inspirations Suite Collection (English) [ 165172 ]](https://assets1.tamsnetwork.com/images/EC042017NF/165172s.jpg "Kintsugi Inspirations Suite Collection (English) [ 165172 ]")
![Inspiring Imperfections Bundle (English) [ 165167 ]](https://assets1.tamsnetwork.com/images/EC042017NF/165167s.jpg "Inspiring Imperfections Bundle (English) [ 165167 ]")
![Joined Together 3 D Embossing Folder [ 165170 ]](https://assets1.tamsnetwork.com/images/EC042017NF/165170s.jpg "Joined Together 3 D Embossing Folder [ 165170 ]")
![Flower Accents [ 165171 ]](https://assets1.tamsnetwork.com/images/EC042017NF/165171s.jpg "Flower Accents [ 165171 ]")
![Crumb Cake Classic Stampin' Pad [ 147116 ]](https://assets1.tamsnetwork.com/images/EC042017NF/147116s.jpg "Crumb Cake Classic Stampin' Pad [ 147116 ]")
![Lost Lagoon 8-1/2" X 11" Cardstock [ 133679 ]](https://assets1.tamsnetwork.com/images/EC042017NF/133679s.jpg "Lost Lagoon 8-1/2\" X 11\" Cardstock [ 133679 ]")
![Lost Lagoon Classic Stampin' Pad [ 161678 ]](https://assets1.tamsnetwork.com/images/EC042017NF/161678s.jpg "Lost Lagoon Classic Stampin' Pad [ 161678 ]")
![Peach Pie Stampin’ Blends Combo Pack [ 163827 ]](https://assets1.tamsnetwork.com/images/EC042017NF/163827s.jpg "Peach Pie Stampin’ Blends Combo Pack [ 163827 ]")
![Mossy Meadow Stampin' Blends Combo Pack [ 148547 ] (Retired)](https://assets1.tamsnetwork.com/images/EC042017NF/148547s.jpg "Mossy Meadow Stampin' Blends Combo Pack [ 148547 ] (Retired)")

![Meant To Bee Dies [ 166582 ]](https://assets1.tamsnetwork.com/images/EC042017NF/166582s.jpg "Meant To Bee Dies [ 166582 ]")
![Meant To Bee Bundle (English) [ 167243 ]](https://assets1.tamsnetwork.com/images/EC042017NF/167243s.jpg "Meant To Bee Bundle (English) [ 167243 ]")
![Secret Sea 8 1/2" X 11" Cardstock [ 165624 ]](https://assets1.tamsnetwork.com/images/EC042017NF/165624s.jpg "Secret Sea 8 1/2\" X 11\" Cardstock [ 165624 ]")
![Misty Moonlight 8-1/2" X 11" Cardstock [ 153081 ]](https://assets1.tamsnetwork.com/images/EC042017NF/153081s.jpg "Misty Moonlight 8-1/2\" X 11\" Cardstock [ 153081 ]")
![Lemon Lime Twist Classic Stampin' Pad [ 147145 ]](https://assets1.tamsnetwork.com/images/EC042017NF/147145s.jpg "Lemon Lime Twist Classic Stampin' Pad [ 147145 ]")
![Old Olive Classic Stampin' Pad [ 147090 ]](https://assets1.tamsnetwork.com/images/EC042017NF/147090s.jpg "Old Olive Classic Stampin' Pad [ 147090 ]")
![Mossy Meadow Classic Stampin' Pad [ 147111 ]](https://assets1.tamsnetwork.com/images/EC042017NF/147111s.jpg "Mossy Meadow Classic Stampin' Pad [ 147111 ]")
![Coneflower Celebration Bundle (English) [ 165251 ]](https://assets1.tamsnetwork.com/images/EC042017NF/165251s.jpg "Coneflower Celebration Bundle (English) [ 165251 ]")
![Glass & Gardens Embossing Folders [ 165597 ]](https://assets1.tamsnetwork.com/images/EC042017NF/165597s.jpg "Glass & Gardens Embossing Folders [ 165597 ]")
![Smoky Slate Classic Stampin' Pad [ 147113 ]](https://assets1.tamsnetwork.com/images/EC042017NF/147113s.jpg "Smoky Slate Classic Stampin' Pad [ 147113 ]")
![Daffodil Delight Stampin' Blends Combo Pack [ 154883 ]](https://assets1.tamsnetwork.com/images/EC042017NF/154883s.jpg "Daffodil Delight Stampin' Blends Combo Pack [ 154883 ]")
![Balmy Blue Stampin' Blends Combo Pack [ 154830 ]](https://assets1.tamsnetwork.com/images/EC042017NF/154830s.jpg "Balmy Blue Stampin' Blends Combo Pack [ 154830 ]")
![Pool Party Stampin' Blends Markers Combo Pack [ 144605 ] (Retired)](https://assets1.tamsnetwork.com/images/EC042017NF/144605s.jpg "Pool Party Stampin' Blends Markers Combo Pack [ 144605 ] (Retired)")
![Misty Moonlight Stampin' Blends Combo Pack [ 153108 ]](https://assets1.tamsnetwork.com/images/EC042017NF/153108s.jpg "Misty Moonlight Stampin' Blends Combo Pack [ 153108 ]")
