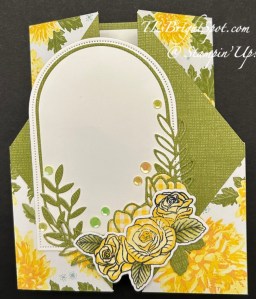
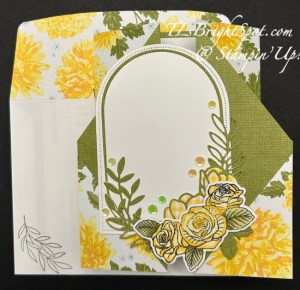
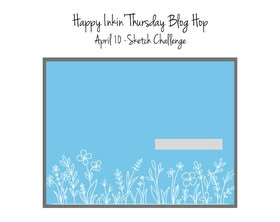
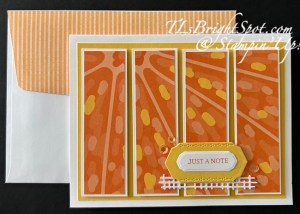
Welcome to our blog hop – it’s Thursday! We have a color challenge today that absolutely stumped me at first. But once I pulled out this bundle of Inspiring Imperfections and coordinating products, it all fell in place.

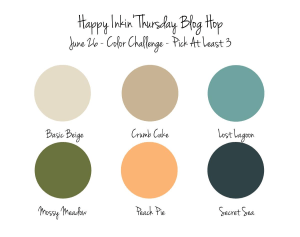
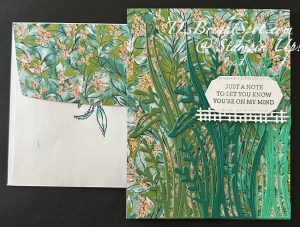
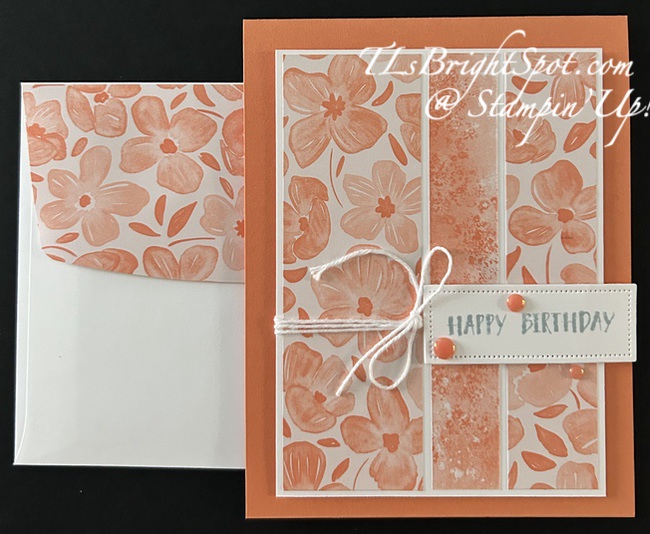
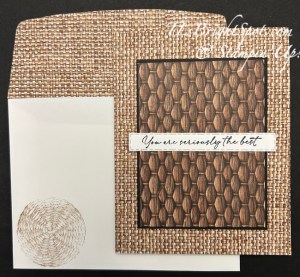
The card base is Crumb Cake cut to 4 1/4 x 11 & scored at 5 1/2. Lost Lagoon is part of the layer on dimensionals and is cut 3 7/8 x 5 1/8 (please cut 2 & save one for the inside of the card. The Basic Beige piece is 3 3/4 x 5 and run through the Joined Together 3D embossing folder, which is part of the Kintsugi Inspirations suite of products in the 2025-2026 Annual Catalog on pages 58-60. I added this panel to the Lost Lagoon and set them aside.
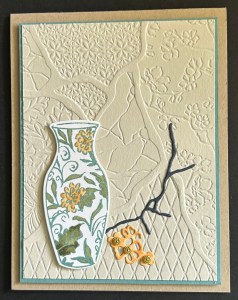
I stamped this gorgeous vase from the Inspiring Imperfections stamp set in Lost Lagoon ink on Basic White scrap, then used Stampin’ Blends in Peach Pie & Mossy Meadow to add additional color. Next I die cut the ‘break’ in Secret Sea and the flower s from Basic White. The flowers I colored with Peach Pie Stampin’ Blends. Once the Vase was in place on the card front (on dimensionals I might add), I attached the ‘break’ and the flowers with dabs of liquid glue. The final touch was to add Wink of Stella to the small flowers and to the flowers & colored leaves on the vase. The final touch was the Flower Accents in the center of each of the flowers.
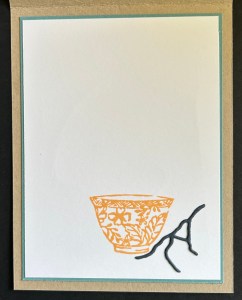
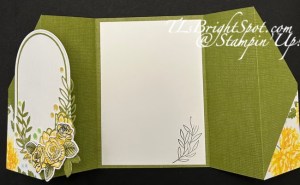
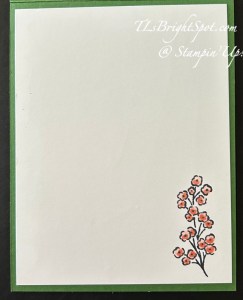
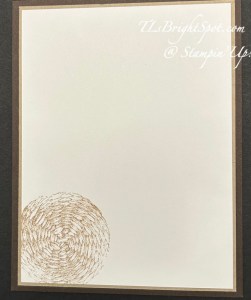
For the inside … remember the saved Lost Lagoon panel? Attach it to the inside of the card to frame the Basic White stamped panel. 😀. This panel is stamped with another of the vases in the Inspiring Imperfections stamp set and has another of the die cut ‘breaks’ form the coordinating dies in the bundle. And yep – die cut from Secret Sea.
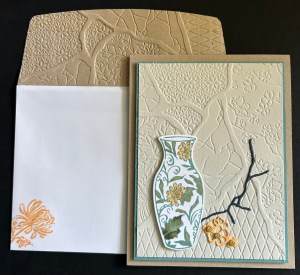
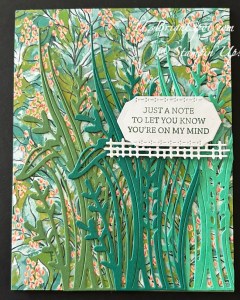
For the envelope, Crumb Cake 2 1/4 x 6 run through the same Joined Together 3D embossing Folder and attached to the flap & trimmed to fit. On the envelope front, this sweet flower stamped in Peach Pie ink. I love it – & hope you approve.
See the product list below to purchase from my ONLINE store. Now – be sure to see what others have created for the hop by clicking the ‘next’ button to take you to Amy, or click on a name to visit someone else. Happy hopping!

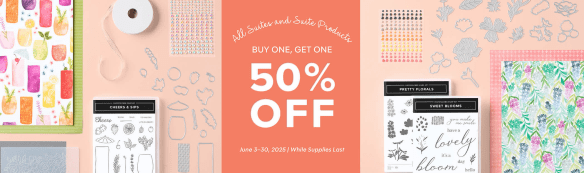
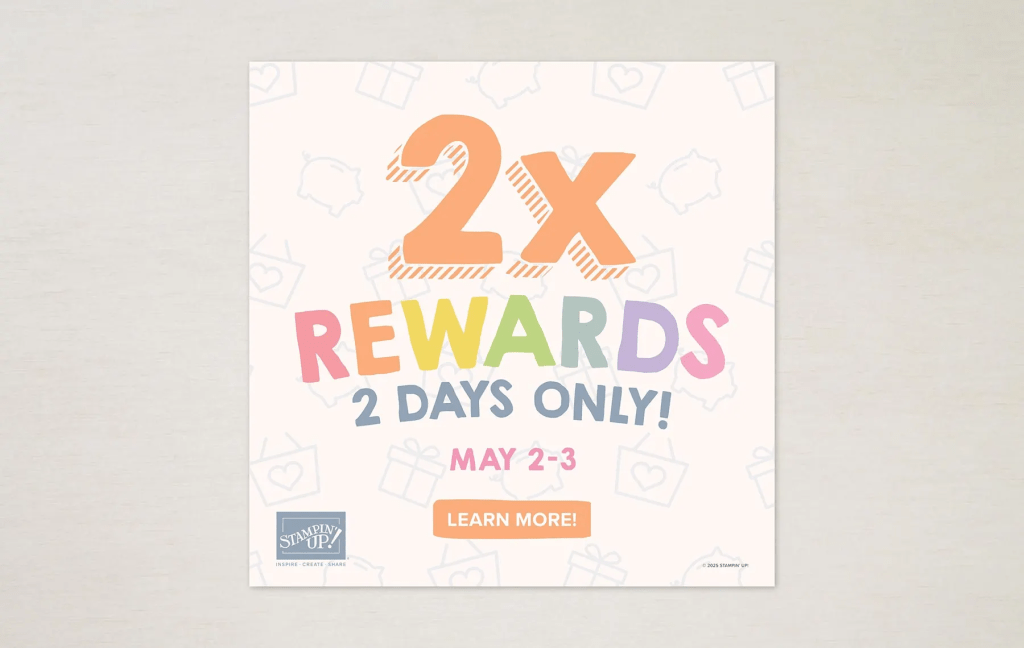
ONLY DAYS LEFT FOR THIS SALE!!! Starting June 3, all available suites and suite products from the 2025–2026 Annual Catalog and Online Exclusives are buy one, get one 50% off! If you’ve had your eye on a new suite from the annual catalog or you really like the look of a stamp set from an Online Exclusives suite, you don’t have to choose—you can get both!
Sales Period: June 3–30, 2025
Ordering Deadlines
Phone: June 30, 2025, at 6:59 p.m. (MT)
Online: June 30, 2025, at 11:59 p.m. (MT)
- All available suites and suite products from the 2025–2026 Annual Catalog and Online Exclusives are buy one, get one 50% off.
- When you shop the sale, the 50% off discount will apply to the lower-priced item (for example, if you buy a suite collection and a stamp set from a suite, the suite would be full price, and the stamp set would be 50% off).
- Suite collections are available if all items are in stock; if all items are not in stock, you can still shop the available suite products.
- You don’t have to buy a suite and suite products all from the same suite collection for the discount to apply. You can buy any suite products from any suite.
- The discount will appear in your cart once you’ve added two items within the sale parameters to your cart.
- Products are available only while supplies last.
- See and shop all qualifying suites in the online store.
SHOP LAST CHANCE PRODUCTS HERE… NEW ITEMS ADDED TO THE LIST… MAKE CERTAIN MY NAME IS LISTED AS YOUR DEMONSTRATOR WHEN YOU CHEVCK OUT! :O) REMEMBER…Browse the selection of Last Chance paper crafting products. Additional items are added every other month. These products are available only while supplies last so be sure to buy them before they are discontinued! Discounts vary and are subject to change.
VIRTUAL ALBUM RETREAT!!!
Who: Crafters who love to scrapbook!
When: July 16–18, 2025, 2:00–10:30 p.m. (MT)
Where: Private Facebook Group
Registration: There is no registration for this event! By purchasing the Month by Month Album Retreat 2025 kit, you’ll get access to an exclusive Facebook group where the live event will stream.
Price of Month by Month Album Retreat 2025 kit: $250
Language of Event: This event will be presented in English only.
After the Event: You can access the recorded event videos on the Virtual Album Retreat Facebook group page.
CONTACT ME FOR INFORMATION RE: ADDITIONAL SUPPLY LIST
Click HERE to join with me & create your Starter Kit! What’s to lose – 20% discount/ 20% commission on all orders.
THANKS FOR STOPPING BY. MAY YOU HAVE A BEAUTIFUL DAY. MAKE SOMEONE HAPPY SENDING THEM A HANDMADE CARD FILLED WITH LOVE. ❤️
Product List![Kintsugi Inspirations Suite Collection (English) [ 165172 ]](https://assets1.tamsnetwork.com/images/EC042017NF/165172s.jpg "Kintsugi Inspirations Suite Collection (English) [ 165172 ]")
![Inspiring Imperfections Bundle (English) [ 165167 ]](https://assets1.tamsnetwork.com/images/EC042017NF/165167s.jpg "Inspiring Imperfections Bundle (English) [ 165167 ]")
![Joined Together 3 D Embossing Folder [ 165170 ]](https://assets1.tamsnetwork.com/images/EC042017NF/165170s.jpg "Joined Together 3 D Embossing Folder [ 165170 ]")
![Flower Accents [ 165171 ]](https://assets1.tamsnetwork.com/images/EC042017NF/165171s.jpg "Flower Accents [ 165171 ]")
![Crumb Cake Classic Stampin' Pad [ 147116 ]](https://assets1.tamsnetwork.com/images/EC042017NF/147116s.jpg "Crumb Cake Classic Stampin' Pad [ 147116 ]")
![Lost Lagoon 8-1/2" X 11" Cardstock [ 133679 ]](https://assets1.tamsnetwork.com/images/EC042017NF/133679s.jpg "Lost Lagoon 8-1/2\" X 11\" Cardstock [ 133679 ]")
![Basic Beige 8 1/2" X 11" Cardstock [ 164511 ]](https://assets1.tamsnetwork.com/images/EC042017NF/164511s.jpg "Basic Beige 8 1/2\" X 11\" Cardstock [ 164511 ]")
![Lost Lagoon Classic Stampin' Pad [ 161678 ]](https://assets1.tamsnetwork.com/images/EC042017NF/161678s.jpg "Lost Lagoon Classic Stampin' Pad [ 161678 ]")
![Peach Pie Classic Stampin Pad [ 163810 ]](https://assets1.tamsnetwork.com/images/EC042017NF/163810s.jpg "Peach Pie Classic Stampin Pad [ 163810 ]")
![Peach Pie Stampin’ Blends Combo Pack [ 163827 ]](https://assets1.tamsnetwork.com/images/EC042017NF/163827s.jpg "Peach Pie Stampin’ Blends Combo Pack [ 163827 ]")
![Mossy Meadow Stampin' Blends Combo Pack [ 148547 ] (Retired)](https://assets1.tamsnetwork.com/images/EC042017NF/148547s.jpg "Mossy Meadow Stampin' Blends Combo Pack [ 148547 ] (Retired)")
![Clear Wink Of Stella Glitter Brush [ 141897 ]](https://assets1.tamsnetwork.com/images/EC042017NF/141897s.jpg "Clear Wink Of Stella Glitter Brush [ 141897 ]")
![Tuxedo Black Memento Ink Pad [ 132708 ]](https://assets1.tamsnetwork.com/images/EC042017NF/132708s.jpg "Tuxedo Black Memento Ink Pad [ 132708 ]")
![Basic White 8 1/2" X 11" Cardstock [ 166780 ]](https://assets1.tamsnetwork.com/images/EC042017NF/166780s.jpg "Basic White 8 1/2\" X 11\" Cardstock [ 166780 ]")
![Basic White 8 1/2" X 11" Thick Cardstock [ 159229 ]](https://assets1.tamsnetwork.com/images/EC042017NF/159229s.jpg "Basic White 8 1/2\" X 11\" Thick Cardstock [ 159229 ]")
![Basic White Medium Envelopes [ 159236 ]](https://assets1.tamsnetwork.com/images/EC042017NF/159236s.jpg "Basic White Medium Envelopes [ 159236 ]")
![Paper Trimmer [ 152392 ]](https://assets1.tamsnetwork.com/images/EC042017NF/152392s.jpg "Paper Trimmer [ 152392 ]")
![Stampin' Cut & Emboss Machine [ 149653 ]](https://assets1.tamsnetwork.com/images/EC042017NF/149653s.jpg "Stampin' Cut & Emboss Machine [ 149653 ]")
![Stampin' Dimensionals [ 104430 ]](https://assets1.tamsnetwork.com/images/EC042017NF/104430s.jpg "Stampin' Dimensionals [ 104430 ]")
![Multipurpose Liquid Glue [ 110755 ]](https://assets1.tamsnetwork.com/images/EC042017NF/110755s.jpg "Multipurpose Liquid Glue [ 110755 ]")
![Stampin' Seal [ 152813 ]](https://assets1.tamsnetwork.com/images/EC042017NF/152813s.jpg "Stampin' Seal [ 152813 ]")
![Bone Folder [ 102300 ]](https://assets1.tamsnetwork.com/images/EC042017NF/102300s.jpg "Bone Folder [ 102300 ]")
![Take Your Pick [ 144107 ]](https://assets1.tamsnetwork.com/images/EC042017NF/144107s.jpg "Take Your Pick [ 144107 ]")

![Meant To Bee Dies [ 166582 ]](https://assets1.tamsnetwork.com/images/EC042017NF/166582s.jpg "Meant To Bee Dies [ 166582 ]")
![Meant To Bee Bundle (English) [ 167243 ]](https://assets1.tamsnetwork.com/images/EC042017NF/167243s.jpg "Meant To Bee Bundle (English) [ 167243 ]")
![Secret Sea 8 1/2" X 11" Cardstock [ 165624 ]](https://assets1.tamsnetwork.com/images/EC042017NF/165624s.jpg "Secret Sea 8 1/2\" X 11\" Cardstock [ 165624 ]")
![Misty Moonlight 8-1/2" X 11" Cardstock [ 153081 ]](https://assets1.tamsnetwork.com/images/EC042017NF/153081s.jpg "Misty Moonlight 8-1/2\" X 11\" Cardstock [ 153081 ]")
![Lemon Lime Twist Classic Stampin' Pad [ 147145 ]](https://assets1.tamsnetwork.com/images/EC042017NF/147145s.jpg "Lemon Lime Twist Classic Stampin' Pad [ 147145 ]")
![Old Olive Classic Stampin' Pad [ 147090 ]](https://assets1.tamsnetwork.com/images/EC042017NF/147090s.jpg "Old Olive Classic Stampin' Pad [ 147090 ]")
![Mossy Meadow Classic Stampin' Pad [ 147111 ]](https://assets1.tamsnetwork.com/images/EC042017NF/147111s.jpg "Mossy Meadow Classic Stampin' Pad [ 147111 ]")
![Full Of Life 6" X 6" (15.2 X 15.2 Cm) Designer Series Paper [ 163357 ]](https://assets1.tamsnetwork.com/images/EC042017NF/163357s.jpg "Full Of Life 6\" X 6\" (15.2 X 15.2 Cm) Designer Series Paper [ 163357 ]")
![Lemon Lime Twist 8-1/2" X 11" Cardstock [ 144245 ]](https://assets1.tamsnetwork.com/images/EC042017NF/144245s.jpg "Lemon Lime Twist 8-1/2\" X 11\" Cardstock [ 144245 ]")
![Spotlight On Nature Dies [ 163580 ]](https://assets1.tamsnetwork.com/images/EC042017NF/163580s.jpg "Spotlight On Nature Dies [ 163580 ]")
![Stitched Shapes Dies [ 152323 ]](https://assets1.tamsnetwork.com/images/EC042017NF/152323s.jpg "Stitched Shapes Dies [ 152323 ]")
![You Are Remarkable Photopolymer Stamp Set (English) [ 165445 ]](https://assets1.tamsnetwork.com/images/EC042017NF/165445s.jpg "You Are Remarkable Photopolymer Stamp Set (English) [ 165445 ]")
![Beautiful Motifs Bundle (English) [ 165206 ]](https://assets1.tamsnetwork.com/images/EC042017NF/165206s.jpg "Beautiful Motifs Bundle (English) [ 165206 ]")
![Tinsel Gems Four Pack [ 161623 ]](https://assets1.tamsnetwork.com/images/EC042017NF/161623s.jpg "Tinsel Gems Four Pack [ 161623 ]")
![Shaded Spruce 8-1/2" X 11" Cardstock [ 146981 ]](https://assets1.tamsnetwork.com/images/EC042017NF/146981s.jpg "Shaded Spruce 8-1/2\" X 11\" Cardstock [ 146981 ]")
![Shaded Spruce Classic Stampin' Pad [ 147088 ]](https://assets1.tamsnetwork.com/images/EC042017NF/147088s.jpg "Shaded Spruce Classic Stampin' Pad [ 147088 ]")
![Spring Corners Photopolymer Stamp Set (English) [ 164738 ]](https://assets1.tamsnetwork.com/images/EC042017NF/164738s.jpg "Spring Corners Photopolymer Stamp Set (English) [ 164738 ]")
![Spring Corners Bundle (English) [ 164743 ]](https://assets1.tamsnetwork.com/images/EC042017NF/164743s.jpg "Spring Corners Bundle (English) [ 164743 ]")
![Beautiful Bokeh 6" X 6" (15.2 X 15.2 Cm) Designer Series Paper [ 164607 ]](https://assets1.tamsnetwork.com/images/EC042017NF/164607s.jpg "Beautiful Bokeh 6\" X 6\" (15.2 X 15.2 Cm) Designer Series Paper [ 164607 ]")
![Layered Thoughts Photopolymer Stamp Set (English) [ 165346 ]](https://assets1.tamsnetwork.com/images/EC042017NF/165346s.jpg "Layered Thoughts Photopolymer Stamp Set (English) [ 165346 ]")
![Low Profile Dots [ 164658 ]](https://assets1.tamsnetwork.com/images/EC042017NF/164658s.jpg "Low Profile Dots [ 164658 ]")
![Soft Sea Foam Stampin' Blends Combo Pack [ 154902 ]](https://assets1.tamsnetwork.com/images/EC042017NF/154902s.jpg "Soft Sea Foam Stampin' Blends Combo Pack [ 154902 ]")
![Lost Lagoon Stampin’ Blends Combo Pack [ 161680 ]](https://assets1.tamsnetwork.com/images/EC042017NF/161680s.jpg "Lost Lagoon Stampin’ Blends Combo Pack [ 161680 ]")
![Pretty Peacock Stampin' Blends Combo Pack [ 149560 ] (Retired)](https://assets1.tamsnetwork.com/images/EC042017NF/149560s.jpg "Pretty Peacock Stampin' Blends Combo Pack [ 149560 ] (Retired)")
![Petal Pink 8-1/2" X 11" Cardstock [ 146985 ]](https://assets1.tamsnetwork.com/images/EC042017NF/146985s.jpg "Petal Pink 8-1/2\" X 11\" Cardstock [ 146985 ]")
![Petal Pink Classic Stampin' Pad [ 147108 ]](https://assets1.tamsnetwork.com/images/EC042017NF/147108s.jpg "Petal Pink Classic Stampin' Pad [ 147108 ]")
![Daffodil Delight 8-1/2" X 11" Cardstock [ 119683 ]](https://assets1.tamsnetwork.com/images/EC042017NF/119683s.jpg "Daffodil Delight 8-1/2\" X 11\" Cardstock [ 119683 ]")
![Daffodil Delight Classic Stampin' Pad [ 147094 ]](https://assets1.tamsnetwork.com/images/EC042017NF/147094s.jpg "Daffodil Delight Classic Stampin' Pad [ 147094 ]")


![Textured Notes Bundle (English) [ 165556 ]](https://assets1.tamsnetwork.com/images/EC042017NF/165556s.jpg "Textured Notes Bundle (English) [ 165556 ]")
![Woven Textures 12" X 12" (30.5 X 30.5 Cm) Designer Series Paper [ 165560 ]](https://assets1.tamsnetwork.com/images/EC042017NF/165560s.jpg "Woven Textures 12\" X 12\" (30.5 X 30.5 Cm) Designer Series Paper [ 165560 ]")
![Early Espresso 8-1/2" X 11" Cardstock [ 119686 ]](https://assets1.tamsnetwork.com/images/EC042017NF/119686s.jpg "Early Espresso 8-1/2\" X 11\" Cardstock [ 119686 ]")
![Crumb Cake 8-1/2" X 11" Cardstock [ 120953 ]](https://assets1.tamsnetwork.com/images/EC042017NF/120953s.jpg "Crumb Cake 8-1/2\" X 11\" Cardstock [ 120953 ]")
![Early Espresso Classic Stampin' Pad [ 147114 ]](https://assets1.tamsnetwork.com/images/EC042017NF/147114s.jpg "Early Espresso Classic Stampin' Pad [ 147114 ]")
![Adhesive Backed Textured Dots [ 163338 ]](https://assets1.tamsnetwork.com/images/EC042017NF/163338s.jpg "Adhesive Backed Textured Dots [ 163338 ]")