Stampin’ Up! Perfectly Pear Fun fold

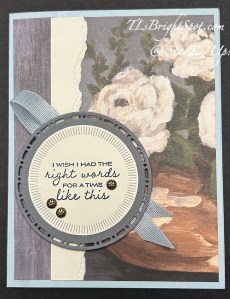
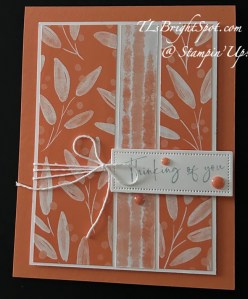
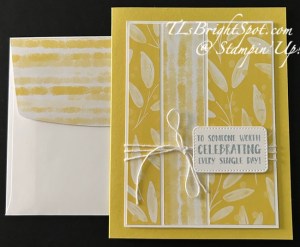
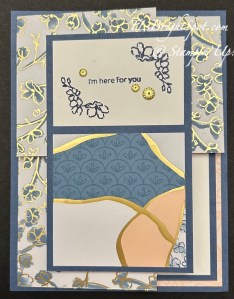
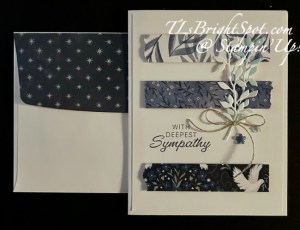
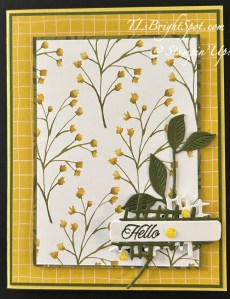
Whew – we are having a m-a-j-o-r heat wave here in NJ, USA. Thank goodness for air conditioning, which we did NOT have when I was growing up in Indiana. But then, the Internet nor cell phones were a thing then either. Sigh. I digress… my card today uses the stunning Painterly Pears 12×12 DSP (available Jul 1 in my online store) and a few other products. Let’s take a look –

Stampin' Up! Perfectly Pears fun fold card front

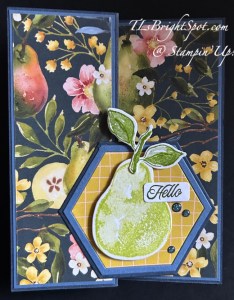
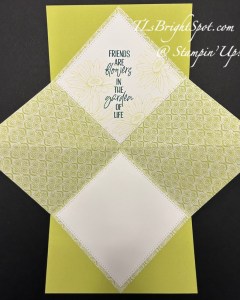
That fun hexagon uses the Meant to Bee Dies.

Stampin' Up! Perfectly Pears fun fold card inside

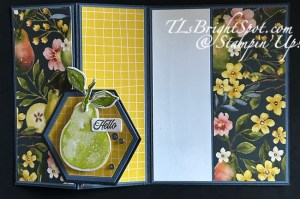
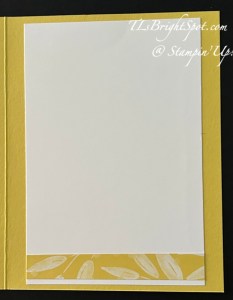
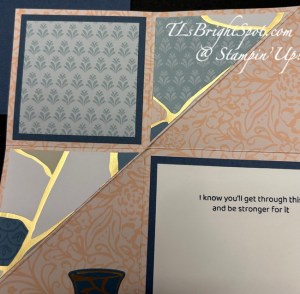
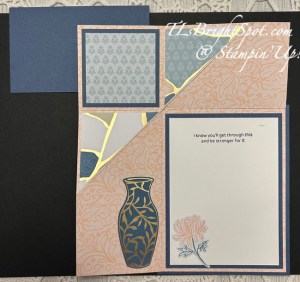
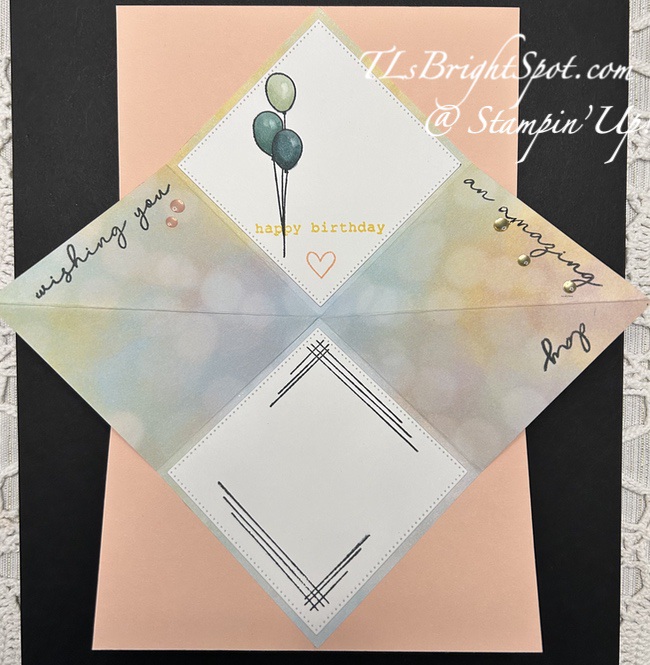
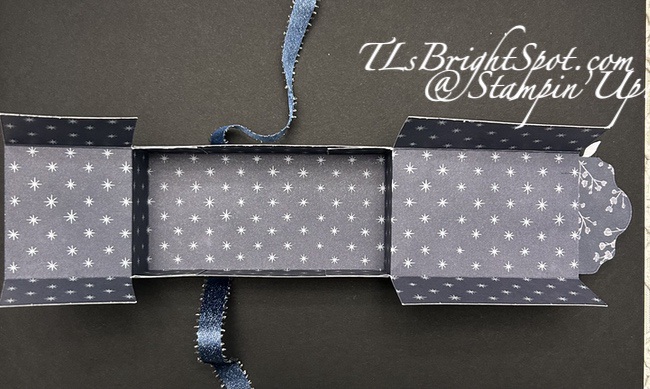
Basic directions to make this fun fold.

  • Card base is 8 1/2 x 5 1/2 scored at 4 1/4 then the front section folded back on itself in half. NOTE: while you could score at 2 1/8 and 4 1/4, I prefer more precise edges (sometimes it’s off a smidge), and that’s why I simply fold it back on itself. Card base is Secret Sea.
  • Layered panels – card stock: 2 x 5 3/8 (cut 2) 4 1/8 x 5 3/8. I used Misty Moonlight.
  • DSP layers – 1 7/8 x 5 1/4 (cut 2 in coordinating patterns), 2 1/4 x 5 1/4
  • Basic White layer – 2 1/4 x 5 1/4

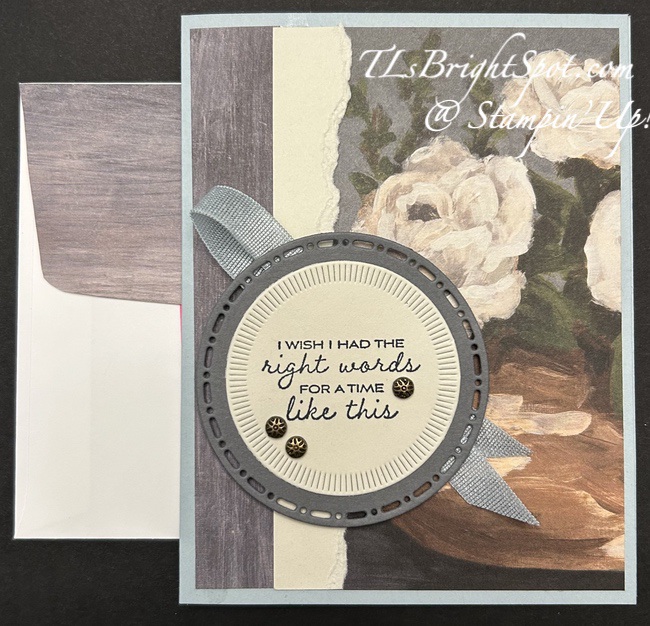
For the sentiment panel, using the Meant to Be Dies, I die cut three hexagons: Secret Sea, Misty Moonlight and Painterly Pears DSP. What’s fun about these dies is they die cut not only the hexagon, but a fun edge and it’s that edge that I used for the Misty Moonlight piece. The pear is stamped in Lemon Lime Twist ink and the leaves in Old Olive – both using the Perfectly Pears stamp set. I die cut them with the Perfectly Pears Dies, attached dimentionals to the pear and added it to the hexagon, then added the stem /leaves with a bit of liquid glue and a dimensional behind the right leaf. The sweet ‘hello’ comes from the Perfectly Pears stamp set and it is stampedin Mossy Meadow ink and die cut with a die from the Perfectly Pears Dies. It was added with dimensionals behind on the right & a dab of glue on the left. I added three Low Profile Dots from the Painterly Pears Suite Collection, then attached the hexagon just to the left front panel.

Stampin' Up!  Perfectly Pears fun fold card & envelope

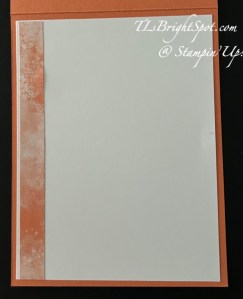
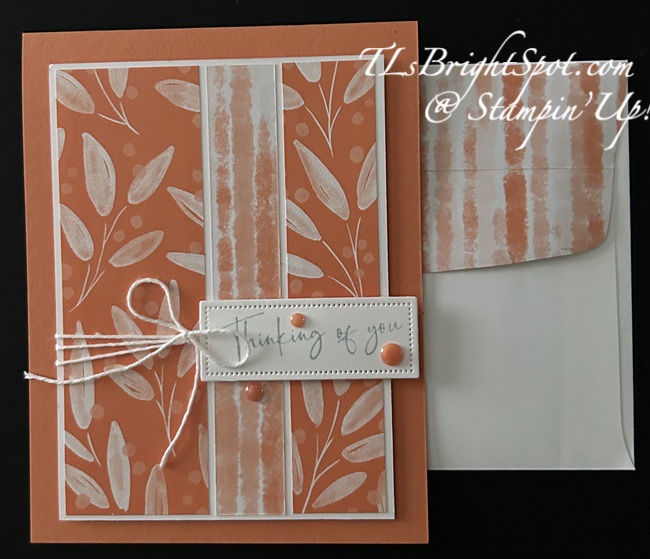
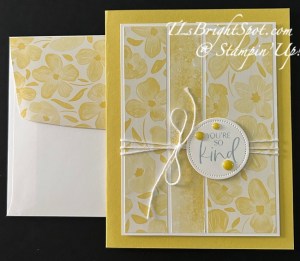
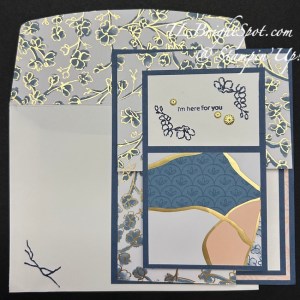
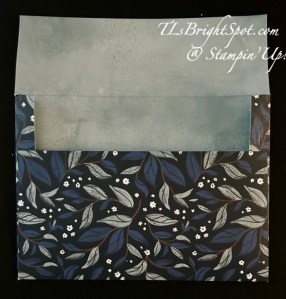
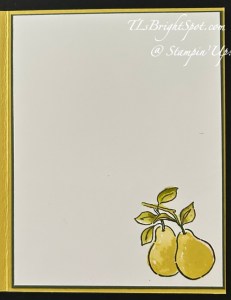
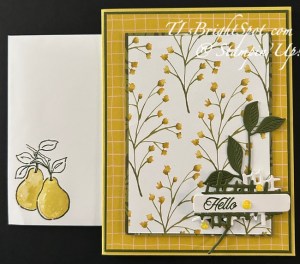
For the envelope, more Painterly Pears 12×12 DSP on the flap & trimmed to fit. The pear is again stamped in Lemon Lime Twist ink and the leaf/stemn in Old Olive ink using appropriate stamps in the Perfectly Pears stamp set. What a friendly, fun looking card and perfect for several occasions. I love the versatility.

Below is a list of products that can be purchased now. Remember the Painterly Pears Suite Collection will be available Jul 1!

Thanks for stopping by. May you have a beautiful day!


Product List

Stampin’ Up! Coneflower Celebrations in a Sympathy card

I’m sharing a card today made with the amazing Coneflower Celebrations bundle in the new 2025-2026 Annual Catalog. I’ve made it looking more like a white daisy with bits of color.

Stampin' Up! Coneflower Celebrations card front

The card base is Thick Basic White with an attached Basic White layer run through with one of the Glass Gardens embossing folders (there are two in this package!). I offset the embossing folder for added interest, putting on an angle on the sheet. Then I began creating the flower using the Coneflower Celebration Dies. The top layer is from one die and has light color with the Light Daffoldil Delight Stampin’ Blends; and the other two are from another die. I stamped on one of those bottom layers with stamped off Smoky Slate then added color with Daffodil Delight Stampin’ Blends. I adhered these together creating layers, so slightly offset. The center of the flower is a gorgeous little die cut from Darling Duckling card stock with added color with the Dark Daffodil Delight Stampin’ Blends & Wink of Stella. This too was added to the flower then attached to the card front. The stems and leaves were stamped in Memento ink and colored lightly with Granny Apple Green Stampin blends, then added in place. The sentiment is from the Everyday Greetings stamp set and is stamped in Smoky Slate then fussy cut at the bottom & attached with dimensionals. The final touch is a Linen Thread bow.

Stampin' Up! Conflower Celebrations card inside

For the inside… again the sentiment is from Everyday Greetings stamp set and stamped in Smoky Slate ink. The butterfly is from the Coneflower Celebrations stamp and stamped in Smoky Slate and colored with Light Balmy Blue, Light Pool Party and Light Misty Moonlight – and of course Wink of Stella. The Basic White panel was added to the inside of the card.

Stampin' Up! Coneflower Celebrations card & envelope

For the envelope… I embossed a piece of Basic White with the same Glass Gardens embossing folder, adhered to the flap & trimmed to fit – done!

BUY ONE GET ONE 50% OFF has begun

On All SUITES and SUITE PRODUCTS!

Stampin' Up! Suite Sale

Starting June 3, all available suites and suite products from the 2025–2026 Annual Catalog and Online Exclusives are buy one, get one 50% off! If you’ve had your eye on a new suite from the annual catalog or you really like the look of a stamp set from an Online Exclusives suite, you don’t have to choose—you can get both!

Sales Period: June 3–30, 2025

Ordering Deadlines

Phone: June 30, 2025, at 6:59 p.m. (MT)

Online: June 30, 2025, at 11:59 p.m. (MT)

  • All available suites and suite products from the 2025–2026 Annual Catalog and Online Exclusives are buy one, get one 50% off.
  • When you shop the sale, the 50% off discount will apply to the lower-priced item (for example, if you buy a suite collection and a stamp set from a suite, the suite would be full price, and the stamp set would be 50% off).
  • Suite collections are available if all items are in stock; if all items are not in stock, you can still shop the available suite products.
  • You don’t have to buy a suite and suite products all from the same suite collection for the discount to apply. You can buy any suite products from any suite.
  • The discount will appear in your cart once you’ve added two items within the sale parameters to your cart.
  • Products are available only while supplies last.
  • See and shop all qualifying suites in the online store.

SHOP LAST CHANCE PRODUCTS HERENEW ITEMS ADDED TO THE LIST… MAKE CERTAIN MY NAME IS LISTED AS YOUR DEMONSTRATOR WHEN YOU CHEVCK OUT! :O) REMEMBER…Browse the selection of Last Chance paper crafting products. Additional items are added every other month. These products are available only while supplies last so be sure to buy them before they are discontinued! Discounts vary and are subject to change.

VIRTUAL ALBUM RETREAT!!!

Stampin' Up! Virtual Album Retreat

Who: Crafters who love to scrapbook!

When: July 16–18, 2025, 2:00–10:30 p.m. (MT)

Where: Private Facebook Group

Registration: There is no registration for this event! By purchasing the Month by Month Album Retreat 2025 kit, you’ll get access to an exclusive Facebook group where the live event will stream.

Price of Month by Month Album Retreat 2025 kit: $250

Language of Event: This event will be presented in English only.

After the Event: You can access the recorded event videos on the Virtual Album Retreat Facebook group page.

CONTACT ME FOR INFORMATION RE: ADDITIONAL SUPPLY LIST

Click HERE to join with me & create your Starter Kit! What’s to lose – 20% discount/ 20% commission on all orders.

Thanks for stopping by. May you have a beautiful day. Make someone happy sending them a handmade card filled with love. ❤️

<!– /wp:paragraph — Product List

Stampin’ Up! Explosion Cards

Explosion cards are just that – meant to WOW when opening them. I’ve two of them for you today 0ne is a 4 1/4 square card and the other is a standard A2 card with a finished size of 5 1/2 x 4 1/4. There are advantages to both sizes… both have the same size inside explosion 😀

card one – made with Full of Life 6×6 DSP, Spotlight On Nature Dies, Stitched Shapes Dies, You Are Remarkable stamp set, Beautiful Motifs stamp, Tinsel Gems , Lemon Lime Twist card base, Lemon Lime Twist, Shaded Spruce & Memento inks. Card base is 4 1/4 x 8 1/2 scored at 4 1/4

Stampin' Up! Full of Life Explosion Card front
Stampin' Up! Full of Life Explosion card inside

card two – made with Beautiful Bokeh 6×6 DSP, Spring Corners stamp set, Layered Thoughts stamp, Stitched Shapes Dies, Low Profile Dots, Stampin’ Blends Soft Sea Foam, Lost Lagoon & Pretty Peacock, Petal Pink card base with an overlay of Daffodil Delight, Petal Pink & Memento inks. Card base is 5 1/2 x 8 1/2 scored at 4 1/4

Basic directions…

  • With the side you wish to have showing most, fold a 6×6 piece of DSP in half, open & turn 90 degrees and fold in half again. Burnish well & open
  • Turn this piece over and fold in half in a diagonal fashion only once. Burnish and open. This creates the fold across the middle
  • The white panels on this are made with the largest of the Stitched Squares Dies, stamped and attached with adhesive of choice
  • Be sure to do all stamping, coloring, decorating before attaching to card base

To attach to card base…

  • Mark the center point both at the bottom of the card base and close to the center fold of the base
  • With ‘explosion’ piece completely closed, line up points on the diagonal with center points on card base and adhere to bottom half of card base. Make certain the card base will open and close easily.
  • Add adhesive to remaining portion of closed ‘explosion’ and close card front. Bingo –

NOTE: Decorate card front before attaching the ‘explosion’ piece.

Thanks for stopping by. I hope you give this explosion card a try – super easy and gives a real wow! to a card. May you have a beautiful day!

Products to make these two cards are listed below. Be sure my name is listed as your demonstrator so you get credit (from me) for purchases. 😀


Product List

Pretty Peacock Stampin' Blends Combo Pack [ 149560 ] (Retired)
Pretty Peacock Stampin’ Blends Combo Pack
[149560]
$9.00

Stampin’ Up! NEW Peaceful Garden Suite Collection

Good morning! I participated in a Demonstrator only event yesterday called Creativity Now and we used a NEW suite collection that will be available in the Sep-Dec 2025 Mini Catalog . We made 3 cards and a darling little box. But first, the suite products.

Peace On Earth Bundle includes stamp set, dies and the Peaceful Greenery 3D embossing folder; Hues of Blue Flowers, Peaceful Garden 12×12 DSP both front & reverse side, and Peaceful Garden 12×12 Glimmer Paper. The Misty Moonlight & Silver Edged ribbon is shown on both a card & a cute box.

Stampin' Up! Hues of Blue Flowers
Stampin' Up! Peaceful Garden 12x12 DSP

Stampin' Up! Peaceful Garden 12x12 DSP, reverse side
Stampin' Up! Peaceful Garden 12x12 Glimmer Paper

Card 1 uses strips and beautiful die cut leaves + a stamped sentiment

Stampin' Up! Peaceful Garden 
Suite, card 1

Card 2 is a fun fold, elongated card with a matching envelope, ribbon and die cuts

Stampin' Up! Peaceful Garden Suite, card 2
Stampin' Up! Peaceful Garden Suite, envelope for card 2

Card 3 uses the embossing folder to create a small strip, the showing off another of the DSP and glimmer paper. It also has a ‘pocket’ on the front for a message

Stampin' Up! Peaceful Garden Suite, card 3

The last is a darling box made with the Designer Series Paper, die cuts and ribbon

Fun projects, right? And all because being a demonstrator offers more opportunity for connecting with others, creating, and and and… :O) Join my team now to be a part of the fun and opportunities that await.

Stampin’ Up! Beautiful Blues Kit with Alternatives

Hello fellow creators. I’ve had some technical issues lately and it has frustrated me. Today though I want to share some alternatives for the Beautiful Blues Kit – not that any alternatives are needed. This is one gorgeous kit, but I couldn’t help myself – i cut one of the card fronts and made a card using the tile technique. Let’s take a look…

Stampin' Up! Beautiful Blues Kit. alternate 1

Notice I did not use the entire card front – or all the ’tiles’. The blue background is from another of the cards that I cut and stamped with one of the stamps & Night of Navy inkspot that are part of the kit. The pieces are cut in 1″ squares and adhered with dimensionals. The sentiment and tag are part of the kit as well, also adhered with dimensionals.

Stampin' Up! Beautiful Blues Kit, alternate 1 card inside

For the inside… I stamped the leaf image using the same stamp from the Beautiful Blues kit and Night of Navy inkspot – on the remainder of the card that I cut apart – making this a 4 x 5 1/4 size and adhering it to the inside of the card.

Here are additional slightly altered cards from this kit. This card has a double bow using Baker’s Twine Essentials pack in white, slipped behind the sentiment . The embellishments are from the kit!

Stampin' Up! Beautiful Blues kit alternate 2

This card has a Linen Thread double bow slipped behind the sentiment. On the inside I stamped the leaf image two times.

On alternate card 1, I had cut a blue card base apart and used it as a background for this card, stamping it all over with the leaf stamp, then adhering it to a Misty Moonlight card base.

Stampin' Up! Beautiful Blues Kit alternate 4
Stampin' Up! Beautiful Blues Kit alternate card 4 completed card front

The ‘overlay’ and all other parts are from the kit.

And for my last alternate card, I cut in half one of the lacy die cuts included in the kit and put it behind the sentiment. The other half is on the inside of the card.

Here are the remainder of the cards unaltered – in other words, put together as suggested:O) I made two of the first shown here.

Stampin' Up! Beautiful Blues kit, 1
Stampin' Up! Beautiful Blues kit.2

Stampin' Up! Beautiful Blues Kit, 3

Such a fun kit to put together – no extras needed unless you so desire to change or alter. Love this kit!

Want to purchase this kit? See the product list below. There’s also more… Stampin’ Up! has this great promotion right now.

BUY ONE GET ONE 50% OFF has begun

On All SUITES and SUITE PRODUCTS!

Stampin' Up! Suite Sale

Starting June 3, all available suites and suite products from the 2025–2026 Annual Catalog and Online Exclusives are buy one, get one 50% off! If you’ve had your eye on a new suite from the annual catalog or you really like the look of a stamp set from an Online Exclusives suite, you don’t have to choose—you can get both!

Sales Period: June 3–30, 2025

Ordering Deadlines

Phone: June 30, 2025, at 6:59 p.m. (MT)

Online: June 30, 2025, at 11:59 p.m. (MT)

  • All available suites and suite products from the 2025–2026 Annual Catalog and Online Exclusives are buy one, get one 50% off.
  • When you shop the sale, the 50% off discount will apply to the lower-priced item (for example, if you buy a suite collection and a stamp set from a suite, the suite would be full price, and the stamp set would be 50% off).
  • Suite collections are available if all items are in stock; if all items are not in stock, you can still shop the available suite products.
  • You don’t have to buy a suite and suite products all from the same suite collection for the discount to apply. You can buy any suite products from any suite.
  • The discount will appear in your cart once you’ve added two items within the sale parameters to your cart.
  • Products are available only while supplies last.
  • See and shop all qualifying suites in the online store.

SHOP LAST CHANCE PRODUCTS HERE… NEW ITEMS ADDED TO THE LIST… MAKE CERTAIN MY NAME IS LISTED AS YOUR DEMONSTRATOR WHEN YOU CHEVCK OUT! :O) REMEMBER…Browse the selection of Last Chance paper crafting products. Additional items are added every other month. These products are available only while supplies last so be sure to buy them before they are discontinued! Discounts vary and are subject to change.

VIRTUAL ALBUM RETREAT!!!

Stampin' Up! Virtual Album Retreat

Who: Crafters who love to scrapbook!

When: July 16–18, 2025, 2:00–10:30 p.m. (MT)

Where: Private Facebook Group

Registration: There is no registration for this event! By purchasing the Month by Month Album Retreat 2025 kit, you’ll get access to an exclusive Facebook group where the live event will stream.

Price of Month by Month Album Retreat 2025 kit: $250

Language of Event: This event will be presented in English only.

After the Event: You can access the recorded event videos on the Virtual Album Retreat Facebook group page.

CONTACT ME FOR INFORMATION RE: ADDITIONAL SUPPLY LIST

Click HERE to join with me & create your Starter Kit! What’s to lose – 20% discount/ 20% commission on all orders.

Thanks for stopping by. May you have a beautiful day. Make someone happy sending them a handmade card filled with love. ❤️


Product List

Stampin’ Up! Painterly Pears for the Happy Inkin’ Thursday Blog Hop

Good Thursday – thanks for stopping in to view the creations from this fabulous team of bloggers! We have a sketch challenge today as you’ll see below and I’ve chosen to use the fabulous new Painterly Pears products that will be available Jul 1 for customers in my online store.

Stampin' Up! Hap[p[y Inkin' Thursday Blog Hop

Stampin' Up! Painterly Pears card front

I begsn with a card base of Darling Duckling and added a panel of Mossy Meadow 4 1/8 x 5 3/8, then a piece of Painterly Pears DSP 4 x 5 1/4. I next cut a piece of Painterly Pears 3 1/8 x 4 3/8 and added it to another piece of Painterly Pear 3 1/4 x 4 1/2. I die cut this gorgeous leaf from Mossy Meadow card stock and adhered it off to the side – this comes from the Painted Pears Dies. I die cut two really fun pieces -open pieces almost like a webbing – one in Mossy Meadow and another in Basic White, also from the Painted Pears Dies. I adhered them offset & together with dots of liquid glue. i stamped the sentiment from the Painted Pears stamp set with Mossy Meadow ink on a strip of Basic White and die cut it with the coordinating dies in the Painted Pears Dies. I adhered this over the fun die cuts mentioned earlier, attached dimensionals to the back and put these in place over the leaf die cut. As a final touchnI added Low Profile Sparkle Dots in Darling Duckling.

Stampin' Up! Painted Pears card inside

For the inside of the card… I stamped these two adorable pears using the Painted Pears stamp set and Mossy Meadow ink. I added color to the leaves with Stampin’ blends light Granny Apple Green then a bit of light Old Olive. For the pears themselves, I stamped them in Darling Duckling ink then added Wink of Stella for some glam :o)

Stampin' Up1 Painterly Pears card & envelope.

For the envelope… I again stamped the oh so cute pears in Mossy Meadow ink, then added the two-step stamp in Darling Duckling for coloring the pears. And yes, more Wink of Stella on the pears. While it doesn’t show in this photo, I did add more of the Painterly Pears DSP to the envelope flap, & trimmed it to fit.

O – time to see what other team members have to share on this hop today. Click the next button to take you to Amy or click on a name to visit their site. Happy hopping!

Stampin' Up! next blog button

BUY ONE GET ONE 50% OFF has begun

On All SUITES and SUITE PRODUCTS!

Stampin' Up! Suite Sale

Starting June 3, all available suites and suite products from the 2025–2026 Annual Catalog and Online Exclusives are buy one, get one 50% off! If you’ve had your eye on a new suite from the annual catalog or you really like the look of a stamp set from an Online Exclusives suite, you don’t have to choose—you can get both!

Sales Period: June 3–30, 2025

Ordering Deadlines

Phone: June 30, 2025, at 6:59 p.m. (MT)

Online: June 30, 2025, at 11:59 p.m. (MT)

  • All available suites and suite products from the 2025–2026 Annual Catalog and Online Exclusives are buy one, get one 50% off.
  • When you shop the sale, the 50% off discount will apply to the lower-priced item (for example, if you buy a suite collection and a stamp set from a suite, the suite would be full price, and the stamp set would be 50% off).
  • Suite collections are available if all items are in stock; if all items are not in stock, you can still shop the available suite products.
  • You don’t have to buy a suite and suite products all from the same suite collection for the discount to apply. You can buy any suite products from any suite.
  • The discount will appear in your cart once you’ve added two items within the sale parameters to your cart.
  • Products are available only while supplies last.
  • See and shop all qualifying suites in the online store.

SHOP LAST CHANCE PRODUCTS HERENEW ITEMS ADDED TO THE LIST… MAKE CERTAIN MY NAME IS LISTED AS YOUR DEMONSTRATOR WHEN YOU CHEVCK OUT! :O) REMEMBER…Browse the selection of Last Chance paper crafting products. Additional items are added every other month. These products are available only while supplies last so be sure to buy them before they are discontinued! Discounts vary and are subject to change.

VIRTUAL ALBUM RETREAT!!!

Stampin' Up! Virtual Album Retreat

Who: Crafters who love to scrapbook!

When: July 16–18, 2025, 2:00–10:30 p.m. (MT)

Where: Private Facebook Group

Registration: There is no registration for this event! By purchasing the Month by Month Album Retreat 2025 kit, you’ll get access to an exclusive Facebook group where the live event will stream.

Price of Month by Month Album Retreat 2025 kit: $250

Language of Event: This event will be presented in English only.

After the Event: You can access the recorded event videos on the Virtual Album Retreat Facebook group page.

CONTACT ME FOR INFORMATION RE: ADDITIONAL SUPPLY LIST

Click HERE to join with me & create your Starter Kit! What’s to lose – 20% discount/ 20% commission on all orders.

Thanks for stopping by. May you have a beautiful day. Make someone happy sending them a handmade card filled with love. ❤️

<!– /wp:paragraph — Product List

Stampin’ Up! Designer Series Paper for the Happy Inkin’ Thursday Blog Hop

WooHoo – it’s Thursday and time for another Happy Inkin’ Blog Hop 😀 I’ve created a couple of cards for you today using different Designer Series Papers – all with the same layout, but reversed.

Stampin' Up! Beautiful Gallery DSP challenge
Stampin' Up! Country woods. hop challenge

Isn’t it interesting how different these look with the same design but one very feminine and the other masculine. I love the contrast – and the simplicity as well.

Let me give you the highlights of these two cards. Card 1 – the feminine one is a sympathy card that uses just a half sheet of Beautiful Gallery 6×6 DSP (so 3 x 5 1/4), then another 1″ strip of a different piece in the pack (1 x 5 1/4) then a piece of Basic Beige torn edge about 3/4 x 5 1/4, adhered just on the straight side. I used the Spotlight On Nature Dies to die cut the larger circle to be a background for the sent; adhering the Basic Beige circle also die cut with another of the Spotlight on Nature Dies. The sentiment was stamped in Secret Sea ink using The Right Words stamp set. The ribbon is Faux Linen Ribbon in Cloud Cover – did I mention the card base is Cloud Cover? The sentiment panel was attached over the ribbon with dimensionals. Pressed Flower Motifs were added to the sentiment.

Card 2 – the masculine birthday card uses Country Woods DSP (3 x 5 1/4) and another piece 1 x 5 1/4. The torn Basic White strip is about 1/2 x 5 1/4 and adhered just on the straight side. The sentiment is from The Right Words stamp set stamped in Misty moonlight ink on Basic White and die cut with the Stitched Shapes Dies. This was added to the card front with dimensionals and three Neutral Matte Dots went underneath.

Obviously the larger card panels are reversed and with different DSP used, they are hardly recognizable as the same layout.

For the inside…

Stampin' Up! Sympathy card 1inside
Stampin' Up! Birthday card inside

Card on left is stamped in Secret Sea ink on a Basic Beige panel 4 x 5 1/4 and adhered in place. Card on right is stamped in Misty Moonlight ink on a Basic White panel 4 x 5 1/4. Both sentiments are from The Right Words stamp set.

for the envelopes: more of the Beautiful Gallery DSP on the envelope flap for the sympathy card and more Country Woods DSP on the birthday card – done!

Click the links below to check out cards made by those participating in today’s hop – enjoy!

Stampin' Up! hop links

Amy Koenders

Mary Deatherage

Karen Ksenzakovic

Tara Carpenter

Terry Lynn Bright – you are here! 😀

Stampin' Up! Buy one Gert one

Buy One Suite Or Suite Product, Get One for 50% Off From Stampin’ Up! June 3-30!!

June 3-30, all available suites and suite products from the 2025–2026 Annual Catalog and Online Exclusives are buy one, get one 50% off!  If you’ve had your eye on a new suite from the annual catalog or you really like the look of a stamp set from an Online Exclusives suite, you don’t have to choose—you can get both!

Here are the promotion details:

  • All available suites and suite products from the 2025–2026 Annual Catalog and Online Exclusives are buy one, get one 50% off.
  • When you shop the sale, the 50% off discount will apply to the lower-priced item (for example, if you buy a suite collection and a stamp set from a suite, the suite would be full price, and the stamp set would be 50% off).
  • Suite collections are available if all items are in stock; if all items are not in stock, you can still shop the available suite products.
  • You don’t have to buy a suite and suite products all from the same suite collection for the discount to apply. You can buy any suite products from any suite.
  • The discount will appear in your cart once you’ve added two items within the sale parameters to your cart.
  • Products are available only while supplies last.
  • See and shop all qualifying suites right here in the ONLINE STORE

Stampin’ Up! Virtual Album Retreat – July 16-18!  Album Retreat Kit Available To Order Now While Supplies Last!

Stampin' Up! Virtual Album Retreat

Who: Crafters who love to scrapbook!

  • We encourage you to invite customers and friends who love to scrapbook to join this unique event.

When: July 16–18, 2025, 2:00–10:30 p.m. (MT)

Where: Private Facebook Group

Registration: There is no registration for this event! By purchasing the Month by Month Album Retreat 2025 kit, you’ll get access to an exclusive Facebook group where the live event will stream.

Price of Month by Month Album Retreat 2025 kit: 
$250 USD | $340 CAD

Language of Event: This event will be presented in English only.

After the Event: You can access the recorded event videos on the Virtual Album Retreat Facebook group page.

Here’s a look at the kit!

Stampin' Up! Virtual Retreat kit

Here are the Month By Month Album Retreat Kit Details:

  • Item: Month by Month Album Retreat 2025 (167338)
  • Includes: Exclusive stamp sets, designed precut sheets, cardstock, embellishments, and more
  • Price: $250
  • Ordering Begins: May 28, 2025 (Kits are only available while supplies last, so be sure to order ASAP! And you’ll want to order early to make sure you get your products in time for the event!)

*This kit does not include an album.

Thanks for stopping by. May you have a beautiful day!

Make someone happy sending them a handmade card filled with love.

Stampin’ Up! 25-27 In Color Cards

Good Monday morning. How was your weekend.? I’m making progress after knee replacement: can’t drive yet as it’s the right knee, so chauffeuring is the mode of transportation for a while yet. I’ve set up a table on our main floor for card making and was finally able to work at the table for more than 15 minutes! In shifts of time, I’ve made these four cards – all with the 25-27 In Color 6×6 DSP pack Timid Tiger and Darling Duckling. For the sentiments I used the new The Right Words stamp set and cut them out with Nested Essential Dies or the Everyday Details Dies. I added White Bakers Twine from the Twine Essentials Pack and on some, 25-27 In color Flat Pearls. Let’s look.

Stampin' Up! Timid Tiger card front.1
Stampin' Up! Darling Duckling card.1

These two cards are the same except the panels widths were switched, making the largest panel to the right as opposed to the left.

Stampin' Up! Timid Tiger card.2
Stampin' Up! Darling Duckling card.2

Here I did the same, reversed the largest panel and used another of the fun papers in the 25-27 In Color 6×6 DSP pack with the same colors Timid Tiger and Darling Duckling.

I kept the inside very simple – no stamping, just a strip of the DSP either on the side or at the bottom of the Basic White panel.

Stampin' Up! Timid Tiger card inside
Stampin' Up! Darling Duckling card inside

Just this little strip dresses up the inside :O) One of the nice aspects of using a layout like this is one full 6×6 will make one card, using the extra pieces for the inside of the card and the envelope flap.

Card cuts…

  • Begin by cutting a panel 3 1/4 x 4 3/4, then trimming that to: 3/4 x 4 3/4, 1 x 4 3/4 and 1 1/2 by 4 3/4. (this will leave a 2 3/4 x 6 strip for covering the flap and adding a strip to the inside of the card)
  • Adhere panels, reversing sides of the DSP as desired to a Basic White cut 3 9/16 x 4 7/8
  • Wrap with Bakers Twine 3 times and tie a bow
  • Stamp sentiment in Cloud Cover ink on Basic White scraps and die cut, adding to the panel with dimensionals.
  • Add finished panel to card front with dimensionals: 8 1/2 x 5 1/2 scored at 4 1/4, or 4 1/4 x 11 scored at 5 1/2
  • Add embellishments
  • Add 2 1/4 x 6 strip to envelope flap, trim to fit. This will leave about 1/2″ for card inside
  • Add cut down strip to inside of card

Now you have a small stack of cards for various occasions – and this can be done with the other colors in this pack as well, making certain some can be used for masculine cards.

Want to purchase the products to make these cards? Check the items below as they will take you directly to my shop. Product List

Inspiring Imperfections Bundle (English)

[165167]

The Right Words Cling Stamp Set (English)

[165316]

Kintsugi Inspirations 12″ X 12″ (30.5 X 30.5 Cm) Specialty Designer Series Paper

[165159]

Flower Accents

[165171]

Misty Moonlight 8-1/2″ X 11″ Cardstock

[153081]

Misty Moonlight Classic Stampin’ Pad

[153118]

Basic White 8 1/2″ X 11″ Cardstock

[166780]

Basic White Medium Envelopes

[159236]

Early Espresso Classic Stampin’ Pad

[147114]

Paper Trimmer

[152392]

Stampin’ Cut & Emboss Machine

[149653]

Stampin’ Dimensionals

[104430]

Adhesive Backed Textured Dots

[163338]

Multipurpose Liquid Glue

[110755]

Stampin’ Seal

[152813]

Bone Folder

[102300]

Take Your Pick

[144107]

Thanks for stopping by today! Remember what a difference you make to others when sending a homemade card made with love.

Stampin’ Up! Happy Inkin’ Thursday Blog Hop

We have a color challenge this week and I can’t wait to see what the others participating have created. I’m still post knee replacement – 3 weeks out now – so lots of elevating and icing and PT and resting! This DOES make it challenging to create cards – an understatement for sure… but here we go. I’ve used Cloud Cover, Misty Moonlight, Petal Pink and Old Olive.

Stampin' Up! Happy Inkin' Thursday Blog Hop
Stampin' Up! Blog Hop color challenge

Stampin' Up! 5/29 Color Challenge

The card base is Misty Moonlight, Petal Pink for the strip, the SDSP is Kintsugi Inspirations SDSP, the Inspiring Imperfections bundle and The Right Words stamp set and Cloud Cover 3/8″ Faux Linen Ribbon – to make this card.

Stampin' Up! 5/29 inside card Color Challenge

For the inside of the card Petal Pink & Basic White card stock stamped with Misty Moonlight ink.

Please follow the others participating today – by clicking the next button or by clicking on a name. Enjoy the hop!

Stampin' Up! blog button - next

Amy Koenders

Mary Deatherage

Karen Ksenzakovic

Tara Carpenter

Terry Lynn Bright

Stampin’ Up! is putting forth some bargains that are extraordinary… here is the most recent…

BUY ONE GET ONE 50% OFF STARTING SOON

On All SUITES and SUITE PRODUCTS!

Stampin' Up! Suite products 50% off

Starting June 3, all available suites and suite products from the 2025–2026 Annual Catalog and Online Exclusives are buy one, get one 50% off! If you’ve had your eye on a new suite from the annual catalog or you really like the look of a stamp set from an Online Exclusives suite, you don’t have to choose—you can get both!

Sales Period: June 3–30, 2025

Ordering Deadlines

Here are the details:

  • All available suites and suite products from the 2025–2026 Annual Catalog and Online Exclusives are buy one, get one 50% off.
  • When you shop the sale, the 50% off discount will apply to the lower-priced item (for example, if you buy a suite collection and a stamp set from a suite, the suite would be full price, and the stamp set would be 50% off).
  • Suite collections are available if all items are in stock; if all items are not in stock, you can still shop the available suite products.
  • You don’t have to buy a suite and suite products all from the same suite collection for the discount to apply. You can buy any suite products from any suite.
  • The discount will appear in your cart once you’ve added two items within the sale parameters to your cart.
  • Products are available only while supplies last.
  • See and shop all qualifying suites in the online store.

A couple of things while we’re at it… Through May 31, 2025 Stampin’ Up! has a super JOIN PROMOTION and I bring that up because as a demonstrator, there is an automatic 20% off the purchase price of items even when there are bargains as mentioned above.

Starter Kit Special is NOW AVAILABLE!

Have you heard? From May 6–31, new demonstrators get $165 USD | $220 CAD worth of products in their Starter Kit for just $99 USD | $135 CAD. (That’s $66 USD | $85 CAD in extra products—our biggest Starter Kit Special yet!) As a bonus, new demonstrators also score FREE shipping on their Kit, FREE business supplies, and a FREE Paper Pumpkin kit! Become a demonstrator and enjoy all the perks that come with that, like a 20–25% product discount, exclusive early access to products, the opportunity to earn a modest supplemental income, the chance to attend incredible training and crafting events, and so much more! 

Stampin' Up! Joining Promotion

Become a Stampin’ Up! demonstrator between May 6–31 and choose $165 worth of products for only $99! (And did we mention your Starter Kit comes with FREE shipping, FREE business supplies, AND a bonus, FREE Paper Pumpkin kit?) Click HERE to join with me & create your Starter Kit! What’s to lose – 20% discount/ 20% commission on all orders.

Product List

Inspiring Imperfections Bundle (English)

[165167]

The Right Words Cling Stamp Set (English)

[165316]

Kintsugi Inspirations 12″ X 12″ (30.5 X 30.5 Cm) Specialty Designer Series Paper

[165159]

Flower Accents

[165171]

Misty Moonlight 8-1/2″ X 11″ Cardstock

[153081]

Misty Moonlight Classic Stampin’ Pad

[153118]

Basic White 8 1/2″ X 11″ Cardstock

[166780]

Basic White Medium Envelopes

[159236]

Early Espresso Classic Stampin’ Pad

[147114]

Paper Trimmer

[152392]

Stampin’ Cut & Emboss Machine

[149653]

Stampin’ Dimensionals

[104430]

Adhesive Backed Textured Dots

[163338]

Multipurpose Liquid Glue

[110755]

Stampin’ Seal

[152813]

Bone Folder

[102300]

Take Your Pick

[144107]

THANKS FOR STOPPING BY – MAY YOU HAVE A BEAUTIFUL DAY!

Stampin’ Up! Kintsugi Inspirations Suite Fun Fold

Gosh – we are heading into Memorial Day weekend – how did that happen?! We are having unseasonably cool weather here in South Jersey – and hubby has built a fire for us. Who would have thought the end of May and 48 degrees at night…

To my card… this is a fun fold using the brand new suite in the 2025-2026 Annual Catalog titled Kintsugi Inspirations. It has stunning Specialty Designer Series Paper, meaning there is gold running through it, Flower Accents a 3D Embossing Folder and of course the Inspiring Imperfections Bundle. The only item I did not use on this card is the embossing folder.

This fun fold is called an Exploding Corner Card. This particular card is made in the portrait style, with the exploding corner in the upper left. Let’s take a look.

Stampin' Up! Inspiring Imperfections Fun Fold card front

I began with a a piece of the Kintsugi Inspirations Specialty 12×12 DSP cut 6 3/4 x 8. With the short side against the trimmer, score at 2 3/4″. Turn paper to the left & along the long side, score at 2 3/4″. Burnish those score lines. With the short side at the top and the score on the left, mark 2 3/4″ to the right of the score line. Turn paper to the right with long side at top and mark 2 3/4″ to the left of the score line. Place this in the paper trimmer & score from mark to mark & burnish. It should look like this. Notice how the diagonal score line goes directly through the intersection of the other two score lines!

Stampin' Up! Exploding Corner card score lines

Add this fun folded DSP to a Misty Moonlight panel 4 1/4 x 5 1/2.

Because of the designs I chose in the Kintsugi Inspirations SDSP pack, Misty Moonlight was used as the card base, cut 4 1/4 x 5 1/2. While still having Misty Moonlight in your hands, make these cuts: 2 3/4 x 4 1/2 (this is the card front panel); 2 1/2 x 2 1/2 ( this is for the inside square corner); and 3 3/4 x 5 (this is the inside right panel layer). Now cut Basic White: 1 5/8 x 2 1/2 (for front panel) & 3 1/2 x 4 3/4 (for inside panel.)

Additional DSP cuts: 2 1/2 x 2 1/2 (cut 2), cutting one on diagonal; 2 1/4 x 2 1/4.

  • Add the 2 1/4 SDSP square to Misty Moonlight 2 1/2 square then add to inside corner (refer to photo above)
  • Add diagonal cut SDSP pieces as shown in photo above
  • Add the 3 3/4 x 5 Misty Moonlight to the inside right section of the card
  • Stamp the Basic White 3 1/2 x 4 3/4 as desired & add over the Misty Moonlight piece. I used the Inspiring Imperfections stamp set & Misty Moonlight ink for this.
  • Die cut the vase using the Inspiring Inspiration Dies directly from the Kintsugi Inspirations SDSP 😀 (love being able to do this!) Add to inside panel as shown
  • Die cut the flower from the same piece of SDSP and add to the Basic White stamped inside panel
Stampin' Up! Inspiring Imperfections Fun Fold inside

Now that the inside is complete – let’s finish the card front.

  • On the remaining piece of Misty Moonlight, add the 2 1/2 x 2 1/2 SDSP to the bottom half.
  • Stamp the 1 5/8 x 2 1/2 Basic White piece using Inspiring Imperfections stamp set and Misty Moonlight ink then add to the top of the Misty Moonlight panel.
  • Add this piece to the card front adhering ONLY to the upper left corner.
  • Add three Flower Accents to the sentiment piece and the card is complete!

Envelope… Add Kintsugi Inspirations SDSP to flap & trim to fit. Stamp image from the Inspiring Imperfections stamp set with Misty Moonlight ink.

WooHoo! Fun fold and fun card to make… It’s not super thick either so should be able to send this with regular postage – and that’s big!

Stampin' Up! Inspiring Imperfections Fun Fold card & envelope

So much going on in the Stampin’ Up! world – Joining promotion ends May 31 so let’s take a look at that special.

Have you heard? From May 6–31, new demonstrators get $165 USD | $220 CAD worth of products in their Starter Kit for just $99 USD | $135 CAD. (That’s $66 USD | $85 CAD in extra products—our biggest Starter Kit Special yet!) As a bonus, new demonstrators also score FREE shipping on their Kit, FREE business supplies, and a FREE Paper Pumpkin kit! Become a demonstrator and enjoy all the perks that come with that, like a 20–25% product discount, exclusive early access to products, the opportunity to earn a modest supplemental income, the chance to attend incredible training and crafting events, and so much more! Click the link in the JOIN MY TEAM image to do that.

Stampin' Up! Joining Promotion

If you want to order – check out this…OK – info on ordering from me…. first of all – no more HOST CODE is needed – YAY! Instead for every order of $20 + Stampin’ Up! has it’s own rewards. And for every $50 order from me in my ONLINE STORE you will earn Daisy Patch Points – one Daisy for every $50 purchase from me. Save those Daisy Patch Points up to 8 points and you’ll be able to order a free gift from me valued to $40. And for that $50 purchase from me, you’ll also receive the monthly tutorial – and for May it features the Gallery Blooms bundle.

Stampin' Up! TL's May Online Class

THANKS FOR STOPPING BY! MAY YOU HAVE A BEAUTIFUL DAY – MAKE SOMEONE HAPPY BY SENDING THEM A HANDMADE CARD!