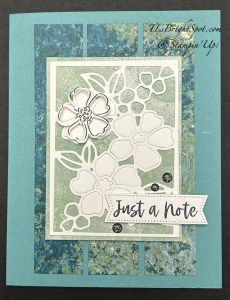
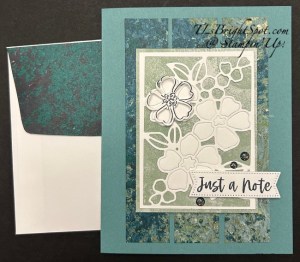
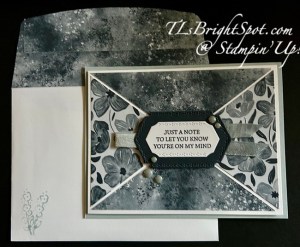
Welcome to February – BRRR. Flowers remind me of spring and warmer weather… This little gem of white die cut has been on my desk fo a bit – and I finally pulled it all together. Fragrant Layers is a beautiful bundle and this piece of the die is perfect for layering. I punched out several of the pieces in this die cut, then taped in the others so they wouldn’t fall out of place. I mounted it on a soft green of the Nature Walk 12×12 DSP about 2 5/8 x 3 5/8 and set it aside. My card base is a standard A2 (* 1/2 x 5 1/2 scored at 4 1/4) in Lost Lagoon. The three strips are 1 x 5. I added the front panel to this with dimensionals. I stamped one of the flowers with Secret Sea ink, die cut it, punched out all the pieces and used a mjini dimensional to attach it to one of the flowers. I stamped the sentiment in Secret Sea & die cut it with the banner die in the Fragrant Layers Dies. I added it with dimensionals then the Low Profile Sparkle Dots in Secret Sea.
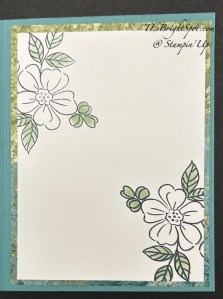
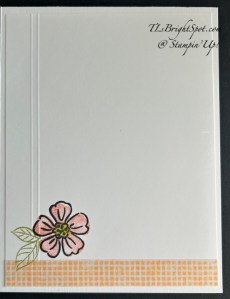
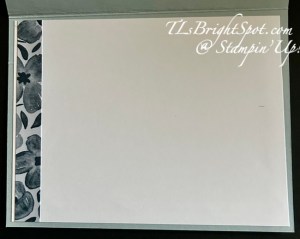
On the inside, I used the large floral stamp in Fragrant Layers to stamp just a portion of the flower in the two corners – Secret Sea ink of course, and used Soft Sea Foam Stampin’ Blends to color just the leaves. I layered this on another panel of the Nature Walk 12×12 DSP (4 x 5 1/4) and the inside was complete!
For the envelope… another piece of the Nature Walk 12×12 DSP was added to the flap & trimmed to fit. and finis!
Today is the last of the BONUS DAYS… HERE’S THE SCOOP…
From January, 6 to Febraury 2, Stampin’ Up! is offering BONUS DAYS. Because do you know what’s a great deal? Getting rewarded for all the crafting supplies you’re already going to buy! When you shop between January 6 and February 2 and spend $50 USD | $60 CAD, you will earn a $5 USD | $6 CAD coupon! Make sure you save all your coupons because you can redeem them (and we mean ALL of them) between February 3 and 28. During the earning period, a shopping-cart notification will appear when an order qualifies for a Bonus Days coupon—an online store feature on both the demonstrator and customer websites.
Shopping with me could not be easier. Click this link to visit my shop.., note the ONLINE EXCLUSIVE, the new kits available, the Jan-Apr 2026 Mini Catalog and of course the 2025-2026 Annual Catalog.
PRODUCT OF THE MONTH – only $5 with a $75 order (before shipping & taxes)
167972
FABULOUS SAYINGS PHOTOPOLYMER STAMP SET (ENGLISH)
$5.00
The Fabulous Sayings Stamp Set is the exclusive Product of the Month for January 2026! Only available until stocks run out—don’t wait to get yours! This is a Two-Step Stampin’ set; it allows you to layer two or more images to create one final image with extra texture and dimension in the colors you want.
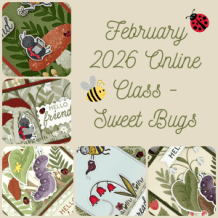
When shopping with me -.With a $50 order or more, receive my MONTHLY TUTORIAL – For February that tutorial is all about the Sweet Bugs Bundle – all part of the Cute As A Bug Suite found in the January- April 2026 Mini Catalog Earn 10% of your retail amount on all orders of $20 or greater! And you’ll be earning Daisy Patch Rewards – one daisy for each $25 you spend thru my Online Store! When you gather up 16 Daisy Rewards, you’ll be able to select a $40 gift right from me! Check out my rewards page.
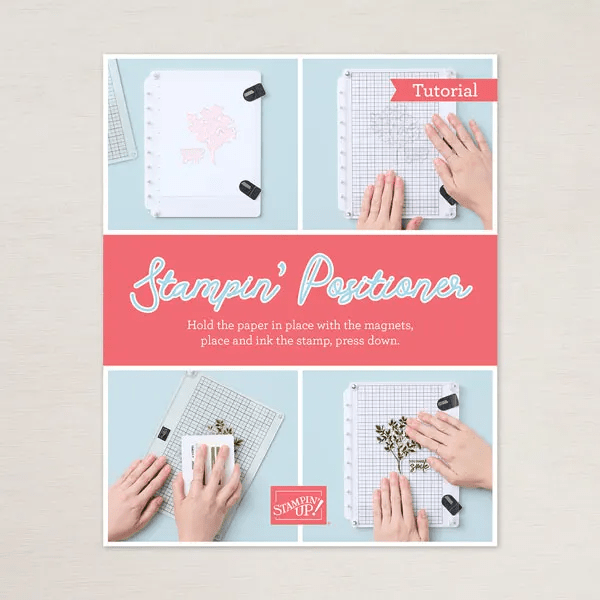
And… if you’re thinking about JOINING… there’s a special offer from Stampin’ Up! that begins February 3 – a Starter Kit Promotion. The Starter Kit is $99 + tax (and it ships for free!) and you get to pick $125 Stampin’ Up! merchandise in your kit! AND – as an added bonus, when you join between 3 February – 2 March, you’ll get the Stampin’ Positioner for FREE with your Starter Kit Purchase!
Do you have questions? Please connect with me so I can help.
Thanks for stopping by. May you have a beautiful day. Make someone happy by sending them a handmade card made with ❤️
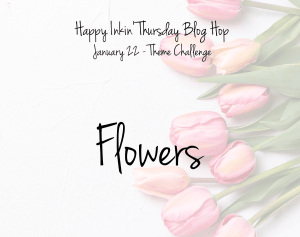
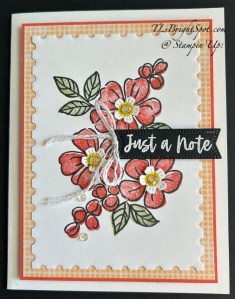
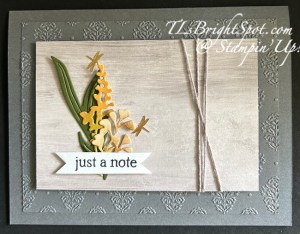
Hello Thursday – and welcome to our fabulous blog hop group! We have a sketch challenge today – flowers – and I’m pleased to share what I created for this hop. It uses the Fragrant Layers bundle that is an ONLINE EXCLUSIVE, meaning not pictured in any of the Stampin’ Up! Catalogs.
This card is just so bright & fresh looking to me. And I love all the texture. So… how to make this
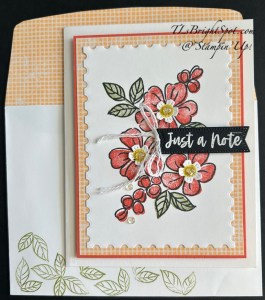
The card base is Thick Basic White 8 1/2 x 5 1/2 & scored at 4 1/4
Using the second largest of the Perennial Postage dies, die cut a Basic White piece & stamp it with the large floral in Fragrant Layers stamp set with Memento Black ink.
Using the coordinating stamps in the Fragrant Layers stamp set, add color to the leaves: Old Olive, and color to the flowers: Calypso Coral.
Die cut more of the tiny flowers from Basic White, color the centers with Darling Duckling and add to the large flowers with liquid glue.
Add this panel to Lovely & Beautiful SDSP ( 3 5/8 x 4 7/8) that was attached to a Calypso panel 3 3/4 x 5. Put dimensionals on the back & add to the card front.
On a Basic Black strip, run the embossing buddy across the paper to remove any static and stamp the sentiment in VersaMark ink, sprinkle it with WOW! White Embossing powder & heat set.
Die cut this piece with the die in the Fragrant Layers dies, put dimensionals on the back and add to the card front.
Add embellishments to the flowers & on the card (5 in all) Iridescent Floral Gems
Add a bow with the white twine pulled apart and attach with a glue dot.
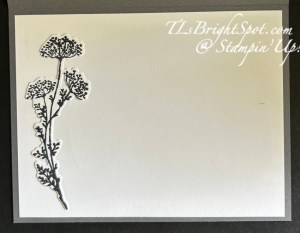
For the inside…
Add a 1/2 x 4″ strip of the Lovely & Beautiful SDSP to the bottom of the card
Stamp the flower in Memento ink (from Fragrant Flowers stamp set) & color with Calypso Coral ink
Stamp the leaf in Old Olive ink
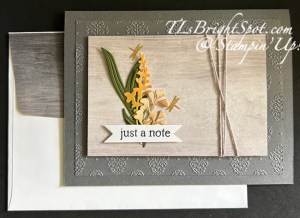
I then put the Basic White panel on my scoring board and scored twice on the left – for more texture.
I used the same leaf stamp as on the inside of the card to stamp several leaves across the bottom of the envelope in Old Olive ink. I then added another strip of the Lovely & Beautiful SDSP to the flap & finis! I love the freshness of the completed card.
You can find information below in how to shop with me and other new & exciting Stampin’ Up! information. To see what others have created, be sure to follow along by clicking the ‘next’ button below to take you to Nicole.
Shopping with me could not be easier. Click this link to visit my shop.., note the ONLINE EXCLUSIVE, the new kits available, the Jan-Apr 2026 Mini Catalog and of course the 2025-2026 Annual Catalog.
From January, 6 to Febraury 2, Stampin’ Up! is offering BONUS DAYS. Because do you know what’s a great deal? Getting rewarded for all the crafting supplies you’re already going to buy! When you shop between January 6 and February 2 and spend $50 USD | $60 CAD, you will earn a $5 USD | $6 CAD coupon! Make sure you save all your coupons because you can redeem them (and we mean ALL of them) between February 3 and 28. During the earning period, a shopping-cart notification will appear when an order qualifies for a Bonus Days coupon—an online store feature on both the demonstrator and customer websites.
PRODUCT OF THE MONTH – only $5 with a $75 order (before shipping & taxes)
167972
FABULOUS SAYINGS PHOTOPOLYMER STAMP SET (ENGLISH)
$5.00
The Fabulous Sayings Stamp Set is the exclusive Product of the Month for January 2026! Only available until stocks run out—don’t wait to get yours! This is a Two-Step Stampin’ set; it allows you to layer two or more images to create one final image with extra texture and dimension in the colors you want.
When shopping with me -.With a $50 order or more, receive my MONTHLY TUTORIAL – For January, that tutorial is all about the Lovely Arrangements bundle and Lovely Blossoms DSP – all part of the January ONLINE EXCLUSIVE Lovely Blossoms Suite Collection.
Thanks for stopping by. May you have a beautiful day. Make someone happy by sending them a handmade card made with ❤️
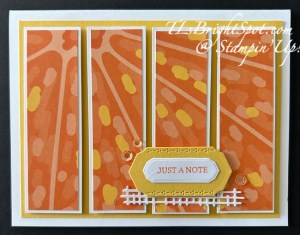
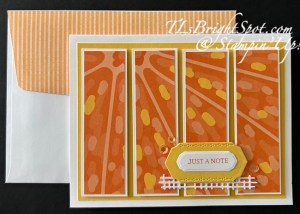
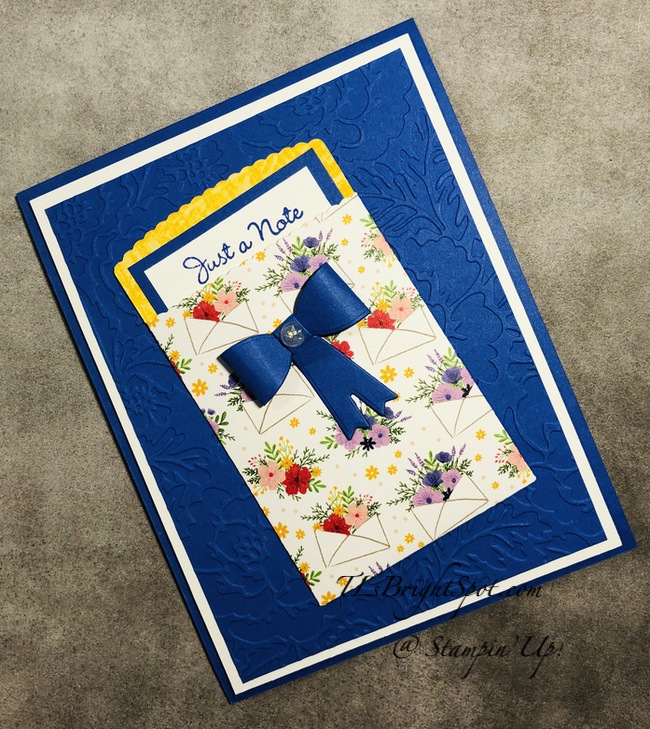
It’s cool again today – 40 degrees… I’m definitely going to wear a heavier jacket when I walk tomorrow! Brushed with Beauty dSP is a new release item come Nov 4 as part of an ONLINE EXCLUSivE suite of products. The paper is gorgeous and I can’t quit using it. When I showed this card to my hubby he immediately said it looked like a windowpane – so I’m coining that word for making this kind of layout. 😁
What is great about this layout is how versatile it is with so many of our Stampin’ Up! papers. And here’s how to do it…
DIRECTIONS FOR WINDOWPANE CARD
cut card base 8 1/2 x 5 1/2 & score @ 4 1/4 (Mossy Meadow
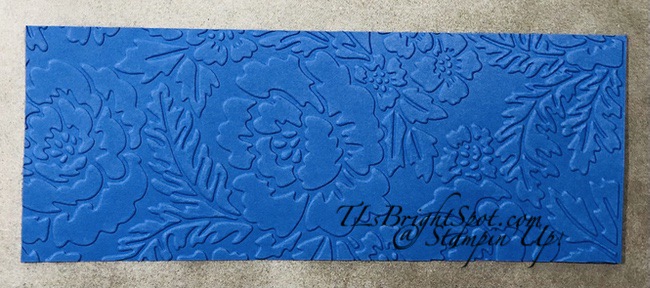
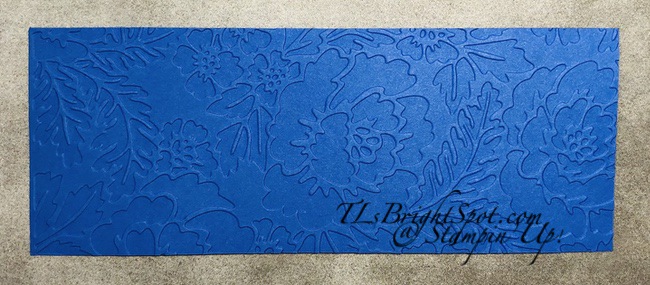
Cut another piece of card stock (same color) 4 1/4 x 5 1/2 & run it through the Gathering Leaves embossing folder. Adhere this to the card front
Cut DSP (Brushed with Beauty) 2 3/4 x 4 then cut that with short edge at top:
1 3/4 x 1 1/2 & 1 x 2 1/2 (that leaves a piece 1 3/4 x 2 1/2 & 1 x 1 1/2)
Adhere these to a card panel 3 x 4 1/4 with even separation (Early Espresso)
Adhere this to a card panel 3 1/4 x 4 1/2 (Very Vanilla)
Add these to the card baser with dimensionals
Stamp sentiment in Early Espresso ink using the Just A Note stamp set
Make a double Linen Thread bow; add to card front with a glue dot
Add sentiment with dimensionals over the bow
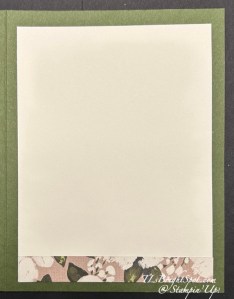
For the inside… I cut a piece of this stunning Brushed with Beauty DSP 1/2 x 3 3/4 and adhered it to the bottom of a Vary Vanilla panel 3 3/4 x 5, then added this to the inside of the card.
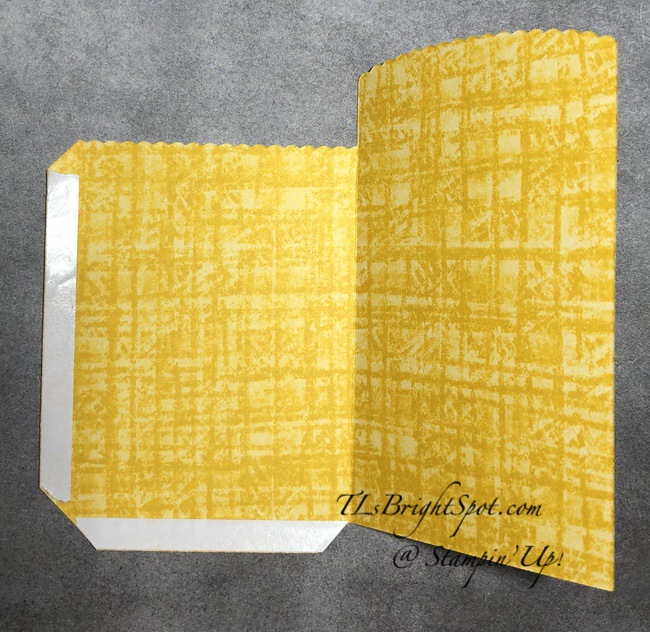
For the envelope… another piece of this beautiful Brushed with Beauty DSP in a coordinating pattern – 2 14 x 6, adhered & trimmed to fit. Bam – done!
Remember, this DSP will be available November 4 as part of a new release of ONLINE EXCLUSIVE products. Want to purchase these sooner than later – become a Demonstrator with me! These can be purchased as part of your demonstrator starter kit 😀 then after joining always get that 20% discount on all your purchases. 👍
From October 1 to 31, anyone who purchases the Starter Kit can choose between two amazing offers. In addition to FREE shipping, FREE business supplies, and a FREE Paper Pumpkin kit, you can either get $125 worth of products for just $35, an amazing first time ever offer, OR $189 worth of products for just $99!
What are some of the benefits of becoming a demonstrator?
Crafting is even more fun with community
Become a demonstrator and enjoy all the perks that come with that:
a 20–25% product discount
2) exclusive early access to the latest releases online and in catalogs
3) the opportunity to earn a modest supplemental income
4) the chance to attend incredible training and crafting events
5) Scrapbooking has never been better in Stampin’ Up! history. Have you seen all the new scrapbook products Stampin’ Up! has? It’s amazing…
6) There’s never an obligation to sell, you can join to enjoy the discount for yourself.
It’s also fun to learn new skills, develop new crafting techniques & share your passion for crafting. If you’re like me, it’s really fun to meet new people & connect with fellow crafters. How can I help & support you – lots of ways… through connection, team meetings, our team facebook page, updates. Feel free to connect with me – ask questions – get excited.
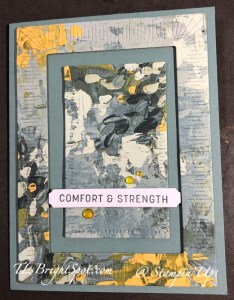
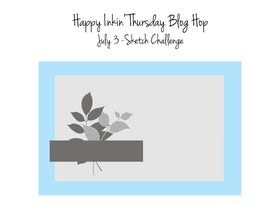
Wow – tomorrow is THE DAY – the Fourth of July – what are you doing special? Picnic? Fireworks? Friends? Welcome to the Happy Inkin’ Thursday Blog Hop! We have a sketch challenge today that offers so man y possibilities Let’s have a look….
What do you think – does this work for the sketch? I used a few items in the Gallery Suite of products.. the Beautiful Gallery 6×6 DSP (the reverse side!) the Damask Designs embossing Folder, the Gallery Blooms Bundle (die cuts), and the Beautiful Motifs stamp set for the sentiment. In lieu of the embellishments in the suite, I used the Adhesive-Backed Birds & Dragonflies. Here’s how I created this…
Basic Gray card base 8 1/2 x 5 1/2 scored at 4 1/4
Basic Gray layer 5 x 3 3/4, embossed with Damask Designs embossing folder. Adhere directly to card base
Beautiful Gallery 6×6 DSP 3 x 4 1/4, backed with card stock for strength (to be added to card front with dimensionals once decorated)
Die cuts: created using the Gallery Blooms Dies… Mossy Meadow for the background leaves; Basic White colored with Blending Brushes using Peach Pie and Mossy Meadow then die cut for the middle flowers & a bit of Pecan Pie on the edges of the flowers after die cutting; die cut the front leaves from Basic White then use a Blending Brush & Pecan Pie ink to color lightly. These were layered as shown with liquid glue.
The sentiment is stamped in Secret Sea ink using the Beautiful Motifs stamp set, then the Basic White strip ‘bannered’ on the ends with paper snips. It was added with dimensionals.
I wrapped the one end with Basic Twine Essentials in gray, three times around and secured in back with Tear n Tape, creating a pattern of lines.
Final touch – two of the dragonflies from the Adhesive-Backed Birds & Dragonflies.
Attach this completed panel with dimensionals, centering.
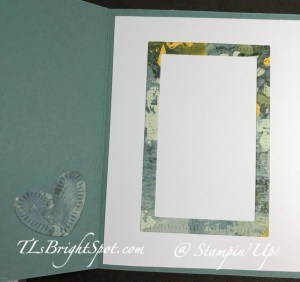
For the inside… I stamped & die cut this wonderful image in Secret Sea ink and was originally going to use it on the front, then decided not to use it. When it came time to do the inside, I decided to0add the die cut (Gallery Blooms Dies) to the 4 x 5 1/4 Basic White panel. And done!
For the envelope… I took the remaining piece of this DSP and added it to the envelope flap & trimmed to fit. To me, this seems like a perfect masculine card – could be used for thinking of you after an illness or sympathy, a thank you – just about anything!
Please enjoy the hop by clicking on the ‘next’ button to take you to Amy or click on a name if you wish to visit another’s blog.
You may shop the products to make this card by visiting the links below.
SHOP LAST CHANCE PRODUCTS HERE… NEW ITEMS ADDED TO THE LIST… MAKE CERTAIN MY NAME IS LISTED AS YOUR DEMONSTRATOR WHEN YOU CHEVCK OUT! :O) REMEMBER…Browse the selection of Last Chance paper crafting products. Additional items are added every other month. These products are available only while supplies last so be sure to buy them before they are discontinued! Discounts vary and are subject to change.
Thanks for stopping by. May you have a beautiful day!
Make someone happy by sending them a handmade card filled with love. ❤️
Good morning Friends… NJ has had a couple of days respite from the heat – a drop of 30 degrees to the 70’s! These are welcome temperatures! Today’s card is made with the new In Colors Secret Sea and Cloud Cover – and could be duplicated using all the new In Colors.
I began with the 2025-2027 In Color 6×6 DSP cut 3 1/2 x 4 3/4 and cut it on the diagonal, then turned the pieces 90 degrees holding them together, to cut on the other diagonal. (NOTE: This works with DSP that has a reverse side that is coordinating in color/ pattern, not conflicting. So choose carefully 😀) After cutting the DSP, decide which sections should be primary showing the pattern desired. Here I chose the left and right panels to be dominant and simply turned the other two panels to the reverse side. These were adhered to Basic White cut 4 x 5 1/4, dimensionals added to the back and attached to a Cloud Cover card base 8 1/2 x 5 1/2 scored at 4 1/4. On the front I added a length of 3/8″ Faux Linen Ribbon with Stampin’ Seal. Using the Mixed Labels Dies, I cut two labels, the larger in Secret Sea, the smaller in Basic White. I stamped the sentiment using the Mixed Labels stamp set in Secret Sea ink. I layered the two together with adhesive, popped dimensionals across the back on top & bottom and adhered it over the ribbon. The final touch was adding several 2025-2027 In Color Flat Pearls in Cloud Cover.
For the inside… simple… a 1/2 x 4 strip of the same 25-27 In Color DSP as used on the card front, and attached to the side of a Basic White 4 x 5 1/4 panel
For the envelope, more of the 25-27 In Color DSP on the flap trimmed to fit. On the front, using Cloud Cover ink and an image in the Mixed Labels stamp set, I stamped twice on the lower left corner. This gives a completed look and could even be used as a masculine card, despite the flowers.
See below for ways to purchase the products to make this card.
ONLY DAYS LEFT FOR THIS SALE!!! Starting June 3, all available suites and suite products from the 2025–2026 Annual Catalog and Online Exclusives are buy one, get one 50% off! If you’ve had your eye on a new suite from the annual catalog or you really like the look of a stamp set from an Online Exclusives suite, you don’t have to choose—you can get both!
Sales Period: June 3–30, 2025
Ordering Deadlines
Phone: June 30, 2025, at 6:59 p.m. (MT)
Online: June 30, 2025, at 11:59 p.m. (MT)
All available suites and suite products from the 2025–2026 Annual Catalog and Online Exclusives are buy one, get one 50% off.
When you shop the sale, the 50% off discount will apply to the lower-priced item (for example, if you buy a suite collection and a stamp set from a suite, the suite would be full price, and the stamp set would be 50% off).
Suite collections are available if all items are in stock; if all items are not in stock, you can still shop the available suite products.
You don’t have to buy a suite and suite products all from the same suite collection for the discount to apply. You can buy any suite products from any suite.
The discount will appear in your cart once you’ve added two items within the sale parameters to your cart.
Products are available only while supplies last.
See and shop all qualifying suites in the online store.
SHOP LAST CHANCE PRODUCTS HERE… NEW ITEMS ADDED TO THE LIST… MAKE CERTAIN MY NAME IS LISTED AS YOUR DEMONSTRATOR WHEN YOU CHEVCK OUT! :O) REMEMBER…Browse the selection of Last Chance paper crafting products. Additional items are added every other month. These products are available only while supplies last so be sure to buy them before they are discontinued! Discounts vary and are subject to change.
VIRTUAL ALBUM RETREAT!!!
Who: Crafters who love to scrapbook!
When: July 16–18, 2025, 2:00–10:30 p.m. (MT)
Where: Private Facebook Group
Registration: There is no registration for this event! By purchasing the Month by Month Album Retreat 2025 kit, you’ll get access to an exclusive Facebook group where the live event will stream.
Price of Month by Month Album Retreat 2025 kit: $250
Language of Event: This event will be presented in English only.
After the Event: You can access the recorded event videos on the Virtual Album Retreat Facebook group page.
CONTACT ME FOR INFORMATION RE: ADDITIONAL SUPPLY LIST
Click HERE to join with me & create your Starter Kit! What’s to lose – 20% discount/ 20% commission on all orders.
THANKS FOR STOPPING BY. MAY YOU HAVE A BEAUTIFUL DAY. MAKE SOMEONE HAPPY SENDING THEM A HANDMADE CARD FILLED WITH LOVE. ❤️
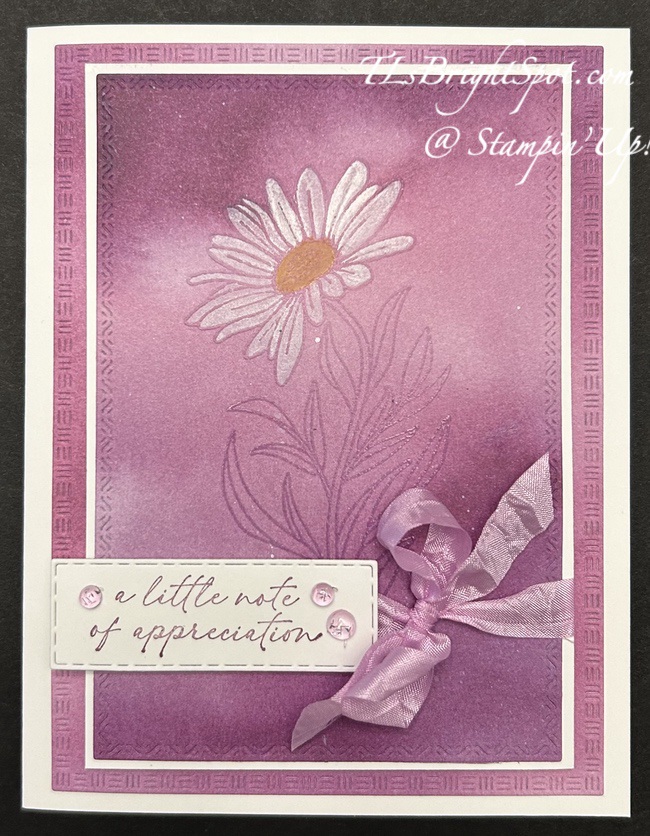
It is Thursday and you know what that means… the fun of this remarkable group hop. We have a sketch challenge today and I have chosen to work with some online exclusive products and a DSP from the ending soon Sale-a-bration catalog – Bloom Impressions.
The daisy flower is from the You Are Remarkable stamp set, an ONLINE EXCLUSIVE set and just lovely. I’m partial to daisies, so this was a definite must have! I also like the fonts in this set… I kept the image large so you can see the detail of the dies in this Textured Notes bundle – also an ONLINE EXCLUSIVE. Each rectangular die has a different pattern for the die cut. The sentiment is from the stamp set, Textured Notes, and I like the delicate font without it being too ‘fussy’ or feminine. The ribbon is a freebie as part of Sale-a-bration with a $60 purchase (which ends at end of day Feb 28, 2025 – tomorrow!!!) The embellishments are from the Tinsel Gems 3 Pack in Fresh Freesia.
Back to the stamped daisy image… I stamped it in VersaMark ink on this piece of Bloom Impressions 12×12 DSP – another free item during Sale-a-bration with a $60 purchase – sprinkled it with Clear Embossing Powder and heat set it. I colored the daisy with Whisper White ink reinker using a water painter brush with water inside. I put a drop of reinker on an acylic block, got the water-painter brush tip wet and added the Whisper White lightly to the daisy portion of the image. This is a pigment ink and takes a bit of time to dry. I used the lightest setting on the heat tool to dry it. I die cut the rectangle using the 2nd to largest die, adhered this to a Basic White slightly larger, added the ribbon around both pieces (Seam Binding Ribbon in Fresh Freesia, a freebie with a $60 purchase until end of day Feb. 28) attached dimensionals on the back & set aside. I used the largest die in the Textured Notes Dies to cut another piece of the same design of DSP – Bloom Impressions and adhered it directly to the Thick Basic White card base. I added the original daisy pieces to the card front (remember they are on dimensionals.) I stamped the sentiment in Blackberry Bliss ink on a Basic White scrap using the Textured Notes stamp set, then die cut it with the smallest of the Textured Notes rectangle dies, added dimensionals and attached over the ribbon on the card front. As I mentioned earlier the embellishments are Tinsel Gems 3 Pack in Fresh Freesia.
For the inside… I had a ‘frame’ left over from the smallest rectangular die cut for this card and added dots of liquid glue to the back and attached it, centering, to the inside of the card. I then stamped this sentiment using Blackberry Bliss ink and a sentiment from You Are Remarkable stamp set.
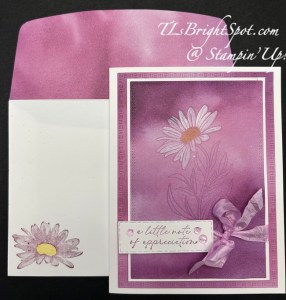
The envelope… More of the same Bloom Impressions DSP adhered to the flap & trimmed to fit. For the front, I stamped the ‘filler’ image of the daisy in Blackberry Bliss ink, then the center in Lemon Lolly ink. And done, ready to send. :O)
What would I do differently on this card? I would use White embossing powder in lieu of clear – so the entire daisy, leaves & all would be more dominant. Otherwise, I really like this card and hope you do as well. To order the items to create this card, see info below the ‘hop names’.
Now – on with the hop. Use the ‘next’ button to take you to Amy Koenders or click on a name to see what others have created.
To purchase the supplies to make this card, please use this link to take you to my Stampin’ Up! store – look around a bit: Online Exclusives, Kits Collections, 2024-2025 Annual Catalog – like that. And when you shop with me right now, Stampin’ Up! is in the ending stages of Sale-a-bration (Jan-Feb), but when you order prior to Feb 28, you will receive an opportunity to receive FREE items from Stampin’ Up! via the Sale-a-Bration offerings.
Sale-a-bration ends soon – Feb 28, 2025 and there are some FAB products you receive FREE with qualified purchases.
For purchases of $60 (level 1) – these items are FREE – click here
For purchases of $120 (level 2) – these items are FREE – click here
To view the ONLINE EXCLUSIVES, CLICK HERE. To see the items in the Jan-Apr 2025 Mini Catalog – click hereAnd if you do not have a demonstrator and need either of these catalogs, let me know! For all those coloring tools, the basics of card stock and embossing/ die cut machines, more stamps & dies, watercolor pencils, click this link for the 2024-2025 Annual Catalog. Remember that when purchasing from me, to use my current host code…and make certain my name is listed as your demonstrator :O)
When you shop with me and your purchase is $50 or more – you will receive a free giftie valued up to $10 that is a Stampin’ Up! item. You will also receive the monthly tutorial – February is the Delightful Wishes Bundle and it has some really clever ideas!
If you’ve been thinking about becoming a Stampin’ Up! demonstrator, then there’s no better time than right now during Sale-A-Bration! When you join by February 28, 2025, you can choose between two fabulous offers:
Option 1: Get $125 worth of product PLUS a choice of two Stampin’ Write Marker Assortment packs AND the Handmade Designs Cling Stamp Set (an exclusive stamp set designed to work with the markers). That’s a $216 value for just $99! I strongly recommend Option 1
Option 2: Get $125 worth of product PLUS an additional $30 worth of product when you join Stampin’ Up! That’s a $155 value for just $99!
If you’d like to join the team, we’d love to have you! Once you join, you’ll get at least a 20% discount on all of your Stampin’ Up! purchases and you can preorder from the upcoming catalogs!
Stampin’ Up! and our particular team welcome all types of Demonstrators – those only purchasing to get the discount for themselves
– those who want to run a business and…
– those anywhere in between! Let’s stamp and have fun doing it!
Demonstrators get lots of perks including at least a 20% discount on all orders that you place as a Demonstrator, invitations to Stampin’ Up! Demonstrator events and preordering from upcoming catalogs and promotions. And if joining this Jan-Feb makes sense to you, you will have the opportunity to view the new catalog early and preorder as well. Opportunity knocks! Click the image below to join with me now.
Thanks for stopping by my blog. May you have a beautiful day!
Hello, hello. My card begins with Thick Basic White 8 1/2 x 5 1/2 scored at 4 1/4. I added a layer directly to this with Daffodil Delight, 3 7/8 x 5 1/8. I set this aside to create the four panels using Fruit Salad 6×6 DSP, a free item during Sale-a-bration (only three days left!).
What I particularly like about this is the way it looks as though the sun was shining with rays extending. The panel is first cut 3 1/2 x 4 then trimmed to four panels of 1 x 3 1/2 strips. They were layered on Basic White each cut 1 1/8 x 3 5/8. Dimensionals were added to the backs and attached to the card. I used a scrap of Daffodil Delight to die cut the background for the sentiment using the Mixed Labels Dies. I used the Mixed Labels stamp set for the sentiment , Pumpkin Pie ink on Basic White and another of the Mixed Labels Dies to die cut it, then attached with dimensionals. The very fun die cut beneath is also from the Mixed Labels Dies and adhered directly beneath and to the card front. The final touch are three Adhesive-Backed Shiny Sequins. This is a perfect use of DSP – and a masculine card too – at least in my opinion. Of course that depends on the DSP used.
For the envelope, I added more DSP to the flap & trimmed it to fit.
To purchase the supplies to make this card, please use this link to take you to my Stampin’ Up! store – look around a bit: Online Exclusives, Kits Collections, 2024-2025 Annual Catalog – like that. And when you shop with me right now, Stampin’ Up! is in the ending stages of Sale-a-bration (Jan-Feb), but when you order prior to Feb 28, you will receive an opportunity to receive FREE items from Stampin’ Up! via the Sale-a-Bration offerings.
Sale-a-bration ends soon – Feb 28, 2025 and there are some FAB products you receive FREE with qualified purchases.
For purchases of $60 (level 1) – these items are FREE – click here
For purchases of $120 (level 2) – these items are FREE – click here
To view the ONLINE EXCLUSIVES, CLICK HERE. To see the items in the Jan-Apr 2025 Mini Catalog – click hereAnd if you do not have a demonstrator and need either of these catalogs, let me know! For all those coloring tools, the basics of card stock and embossing/ die cut machines, more stamps & dies, watercolor pencils, click this link for the 2024-2025 Annual Catalog. Remember that when purchasing from me, to use my current host code…and make certain my name is listed as your demonstrator :O)
When you shop with me and your purchase is $50 or more – you will receive a free giftie valued up to $10 that is a Stampin’ Up! item. You will also receive the monthly tutorial – February is the Delightful Wishes Bundle and it has some really clever ideas!
If you’ve been thinking about becoming a Stampin’ Up! demonstrator, then there’s no better time than right now during Sale-A-Bration! When you join by February 28, 2025, you can choose between two fabulous offers:
Option 1: Get $125 worth of product PLUS a choice of two Stampin’ Write Marker Assortment packs AND the Handmade Designs Cling Stamp Set (an exclusive stamp set designed to work with the markers). That’s a $216 value for just $99! I strongly recommend Option 1
Option 2: Get $125 worth of product PLUS an additional $30 worth of product when you join Stampin’ Up! That’s a $155 value for just $99!
If you’d like to join the team, we’d love to have you! Once you join, you’ll get at least a 20% discount on all of your Stampin’ Up! purchases and you can preorder from the upcoming catalogs!
Stampin’ Up! and our particular team welcome all types of Demonstrators – those only purchasing to get the discount for themselves
– those who want to run a business and…
– those anywhere in between! Let’s stamp and have fun doing it!
Demonstrators get lots of perks including at least a 20% discount on all orders that you place as a Demonstrator, invitations to Stampin’ Up! Demonstrator events and preordering from upcoming catalogs and promotions. And if joining this Jan-Feb makes sense to you, you will have the opportunity to view the new catalog early and preorder as well. Opportunity knocks! Click the image below to join with me now.
Thanks for visiting with me today. I’ll try to post a picture or two tomorrow. May you have a beautiful day!
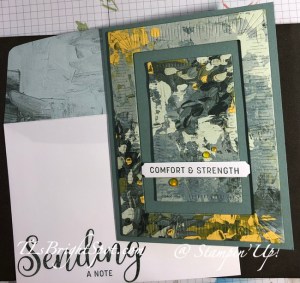
I made this card a bit ago and forgot to post it… do you know how this happens? At any rate… a friend asked for a card (or two) to be used as a sympathy card. I also needed a card of congratulations for a man and since I was on a roll – why not do both with the same dies just different Designer Series Paper? I’m pleased with how they both turned out – hope you like as well.
I used a piece of the Fancy Flora 6×6 DSP and layered the dies next to one another ran it through the die cutting machine. This created three die pieces to use. With the largest panel, I added dimensionals to the back and attached it to a Soft Succulent card base. The center piece is also on dimensionals and centered in the opening. I used Evening Evergreen ink to stamp on a Basic White strip then die cut with a banner die from the Sending Smiles Stamp set. This was attached with liquid glue directly to the center panel with dimensionals on the ends. For an additional touch three Loose Frosted Dots were attached with tiny dabs of liquid glue.
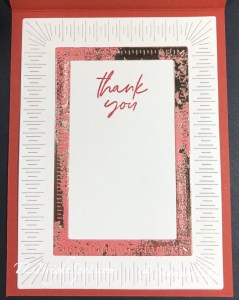
For the inside I added the remaining die cut piece to a panel of Basic White, also run through the Radiating Stitches Dies. It created a wonderful outline! Can you see the heart? That is also from the Radiating stitches Dies set – and die cut from a scrap of Fancy Flora 6×6 DSP.
For the envelope I added more Fancy Flora 6×6 DSP to the flap & trimmed to fit. I stamped the front of the envelope with stamps from the Sending Smiles Stamp set in Evening Evergreen ink.
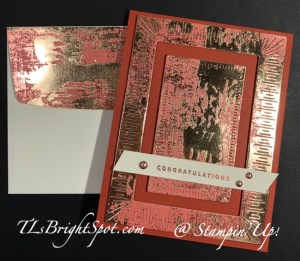
Here’s the congratulations card…
This uses Dry Brushed Metallic Specialty DSP, Copper Embossing Powder, Something Fancy stamp set and Adhesive-Backed Dots in Copper. Note: all but the embossing powder are also retiring and are part of the LAST CHANCE PRODUCTS.
The Fancy Flora 6×6 DSP, Soft Succulent& Evening Evergreen items are also going away as of May 1 – so make a quick click to shop… order from me here and be sure to use my HOST CODE CXR49K4W
When you place an order of $50 or more (before shipping & taxes), you receive from me a SU! item valued up to $10 + Star-Studded Rewards. If your order exceeds $150, do not use my HOST CODE as SU! has it’s own rewards from which you may choose. You will still receive that FREE ITEM from me up to $10 + the Star-Studded Rewards. Host Code… CXR49K4W
Make sure that you can see my name on the final checkout page listed as your Demonstrator when you order so that you know that you’re ordering with me and you’ll get my rewards!
This Last Chance Products promotion includes two lists of Last Chance Products that will no longer be available once the catalog retires. There will be one for each catalog retiring. For these retiring catalogs, there will not be a Carryover List. You can find carryover products in the upcoming Annual Catalog.
Click here for the PDF of the 2022-2023 Annual Catalog products on sale
Click here for the PDF of the January to April LAST CHANCE PRODUCTS
REMEMBER… this sale is Apr 4 – May 1 and is while supplies last. My first recommendation is to order ASAP as products run out quickly.
All products are available while supplies last, and there are no purchase limits.
Discounted items can be added to a Starter Kit and redeemed as a 50% off item or with Stampin’ Rewards.
Only orders opened and closed during the promotion period apply.
Stamp Sets are not guaranteed during this promotion and are while supplies last.
Our color collection is getting a fresh look with new and returning colors! We’re excited to welcome these colors, but it also means saying goodbye to others. There’s no better time to purchase the outgoing color products than during Last Chance!
It’s Sunday – and we had a full moon a couple of night ago – our daughter’s cats were carrying on at their house. We have a dog and it didn’t seem to bother him at all, thank goodness. So why do I mention this – not sure… perhaps it was remembering the many deer in our front yard last night and wondering if one had anything to do with the other. I don’t know.
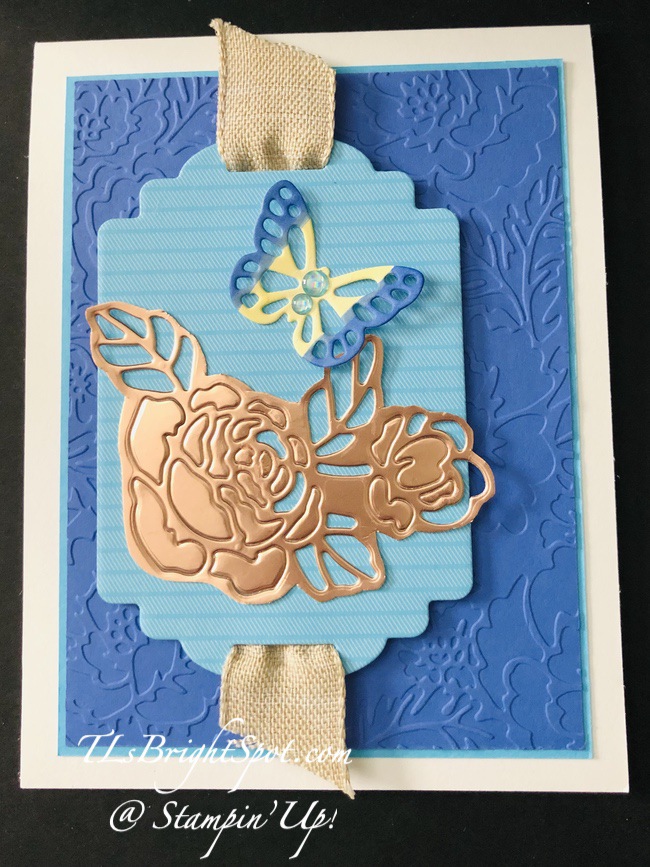
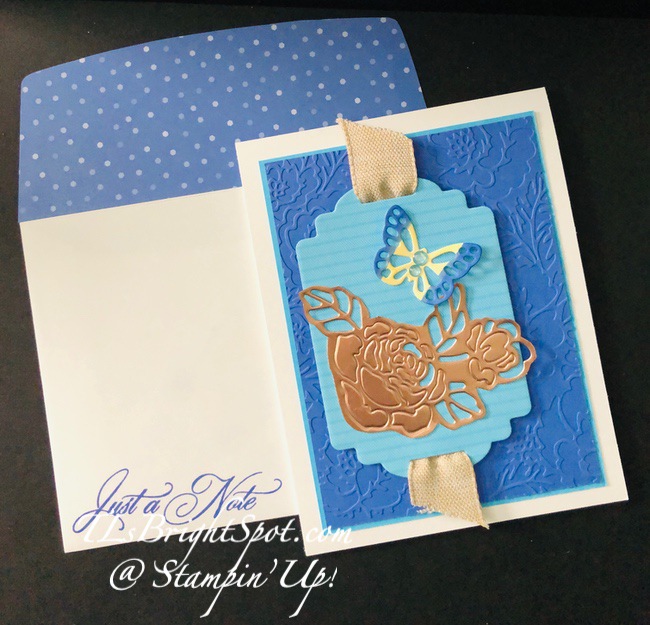
Today’s card is made with the Detailed Tags Dies in the 2022-2023 Annual catalog – such a pretty set. I want to share a card that I made with this.
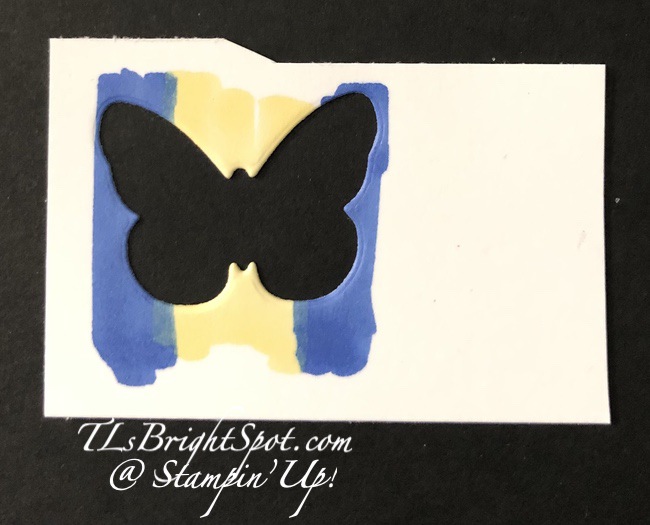
Aren’t the colors pretty? Tahitian Tide & Orchid Oasis, with a bit of Rose Gold Specialty DSP. It’s obvious where I used the Rose Gold SDSP – the rose, and I removed some of the die cut pieces AND I fussy-cut around the outside. The butterfly I created by marking Basic White with Stampin’ Blends: Light Starry Sky and Light Daffodil Delight and die cut the image. It has two Glossy Dots Assortment in Pool Party on the butterfly.
The centerpiece is the largest die in the Detailed Tags Die set and is die cut from from 2022-2024 In Color 6×6 DSP – Tahitian Tide. I die cut another from Tahitian Tide card stock and adhered them together for strength before slipping a length of Natural Finish 7/8″ Ribbon through the openings. Once the rose and butterfly were attached with liquid glue I put dimensionals on the back and set it aside.
To the Thick Basic White card base I adhered a panel of Tahitian Tide (3 3/4 x 5). I then ran a slightly smaller Orchid Oasis panel through the Pretty Flowers embossing folder and added it to the Tahitian Tide. The dimensionals were already on the Detailed Tags Dies piece, so it was attached off-set as shown.
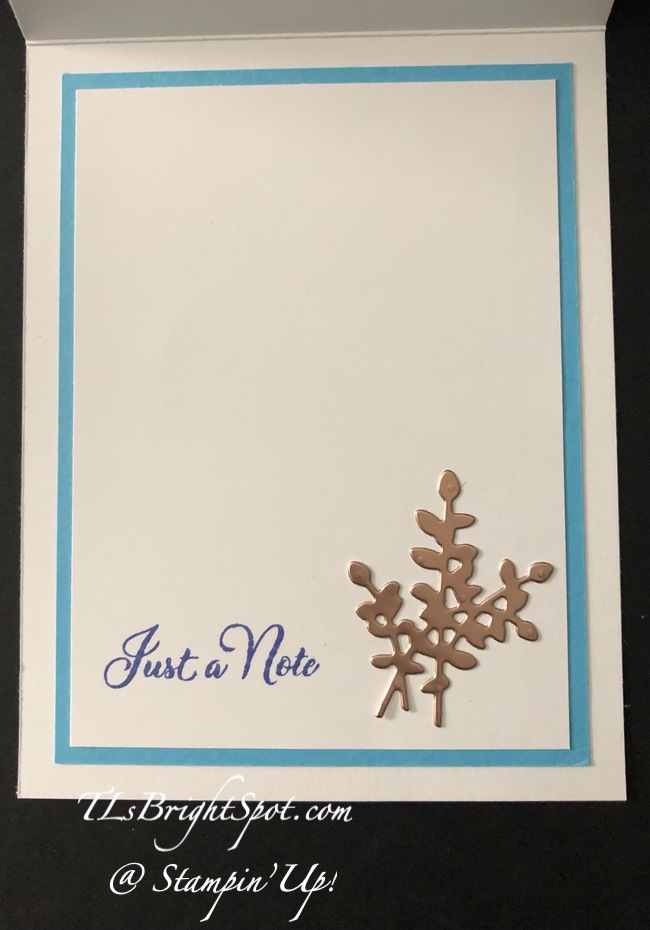
For the inside I die cut a ‘spray’ with the Detailed Tags Dies in Rose Gold SDSP and added it to a piece of Basic White card stock. With that in place I stamped the sentiment: Go To Greetings stamp set in Orchid Oasis. This panel was added to a Tahitian Tide and into the inside of the card – done!
The envelope was easy enough… more 2022-2024 In color 6×6 DSP for the envelope flap and another sentiment from the Go To Greetings stamp set in Orchid Oasis on the front. I like the contrast of the bright colors with white – it really makes it stand out.
Some of the products to make this card are from the Jul- Dec 2022 Annual Catalog. If you do not have a demonstrator and need catalogs please reach out to me – happy to send one to you. The other catalog available right now is the 2022 -2023 Annual Catalog . When ordering, please also use my current host code:TXBWJTMW and remember I offer Star-Studded Rewards. More about the rewards below :O) As a thank you to my customers I also offer a free item from Stampin’ Up! item valued to $10 with your order of $50 and above. Click here to go my store. When the order is over $150, you still receive that free gift from me, but SU! has Stampin’ Rewards that may be used for additional products, so don’t use the host code at that time. If you have questions just let me know. If you would like to be able to order products early from catalogs AND enjoy that 20% discount, join my team now… you may do that here. WooHoo! We have lots of fun and are a creative bunch that encourages & supports one another. Would love to have you. :O)
New products added each week on 1, 8, 15, and 22 September.
Promotion ends 28 September.
Product options and discounts vary based on inventory availability.
All order types qualify for this promotion (customer, demonstrator, workshop, and online).
Discounted items can be added to a Starter Kit.
Get the most up-to-date product information on the online store beginning 1 September.
Please visit my online store here to learn the deals of the week!
Here’s how my STAR REWARDS work: For each $50 that you order from my online store (before shipping & taxes) and when you add my current Host Code, you will earn 1 STAR Reward. Orders of $49.99 or below DO NOT earn any rewards.Example $50 = 1 STAR Reward, $100 = 2 STAR Rewards, $150 = 3 STAR Rewards etc. When you have earned 8 STAR Rewards you will get a FREE product order valued up to $40.00, your choice, and mailed directly to you! Is that a deal or what??? You also earn my monthly Online Class Tutorial of exclusive projects when you place an order. For any order $50 or more you will also receive 1 free gift from me valued up to $10. And remember too, during this time of Sale-a-bration, for every $50 order from any catalog, you’ll earn free Sale-a-bration goodies from Stampin’ Up! Remember to use MY current HOST CODE: TXBWJTMW Click here to go my store. HAPPY SHOPPING!
stamp sets and dies—and that’s what the Perfect Partners promotion is all about!
We created six new dies that coordinate with stamp sets in the 2022–2023 Annual Catalog and the July–December 2022 Mini Catalog. These coordinating dies will only be available during this promotion and will not be offered in any catalog.
AVAILABLE1–30 September 2022
Starting 1 September 2022, customers can order these fun and festive dies and/or bundles. Dies coordinate with stamp sets from the 2022–2023 Annual Catalog and the July–December 2022 Mini Catalog. These six new dies sets are only available for a limited time. Save 10% off when purchasing the bundle.
Items available during this promotion can be added to demonstrator, customer, workshop, and online orders.
Dies are exclusive to this promotion and are only available while supplies last. No quantity limits apply during the customer sales period.
Qualifying orders qualify for Stampin’ Rewards. Items can be added to a starter kit.
Thanks for stopping by.
May you have a beautiful day.
Make someone happy sending them a handmade card filled with love.
Happy Monday… it’s also Memorial Day, a day in which we give thanks to those who gave their lives for this country, for our freedom to think, to speak, to worship. Many have no idea what that really means ~ the ultimate sacrifice. Let me say, it’s a privilege to be an American citizen. There are incidences that occur that do not make me proud, and yet, we strive to do better, to be better. On this day as we consider the full meaning of Memorial Day, may we strive to be a better citizen, a better member of this country, a better person.
Today’s card is made with several items from the Stampin’ Up family… the Pretty Flowers embossing folder, Pocket Envelope Dies, Tea Boutique 6×6 DSP, Penned Flowers Dies, Go to Greetings stamp set and Opal Rounds. And, there may be one or two other items as well. :O) I love the Tea Boutique 6×6 DSP – so many ideas float through my head. One of the papers I especially like is the one with the cutest little envelopes with flowers sticking out of it. I pulled out the Pocket Envelope Dies and made a cute pocket for a special note inside it. I used the Go To Greetings stamp set to stamp the sentiment for the note in Orchid Oasis ink. Before I get toon far, here’s the completed card.
Pocket Envelope Dies.1
It’s funny how we can see things in a photo we didn’t notice before… for instance, the bow sdhould be straight on the ‘pocket’. Oh well, that cannot be changed now! That cute bow is made with one of the dies in the Envelope Dies. It comes in two pieces and I added the largest of the Opal Rounds on the bow. This is one of ‘hand deliver’ kind of cards as the bow would be crushed in the mail. And that cue bow would be adorable on small gift boxes. Yet, I digress :O)
The card base is Orchid Oasis card stock with a layer of Basic White, then another layer of Orchid Oasis run through the Pretty Flowers EF. You know, there are two sides that can be used with this EF: embossed and what I’ll call de-bossed. One side has more raised impressions and other more outline.
Pretty Flowers Embossing Folder.1
Pretty Flowers Embossing Folder.2
Can you see the difference in the two? I chose to use side 2. And here’s the back side of the ‘pocket’ and where I added Tear ‘n Tape to adhere it to the card front.
Pocket Envelope Dies.2
One thing to notice is side 2 of the DSP, cuz this will show at the top of the pocket. While I added a ‘note’ inside it, it does still show, so just be aware of that when putting your card or something else together. The size of the ‘note’ is about the size of a credit card, if not just a bit longer. I wanted the sentiment on it to show. :O) Orchid Oasis for the note base and a Basic White piece adhered to it after stamping. Nothing else.
For the inside of the card, I wanted to carry out the idea of the envelope on the DSP, filled with flowers. The Pocket Envelope Dies has small leaves, so I die cut several of those in Garden Green. The flowers were die cut from Penned Flowers Dies in both Fresh Freesia and Orchid Oasis. I used small scraps to adhere to the back side of the flowers contrasting the background. I thought we had an envelope die, maybe in a past set… anyway, I created my own kind of ‘willy nilly’.
Pocket Envelope Dies, inside
Didn’t this turn out sweet? It looks very similar to the ‘envelope bouquet on the DSP! The leaves were all adhered with dabs of liquid glue while many of the flowers have mini dimensionals on the back to create depth – even though it’s the inside of the card. This is probably my favorite part of this card ~ the inside.
OK, the envelope… an embossed piece of Orchid Oasis was added to the flap and a bouquet was stamped in Memento ink on the front, then colored with Fresh freesia and Orchid Oasis Stampin’ Blends. That very sweet bouquet is from Happiness Abounds stamp set.
Here’s a photo of the card, envelope.
Pocket Envelope Dies.4
Products to make this card are listed below. If you do not have a demonstrator and need an Annual Catalog please reach out to me (the 2022-2023 AC) – happy to send one to you. When ordering, please also use current host code:AZQDZ4U4. I offer my customers a free item from Stampin’ Up! item valued to $10 with your order of $50 and above. Click here to go my store. When the order is over $150, you still receive that free gift from me, but SU! has Stampin’ Rewards that may be used for additional products, so don’t use the host code at that time. If you have questions just let me know. If you would like to be able to order products early from catalogs AND enjoy that 20% discount, join my team now… you may do that here. WooHoo! We have lots of fun and are a creative bunch that encourages & supports one another. Would love to have you. :O)
Let’s talk starter kit… New In Colors, New 2022-2023 Annual Catalog release
Time is getting short my friends… today is the 30th and you have until the 31st to join with this fabulous promotion. What ARE you waiting for??? It isn’t often an opportunity like this comes along – to join with such fantastic benefits. I haven’t seen this in some time. So, if the idea is a fleeting one, grab hold of it and join.
Order products early from catalogs AND enjoy that 20% discount, join my team now… you may do that here.
Just a few of the perks of being a Stampin’ Up! Demonstrator AND part of our Critters ‘n Creatin’ Krew Team:
At least a 20% discount on everything that you order as a Demonstrator!
Early peeks at new release items and preorders for new items about a month before they are available to customers!
The ability to attend Demonstrator exclusive Stampin’ Up! events!
No pressure to sell to anyone, hold classes or workshops or run a business. You can simply order for yourself and get the discount! And as long as you have at least $300 in sales per quarter, you’ll continue as an active Demonstrator and continue to get the discount. If you aren’t able to maintain the $300 per quarter minimums, you simply go back to being a customer, no commitment required and no penalty if decide that being a Demonstrator isn’t right for you.
Stampin’ Up! does have an extensive library of class and project ideas for those wishing to jump into hosting classes as well as training to help start your business, should you choose to do that.
If you join with me, you’ll also get:
Monthly team meetings via video conference where we talk about the latest happenings at Stampin’ Up! and share project ideas. Team members are located all over the United States, but we still get together in person online and have lots of fun.
Quarterly in-person meetings if you live in the NJ or surrounding area, where we get together to do a little stamping, creating, getting to know one another and most of all SHARE inspiration. If you live outside the NJ area you can join us through that wonderful ZOOM video conference.
Free access to our online class tutorials. These are exceptional!
A private Facebook page where we can chat, ask questions and share ideas.
Team giveaways and prizes for reaching sales and team goals or attending specific meetings. 😉
The best part is the laughing and kidding and sharing of information/ creativity/ talent ~ following the SU! adage: Inspire. Create. Share. ❤️ 😁
Join our incredible group of crafters and creators.
If you would like to be able to order products early from catalogs AND enjoy that 20% discount, join my team now… you may do that here
Remember to connect with me if you do not have a demonstrator and need a catalog.


![Fragrant Layers Bundle (English) [ 167155 ]](https://assets1.tamsnetwork.com/images/EC042017NF/167155s.jpg "Fragrant Layers Bundle (English) [ 167155 ]")
![Nature Walk 12" X 12" (30.5 X 30.5 Cm) Designer Series Paper [ 166912 ]](https://assets1.tamsnetwork.com/images/EC042017NF/166912s.jpg "Nature Walk 12\" X 12\" (30.5 X 30.5 Cm) Designer Series Paper [ 166912 ]")
![Low Profile Sparkle Dots [ 166157 ]](https://assets1.tamsnetwork.com/images/EC042017NF/166157s.jpg "Low Profile Sparkle Dots [ 166157 ]")
![Secret Sea Classic Stampin' Pad [ 165285 ]](https://assets1.tamsnetwork.com/images/EC042017NF/165285s.jpg "Secret Sea Classic Stampin' Pad [ 165285 ]")
![Lost Lagoon 8-1/2" X 11" Cardstock [ 133679 ]](https://assets1.tamsnetwork.com/images/EC042017NF/133679s.jpg "Lost Lagoon 8-1/2\" X 11\" Cardstock [ 133679 ]")
![Soft Sea Foam Stampin' Blends Markers Combo Pack [ 148059 ] (Retired)](https://assets1.tamsnetwork.com/images/EC042017NF/148059s.jpg "Soft Sea Foam Stampin' Blends Markers Combo Pack [ 148059 ] (Retired)")
![Basic White 8 1/2" X 11" Cardstock [ 166780 ]](https://assets1.tamsnetwork.com/images/EC042017NF/166780s.jpg "Basic White 8 1/2\" X 11\" Cardstock [ 166780 ]")
![Basic White Medium Envelopes [ 159236 ]](https://assets1.tamsnetwork.com/images/EC042017NF/159236s.jpg "Basic White Medium Envelopes [ 159236 ]")
![Stampin' Cut & Emboss Machine [ 149653 ]](https://assets1.tamsnetwork.com/images/EC042017NF/149653s.jpg "Stampin' Cut & Emboss Machine [ 149653 ]")
![Paper Trimmer [ 152392 ]](https://assets1.tamsnetwork.com/images/EC042017NF/152392s.jpg "Paper Trimmer [ 152392 ]")
![Stampin' Dimensionals [ 104430 ]](https://assets1.tamsnetwork.com/images/EC042017NF/104430s.jpg "Stampin' Dimensionals [ 104430 ]")
![Multipurpose Liquid Glue [ 110755 ]](https://assets1.tamsnetwork.com/images/EC042017NF/110755s.jpg "Multipurpose Liquid Glue [ 110755 ]")
![Mini Glue Dots [ 103683 ]](https://assets1.tamsnetwork.com/images/EC042017NF/103683s.jpg "Mini Glue Dots [ 103683 ]")
![Paper Snips [ 103579 ]](https://assets1.tamsnetwork.com/images/EC042017NF/103579s.jpg "Paper Snips [ 103579 ]")
![Take Your Pick [ 144107 ]](https://assets1.tamsnetwork.com/images/EC042017NF/144107s.jpg "Take Your Pick [ 144107 ]")
![Clear Wink Of Stella Glitter Brush [ 141897 ]](https://assets1.tamsnetwork.com/images/EC042017NF/141897s.jpg "Clear Wink Of Stella Glitter Brush [ 141897 ]")


![Lovely & Beautiful 12" X 12" (30.5 X 30.5 Cm) Specialty Designer Series Paper [ 166957 ]](https://assets1.tamsnetwork.com/images/EC042017NF/166957s.jpg "Lovely & Beautiful 12\" X 12\" (30.5 X 30.5 Cm) Specialty Designer Series Paper [ 166957 ]")
![Perennial Postage Dies [ 162607 ]](https://assets1.tamsnetwork.com/images/EC042017NF/162607s.jpg "Perennial Postage Dies [ 162607 ]")
![Calypso Coral 8-1/2" X 11" Cardstock [ 122925 ]](https://assets1.tamsnetwork.com/images/EC042017NF/122925s.jpg "Calypso Coral 8-1/2\" X 11\" Cardstock [ 122925 ]")
![Basic White 8 1/2" X 11" Thick Cardstock [ 159229 ]](https://assets1.tamsnetwork.com/images/EC042017NF/159229s.jpg "Basic White 8 1/2\" X 11\" Thick Cardstock [ 159229 ]")
![Basic Black 8-1/2" X 11" Cardstock [ 121045 ]](https://assets1.tamsnetwork.com/images/EC042017NF/121045s.jpg "Basic Black 8-1/2\" X 11\" Cardstock [ 121045 ]")
![Old Olive Classic Stampin' Pad [ 147090 ]](https://assets1.tamsnetwork.com/images/EC042017NF/147090s.jpg "Old Olive Classic Stampin' Pad [ 147090 ]")
![Calypso Coral Classic Stampin' Pad [ 147101 ]](https://assets1.tamsnetwork.com/images/EC042017NF/147101s.jpg "Calypso Coral Classic Stampin' Pad [ 147101 ]")
![Tuxedo Black Memento Ink Pad [ 132708 ]](https://assets1.tamsnetwork.com/images/EC042017NF/132708s.jpg "Tuxedo Black Memento Ink Pad [ 132708 ]")
![Iridescent Foil Gems [ 162842 ]](https://assets1.tamsnetwork.com/images/EC042017NF/162842s.jpg "Iridescent Foil Gems [ 162842 ]")
![Baker's Twine Essentials Pack [ 155475 ]](https://assets1.tamsnetwork.com/images/EC042017NF/155475s.jpg "Baker's Twine Essentials Pack [ 155475 ]")
![Basics Wow! Embossing Powder [ 165679 ]](https://assets1.tamsnetwork.com/images/EC042017NF/165679s.jpg "Basics Wow! Embossing Powder [ 165679 ]")
![Embossing Additions Tool Kit [ 159971 ]](https://assets1.tamsnetwork.com/images/EC042017NF/159971s.jpg "Embossing Additions Tool Kit [ 159971 ]")
![Versamark Pad [ 102283 ]](https://assets1.tamsnetwork.com/images/EC042017NF/102283s.jpg "Versamark Pad [ 102283 ]")


![Mossy Meadow 8-1/2" X 11" Cardstock [ 133676 ]](https://assets1.tamsnetwork.com/images/EC042017NF/133676s.jpg "Mossy Meadow 8-1/2\" X 11\" Cardstock [ 133676 ]")
![Gathering Leaves Embossing Folder [ 165983 ]](https://assets1.tamsnetwork.com/images/EC042017NF/165983s.jpg "Gathering Leaves Embossing Folder [ 165983 ]")
![Just A Note Cling Stamp Set (English) [ 166098 ]](https://assets1.tamsnetwork.com/images/EC042017NF/166098s.jpg "Just A Note Cling Stamp Set (English) [ 166098 ]")
![Very Vanilla 8 1/2" X 11" Cardstock [ 166784 ]](https://assets1.tamsnetwork.com/images/EC042017NF/166784s.jpg "Very Vanilla 8 1/2\" X 11\" Cardstock [ 166784 ]")
![Early Espresso 8-1/2" X 11" Cardstock [ 119686 ]](https://assets1.tamsnetwork.com/images/EC042017NF/119686s.jpg "Early Espresso 8-1/2\" X 11\" Cardstock [ 119686 ]")
![Early Espresso Classic Stampin' Pad [ 147114 ]](https://assets1.tamsnetwork.com/images/EC042017NF/147114s.jpg "Early Espresso Classic Stampin' Pad [ 147114 ]")
![Linen Thread [ 104199 ]](https://assets1.tamsnetwork.com/images/EC042017NF/104199s.jpg "Linen Thread [ 104199 ]")
![Heat Tool (Us And Canada) [ 129053 ]](https://assets1.tamsnetwork.com/images/EC042017NF/129053s.jpg "Heat Tool (Us And Canada) [ 129053 ]")


![Beautiful Gallery Suite Collection (English) [ 165217 ]](https://assets1.tamsnetwork.com/images/EC042017NF/165217s.jpg "Beautiful Gallery Suite Collection (English) [ 165217 ]")
![Beautiful Motifs Bundle (English) [ 165206 ]](https://assets1.tamsnetwork.com/images/EC042017NF/165206s.jpg "Beautiful Motifs Bundle (English) [ 165206 ]")
![Gallery Blooms Bundle [ 165213 ]](https://assets1.tamsnetwork.com/images/EC042017NF/165213s.jpg "Gallery Blooms Bundle [ 165213 ]")
![Damask Designs Embossing Folder [ 165214 ]](https://assets1.tamsnetwork.com/images/EC042017NF/165214s.jpg "Damask Designs Embossing Folder [ 165214 ]")
![Basic Gray 8-1/2" X 11" Cardstock [ 121044 ]](https://assets1.tamsnetwork.com/images/EC042017NF/121044s.jpg "Basic Gray 8-1/2\" X 11\" Cardstock [ 121044 ]")
![Small Blending Brushes [ 160518 ]](https://assets1.tamsnetwork.com/images/EC042017NF/160518s.jpg "Small Blending Brushes [ 160518 ]")
![Peach Pie Classic Stampin Pad [ 163810 ]](https://assets1.tamsnetwork.com/images/EC042017NF/163810s.jpg "Peach Pie Classic Stampin Pad [ 163810 ]")
![Pecan Pie Classic Stampin' Pad [ 161665 ]](https://assets1.tamsnetwork.com/images/EC042017NF/161665s.jpg "Pecan Pie Classic Stampin' Pad [ 161665 ]")
![Metallics Wow! Embossing Powder [ 165678 ]](https://assets1.tamsnetwork.com/images/EC042017NF/165678s.jpg "Metallics Wow! Embossing Powder [ 165678 ]")
![Stampin' Seal [ 152813 ]](https://assets1.tamsnetwork.com/images/EC042017NF/152813s.jpg "Stampin' Seal [ 152813 ]")
![Bone Folder [ 102300 ]](https://assets1.tamsnetwork.com/images/EC042017NF/102300s.jpg "Bone Folder [ 102300 ]")


![Mixed Labels Bundle (English) [ 164653 ]](https://assets1.tamsnetwork.com/images/EC042017NF/164653s.jpg "Mixed Labels Bundle (English) [ 164653 ]")
![Mixed Media Florals Suite Collection (English) [ 164659 ]](https://assets1.tamsnetwork.com/images/EC042017NF/164659s.jpg "Mixed Media Florals Suite Collection (English) [ 164659 ]")
![2025–2027 In Color™ 6" X 6" (15.2 X 15.2 Cm) Designer Series Paper [ 165300 ]](https://assets1.tamsnetwork.com/images/EC042017NF/165300s.jpg "2025–2027 In Color™ 6\" X 6\" (15.2 X 15.2 Cm) Designer Series Paper [ 165300 ]")
![Cloud Cover 8 1/2" X 11" Cardstock [ 165621 ]](https://assets1.tamsnetwork.com/images/EC042017NF/165621s.jpg "Cloud Cover 8 1/2\" X 11\" Cardstock [ 165621 ]")
![Cloud Cover 3/8" (1 Cm) Faux Linen Ribbon [ 165271 ]](https://assets1.tamsnetwork.com/images/EC042017NF/165271s.jpg "Cloud Cover 3/8\" (1 Cm) Faux Linen Ribbon [ 165271 ]")
![2025–2027 In Color™ Flat Pearls [ 165192 ]](https://assets1.tamsnetwork.com/images/EC042017NF/165192s.jpg "2025–2027 In Color™ Flat Pearls [ 165192 ]")
![Cloud Cover Classic Stampin' Ink Refill [ 165279 ]](https://assets1.tamsnetwork.com/images/EC042017NF/165279s.jpg "Cloud Cover Classic Stampin' Ink Refill [ 165279 ]")
![Uninked Stampin' Spots [ 141822 ]](https://assets1.tamsnetwork.com/images/EC042017NF/141822s.jpg "Uninked Stampin' Spots [ 141822 ]")