Good Saturday morning! We’re due for some warmer weather today – hoping some of the snow melts so we can get to our mailbox! I don’t remember if I mentioned our mailbox was plowed in and the snow packed down so tightly it became solid, solid. Our snow blowing neighbors couldn’t remove any of it! For now our mail is being delivered to our neighbors for a bit. Spring awaits… 🌺
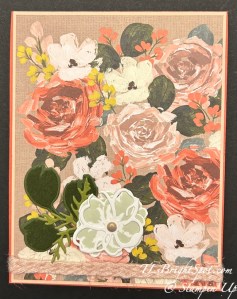
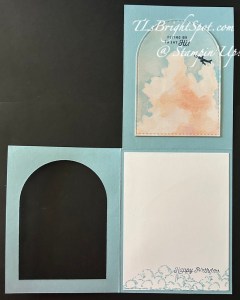
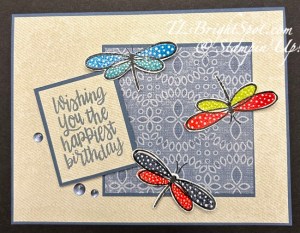
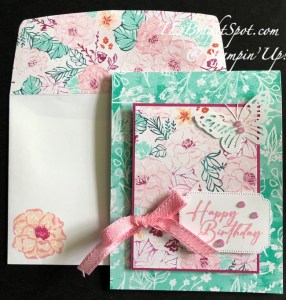
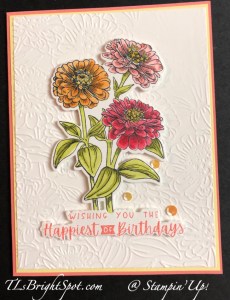
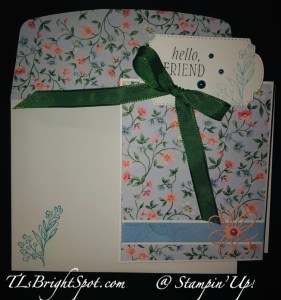
The Fragrant Layers bundle is perfectly sweet and has so many possibilities. I had this on my desk & hadn’t completed it, & decided to do just that. I colored the flowers with Stampin’ Blends, Light Peach Pie then both Light & Dark Timid Tiger & Bronze for the center. I also added Wink of Stella to the center. The leaves got a light touch of stamped Old Olive ink. I added this to a Mossy Meadow layer then wrapped Old Olive Linen Thread around twice and tied a bow, securing with a glue dot. The card base is Mossy Meadow A2 size and layered with Timeless Plaid 6×6. I added the floral scene to the card front, with dimensionals, off-setting it to the left. My sentiment is stamped in Mossy Meadow ink & die cut with a banner die in this Fragrant Layers Dies. I added it next to the bow with dimensionals, then doubled up the dimensionals on the right end of the sentiment. Final touch… Natural Matte Dots available March 3 as part of our ONLINE EXCLUSIVES 😀.
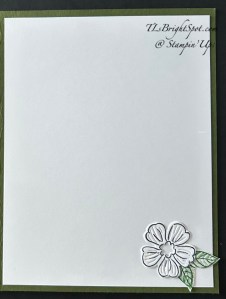
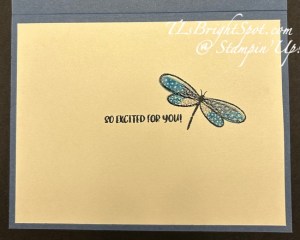
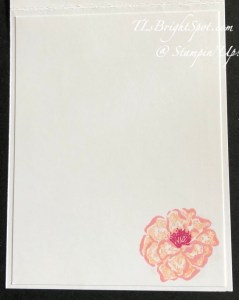
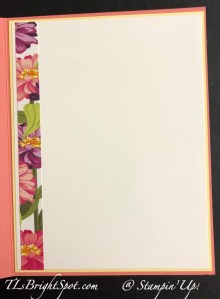
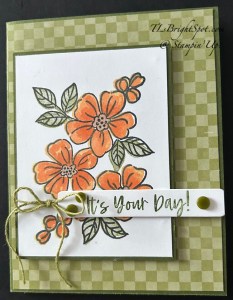
For the inside… I had this sweet flower already die cut & waiting for use… stamped in Memento ink & die cut with the Fragrant Layers Dies – added it to the Basic White panel. The little leaves were also waiting and come from this same Fragrant Layers bundle. This will make a perfect card – for a birthday or a simple hello – refreshing.
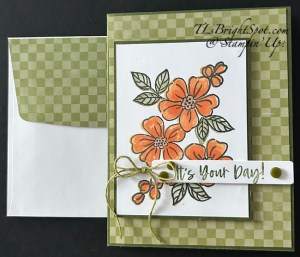
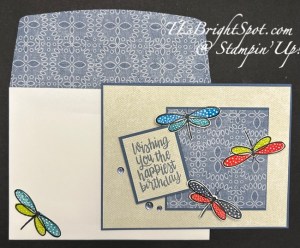
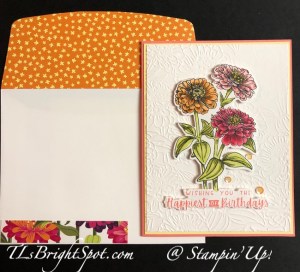
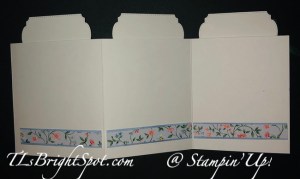
The envelope… more of the same Timeless Plaid 6×6 adhered to the flap & trimmed to fit. And a sweet flower on the front colored the same as the card front.
Today is THE LAST DAY to redeem those bonus days coupons. Do not let them go to waste!

Redemption Period: February 3–28, 2026. There is no limit to the number of coupon codes you can redeem on an order during the redemption period. If you’re redeeming multiple codes, you must put a space between each code.
You may only redeem coupon codes one time. You cannot redeem them after February 28.
You can redeem Bonus Days coupon codes for month-to-month Paper Pumpkin subscriptions and new prepaid subscriptions.
Some restrictions apply. Coupons can’t be redeemed towards Starter Kits and you cannot use them on exchanges.
Redemption period ends: February 28, 2026, at 11:59 p.m. (MT)
When you shop with me, there are some fun benefits… I like to thank my customers.. When you spend $50 or more (before tax & shipping) you will also receive a copy of my monthly tutorial – and guess what – it’s Sweet Bugs for February! AND… keep track of your purchases using my Daisy Patch Rewards and get even more benefits! Visit my REWARDS Page for more info.
As a demonstrator, there are so MANY benefits: being able to preorder new products before they are available to the ‘open market’, having a supportive creative community that encourages & helps in various ways, being able to attend creative events via ZOOM or in person (CONVENTIONS!), 20% – 25% discount on all products after joining, monthly tutorials and lots, lots more.
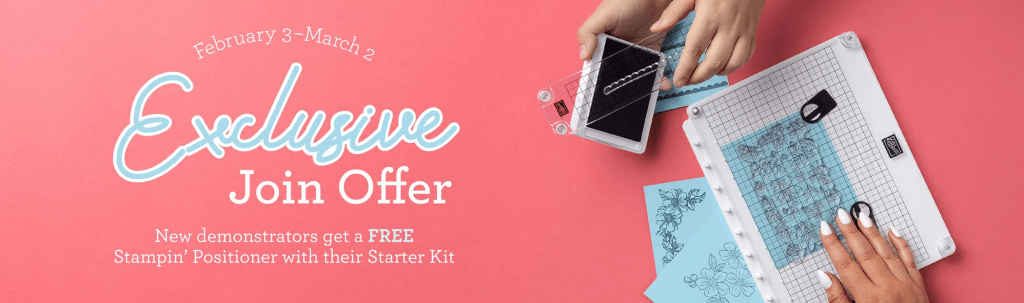
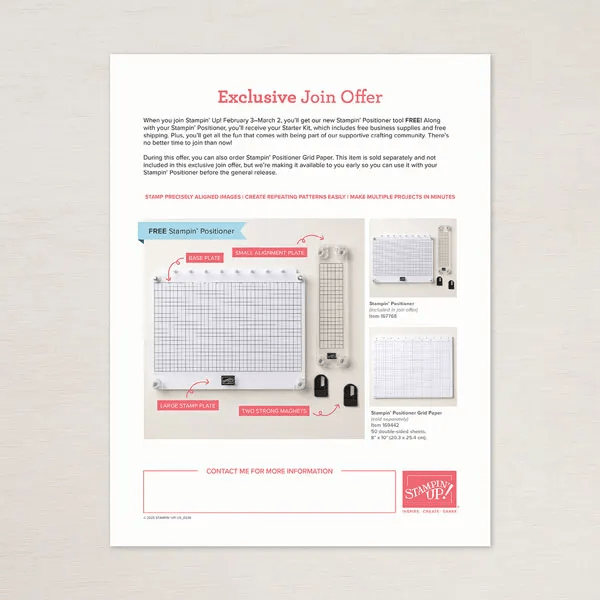
Want to thinking about JOINING MY TEAM? Check out how to do that HERE. What more could you ask for? well, let me just say… JOIN MY TEAM & get this awesome new Positioner Tool designed by our Stampin’ Up! TEAM!
Here are the details about the JOINING PROMOTION…New team members who purchase their Starter Kit February 3–March 2 will also receive our new Stampin’ Positioner*.
Check out this video to learn more
Thanks for stopping by. May you have a beautiful day. Make someone happy by sending them a handmade card made with ❤️
Product List![Fragrant Layers Bundle (English) [ 167155 ]](https://assets1.tamsnetwork.com/images/EC042017NF/167155s.jpg "Fragrant Layers Bundle (English) [ 167155 ]")
![Timeless Plaid 6" X 6" (15.2 X 15.2 Cm) Designer Series Paper [ 164678 ]](https://assets1.tamsnetwork.com/images/EC042017NF/164678s.jpg "Timeless Plaid 6\" X 6\" (15.2 X 15.2 Cm) Designer Series Paper [ 164678 ]")
![Mossy Meadow 8-1/2" X 11" Cardstock [ 133676 ]](https://assets1.tamsnetwork.com/images/EC042017NF/133676s.jpg "Mossy Meadow 8-1/2\" X 11\" Cardstock [ 133676 ]")
![Mossy Meadow Classic Stampin' Pad [ 147111 ]](https://assets1.tamsnetwork.com/images/EC042017NF/147111s.jpg "Mossy Meadow Classic Stampin' Pad [ 147111 ]")
![Peach Pie Stampin’ Blends Combo Pack [ 163827 ]](https://assets1.tamsnetwork.com/images/EC042017NF/163827s.jpg "Peach Pie Stampin’ Blends Combo Pack [ 163827 ]")
![Timid Tiger Stampin’ Blends Combo Pack [ 165291 ]](https://assets1.tamsnetwork.com/images/EC042017NF/165291s.jpg "Timid Tiger Stampin’ Blends Combo Pack [ 165291 ]")
![Bronze & Ivory Stampin' Blends Combo Pack [ 154922 ]](https://assets1.tamsnetwork.com/images/EC042017NF/154922s.jpg "Bronze & Ivory Stampin' Blends Combo Pack [ 154922 ]")
![Basic White 8 1/2" X 11" Cardstock [ 166780 ]](https://assets1.tamsnetwork.com/images/EC042017NF/166780s.jpg "Basic White 8 1/2\" X 11\" Cardstock [ 166780 ]")
![Basic White 12" X 12" (30.5 X 30.5 Cm) Thick Cardstock [ 166782 ]](https://assets1.tamsnetwork.com/images/EC042017NF/166782s.jpg "Basic White 12\" X 12\" (30.5 X 30.5 Cm) Thick Cardstock [ 166782 ]")
![Basic White Medium Envelopes [ 159236 ]](https://assets1.tamsnetwork.com/images/EC042017NF/159236s.jpg "Basic White Medium Envelopes [ 159236 ]")
![Stampin' Cut & Emboss Machine [ 149653 ]](https://assets1.tamsnetwork.com/images/EC042017NF/149653s.jpg "Stampin' Cut & Emboss Machine [ 149653 ]")
![Paper Trimmer [ 152392 ]](https://assets1.tamsnetwork.com/images/EC042017NF/152392s.jpg "Paper Trimmer [ 152392 ]")
![Stampin' Dimensionals [ 104430 ]](https://assets1.tamsnetwork.com/images/EC042017NF/104430s.jpg "Stampin' Dimensionals [ 104430 ]")
![Multipurpose Liquid Glue [ 110755 ]](https://assets1.tamsnetwork.com/images/EC042017NF/110755s.jpg "Multipurpose Liquid Glue [ 110755 ]")
![Mini Glue Dots [ 103683 ]](https://assets1.tamsnetwork.com/images/EC042017NF/103683s.jpg "Mini Glue Dots [ 103683 ]")
![Paper Snips [ 103579 ]](https://assets1.tamsnetwork.com/images/EC042017NF/103579s.jpg "Paper Snips [ 103579 ]")
![Take Your Pick [ 144107 ]](https://assets1.tamsnetwork.com/images/EC042017NF/144107s.jpg "Take Your Pick [ 144107 ]")
![Clear Wink Of Stella Glitter Brush [ 141897 ]](https://assets1.tamsnetwork.com/images/EC042017NF/141897s.jpg "Clear Wink Of Stella Glitter Brush [ 141897 ]")
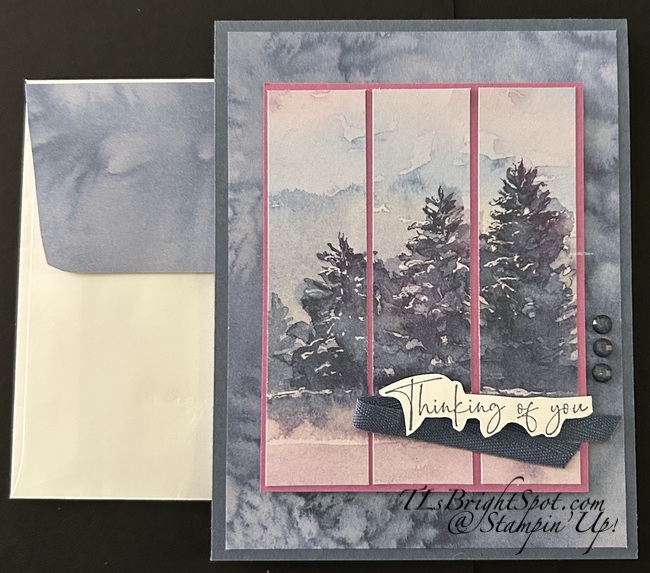
![Thoughtful Journey 6" X 6" (15.2 X 15.2 Cm) Designer Series Paper [ 163303 ]](https://assets1.tamsnetwork.com/images/EC042017NF/163303s.jpg "Thoughtful Journey 6\" X 6\" (15.2 X 15.2 Cm) Designer Series Paper [ 163303 ]")
![The Right Words Cling Stamp Set (English) [ 165316 ]](https://assets1.tamsnetwork.com/images/EC042017NF/165316s.jpg "The Right Words Cling Stamp Set (English) [ 165316 ]")
![Traditional Labels Bundle (English) [ 165865 ]](https://assets1.tamsnetwork.com/images/EC042017NF/165865s.jpg "Traditional Labels Bundle (English) [ 165865 ]")
![Misty Moonlight 8-1/2" X 11" Cardstock [ 153081 ]](https://assets1.tamsnetwork.com/images/EC042017NF/153081s.jpg "Misty Moonlight 8-1/2\" X 11\" Cardstock [ 153081 ]")
![Petunia Pop 8 1/2" X 11" Cardstock [ 163801 ]](https://assets1.tamsnetwork.com/images/EC042017NF/163801s.jpg "Petunia Pop 8 1/2\" X 11\" Cardstock [ 163801 ]")
![Charming Shimmer Faceted Dots [ 166139 ]](https://assets1.tamsnetwork.com/images/EC042017NF/166139s.jpg "Charming Shimmer Faceted Dots [ 166139 ]")
![Petunia Pop 3/8" (1 Cm) Bordered Ribbon [ 163785 ]](https://assets1.tamsnetwork.com/images/EC042017NF/163785s.jpg "Petunia Pop 3/8\" (1 Cm) Bordered Ribbon [ 163785 ]")
![Misty Moonlight & White 1/4" (6.4 Mm) Starter Ribbon Pack [ 165276 ]](https://assets1.tamsnetwork.com/images/EC042017NF/165276s.jpg "Misty Moonlight & White 1/4\" (6.4 Mm) Starter Ribbon Pack [ 165276 ]")
![Petunia Pop Classic Stampin Pad [ 163811 ]](https://assets1.tamsnetwork.com/images/EC042017NF/163811s.jpg "Petunia Pop Classic Stampin Pad [ 163811 ]")
![Misty Moonlight Classic Stampin' Pad [ 153118 ]](https://assets1.tamsnetwork.com/images/EC042017NF/153118s.jpg "Misty Moonlight Classic Stampin' Pad [ 153118 ]")
![Tuxedo Black Memento Ink Pad [ 132708 ]](https://assets1.tamsnetwork.com/images/EC042017NF/132708s.jpg "Tuxedo Black Memento Ink Pad [ 132708 ]")