Stampin’ Up! Happy Inkin’ Thursday Blog Hop

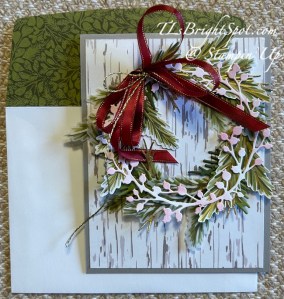
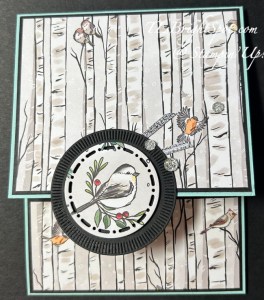
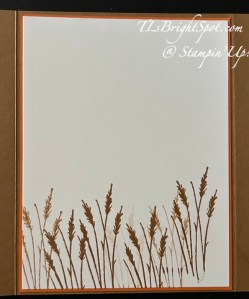
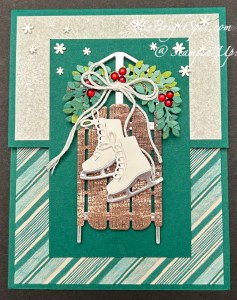
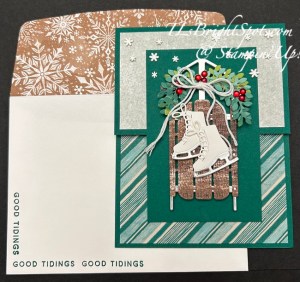
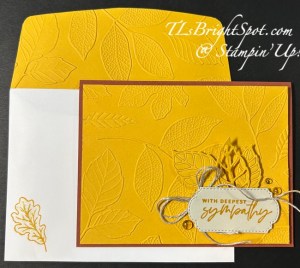
HAPPY THANKSGIVING EVERYONE! We have a fantastic theme today – Evergreen Trees 😀 perfect timing, right? I’ve pulled together a card using the Painted Trees 3D EF + the Peaceful Evergreen bundle & Peaceful Season bundle to create my card for you today.

Stampin' Up! Happy Inkin' Thursday Blog Hop
Stampin' Up! Hop Theme Challenge
Stampin' Up! Painted Trees 3D EF card front

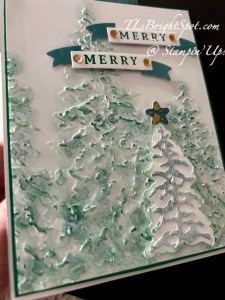
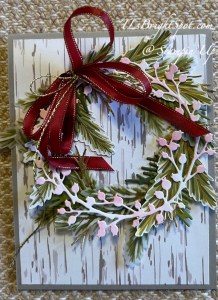
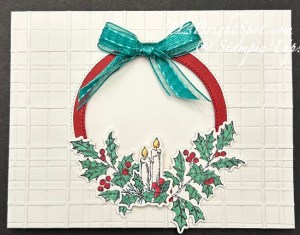
I took this photo in hopes you would be able to see the texture provided by the embossing folder and also the Pearlized Enamel Effects that I added in various places on the trees. Can you see the Pearlized Enamel? I’m pretty certain you can see the texture – it shows easily in this photo. Let me tell you how I created this card.

Directions:

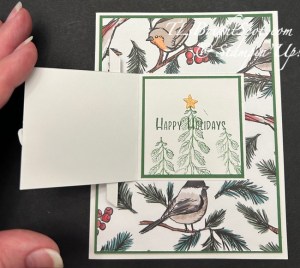
  • On a 4 x 5 1/4 piece of Basic White, I embossed the trees using the Painted Trees 3D EF. I then used a sponge dauber and dabbed Shaded Spruce ink on the tree-raised portions. With another sponge dauber & Pretty Peacock ink, I added some color, but less than with the Shaded Spruce.
  • I die cut from Basic White, the tree outline image (Peaceful Evergreens Dies), then with the dauber & Shaded Spruce ink, colored just the edges.
  • I die cut the center of the tree (Peaceful Evergreen Dies) from Winter Meadow DSP and attached it with dots of liquid glue, to the tree outline.
  • I added these to the embossed panel with dimensionals.
  • I die cut the star (Peaceful Evergreens Dies) from Season of Elegance SDSP and attached with a mini dimensional.
  • At this point, I added the Pearlized Enamel Effects to various tips of the embossed trees and to the tree on dimensionals – and set this aside to dry while creating the sentiment pieces.
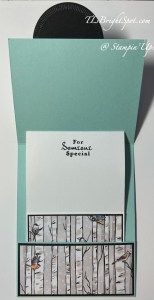
  • Using the Peaceful Season Dies… I die cut from Winter Meadow DSP two banners, then die cut two from Basic White. I stamped the Merry in two different inkson the basic white pieces: the upper in Pretty Peacock and the lower in Shaded Spruce, then I cut them apart so just the center remained and attached it to the Winter Meadow DSP piece.
  • I added these to the card with mini dimensionals.
  • I added Neutral Adhesive-Backed Sequins in gold to the banner.
  • I added this to a 4 1/8 x 5 3/8 panel of Shaded Spruce, then to the Thick Basic White card base 4 1/4 x 11 scored at 5 1/2

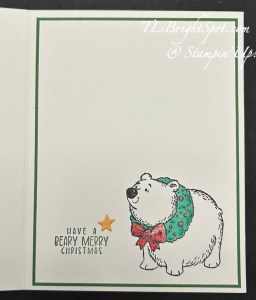
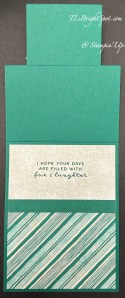
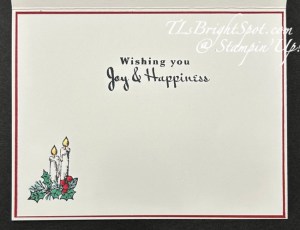
On the inside… I stamped the sentiment in Shaded Spruce ink using the Peaceful Season stamp set on a 4 x 5 1/4 Basic White panel. I again used the Pearlized Enamel Effects to highlight along the top of each letter of the sentiment. Then I used Shaded Spruce ink & the Peaceful Evergreens stamp set to stamp the trees along the bottom of the panel. Once the Pearlized Enamel Effgects was dry, I added the panel to the inside of the card.

Stampin' Up! Painted Trees 3D card & envelope

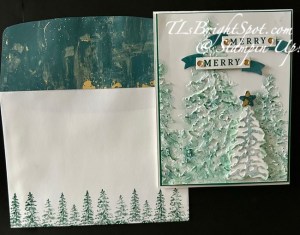
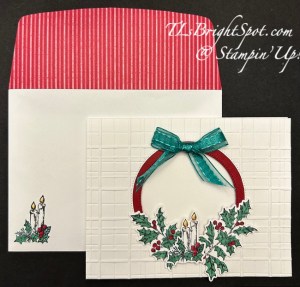
For the envelope… I used the same Season of Elegance SDSP to adhere to envelope flap, trimming it to fit, then stamped the same trees along the bottom of the envelope in Shaded Spruce ink. My hubby LOVES these trees! I like this… what do you think?

OK – time to visit others participating in the hop… click the ‘next’ button to see what Carol has to share. For more information about how to purchase the products used to make this card, see below the list of names!

Stampin' Up! Happy Inkin' Thursday Blog Hop next button

Amy Koenders

Karen Finkle

Akiko Sudano

Karen Ksenzakovic

Tara Carpenter

Terry Lynn Bright ~ this is me :O)

Carol Buckalew

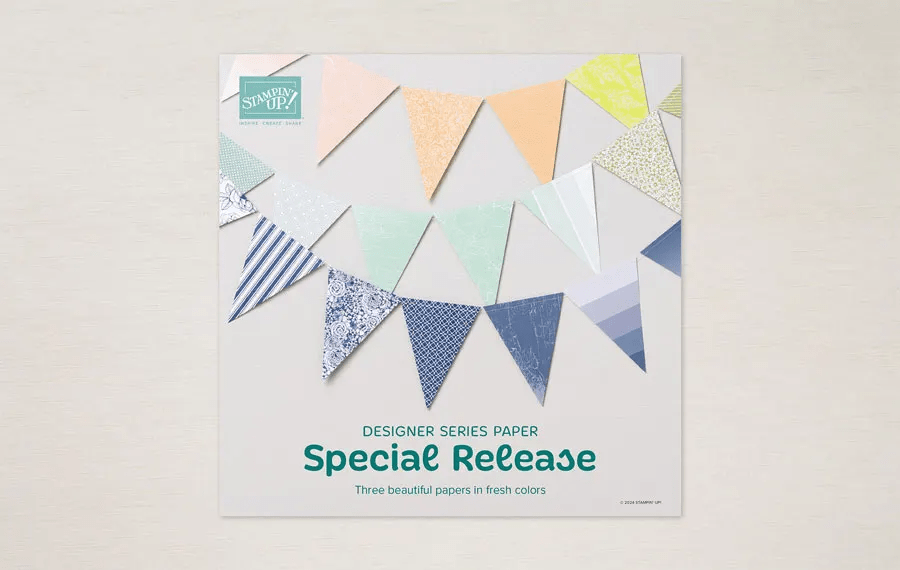
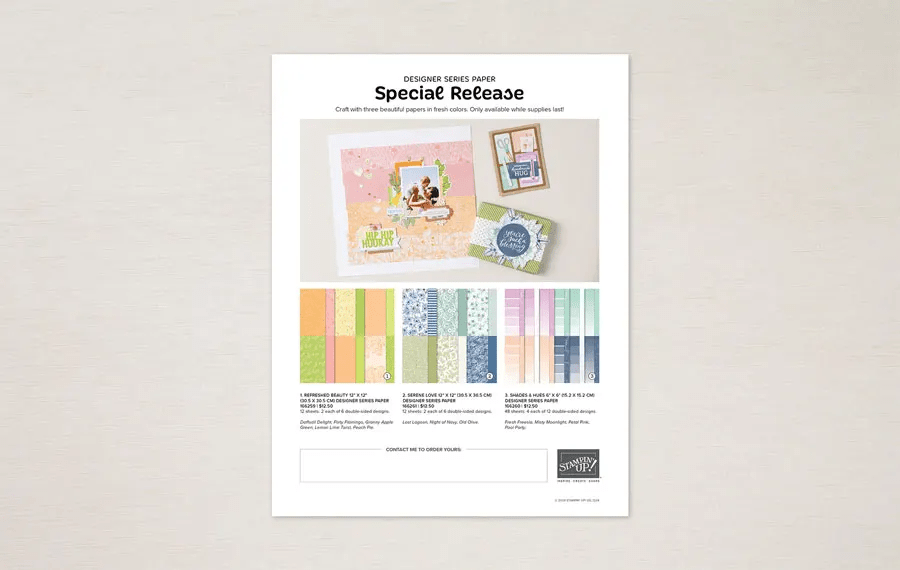
  • Stampin’ Up! refreshed these previous Designer Series Papers using some of our best-selling colors!
    • Serene Love is recolored from True Love.
    • Refreshed Beauty is recolored from Blackberry Beauty.
    • Shades & Hues is recolored from Color Theory.
  • Available while supplies last.
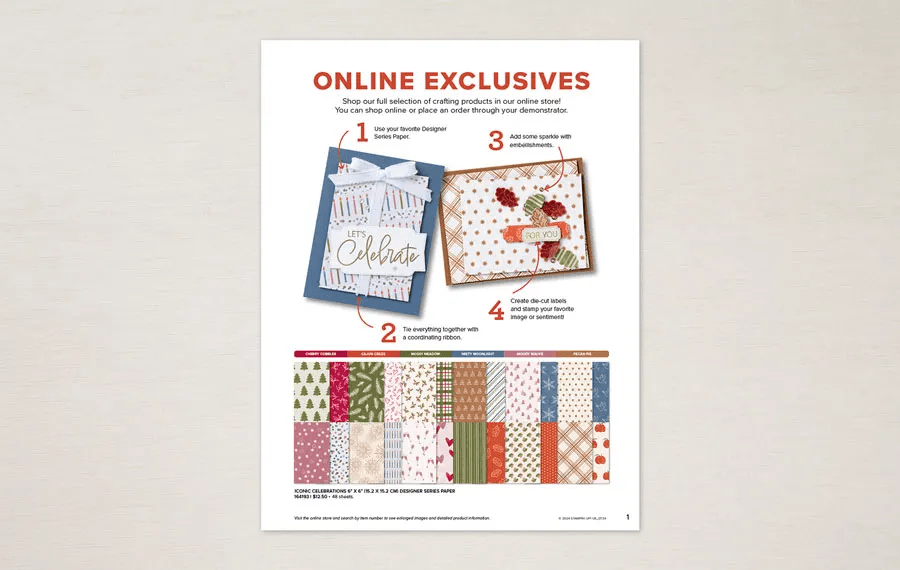
  • Sales begin Dec. 3, 2024 as part of the ONLINE EXCLUSIVES – click to see what’s available right now!
Stampin' Up! Special DSP Release!
Stampin' Up! DSP Special Release Dec. 3, 2024

To see the items from the Sep-Dec 2024 Mini Catalog, click here

Today’s card featured items from this catalog :O)

When shopping with me, please use the new host code listed below. This is good 11/20 – 12/11. Use it when your order is $50 to just less than $150 to receive a free gift from me + the monthly tutorial. If your order is over $150, SU! has it’s own rewards so don’t use my code… but I will still send that free SU! item to you valued up to $10. Got that? If not, connect with me to talk you through it. :O) I would love to have you join my team and we can create & have some fun together. Please make certain my name is on as your demonstrator when ordering :O)

HOST CODE Q4Y3MQEU

Thanks so much for joining me today. I hope you enjoyed my card and this hop. May you have a beautiful day!

Stampin’ Up! Wreath Card

Good morning

1 We had a terrifically rainy day Thursday, which actually began Wednesday in the middle of the night. I don’t often make comments about the rain, but this was needed SO BADLY. the reservoirs were becoming quite low – and well it was a full on drought. We had 2 1/2″ Wednesday night and more rain on Thursday, so it’s starting to resolve.

I have a multi-layered wreath card for you today – created with multiple Stampin’ Up! products. I had this Basic White berry wreath die cut on my desk and several die cuts from the Graceful Greenery Vellum (die cut with the Golden Greenery Dies). I began playing around and this is my final product.

Stampin' Up! Wreath Card front

The card base is Gray Granite with a layer of Nests of Winter DSP, a very wood grain kind of effect. I was thinking the side of a barn or door front. For a foundation for the wreath shape, I pulled out the Encircled in Nature Dies. There are two dies that form a circle like shape so I used those and Old Olive card stock for that particular die cut. There are pine bough dies in the Golden Greenery Dies and I used these to die cut from Old Olive & Mossy Meadow, – 3-4 of each just to have enough to play around. I ended up trimming some of these down as they were too long. I also die cut more pine boughs from the Season of Green & Gold SDSP I used pine dies from the Encircled in Nature Dies and Distressed Gold Specialty Paper for even more color and texture. I did a lot of moving things around til it suited me then glued things in place, trying to keep depth and looseness so as not to be too flat. I laid the Basic White berry wreath on top of all of it – too white! So, I pulled out my small Blending Brush & Cherry Cobbler ink and very gently added color to various berries. Again I laid it on top of the wreath – and oh so much better! I added a double bow using the 1/4″ Cherry Cobbler Satin Ribbon and Gold Twisted Thread (a new ONLINE EXCLUSIVE product!) and attached it in place with a glue dot. I thought about adding a sentiment and decided against it.

Stampin' Up! Wreath card inside

The inside of the card does not show up well in this photo – no sentiment, just a 1/2 x 4 inch strip of Season of Green & Gold SDSP at the bottom. Why no sentiment? I want to be able to say ‘thank you’ with this beautiful card, or ‘thinking of you’ or ‘Merry Christmas’, whatever is necessary at the time. And when time, I will probably stamp with Mossy Meadow ink.

Stampin' Up! Wreath Card & envelope

For the envelope… More of the same Season of Green & Gold SDSP on the flap, trimmed to fit. This is the same as the small strip on the inside of the card. I love this card – and it could easily be a masculine card too!

Some fun options for purchases at Stampin’ Up! right now.

ONLINE EXCLUSIVES – shop here

Stampin' Up! ONLINE EXCLUSIVE

Paper Pumpkin opportunities – shop here

Kits Collections – shop here

Stampin' Up! Kits Collection

September- December 2024 Mini Catalog – shop here

2024- 2025 Annual Catalog – shop here

Join my team – here

One of the benefits of being a demonstrator is being able to see & order Stampin’ Up! products before they go ‘live’ to the rest of the stamping community. As a matter of fact, my order is due to arrive, maybe tomorrow and I can’t wait to play!!! And while I’m talking the new Jan-Apr 2025 Mini Catalog, if you have been a customer of mine in the past nine months and placed an order of at least $50, I will be sending the catalog to you AND the famous Sale-a-bration catalog as well. Look for those in your mailbox SOON. If you are not certain if you qualify – give me a shout-out.

Stampin' Up! Jan - Apr 2025 Mini Catalog

When shopping with me, please use the new host code listed below. This is good 11/20 – 12/11. Use it when your order is $50 to just less than $150 to receive a free gift from me + the monthly tutorial. If your order is over $150, SU! has it’s own rewards so don’t use my code… but I will still send that free SU! item to you valued up to $10. Got that? If not, connect with me to talk you through it. :O) I would love to have you join my team and we can create & have some fun together. Please make certain my name is on as your demonstrator when ordering :O)

HOST CODE Q4Y3MQEU

Thanks so much for joining me today. I hope you enjoyed my card and this hop. May you have a beautiful day!

Stampin’ Up! Pop-Up Gift Card Fun Fold

Oh I’ve a fun gift card for you today using both the Spotlight on Nature Dies (one of my favorite die sets!) and the gorgeous Nests of Winter DSP.

Stampin' Up! Pop-Up Gift card

We start with a card base of Pool Party, score, burnish and adhere layers of Basic Black and Nests of Winter DSP to the top section and the lower section. Next I used one of thew gorgeous Spotlight on Nature Dies to die cut the black circle and also this sweet chickadee from the Nest of Winter DSP. I adhered the bird image to the Basic Black circle with dimensionals. I used the Stampin’ Seal+ to the back of this larger circle and added this wonderful Silver 1/8″ Trim then adhered the circle to the upper section of the card. I added three Drusy Adhesive-Backed Dots and the front was complete :O)

Stampin' Up! Pop-up Gift Card inside

For the inside… here you can see that lower front section is folded up for the inner ‘liner’ to slide into – like a pocket. And, that inner liner also has a ‘pocket’ – this time for the gift card. This basic White panel has two score lines, one at the top where it adheres to the upper section of the card and another to create the pocket for the gift card. It is also stamped using the Spotlight on Nature stamp set and Memento Black ink. What’s nice is this card can be used for Christmas or birthday or anything really. The measurements are listed below.

Measurements:

  • Card base: Pool Party – 4 1/4 x 11 scored @ 3 1/2 & 9, burnishing both inward
  • Upper layers: Basic Black 4 1/8 x 3 3/8; DSP 4 x 3 3/4
  • Lower layers: Basic Black 4 1/8 x 1 7/8; DSP 4 x 1 3/4 – – once layers are in place, fold up lower section and secure in place with glue dots in each bottom inside corner. This allows the insert to slide easily.
  • Pop-up insert: Basic White 3 1/2 x 7 1/4, score @ 1/2 & 5 3/8. Burnish score lines so the 1/2″ score goes back and the bottom score is forward. Stamp upper sentiment. Decorate bottom panel of insert.
    • Basic Black: 33/8 x 1 7/8
    • DSP: 3 1/4 x 1 3/4
  • Add glue dots to bottom inside corners and close to create pocket.
  • Insert into card base pocket; add tear ‘n tape to the 1/2″ area at top and with this section open and flat, close the top of the card. Bingo – the card opens with the insert in place and ready for the gift card.

Stampin’ Up! Christmas Friends for the Happy Inkin’ Thursday Blog Hop

Welcome to our hop! We have a sketch challenge today and it has been fun to play with this. I’ve used the Christmas Friends bundle to make my creation – such cute creatures in this set.

Stampin' Up! Happy In kin' Thursday Blog Hop
Stampin' Up! Hop Sketch Challenge
Stampin' Up! Christmas Friends card front

Ok, this is like two cards in one… as the small square with the green stripe opens. I love this little tree and the stars are die cut with the coordinating Christmas Friends Dies and a bit of Peach Pie. I stamped the tree in Garden Green ink and die cut it for the card front, attaching the die cut with dimensionals to a Basic White strip 1/4 x 3 1/2 – then set it aside. Oh- but I get ahead of myself… the base of the entire card is 5 1/2 x 8 1/2 scored at 4 1/4. The layers are Garden Green 4 x 5 14 and Nests of Winter DSP 3 7/8 x 5 1/8, then attached to the Basic White card base with dimensionals.

The small square is 2 3/8 x 4 3/4 folded in half and burnished. Garden Green is adhered both to the square front and the inside cut 2 1/4 x 2 1/4. The Nests of Winter green stripe piece is 2 1/8 x 2 1/8 – both adhered with liquid glue. The mouse is stamped in Memento Black and colored with Stampin’ Blends: Gray granite, Real Red, Shy Shamrock & Petal Pink. I added Wink of Stella to the bell and also to each Peach Pie star. I die cut the mouse and added it to the small square card, also attaching the strip with the tree. For the inside of the square card, I stamped the tree from Christmas Friends stamp set, stampin off first, then stamping on the Basic White panel. This was added to the card front, centering it.

For the inside… a Garden Green panel 4 x 5 1/4 adhered to the inside. A Basic White panel cut to 3 7/8 x 51/8 and stamped with the adorable bear from Christmas Friends stamp set in Memento Black ink and colored with Stampin’ Blends Real Red and Shy shamrock. Wink of Stella was added to the bow and the red dots. I then stamped the sentiment in Garden Green ink – also from Christmas Friends stamp set. I adhered the remaining star and added Wink of Stella to it as well. This was attached to the inside of the card – and all done!

For the envelope… more of the Nests of Winter DSP to the flap and the tree stamped in Garden Green ink on the front. Ta Da! These are the cutest little beasties…

For more information about new kits, ONLINE EXCLUSIVES & shopping in my store, continue below the lineup. For visiting each participating blog member, click the next button or a name – enjoy the hop!

Amy Koenders

Mary Deatherage

Karen Finkle

Akiko Sudano

Karen Ksenzakovic

Tara Carpenter

Terry Lynn Bright

Carol Buckalew

Stampin' Up! Marbled Elegance Suite

Marbled Elegance Suite – I’ll be sharing some ideas suing this suite of products in the days ahead – they don’t have to be used for valentines :O)

Stampin' Up! Otterly Adorable Suite, ONLINE

Click here to take you to the ONLINE EXCLUSIVES!

Click here for the 2024 September-December Mini Catalog

Click here for items in the 2024 Annual Catalog

I appreciate your business and welcome any questions regarding sales or creating or joining my team. Make sure when shopping with me, that you see my name at the top as your demonstrator. That way I can send you a Stampin’ Up! giftie and you can earn rewards – with a $50 order or more. You also receive the monthly tutorial for that particular month – for November, it is the Peaceful Season bundle. Make certain when you check out that my name is listed as your demonstrator :O)

HOST CODE NOVEMBER 7-21 CUH6ZRGF

Thanks for stopping by – may you have a beautiful day!

Stampin’ Up! Glimmer Christmas Card for the Happy Inkin’ Thursday Blog Hop

Good Thursday – and time for another Happy Inkin’ Thursday Blog Hop. We have a theme challenge today – Christmas. Love it! It could be packaging or a card or decoration. You have jumped here from the fabulous Tara or simply come here first. However you got here – welcome! I chose to use the Festive 12×12 Glimmer Paper to make my card.

Stampin' Up! Happy Inkin' Thursday Blog Hop logo
Stampin' Up! 10/31 Blog Hop challenge
Stampin' Up! Glimmer Christmas Card front

This is full of glimmer and the Take A Bow 6×6 DSP, plus Spotlight on Nature Dies (one of my favorite die sets) and the Sentimental Wishes bundle.

Begin with a card base 7 1/2 x 5 1/2 scored at 4 1/4. Add a panel of Take a Bow DSP on the card front on the bottom 1 1/2 x 3 1/4. Cut strips of Glimmer 12 x 12 Paper 1 x 6, then cutting diagonally to opposite corners. (These are Real Red and Garden Green glimmer papers.) Begin adding strips with the pointy tip at the edge of the card front, attaching just above the bottom panel of DSP. Keep adding until the card front is covered. It will look like the below photo. Notice the extra Glimmer at the top and excess DSP at the bottom?

Now turn over the card front and remove excess DSP so it’s even with the card base. :O) Now create the decorated panel that will cover those pointy tips: Basic White 2 1/2 x 2 1/2, die cut circle using Spotlight on Nature Dies; die cut another circle using same die set and Granny Apple Green card stock & adhere to Basic White circle with dimensionals. Stamp this sweet candle/ greens stamp using Sentimental Wishes stamp set & Memento ink. Color with Stampin Blends – Old Olive, Real Red, Lemon Lolly with Peach Pie at the bottom of the flame. Add Wink of Stella to candle drippings and berries. Die cut with appropriate die from Sentimental Wishes Dies. Add with dimensionals. For embellishment, add Clear Ribbon Adhesive-Backed Dots. Add to card front, making certain it does not extend beyond card when closed.

Stampin' Up! Glimmer Christmas card inside

For the inside… add a 3/4 x 5 1/2 strip of Take a Bow 6×6 DSP to the outside edge of the inside of the card. Add another strip 1/2 x 5 1/2, this time in Granny Apple Green. Stamp the sentiment from Sentimental Wishes stamp set in Garden Green ink – and the card is complete!

Stampin' Up! Glimmer paper Christmas card & envelope

For the envelope – more of the Take A Bow 6×6 DSP to the flap and trimmed to fit. Add the Sentimental Wishes sentiment in Garden Green ink and the card is complete! Time to count my Christmas cards… I’m pretty certain I do not have enough :O(

Please know you can shop with me anytime. See more information below! Time to see what the rest of the team have created. Follow the links to view more fabulous creations.

Amy Koenders

Mary Deatherage

Jaimie Babarczy

Karen Finkle

Akiko Sudano

Karen Ksenzakovic

Tara Carpenter

Terry Lynn Bright

Carol Buckalew

Stampin' Up! Joining Promotion

Today is the LAST DAY for the Stampin’ Up! Joining Promotion… take advantage of our Starter Kit Special! Those who sign up to be Stampin’ Up! demonstrators by October 31 will get $125 USD | $165 CAD $155 USD | $206 CAD worth of products in their Starter Kit for just $99 USD | $135 CAD! This offer also includes FREE business supplies and FREE shipping. Not to mention all the FUN that comes with being part of our fantastic crafting community. Join with me here…

The Kits Collection Sale Ends Soon

Our Kits Collection sale is coming to an end. This the last few day for you to shop all our kits at up to 30% off. Shop our wide selection of kits before it’s too late! See the Kits Collections here.

OK – so time to order… don’t forget to use a HOST CODE FYAH4HG3 when placing a $50 order or more. This gets you a free item from me valued up to $10 for a Stampin’ Up! item – and a special tutorial for that month.

Thanks for stopping by… love to hear from you, thank you for comments shared. May you have a beautiful day!

Stampin’ Up! Autumn Expressions Grateful Fun Fold for Amy’s Inkin’ Krew Blog Hop

Welcome, welcome! Welcome to this blog hop group! Our theme this month is ‘Giving Thanks’ in whatever way that means for us… and I have lots for which to be thankful: people, support, this team and other teams, family, a roof over my head – just LOTS! I chose to use the Autumn Expressions bundle – beautiful script stamps, great dies (I’m a succor for leaf dies) and a host of other beautiful Stampin’ Up! products.

Stampin' Up! Autumn Expressions Gate fold card front

Stunning leaf die cut from Textured Metallic 12×12 Specialty DSP in both gold (2) and copper (1). And the very swirly script and framing – all from the Autumn Expressions bundle. Such a great set! The additional DSP is an online product – Meandering Meadows 6s6 DSP. I cut the front panels to look like sunset, the oranges and pinks streaking across the sky. The ‘frame’ is from another panel of the Meandering Meadows DSP.

Stampin' Up! Autumn Expressions Gate Fold, inside

For the inside, I used this wonderful ‘grass’ stamp and Pecan Pie ink – first generation and 2nd generation – to stamp across the bottom. How to do that? Ink the stamp, stamp the paper, stamp again without re-inking. This second stamping is called second generation.

Card Cuts/ directions:

  • Pecan Pie for the card base – 8 1/2 x 5 1/2, scored at 2 1/8 on the long side. Burnish and fold other side to meet it, burnishing it as well. Why do I do this in lieu of scoring on each side at 2 1/8? ‘Cuz it doesn’t always come together in the middle – and I want them to. I have found this to be the easiest way to make sure that happens.
  • Cut Pumpkin Pie 2 x 5 3/8 (2) and adhere to each side front panel
  • Cut Meandering Meadows 6×6 DSP 1 7/8 x 5 1/4 (2) and adhere to the Pumpkin Pie
  • On Basic White 2 3/4 x 3 3/4, stamp the sentiment from Autumn Expressions stamp set in Pecan Pie ink. Die cut with the smaller ‘frame’ from Autumn Expressions Dies. Die cut the outside ‘frame’ for this using the larger ‘frame’ die. Attach together with dots of liquid glue.
  • Die cut the gorgeous leaves from 1 1/4 square Textured Metallic 12×12 SDSP – two in gold and one in copper. Attach one go0ld leaf to the top of the sentiment frame with liquid glue, then the copper leaf on the opposite corner also with liquid glue. Attache the other gold leaf with a dimensional. Add three Drusy Adhesive-Backed Embellishments on the sentiment panel. Add sentiment panel to the left side of the gate fold – and the card front is complete!

For the envelope… I added more of the same Meandering Meadows 6×6 DSP to the flap and trimmed to fit. Do the same stamping technique as before along the envelope front.

This can so easily be a masculine card if needed. I like that versatility! And many of these products may be found in the Sep-Dec 2024 Mini Catalog, Card Stocks & inks, acrylic blocks, paper trimmer – these ‘staples’ are in the Annual Catalog.

Time to continue the hop – click on a name or use the previous & next buttons to take you to specific folks. Thanks for dropping in!

  1. Karen Ksenzakovic
  2. Ann Louise Fodgaard
  3. Sue Prather
  4. Akiko Sudano
  5. Christie King
  6. Mary Deatherage
  7. Tara Carpenter
  8. Terry Lynn Bright
  9. Karen Finkle
  10. Shirley Gentry
  11. Carol Buckalew
  12. Amy Koenders
ampin' Up! Stamp Sale

Click on the image above to shop the Stampin’ Up! stamp sale.

If you’ve had your eye on a certain stamp set or two (or ten) from the 2024–2025 Annual Catalog, then we have some exciting news! From October 7–9, all the stamp sets (excluding bundles) from the 2024–2025 Annual Catalog will be 15% off!

Here are the details:This stamp sale only happens once a year!

The sale will run for three days.

The 15% off discount will apply to all stamp sets (photopolymer and cling) from the 2024–2025 Annual Catalog.

Bundles are not included in this sale.

Stamp sets are available while supplies last.

Sales Period: October 7, 2024, at 12:00 a.m. to October 9, 2024, at 11:59 p.m. (MT)

Ordering Deadlines: By Phone – October 9, 2024, at 6:59 p.m. (MT), or Online – October 9, 2024, at 11:59 p.m. (MT)

Stampin' Up! Starter Kit Promotion

Promotion Period: October 1–31

Ordering Deadlines

  • Phone: October 31 2024, at 6:59 p.m. (MT)
  • Online: October 31 2024, at 11:59 p.m. (MT)

Become a demonstrator between October 1–31 can get $125 USD | $165 CAD $155 USD | $206 CAD worth of products for just $99 USD | $135 CAD.

Being a part of Stampin’ Up!’s creative community also comes with several perks, including early access to products, special discounts, a chance to earn product credits, access to exclusive trainings, demonstrator-only events, and so much more.

As a demonstrator, I am here to help you through the join process and beyond. Join with me here.

Kits Collection Sale started Oct 1!

Exciting news! We’re having a huge sale on our Kits Collection beginning October 1! All kits will be available at a discounted price. Save up to 30% off on all your favorite kits October 1–31! Our kits come with everything you need to create a unique paper craft. We have crafting options for card kits, treat packaging, home decor, and so much more!  Click here

Stampin' Up! Kits Collection SALE

Santa Claus is comin’ to town a bit early this year—and he’s brought a holiday Paper Pumpkin sale! Starting September 11, 2024, at 12:01 a.m. (MT) until October 10, 2024, at 11:50 p.m. (MT), anyone who signs up for our monthly Paper Pumpkin subscription as a new subscriber will receive 40% off their first kit. That’s right, 40% OFF!

Stampin' Up! Paper Pumpkin Promotion

Where This Discount Is Applied
This discount will be applied to one kit in the first kit shipment of the Paper Pumpkin subscription, which means new subscribers will get 40% off the October Nests of Christmas Paper Pumpkin Kit. After that, each month’s kit will return to the regular price of $25.00.

Qualifying for This Discount
This offer is only for new month-to-month subscribers and is not valid on purchased or redeemed prepaid subscriptions.

Now that you’ve read through all the details, it’s time to head to paperpumpkin.com to subscribe and use code HOLIDAY40 to get 40% off.

https://www.stampinup.com/categories/specials/stamp-sale

Click the link above to take you to the ONLINE EXCLUSIVES!

I appreciate your business and welcome any questions regarding sales or creating or joining my team. Make sure when shopping with me, that you see my name at the top as your demonstrator. That way I can send you a Stampin’ Up! giftie and you can earn rewards – with a $50 order or more. You also receive the monthly tutorial for that particular month – for October, it is More Than Autumn bundle.

Click the image above to take you to the ONLINE EXCLUSIVES!

I appreciate your business and welcome any questions regarding sales or creating or joining my team. Make sure when shopping with me, that you see my name at the top as your demonstrator. That way I can send you a Stampin’ Up! giftie and you can earn rewards – with a $50 order or more. You also receive the monthly tutorial for that particular month – for October, it is More Than Autumn bundle.

HOST CODE … SEP 26- OCT 15 NDADFHMR

Happy Shopping – thanks for stopping by!

Stampin’ Up!Front Flap & Gate Fold for the Happy Inkin’ Thursday Blog Hop

Welcome to the HOP! Our theme today is fun folds – and there will be some extraordinary ones, I am certain. I have chosen a tried & true front flap fun fold for today, using the WinterlyTree Tops bundle, the
Christmas Labels bundle and Nests of Winter 12 x 12 DSP.

Stampin' Up! Happy Inkin' Thursday Blog Hop
Stampin' Up! Front Flap Fun Fold with Winterly Tree Tops - card front

I’m going to be honest, I haven’t played with this set and I’ve had it for a bit. I… LOVE… IT… The pine frame is from Basic White card stock (3 5/8 x 5) and die cut with Winterly Tree Tops Dies. The birds are fussy cut (paper snips) from the Nests of Winter 12×12 DSP and added with dimensionals. The background (stripes) is also from this DSP pack (3 7/8 x 5 1/8) and was layered on Cherry Cobbler (4 x 5 3/8), and adhered to the Basic Black card front. I added three Pecan Pie Ribboned Adhesive-Backed Dots (an ONLINE EXCLUSIVE). Let’s look at how this card opens… the front flap opens from the top to show the gatefold, below.

Stampin' Up! Front Flap & Gatefold partially open

The layers are Cherry Cobbler (2 x 5 3/8 – cut 2) and a smaller Nests of Winter 12×12 DSP (1 7/8 x 5 1/4- cut 2) and adhere together and then to the Basic Black card baseThe sentiment panel is stamped on Basic White with Cherry Cobbler ink using the Christmas Labels stamp set then die cut with the coordinating Christmas Lablels Dies. Only the left side of the label was attached to the left ‘gate’.

Here is the inside…

Stampin' Up! Front Flap  & Gate Fold, inside

The inside… a panel of Basic White (3 7/8 x 5 1/8) with another fussy cut bird from the Nests of Winter 12×12 DSP attached with liquid glue. This panel was added to Cherry Cobbler (4 x 5 1/4) then to the inside of the Basic Black card base. All opened out the card looks like this…

Stampin' Up! Front Flap & Gate Fold fully  opened

And the envelope I kept very simple… more of the Nests of Winter 12×12 DSP on the flap & trimmed to fit, and a sentiment stamped in Cherry Cobbler ink from the Christmas Labels stamp set.

Stampin' Up! front Flap & Gate Fold card & envelope

These two bundles and the DSP may be found in the Stampin’ Up! Sep-Dec 2024 Catalog. The card stock & adhesive, scissors, paper trimmer, bone folder are in the Stampin’ Up! 2024 Annual Catalog. And the adhesive dots part of the Stampin’ Up! ONLINE EXCLUSIVES. You can find more information about shopping with me below the list of names of those participating in the hop today – so scroll down to learn more.

Carol is the next participant on the hop and she always has something amazing to share. Click the next button or click on a name to take you on an extraordinary adventure.

Stampin' Up! Happy Inkin' Thursday Blog hop next button

Amy Koenders

Mary Deatherage

Karen Finkle

Akiko Sudano

Karen Ksenzakovic

Tara Carpenter

Terry Lynn Bright

Carol Buckalew

LOTS GOING ON IN THE STAMPIN’ UP! WORLD – give me a few minutes to share the excitement…

Kits Collection Sale started Oct 1!

Exciting news! We’re having a huge sale on our Kits Collection beginning October 1! All kits will be available at a discounted price. Save up to 30% off on all your favorite kits October 1–31! Our kits come with everything you need to create a unique paper craft. We have crafting options for card kits, treat packaging, home decor, and so much more!  Click here

Stampin' Up! Kits Collection SALE

Clearance Rack Refresh – click here!

Santa Claus is comin’ to town a bit early this year—and he’s brought a holiday Paper Pumpkin sale! Starting September 11, 2024, at 12:01 a.m. (MT) until October 10, 2024, at 11:50 p.m. (MT), anyone who signs up for our monthly Paper Pumpkin subscription as a new subscriber will receive 40% off their first kit. That’s right, 40% OFF!

Stampin' Up! Paper Pumpkin new subscriber promotion

Where This Discount Is Applied
This discount will be applied to one kit in the first kit shipment of the Paper Pumpkin subscription, which means new subscribers will get 40% off the October Nests of Christmas Paper Pumpkin Kit. After that, each month’s kit will return to the regular price of $25.00.

Qualifying for This Discount
This offer is only for new month-to-month subscribers and is not valid on purchased or redeemed prepaid subscriptions.

Now that you’ve read through all the details, it’s time to head to paperpumpkin.com to subscribe and use code HOLIDAY40 to get 40% off.

Click here to take you to the Sep-Dec 2024 Mini Catalog

Stampin' Up! Joining Promotion

Promotion Period: October 1–31

Ordering Deadlines

  • Phone: October 31 2024, at 6:59 p.m. (MT)
  • Online: October 31 2024, at 11:59 p.m. (MT)

Become a demonstrator between October 1–31 can get $125 USD | $165 CAD $155 USD | $206 CAD worth of products for just $99 USD | $135 CAD.

Being a part of Stampin’ Up!’s creative community also comes with several perks, including early access to products, special discounts, a chance to earn product credits, access to exclusive trainings, demonstrator-only events, and so much more.

As a demonstrator, I am here to help you through the join process and beyond. Join with me here.

Stampin' Up! ONLINE EXCLUSIVES

Click the image above to take you to the ONLINE EXCLUSIVES!

Want to just shop? You can do that too. I appreciate your business and welcome any questions regarding sales or creating or joining my team. Make sure when shopping with me, that you see my name at the top as your demonstrator. That way I can send you a Stampin’ Up! giftie and you can earn rewards – with a $50 order or more. You also receive the monthly tutorial for that particular month – for October, it is More Than Autumn bundle.

HOST CODE … SEP 26- OCT 15 NDADFHMR

Thanks for stopping by. May you have a beautiful day!

Stampin’ Up! Sophisticated Sled Bundle in Shaded Spruce

Good Saturday! What is your day like where you live? Here in New Jersey it is rainy and about 71 degrees. A day for staying inside! Wednesday I had a card class using the super fun Sophisticated Sled bundle. I love this card and this bundle…

Stampin' Up! Sophisticated Sled card front

I used several different products to make this card, but let’s begin with the card base – Shaded Spruce 4 1/4 x 11 scored at 5 1/2, then trim off on the long side 2 3/4. This panel becomes the background for the sled. :O) Next
I cut pieces of Sentimental Christmas DSP and adhered them to the card base: 4 x 2 1/2 (cut 2, one for card front top and one for inside); 4 x 2 3/4 (this is my stripe panel). And since there is some overlap here, I added a strip of Shaded Spruce 1/2 x 4.

Stampin' Up! Sophisticated Sled card inside

I stamped the inside top panel in Shaded Spruce ink with a stamp from Sophisticated Sled stamp set. Back to the card front… with the DSP
adhered, I added the 2 3/4 x 4 1/4 panel removed from the card base by centering it and added adhesive just to the top portion. Now the super fun part – the sled.

  • From Silver Foil Sheet (2 x 4) die cut the sled rungs and skate bottoms
  • From Basic White (2 x 2 3/4) die cut the skate shoes and laces
  • From Country Woods DSP (2 x 3 & note the direction of the grain) die cut the sled.
  • From Full of Life DSP die cut the green leaf spray. There are two layered together here, offset, so the variegation of the DSP shows.

Putting it all together…

  • Adhere the wood-grain Country Woods sled top to the silver sled rungs. NOTE: the sled top has tiny holes on each side – line those up with the silver cross bars. There are two parts to the sled top die cut, the second does not show as it is under the green spray, but that portion used to ‘guide’ the sled if someone was riding it. (Remember those days?) Adhere this piece in place at a silver cross bar.
  • Glue the two leaf sprays together in the center only, then add to the sled ‘cross bar’ in center only.
  • Skates shoes … there is a tiny slit to insert the laces, adhere those in place; add silver ‘skate’ to shoe bottom. Add left skate shoe to sled with dimesnionals, then right skate shoe with dimensionals on bottom of skate
  • Add sled to Shaded Spruce panel with dimensionals
  • Add Add Cherry Cobbler Adhesive-Backed Berries to green spray
  • Add White Loose Snowflakes as shown with dots of liquid glue. This is a bit fiddly but worth the effect/ look!

Now turn the card over to the back… to a Basic White 4 x 5 1/4 panel, add 3 die cut snowflakes using the Frozen Edges Dies. I die cut these from scraps of the Sentimental Christmas DSP. I added Adhesive-Backed Snowflakes on each of these – in gold, copper and white, adhered the panel in place and the card was complete!

Stampin' Up! Sophisticated Sled card back
Stampin' Up! Sophisticated Sled full card
Stampin' Up! Sophisticated Sled card & envelope

For the envelope… I cut a panel of Sentimental Christmas DSP 2 1/4 x 6 and adhered it to the flap & trimmed to fit. On the front I stamped the sentiment from Sophisticated Sled in Shaded Spruce ink. I stamped the bottom two times, then the final stamp on the side.

Love, love, love this card! Maybe because it brings back such fond memories of snow & sledding the hills of a golf course back home – really good memories.

LOTS GOING ON IN THE STAMPIN’ UP! WORLD – give me a few minutes to share the excitement…

Upcoming Kits Collection Sale

Exciting news! We’re having a huge sale on our Kits Collection beginning October 1! All kits will be available at a discounted price. Save up to 30% off on all your favorite kits October 1–31! Our kits come with everything you need to create a unique paper craft. We have crafting options for card kits, treat packaging, home decor, and so much more! 

Stampin' Up! Kits Collection Sale

Santa Claus is comin’ to town a bit early this year—and he’s brought a holiday Paper Pumpkin sale! Starting September 11, 2024, at 12:01 a.m. (MT) until October 10, 2024, at 11:50 p.m. (MT), anyone who signs up for our monthly Paper Pumpkin subscription as a new subscriber will receive 40% off their first kit. That’s right, 40% OFF!

Stampin' Up! Paper Pumpkin Promotion

Where This Discount Is Applied
This discount will be applied to one kit in the first kit shipment of the Paper Pumpkin subscription, which means new subscribers will get 40% off the October Nests of Christmas Paper Pumpkin Kit. After that, each month’s kit will return to the regular price of $25.00.

Qualifying for This Discount
This offer is only for new month-to-month subscribers and is not valid on purchased or redeemed prepaid subscriptions.

Now that you’ve read through all the details, it’s time to head to paperpumpkin.com to subscribe and use code HOLIDAY40 to get 40% off

We’ve added new items to the Clearance Rack in our online store. Reach out to your customers so they can shop and save up to 60% off select products. 

As we evaluated inventory levels from our 2024 Sale-A-Bration offering, we decided to provide you and your customers with a second chance to add different products to your craft supplies.

These items are only available while supplies last, so act quickly to spread the word! Visit the CLEARANCE RACK  store to start shopping.

Upcoming Starter Kit Special!

Stampin' Up! Starter kit promotion

I appreciate your business and welcome any questions regarding sales or creating or joining my team. Make sure when shopping with me, that you see my name at the top as your demonstrator. That way I can send you a Stampin’ Up! giftie and you can earn rewards – with a $50 order or more. You also receive the monthly tutorial for that particular month – September is Autumn Expressions.

NEW HOST CODE … SEP 26- OCT 15 NDADFHMR

Thanks for stopping by. May you have a beautiful day!

Stampin’ Up! Sympathy Card with Changing Leaves Bundle

It’s funny how things come about…. I needed a sympathy card and on my desk was a 4 x 5 1/4 panel already embossed with the Changing Leaves Hybrid embossing folder – and I said, why not! And here’s how it turned out…

Stampin' Up! Changing Leaves Sympathy Card front

Gosh, this photo is not the best! Yes, the embossed panel is Crushed Curry as are the die cut leaves, and from the Changing Leaves Dies. The panel is set on dimensionals on a Copper Clay card base 8 1/2 x 5 1/2 scored at 4 1/4. The two outside leaves are attached with dimensionals asa well and the middle leaf simply tucked in and adhered at the stem end, which you cannot see. The sentiment panel is Basic Beige stamped in Crushed Curry ink and die cut with a die from Thoughtful Expressions Dies. The sentiment comes from Something Fancy stamp set. And the Linen Thread is a double bow slipped just under the corner of the sentiment with a glue dot. My final touch was the Gold Textured Adhesive-Backed Dots. I love all the texture and elegance of this card.

Stampin' Up! Changing Leaves Sympathy Card inside

For the inside, I stamped the sentiment in crushed Curry ink but the message is from Hope You Know stamp set – and on a Basic Beige 4 x 5 1/4 panel.

Stampin' Up! Changing Leaves sympathy card & envelope

For the envelope… I embossed a 2 1/4 x 6 panel of Crushed Curry card stock with the Changing Leaves Hybrid embossing folder, adhered it and trimmed to fit the flap. The leaf on the front of the envelope is from Autumn Expressions stamp set, stamped in Crushed Curry ink, then added Wink of Stella to the inside of the leaf. It looks very cool – again a bit of texture and glam too. And even though this is a sympathy card, the glam is not overdone. I’ve already passed this card on to the person for whom it was made – and they loved it.

Stampin' Up! Sep-Dec 2024 Mini Catalog

Use this link to take you to the mini catalog and view all the awesome items available.

I appreciate your business and welcome any questions regarding sales or creating or joining my team. Make sure when shopping with me, that you see my name at the top as your demonstrator. That way I can send you a Stampin’ Up! giftie and you can earn rewards – with a $50 order or more. You also receive the monthly tutorial for that particular month – September is Autumn Expressions.

There are new kits available beginning Sep 4 – check by clicking here.

Upcoming Kits Collection Sale

Exciting news! We’re having a huge sale on our Kits Collection beginning October 1! All kits will be available at a discounted price. Save up to 30% off on all your favorite kits October 1–31! Our kits come with everything you need to create a unique paper craft. We have crafting options for card kits, treat packaging, home decor, and so much more! 

Stampin' Up! Kits Collection SALE
Stampin' Up! Christmas Ornament Kit
Christmas Ornament Kit – NEW!
Stampin' Up! Card Keeper Kit
Card Keeper Kit – NEW!

There are new scrapbooking supplies available, click here! Also – click on the brochure for other information. This is a digital-only scrapbooking brochure, full of scrapbooking essentials and exciting new products. As a companion brochure to the September–December 2024 Mini Catalog, the products inside coordinate with products from the mini catalog (and some online only products, too!). With Workshop Kits and some new product releases *hint* Two-Tone Cardstock *hint*, we hope this adds variety and inspiration to your and your customers’ holiday crafts this year!

Products will be available like our Online Exclusive releases, meaning that some products will be reordered when inventory is low, and others will only be available while supplies last.

Stampin' Up! Scrapbooking Brochure

Santa Claus is comin’ to town a bit early this year—and he’s brought a holiday Paper Pumpkin sale! Starting September 11, 2024, at 12:01 a.m. (MT) until October 10, 2024, at 11:50 p.m. (MT), anyone who signs up for our monthly Paper Pumpkin subscription as a new subscriber will receive 40% off their first kit. That’s right, 40% OFF!

Stampin' Up! Paper Pumpkin Subscription Sale

Where This Discount Is Applied
This discount will be applied to one kit in the first kit shipment of the Paper Pumpkin subscription, which means new subscribers will get 40% off the October Nests of Christmas Paper Pumpkin Kit. After that, each month’s kit will return to the regular price of $25.00.

Qualifying for This Discount
This offer is only for new month-to-month subscribers and is not valid on purchased or redeemed prepaid subscriptions.

Now that you’ve read through all the details, it’s time to head to paperpumpkin.com to subscribe and use code HOLIDAY40 to get 40% off your first month!

Stampin' Up! ONLINE EXCLUSIVES

Click the image above to see that’s available in the ONLINE EXCLUSIVES!

Shop the Clearance Rack for Great Products at a Fantastic Discount!

September 24

We’ve added new items to the Clearance Rack in our online store. Reach out to your customers so they can shop and save up to 60% off select products. 

As we evaluated inventory levels from our 2024 Sale-A-Bration offering, we decided to provide you and your customers with a second chance to add different products to your craft supplies.

These items are only available while supplies last, so act quickly to spread the word! Visit the CLEARANCE RACK  store to start shopping.

NEW HOST CODE … SEP 26- OCT 15 NDADFHMR

Thanks for stopping by. May you have a beautiful day!

Stampin’ Up! Sentimental Wishes in Elegant Mode

Good Friday morning! We had a team meeting recently and the Sentimental Wishes bundle was used for three presentations. This card is elegant and stunning.

Stampin' Up! Elegant Sentimental Wishes card front

First of all, I love the Forever Plaid 3D embossing folder from the Sep-Dec 2024 Mini Catalog. It adds wonderful texture to this card. The Stitched Shapes Dies (circles) feel as though I’m looking through a special window – and I love the Shaded Spruce Satin and Sheer Ribbon bow! Let’s create this together.

  • Cut a Thick Basic White card base 8 1/2 x 5 1/2, score at 4 1/4 and set aside.
  • Cut a Basic White panel 4 1/4 x 5 1/2, place the largest Stitched Shape circle die in the center and die cut. Take this same piece and run it through the Forever Plaid 3D embossing folder. Hint: Because this is a linear folder, I tend to use the black line as my guide for making sure the lines are straight and square using this folder.
  • Cut a Cherry Cobbler panel 4 x 5 1/4 and with the next to largest circle in the Stitched Shapes Dies, center the die and die cut. Layer this panel to the back side of the embossed panel with adhesive of choice. Add to the Thick Basic White card front with dimensionals.
  • On Basic White scraps, stamp the candle image and two holly images from Sentimental Wishes stamp set in Memento ink. Color with Stampin’ Blends: flame- Lemon Lolly and Light Pumpkin Pie; holly leaves – Shaded Spruce; berries – Cherry Cobbler; candle shading – Light Gray Granite. Add Wink of Stella to the flame & the dripping wax for a bit of sparkle. Die cut pieces with the Sentimental Wishes Dies.
  • Add holly branches with glue dots and candles w/ holly on dimensionals to the card front circle.
  • Add the bow made from Shaded Spruce Satin & Sheer Ribbon with a glue dot – and the front is complete – elegance personified!

For the inside…

Stampin' Up! Elegant Sentimental Wishes card inside

On the Basic White panel 4 x 5 1/4, stamp the sentiment from Sentimental Wishes stamp set in Memento ink. Stamp the candle image from this set, also in Memento ink. Color as on card front. Adhere this to a Cherry Cobbler panel 4 1/8 x 5 3/8 and add to inside of card. Fait accomplis’ – and beautiful!

Stampin' Up! Elegant Sentimental Wishes card & envelope

For the envelope I added a panel of Regals 6×6 DSP to the envelope flap and trimmed to fit. On the front, I stamped the candle image once more in Memento ink and colored as before. Love, love this card! Thank you Karen Ksenzakovich, for your creation and demonstration during our team meeting.

Want to make this card? All items, except the card stock, may be found in the Sep-Dec 2024 Mini Catalog. Click the image below.

Stampin' Up! Sep-Dec 2024 Mini Catalog

I appreciate your business and welcome any questions regarding sales or creating or joining my team. Make sure when shopping with me, that you see my name at the top as your demonstrator. That way I can send you a Stampin’ Up! giftie and you can earn rewards – with a $50 order or more. You also receive the monthly tutorial for that particular month – September is Autumn Expressions.

Click here to view the 2024-2025 Annual Catalog – card stock, adhesives, more stamps and die sets, cut & emboss machines, tools and more tools for creating awesome cards and gifts. – all are available in this catalog.

There are new kits available beginning Sep 4 – check by clicking here.

Stampin' Up! Christmas Ornament kit
Christmas Ornament kit – NEW!
Stampin' Up! Card Keeper Kit
Card Keeper kit – NEW!

There are new scrapbooking supplies available, click here! Also – click on the brochure for other information. This is a digital-only scrapbooking brochure, full of scrapbooking essentials and exciting new products. As a companion brochure to the September–December 2024 Mini Catalog, the products inside coordinate with products from the mini catalog (and some online only products, too!). With Workshop Kits and some new product releases *hint* Two-Tone Cardstock *hint*, we hope this adds variety and inspiration to your and your customers’ holiday crafts this year!

Stampin' Up! Scrapbooking Brochure

Products will be available like our Online Exclusive releases, meaning that some products will be reordered when inventory is low, and others will only be available while supplies last.

Stampin' Up! Paper Pumpkin SALE!

Santa Claus is comin’ to town a bit early this year—and he’s brought a holiday Paper Pumpkin sale! Starting September 11, 2024, at 12:01 a.m. (MT) until October 10, 2024, at 11:50 p.m. (MT), anyone who signs up for our monthly Paper Pumpkin subscription as a new subscriber will receive 40% off their first kit. That’s right, 40% OFF!

Where This Discount Is Applied
This discount will be applied to one kit in the first kit shipment of the Paper Pumpkin subscription, which means new subscribers will get 40% off the October Nests of Christmas Paper Pumpkin Kit. After that, each month’s kit will return to the regular price of $25.00.

Qualifying for This Discount
This offer is only for new month-to-month subscribers and is not valid on purchased or redeemed prepaid subscriptions.

Now that you’ve read through all the details, it’s time to head to paperpumpkin.com to subscribe and use code HOLIDAY40 to get 40% off your first month!

Stampin' Up! ONLINE EXCLUSIVES

Click the image above to see that’s available in the ONLINE EXCLUSIVES!

Use my HOST CODE so I recognize you!

host code ZBAU6PKX

Thanks for stopping by. May you have a beautiful day. Make someone happy sending them a handmade card filled with lovem a handmade card filled with love