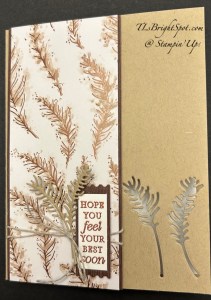
Good Tuesday! It’s March 3 and do you know what that means… new ONLINE EXCLUSIVES AVAILABLE! This bundle & papers are simply stunning and perfect for either masculine or feminine cards.
I began with a Crumb Cake card base 8 1/2 x 5 1/2 scored at 4 1/4. I used two dies from the Delicate Whispers Dies to die cut these two images. I added a strip of the Delicate Designs Specialty Designer Series Paper to a Wood Grain Wonders, wrapped Linen Thread around the two papers, twice, & tied a bow. I attached these to the card front. On a scrap of Basic White, I stamped the sentiment in VersaMark ink, sprinkled Wow! Metallic Embossing Powder in Copper & heat set. Once this was cool, I attached it to a piece of Wood Grain Wonders DSP cut with Perennial Postage Dies and attached it with dimensionals over the Linen Thread. I then added the two die cuts under the bow & secured with a glue dot.
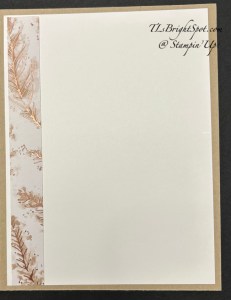
For the inside, an additional styrip of the Delicate Designs SDSP was added to the edge of the Basic White 4 x 5 1/4 panel and attached to the inside of the card. I’ve stamped no inside sentiment as this card is being signed by lots of folks to let them know we’re thinking of them. I love this card and I think the person receiving it will also!
For the envelope, another piece of the Delicate Designs SDSP was attached to the flap & trimmed to fit. On the front another image from Delicate Wishes stamp set stamped in Crumb Cake ink to bring everything together.
Want to purchase this bundle & Designer Series Paper? There are several new products available today in the online exclusives – so check them out. Remember that when shopping with me and your purchased is $50 & up, you will receive my monthly tutorial, Daisy Patch Rewards from me and more. Visit my Rewardes Page for more details!
Today’s card is to inspire you re: retiring products on this FREE SHIPPING day from Stampin’ Up! Now is the time to purchase those LAST CHANCE PRODUCTS, CLEARANCE RACK, KITS & more.
Time for you to stock up and save on your favorite Stampin’ Up! products! What’s the big occasion? On 19 April only (TODAY), we are offering FREE shipping on orders subtotaling $75 USD or more. This incredible deal lasts for just 24 hours, so get your orders placed on Wednesday, April 19to get free shipping on your order of $75+!!!
All order types qualify for this promotion
Free shipping applies after the qualifying amount of $75 has been met.
The minimum qualifying amount to receive free shipping is $75 USD or more (before tax).
Free shipping only applies during the 24-hour period the promotion is live; this means that the order must be opened and closed on 19 April 2023.
With the exception of a one-time monthly Paper Pumpkin subscription, all Stampin’ Up! products qualify for the free shipping promotion. Subscriptions billed and shipped this month will be charged for the normal amount ($24.50 USD shipping included) + tax.
Prepaid 3, 6, or 12 month Paper Pumpkin subscriptions are eligible for FREE shipping under the same rules as all other Stampin’ Up! items during the promotion.
The free shipping promotion does not cover the additional cost for expedited shipping.
Please keep in mind, that the distribution center may fall behind their typical shipping time frames. In such cases, Stampin’ Up! will do all they can to return to our regular service levels as quickly as possible.
Free shipping begins on Wednesday, April 19 at 12:01 AM MT and ends on Wednesday, April 19, 2023 at 11:59 p.m. (MT).
GO TO MY ONLINE STORE AND ORDER…order from me here
When you place an order of $50 or more (before shipping & taxes), you receive from me a SU! item valued up to $10 + Star-Studded Rewards. If your order exceeds $150, do not use my HOST CODE as SU! has it’s own rewards from which you may choose. You will still receive that FREE ITEM from me up to $10 + the Star-Studded Rewards. And if your order is $50 or more I will also send you my monthly class tutorials. BONUS! :O)
Stock Up Now Because Prices Are Increasing – As of May 2nd, prices will increase with the new Annual Catalog. Right now is the best time to stock up on basics and carryover products. New prices will be in effect (including for all catalog-related promotions, such as the catalog preorder) within the following product categories:
Cardstock
Designer Series Paper
Specialty Paper
Notecards and Envelopes
Classic Stampin’ Ink Pads and Refills
Stampin’ Blends
Stampin’ Write Markers
Select Specialty Inks
Stampin’ Cut & Emboss Machines and plates
Embossing Folders
Punches
Take Your Pick products
Storage
Clear Blocks
Select tools
Select adhesives
Select stamp sets
Paper Pumpkin
OK – so now are you looking for the card???
This is a great card to show off both sides of the Designer Series Paper. In this case, that is Perfectly Penciled DSP (retiring). I’ve coordinated the Hand Penned stamp set (retiring) and the Penned Flowers Dies (retiring), Polished Pink card stock (retiring), Polished Pink & Pale Papaya Stampin’ Blends (retiring) + the Open Weave Ribbon in Pale Papaya (retiring). Yep – I loaded this card with retiring items :O)
What is not retiring that is used on this card are the Old Olive Stampin’ Blends (still a great buy when you order $75 & up of product on FREE SHIPPING day), Basic White card stock, Memento ink, Basic White Medium Envelopes. Did I forget anything?
So the ‘how to’ to make this card.
Begin with your Perfectly Penciled DSP cutting it 5 1/4 x 12 and scoring on the long side @ 2, 4, 8, and 10″. Measure down from the top on each end, 2 5/8″ and place a mark on the edge. Now trim from the 4″ score line to the 2 5/8″ mark on the left side. Do the same on the right side, trimming from the 8″ score down to the 2 5/8″ mark. Adhere those pieces to each corner edge (see the dotted pattern in each bottom corner? Burnish the folds completely.
Cut a backing card base (in this case Polished Pink) 4 1/4 x 5 1/2 and adhere to the back of the DSP. This creates strength for the card.
Cut another piece in Polished Pink 2 1/2 x 2 1/2. Adhere this panel with corner points on the burnished score line, with adhesive on the left side only. Adhere a Basic White panel cut to 2 1/2 x 2 1/2 to the Polished Pink square. Now decorate!
For decoration… Using the Hand Penned stamp set, I stamped this fun floral image in Memento ink on Basic White, colored it with Stampin’ Blends: Polished Pink, Pale Papaya and Old Olive. I die cut the image with the coordinating Penned Flower Dies and attached it to the Basic White square with dimensionals. I stamped the sentiment in Memento ink on a Basic White scrap – yes, also from Hand Penned stamp set – and fussy cut it. This was attached with dimensionals as well. I tied a bow with the Open Weave Ribbon in Pale Papaya and attached it with a glue dot. Front, done!
For the inside.. the Basic White panel is cut 3 3/4 x 5. I wanted to be certain when stamping the inside, that nothing showed when the card was closed. I ‘eyeballed’ a bit lower than center and stamped the sentiment from Hand Penned stamp set in memento ink. I then stamped the flowers, also from Hand Penned stamp set, in Polished Pink ink. I attached this panel to the inside – and voila! a fun fold and gorgeous!
For the envelope… more of the Perfectly Penciled DSP to the flap, trimmed to fit. For the front… a sweet stamped flower in Polished Pink ink from the Hand Penned stamp set.
I want to see what you create with this fun fold, retiring DSP or new. Enjoy creating!
Thanks for stopping by. May you have a beautiful day.
Make someone happy sending them a handmade card filled with love.
SHOP TO YOUR HEARTS CONTENT! :O) FREE SHIPPING TODAY ONLY!
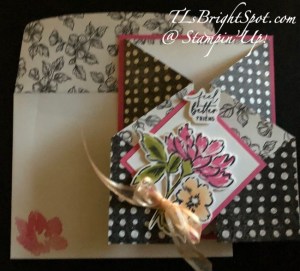
Hello Saturday! I have a super easy fun fold today made with the gorgeous Awash In Beautfy DSP and the Teacup Dies.
Easy Fun Fold.1
To make this card…
Cut Card base (Balmy Blue) 5 1/2 x 7 and score on the long side at 4 1/4
Cut another piece of Balmy Blue 4 x 4 & score on one side at 1″. This becomes the fold-over flap
Decorate the card base front: Awash in Beauty DSP cut 2 1/2 x 5 1/4
Fold this area back and decorate it with another panel of Awash in Beauty 2 1/2 x 5 14 (see photo 2)
Easy Fun Fold.2
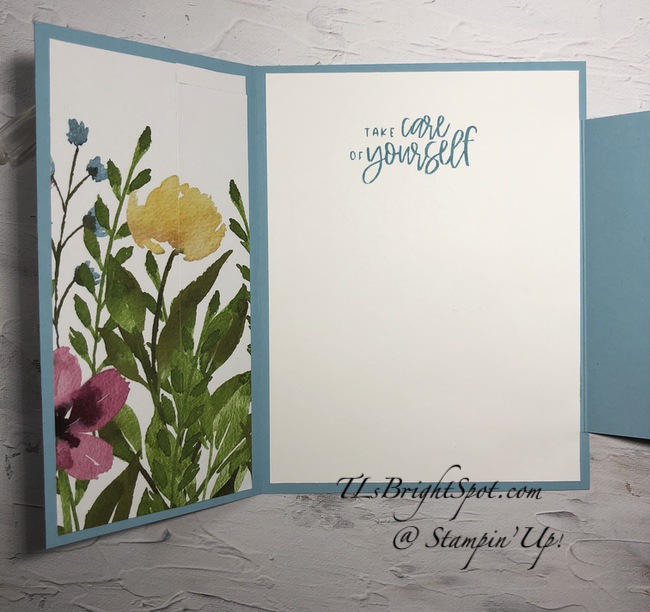
Cut panel of Basic White 4 x 5 1/4 for inside, stamp in Balmy Blue ink the sentiment from Cup of Tea stamp set. Add ‘fold-over flap with liquid glue, adhering close to the burnished fold line of the 4 x 4 piece, centering it. Add to inside of card.
Decorate fold-over flap:
Awash in Beauty DSP cut 2 3/4 x 3 3/4 adhered to front of flap.
Stamp the flower stems from Cup of Tea stamp set on a Basic White piece approx. 2 x 2 1/4 in Pear pizzazz ink. Die cut with Teacup Dies. Stamp flowers from Cup of Tea stamp set in Merry Merlot ink and die cut with Teacup Dies. Set these aside
Die cut tea cup from another piece of Awash in Beauty (pink)
Die cut decorative pattern for tea cup in Basic White & add to pink tea cup.
Add die cut leaves to fold-over front, then flowers, some on dimensionals some with liquid glue.
Add tea cup on dimensionals
Decorate flowers with Iridescent Rhinestone Basic Jewels
Add more Iridescent Rhinestone Basic Jewels to left front of card and voila! Card is done. :O)
Easy Fun Fold.3
For the envelope, add a 2 1/4 x 6 piece of Awash in Beauty DSP to the flap; stamp the sentiment from Cup of Tea stamp set in Balmy Blue.
Easy Fun Fold.4
Here’s another photo of the card/ envelope with the card held closed.
Easy Fun Fold.5
I do hope you will try this super easy fun fold. You can change the size of the fold-over flap to make it cover more of the card front, but still maintain the 1″ score line to adhere to the Basic White panel. Instead of 4 x 4, make it 4 1/2 x 4 1/2. Let me know how either one works for you. 😀
Products to make this card are listed below. If you do not have a demonstrator and need an Annual Catalog please reach out to me (the 2022-2023 AC) – happy to send one to you. When ordering, please also use current host code:AZQDZ4U4. I offer my customers a free item from Stampin’ Up! item valued to $10 with your order of $50 and above. Click here to go my store. When the order is over $150, you still receive that free gift from me, but SU! has Stampin’ Rewards that may be used for additional products, so don’t use the host code at that time. If you have questions just let me know. If you would like to be able to order products early from catalogs AND enjoy that 20% discount, join my team now… you may do that here. WooHoo! We have lots of fun and are a creative bunch that encourages & supports one another. Would love to have you. :O)
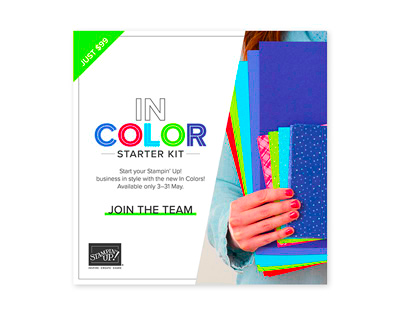
Let’s talk starter kit… New In Colors, New 2022-2023 Annual Catalog release
Time is getting short my friends… today is the 28th and you have until the 31st to join with this fabulous promotion. What ARE you waiting for???
Order products early from catalogs AND enjoy that 20% discount, join my team now… you may do that here.
Just a few of the perks of being a Stampin’ Up! Demonstrator AND part of our Critters ‘n Creatin’ Krew Team:
At least a 20% discount on everything that you order as a Demonstrator!
Early peeks at new release items and preorders for new items about a month before they are available to customers!
The ability to attend Demonstrator exclusive Stampin’ Up! events!
No pressure to sell to anyone, hold classes or workshops or run a business. You can simply order for yourself and get the discount! And as long as you have at least $300 in sales per quarter, you’ll continue as an active Demonstrator and continue to get the discount. If you aren’t able to maintain the $300 per quarter minimums, you simply go back to being a customer, no commitment required and no penalty if decide that being a Demonstrator isn’t right for you.
Stampin’ Up! does have an extensive library of class and project ideas for those wishing to jump into hosting classes as well as training to help start your business, should you choose to do that.
If you join with me, you’ll also get:
Monthly team meetings via video conference where we talk about the latest happenings at Stampin’ Up! and share project ideas. Team members are located all over the United States, but we still get together in person online and have lots of fun.
Quarterly in-person meetings if you live in the NJ or surrounding area, where we get together to do a little stamping, creating, getting to know one another and most of all SHARE inspiration. If you live outside the NJ area you can join us through that wonderful ZOOM video conference.
Free access to our online class tutorials. These are exceptional!
A private Facebook page where we can chat, ask questions and share ideas.
Team giveaways and prizes for reaching sales and team goals or attending specific meetings. 😉
The best part is the laughing and kidding and sharing of information/ creativity/ talent ~ following the SU! adage: Inspire. Create. Share. ❤️ 😁
Join our incredible group of crafters and creators.
If you would like to be able to order products early from catalogs AND enjoy that 20% discount,
Hello again… it’s FRIDAY! Do you have big plans for the weekend? We have a concert on Sunday and rehearsal with orchestra from 9-12 on Saturday morning. Plus the weather is supposed to be rainy, windy, cold – so I won’t be playing in the garden for sure!
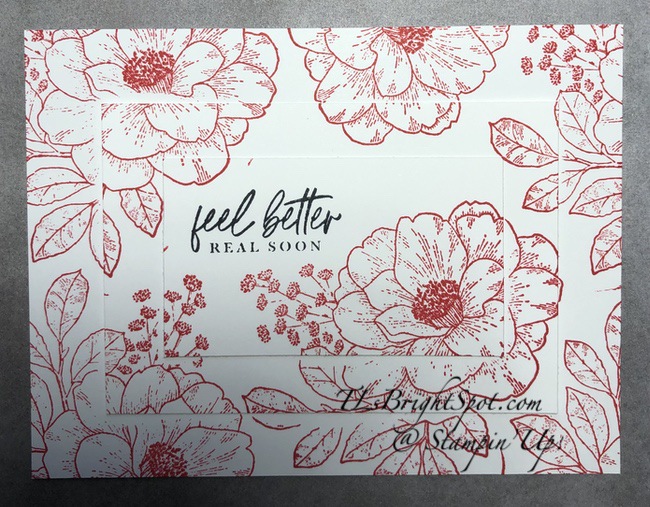
We had card class today & I chose to use the Cottage Rose stamp set for a bit of triple stamping. It is really quick and easy and makes a beautiful card that… depending on sentiment used, could be birthday or sympathy or thinking of you. I stuck with just the single stamp set and chose, well, you’ll see. :O)
Triple stamping w/ Cottage Rose.1
Isn’t this just lovely? And if you wanted, you could choose to color one of the roses, leaves, but I really like this just the way it is. Perhaps I’ll do one and color it, just to see if I like it. Anyway – here are the details on how to do this:
Cut the card stocks
Sweet Sorbet: 8 1/2 x 5 1/2, scored at 4 1/4; 4 1/4 x 3; 3 1/4 x 2
Basic White: 4 x 5 1/4 (2); 4 x 2 3/4; 3 x 1 3/4
Stamp sentiment in upper left corner of smallest panel of Basic White: Memento ink using the Cottage Rose stamp set
Layer Basic White panels together & adhere with either removable adhesive (which SU! does not sell!) or you may use glue dots.
Stamp with Basic White layers in place all over the panels. I recommend pressing firmly but do not wiggle, just press firmly.
Triple stamping example
Take Basic White layers apart being careful not to tear paper where adhered together
Add largest panel to card front; add next layer to Sweet Sorbet layer then to card front, matching flower patterns; add top layer to Sweet Sorbet panel, put dimensionals on back and add to card front.
Almost done… add two Iridescent Rhinestone Basic Jewels… and card front is done :O)
Triple Stamping w/ Cottage Rose.1
Now for the inside: With the remaining 4 x 5 1/4 panel, stamp the single rose from the Cottage Rose stamp set in Sweet Sorbet ink and add to the inside of the card.
Cottage Rose, inside
For the envelope, I stamped the same rose from Cottage Rose stamp set in Sweet Sorbet on the envelope front. Ink the stamp and continue inking, stamping for the envelope flap.
Triple stamping w/ Cottage Rose.3
Products to order this card are listed below. If you do not have a demonstrator and need an Annual Catalog please reach out to me (the 2022-2023 AC) – happy to send one to you. When ordering, please also use current host code:AZQDZ4U4. I offer my customers a free item from Stampin’ Up! item valued to $10 with your order of $50 and above. Click here to go my store. When the order is over $150, you still receive that free gift from me, but SU! has Stampin’ Rewards that may be used for additional products, so don’t use the host code at that time. If you have questions just let me know. If you would like to be able to order products early from catalogs AND enjoy that 20% discount, join my team now… you may do that here. WooHoo! We have lots of fun and are a creative bunch that encourages & supports one another. Would love to have you. :O)
Let’s talk starter kit… New In Colors, New 2022-2023 Annual Catalog release
Join our incredible group of crafters and creators.
If you would like to be able to order products early from catalogs AND enjoy that 20% discount, join my team now… you may do that here.
Just a few of the perks of being a Stampin’ Up! Demonstrator AND part of our Critters ‘n Creatin’ Krew Team:
At least a 20% discount on everything that you order as a Demonstrator!
Early peeks at new release items and preorders for new items about a month before they are available to customers!
The ability to attend Demonstrator exclusive Stampin’ Up! events!
No pressure to sell to anyone, hold classes or workshops or run a business. You can simply order for yourself and get the discount! And as long as you have at least $300 in sales per quarter, you’ll continue as an active Demonstrator and continue to get the discount. If you aren’t able to maintain the $300 per quarter minimums, you simply go back to being a customer, no commitment required and no penalty if decide that being a Demonstrator isn’t right for you.
Stampin’ Up! does have an extensive library of class and project ideas for those wishing to jump into hosting classes as well as training to help start your business, should you choose to do that.
If you join with me, you’ll also get:
Monthly team meetings via video conference where we talk about the latest happenings at Stampin’ Up! and share project ideas. Team members are located all over the United States, but we still get together in person online and have lots of fun.
Quarterly in-person meetings if you live in the NJ or surrounding area, where we get together to do a little stamping, creating, getting to know one another and most of all SHARE inspiration. If you live outside the NJ area you can join us through that wonderful ZOOM video conference.
Free access to our online class tutorials. These are exceptional!
A private Facebook page where we can chat, ask questions and share ideas.
Team giveaways and prizes for reaching sales and team goals or attending specific meetings. 😉
The best part is the laughing and kidding and sharing of information/ creativity/ talent ~ following the SU! adage: Inspire. Create. Share. ❤️ 😁
If you would like to be a part of all the above AND enjoy that 20% discount, join my team now…


![Delicate Whispers Photopolymer Stamp Set (English) [ 167500 ]](https://assets1.tamsnetwork.com/images/EC042017NF/167500s.jpg "Delicate Whispers Photopolymer Stamp Set (English) [ 167500 ]")
![Wood Grain Wonders 12" X 12" (30.5 X 30.5 Cm) Designer Series Paper [ 167428 ]](https://assets1.tamsnetwork.com/images/EC042017NF/167428s.jpg "Wood Grain Wonders 12\" X 12\" (30.5 X 30.5 Cm) Designer Series Paper [ 167428 ]")
![Delicate Designs 12" X 12" (30.5 X 30.5 Cm) Specialty Designer Series Paper [ 167509 ]](https://assets1.tamsnetwork.com/images/EC042017NF/167509s.jpg "Delicate Designs 12\" X 12\" (30.5 X 30.5 Cm) Specialty Designer Series Paper [ 167509 ]")
![Perennial Postage Dies [ 162607 ]](https://assets1.tamsnetwork.com/images/EC042017NF/162607s.jpg "Perennial Postage Dies [ 162607 ]")
![Linen Thread [ 104199 ]](https://assets1.tamsnetwork.com/images/EC042017NF/104199s.jpg "Linen Thread [ 104199 ]")
![Crumb Cake 8-1/2" X 11" Cardstock [ 120953 ]](https://assets1.tamsnetwork.com/images/EC042017NF/120953s.jpg "Crumb Cake 8-1/2\" X 11\" Cardstock [ 120953 ]")
![Crumb Cake Classic Stampin' Pad [ 147116 ]](https://assets1.tamsnetwork.com/images/EC042017NF/147116s.jpg "Crumb Cake Classic Stampin' Pad [ 147116 ]")
![Metallics Wow! Embossing Powder [ 165678 ]](https://assets1.tamsnetwork.com/images/EC042017NF/165678s.jpg "Metallics Wow! Embossing Powder [ 165678 ]")
![Embossing Additions Tool Kit [ 159971 ]](https://assets1.tamsnetwork.com/images/EC042017NF/159971s.jpg "Embossing Additions Tool Kit [ 159971 ]")
![Basic White 8 1/2" X 11" Cardstock [ 166780 ]](https://assets1.tamsnetwork.com/images/EC042017NF/166780s.jpg "Basic White 8 1/2\" X 11\" Cardstock [ 166780 ]")
![Basic White 12" X 12" (30.5 X 30.5 Cm) Thick Cardstock [ 166782 ]](https://assets1.tamsnetwork.com/images/EC042017NF/166782s.jpg "Basic White 12\" X 12\" (30.5 X 30.5 Cm) Thick Cardstock [ 166782 ]")
![Basic White Medium Envelopes [ 159236 ]](https://assets1.tamsnetwork.com/images/EC042017NF/159236s.jpg "Basic White Medium Envelopes [ 159236 ]")
![Stampin' Cut & Emboss Machine [ 149653 ]](https://assets1.tamsnetwork.com/images/EC042017NF/149653s.jpg "Stampin' Cut & Emboss Machine [ 149653 ]")
![Paper Trimmer [ 152392 ]](https://assets1.tamsnetwork.com/images/EC042017NF/152392s.jpg "Paper Trimmer [ 152392 ]")
![Stampin' Dimensionals [ 104430 ]](https://assets1.tamsnetwork.com/images/EC042017NF/104430s.jpg "Stampin' Dimensionals [ 104430 ]")
![Multipurpose Liquid Glue [ 110755 ]](https://assets1.tamsnetwork.com/images/EC042017NF/110755s.jpg "Multipurpose Liquid Glue [ 110755 ]")
![Mini Glue Dots [ 103683 ]](https://assets1.tamsnetwork.com/images/EC042017NF/103683s.jpg "Mini Glue Dots [ 103683 ]")
![Paper Snips [ 103579 ]](https://assets1.tamsnetwork.com/images/EC042017NF/103579s.jpg "Paper Snips [ 103579 ]")
![Take Your Pick [ 144107 ]](https://assets1.tamsnetwork.com/images/EC042017NF/144107s.jpg "Take Your Pick [ 144107 ]")
![Clear Wink Of Stella Glitter Brush [ 141897 ]](https://assets1.tamsnetwork.com/images/EC042017NF/141897s.jpg "Clear Wink Of Stella Glitter Brush [ 141897 ]")