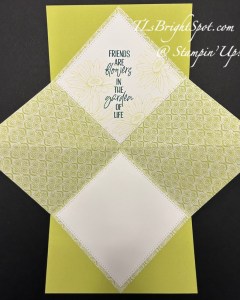
Explosion cards are just that – meant to WOW when opening them. I’ve two of them for you today 0ne is a 4 1/4 square card and the other is a standard A2 card with a finished size of 5 1/2 x 4 1/4. There are advantages to both sizes… both have the same size inside explosion 😀
card one – made with Full of Life 6×6 DSP, Spotlight On Nature Dies, Stitched Shapes Dies, You Are Remarkable stamp set, Beautiful Motifs stamp, Tinsel Gems , Lemon Lime Twist card base, Lemon Lime Twist, Shaded Spruce & Memento inks. Card base is 4 1/4 x 8 1/2 scored at 4 1/4
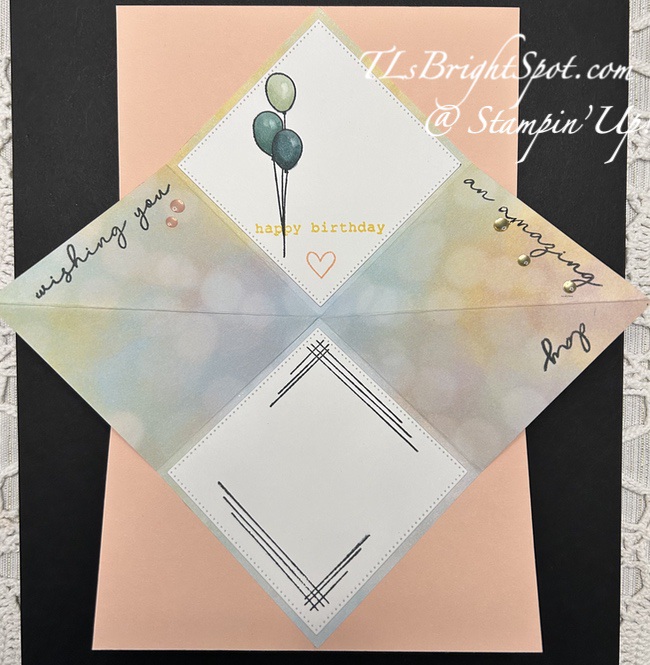
card two – made with Beautiful Bokeh 6×6 DSP, Spring Corners stamp set, Layered Thoughts stamp, Stitched Shapes Dies, Low Profile Dots, Stampin’ Blends Soft Sea Foam, Lost Lagoon & Pretty Peacock, Petal Pink card base with an overlay of Daffodil Delight, Petal Pink & Memento inks. Card base is 5 1/2 x 8 1/2 scored at 4 1/4
Basic directions…
With the side you wish to have showing most, fold a 6×6 piece of DSP in half, open & turn 90 degrees and fold in half again. Burnish well & open
Turn this piece over and fold in half in a diagonal fashion only once. Burnish and open. This creates the fold across the middle
The white panels on this are made with the largest of the Stitched Squares Dies, stamped and attached with adhesive of choice
Be sure to do all stamping, coloring, decorating before attaching to card base
To attach to card base…
Mark the center point both at the bottom of the card base and close to the center fold of the base
With ‘explosion’ piece completely closed, line up points on the diagonal with center points on card base and adhere to bottom half of card base. Make certain the card base will open and close easily.
Add adhesive to remaining portion of closed ‘explosion’ and close card front. Bingo –
NOTE: Decorate card front before attaching the ‘explosion’ piece.
Thanks for stopping by. I hope you give this explosion card a try – super easy and gives a real wow! to a card. May you have a beautiful day!
Products to make these two cards are listed below. Be sure my name is listed as your demonstrator so you get credit (from me) for purchases. 😀
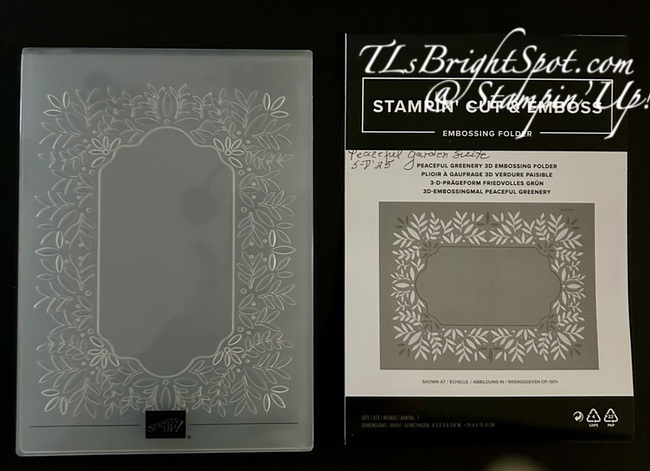
Good morning! I participated in a Demonstrator only event yesterday called Creativity Now and we used a NEW suite collection that will be available in the Sep-Dec 2025 Mini Catalog . We made 3 cards and a darling little box. But first, the suite products.
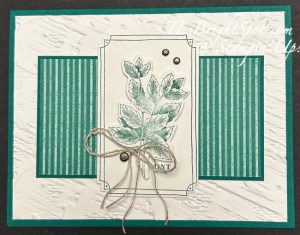
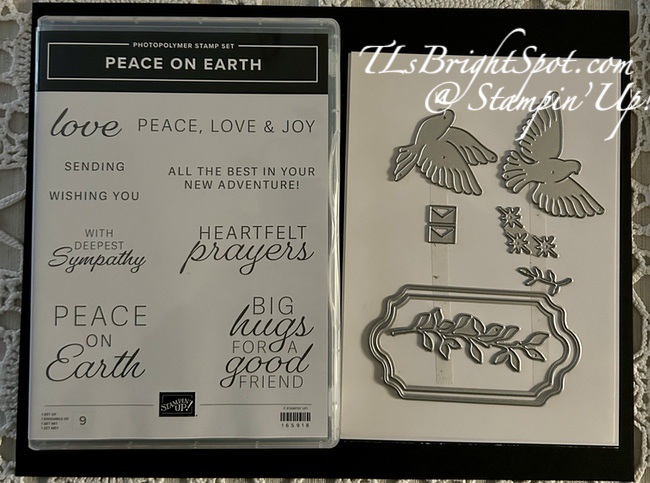
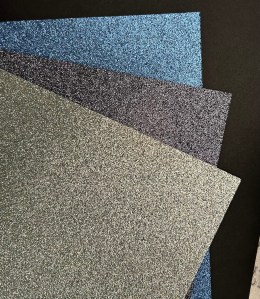
Peace On Earth Bundle includes stamp set, dies and the Peaceful Greenery 3D embossing folder; Hues of Blue Flowers, Peaceful Garden 12×12 DSP both front & reverse side, and Peaceful Garden 12×12 Glimmer Paper. The Misty Moonlight & Silver Edged ribbon is shown on both a card & a cute box.
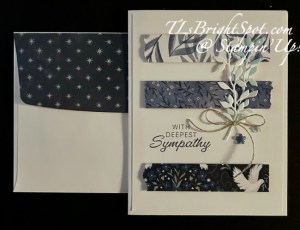
Card 1 uses strips and beautiful die cut leaves + a stamped sentiment
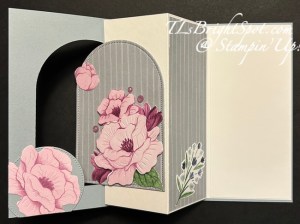
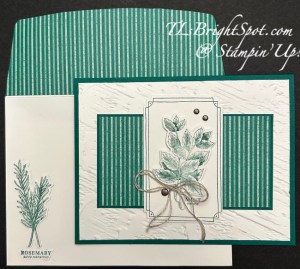
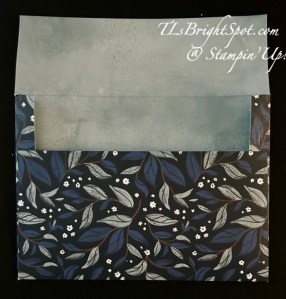
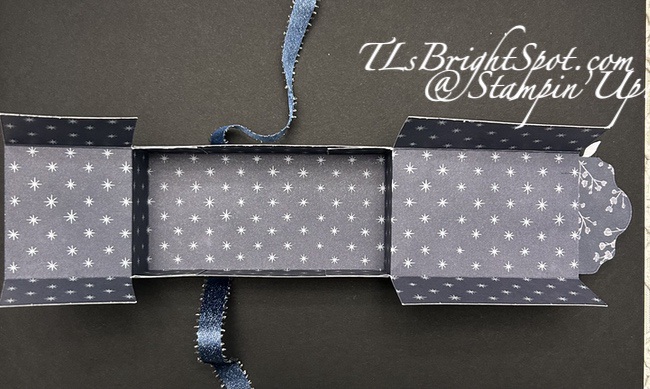
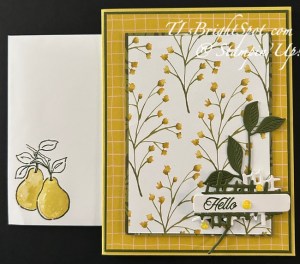
Card 2 is a fun fold, elongated card with a matching envelope, ribbon and die cuts
Card 3 uses the embossing folder to create a small strip, the showing off another of the DSP and glimmer paper. It also has a ‘pocket’ on the front for a message
The last is a darling box made with the Designer Series Paper, die cuts and ribbon
Fun projects, right? And all because being a demonstrator offers more opportunity for connecting with others, creating, and and and… :O) Join my team now to be a part of the fun and opportunities that await.
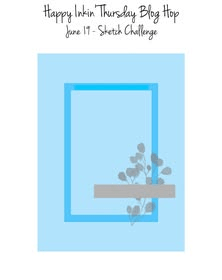
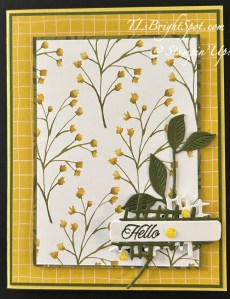
Good Thursday – thanks for stopping in to view the creations from this fabulous team of bloggers! We have a sketch challenge today as you’ll see below and I’ve chosen to use the fabulous new Painterly Pears products that will be available Jul 1 for customers in my online store.
I begsn with a card base of Darling Duckling and added a panel of Mossy Meadow 4 1/8 x 5 3/8, then a piece of Painterly Pears DSP 4 x 5 1/4. I next cut a piece of Painterly Pears 3 1/8 x 4 3/8 and added it to another piece of Painterly Pear 3 1/4 x 4 1/2. I die cut this gorgeous leaf from Mossy Meadow card stock and adhered it off to the side – this comes from the Painted Pears Dies. I die cut two really fun pieces -open pieces almost like a webbing – one in Mossy Meadow and another in Basic White, also from the Painted Pears Dies. I adhered them offset & together with dots of liquid glue. i stamped the sentiment from the Painted Pears stamp set with Mossy Meadow ink on a strip of Basic White and die cut it with the coordinating dies in the Painted Pears Dies. I adhered this over the fun die cuts mentioned earlier, attached dimensionals to the back and put these in place over the leaf die cut. As a final touchnI added Low Profile Sparkle Dots in Darling Duckling.
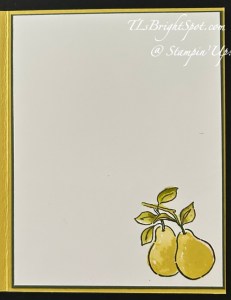
For the inside of the card… I stamped these two adorable pears using the Painted Pears stamp set and Mossy Meadow ink. I added color to the leaves with Stampin’ blends light Granny Apple Green then a bit of light Old Olive. For the pears themselves, I stamped them in Darling Duckling ink then added Wink of Stella for some glam :o)
For the envelope… I again stamped the oh so cute pears in Mossy Meadow ink, then added the two-step stamp in Darling Duckling for coloring the pears. And yes, more Wink of Stella on the pears. While it doesn’t show in this photo, I did add more of the Painterly Pears DSP to the envelope flap, & trimmed it to fit.
The products to make this card are part of the Painterly Pears suite of products available Jul 1 in my online store. The only item in the suite not used is the stunning Mossy Meadow & Gold ribbon. I cannot wait to play more with this suite! One way to be able to learn about new products before everyone in the world – is to become a demonstrator. Once a demonstrator – and I’d love to have you on my team! – 20% discount on every order, 20% commission on all orders, making connections with some super fun and awesome creative folks. There are other benefits as well – like attending conventions in various states and actually meeting many of the creators. So – connect with me to learn more or join here!
O – time to see what other team members have to share on this hop today. Click the next button to take you to Amy or click on a name to visit their site. Happy hopping!
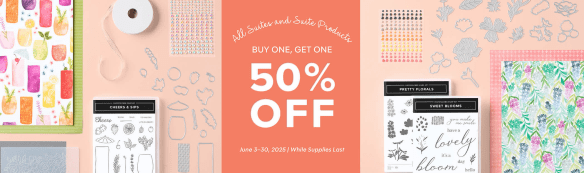
Starting June 3, all available suites and suite products from the 2025–2026 Annual Catalog and Online Exclusives are buy one, get one 50% off! If you’ve had your eye on a new suite from the annual catalog or you really like the look of a stamp set from an Online Exclusives suite, you don’t have to choose—you can get both!
Sales Period: June 3–30, 2025
Ordering Deadlines
Phone: June 30, 2025, at 6:59 p.m. (MT)
Online: June 30, 2025, at 11:59 p.m. (MT)
All available suites and suite products from the 2025–2026 Annual Catalog and Online Exclusives are buy one, get one 50% off.
When you shop the sale, the 50% off discount will apply to the lower-priced item (for example, if you buy a suite collection and a stamp set from a suite, the suite would be full price, and the stamp set would be 50% off).
Suite collections are available if all items are in stock; if all items are not in stock, you can still shop the available suite products.
You don’t have to buy a suite and suite products all from the same suite collection for the discount to apply. You can buy any suite products from any suite.
The discount will appear in your cart once you’ve added two items within the sale parameters to your cart.
Products are available only while supplies last.
See and shop all qualifying suites in the online store.
SHOP LAST CHANCE PRODUCTS HERE… NEW ITEMS ADDED TO THE LIST… MAKE CERTAIN MY NAME IS LISTED AS YOUR DEMONSTRATOR WHEN YOU CHEVCK OUT! :O) REMEMBER…Browse the selection of Last Chance paper crafting products. Additional items are added every other month. These products are available only while supplies last so be sure to buy them before they are discontinued! Discounts vary and are subject to change.
VIRTUAL ALBUM RETREAT!!!
Who: Crafters who love to scrapbook!
When: July 16–18, 2025, 2:00–10:30 p.m. (MT)
Where: Private Facebook Group
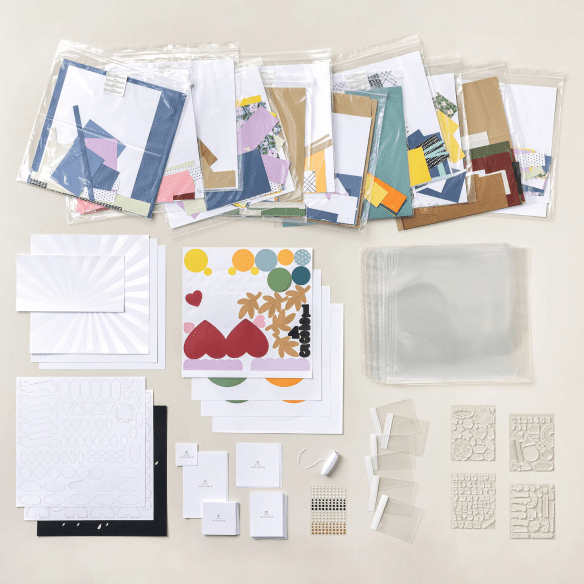
Registration: There is no registration for this event! By purchasing the Month by Month Album Retreat 2025 kit, you’ll get access to an exclusive Facebook group where the live event will stream.
Price of Month by Month Album Retreat 2025 kit: $250
Language of Event: This event will be presented in English only.
After the Event: You can access the recorded event videos on the Virtual Album Retreat Facebook group page.
CONTACT ME FOR INFORMATION RE: ADDITIONAL SUPPLY LIST
Click HERE to join with me & create your Starter Kit! What’s to lose – 20% discount/ 20% commission on all orders.
Thanks for stopping by. May you have a beautiful day. Make someone happy sending them a handmade card filled with love. ❤️
Hello Sunday! We are slated to have a pretty nice day today – after a drenching rain yesterday that we desperately needed. Those fires in South Jersey did not affect us personally, but they weren’t far. Lots of businesses destroyed & 15,000 acres burned. We needed this rain to put out remaining hot spots on the forests floor. Sigh.
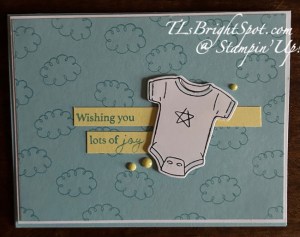
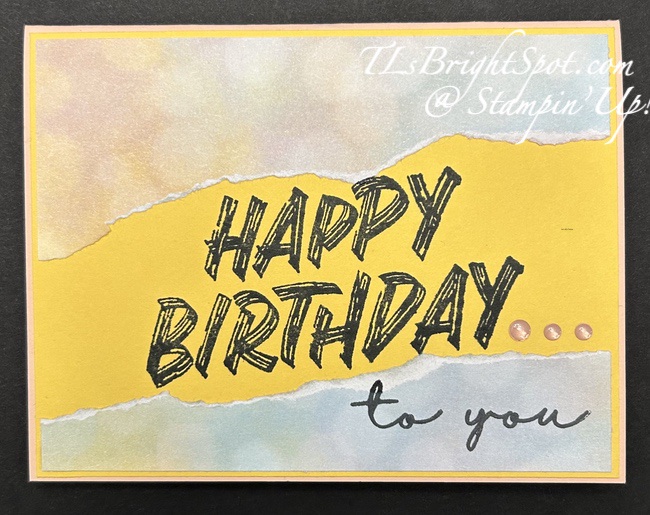
Today’s card is about new life – a baby boy – and I’ve used the carrying over Cutest Onsie Bundle to make it, and Balmy Blue.
I began with by stamping a Balmy Blue panel (4 x 5 1/4) with these cute ‘clouds’ (think dreamy 🙂 and Balmy Blue ink. I then stamped the ‘onsie’ with Memento ink and with a Balmy Blue Stampin’ Blends, colored the neck, sleeves and bottom edges. I also stamped the star in Memento ink. I die cut the onsie and set it aside. Next I stamped the sentiment on two pieces of Lemon Lolly card stock, inking just a portion of the sentiment for each stamping. It was stamped in Azure Afternoon ink I adhered the strips with liquid glue then paced the onsie on dimensionals and overlaid the strips The embellishments are Adhesive-Backed Solid Gems in Lemon Lolly. This panel was adhered to Basic White 4 1/8 x 5 3/8 then attached to a card base of Balmy Blue (8 1/2 x 5 1/2 scored at 4 1/4) with dimensionals.
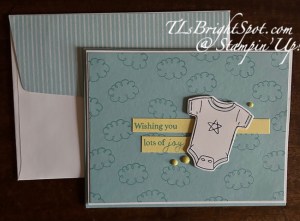
For the inside of the card, I stamped the onsie with Memento ink on a piece of Subtles 6×6 DSP (Balmy Blue of course) and while die cutting, I also die cut the pocket for the onsie. I adhered it directly to the Basic White inset (4 x 5 1/4) then stamped the sentiment in Azure Afternoon ink and the hearts too. This was attached to the inside of Balmy Blue card base for the completed card.
For the envelope, more of the Subtles 6×6 DSP in Balmy Blue was added to the flap and trimmed to fit. This added touch just unifies every project – love this! And there ya go… a baby boy card for a new little one.
All the items for today’s card are in the 2024-2025 Annual Catalog, which you may find in my store by – Clicking here to go to my store – and be sure to visit the LAST CHANCE PRODUCTS and the ONLINE EXCLUSIVES too. Remember that when your order is $50+ you will receive in your inbox this months tutorial (Memorable Blooms for April) and with the new Stampin’ Up! rewards system, you will have rewards from Stampin’ Up! that can be used for your next order!
On May 6, 2025, the Stampin’ Up! 2025-2026 Annual Catalog will go ‘live’ and you’ll find this bundle in that catalog as well :O) Need a catalog and don’t have a demonstrator? Please let me know & I can quickly send one to you.
This is my 2nd post today – the first being a reminder of the FREE SHIPPING provided by Stampin’ Up! for purchases of $75+ AND… up to 75% off some Paper Pumpkin supplies. If you haven’t ordered or looked – please Click here to go to my store – and be sure to visit the LAST CHANCE PRODUCTS and the ONLINE EXCLUSIVES too.
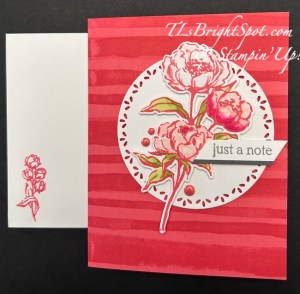
For my 2nd post, here is this extra pretty card using new products in the 2025-2026 Annual Catalog AND in the ONLINE EXCLUSIVES – both available May 6. That will be an auspicious day!!!
I used the new IN Color for 2025-2027 called Strawberry Slush both for the card stock base, the Painted Stripes stamp set inked & stamped and the floral design also inked, stamped & die cut. After stamping the flowers, I used Stampin’ Blends to color them: Pretty In Pink, Melon Mambo, also Color Lifter for highlights and Wink of Stella. The leaves were colored with Granny Apple Green Blends. I then die cut and added dimensionals to the back and set it aside. I used the Spotlight on Nature Dies to die cut the circle from Basic White card stock and added it to the card front with dimensionals, off-setting it. I then added the flowers to the circle. The sentiment is from the Beautiful Motifs stamp set & Basic Gray ink. I added a very thin strip to the sentiment piece, then attachecd this to the card front… a dimensional on the back right of the sentiment and a dab of glue on the left. The final step was adding embellishments: 2025-2027 In Color Gems in Strawberry Slush.
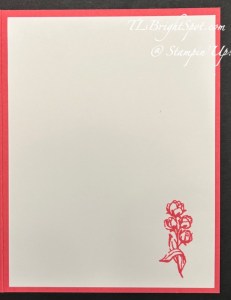
For the inside of the card I kept it really simple: this sweet bouquet of roses from the Gallery Blooms stamp set, stamped in Strawberry Slush ink on the Basic White 4 x 5 1/4 panel.
For the envelope I used the very same sweet rose bouquet from the Gallery Blooms stamp set and Strawberry Slush ink to stamp the envelope front.
What are your favorite items to purchase during FREE SHIPPING? With paper costs going up with the new annual catalog, card stocks are a perfect choice. I also stock up on envelopes which I use a lot, and your adhesives of choice are also a good purchase during free shipping.
Today is the last day (4/25, 2025) of FREE SHIPPING WITH an order of $75 + from STAMPIN’ UP! Not only that, but some Paper Pumpkin items are available @ 75% off. Take advantage, making certain my name is listed as your demonstrator :O)
Thanks for stopping by. May you have a beautiful day!
Hello Monday! It’s a new week, actually a new day – – and it is NOT raining here. Whew! We need the rain to fill our reservoirs; I like rain; but the days are a bit gloomy. We had sunshine for a bit of the day & it felt good. Thank you for the rain; and thank you for the sunshine!
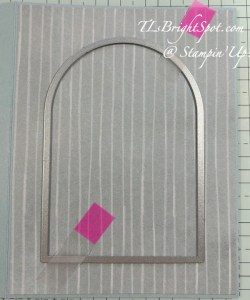
My card today uses the ever-popular Arches Dies found in the ONLINE EXCLUSIVES. I’ve paired it with one of the new In Colors for 2025-2026 called Cloud Cover plus a beautiful Florals In Bloom DSP. I either fussy cut the flowers with my paper snips, or die cut them with a die from Pretty Florals Dies or Sweet Blooms Dies. Both of these dies and the DSP are part of a new suite of products in the 2025-2026 Annual Catalog – the Florals In Bloom Suite.
This card begins with a standard A2 card base in Cloud Cover. The DSP layer is just 1/8″ smaller all around and is from the Florals In Bloom pack. It is from the other side of this sheet that I either fussy cut or die cut the flowers for the front of this card. :O) Ah, but I jump ahead… after adhering the DSP to the card front, open card & use the 4th largest die in the Arches Dies to center it on the front & die cut the arch. This may take running it back & forth a couple of times.
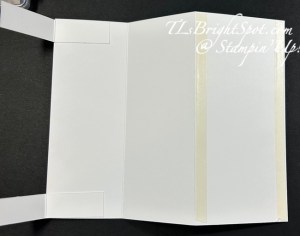
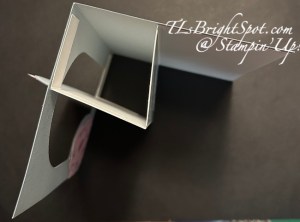
Now prepare the inside panel… 6 1/2 x 5 3/8 scored at 2 & 4 on the long side. Prepare two ‘hinges’ cutting 3″ x 1 1/4″, scored @ 1 1/2. Add Tear n’ Tape in several places then cut in half lengthwise, thereby creating 2 hinges. Add Tear n’ Tape to the BACK SIDE of the 2 1/2″ panel. On that same back side, add the hinges with the fold at the outside edge, one at top & one at bottom. Refer to photos below.
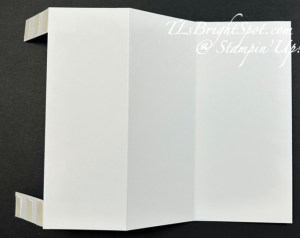
back side of card insert front side of card insert
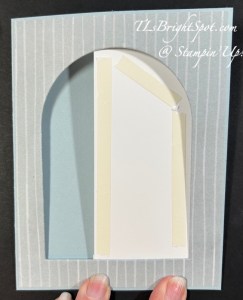
Remove tape cover & add insert to to inside of card with 1/8″ edge top, right & bottom. Fold insert along score lines, remove tape cover on hinges and with them flat & sticky side up, close card front. Boom! Now, with card closed & ‘window’ uncovered, add adhesive or Tear n’ Tape to open area – see photo… & attach die cut arch & decorate! ….
As mentioned earlier, I either fussy cut with my paper snips or die cut with appropriate dies all the flowers. On the bottom right, this flower was Cloud Cover so that when the card is opened, there is a ‘like’ image inside – cut 2. After adhering, circle & flower were trimmed to card front edges.
Additional info:
DSP added to inside of card is 1 7/8 x 5 1/4, decorated with a die cut from the DSP (Sweet Blooms Dies)
Basic White panel on far right is 2 3/8 x 5 1/4
Embellishments on fron are 2024-2026 In Color Shimmer Gems
Wink of Stella was added to shaded areas of all flowers
This is what the card looks like from the top
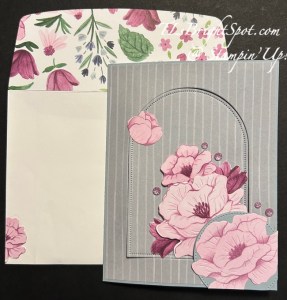
For the envelope…
More of the same DSP from Florals In Bloom DSP pack (just the other side) adhered to the flap & trimmed to fit. On the front, another fussy cut flower added to the edge of the envelope front.
I had so much fun creating this card. It was pretty easy really and the fun came in the decorating. I would love to see what you do with this Window Pop-Out card design.
As I mentioned earlier, this suite of products are all available in the 2025-2026 Annual catalog, which goes live to customer May 6. That’s a few short weeks away. But… if you were to join my team, you could purchase the items to make this card (& more) as part of your starter kit. Wouldn’t that be fun? And in any future orders you would always get at least 20% off your purchase, just for being a demonstrator. And being a part of this team – well, lots of creative folks to inspire & encourage and learn more & more. so, think about it & come join the fun. Join with me here.
Want to just shop? You can see everything in my store by clicking here… Kits Collections, Last chance Products, ONLINE EXCLUSIVES, specials, Paper Pumpkin – it’s all in that link. Need a new 2025-2026 Annual Catalog – just let me know!
In just a couple of days… April 15 to be exact, Stampin’ Up! is going to be offering rewards to every customer beginning with a $20 purchase & above. No more host codes to worry about, just order & reap the benefits.
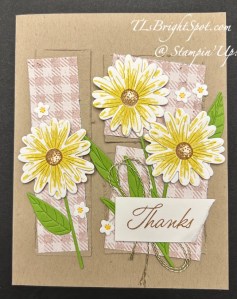
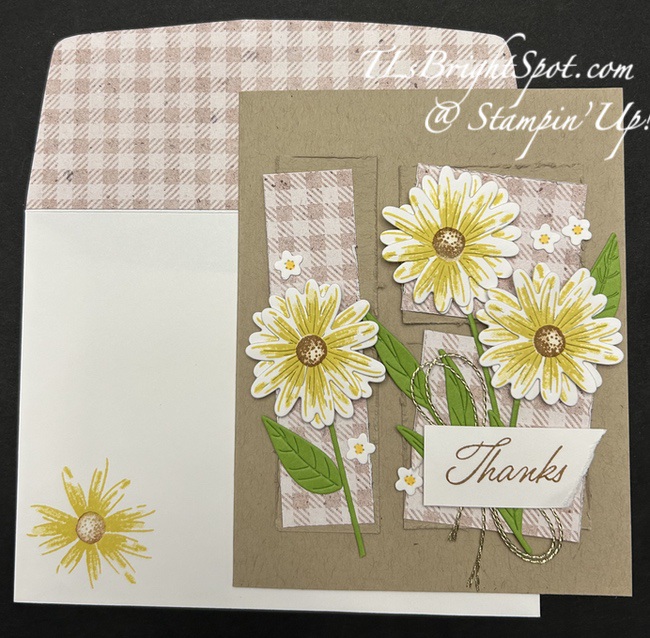
Impressions Abloom is one of the new bundles in the Stampin’ Up! 2025-2026 Annual Catalog – and it’s wonderful. This card was one inspired by the After Hours program at the Stampin’ Up! Convention recently. I confess it’s a direct CASE of one in the After Hours booklet :O)
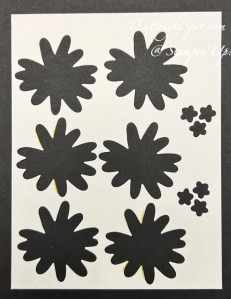
This card begins with a Crumb Cake card base, standard A2 size. Several pieces of Crumb Cake were trimmed down for layering with Perennial Lavender DSP. This DSP is a carry over 12×12 paper and is gorgeous. What you are seeing here is a checkered pattern. Notice how the edges of both the Crumb Cake pieces and the DSP pieces have frayed edges. That was done by holding the scissors at an angle on each piece and ‘scratching’ down the side. It sometimes even tears a bit, which is ok. It gives it a country look. Each of the flower heads is stamped in Darling Duckling ink then die cut with the appropriate die with two layers per flower head. The centers are stamped with Pecan Pie ink then Wink of Stella for a bit of sparkle in the centers. The stems & leaves are die cut using this same Impressions Abloom bundle – using Granny Apple Green card stock. These were attached to the card front, then the flowers heads added with dimensionals. The tiny flowers were die cut from Basic White then a Stampin’ Blends in Daffodil Delight colored the center. These were added with dots of liquid glue. A double bow was created using the Gold thread and attached with a glue dot. The sentiment was stamped in Pecan Pie ink, an edge torn and added with dimensionals.
Here’s a photo of all the daisy die cuts:
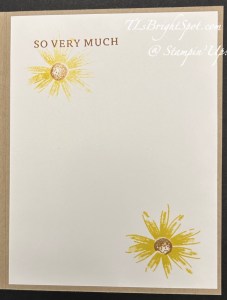
For the inside…
I stamped the daisy image in Darling Duckling ink and the centers in Pecan Pie – same as the card front. I stamped the sentiment, also from Impressions Abloom stamp set, in Pecan Pie ink. The panel was added to the inside of the card.
The envelope …
More of the Perennial Lavender 12×12 DSP was added to the flap & trimmed to fit. The very same flower from Impressions Abloom stamp set was stamped on the envelope front: Darling Duckling for the flower and Pecan Pie for the center. And of course, Wink of Stella was added to the center :O) This would be a great birthday or hello card – just change the sentiment. It’s cheerful – a real lift me up kind of card.
This bundle and DSP will be available May 6, both in the ONLINE Exclusives AND in the 2025-2026 Annual Catalog. Remember too, the Stampin’ rewards are changing as well. – no more HOST CODES, but customers will begin receiving rewards with a $20 purchase – and that reward can be used toward their NEXT purchase. It’s quite a nice deal.
Feel free to look through my store by clicking the link here. This link will allow you to view any specials going on, ONLINE EXCLUSIVES, Paper Pumpkin, the Kits Collection – like that. And if you have any questions, reach out to me. I’m here to help… to inspire, to create, to answer questions.
card cuts:
card base: 8 1/2 x 5 1/2 scored @ 4 1/4
layer: 1 1/8 x 4; 2 x 2; 1 3/4 x 2
DSP layer: 1 x 4; 1 3/4 x 2; 1 3/4 x 1 5/8
Basic White: 4 x 5 1/4, inside; 4 x 5 1/4 die cutting flowers
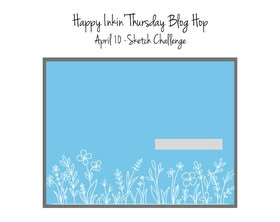
Hello – and WELCOME to the Happy In kin’ Thursday Blog Hop. We have a sketch challenge today & I’ve maybe stretched the parameters just a bit, but I like the card and think it works.
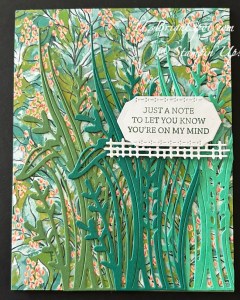
I’ve used some ONLINE EXCLUSIVE products for this card – primarily the Mixed Media Florals DSP, the Mixed Labels Bundle and the Mixed Florals Bundle. I LOVE this DSP for the background. It reminds me a bit of a jungle and it was adhered directly to the Garden Green card base. The multiple die cut leaves are in Garden Green, Shaded Spruce and Shy Shamrock & I used the Mixed Florals Dies to create them. I simply adhered them with dabs of liquid glue but could very easily have used Adhesive Sheets as a backing, I just didn’t. The next step was to stamp the sentime on a Basic White scrap in Garden Green ink using the Mixed Labels stamp set. I die this and the rectangular piece using the Mixed Labels Dies. I adhered the fence-like piece to the back of the sentiment label then added dimensionals to the sentiment & attached it to the card. Viola!
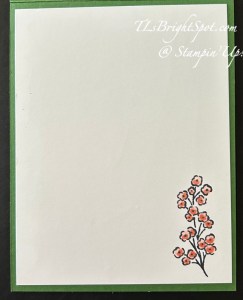
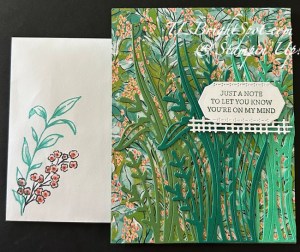
For the inside… I stamped this beautiful floral image in Memento ink on the Basic White panel then colored it with Calypso Coral Stampin’ Blends. Done!
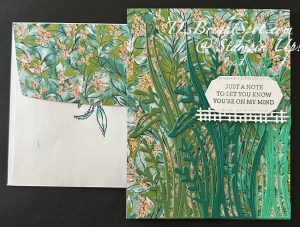
For the envelope… I added more of the Mixed Media Florals DSP to the flap (after messing up the stamp image of the leaf!), trimmed the paper to fit. Since the mess-up of the stamped image on the flap, I decided to add some ink ‘edging’ to the remaining leaves, making them look like the leaves on the DSP :O) I added some extra ‘doodles’ for fun – all this with a SU! Journaling Pen. For the envelope front, I stamped the image of the leaves (just fine) with Shy Shamrock ink & used a Blends in Shy Shamrock to add some extra color depth. I also stamped the same sweet image as on the inside of the card in Memento ink & colored the flowers with Calypso Coral Stampin’ Blends. Finis…
This is such pretty DSP and the coordinating bundles are so perfect to layer or use individually. I encourage you to visit my ONLINE EXCLUSIVE store – see info below.
Now, make the rounds of the hop – don’t miss a single one :O) & have fun! Click on the next button or click on a name to make the rounds.
When shopping with me and your purchase is $50 or more, you will receive a SU! item valued up to $10 and the current months fabulous tutorial – for April, it’s Memorable Blooms. And use my HOST CODE until April 12. If you do not have a demonstrator, I would love to support, encourage and help you create your best. Contact me!
HOST CODE Y3TPZVYN
HOST CODES are going away April 12, but something even better for you is happening – you will be earning Stampin’ Rewards when your purchases are $20 or more.
Remember the LAST CHANCE LIST ? Click here to shop that list.
Click this link to see all that’s available in the Stampin’ Up! world – this includes the link to ONLINE EXCLUSIVES – and make sure my name is at the top when checking out. This link allows you to see the online exclusives, Kits Collection, The Paper Pumpkin information, etc., etc. If you have questions, please connect with me!
Thanks for stopping by. May you have a beautiful day!
Welcome to ‘the hop’! We have a great lineup of folks participating so be sure you visit each post. The theme for this month’s hop is “for the ladies/ girls” and we can interpret that any way that suits. Mother’s Day cards are difficult for me as my mother is gone and well, it just feels weird. April 8 is actually her birthday, so this works for me. Having said that, my card IS a Mother’s Day card and I will send it to our daughter who has three not so little ones (the oldest is 6’5″, the next is maybe 5’11” and the third is about 5’3″).
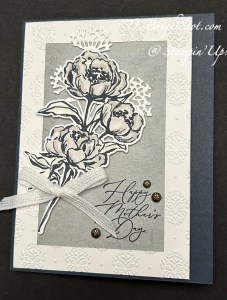
My card features products from the new 2025-2026 Annual Catalog. If you haven’t received yours from me yet, be patient… sometimes the mail takes a bit :O( Look for the Beautiful Gallery Suite of products that are showcased on pages 52-57. They are a really fun suite of products: frame dies, floral & leaf dies, stamps & more stamps, an embossing folder, a wonderful set of embellishments, ribbon, DSP – it’s quite grand! I’m also showcasing some of the new 2025-2027 In Colors: Cloud Cover and Secret Sea.
I’m loving this rose stamp & die from the Gallery Blooms bundle in this suite! And the Damask Designs embossing folder is evident on the ‘frame’ of this image. The ‘frame is also from the Gallery Blooms bundle. And the sweet background floral die cut is from the Beautiful Motifs Dies in the suite. The ribbon on this card is NOT part of this suite – it IS part of the Botanical Textured Suite of products that are ONLINE EXCLUSIVES. Lastly – the embellishments – gorgeous – are part of the Beautiful Gallery Suite and are called Pressed Flower Motifs. Let’s see, what did I leave out – oh, the DSP… is Beautiful Gallery 6×6 DSP and from the Beautiful Gallery Suite.
So, how to make this card… The card base is Secret Sea cut 8 1/2 x 5 1/2 & scored at 4 1/4. I embossed a 4 x 5 1/4 Basic White panel with the Damask Designs embossing folder; then die cut with the Gallery Blooms Dies that are the frames. This die is so cool – it die cuts two frames at the same time and creates a center panel as well. I used the larger of the frames for this card. I adhered the frame to the desired Beautiful Gallery 6×6 DSP, then trimmed the DSP even with the frame. I stamped the rose image in the new Secret Sea ink – it’s a deep blue black – on a piece of Basic White. I used Stampin’ Blends in Gray Granit &, Smoky Slate to color the roses and Dark Sea Foam to color the leaves. I die cut with the coordinating die in Gallery Blooms Dies. I then die cut from Basic White, the flower used in the background – which came from the Beautiful Motifs Dies. I placed both floral dies without adhering them so I would know where to stamp my sentiment. The sentiment is from Stippled Roses stamp set and is stamped in Secret Sea ink. I then added the two dies to the card, adhering the white die cut with dabs of liquid glue and the roses with dimensionals. I wanted a ribbon, so pulled out the 1/4″ Basic White Ribbon from the Botanical Textured Suite (an ONLINE EXCLUSIVE) and adhered that with a glue dot. I added three of these gorgeous Pressed Flower Motifs around the sentiment. The card needed some sparkle – Wink Of Stella to the rescue on all the roses! I didn’t cover them completely but that Wink of Stella did the trick I was looking for.
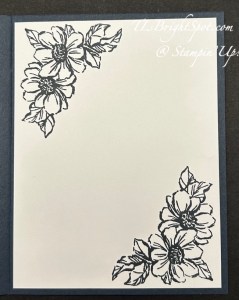
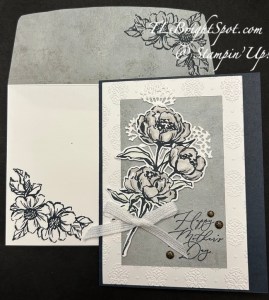
For the inside – I stamped another sweet rose stamp from the Gallery Blooms stamp set in Secret Sea ink in each corner. I decided not to color the roses – let the card front be all the glory.
For the envelope, I covered the flap in the remaining piece of the Beautiful Gallery 6×6 DSP & trimmed to fit. I used the same image as the inside of the card & Secret Sea ink to stamp on the flap & on the envelope front. Love, love. This suite of products will be available to you, the customer, on May 6, 2025, less than a month away!
Now – on to the others on the hop. Be sure to check out all the fun creations. Click the previous or the next button to make the full circuit.
When shopping with me and your purchase is $50 or more, you will receive a SU! item valued up to $10 and the current months fabulous tutorial – for April, it’s Memorable Blooms. And use my HOST CODE until April 12. If you do not have a demonstrator, I would love to support, encourage and help you create your best. Contact me!
HOST CODE Y3TPZVYN
Remember the LAST CHANCE LIST ? Click here to shop that list.
Click this link to see all that’s available in the Stampin’ Up! world and make sure my name is at the top when checking out. This link allows you to see the Kits Collection, The Paper Pumpkin information, etc., etc. If you have questions, please connect with me!
Thanks for stopping by. May you have a beautiful day!
Online Exclusives are just that – items not in any of the Stampin’ Up! Catalogs. This Grow with Love bundle is perfect for cards for no specific reason. I like sending cards just for fun and it makes the receiver feel special.
The card base is a standard A2 size in Shaded Spruce. I layered an embossed Basic White panel 4 x 5 1/4. The embossing folder is another ONLINE EXCLUSIVE called Plaster Painting 3D embossing folder. It has lots of texture. The next layer is Shaded Spruce 2 3/8 x 4 3/8 with Regals 6×6 cut 2 1/4 x 4 1/4 adhered directly to the card front. The center Basic White panel is 2 1/4 x 3 3/4 stamped in Shaded Spruce ink with another of the stamps in Grow With Love, then die cut with the appropriate Grow With Love Dies. I really like the corner edges! Again, this was adhered directly to the card front, centering. The mint leaves were stamped again and die cut and attached with dimensionals over the stamped image. I tied a double Linen Thread and attached it with a glue dot. Lastly, Adhesive-Backed Dots were added for contrast.
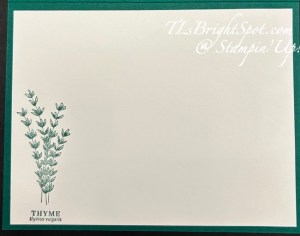
For the inside… another stamp in the Grow with Love is Thyme – and it’s stamped here in Shaded Spruce on the Basic White 4 x 5 1/4 panel.
The envelope… more of the Regals 6×6 DSP in Shaded Spruce added to the flap & trimmed to fit (2 1/4 x 6) and on the front another image – this time it’s Rosemary :O). I messed up when stamping the image so did it again on a scrap, die cut it and adhered with liquid glue. When die cutting the image, it cuts off the name of the plant, so I fussy cut that with my paper snips and added it.
Fun, easy card, could be masculine if one is needed. It shows appreciation and care for another human being – which the world always needs.
You may this Grow With Love bundle in my store – look around at all the possibilities, kits, last chance products and more . When shopping with me and your purchase is $50 or more, you will receive a SU! item valued up to $10 and the current months fabulous tutorial – for April, it’s Memorable Blooms. And use my HOST CODE until April 12.
HOST CODE Y3TPZVYN
Remember the LAST CHANCE LIST I mentioned in an earlier post? Click here to shop that list.
Click this link to see all that’s available in the Stampin’ Up! world and make sure my name is at the top when checking out.
Thanks for stopping by. May you have a beautiful day!

![Full Of Life 6" X 6" (15.2 X 15.2 Cm) Designer Series Paper [ 163357 ]](https://assets1.tamsnetwork.com/images/EC042017NF/163357s.jpg "Full Of Life 6\" X 6\" (15.2 X 15.2 Cm) Designer Series Paper [ 163357 ]")
![Lemon Lime Twist 8-1/2" X 11" Cardstock [ 144245 ]](https://assets1.tamsnetwork.com/images/EC042017NF/144245s.jpg "Lemon Lime Twist 8-1/2\" X 11\" Cardstock [ 144245 ]")
![Spotlight On Nature Dies [ 163580 ]](https://assets1.tamsnetwork.com/images/EC042017NF/163580s.jpg "Spotlight On Nature Dies [ 163580 ]")
![Stitched Shapes Dies [ 152323 ]](https://assets1.tamsnetwork.com/images/EC042017NF/152323s.jpg "Stitched Shapes Dies [ 152323 ]")
![You Are Remarkable Photopolymer Stamp Set (English) [ 165445 ]](https://assets1.tamsnetwork.com/images/EC042017NF/165445s.jpg "You Are Remarkable Photopolymer Stamp Set (English) [ 165445 ]")
![Beautiful Motifs Bundle (English) [ 165206 ]](https://assets1.tamsnetwork.com/images/EC042017NF/165206s.jpg "Beautiful Motifs Bundle (English) [ 165206 ]")
![Tinsel Gems Four Pack [ 161623 ]](https://assets1.tamsnetwork.com/images/EC042017NF/161623s.jpg "Tinsel Gems Four Pack [ 161623 ]")
![Shaded Spruce 8-1/2" X 11" Cardstock [ 146981 ]](https://assets1.tamsnetwork.com/images/EC042017NF/146981s.jpg "Shaded Spruce 8-1/2\" X 11\" Cardstock [ 146981 ]")
![Shaded Spruce Classic Stampin' Pad [ 147088 ]](https://assets1.tamsnetwork.com/images/EC042017NF/147088s.jpg "Shaded Spruce Classic Stampin' Pad [ 147088 ]")
![Spring Corners Photopolymer Stamp Set (English) [ 164738 ]](https://assets1.tamsnetwork.com/images/EC042017NF/164738s.jpg "Spring Corners Photopolymer Stamp Set (English) [ 164738 ]")
![Spring Corners Bundle (English) [ 164743 ]](https://assets1.tamsnetwork.com/images/EC042017NF/164743s.jpg "Spring Corners Bundle (English) [ 164743 ]")
![Beautiful Bokeh 6" X 6" (15.2 X 15.2 Cm) Designer Series Paper [ 164607 ]](https://assets1.tamsnetwork.com/images/EC042017NF/164607s.jpg "Beautiful Bokeh 6\" X 6\" (15.2 X 15.2 Cm) Designer Series Paper [ 164607 ]")
![Layered Thoughts Photopolymer Stamp Set (English) [ 165346 ]](https://assets1.tamsnetwork.com/images/EC042017NF/165346s.jpg "Layered Thoughts Photopolymer Stamp Set (English) [ 165346 ]")
![Low Profile Dots [ 164658 ]](https://assets1.tamsnetwork.com/images/EC042017NF/164658s.jpg "Low Profile Dots [ 164658 ]")
![Soft Sea Foam Stampin' Blends Combo Pack [ 154902 ]](https://assets1.tamsnetwork.com/images/EC042017NF/154902s.jpg "Soft Sea Foam Stampin' Blends Combo Pack [ 154902 ]")
![Lost Lagoon Stampin’ Blends Combo Pack [ 161680 ]](https://assets1.tamsnetwork.com/images/EC042017NF/161680s.jpg "Lost Lagoon Stampin’ Blends Combo Pack [ 161680 ]")
![Pretty Peacock Stampin' Blends Combo Pack [ 149560 ] (Retired)](https://assets1.tamsnetwork.com/images/EC042017NF/149560s.jpg "Pretty Peacock Stampin' Blends Combo Pack [ 149560 ] (Retired)")
![Petal Pink 8-1/2" X 11" Cardstock [ 146985 ]](https://assets1.tamsnetwork.com/images/EC042017NF/146985s.jpg "Petal Pink 8-1/2\" X 11\" Cardstock [ 146985 ]")
![Petal Pink Classic Stampin' Pad [ 147108 ]](https://assets1.tamsnetwork.com/images/EC042017NF/147108s.jpg "Petal Pink Classic Stampin' Pad [ 147108 ]")
![Daffodil Delight 8-1/2" X 11" Cardstock [ 119683 ]](https://assets1.tamsnetwork.com/images/EC042017NF/119683s.jpg "Daffodil Delight 8-1/2\" X 11\" Cardstock [ 119683 ]")
![Daffodil Delight Classic Stampin' Pad [ 147094 ]](https://assets1.tamsnetwork.com/images/EC042017NF/147094s.jpg "Daffodil Delight Classic Stampin' Pad [ 147094 ]")
![Tuxedo Black Memento Ink Pad [ 132708 ]](https://assets1.tamsnetwork.com/images/EC042017NF/132708s.jpg "Tuxedo Black Memento Ink Pad [ 132708 ]")
![Basic White 8 1/2" X 11" Cardstock [ 166780 ]](https://assets1.tamsnetwork.com/images/EC042017NF/166780s.jpg "Basic White 8 1/2\" X 11\" Cardstock [ 166780 ]")
![Clear Wink Of Stella Glitter Brush [ 141897 ]](https://assets1.tamsnetwork.com/images/EC042017NF/141897s.jpg "Clear Wink Of Stella Glitter Brush [ 141897 ]")
![Basic White Medium Envelopes [ 159236 ]](https://assets1.tamsnetwork.com/images/EC042017NF/159236s.jpg "Basic White Medium Envelopes [ 159236 ]")
![Paper Trimmer [ 152392 ]](https://assets1.tamsnetwork.com/images/EC042017NF/152392s.jpg "Paper Trimmer [ 152392 ]")
![Stampin' Cut & Emboss Machine [ 149653 ]](https://assets1.tamsnetwork.com/images/EC042017NF/149653s.jpg "Stampin' Cut & Emboss Machine [ 149653 ]")
![Stampin' Dimensionals [ 104430 ]](https://assets1.tamsnetwork.com/images/EC042017NF/104430s.jpg "Stampin' Dimensionals [ 104430 ]")
![Multipurpose Liquid Glue [ 110755 ]](https://assets1.tamsnetwork.com/images/EC042017NF/110755s.jpg "Multipurpose Liquid Glue [ 110755 ]")
![Stampin' Seal [ 152813 ]](https://assets1.tamsnetwork.com/images/EC042017NF/152813s.jpg "Stampin' Seal [ 152813 ]")
![Bone Folder [ 102300 ]](https://assets1.tamsnetwork.com/images/EC042017NF/102300s.jpg "Bone Folder [ 102300 ]")
![Take Your Pick [ 144107 ]](https://assets1.tamsnetwork.com/images/EC042017NF/144107s.jpg "Take Your Pick [ 144107 ]")


![Darling Duckling 8 1/2" X 11" Cardstock [ 165622 ]](https://assets1.tamsnetwork.com/images/EC042017NF/165622s.jpg "Darling Duckling 8 1/2\" X 11\" Cardstock [ 165622 ]")
![Mossy Meadow 8-1/2" X 11" Cardstock [ 133676 ]](https://assets1.tamsnetwork.com/images/EC042017NF/133676s.jpg "Mossy Meadow 8-1/2\" X 11\" Cardstock [ 133676 ]")
![Mossy Meadow Classic Stampin' Pad [ 147111 ]](https://assets1.tamsnetwork.com/images/EC042017NF/147111s.jpg "Mossy Meadow Classic Stampin' Pad [ 147111 ]")
![Darling Duckling Classic Stampin' Pad [ 165277 ]](https://assets1.tamsnetwork.com/images/EC042017NF/165277s.jpg "Darling Duckling Classic Stampin' Pad [ 165277 ]")
![Granny Apple Green Stampin' Blends Markers Combo Pack [ 147274 ] (Retired)](https://assets1.tamsnetwork.com/images/EC042017NF/147274s.jpg "Granny Apple Green Stampin' Blends Markers Combo Pack [ 147274 ] (Retired)")
![Old Olive Stampin' Blends Markers Combo Pack [ 144597 ] (Retired)](https://assets1.tamsnetwork.com/images/EC042017NF/144597s.jpg "Old Olive Stampin' Blends Markers Combo Pack [ 144597 ] (Retired)")