Stampin’ Up! Ornate Borders and Ornate Layers Dies

Whoa – it’s Friday! And what are your plans this weekend – stay at home you say? Us too. Praying things will turn around soon – so many lives lost and families heartbroken….

The card for today is made using Stampin’ Up! Ornate Borders Dies and Ornate Layers Dies. It’s nice they work together so well.This particular border I had not played with yet and it is so gorgeous – it could become a favorite very easily. Here it is…

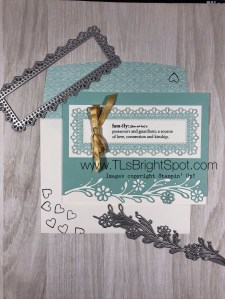
Ornate Borders Dies, Ornate Layers Dies

The details:

  • Pool Party cs 4 1/4 x 5 1/2
  • Thick Whisper White 4 1/4 x 11, scored at 5 1/2
  • Regular Whisper White 2 x 5 plus diecut  panel
  • Tropical Oasis DSP 2 1/4 x 5 for the diecut plus 2 1/4 x 6 for the envelope flap
  • Shimmer Ribbon 1/4″ (from the holiday catalogue
  • Praiseworthy Prose stamp set


Ornate Borders Dies Ornate Layers Dies

  • Place the floral die cut from the Ornate Borders Dies on the edge of your Pool Party on the long side and run through your die cutting machine. Voila – you have this gorgeous edge! Isn’t it beautiful? There are some leaf like pieces that come out of this you will definitely want to save – just sayin’.
  • Adhere this directly to your Thick Whisper White with liquid glue
  • With your Ornate Layers Dies, run this through your die cutting machine using the Tropical Oasis DSP 
  • Run your Whisper White panel through this same machine using the stitched rectangle  from the Ornate Layers Dies.
  • Using your stamparatus, stamp your sentiment from the Praiseworthy Prose stamp set with Memento Black ink. Adhere this with liquid glue to the die cut DSP, then to the Whisper White 2 x 5 panel. Isn’t this a perfect sentiment for our times right now? It’s perfect for any time really, but certainly fits what’s going on in the world right now.
  • Wrap a length of the Shimmer Ribbon 1/4″ around and tie a bow. Hold in place with a glue dot
  • Adhere to the card front with liquid glue and your card front is complete!

For the envelope…

  • Adhere 2 1/4 x 6 piece of DSP to the envelope flap. Trim to fit.
  • Stamp the heart in the corner of the flap then several hearts on the front with Memento Black ink. This heart is also from Praiseworthy Prose stamp set

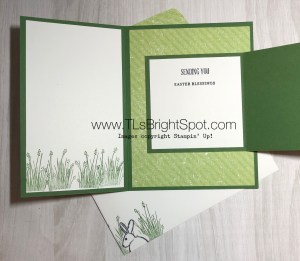
I cannot share the inside as this will be for a specific family member and just in case they see this post – well, I can’t share it yet.  I’ll definitely share after I’ve given it to them 😘

A couple of things before I sign off…

Stampin’ Up! has updated it’s Clearance Rack and there are some real deals – so check it out!

The Ornate Garden Suite is a premier promotion for the 2020-21 Annual Catalogue. Since it is a premier it is available for a limited time as a suite of products – therefore a much better deal than if purchased individually.

And lastly – there will be anew set of In Colors for 2020-21, so shop those retiring In Colors before it’s too late!

Thanks for stopping by.

May you have a beautiful day.

Make someone happy by sending them a handmade card!

Ornate Borders Dies Ornate Layers Dies

Stampin’ Up! Ornate Layers Dies and Stitched Rectangles Dies

Hi Folks – it’s Thursday! Did you know that already? Well, my days are all mixed up… just sayin’. The card for today features the fabulous Stampin’ Up! Ornate Layers Dies (NEW!) and the Stitched Rectangles Dies and oh yes… the fun Tropical Oasis DSP. What a combination! The other factor about this gem is… it’s a gift card! Let’s take a look.

Ornate Layers Dies, Stitched Rectangles Dies, Tropical Oasis DSP

Gift Card
Ornate Layers Dies, Tropical Oasis DSP

Don’t you love this combination? So, how did I do that? Here are the deets…

  • Terracotta Tile  4 1/4 x 11, scored at 5 1/2 and 9; additional piece for diecut approx 3 3/4 x 2 1/2
  • Whisper White 4 x 5 1/4 (for inside panel; additional piece for diecut approx 3 1/2 x 2 1/4
  • Tropical Oasis DSP 3 1/4 x 4 (front of card) and 1 3/4 x 4 (for the fold over for the gift card

Ornate Layers Dies, Stitched Rectangles Dies, Tropical Oasis DSP

  • Adhere the DSP to the front panel and also to the fold over for the gift card. Make certain the DSP is going in the right direction! Using a 3/4″ circle punch, punch a ‘half moon’ to easily remove the gift card
  • Die cut the 4 x 5 1/4 panel of Whisper White close to the right edge, for a delicate wonderful border
  • Diecut the smaller panel of Whisper White for the card front using the Ornate Layers Dies
  • Diecut the smaller panel of Terracotta Tile for the card front using the Stitched Rectangles dies.
  • Stamp your sentiment for the card front from the Floral Essence stamp set. Stamp the inside sentiment using the same stamp set.
  • Adhere the inside panel using liquid glue
  • Using Tear ‘Whisper Whitew diecut to the Terracotta Tile diecut with liquid glue. Adhere this to the card front with either liquid glue OR snail. I tend to use snail when I am attaching a panel like this

For the envelope…

  • Adhere a panel of the Tropical Oasis DSP 2 1/4 x 6, to the envelope flap using liquid glue and trim to fit.
  • I also stamped a hello sentiment on the front of the card from the Timeless Tropical stamp set but covered it up when I took the picture… silly me! 😳

Your card is complete! I am using this card for a woman graduating from Hairdressing School in a couple of weeks. She’s a sweetheart of a young lady, has a wonderfully refreshing personality and will do well in her future. I wish her well.

Thanks for stopping by.

May you have a beautiful day.

Make someone happy by sending them a handmade card.


Remember to look for the Ornate Garden Suite of products premiered right now prior to the launch of the 2020-21 Annual Catalogue. Here is a flyer to refresh your memory.

Stampin’ Up!, Fun Fold and DSP

Wow! Late post today… I’ve been cleaning out a space and got caught up in the throws of it all… Todays cards are two for one:  another fun fold as yesterday, but turned sideways & a regular 4 1/4″ x 11″. Yesterdays was for our 10 yr old granddaughter – who is a sweetheart and growing up waaay too fast. This one is for our 19 year old grandson, so it needed to be masculine 😏. He’s wonderful… and a general gem of a young man. Am I a proud Nana? You bet I am! The next card is for our 12 year old grandson and I get bragging rights on him too: gentle soul, tender hearted and growing to a man already.

Here’s the card for the 19 year old… it’s simple and perfect for him…

Fun Fold, sideways

Fun Fold inside


Here are the card cuts…

  • It starts with a 4 1/4″ x 11″ Thick Whisper White. Score at 5 1/2″, then trim off 1″ the front edge
  • Cut your DSP 4 1/4″ x 4″ for the front panel, 4 ” x 5 1/4″ for the inside, 2 1/2″ square for the insert panel and a 2 3/4″ square for the back of the insert panel (the part you see when you open the insert); 2/14″ x 6″ for the envelope flap
  • Night of Navy 2 3/4″ square (the 2 1/2″ DSP gets adhered to this) + approx. 3″ scrap for the scalloped layer on card front
  • Whisper White 4″ x 4 1/4″ inside front panel); 3″ x 6″ scored at 3″ (insert panel), a 2 3/4″ square for the inside panel + scrap approx. 3″ square for stamping the image for the front of the panel

Directions…

  • Adhere the 4″ x 5 1/4″ DSP to the card inside; adhere the 2 1/2″ DSP square to the 2 3/4″ Night of Navy and adhere this to the 3″ x 6″ insert panel for the card front
  • Stamp the 4″ x 4 1/4″ Whisper White with the grass from the March PP kit in Garden Green. Add the bunny, also from the same kit, using Memento Black ink. Adhere this to the left inside of your card using liquid glue
  • While you have the grass and Garden Green handy, stamp the front of the envelope
  • With the scrap of Whisper White, stamp the bunny in Memento Black ink making certain you are stamping it on the diagonal, create a mask, and stamp the grass in Garden Green. Using a Layering Square Die, cut this piece
  • Using a scalloped Layering Square Die, cut a piece of Night of Navy to go behind the bunny/ grass Whisper White piece. Adhere the Whisper White stamped piece to the Night of Navy scalloped piece with liquid glue. Put dimensionals on the back and adhere to the insert panel. Add a pom-pom for the Assorted Pom-Poms  elements available in the SAB catalogue. Stamp your sentiment (I used Itty Bitty Greetings) in Memento Black ink and adhere this insert panel to the inside of the card (the DSP layer).
  • Using a glue dot, adhere a neodynium magnet to the inside panel insert (it should sit right behind the point of the diagonal piece on dimensionals). With the second magnet attached to this, add a glue dot to the back and close the panel over the front of the card that has no decoration. This will match those magnets perfectly and allow your card to stay shut.
  • Open your card and adhere your 4 1/4″ x 4″ DSP to the card front panel using liquid glue

Wow – your card is done…

Envelope…

  • You have already stamped the grass on the envelope front. Now adhere the 2 1/4″ x 6″ DSP to the envelope flap

Card #2 is for the 12 year old growing to close to 6′ already

Tropical Oasis DSP

Tropical Oasis inside


Here’s what’s needed…

  • Old Olive and Pear Pizzazz markers
  • Light Petal Pink Blends
  • Iridescent Sequins Assortment
  • Assorted Pom-Poms
  • Burlap Ribbon – about 5″
  • Papers: Early Espresso Grapefruit Grove, Pear Pizzazz, Whisper White and Tropical Oasis DSP
  • Stitched Rectangle Dies
  • Int the Tropics Dies
  • Itty Bitty Greeting for the sentiment
  • March PP stamps

Directions are super easy…

  • Early Espresso 4 1/4″ x 11″ scored at 5 1/2″
  • Grapefruit Grove 4″ x 5″1/4″ adhered to the card front
  • Tropical… DSP 3 3/4″ x 5″ adhered next
  • With your Whisper White, stamp the palm trees and the bunny. Color the bunny using the Light Petal Pink Blends and adhere the Pom-Pom for the tail (I used liquid glue). Cut with the Stitched Rectangle Dies. Adhere to the card front using dimensionals
  • Add the Iridescent Sequins Assortment with glue dots. They are like little eggs buried for the finding. 😉

Inside the card…

  • Grapefruit Grove 4″ x 51/4″ – adhere to the inside with liquid glue
  • Whisper White 3 3/4″ x 5″ . Die cut two leaves from the In The Tropics Dies from Old Olive cs. Cut a 1/2″ x 5″ strip of matching DSP. Lightly place these so you see where to stamp the bunny.
  • Stamp the bunny in Memento Black ink. Color using the Light Petal Pink Blends
  • Adhere the leaves then the DSP Strip using liquid glue. Adhere all this to the card inside and card is complete!

the envelope…

  • Stamp the grass in Garden Green across, then the bunny in Memento Black ink, just peeking near the edge
  • Adhere the 2 1/4″ x 6″ DSP to the envelope flap.

What fun making cards for very particular folks, knowing they will appreciate and love your creations. The package is already mailed – another delay for my blogging efforts today, but I wanted it there for Easter fun.

Here are all three cards…

Fun Fold with PP bunny, grass

Fun Fold, sideways


Tropical Oasis DSP


Thanks for stopping by today. I hope you enjoyed the cards.

May you have a beautiful rest of your day

Make someone happy by sending them a handmade card.

Stampin’ Up! and a Fun Fold and DSP

Today’s card is made using Stampin’ Up! products and a very fun fold… Since we can’t be with our grands this Easter, with all the coronavirus about us, making and sending is the best I can do. I’ve gotten a bit of a late start but will finish up today so you may see the other items in a future post 😏 But for now, here we go…

Fun Fold with PP bunny, grass

DSP Treat holders


Items needed for the card…

  • Garden Green 5 1/2″ x 8 1/2″, scored at 4 1/4″, then 1″ removed from the front; 3 1/4″ x 6 1/2″, scored at 3 1/4″ (this is the insert); approximately 3″ x 3″ for front of insert; 2 1/4″ x 6″ for the envelope flap
  • Designer Series Paper (DSP) of choice 3″ x 5 1/4″ for the left front; 4″ x 5 1/4″ for the inside
  • Whisper White 3 x 5 1/4″ for inside the front flap; 3″ x 3″ for the left part of the insert; approximately 3″ x 3″ for the front of the insert
  • Iridescent Sequins Assortment from the SAB catalogue
  • Basic Pearl Jewels
  • Assorted Pom-Poms from the SAB catalogue
  • Layering Squares Dies
  • March PP stamps
  • Garden Green ink & Memento black ink

Directions…

  • Adhere DSP to the card front, the inside and the insert plus your envelope flap
  • Stamp your bunny in Memento Black ink for the insert front, create a mask for the bunny, place it over the stamped bunny on the Whisper White cs, and stamp the grass with your Garden Green ink (I love this grass!!!)
  • Using just the grass stamp, stamp the Whisper White piece for inside the front of the card, stamping twice (Did I say I love this grass?)
  • Go ahead and stamp your envelope while you have everything handy 😁
  • Die cut your bunny that is on the 3″ x 3″ piece with a Layering Squares Die
  • Die cut the 3″ x 3″ Garden Green with the scalloped Layering Squares Die. Adhere the two together with liquid glue, put on dimensionals and adhere to the insert piece, MAKING CERTAIN THE FOLD IS ON THE RIGHT.
  • Adhere this to the inside of your card – almost finished…
  • Stamp your 3″ x 3″ piece with sentiment of choice. Mine came from A Wish For Everything stamp set and Itty Bitty Greetings stamp set

Fun Fold inside

Items needed for the treat bags…

  • 6″ x 6″ DSP of choice (Our grands are 19, 12 and 10, the girl being the 10 yr old. Can you tell which treat bag goes to which grand?)
  • Buttons (these are retired ones in my stash!)
  • Thread or twine to coordinate (again retired items in my stash)
  • Tear n Tape
  • Glue dots

Directions for the treat bags…

  • Choosing one side, adhere Tear n Tape almost to end of paper
  • Fold DSP into a cone shape carefully rounding the paper so it doesn’t fold, adhere together
  • Thread button and tie a bow, adhere to DSP with glue dots
  • FILL – this is important 😳

Thanks for stopping by today. It was nice being with you to share my creations. 

May you have a beautiful day.

Make someone happy by sending them a handmade card – or a treat!

Fun Fold with PP bunny, grass

DSP Treat holders

Stampin’ Up! More… Morning Magnolia Memories and More Card Pack

Todays post brings a few more cards made with the Morning Magnolia Memories and More Card Pack. I took yesterday off and didn’t post. Could you tell? 😏 What a strange Palm Sunday it was! Our church is doing its worship services by Livestreaming and that’s good, just feels odd. All this social distancing… some people do it, others not so much. Ah sigh… guess we have to give this at least another month. I’m doing my best, so is hubby. We are very upbeat and positive people and that’s good, ‘cuz we don’t get ‘down in the dumps’ much. I just feel for those folks who panic easily. It’s helpful for everyones psyche when there is a sense of order to our lives ~ and well, we don’t have that right now. I mean, sometimes I forget what day of the week it is!!! ‘Nuf… on with the cards. I only made three this time…. and I tried just using the elements from the card pack. I was successful to a point.

Card #1…

  • Whisper White cardstock behind the printed vellum, Early Espresso behind the ‘card’ and placed on dimensionals.
  • The inside uses the same cardstocks and sticky embellishments from the card pack.
  • This could be a nice masculine card!

Morning Magnolia Memories and More Card Pack card #1

card #1 inside


Card #2…

  • Nothing behind the printed vellum this time and I kind of like it with this particular card. Petal pink is behind the ‘card’ and both are wrapped with the Petal Pink gold edged ribbon from the SAB catalogue, then raised on dimensionals.
  • The inside is simple but elegant to me… Petal Pink and Whisper White cardstocks, two strands separated from the Flax 5/8″ ribbon tied in a bow and the sentiment is from Parisian Beauty stamp set, also from the SAB catalogue.

Morning Magnolia Memories and More Card Pack card #2

inside card #2


Card #3…

  • Vellum on one of the larger cards from the pack, the magnolia is on a dimensional and then a small linen thread ribbon adhered with a glue dot.
  • The inside is Mint Macaron and Whisper White cardstock with one of the sticky embellishments in the card pack.

Morning Magnolia Memories and More Card Pack card #3

inside card #3


That’s it folks – what do you think? I’m rather pleased with these and hope you like them too. Although I have a very few of the cards and envelopes left, tomorrow we’ll have something else to share. If you are interested in purchasing the Morning Magnolia Memories and More Card Pack (item # 149554)and the Magnolia Lane Large Specialty Memories and More Cards and Envelopes (item #149487), check them out in the 2019-20 Catalogue on page 171. These two together make a huge number of cards. There are 50 double sided cards in the card pack – two different sizes, some vellum sheets included and 4 sticker sheets with some really fun and beautiful options for creating your own ideas; and 20 large specialty cards and envelopes in the other pack. Am I encouraging you to purchase these two items – you bet I am. They are a wonderful product and very reasonably priced.

When you purchase product from me, please use my CURRENT HOST CODE ZUPR7SAY for purchases between $50- $150 to receive a free $10 item of your choice from me. Such a deal!!!

Thanks for stopping.

May you have a beautiful day.

Make someone happy by sending them a handmade card.

Stampin’ Up! Magnolia Lane Memories and More Card Pack

Today’s post is all about the fun Stampin’ Up! Magnolia Lane Memories and More Card Pack with the coordinating Magnolia Lane Large Specialty Memories and More Cards and Envelopes.. Do you hoard some of your card making products? Let’s say I used to but am getting better at actually making use of most everything. So why do I ask about hoarding? I have had this card pack for quite some time, used one or two then set it aside. I even made a fun “album” of sorts very early on. There were so many new products I think I got a bit overwhelmed. Yesterday I pulled out that card pack and went to ‘town’. I think this would make a lovely gift package as there are birthday, wedding, and congratulations cards made from this set. Enjoy.

These large specialty cards and envelopes are of a lighter weight paper than our regular cardstock, so you will notice I have used additional cardstock behind all the cards. I just felt it needed it and even more importantly, I liked the look. 😏 Here’s  what I used on various cards along with the Magnolia Lane Memories and More Card Pack … Notice nearly every card has aspects on dimensionals. I really like the layered look

Card #1…. Large Specialty Cards and Envelopes and the Magnolia Lane Ribbon Combo pack, Early Espresso cardstock, Glitter Enamel Dots, Whisper White and the Woven Heirlooms stamp set

Magnolia Lane Memories and More Card Pack card #1

Inside card #1


Card #2…. Magnolia Lane Ribbon Combo pack, Garden Green cardstock, Good Morning Magnolia stamp set in Mossy Meadow ink

Magnolia Lane Memories and More Card Pack card #2

Inside card #2


Card #3….Mossy Meadow cardstock, Basic Pearls colored with Light and Dark Petal Pink Stampin’ Blends, Whisper White cardstock. Yes I split the Whisper White inside… ‘cuz I wanted to!

Magnolia Lane Memories and More Card Pack card #3

Inside card #3


Card #4….Mossy Meadow cardstock, Whisper White cs, Positive Thoughts stamp set in Mossy Meadow ink

Magnolia Lane Memories and More Card Pack card #4

Inside card #4


Card #5…. Whisper White cardstock and Basic Pearls. I did nothing special on the inside, just added Whisper White cardstock. Yes, itg will need a swentiment but I couldn’t figure out what at the time. 😔

Magnolia Lane Memories and More Card Pack card #5

Card #6….Linen Thread in a triple bow, Whisper White cardstock, Petal Pink cs, Good Morning Magnolia stamp set for the flower, Light and Dark Petal Pink and Old Olive Stampin’ Blends for coloring the flower, Peaceful Moments for the sentiment stamped in Early Espresso ink

Magnolia Lane Memories and More Card Pack card #6

Inside card #6


Card #7….Early Espresso cardstock, Magnolia Lane Ribbon Combo Pack, Crumb Cake ink, Good Morning Magnolia stamp set for the sentiment

Magnolia Lane Memories and More Card Pack card #7

Inside card #7


So do you have a favorite. I think mine are cards #1, #6 and #7. Sometimes I liked the inside better than the outside! Imagine that. Thanks to those who inspired these creations. If I found something I liked, I put my own twist on it.

Thanks for stopping by today.

May you have a beautiful day.

Make someone happy by sending them a handmade card.


Stampin’ Up! Peaceful Poppies Peek – a -boo Card

Today’s card features the Stampin’ Up! Peaceful Poppies DSP and several coordinating products: Peaceful Poppies Elements, Poppy Moments Dies, the Peaceful Moments stamp set AND the Painted Poppies stamp set – all in one card! So fun… here it is…

Peaceful Poppies Peek-a-boo Card

And here’s how to make it…

  • Whisper White Thick card stock for the card base 4 1/4″ x 11″ scored at 5 1/2″
  • Peaceful Poppies DSP 4″ x 5 1/4″. Adhere to the card front with liquid glue.
  • Using the second largest circle in the Layering Circles Dies, cut a circle about 3/4″ from the top and centered right to left.
  • Cut another circle out of coordinating Peaceful Poppies DSP using the same circle die.
  • Using the largest Stitched Shapes Dies circle, cut a circle from Rich Razzleberry.
  • Adhere the coordinating DSP circle to the Rich Razzleberry circle with dimensionals.
  • Place the circle on the inside without glue. Locate the correct placement for this circle set by closing the card front over it, carefully lifting the card front while still holding the double circle in place. Make very small pencil marks on the outside of the double circle to use as a guideline for adhering. Attach this to the card inside with liquid glue. Erase pencil marks if they show.

That was the hard part! Now the rest is easy… Back to the card front…

  • With your Peaceful Poppies Elements at hand, remove the double poppy and three leaves from the vellum. I arranged these as desired and felt something more was needed.
  • Diecut the leaves from vellum using the Poppy Moments Dies
  • The double poppy elements were put on dimensionals, but before adhering, the vellum leaves were adhered with glue dots,. making certain those glue dots would be covered by the double poppy element. Attach the double poppy.
  • Stamp your sentiment using the Painted Poppies stamp set with Memento Black ink.

The inside…

Peaceful Poppies DFSP with Well Said stamp set

  • Because the circle is already in place, all you need is your sentiment. I found these two from the Well Said stamp set, stamped in Memento Black ink.

The envelope…

  • Using liquid glue, adhere a 2 1/4″ x 6″ strip of the coordinating DSP to the envelope flap and trim.
  • On the card front, stamp the leaves from the Painted Poppies stamp set with Memento Black ink.
  • Color the leaves with Old Olive marker and the stem with Granny Apple Green marker. TIP… when coloring anything, leave a bit of white showing. It gives the leaf (or whatever the stamp is) a bit of reality and depth.

Your card is complete and ready to send… this one is going to a fellow stamper who has just achieved a goal. Hope she likes it!

Peaceful Poppies #2

Peaceful Poppies Peek-a-boo Card


Thanks for stopping by today.

May you have a beautiful day!

Maker someone happy by sending them a handmade card.

Please use my CURRENT HOST CODE WHEN SHOPPING WITH ME… XYW2SYNV. Sale-a-bration ends today, March 31. I’ll be back later with more info about that.

Stampin’ Up! Flowering Foils Card and Gift Bag

My card today uses the stunning Stampin’ Up! Flowering Foils papers that can be earned with a $50 order. It also uses Daisy Lane Stamp set, Around the Corner stamp set, Beautiful Bouquet stamp set, the Medium Daisy punch and the Bouquet Bunch dies.Sounds like a lot doesn’t it? But the card was super fun and easy to create. Here it is…

Isn’t this fun? I really, really like it. This Flowering Foils paper has some body to it, was easy to work with and is stunning in person. Pictures really does not do it justice. My intension was to make a masculine card but once I got started, well, you see what happened. It isn’t masculine at all!

Here are the details:

  • Smokey Slate card stock cut to 8 1/2″ x 5 1/2″, scored at 4 1/4″
  • Blueberry Bushel cut to 4 3/4″ x 3 1/4″
  • Flowering Foils cut to 4 1/2″ x 3″

So how did I get this wonderful ombre effect? By using a brush roller! Using the roller, roll over the ink pad GOING IN ONE DIRECTION ONLY, NOT BACK AND FORTH. This allows the ink to cover the entire roller, not just sections of it. Put roller to paper starting at the top of the foils paper and moving downward. I did not go to the end of the piece as I wanted a gradient color. Continue this process until it’s to the depth of shade desired. Allow to dry a few minutes then buff lightly with a soft cloth to remove ink from the foil design. This is a bit of a messy process as it gets ink on your hands during the handling and holding of the paper. Just make certain the ink on your hands is dry before handling other papers!

  • Adhere the Flowering Foils piece to the Blueberry Bushel using liquid glue. Wrap braided linen thread around these two pieces and tie in a knot
  • Using the Daisy Lane stamp set stamp three daisies on Whisper White card stock and punch out with the Medium Daisy punch. Curl the petals by running a bone folder over the petals and lifting them. Adhere daisies together with glue dots. Adhere over the ribbon with a dimensional. Adhere a Gold Faceted Gem in the daisy center.
  • Stamp the “for you” using Blueberry Bushel ink and the Beautiful Bouquet stamp set onto a Whisper White scrap. Cut out using the Bouquet Bunch dies. Put a dimensional on the back, slip a length of linen thread through the hole and tie in a knot to the braided linen ribbon.
  • Adhere all this with dimenionals to the Smokey Slate cs and the card front is complete!

This card is for a friend who will be running a convention in a couple of months, and that’s why the sentiment on the inside. Here it is…

  • Blueberry Bushel 4 3/4″ x 3 1/4″
  • Whisper White 4 1/2″ x 3″
  • Stamp the sentiment with Blueberry Bushel ink
  • Add a Noble Rhinestone jewel and the card is complete.

The envelope…

  • The envelope got the same treatment on the flap, using a piece of the Flowering Foils cut 2 1/4″ x 6″, adhering with liquid glue and trimming to size.
  • On the envelope front I stamped the sentiment from Around the Corner stamp set in Blueberry Bushel. Since this card will be hand delivered, I adhered five jewels from the Noble Peacock Rhinestone pack

I love this card – did I say that already? Hope you do as well. Now – on with the matching gift bag..


  • Cut a piece of Flowering Foils paper 6″ x 12″. Create the ombre effect as described above.
  • Score on the long side 1 1/2″, 5 3/4″, 7 1/4″ and 11 1/2″.
  • With the ombre on the right, score on the short side 1 1/2″
  • Burnish all score lines.
  • Remove the small 1/2″ section below the 1 1/2″ score line. Adhere Tear n’ Tape to the long 1/2″ section
  • Cut up to the 1 1/2″ score line
  • Fold over the bag to the Tear n’ Tape; fold up the bottom and adhere with Tear n’ Tape
  • Pinch top; Wrap a length of Braided Linen Ribbon around the bag, tie in a bow
  • Stamp the ‘Smile’ sentiment from the Daisy Lane stamp set in Blueberry Bushel. Punch out with the Tailored Tag Punch. Add you own ‘scrolly’ around the edge. Using the Tailored Tag Punch , punch another from Blueberry Bushel cs and cut in half. Adhere the white punched piece to the two sections of Blueberry Bushel creating an even border. Adhere with dimensionals to the bag. DONE!
  • I want to give credit to Pootles for the wonderful video on YouTube that inspired this fun set. Thank you!

Thanks for stopping by today. I hope you liked this fun set. Remember this Flowering Foils paper is available during the rest of Sale-a-bration (Mar 31!) with a $50 order. In other words it;s a FREE ITEM!

May you have a beautiful day. Make someone happy by sending them a handmade card.


February Paper Pumpkin from SU!

Extra short post today but I wanted to share with you my current creations with the February PP kit. PP is such a treat to receive with all the embellishments, glue dots, dimensionals, card stock AND directions. I usually create one or two per directions that come with the kit, but not always. Here’s what I’ve done thinking “outside the box” …

Questions about PP? Please contact me for more details… now is a great time to invest in this monthly subscription. If you are interested in the March subscription you may order until Mar 10. One of the ideas SU! is using is coordinating the PP with current stamp sets. WOW, does this make it even more valuable for future use.

For now – ta ta. Enjoy your day… make it better by creating and sharing what you love to do!

Country Club, Father’s Day

Hi there! Today’s card is in preparation of our fathers or brothers or male friend – Father’s Day  -and we are ahead of the game 😉 It could easily be changed to a birthday card using the same stamp set/ dies. The Designer Series Paper that coordinates with this stamp set is so stately, I just really, really like it. You can find these items in the Jan-Jun Mini Catalogue.

Here’s how to do the card cuts…

  • Card base is Garden Green 4 1/4″ x 11″ scored at 5 1/2″.
  • Bottom layer is Pear Pizzaz 1 7/8″ x 5 1/4″,  DSP is adhered with Tombow glue and is 1 3/4″ x 5 1/8″
  • Layer #2 is Pear Pizzaz at 2 1/4″ x 4 1/4″; Garden Green cut at 2 1/8″ x 4 1/8″; then DSP is 2″ x 4″
  • Top layer is Pear Pizzaz 2 3/4″ x 3 1/4″; Garden Green 2 5/8″ x 3 1/8″; Whisper White 2 1/2″ x 3″

Stamp the sentiment in Night of Navy on the Whisper White piece; cut the golf clubs and the balls out of Silver foil, adhering with Tombow glue. Card front is done!

Inside..

Stamp the sentiment in Night of Navy on Whisper White which is cut at 4″ x 5″; adhere another of the golf balls with Tombow glue; adhere to the card base… inside done!

I showed this card to my hubby and he loved it! He said it looked so elegant – made my head swell just a little 😏. Thanks for stopping by. Remember to use my

current Host Code 2TMMA9HX

to receive free goodies from me if your purchase is over $50 but not over $150. The freebie is an item of your choice not to exceed $10 and will be sent at the end of the month. One item per customer, thank you!

Please feel free to contact me if you have questions: tlsbrightspot@gmail.com or comment on my website.