
Today’s card is made using Stampin’ Up! products and a very fun fold… Since we can’t be with our grands this Easter, with all the coronavirus about us, making and sending is the best I can do. I’ve gotten a bit of a late start but will finish up today so you may see the other items in a future post 😏 But for now, here we go…

Fun Fold with PP bunny, grass

DSP Treat holders
Items needed for the card…
- Garden Green 5 1/2″ x 8 1/2″, scored at 4 1/4″, then 1″ removed from the front; 3 1/4″ x 6 1/2″, scored at 3 1/4″ (this is the insert); approximately 3″ x 3″ for front of insert; 2 1/4″ x 6″ for the envelope flap
- Designer Series Paper (DSP) of choice 3″ x 5 1/4″ for the left front; 4″ x 5 1/4″ for the inside
- Whisper White 3 x 5 1/4″ for inside the front flap; 3″ x 3″ for the left part of the insert; approximately 3″ x 3″ for the front of the insert
- Iridescent Sequins Assortment from the SAB catalogue
- Basic Pearl Jewels
- Assorted Pom-Poms from the SAB catalogue
- Layering Squares Dies
- March PP stamps
- Garden Green ink & Memento black ink
Directions…
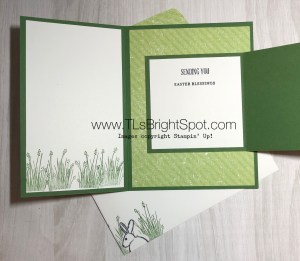
- Adhere DSP to the card front, the inside and the insert plus your envelope flap
- Stamp your bunny in Memento Black ink for the insert front, create a mask for the bunny, place it over the stamped bunny on the Whisper White cs, and stamp the grass with your Garden Green ink (I love this grass!!!)
- Using just the grass stamp, stamp the Whisper White piece for inside the front of the card, stamping twice (Did I say I love this grass?)
- Go ahead and stamp your envelope while you have everything handy 😁
- Die cut your bunny that is on the 3″ x 3″ piece with a Layering Squares Die
- Die cut the 3″ x 3″ Garden Green with the scalloped Layering Squares Die. Adhere the two together with liquid glue, put on dimensionals and adhere to the insert piece, MAKING CERTAIN THE FOLD IS ON THE RIGHT.
- Adhere this to the inside of your card – almost finished…
- Stamp your 3″ x 3″ piece with sentiment of choice. Mine came from A Wish For Everything stamp set and Itty Bitty Greetings stamp set
Fun Fold inside
Items needed for the treat bags…
- 6″ x 6″ DSP of choice (Our grands are 19, 12 and 10, the girl being the 10 yr old. Can you tell which treat bag goes to which grand?)
- Buttons (these are retired ones in my stash!)
- Thread or twine to coordinate (again retired items in my stash)
- Tear n Tape
- Glue dots
Directions for the treat bags…
- Choosing one side, adhere Tear n Tape almost to end of paper
- Fold DSP into a cone shape carefully rounding the paper so it doesn’t fold, adhere together
- Thread button and tie a bow, adhere to DSP with glue dots
- FILL – this is important 😳
Thanks for stopping by today. It was nice being with you to share my creations.
May you have a beautiful day.
Make someone happy by sending them a handmade card – or a treat!
Fun Fold with PP bunny, grass
DSP Treat holders

Very cute card and treat holders! They’ll love them! 🙂
LikeLiked by 1 person