Stampin’ Up! Color & Contour + Delightfully Eclectic Fun Fold

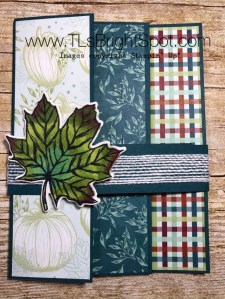
We have a challenge of a ‘fun fold’ for Amy’s Inkin’ Krew Blog Hop Group today. I’ve combined Delightfully Eclectic DSP and the Color & Contour bundle for my card.

Stampin' Up! Amy's Inkin' Krew 
Blog Hop Group
Stampin' Up! Color & Contour Fun Fold

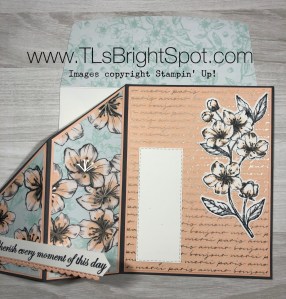
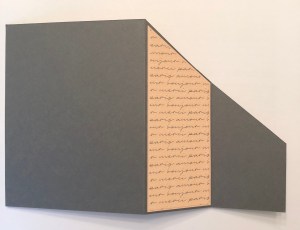
This fun fold uses a 5 1/2 x 12 piece of Designer Series Paper. Here I’m using Delightfully Eclectic. It’s scored @ 1 3/4, 4 3/4, & 7 3/4 and folded accordian style or valley, mountain, valley. Here’s the finished card, open.

Stampin' Up! Color & Contour Fun Fold inside

Using the Scalloped Contour Dies, cut 3 from Bubble Bath card stock cut 3 1/4 x 4 1/2. Begin by adhering to the back panel first, centering the die cut. Fold DSP at 2nd score line and attach 2nd Bubble Bath die cut so that it is even with the die cut on the bottom panel. Remember, the adhesive will not cover the entire die cut as there is some ‘overhang’. See photo.

Stampin' Up! Color & Contour fun fold

Close entirely and attach the front Scalloped Contour die cut. I do this by turning the die to the wrong side and add adhesive to back side as per this photo. That way I do not put adhesive where it is not needed!

Stampin' Up! Scalloped Contour Dies.3
Stampin' Up! Color & Contour fun fold closed

Cut 3 panels of Basic White card stock and decorate as desired. For the front panel I used a Color & Contour sentiment and stamped it in Memento ink. I then used the blotchy dot stamp and Bubble Bath ink to stamp over the sentiment. I attached this to the front Scalloped Contour die then added a flower already put together from the Paper Florist Dies (cut from Fresh Freesia and Basic White) and added it as you see it. As a final touch to the front, I added three Tinsel Gems in Berry Burst. For the second section of this fun fold, I stamped the flower in Memento ink from Color & Contour stamp set, then colored it with the additional stamps provided: Fresh Freesia for the flowers and Old Olive for the leaves. I then stamped the sentiment on this panel in Memento ink. For the last panel I stamped the sentiment from Color & Contour stamp set in Memento ink, then the splotchy dots in Bubble Bath and added the panel. Once everything was together, I attached a panel of Old Olive card stock ( 4 1/4 x 5 1/2) to the very back to add strength and stability to the card. All done!

Stampin' Up! Color & Contour Fun Fold.4

The envelope got more of the Delightfully Eclectic DSP to the flap, & trimmed to fit. For the front I stamped the leaves in Old Olive, the bud in Memento, then filled the bud with Bubble Bath – all from the Color & Contour stamp set. This is such a sweet, delicate card. I absolutely love it. I hope you do as well.

Now it’s time to continue the hop. Do that by clicking on one of the “previous’ or ‘next’ or a name to continue.

Stampin' Up! AIK previous button
Stampin' Up! AIK 'next' button
  1. Tara Carpenter
  2. Karen Ksenzakovic
  3. Akiko Sudano
  4. Mary Deatherage
  5. Carol Buckalew
  6. Karen Finkle
  7. Ann Louise Fodgaard
  8. Terry Lynn Bright
  9. Amy Koenders

BONUS DAYS for Stampin’ Up! have begun… and run for this entire month

Stampin' Up! Bonus days

BONUS DAYS! Because do you know what’s a great deal? Getting rewarded for all the crafting supplies you’re already going to buy! When you shop between 6–31 July and spend $50 USD | $60 CAD you will earn a $5 USD | $6 CAD coupon! Make sure you saveall your coupons because you can redeem them (and we mean ALL of them) between 1–31 August.

  • Coupon codes may be redeemed for any product (excluding Starter Kits, demonstrator supply items, and Paper Pumpkin month-to-month subscriptions).
  • New prepaid Paper Pumpkin codes may be discounted using Bonus Days coupon codes.
  • You can shop with me here.
Stampin' Up! ONLINE EXCLUSIVES

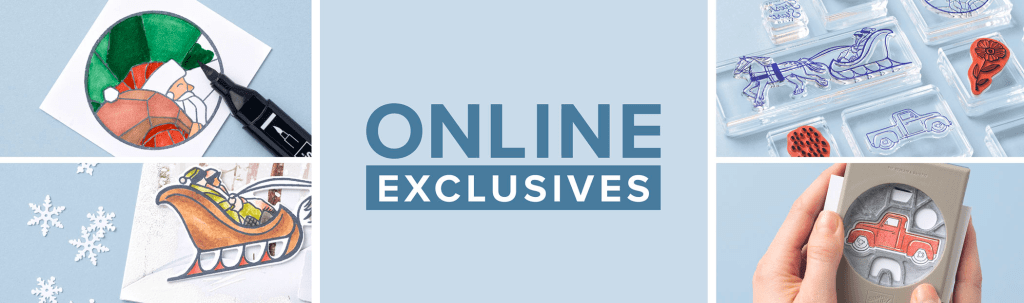
New Product release in the Online Store as of Jul 6.

ONLINE EXCLUSIVES are just that – ONLINE ONLY products not shown in any Stampin’ Up! Catalog. New products mean new inspiration and new ways to express your creativity and develop your business! 6 July, there will be even more Online Exclusive products for you to shop. The best way to see what is available is to view the online store.

Visit here to shop these EXCLUSIVES.

And if you wish to order these products, be sure to use my current HOST CODE to receive rewards. What does that mean? With every order of $50 you receive a FREE GIFT from me of a SU! items of your choice valued to $10. If your order is over $150, don’t use my host code, but you’ll still get my free gift item.

HOST CODE CV4N6Y6M

Thanks for stopping by. May you have a beautiful day.

Stampin’ Up! By the Bay Book Fold Card

Good morning folks! It’s Saturday… and I have a masculine card for you using the By the Bay Designer Series Paper. This is for a gentleman who just had a hip replacement and is struggling with being able to do things. Thankfully he just began rehab, but he’s a bit ‘under the weather’ you might say. He’s a really big man and that’s part of the trouble… moving isn’t easy. So, a card for encouragement!

Stampin' Up! By the Bay Book fold

Isn’t this paper pretty? It’s also masculine and that helps me keep it simple. I really like how these papers coordinate and in corporate other shades of blue and bring in Sahara Sand and some sparkly as well. I used Wisteria Wishes stamp set for the sentiment and Night of Navy ink. To die cut, I used two dies from Something Fancy Dies (carrying over!) and die cut the larger in Night of Navy and the sentiment is Basic White. I wrapped Linen thread around each end of the Basic White piece (this fellow is a sailing friend and it fits), tied knots then added it to the Night of Navy piece with dimensionals. Then onto the card base with liquid glue. I added Sea Glass embellishments to tie in the colors of the DSP.

So… book fold how to:

  • Card base is 4 1/4 x 11 scored @ 5 1/2 and 6 3/4. Burnish the score lines
  • Add adhesive to the area between score lines and secure to the unscored section of the card. And there you have it, the book fold!

My card base is Balmy Blue – a carry over color. :O) The layers on the card are Night of Navy (carry over color) and the DSP. I’ll put the measurements at the bottom of the post. For the inside Idid not add the layer of Night of Navy, but did add a 5/8 strip of the By the Bay DSP to the Basic
White panel.

Stampin' Up! By the Bay book fold, inside

This inside leaves plenty of room for words of personal encouragement for this gentleman. For the envelope, I again kept it really simple… more By the Bay DSP on the envelope flap and that was it. This man does not want fussy.

Now… products… As you know Stampin’ Up! is coming out with their new 2023-2024 Annual Catalog May 2 and have done a color refresh at the same time. That’s why I mentioned Balmy Blue and Night of Navy are carry over colors. Below is a list of those colors being retired.

  • Blushing Bride
  • Pear Pizzazz
  • Mint Macaron
  • Rich Razzleberry
  • So Saffron
  • Merry Merlot
  • Pacific Point
  • Mango Melody
  • Soft Suede
  • Sahara Sand
  • Bermuda Bay
Stampin' Up! 2023-2025 In Colors

These new In Colors are…

  • Pebble Path
  • Moody Mauve
  • Boho Blue
  • Copper Clay
  • Wild Wheat.

Love, love these new colors! You can see a fun video here… about these colors. Drum roll here… this next graphic shows all the colors being used in the new 2023-2024 Annual catalog. You will note there are some returning colors, meaning from past years, and new colors being introduced.

As with all things retiring, there is a retiring list for both the 2022-2023 Annual Catalog AND the Jan-Apr 2023 Mini Catalog. These items are available while supplies last… and the sale beings 4 April through 1 May.

Stampin' Up! LAST CHANCE PRODUCTS

Click here for the PDF of the January to April LAST CHANCE PRODUCTS

Click here for the PDF of the 2022-2023 Annual Catalog

I have put together a list of bundles that are items carrying over, just not as bundles.

Stampin' Up! Retiring bundles from the 2022-2023 Annual Catalog
Stampin' Up! Retiring bundles from Jan-April 2023 Mini Catalog

OK, want to buy products? Here ya go… And remember to use my HOST CODE CXR49K4W when shopping with me. . Here’s how it works… when you place an order of $50 or more (before shipping & taxes), you receive from me a SU! item valued up to $10 + Star-Studded Rewards. If your order exceeds $150, do not use my HOST CODE as SU! has it’s own rewards from which you may choose. You will still receive that FREE ITEM valued up to $10 from me + the Star-Studded Rewards. 

DOUBLE STAR REWARDS MAR 29 – APRIL 5 That means double the pleasure, double the fun. If you want those colors retiring as of May 1 – get them now: papers, ink pads, ink refills – only available while supplies last!

Please note… I have had to remove card stock as a free item due to increased cost of mailing – ugh.

For every $50 that you order from my online store (before shipping & taxes) and when you add my current Host Code CXR49K4W you will earn 1 STAR Reward.  Orders of $49.99 or below DO NOT earn any rewards. Example $50 = 1 STAR Reward, $100 = 2 STAR Rewards , $150 = 3 STAR Rewards etc. When you have earned 8 STAR Rewards you will get a FREE product order valued up to $40.00, your choice, and mailed directly to you! Is that a deal or what??? You also earn my monthly Online Class Tutorial of exclusive projects when you place an order. For any order $50 or more you will also receive 1 free gift from me valued up to $10.  DOUBLE STAR REWARDS MAR 29 – APRIL 5 That means double the pleasure, double the fun.

For todays card…

Card cuts:

Balmy Blue: 4 1/4 x 11 scored at 5 1/2 & 6 3/4

Night of Navy: 1 1/8 x 4 1/8; 4 1/8 x 4 1/8

By the Bay DSP: 1 x 4; 4 x 4; 5/8 x 4; 2 1/4 x 6 (envelope flap)

Basic White: 4 x 4

Stampin’ Up! Perched In A Tree Support

Good morning, good morning. I’ve an encouragement card for you today. A friend of mine has had some health issues for a bit & just needs a ‘pick-me-up’, so I send cards every now & then to let her know she’s in my prayers and not forgotten in her pain. I’ve used Perched In A Tree stamp set with it’s coordinating Aspen Tree Dies – one of my favs.

Stampin' Up! Perched in a Tree.1

I’ve tried coloring this sweet bird similar to a chickadee – not sure that worked so that’s why I’m telling you :O). I used Watercolor Pencils after stamping with Memento ink on a Basic White scrap: Basic Black, Basic Gray, Daffodil Delight, Calypso Coral , Whisper White and then blended with a Blender Pen to smooth the lines. It was then die cut with the appropriate die from the Aspen Trees Dies. My next step was to die cut several of these gorgeous leaves from the Aspen Trees Dies: Brushed Metallic paper & Copper Foil Sheets. I used a circle on my desk die cut for another project to create the sun/ moon. I used a Blending Brush with So Saffron ink then Mango Melody ink around the edges. It isn’t real bright cuz it’s on Gray Granite card stock. I used another Blending Brush to add some Balmy Blue ink all over, making it look like sky. It’s very subtle, but definitely there in person. I stamped the tree branch in Soft Suede ink and the sentiment in Memento ink – both from the Perched in a Tree stamp set. The bird was adhered over the branch with dimensionals, then the leaves added with liquid glue. The center leaf is adhered with liquid glue at the stem and a dimensional on its leaf tip for more depth. This panel was added to a Basic Gray card base.

Stampin' Up! Perched in a Tree. Support.2

For the inside I stamped the sentiment in Balmy Blue ink using Perched In A Tree stamp set, then used a Blending Brush to add a frame of color to the Basic White panel. I included the large die cut leaf from the Aspen Trees Dies with liquid glue. This leaf was die cut from Copper Foil Sheets. The panel was added to the inside of the Basic Gray card base.

Stampin' Up! Perched in a Tree. Support.3

For the envelope, stamp the branch again with Soft Suede ink on the front. Add a strip of Basic Gray that has been run through the Timber 3D embossing folder to the flap, trim to fit. This could so easily be a masculine card, and I don’t have many of those. However, as I mentioned earlier, this for a woman friend this time.

If you would like to order the products to make this card, please see the list below. Please use my current host code: 4TMA4FZU and remember I offer Star-Studded Rewards As a thank you to my customers I also offer a free item from Stampin’ Up! valued to $10 with your order of $50 and above. Click here to go my store. When the order is over $150, you still receive that free gift from me, but SU! has Stampin’ Rewards that may be used for additional products, so don’t use the host code at that time. If you have questions just let me know. You also earn my monthly Online Class Tutorial of exclusive projects when you place an order of $50 or more. If you would like to be able to order products early from catalogs AND enjoy that 20% discount, join my team now… you may do that here. WooHoo! We have lots of fun and are a creative bunch that encourages & supports one another. Would love to have you. :O) Speaking of joining, below the product list is the current Stampin’ Up! joining special!

Stampin’ Up! has an awesome joining special right now – which makes me ask – why wouldn’t you join now?It’s a fabulous time to join Stampin’ Up! For a limited time, new team members will get even MORE FREE products in their customizable Starter Kit. Sign up between 4–31 October and you’ll get $125 USD | $165 CAD $155 USD | $206 | $135 CAD worth of products + free business supplies + all the fun being a part of our fantastic community! You may do that here.

My Star-Studded Rewards as a THANK YOUDOUBLE OCT 3-7, 2022

For each $50 that you order from my online store (before shipping & taxes) and when you add my current Host Code, you will earn 1 (2) STAR Reward.  Orders of $49.99 or below DO NOT earn any rewards.Example $50 = 1 (2) STAR Reward, $100 = 2 (4) STAR Rewards , $150 = 3 (6) STAR Rewards etc.
When you have earned 8 STAR Rewards you will get a FREE product order valued up to $40.00, your choice, and mailed directly to you! Is that a deal or what??? You also earn my monthly Online Class Tutorial of exclusive projects when you place an order. For any order $50 or more you will also receive 1 free gift from me valued up to $10. Remember to use MY current HOST CODE: 4TMA4FZU Click here to go my store.
HAPPY SHOPPING!

Here are more really cool specials Stampin’ Up! is offering.

Stampin' Up! Fitting Florets Special

This could be added to your joining items as a demonstrator – only available right now to demonstrators. As a demonstrator, this can be ordered Oct 4-31, same time frame as the joining promotion 😁 just sayin’ – you may join my team here. And you can see a card I posted with the above items here.

Stampin' Up! Birthday Card Organizer

161056 BIRTHDAY CARD ORGANIZER KIT. $25 USD | $34 CAD

  • Kit includes one 8″ x 10″ (20.3 x 25.4 cm) monthly planner with space to record birthdays each month as well as a pocket sleeve to hold birthday cards.
  • Includes 12 full-size birthday cards, 6 of 2 designs, and 12 coordinating envelopes.
  • Includes Glue Dots, Stampin’ Dimensionals, Adhesive-Backed Embellishments, and Tear & Tape Adhesive
  • Includes die-cut florals and pieces ready for you to use­—no prep work required!
  • Includes sticker sentiments and die-cut labels in Dutch, English, French, and German
  • Coordinating colors: Basic Black, Evening Evergreen, Petal Pink, Sahara Sand, and Soft Succulent
Stampin' Up! Christmas Gifting Kit

160342 CHRISTMAS GIFTING KIT $21 USD | $29 CAD

  • Kit includes 9 tags and 9 gift card holders—3 each of 3 designs
  • Includes the exclusive Christmas Gifting Stamp Set and a Shaded Spruce Classic Stampin’ Spot
  • Sized to fit standard gift cards
  • Coordinating colors: Basic Black, black foil, Mint Macaron, Real Red, Shaded Spruce

Thanks for stopping by.

May you have a beautiful day.

Make someone happy sending them a handmade card filled with love.

Stampin’ Up! Paradise Palms for the Happy Inkin’ Thursday Blog Hop

WooHoo! It’s time for another fabulous Happy Inkin’ Thursday Blog Hop. Below is the sketch challenge ~ and just so you know, I was very liberal in my interpretation of the sketch :O)

And here’s my card… don’t you just love these palm trees? They were die cut with the Palms Dies from the sparkly Ombre Specialty Paper (why haven’t I used this paper more often???). I’m not certain the variation shows very much in the picture, but it does in person. In my interpretation of this sketch, I moved the center panel to the bottom of the card and in lieu of flowers I bordered the panel with grasses, also die cut using the Palms Dies. As I mentioned – loose interpretation.

The background paper is the wonderful Pattern Party DSP adhered directly to the Flirty Flamingo card base. I adhered the left palm with liquid glue, then the center palm with dimensionals cut down to fit and liquid glue at the bottom of the trunk. The right palm tree was also adhered with liquid glue, slipping it under the center palm and trimming the trunk to the proper length. I cut two of the grasses to fit below the palms: in Garden Green and the new Parakeet Party card stocks. The banner is 3/4″ and trimmed at each end with the Lovely Labels Pick a Punch. The sentiment was stamped in Early Espresso ink using the Through It Together stamp set. I adhered the banner with liquid glue and dimensionals along the bottom and right end. I die cut two more of the grasses, this time from Mossy Meadow card stock and adhered them with liquid glue and dimensionals. I added several (too many???) Holiday Rhinestone Basic Jewels both to the banner and in the palm trees. Those in the trees represent coconuts! (You know, vivid imagination.) My final step was the sun, cuz something was missing on the card without it. I die cut the sun, again using one of the dies in the Palm Dies, from a sticky note, then with a Blending Brush and So Saffron ink, colored it in. And the card front was done.

Paradise Palms Bundle.1

For the inside, I stamped the small palms in Mango Melody ink after adhering this wonderful panel of
Flirty Flamingo card stock die cut with another of the Palm Dies. The strip was adhered with dabs of liquid glue (isn’t it a fun addition?). The sentiment was stamped in Early Espresso ink, again using the Through It Together stamp set. All of this was on a Basic White panel that was adhered to the inside of the card when completed.

Paradise Palms Bundle.2


The envelope got another small group of the palms stamped in Mango Melody ink. More of the Pattern Party DSP was adhered to the flap and trimmed to fit. Done, done! This was another one of those cards created out of my usual comfort zone. Experimenting is a good thing! It was inspired by a T-shirt I saw advertised with palm trees across the front and a striped background.

Paradise Palms Bundle.3

As mentioned early in this post… this is the Happy Inkin’ Thursday Blog Hop so please hop around to visit all the other creations. Click on the ‘next’ button to visit Amy Koenders or click on a name to visit that particular post. Happy hopping!

Amy Koenders

Mary Deatherage

Sue Prather

Karen Finkle

Akiko Sudano

Karen Ksenzakovic

Tara Carpenter

Terry Lynn Bright ~ YOU ARE HERE! 🤗

Products to make this card are listed below so feel free to order away :O) If you do not have a demonstrator and need an Annual Catalog please reach out to me (the 2022-2023 AC will be available as of May 3!!!) – happy to send one to you. AND… I have the Jan-Jun 2022 Mini Catalog and can send that as well – ordering from that catalog ends May 2! When ordering, please also use current host code: 22R4JPCG. I offer my customers a free item from Stampin’ Up! valued to $10 with your order of $50 and above. Click here to go my store. When the order is over $150, you still receive that free gift from me, but SU! has Stampin’ Rewards that may be used for additional products, so don’t use the host code at that time. If you have questions just let me know. If you would like to be able to order products early from catalogs AND enjoy that 20% discount, join my team now… you may do that here. WooHoo! We have lots of fun and are a creative bunch that encourages & supports one another. Would love to have you. :O)

You can reserve your copy of this catalog by contacting me ~ just let me know and I’ll get in touch with you :O). Be a part of this amazing community! I received my copy of the catalog yesterday… and the preorder for demonstrators has begun… guess who got their order in early … me, me, me! Can’t wait! And I want to share it with you – so stay tuned. 👍😁😉

What else is going on… oh yes… with the upcoming launch of a new catalog, there are also items RETIRING, some for a real bargain. It is always bittersweet to see some of these items go away. Remember too, only available while supplies last.

You may click here to see the list of last chance products.

After making your list, click here to go my store. Happy, happy shopping!

Thanks for stopping by. May you have a beautiful day.

Maker someone happy by sending them a handmade card filled with love.

Inspire. Create. Share.

SU! In Good Taste DSP – Masculine Card

Hi Everyone – it’s… Thursday – almost Labor Day weekend… can you believe it? I cannot. As long and slow as this pandemic has been, time did not slow in any way… And guess what? The Kentucky Derby is also this weekend. I enjoy horse racing and this one in particular, for some reason and plan on watching it.

The card today was made for two specific reason… 1) last week I did a Christmas Card with this same layout and mentioned in my post how easy it would be to ‘transition’ to a masculine (or other sort) of card; reason #2 my friends hubby just had shoulder replacement and it seemed perfect for that.

In Good Taste

What I did… cut three strips of coordinating In Good Taste DSP. Layer on an Early Espresso panel with liquid glue, then onto the Gray Granite card base, also with liquid glue. Cut a length of  Vanilla 1/2″ ribbon from the Forever Greenery Trim Combo Pack. Adhere with just a bit of Stampin Seal. Over this goes a banner on dimensionals. Banner: Early Espresso cs cut with the Ornate Frames Dies (gosh these are versatile!!). Stamp the sentiment in Early Espresso ink on Very Vanilla scrap and die cut with another of the Ornate Frames Dies. Adhere to the Early Espresso banner with liquid glue; add dimensionals and place over the ribbon. Bingo – your card front is done!

For the inside.. on a panel of Very Vanilla, stamp the leaf/ fall floral bouquet in stamped off once Crumb Cake ink. Over the top of this stamp the sentiment from Healing Hugs stamp set in Early Espresso ink. Adhere the completed Very Vanilla panel to Early Espresso cs with liquid glue then add to the card base the same way. yes – card completed…

In Good Taste – Masculine
inside

In the last photo I’m hoping you can see that I dry embossed the envelope flap after adhering Early Espresso cs to the flap. I used the Tastful Textile 3D embossing folder. The front of the card got another of those floral/ leaf bouquets. And this card is ready to send! Actually – it went out in yesterday’s mail 😊

In Good Taste – Masculine

OK – what else – of course you want card cuts. They will be found at the bottom of this post.

Other news – NEW HOST CODE… Z3WFFJTH  – so shop with me 🙂


Here’s a picture of how this new machine looks open, in use and closed. There is also a picture of the Mini Stampin’ Cut and Emboss Machine, but it is not yet available for purchase – not even for demonstrators.


Starting 1 September the Magnetic Cutting Plate becomes available to customers AND demonstrators. It is not required for use with the new machine but is great to incorporate into the die-cutting experience. It is a thin, fully magnetic sheet with a self-healing cutting surface and holds dies securely in place, even nested dies. This slim, portable sheet replaces a Cutting Plate in your sandwich. That order number is…149656 – so SHOP WITH ME…

Join My Team…

Starter Kit Promotion 1-30 September

  • In addition to the regular starter kit (for $99 USD/$135 CAD, new recruits choose $125 USD/$165 CAD-worth of products) new recruit will also receive enough card stock pieces to make 16 cards, a pack of Rhinestone Basic Jewels, the So Much Love stamp set, and the Queen Anne’s Lace stamp set—all for their first event.
  • 8 packs of precut card stock of the coastal cabana pack will be provided, and 8 packs of precut card stock of the Granny Apple Green pack, for a total of 16 cards (packs include envelopes). The new recruit can choose what samples to replicate and how to distribute the packs to their customers.
  • Important note: Ink, adhesive, cutting tool, and clear block for stamping must be purchased separately. However, these products may be included as part of the Starter Kit product selection.

Card cuts for Today’s project:

  • In Good Taste DSP 1 1/4 x 5 1/2 (cut 3 coordinating panels
  • Early Espresso cs 4 1/8 x 5 3/8 (cut 2) + scrap for banner
  • Very Vanilla cs 4 x 5 1/4 (inside) + scrap for banner
  • Gray Granite card base 4 1/4 x 11 scored at 5 1/2

SU! Celebrate Sunflowers/ Sunflowers Dies

Hi Everyone. Have I told you lately… how much I like the Sunflowers Dies? I could play with that bundle for a very long time and be quite content.  I had this sunflower sitting on my desk from a previous project and it kept calling me to do something. I pulled out the Plaid Tidings 6×6 DSP and began…

Celebrate Sunflowers

What do you think? Do you see those curled leaves? I used an X’acto knife and cut along the lines of several petals all near the center. I could have stamped and die cut several sunflowers, cut them down and layered, but I wanted to try this and I like it. Here’s the full scoop:

Stamp the sunflower using Memento black ink onto Whisper White cs using the Celebrate Sunflowers stamp set. With Dark Mango Melody Blends, highlight many of the accents on the sunflower. With an X’acto knife, cut along the lines of several inner petals , leaving them attached to the sunflower, and raise them. TIP: when using an X’acto knife I use a piece of glass as my cutting surface – often that glass has come from an old picture frame that I’m not using and I have covered the rims with tape so there are no sharp edges.

I used the Layering Squares Dies, plain and scalloped, to die cut a piece of the Plaid Tidings 6×6 DSP, then cut the Bumblebee cs with the largest scallop die. These I adhered together with liquid glue. I layered the sunflower atop that with dimensionals, intentionally not centered. Then using the Stitched Rectangles Dies, I cut another panel of the Plaid Tidings 6×6 DSP that coordinated with the other piece. Next I die cut another another panel of Bumblebee cs with the Stitched Rectangles Dies.. These two were layered together with liquid glue, then the Squares dies with the sunflower was placed with dimensionals. All this was added to a Thick Whisper White card base.

Next came the IN COLOR 2020-2022 Bumblebee Ribbon attached with just a bit of Stampin Seal right in the center. The sentiment strip was first stamped with Memento Black ink using the Posted For You stamp set, then trimmed with the Lovely Labels Pick a Punch. I then added these gorgeous Blue Adhesive-Backed Gems to give it some sparkle. Perfect touch! And the card front is complete.

Celebrate Sunflowers

For the inside I cut a piece of the darker Plaid Tidings 6×6 DSP used on the front of the card and adhered it with liquid glue. The Whisper White panel was first stamped with the Special Delivery stamp from Posted For You in Memento Black ink. Then I did an overlay with a sentiment from the Forever Fern stamp set in Shaded Spruce ink. Adhere this panel over the plaid piece with liquid glue and the inside is done.

Celebrate Sunflowers

For the envelope I took a piece of this same Shaded Spruce plaid and adhered it to the envelope flap with liquid glue. There was just a bit left – a 1/2″ strip, so I adhered that to the front of the card near the bottom. And the entire card is ready for mailing! This one is going to a friend who just had major surgery, that’s why the inside sentiment is so important – ‘you can do this’. Recovery is going to take some mental strength and courage.

So what do you think? Like this? I’m really pleased with the way it turned out. This bundle is just exquisite!

Celebrate Sunflowers

OK – now for a bit of business…

  • The new Cut & Emboss machine is available to order NOW – just do it – you will love the ease of this machine!
  • SU! has a promotion going on for new recruits that is a win-win for everyone… for $99 you will get a starter kit worth of products valued at $125 – plus two card sets with instructions & an additional stamp set & Rhinestones. What’s not to like about that? Join my team- and yes, do it NOW so you get all the benefits of this awesome deal. More details below.

.

  • In addition to the regular starter kit (for $99 USD/$135 CAD, new recruits choose $125 USD/$165 CAD-worth of products) new recruit will also receive enough card stock pieces to make 16 cards, a pack of Rhinestone Basic Jewels, the So Much Love stamp set, and the Queen Anne’s Lace stamp set—all for their first event.
  • 8 packs of precut card stock of the coastal cabana pack will be provided, and 8 packs of precut card stock of the Granny Apple Green pack, for a total of 16 cards (packs include envelopes). The new recruit can choose what samples to replicate and how to distribute the packs to their customers.
  • Important note: Ink, adhesive, cutting tool, and clear block for stamping must be purchased separately. However, these products may be included as part of the Starter Kit product selection.

Finally – card cuts for todays card:

  • Thick Whisper White 4 1/4 x 11 scored at 5 1/2
  • Bumblebee cs – large panel on front  (3 3/4 x 5 1/8); largest scalloped square
  • Plaid Tidings 6×6 DSP – larger panel of front 4 1/2 x 3 1/4 + largest scalloped square + 4 x 5 1/4 for inside + 2 1/4 x 6 for envelope
  • Whisper White approximately 3 1/2 square for sunflower, 1/2 x about 3 for sentiment panel, 3 1/2 x 4 3/4 inside

Thanks for stopping by.

May you have a beautiful day.

Make someone happy by sending them a handmade card filled with love.


SU! Boho Indigo Product Medley

Hi Everyone… My box for this fantabulous product medley came some time ago and I simply had to wait to open it until I had played with many of the other new products that arrived – all at the same time! Let me say – this medley is OVER THE TOP! Gorgeous, gorgeous papers, fun stamp set and coordinating dies, two ribbons, adorable little paper flowers, stickers. Just. plain. wonderful… Today’s card uses many of the products in this medley – here ’tis.

Boho Indigo stamp set
Last a Lifetime stamp set
Lasting Elegance Dies, Stitched So Sweetly Dies
Boho Indigo DSP
#1

First of all, I love blue/ white together – this is blue/ very vanilla, but no matter – the papers are wonderful, a nice variety of design. I need to make a masculine card and there are papers in this pack that will be perfect. Here’s what I did…

Cut a panel of one of the Very Vanilla embossed papers included in the medley and adhere to the center of the Night of Navy card base. Cut a panel from one of the papers from this medley using the Stitched So Sweetly Dies. I cut another piece of Night of Navy to adhere to the DSP as to me, it needs a bit of strength when used the way this is. These were adhered witgh liquid glue as well, but only in the center, not on the ends extending beyond the embossed piece. I stamped the sentiment in Night of Navy on one of the labels included in the kit. ( I made a booboo when stamping on the right side of the sticker, so I just turned it over! Then it needed a bit of dressing up…) I adhered three Holiday Rhinestone Gems and put the label on dimensionals and set it aside.

I stamped the sweet flower from Last A Lifetime stamp set, then colored it with several Stampin’ Blends: Mango Melody, Granny Apple Green, Poppy Parade (dark only) and Bronze for the flower center. I then die cut the flower with the matching dies, Lasting Elegance Dies. This I adhered with liquid glue to the label, then added dimensionals to the portion over-hanging the label. I cut a length of the ribbon from the medley, Frayed Grosgrain Very Vanilla/ Gold 1/4″, added a bit of Tear n Tape to the back and attached it to the DSP. I adhered the flower and label and the card front was done!

Boho Indigo Product Medley
Last a Lifetime stamp set
Lasting Elegance Dies
#2

For the inside, I used one of the gorgeous corner dies to die cut two corners from a panel of Very Vanilla cs – Lasting Elegance Dies. This I adhered to the Night of Navy inside panel of the card and the card was complete…

Lasting Elegance Dies
#3

For the envelope, I adhered the same DSP from the Boho Indigo Product medley to the envelope flap. I then stamped a vase from the Boho Indigo stamp set in Night of Navy. Then I stamped the sweet set of three flowers in Mango Melody so it looked like a bouquet. Voila..

Boho Indigo Product Medley
Last A Lifetime stamp set, Lasting Elegance Dies
#4

What do you think? I love this medley and can’t wait to sit down and create, create, create…

Want to know how to get this medley – reach out to me if you do not have a demonstrator and we can make this happen! This medley can be found on pg 9 of the 2020-2021 Annual Catalog. If you don’t have a current catalog, please refer to this PDF file. 2020 AC US

Thanks for stopping by.

May you have a beautiful day.

Make someone happy by sending them a handmade card.

SU! Back On Your Feet

Hi Everyone… HAPPY FATHER’S DAY! Woohoo ~ hope you are doing something special for that man in your life: a phone call, a hug, A CARD! Think of that? 😁

OK, today’s card… is NOT a Father’s Day card. Yep, probably should have… however…. let’s just get to it, shall we?

Back On Your Feet
#1

I have a confession… this is the first this has been inked ~ isn’t that sad? And the images are so CUTE! My neighbor burned her arm and this is so appropriate I could not resist. And the bandage around the arm – well, how perfect is that! Despite all that, this is a cheerful, colorful card that should put a smile on her face.

Supplies for this card…

  • Back On Your Feet stamp set
  • 2020-2022 In Color Ribbon – Magenta Madness
  • 2020-2022 In Color 6×6 DSP – Magenta Madness
  • 2020-2022 In Color Enamel Dots – Magenta Madness
  • Flowers For Every Season Ribbon Combo Pack – Misty Moonlight/ Silver
  • Stitched So Sweetly Dies
  • Gray Granite ink – sloth
  • Misty Moonlight ink and cs
  • Thick Whisper White, regular Whisper White

And here’s the how to…

First of all, let me say this is a CASE of a card made by Mary Fish: different papers, ribbon, stamp set, dies… but the layout is Mary’s and I love the way it turned out.

Cut a panel of Misty Moonlight 2 x 5 1/2 and adhere to Thick Whisper White 8 1/2 x 5 1/2, scored at 4 1/4. Cut a strip of 2020-2022 In Color 6×6 DSP 2 5 /8 x 4 and adhere to regular Whisper White panel 3 1/8 x 4. Cut a length of 2020-2022 In Color Ribbon and wrap aroung the Whisper White panel, adhering in back with Stampin Seal. Over this, wrap another ribbon, this time the Misty Moonlight/ Silver ribbon from the Flowers For Every Season Combo Pack, and attach with Stampin Seal (or tape!). Put dimesnionals on the back and adhere to the card front.

Stamp the sloth from Back On Your feet in Gray Granite. Stamp the sentiment in Misty Moonlight from the same stamp set. Cut with Stitched So Sweetly Dies. Color the bandage with Magenta Madness marker. Put dimesnional on this panel and adhere to the card front. Make a bow using thee 2020-2022 In Color Ribbon and the Misty Moonlight/ Silver from the
Flowers For Every Season Combo Pack and attach with a glue dot. Your card front is complete.

For the inside…

Back On Your Feet
#2

Stamp the sentiment from the Back On Your Feet stamp set in Misty Moonlight, taping off the lower portion of the sentiment when inking, then removing the tape prior to stamping on a Whisper White scrap. Stamp the additional word… SIGH… also from this stamp set and in Misty Moonlight. Add the three 2020-2022 In Color Enamel Dots over the dots of the stamp. Adhere the Whisper White to a 2020-2022 In Color 6×6 scrap, then attach to the card inside. DONE!

Now for the envelope…

Back On Your Feet
#3

Stamp the word OUCH! in Misty Moonlight from the Back On Your Feet stamp set. Cover the flap in a panel of 2020-2022 In Color 6×6 DSP. VIOLA… this card is ready for the giving or sending. It is sure to put a smile on someone’s face – how could someone not smile?

Couple of dates to share with you…

  • Jun 24 the PDF of the Aug – Dec 2020 Mini Catalog will be available to demonstrators!!!
  • Aug 1 demonstrators may preorder from  the Aug – Dec 2020 Mini Catalog!!!
  • Aug 4 the preorder for the new die cutting/ embossing machine will be available to demonstrators!!!

Notice the dates refer to AVAILABLE TO DEMONSTRATORS? Would you like to be part of that opportunity – you can! Join my team… and here’s a flyer with a bit more info of the benefits for joining now – like a FREE BUNDLE, EXTRA REWARDS… what is there to lose? Want that 20% discount? Join now!


06.03.20_FLYER_RECRUITING_PROMO_NA

Thanks for stopping by.

May you have a beautiful day.

Make someone happy by sending them a handmade card.

Stampin’ Up! Forever Blossoms and Parisian Blossoms SDSP

Hi Everyone – it’s Wednesday – hump day as many folks call it. Guess that means mid week 😉 Today’s card is a rather fun fold – maybe accordion (?) and uses a bit more than the usual Specialty DSP. I like it, but it needed LOTS of card cuts cuz I did multiple layering (which I really like). This has two additional layers to each panel…

Forever Blossoms stamp set & Parisian Blossoms SDSP #1

And here’s how it happens…

  • Basic Gray cs 8 1/2 x 5 1/2, scored at 4 1/4. Cut diagonally from the score line to 2″ up from the bottom of the left side of the card stock.
  • Petal Pink cs 4 1/8 x 5 3/8, 2 x 5 1/4, 2 x 3 1/2, 2 x 5 3/8
  • Parisian Blossoms DSP 4 x 5 1/4,1 7/8 x 5 1/8, 1 7/8 x 1 3/8, 1 7/8 x 5 1/4
  • Whisper White scraps approx 1/2 x 4 1/4 fro front sentiment, 4 x 5 1/4 sentiment panel on inside and stamped flowers die cut.  Take a peek  how the panels adhere…

Forever Blossoms #2 – open front

Forever Blossoms #3 – open back


  • The tricky part is the angle for the supplementary panels… but I hope to make this real easy for you 😏… I used the card stock base and the angle already cut as my guideline. For instance, in picture #3 that panel is Petal Pink 2 x 5 1/4. Lay the Petal Pink under the Basic Gray (Basic Gray is on top) and softly pencil the angle onto the Petal Pink. Trim on that pencil line. If it needs more length removed, cut it off the straight bottom.This keeps the angle correct and simply adjusts the length of the new panel. Now do the same for the Parisian SDSP: lay it under the Basic Gray, draw a thin pencil line for the angle (making certain the SDSP is going in the appropriate direction) and trim along the pencil line. Adjust the length to fit 1/8″ smaller than the Petal Pink. Adhere the Petal Pink o the “back” as shown in picture #3, then the SDSP.
  • Now go back to picture #2 and do the same steps for cutting the angle for the front panels – do the Petal Pink first, then the SDSP.
  • Adhere SDSP to the appropriate Petal Pink panel, then adhere to the Basic Gray card base.
  • TIP: Adhering each panel as you go saves you from making mistakes in cutting and adhering.

Now you are ready for the largest panel…

  • Adhere the 4 1/8 x 5 3/8 Petal Pink to the Basic Gray cs, then adhere the SDSP 4 x 5 1/4 to the Petal Pink
  • Stamp the large flower from Forever Blossoms stamp set in Black Memento ink. Color using the Dark Petal Pink Blends. Die cut this with the Cherry Blossoms Dies and adhere using liquid glue.
  • Using the Stitched Rectangles Dies, cut a piece from Whisper White and adhere using liquid glue
  • Stamp your sentiment from the Forever Blossoms stamp set on the 1/2 x 4 1/4 strip, using Black Memento ink. Cut to size
  • Cut a strip of Petal Pink for the scallop under the sentiment, from Be Mine Stitched Framelits. Adhere to the sentiment strip with liquid glue and attach to the far left front panel using liquid glue.

For the envelope..

  • Adhere a 2 1/4 x 6 strip of the SDSP to the envelope flap using liquid glue; trim to fit
  • Stamp the single flower from Forever Blossoms stamp set in Back Memento ink and color using Dark Petal Pink Blends

Done, done, done. Now you have completed an accordion card with multiple layers and it wasn’t so hard. Do you love it? My hubby did and that made me very happy.

What’s retiring from the items used today… only the Parisian Specialty DSP – and folks, it is beautiful and right now a real bargain.. Love love love this paper and I am so glad this stamp set is carrying over into the new 2020-2021 catalogue. If youy would like to shop with me (I like that idea by the way!), please use my CURRENT HOST CODE J2E4VDGM for purchases between $50 – $150 to receive a free item of your choice from me – up to a $10 value. If your purchase is over $150, you will receive not only your free item of choice from me, but Stampin’ Up will offer you something as well. Shop now looking at not only the CLEARANCE RACK but also the RETIRING LIST…


Last Chance Products JJ (US)

Last Chance Products AC (US)

Thanks for stopping by

May you have a beautiful day

Make someone happy by sending them a handmade card


Triple Fold Card

Fun fold cards are just that – FUN to create! One of the best parts of card making is creating something for a special someone. Somehow for me, it’s easier to make a card when I have a reason for that card. This card is for that woman who is struggling with some health issues, is getting better but needs encouragement. Let’s take a look.


The card was created with a 12″ x 5 1/2″ piece of Pretty Peacock. Score it on the long side at 4 1/4″, 7 1/4″ and 10 1/4″. The elegant papers used to decorate this project were taken from the Come to Gather Designer Series papers in the Holiday catalogue shown on page 48. Here are the stats for the card cuts:

  • for the front and reverse side of that fold, 1 5/8″ x 5 3/8″, cut two, using one side for the front of the card and thew other side of the card stock for the reverse side.
  • for the next two sections, 2 3/4″ x 5 3/8″, cutting two. Again use alternating sides of the DSP for each section.
  • For the last section, 4″ x 5 3/8″. What I did here is slice off 1/2″ the long side, turn that small piece to the reverse side.

Adhere all pieces to the appropriate panels. That third panel could easily be a piece of plain card stock for writing a lovely note :o) ~ just sayin’. On the last panel I have used the 2nd (on mint macaron card stock) and 3rd (on whisper white card stock) largest dies in the Stitched Nested Labels set shown on page 92 in the annual catalogue to include a sentiment. That nice saying came from the Colorful Seasons stamp set shown on page 56 in the annual catalogue. I used another of it’s sayings on the second panel, stamped on a 1 1/8″ piece of mint macaron card stock. It was originally cut as a 4″ length, then I cropped it using the banner triple punch shown on page 186 in the annual catalogue.

The belly band is 1″ x 12″. You may find when you gently wrap it around the card, that it needs to be shortened a bit.  Do that before adhering together with snail. Then decorate the belly band. I used the beautiful whisper white 5/8″ Flax Ribbon found on page 174 in the annual catalogue and adhered that also with snail. Using the Gathered Together stamp set (pages 47 & 48 in the Holiday catalogue), I stamped that gorgeous large leaf and colored it with several stamping blends: Pretty Peacock,  Granny Apple Green and just a hint of Cherry Cobbler. (see the full range of colors available in the Annual Catalogue on page 179. I then cut it with the Gathered Leaves dies (pg. 47 HC) and adhered with snail.

Notice how Stampin’ Up! products can be used in so many different ways? They coordinate like no other products out there! If you would like to place an order, please use my host code that is good until Oct 31, 2019. If your order is over $150, don’t use the host code – get your own free products SU! offers! If your orders are $50 or more, you will receive a free product from me ~ doesn’t that seem fun?

May you have a beautiful day! Make someone happy by sending them a handmade card  <:o)