Stampin’ Up! Brighten Your Day Kit

Our Internet is quite spotty & intermittent today so not sure if this will publish appropriately. I’ve been trying all morning.

This is such a beautiful kit and I had promised to share photos of my completed cards a few days ago. I had a difficult reaction to a vaccine that really set me back for two straight days. Thanks goodness that is behind me!

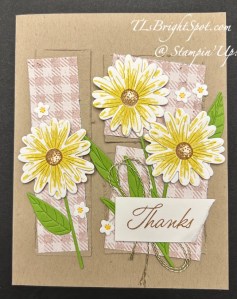
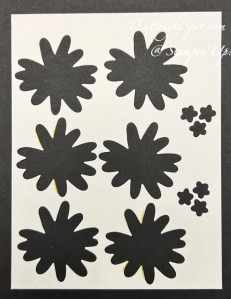
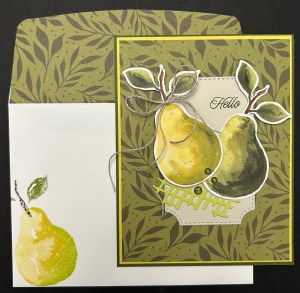
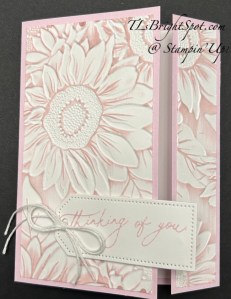
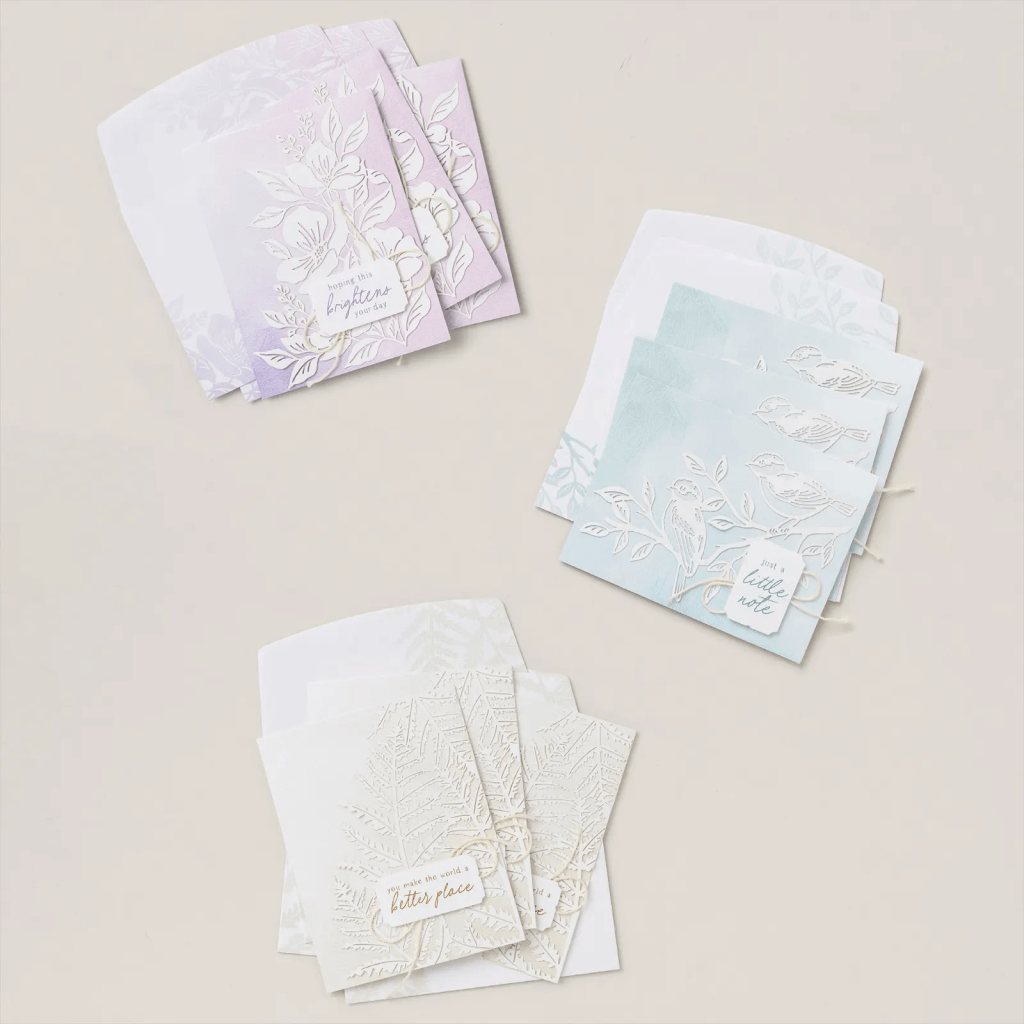
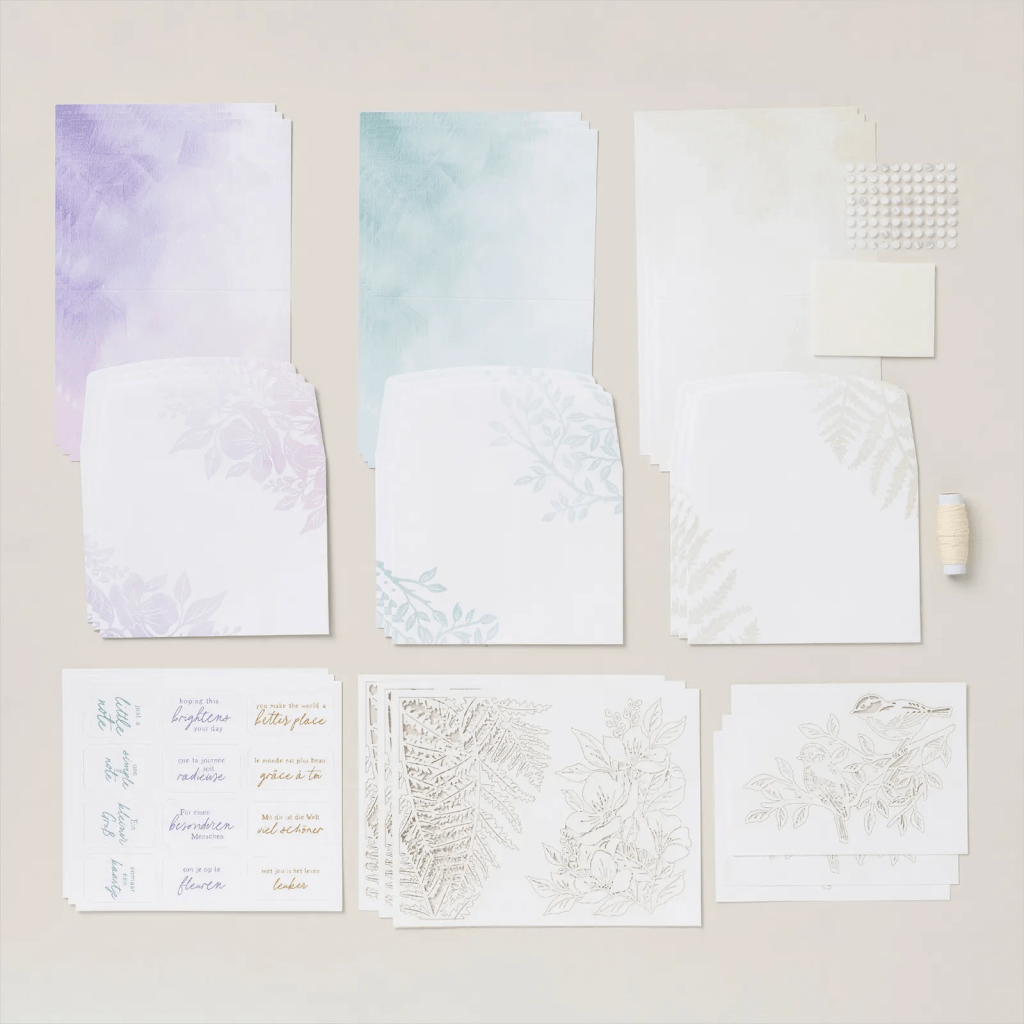
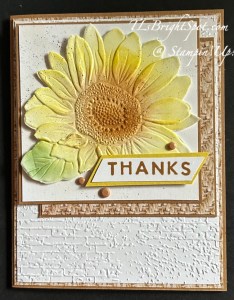
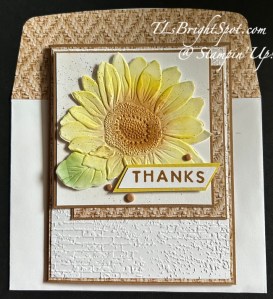
Each card in this kit has a laser-cut delicate design – so three designs for nine cards, make sense? I made one each of the ‘prescribed’ card designs and here they are

Stampin' Up! Brighten Ypour Day Kit original

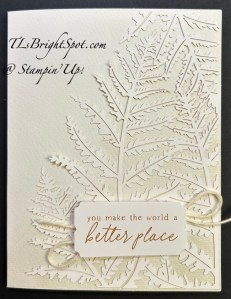
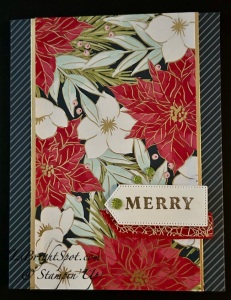
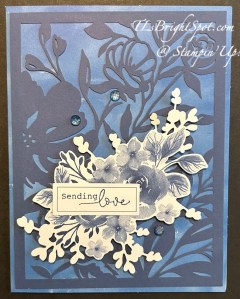
These first three cards are the original ‘plan’ of the kit and they show Fresh Freesia, Basic Beige and Balmy Blue. These next two images are of the birds with a card base of Balmy Blue on the left and Lost Lagoon on the right, both using what had been the original base as part of a layer for the card front.

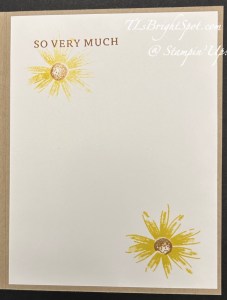
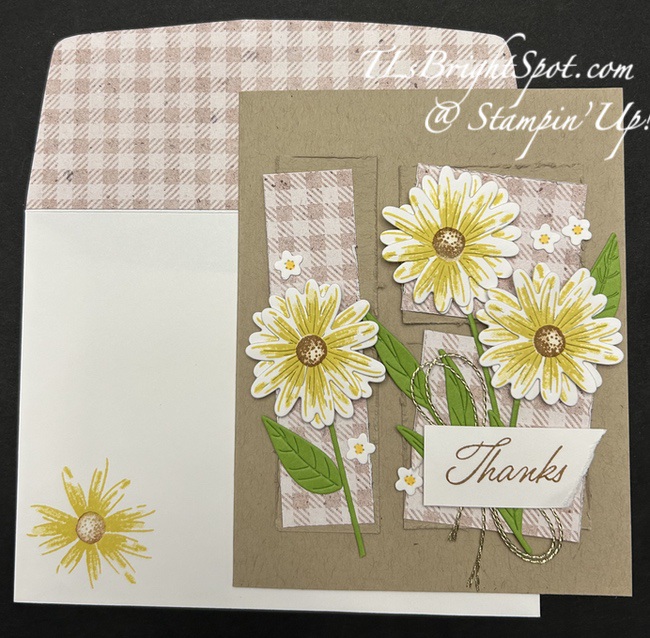
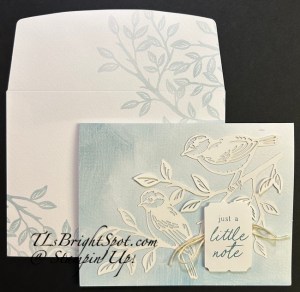
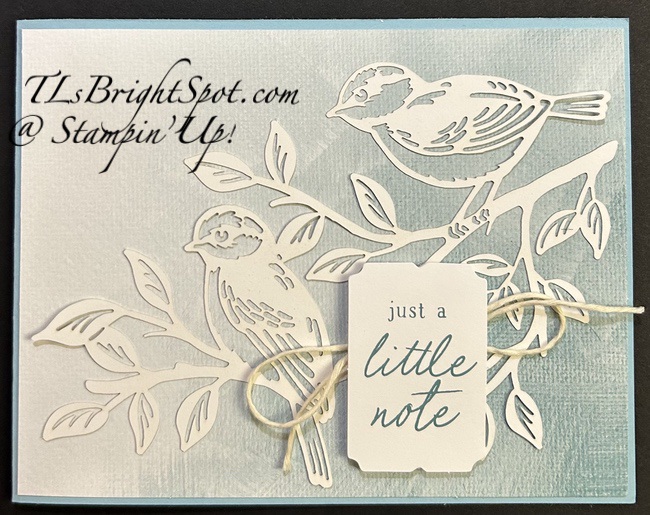
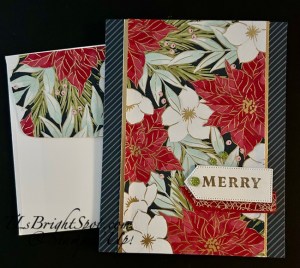
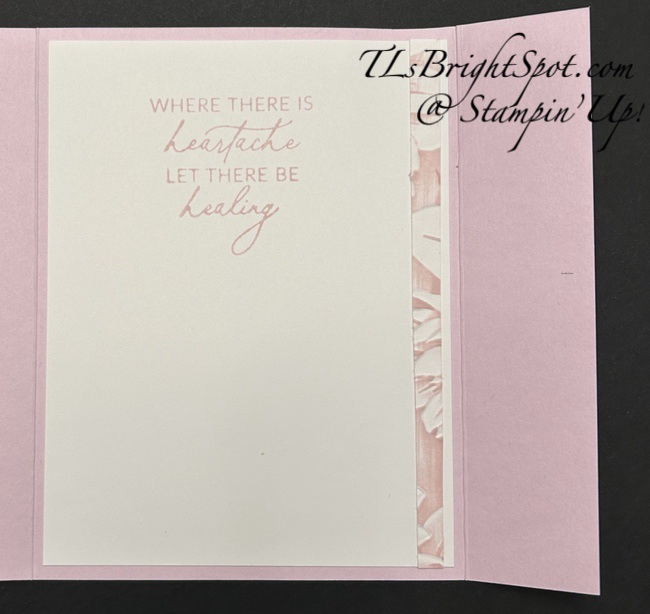
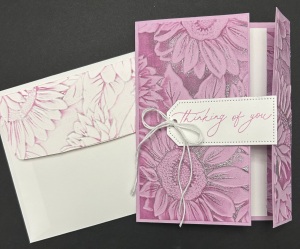
With the remaining cards bases, I trimmed each down to 41/8 x 5 3/8, thereby making a card front panel and an inside panel with each supplied card base. Here are my completed cards – nothing fancy or over the top done, just incorporated an additional card base.

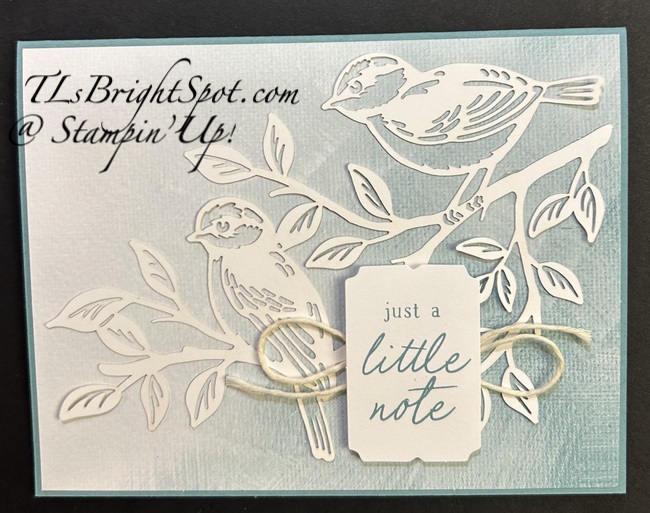
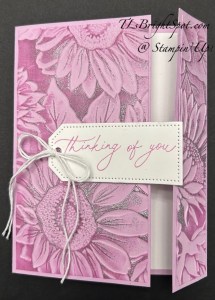
Below left has a card base of Balmy Blue with the original card base as a layer for the laser-cut image. Below right uses Lost Lagoon as the card base

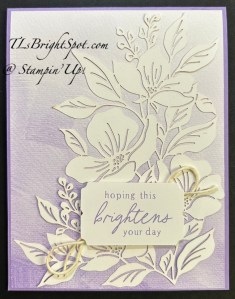
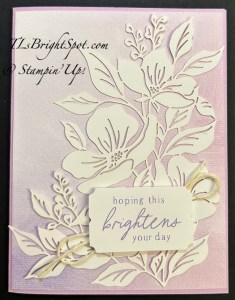
These two cards show card bases in Highland Heather for the left card and Fresh freesia for the right card, again using the original card base as a front layer.

I took a LOT more pictures but they just didn’t turn out that well so I have not included them – bummer!

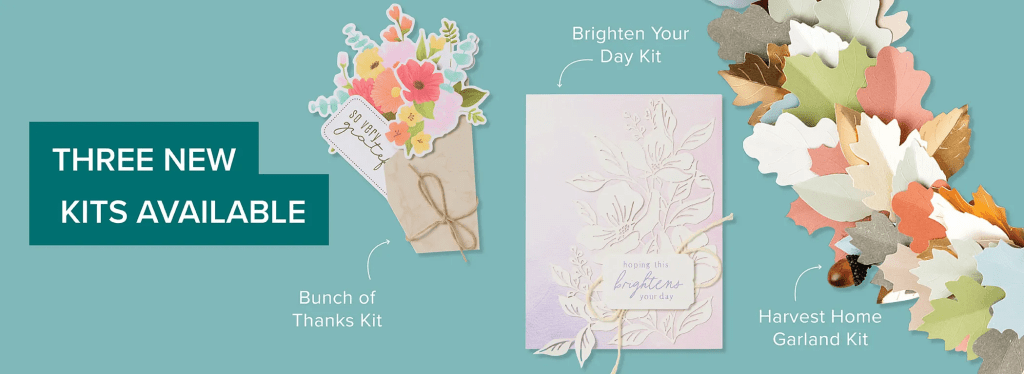
OK – so this is one of the fabulous kits Stampin’ Up! is offering. There is always something going on… remember there are changes coming to the packaging for both photopolymer stamps and dies. Also, rubber stamps are being discontinued. Both of these will take effect at the end of each catalog. What that means is at the end of both the Sep-Dec 2025 catalog and the 2025-2026 Annual Catalog, no more rubber stamps. For full disclosure, check this post. It will give you measurements of the new packaging and you’ll see a glimpse of a new bundle available in the ONLINE EXCLUSIVES for November. There is also a video you can access.

Other items of interest… the In Color Sale ends Aug 31 and here it is the 22nd. Click the link in the image below to shop those products!

If you do not have a demonstrator and need the Sep-Dec 2025 Mini Catalog – please give me a shout-out. I’m here to help you have fun in this crafting world! And if you see LOTS of items on your wish list, consider joining my team, become apart of the Stampin’ Up! party, craft with others, learn new techniques, receive at least 20% off each order, attend a convention or two, or three 😀, get catalogs early to play with new products, JOIN HERE with me.

Thanks for stopping by today. Make this a beautiful day for others – send a card made with ❤️!

Product List

Stampin’ Up! Perfectly Pears plus Branching Out Dies

Good Sunday morning! I’ve a sweet Perfectly Pears card for you today and I paired it with a new die set from the Sep-Dec 2025 Mini Catalog called Branching Out Dies. It has a stamp set as well, but I’m not using that today.

Stampin' Up! Perfectly Pears card front

This new die is shown here in the Basic Beige – as a background for the pears. The leaves of thew pears cover the top of the die cut, but it’s the same as the bottom. There are at least 6 of these layering dies in the set, plus some other fun dies as well. It’s wonderful. How to make this card…

The card base is Mossy Meadow with a layer of Darling Duckling then a layer of Painterly Pears DSP. Next I die cut the Basic Beige with the Branching Out dies and added it. With another piece of the Painterly Pears DSP and the Perfectly Pears Dies, I die cut the two pears and the stem/ leaves. Using another die in the Perfectly Pears Dies and Lemon Lime Twist, I die cut the open weave image. I adhered the stem/ leaves to each pear, then attached them to the card front: the darker pear is adhered directly and the lighter pear is on dimensionals. I slipped the open weave die cut under the pears and attached with dabs of liquid glue. The leaves of the darker pear do have dimensionals. Once everything was innplace, I stamped the sentiment in Mossy Meadow ink. It comes from the Perfectly Pears stamp set. Final touch – three Low Profile Sparkle Dots in Old Olive and a double Linen Thread bow added with a glue dot.

Stampin' Up! Perfectly Pears inside card

For the inside…on a panel of Basic White… the pear comes from the Perfectly Pears stamp set… inked first in Darling Duckling then Lemon Lime Twist added with a sponge dauber and stamped on the panel. The stem’ leaves are also from this stamp set and are inked with Old Olive and Early Espresso Markers. This was attached to aDarling Duckling panel then added to the inside of the card.

Stampin' Up! Perfectly Pearas card & envelope

For the envelope… The same Painterly Pears DSP was added to the flap & trimmed to fit. The pear was stamped using the same method as above – using the Perfectly Pears stamps, Darling Duckling and Lemon Lime Twist inks for the pear and Old Olive and Early Espresso markers for the stem’ leaves. This is such a fabulous suite of products!

OK – more Stampin’ Up! info… The 2025-2027 In Color Sale is still on until the end of August. Click the image below to view this product sale.


Stampin' Up! In Color Sale

Last Chance Products are just that – last chance 😀 and available while supplies last. Click that image below to take you to this list.

Stampin' Up! Last Chance Products

Kits and more kits… Stampin’ Up! continues to provide some of the best kits ever… There are kits for decorative items for your home as well as card kits. See those kits by clicking the image below. See that Brighten You Day Kit in the image? It is stunning! I’ll have photos of completed cards from that kit tomorrow.

Stampin' Up! Kits Collection

The Painterly Pears Suite was a July release in the Online Exclusives. It’s in my product list below. The new Sep-Dec 2025 Mini Catalogs are in the mail. If you do not have a demonstrator and need a catalog, please let me know… happy to send one to you!

Thanks for stopping by. May you have a beautiful day.

Make someone happy sending them a handmade card filled with love. ❤️


Product List

!– /wp:paragraph –>

Stampin’ Up! Traditions of Christmas ~ Sending Love & Joy

Yesterday was a blog hop & I used the Traditions of Christmas SDSP for my focal point. Today – still the same package of Designer Series Paper, but used very differently. First of all, there is a coordinating stamp & die bundle that coordinates and die cuts images in the paper – the Christmas Greenery bundle, available Sep 3 in the Sep-Dec 2025 Mini Catalog.

Stampin' Up! Traditions of C'mas - sending love

I began with one of those die cuts – of this beautiful ‘swag’. I then stamped some extra leaves from the Christmas Greenery stamp set in Old Olive ink on Old Olive card stock scraps – and die cut them as well. I adhered the ‘swag’ with dimensionals and the leaves directly to a Basic White panel. Next I die cut this gorgeous bow from Real Red and adhered it together, placed a cut dimensional and put it in place. Pulling out another bundle that coordinates is the Traditional Labels bundle that has all sentiments and label dies. I stamped on Basic White in Real Red ink, then die cut the label – love this curve die! I also die cut the same lable from Old Olive cardstock, cut it min half lengthwise to give a ‘shadow effect’ or frame to the white label. I added this to the card front with dimensionals. Once that was inn place, I felt the white space was ‘too white’ – too much white space (for me). So I pulled out the Christmas Greenery stamp that had the three berries and stamped those in Real Red all over the open spaces. As a final touch I added Traditional Sparkling Sequins in gold to the sentiment banner. This entire panel was adhered to an Old Olive card base.

Stampin' Up! Traditions of C'mas, sending love card inside

For the inside of the card, I stamped the sentiment from the Traditional Labels stamp set in Old Olive on a Basic White panel, then added berries in Real Red using the Christmas Greenery stamp set. This was adhered to the inside of the card – and done!

Stampin' Up! Traditions of C'mas, sending love card & envelope

For the envelope… more of the Traditions of Christmas SDSP but using this fun olive plaid pattern, was adhered to the flap & trimmed to fit.

Don’t have a demonstrator & need/ want a Sep-Dec 2025 Mini Catalog?

Reach out to me so I can fix that!

The 2025-2027 IN COLOR SALE continues through the end of August.

See all that’s available by clicking here.

Stampin' Up! 2025-2027 In Color Sale

Last chance products are those that are closing out & MANY at a fabulous sale price. Click the image below to take you right there.

Stampin' Up! Last Chance Products

Kits collection… Three new kits available. Click the image below to visit and see ALL THE KITS

Stampin' Up! Kits Collection

Remember that shopping with me has benefits… Stampin’ Up! already gives it’s own product credits when shopping with me – and when your order is $50 & up, you will receive the monthly tutorial (this month is the Painterly Pears) via email, which has lots of ideas. And Daisy points add up – sometimes I offer double Daisy Points :O)

Thanks for stopping by. May you have a beautiful day.

Make someone happy sending them a handmade card filled with love ❤️

Product List

Stampin’ Up! Traditions of Christmas for the Happy Inkin’ Thursday Blog Hop

It’s Thursday and you know what that mean – a super dooper hop. Let’s get to it! We have a sketc h challenge today and I’ve used NEW PRODUCTS from the Sep-Dec 2025 Mini Catalog. Wheee!

Stampin' Up! Happy Inkin' Thursday Blog Hop

Stampin' Up! Traditions of Christmas card front

I used Secret Sea for my card base and adhered strips of Traditions of Christmas DSP & Gold Foil to create the front of the card. (card cuts are listed below) I stamped then sentiment in VersasMark ink then sprinkled WOW! Metallic Embossing Powder (gold) and heat set it. This small banner seemed to need some accent – so I cut a length of ribbon 1/2″ Shiny Ribbon in Real Red, angling one end to mimic the banner. To this ribbon i added 3/8″ Irregular Weave Trim with Stampin’ Seal. I adhered these to the card front, put dimensionals on the sentiment banner (die cut with the Traditional Labels Dies) and attached over the ribbons – creating a great accent. NOTE: you could easily create the same thing with card stock. My final step was adding three Traditional Sparkling Sequins – and the card front was complete! Remember these items will be available in the Sep-Dec 2025 Mini Catalog. You could also join my team now and be able to order these items as part of your starter kit!

Stampin' Up! Traditions of Christmas card inside

For the inside of the card, I stamped the sentiment using the Traditional Labels stamp set and Real Red ink. I then fussy cut the image from one of the Traditions of Christmas SDSP and adhered it with liquid glue next to the sentiment.

Stampin' Up! Traditions of Christmas card & envelope

For the envelope, more of the same main pattern of the Traditions of Christmas SDSP adhered to the envelope

Visit all those participating in today’s hop for inspiration – it’s going to be fabulous! Click the next button or click on a name. Enjoy!

Stampin' Up! 'next' blog button

Amy Koenders

Mary Deatherage

Karen Ksenzakovic

Akiko Sudano

Tara Carpenter

Terry Lynn Bright

Nicole Bloxom

The 2025-2027 IN COLOR SALE continues through the end of August. See all that’s available by clicking here.

Stampin' Up! 2025-2027 In Color SALE

Last chance products are those that are closing out & MANY at a fabulous sale price. Click the image below to take you right there.

Stampin' Up! Last Chance Products

Kits collection… Three new kits available. Click the image below to visit and see ALL THE KITS

Remember that shopping with me has benefits… Stampin’ Up! already gives it’s own product credits when shopping with me – and when your order is $50 & up, you will receive the monthly tutorial (this month is the Painterly Pears) via email, which has lots of ideas. And Daisy points add up – sometimes I offer double Daisy Points :O)

Card cuts for today’s card:

  • Secret Sea card base 8 1/2 x 5 1/2 scored at 4 1/4
  • Layer: Traditions of Christmas SDSP – 3/8 x 5 1/2 (2 side strips); Gold Foil – 1/8 x 5 1/2 (2); 3 1/4 x 5 1/2 (center panel)
  • Basic White 1 x 2 1/4 (sentiment label); 4 x 5 1/4 (inside)
  • Envelope: Traditions of Christmas 2 1/4 x 6 (flap)

Thanks for stopping by. May you have a beautiful day.

Make someone happy sending them a handmade card filled with love ❤️

Product List

Stampin’ Up! Sunflower Embossing Folder – Off-set Gatefold Sympathy Card

Good morning – it’s Friday and I have two cards for you this morning using the debossed side of paper run through this fabulous Sunflower 3D embossing folder. And, it’s an off-set gatefold card. In a traditional gatefold card, both closing sides are the same width; this off-set means one side (the right side in this case) is more narrow. Let’s take a peek…

Stampin' Up! Sunflower 3D offset gatefold card front
Stampin' Up! Offset gatefold Sunflower 3D card front

The card on the left is made with a Bubble Bath card base, embossed Basic White card stock, and Bubble Bath ink. The card on the right is made with Fresh Freesia card stock and a layer of embossed Fresh Freesia sprinkled with WOW! Metallic Embossing Powder in silver and heat set with the heat tool. It gives this card a real element of elegance. The sentiment on each card is from the Everday Greetings stamp set die cut with the Tailor Made Tags Dies. White Basic Twine was run through the hole in the tag and tied into a bow. The tag was adhered with dimensionals to the larger side of the card front.

For the inside of the card… I had started with a 4 x 5 1/4 Basic White panel to emboss with the Sunflower Embossing folder. After inking the debossed side, I trimmed it down and there was a narrow remaining piece – which I adhered to the Basic White insert. I also stamped the sentiment: Bubble Bath for the first card and Fresh Freesia for the second. These were adherred and the cards were complete.

For the envelope… I took another strip of Basic White, ran it through the Sunflower 3D embossing folder, inked the debossed side: again, Bubble Bath ink for the first card and Fresh Freesia for the second card. For the second card I again sprinkled it with WOW! Metallic embossing powder in silver and heat set it. Each was adhered to a Basic White envelope and trimmed to fit. Card cuts are listed below.

Just a word about inking an embossed panel… if you saw yesterday’s post, it indicated a 45 degree angle when running the ink pad along the embossed piece. For these cards, the angle was more like a 20 degree angle and I liked it much better. Practice, right?!

Card cuts:

  • Card bass 8 1/2 x 5 1/2 scored on long side @ 1 1/4 & 5 1/2
  • Embossed layer 4 x 5 1/4 trimmed to 2 7/8 x 5 14, 1 x 5 1/4, remainder used for inside
  • Basic White for inside 4 x 5 1/4
  • Envelope flap 2 1/4 x 6, adhered & trimmed to fit

Stampin’ Up! has some fabulous updates: 2025-2027 IN COLOR SALE; LAST CHANCE PRODUCTS LIST UPDATED; and 3 new kits available. CLICK HERE TO VIEW ALL!

Stampin' Up! 2025-2027 IN COLOR SALE
Stampin' Up! LAST CHANCE PRODUCTS
Stampin' Up! Kits Collection

Thanks for stopping by. May you have a beautiful day.

Make someone happy sending them a handmade card filled with love ❤️


Product List

Stampin’ Up! NEW NEW NEW

SO MUCH happening today in the Stampin’ Up! world… the IN COLOR SALE begins today, LAST CHANCE PRODUCT REFRESH and three new Kits available. See all those below and place your order with me… for a $50 purchase you will receive the tutorial of the month & other benefits.

Stampin’ Up! 2025-2027 In Color SALE here

Stampin’ Up! refresh of LAST CHANCE PRODUCTS

Stampin' Up! KITS COLLECTION

THREE NEW KITS AVAILABLE IN THE KITS COLLECTION

Harvest Home Garland Kit $22.00 166228

Gather your friends and create beautiful DIY home decor with the Harvest Home Garland Kit. Layer die-cut leaves—including hints of copper foil—for a rich, nature-inspired look. It’s perfect for group crafting or a cozy solo session with your favorite show—and you’ll have a one-of-a-kind piece you made yourself!

BRIGHTEN YOUR DAY KIT $17.00 166460

Create easy to assemble, nature-inspired cards with the Brighten Your Day Card Kit. The delicate, organic overlays and soft pastel colors pair beautifully with friendship and encouragement sentiments.

BUNCH OF THANKS KIT (ENGLISH) SALE $19.55 $23.00 166212

$19.55 $23.00

Shop now before items are sold out!

Thanks for stopping by!

May you have a beautiful day! ❤️

Stampin’ Up! Sunflower 3D and Woven Textures DSP for the Happy Inkin’ Thursday Blog Hop

Welcome to our Blog Hop! I want to give a shout out to a new person in our Thursday lineup for the blog hop – Nicole Bloxom. Can’t wait to see what she has created for today’s sketch challenge. Welcome Nicole!

So… this has been a stressful week – I learned I must have a heart catheterization tomorrow (7/18) with the possibility of a stent. I’m not used to this – having a cardiologist & all that, testing & so forth. It took my mojo & I’m having a bit of trouble creating… so bear with me. You may remember, I had a knee replacement back in early May – that has meant PT 3 x/ week since then. Today’s card is for my Physical Therapist as today is my last day for PT. WOOHOO!!! And just so you know, I can bend my knee on my own to 120 degrees and walk without a limp – no one would ever know I had a knee replacement. 😀

Stampin' Up! Blog hop Logo
Stampin' Up! Hop Sketch Challenge

Stampin' Up! Sunflower 3D & Woven Textures card front

I used a new embossing folder from the July ONLINE EXCLUSIVES called Sunflower 3D embossing folder. It’s a stand alone item, which is unusual. I embossed the sunflower then colored it with Stampin’ Blends Darling duckling, Pecan Pie & Garden Green then fussy cut this single flower with my paper snips. I put dimensionals on the back and attached it to a Basic White panel 3 1/2″ square then to Pecan Pie card stock 1/8″ larger. I took Woven Textures DSP & cut it 3 1/2″ square and added that to Pecan Pie cardstock 1/8″ larger, then adhered these squares together as shown. For the background I ran a 4 x 5 14 panel of Basic White through the Exposed Brick 3D embossing folder then to another of the same design Woven Textures DSP 1/8″ larger – and attached to the Pecan Pie A2 card base. I used my Early Espresso Marker to ‘flip’ some splatters to the upper portion.The sentiment is from Sunshine Vibes stamp set stamped in Pecan Pie ink on a 1/2″ strip of Basic White adhered to Darling Duckling just 1/8″ wider. This was added to the flower with liquid glue then I added a single mini dimensional under the ‘s’. Myn final touch was three Neutral Matte Dots in Pecan Pie.

Stampin' Up! Sunshine Vibes inside card

For the inside… I wanted something light & positive. Pulling out that same Sending Sunshine stamp set, I stamped the half sun in Darling duckling then the rays (stamped twice) in Crushed Curry, then the sentiment in Pecan Pie – all on a Basic White 4 x 5 1/4. I added this to the same pattern of Woven Textures DSP 4 1/8 x 5 3/8, added them both to the inside of the card – and done! As I mentioned, this card is to my Physical Therapist, but there are two therapists in this office. We joke with one another, share stories, kid around and WORK OUR ROUTINE to get where we need to be. It has been a good experience and I will miss these folks.

Stampin' Up! Sunflower 3D & Woven textures card & envelope

The envelope – keeping it simple, a piece of the same pattern of Woven Textures DSP adhered to the flap & trimmed to fit. That’s it. Want to purchase the products to make this card? See below for all the pertinent information. Also – continue on the hop by clicking the ‘next’ button or clicking on a name. Enjoy the hop!

Stampin' Up! Hop button

Amy Koenders

Mary Deatherage

Karen Ksenzakovic

Tara Carpenter

Terry Lynn Brightyou are here!!!

Nicole Bloxom

For online Exclusive’s click here. Use that same link to see the KITS COLLECTION, LAST CHANCE PRODUCTS and all items in the 2025-2026 Annual Catalog, & Paper Pumpkin info.

Thanks for Stopping by. May you have a beautiful day!

Create for someone else – be a positive influence for others. ❤️

Product List

Stampin’ Up! NEW ONLINE EXCLUSIVES Items Available NOW

In the ONLINE store, two new kits are being showcased.

Stampin' Up! Kits Collection

Birthday Fancy Kit – $25 -166211

Stampin' Up! Birthday Fancy Kit

DETAILS
– Makes 12 cards: 4 each of 3 designs
– Folded card size: 5-1/2″ x 4-1/4″ (14 x 10.8 cm)
– Colors: Darling Duckling, Fresh Freesia, gold, Lost Lagoon, Petal Pink, Strawberry Slush
– Also available in French

Kit includes one of each item listed below.
– Birthday Fancy Photopolymer Stamp Set
– Clear stamp block
– Lost Lagoon Classic Stampin’ Spot
– Step-by-step instructions
– 12 printed envelopes
– Gold foil accents
– Adhesive

SWEET & SPOOKY KIT – $21 – 166229

Stampin' Up! Sweet & Spooky Kit

Make Halloween gifting extra special with the Sweet & Spooky Kit! This kit makes 15 treat boxes (5 each of 3 playful designs) featuring cute ghosts, bats, pumpkins, and more in a fun palette of black, pink, orange, and iridescent. With matching tags and ribbon included, these sweet boxes are perfect for party favors, classroom treats, or spooky surprises.

DETAILS
– Makes 15 treat boxes: 5 each of 3 designs
– Colors: Basic Black, Bubble Bath, Fresh Freesia, iridescent, Pumpkin Pie

Kit includes one of each item listed below.
– Step-by-step instructions
– Printed and iridescent-foil precut pieces
– Paper clips
– Pressed wood picks
– Baker’s twine
– Adhesive-backed holographic stars
– Adhesive

Some of the July ONLINE EXCLUSIVES

The Perfectly Pear bundle is part of a suite of products that are fabulous – pictured on the left is the bundle. On the right is the Sunflower 3D Embossing folder – another of the July ONLINE EXCLUSIVES available as of today – July 1. And on the right – yep Jolly Holly bundle getting you ready for Christmas. You won’t find these products in any catalog, they’ll only be listed in the online store.  They’re also only available while supplies last, so order early for the best selection! The Online Exclusive product releases will continue throughout the year so there will be new products to shop from, in addition to new catalogs!

Click the links below to SHOP NOW with me or click here

Product List

/p>

Stampin’ Up! Beautiful Blues Kit with Alternatives

Hello fellow creators. I’ve had some technical issues lately and it has frustrated me. Today though I want to share some alternatives for the Beautiful Blues Kit – not that any alternatives are needed. This is one gorgeous kit, but I couldn’t help myself – i cut one of the card fronts and made a card using the tile technique. Let’s take a look…

Stampin' Up! Beautiful Blues Kit. alternate 1

Notice I did not use the entire card front – or all the ’tiles’. The blue background is from another of the cards that I cut and stamped with one of the stamps & Night of Navy inkspot that are part of the kit. The pieces are cut in 1″ squares and adhered with dimensionals. The sentiment and tag are part of the kit as well, also adhered with dimensionals.

Stampin' Up! Beautiful Blues Kit, alternate 1 card inside

For the inside… I stamped the leaf image using the same stamp from the Beautiful Blues kit and Night of Navy inkspot – on the remainder of the card that I cut apart – making this a 4 x 5 1/4 size and adhering it to the inside of the card.

Here are additional slightly altered cards from this kit. This card has a double bow using Baker’s Twine Essentials pack in white, slipped behind the sentiment . The embellishments are from the kit!

Stampin' Up! Beautiful Blues kit alternate 2

This card has a Linen Thread double bow slipped behind the sentiment. On the inside I stamped the leaf image two times.

On alternate card 1, I had cut a blue card base apart and used it as a background for this card, stamping it all over with the leaf stamp, then adhering it to a Misty Moonlight card base.

Stampin' Up! Beautiful Blues Kit alternate 4
Stampin' Up! Beautiful Blues Kit alternate card 4 completed card front

The ‘overlay’ and all other parts are from the kit.

And for my last alternate card, I cut in half one of the lacy die cuts included in the kit and put it behind the sentiment. The other half is on the inside of the card.

Here are the remainder of the cards unaltered – in other words, put together as suggested:O) I made two of the first shown here.

Stampin' Up! Beautiful Blues kit, 1
Stampin' Up! Beautiful Blues kit.2

Stampin' Up! Beautiful Blues Kit, 3

Such a fun kit to put together – no extras needed unless you so desire to change or alter. Love this kit!

Want to purchase this kit? See the product list below. There’s also more… Stampin’ Up! has this great promotion right now.

BUY ONE GET ONE 50% OFF has begun

On All SUITES and SUITE PRODUCTS!

Stampin' Up! Suite Sale

Starting June 3, all available suites and suite products from the 2025–2026 Annual Catalog and Online Exclusives are buy one, get one 50% off! If you’ve had your eye on a new suite from the annual catalog or you really like the look of a stamp set from an Online Exclusives suite, you don’t have to choose—you can get both!

Sales Period: June 3–30, 2025

Ordering Deadlines

Phone: June 30, 2025, at 6:59 p.m. (MT)

Online: June 30, 2025, at 11:59 p.m. (MT)

  • All available suites and suite products from the 2025–2026 Annual Catalog and Online Exclusives are buy one, get one 50% off.
  • When you shop the sale, the 50% off discount will apply to the lower-priced item (for example, if you buy a suite collection and a stamp set from a suite, the suite would be full price, and the stamp set would be 50% off).
  • Suite collections are available if all items are in stock; if all items are not in stock, you can still shop the available suite products.
  • You don’t have to buy a suite and suite products all from the same suite collection for the discount to apply. You can buy any suite products from any suite.
  • The discount will appear in your cart once you’ve added two items within the sale parameters to your cart.
  • Products are available only while supplies last.
  • See and shop all qualifying suites in the online store.

SHOP LAST CHANCE PRODUCTS HERE… NEW ITEMS ADDED TO THE LIST… MAKE CERTAIN MY NAME IS LISTED AS YOUR DEMONSTRATOR WHEN YOU CHEVCK OUT! :O) REMEMBER…Browse the selection of Last Chance paper crafting products. Additional items are added every other month. These products are available only while supplies last so be sure to buy them before they are discontinued! Discounts vary and are subject to change.

VIRTUAL ALBUM RETREAT!!!

Stampin' Up! Virtual Album Retreat

Who: Crafters who love to scrapbook!

When: July 16–18, 2025, 2:00–10:30 p.m. (MT)

Where: Private Facebook Group

Registration: There is no registration for this event! By purchasing the Month by Month Album Retreat 2025 kit, you’ll get access to an exclusive Facebook group where the live event will stream.

Price of Month by Month Album Retreat 2025 kit: $250

Language of Event: This event will be presented in English only.

After the Event: You can access the recorded event videos on the Virtual Album Retreat Facebook group page.

CONTACT ME FOR INFORMATION RE: ADDITIONAL SUPPLY LIST

Click HERE to join with me & create your Starter Kit! What’s to lose – 20% discount/ 20% commission on all orders.

Thanks for stopping by. May you have a beautiful day. Make someone happy sending them a handmade card filled with love. ❤️


Product List

Stampin’ Up! Impressions Abloom Thanks Card

Impressions Abloom is one of the new bundles in the Stampin’ Up! 2025-2026 Annual Catalog – and it’s wonderful. This card was one inspired by the After Hours program at the Stampin’ Up! Convention recently. I confess it’s a direct CASE of one in the After Hours booklet :O)

Stampin' Up! Impressions Abloom Thanks card front

This card begins with a Crumb Cake card base, standard A2 size. Several pieces of Crumb Cake were trimmed down for layering with Perennial Lavender DSP. This DSP is a carry over 12×12 paper and is gorgeous. What you are seeing here is a checkered pattern. Notice how the edges of both the Crumb Cake pieces and the DSP pieces have frayed edges. That was done by holding the scissors at an angle on each piece and ‘scratching’ down the side. It sometimes even tears a bit, which is ok. It gives it a country look. Each of the flower heads is stamped in Darling Duckling ink then die cut with the appropriate die with two layers per flower head. The centers are stamped with Pecan Pie ink then Wink of Stella for a bit of sparkle in the centers. The stems & leaves are die cut using this same Impressions Abloom bundle – using Granny Apple Green card stock. These were attached to the card front, then the flowers heads added with dimensionals. The tiny flowers were die cut from Basic White then a Stampin’ Blends in Daffodil Delight colored the center. These were added with dots of liquid glue. A double bow was created using the Gold thread and attached with a glue dot. The sentiment was stamped in Pecan Pie ink, an edge torn and added with dimensionals.

Here’s a photo of all the daisy die cuts:

Stampin' Up! Impressions Abloom daisy die cuts
Stampin' Up! Impressions Abloom card inside

For the inside…

I stamped the daisy image in Darling Duckling ink and the centers in Pecan Pie – same as the card front. I stamped the sentiment, also from Impressions Abloom stamp set, in Pecan Pie ink. The panel was added to the inside of the card.

The envelope …

Stampin' Up! Impressions Abloom card & envelope

More of the Perennial Lavender 12×12 DSP was added to the flap & trimmed to fit. The very same flower from Impressions Abloom stamp set was stamped on the envelope front: Darling Duckling for the flower and Pecan Pie for the center. And of course, Wink of Stella was added to the center :O) This would be a great birthday or hello card – just change the sentiment. It’s cheerful – a real lift me up kind of card.

This bundle and DSP will be available May 6, both in the ONLINE Exclusives AND in the 2025-2026 Annual Catalog. Remember too, the Stampin’ rewards are changing as well. – no more HOST CODES, but customers will begin receiving rewards with a $20 purchase – and that reward can be used toward their NEXT purchase. It’s quite a nice deal.

Feel free to look through my store by clicking the link here. This link will allow you to view any specials going on, ONLINE EXCLUSIVES, Paper Pumpkin, the Kits Collection – like that. And if you have any questions, reach out to me. I’m here to help… to inspire, to create, to answer questions.

card cuts:

  • card base: 8 1/2 x 5 1/2 scored @ 4 1/4
  • layer: 1 1/8 x 4; 2 x 2; 1 3/4 x 2
  • DSP layer: 1 x 4; 1 3/4 x 2; 1 3/4 x 1 5/8
  • Basic White: 4 x 5 1/4, inside; 4 x 5 1/4 die cutting flowers
  • Granny Apple Green: 1 3/4 x 5 3/4, leaves/ stems
  • DSP: 2 14 x 6, envelope flap