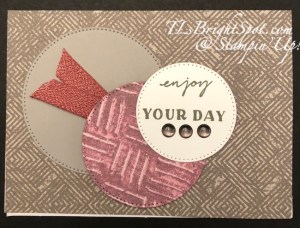
Wow – tomorrow is THE DAY – the Fourth of July – what are you doing special? Picnic? Fireworks? Friends? Welcome to the Happy Inkin’ Thursday Blog Hop! We have a sketch challenge today that offers so man y possibilities Let’s have a look….
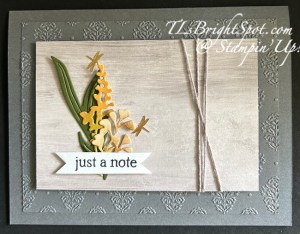
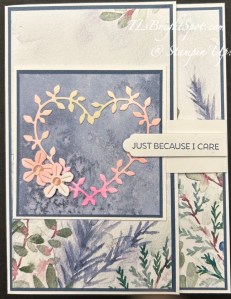
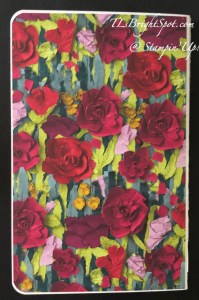
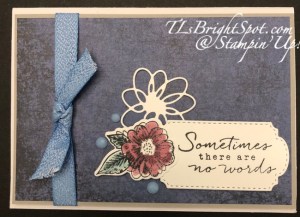
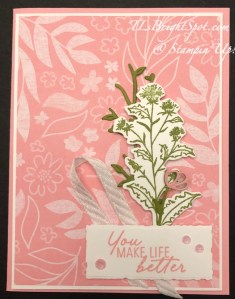
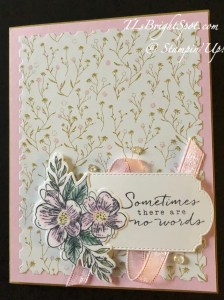
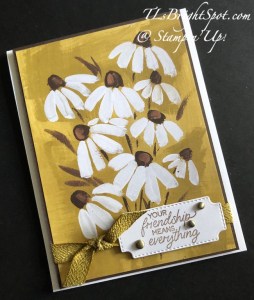
What do you think – does this work for the sketch? I used a few items in the Gallery Suite of products.. the Beautiful Gallery 6×6 DSP (the reverse side!) the Damask Designs embossing Folder, the Gallery Blooms Bundle (die cuts), and the Beautiful Motifs stamp set for the sentiment. In lieu of the embellishments in the suite, I used the Adhesive-Backed Birds & Dragonflies. Here’s how I created this…
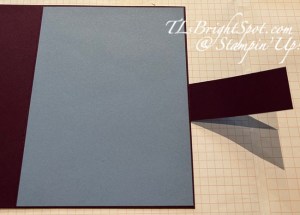
Basic Gray card base 8 1/2 x 5 1/2 scored at 4 1/4
Basic Gray layer 5 x 3 3/4, embossed with Damask Designs embossing folder. Adhere directly to card base
Beautiful Gallery 6×6 DSP 3 x 4 1/4, backed with card stock for strength (to be added to card front with dimensionals once decorated)
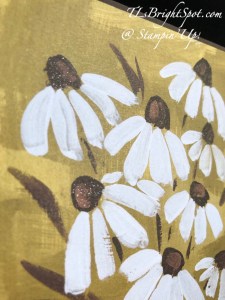
Die cuts: created using the Gallery Blooms Dies… Mossy Meadow for the background leaves; Basic White colored with Blending Brushes using Peach Pie and Mossy Meadow then die cut for the middle flowers & a bit of Pecan Pie on the edges of the flowers after die cutting; die cut the front leaves from Basic White then use a Blending Brush & Pecan Pie ink to color lightly. These were layered as shown with liquid glue.
The sentiment is stamped in Secret Sea ink using the Beautiful Motifs stamp set, then the Basic White strip ‘bannered’ on the ends with paper snips. It was added with dimensionals.
I wrapped the one end with Basic Twine Essentials in gray, three times around and secured in back with Tear n Tape, creating a pattern of lines.
Final touch – two of the dragonflies from the Adhesive-Backed Birds & Dragonflies.
Attach this completed panel with dimensionals, centering.
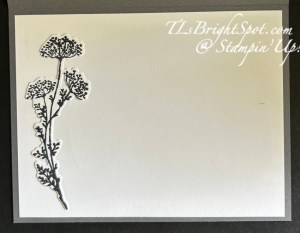
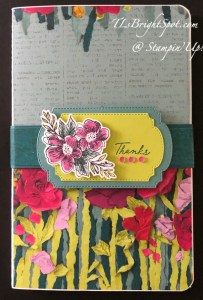
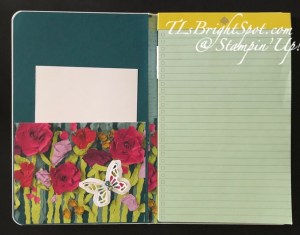
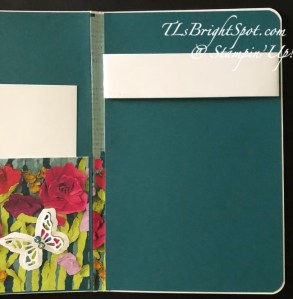
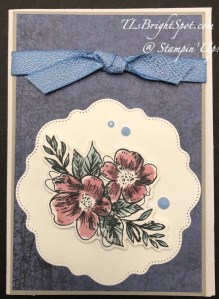
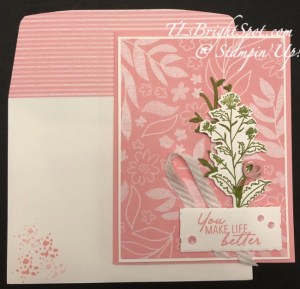
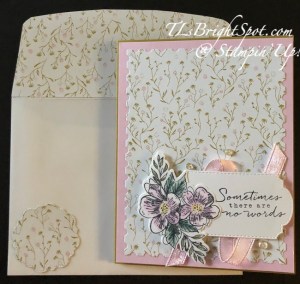
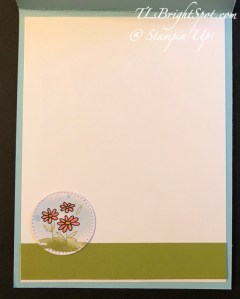
For the inside… I stamped & die cut this wonderful image in Secret Sea ink and was originally going to use it on the front, then decided not to use it. When it came time to do the inside, I decided to0add the die cut (Gallery Blooms Dies) to the 4 x 5 1/4 Basic White panel. And done!
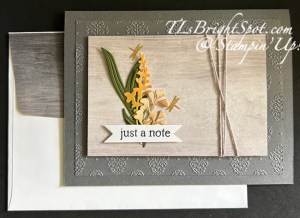
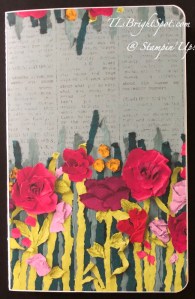
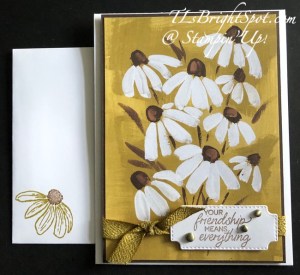
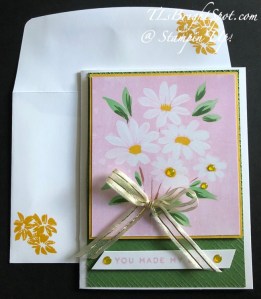
For the envelope… I took the remaining piece of this DSP and added it to the envelope flap & trimmed to fit. To me, this seems like a perfect masculine card – could be used for thinking of you after an illness or sympathy, a thank you – just about anything!
Please enjoy the hop by clicking on the ‘next’ button to take you to Amy or click on a name if you wish to visit another’s blog.
You may shop the products to make this card by visiting the links below.
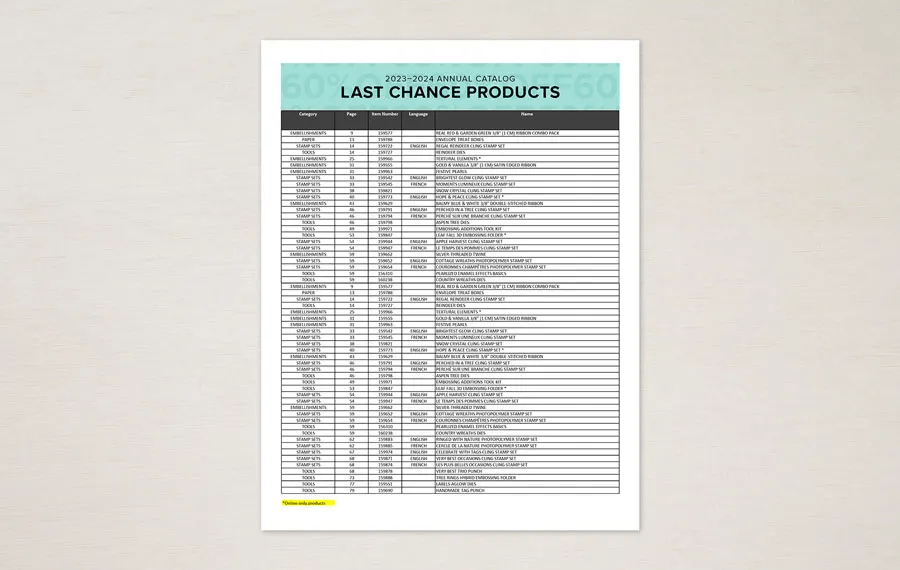
SHOP LAST CHANCE PRODUCTS HERE… NEW ITEMS ADDED TO THE LIST… MAKE CERTAIN MY NAME IS LISTED AS YOUR DEMONSTRATOR WHEN YOU CHEVCK OUT! :O) REMEMBER…Browse the selection of Last Chance paper crafting products. Additional items are added every other month. These products are available only while supplies last so be sure to buy them before they are discontinued! Discounts vary and are subject to change.
Thanks for stopping by. May you have a beautiful day!
Make someone happy by sending them a handmade card filled with love. ❤️
Hi folks! Today is – GAME DAY… are you for the red (Kansas City Chiefs) or green for the Eagles? Because of where I live, the Eagles are the players of choice. :O)
On Thursday evening I learned a friend of mine is on hospice care and it really threw me for a loop. I was shocked and dismayed – and heartbroken. This card is for her…
I combined a couple of Stampin’ Up! items… Winter Meadow DSP and the free during Sale-a-Bration bundle called Heart Shaped. It’s delicate, it’s beautiful and perfect for so many occasions.. Here I used I a heart stamped from paper I created with Blending brushes and several colors. I’ll link to the post here that will give all the info about how to do that. The two small flowers were die cut from that same paper with dies from Heart Shaped Dies.
I began with a Thick Basic White card stock 5 1/2 x 7 1/2 scored on the long side at 4 1/4. Cut layer pieces (here it was Misty Moonlight cs) 3 1/8 x 5 3/8 for the front and 4 1/8 x 5 3/8 for the inside. DSP panels should be 3 x 5 1/4 and 1 x 5 1/4. Adhere the larger DSP panel to the larger card stock piece then secure to the card front. The 1″ strip should be added to a Basic White piece 4 x 5 1/4 for the inside of the card. Cut another piece of Basic White 1 x 3 and score at 1/2″ on one end. This will become the tab for the front ‘flap’. Add this tab to the back of the card stock layer for the inside of the card, centering it top to bottom. Now add this card stock to the inside of the card. It will look like the photo below.
Add the 1″ DSP strip to the right edge of the Basic White layer, then stamp the sentiment.. Here the sentiment is from Everyday Greetings stamp set and stamped in Misty Moonlight ink I also added the stamped heart, twice – once in Pretty in Pink and the second in Moody Mauve stamped off once. Adhere this to the inside of the card.
Now close the card and center the square that attaches to the flap. The layers are Basic White 2 3/4 x 2 3/4, Winter Meadow DSP cut 2 5/8 x 2 5/8. The die c ut heart is attached with tiny dabs of liquid glue. The flowers are attached with a mini dimensional for one and liquid glue for the other. The sentiment is again from Everyday Greetings and stamped in Misty Moonlight ink. It was die cut with a banner die from the Heart Shaped dies, then one end trimmed. This was attached with mini dimensionals.
Unfortunately I do not have a photo of the envelope – ugh! – but I did attach more of the Winter Meadow DSP to the flap, trimmed to fit, then stamped the grouping of flowers in Pretty In Pink ink on the envelope front.
I made three more cards using this same ‘pattern’ but chose different DSP for those and different card stock bases as well.I’ll share those photos below.
To purchase the supplies to make this card, please use this link to take you to my Stampin’ Up! store – look around a bit: Online Exclusives, Kits Collections, 2024-2025 Annual Catalog – like that. And when you shop with me right now, Stampin’ Up! is in the ending stages of Sale-a-bration (Jan-Feb), but when you order prior to Feb 28, you will receive an opportunity to receive FREE items from Stampin’ Up! – the Heart Shaped bundle is one of those that qualifies with a $120 order. How fun is that!!!
So now… how to purchase from me..These items can all be purchased through me – and I would appreciate your business! To view the ONLINE EXCLUSIVES, CLICK HERE. To see the items in the Jan-Apr 2025 Mini Catalog – click hereAnd if you do not have a demonstrator and need either of these catalogs, let me know! For all those coloring tools, the basics of card stock and embossing/ die cut machines, more stamps & dies, watercolor pencils, click this link for the 2024-2025 Annual Catalog. Remember that when purchasing from me, to use my current host code…and make certain my name is listed as your demonstrator :O)
Sale-a-bration ends soon – Feb 28, 2025 and there are some FAB products you receive FREE with qualified purchases.
For purchases of $60 (level 1) – these items are FREE – click here
For purchases of $120 (level 2) – these items are FREE – click here
Use my CURRENT HOST CODE WTGKS9DH
When you shop with me and your purchase is $50 or more – you will receive a free giftie valued up to $10 that is a Stampin’ Up! item. You will also receive the monthly tutorial – January is the Terrific Toadstool and it has some really cute ideas!
If you’ve been thinking about becoming a Stampin’ Up! demonstrator, then there’s no better time than right now during Sale-A-Bration! When you join by February 28, 2025, you can choose between two fabulous offers:
Option 1: Get $125 worth of product PLUS a choice of two Stampin’ Write Marker Assortment packs AND the Handmade Designs Cling Stamp Set (an exclusive stamp set designed to work with the markers). That’s a $216 value for just $99! I strongly recommend Option 1
join by February 28, 2025, you can choose between two fabulous offers:
Option 2: Get $125 worth of product PLUS an additional $30 worth of product when you join Stampin’ Up! That’s a $155 value for just $99!
If you’d like to join the team, we’d love to have you! Once you join, you’ll get at least a 20% discount on all of your Stampin’ Up! purchases and you can preorder from the upcoming catalogs!
Another key thought for joining now during Sale-a-bration… you will receive either an extra $30 in free product in your Starter Kit or your choice of two packs of Stampin’ Write Markers and an exclusive stamp set!
Stampin’ Up! and our particular team welcome all types of Demonstrators – those only purchasing to get the discount for themselves
those who want to run a business and…
– those anywhere in between! Let’s stamp and have fun doing it!
Demonstrators get lots of perks including at least a 20% discount on all orders that you place as a Demonstrator, invitations to Stampin’ Up! Demonstrator events and preordering from upcoming catalogs and promotions. And if joining this Jan-Feb makes sense to you, you will have the opportunity to view the new catalog early and preorder as well. Opportunity knocks! Click the link in the image below to join with me now.
Thanks for stopping by. May you have a beautiful day!
Make someone happy by sending them a handmade card filled with love.
Yesterday was a very successful working outside kind of day! 77 degrees and dry leaves that could easily picked up, some Easter bulbs planted and yard furniture taken out from shed. Whew! To say the least, just a bit sore today :O)
I like notebooks and have a few notepads on shelves and in convenient places – and decided to make some fun covers for them – they are nice notepads – and give as gifts. Here’s my first.
This is such pretty Designer Series paper! I love the colors, wonderfully paired Lost Lagoon, Berry Burst, Lemon Lime Twist. Yummy. And the belly band is made with Pretty Peacock. The base of the notebook is the white backing for the DSP – you know the one with name of DSP and color coordinations. It is cut 10 3/4 x 8 1/4 scored at 5 1/4 & 5 1/2. I rounded the corners but you wouldn’t have to do that. The front DSP mat is 5 1/8 x I 8 1/8.
And here are inside and back photos.
Just to explain the inside a bit: in photo with the butterfly (butterfly is a Paper Pumpkin add-on called Thanks & Beyond Dies) – that is a pocket for extraneous notes (3 7/8 x 5) with a full liner of Pretty Peacock 5 1/8 x 8 1/8. The second photo above shows another ‘liner’ of Pretty Peacock 5 1/8 x 8 1/8 and the ‘holder’ for the notepad 1 1/4 x 12 – also from the backing of the DSP. I wrapped it around the heavy piece of the back of the notepad, adhered the ends together, removed it from the notepad and adhered it to the notebook with the smooth side up. This allows for replacement of a Junior Legal notepad at any time. The last photo is another panel of Masterfully Made DSP 5 1/8 x 8 1/8 adhered to the notepad base.
The belly band… 1 1/4 x 12 Pretty Peacock covered with a strip of Masterfully Made DSP 1 1/8 x 12. Wrap loosely around closed notepad and adhere ends together in front with Tear n’ Tape. Decorate: Using the Thoughtful Expressions Dies, I die cut two pieces for the label – Lost Lagoon and Lemon Lime Twist and adhered together with liquid glue. I stamped the sentiment from Thoughtful Wishes stamp set in Pretty Peacock ink and added several dimensionals to the back. With the belly band in place on the notebook I attached the die cuts to the belly band.With the Thoughtful Expressions stamp set I stamped the floral image on a Basic White piece in Memento ink and colored it with Stampin’ Blends: Berry Burst, Lost Lagoon and Lemon Lime Twist. I die cut the image with the appropriate die from the Thoughtful expressions dies and adhered in place with dimensionals. As a final touch, I added three Adhesive-Backed Shiny Sequins in Berry Burst – an ONLINE EXCLUSIVE.
The Masterfully Made DSP retires at the end of April as the 23-24 annual catalog sadly ends. It is still available, but not for long! Click the Last Chance photo to take you directly to the shop!
As with any retiring catalog – a new catalog becomes available – the 2024-2025 Annual catalog. I have sent catalogs to my customers, but if you do not have a demonstrator and need a catalog, please connect with me!
me in Houston receiving the 24-25 Annual Catalog
With a new catalog I offer Designer Series Paper Shares and this year I am offerring Ribbon Shares as well. Please click here to find more information about that!
Shopping with me… use my current HOST CODE 4JF6ZWC9 to receive that $10 item when your order is $50-$149.
Good morn ing! Oh my goodness, we have had a stunningly gorgeous weekend – well, mostly on Sunday. We had sprinkles on Sat & overcast skies. But Sunday was glorious!!! I’ve been working on using my retiring DSP and started with a pack that was nearly gone – Earthen Elegance DSP. I paired it with the beautiful Thoughtful Expressions bundle and some other items. I have six cards to share – some just the card fronts.
#1
Note Card 1
Ribbon: Boho Blue
Embellishment: Adhesive- backed Solid Gems in Boho Blue; sentiment: Thoughtful Elegance stamp set
Blends: Moody Mauve & Pretty Peacock
Ink: Memento
#2
All the same elements used for Card 1 used for Card 2
#3
Card 3 Ribbon: Copper Clay
Embellishemnts: 23-25 In Color Dots in Copper Clay
#4
Silver Specialty DSP
Embellishments: 23-25 In Color dots in Moody Mauve
Stitched Shapes Dies
#5
Stitched Shapes Dies
Ribbon: Moody Mauve
Embellishments: 23-25 In Color Dots – Pebbled Path
#6
I added Granny Apple Green die cuts & Blends for card #6 & two small leaf dies in Pretty Peacock – also Countryside Corners Dies in two layers. Thoughtful Expressions stamp set & Dies were the foundation and the Earthen Elegance DSP.
My idea is to use as much of the retiring DSP as I can over the next days as they retire April 30. It’s much more fun to use the new supplies, but I want to USE the retiring DSP – bottom line!!! I have more new supplies arriving soon that are in the 24-25 Annual Catalog & can’t wait to share those as well.As with any new catalog, I am offering Designer Series Paper Share & this year, also ribbon shares. Here is a link to see all the details for ordering those shares through me. The new catalog goes live to customers May 1. If yoou do not have a demonstrator, I would be happy to send a catalog.
me in Houston receiving 24-25 Annual Catalog!
If you are interested in the products of the ONLINE EXCLUSIVES, –
Good Friday morning! The wind & rain pummeled our house last night, waking me. Hubby slept right through it! My card for today uses a couple of new products from the 24-25 Annual catalog: Pretty In Pink card stock & ink, 24-26 In Color 6×6 DSP, White Diagonal Trim (from the Petal Pink & White Diagonal Trim Combo Pack), 24-26 In Color Shimmer Gems and Thoughtful Wishes bundle – all available May 1!!! It It also includes a retiring Playing In The Rain stamp set (moving to ONLINE EXCLUSIVE) and Deckled Rectangle dies, also from the ONLINE shop.
I adhered the 3 7/8 x 5 1/8 piece of 24-26 In Color 6×6 DSP to a Basic White 4 x 5 1/4, put dimensionals on the back and attached to a Pretty In Pink card base 8 1/2 x 5 1/2. I stamped the floral stamp from Thoughtful Wishes stamp set in Old Olive ink on a Basic White scrap and die cut it with the coordinating Thoughtful Wishes Dies. With those dies still on my desk, I die cut another in Old Ol;ive card stock and the small flower in Old Olive and Pretty In Pink, trimmed the Pretty In Pink flower off and adhered it to the stem of Old Olive. I adhered the tasll Old Olive die cut directly to the card front, then the floral spray with dimensionals and the small flower with liquid glue.. I stamped the sentiment from Thoughtful Wishes in Pretty In Pink ink on a Basic White piece and die cut it with the Deckled Rectangle Dies. I attached a length of the White Diagonal Trim with Stampin’ Seal, then added the sentiment banner with dimensionals on each end. The final touch was tghree 24-26 In Color Shimmer Gems in Pretty In Pink.
For the inside, I wanted something light & fun so pulled out the Playing in the Rain stamp set, stamped the sentiment in Pretty In Pink ink and the flowers in Old Olive ink – all on a Basic White panel. This was adhered directly to the card base.
For the envelope, I used the same panel of 24-26 In Color 6×6 DSP and turned it to the other side, adhered it to the flap and trimmed to fit. On the front I used the Thoughtful Wishes stamp set ‘splotch’ stamp and Pretty In Pink ink to stamp – some first generation and others stamped off. This is such a gorgeous shade of pink – love the new 24-26 In Colors!!! If you do not have a 24-25 Annual Catalog, please connect with me & I’ll send one to you ASAP. My regular customers have theirs already.
me in Houston receiving my SU! 24-25 Annual Catalog :O)
I offer Designer Series Paper Shares when a new catalog is launched and this yerar am also offering Ribbon Shares. Click here for that information
If you are interested in the products of the ONLINE EXCLUSIVES, –
Good Tuesday – day after the solar eclipse! Did you see it? Wasn’t it amazing??? What was interesting to me was how quiet all the birds & animals became – they disappeared and stopped their singing, chirping, playing around. I expected some of that as I had read about it, but that’s different than experiencing it. Just sayin’.
Today’s card features a couple of the LAST CHANCE PRODUCTS that go on sale today, April 9.: Poetic Expressions 12×12 DSP and the Thoughtful Expressions Bundle. Later in this post is a link to the Last Chance Products shopping with me.
I began with die cutting the beautiful Poetic Expressions 12×12 DSP with the largest of the Perennial Postage Dies. I saved the outside rim of the die cut to use on the inside – see that in next photo. I adhered this DSP die cut to Bubble Bath card stock 4 18 x 5 3/8, put dimensionals on the back and attached it to a Wild Wheat card base (8 1/2 x 5 12 scored at 4 1/4). I then stamped the image from Thoughtful Expressions stamp set in Memento Black ink on a Basic White scrap 2 3/8 x 3. I colored this sweet floral image with Stampin’ Blends: Bubble Bath, Daffodil Delight, Lost Lagoon and Light Mossy Meadow, then die cut it with the coordinating die in the Thoughtful Expressions Dies. I pulled out one of the banner dies in Thoughtful Expressions Dies and die cut from Basic White 1 3/4 x 3 1/4. I stamped the sentiment in Memento ink using the Thoughtful Expressions stamp set. I adhered the floral die cut to the sentiment banner with liquid glue then added lots of dimensionals to the back. I set this aside to add a Sheer Ribbon in Bubble Bath (from the Sheer Ribbon Combo Pack) to create a background for the sentiment banner. I added the ribbon with Stampin’ Seal & wove it back & forth, then added the sentiment banner over it to further secure it in place. The final touch was adding the three Iridescent Foil Gems – and the card front was complete.
For the inside… the first step was to adhere the outer rim of the Poetic Expressions DSP, the one die cut with the largest Perennial Postage Dies, to a 4 x 5 1/4 Basic White panel. I then stamped the hummingbird image from Thoughtful Expressions stamp set in Bubble Bath ink. I then stamped the sentiment – also from Thoughtful expressions stamp set – in Memento ink. This panel was added to a Bubble Bath card stock 4 1/8 x 5 3/8, then to the inside of theWild Wheat card base. Love, love – so feminine – and so perfect for a sympathy card.
For the envelope… more of the same Poetic Expressions 12×12 DSP adhered to the flap, then a die cut from the same DSP using one of the Thoughtful Expressions Dies – also added to the envelope front.
This is such an awesome bundle and can be found in the Jan-Apr 2024 Mini Catalog on page 62. The Poetic Expressions DSP can be found on page 61. These are both LAST CHANCE PRODUCTS. Visit my site here to purchase any other LAST CHANCE PRODUCTS – STARTING TODAY, APRIL 9. You can also click the image below :O)
Remember when shopping with me, when your purchase is $50 – $149, you receive a Stampin’ Up! item from me valued up to $10. I encourage you to use my CURRENT HOST CODE 4JF6ZWC9 to redeem those benefits. Make sure my name as your demonstrator is at the top of the page when checking out :O)
Last Chance Products indicates a new catalog :O) If you have been a customer of mine this past year, your catalog is in the mail and you should receive it shortly. If you do not have a demonstrator and need a catalog, please let me know. With a new catalog, I offer PRODUCT SHARES FOR DSP AND RIBBON. Please click here to view that information. I am taking orders for shares now through Monday April 29 @ 3 PM.
me in Houston receiving the NEW ’24-’25 ANNUAL CATALOG
Thanks for stopping by today. May you have a beautiful day. Remember to make someone happy by sending them a handmade card filled with love. BLESSINGS!
Welcome to our awesome Happy Inkin’ Thursday Blog Hop! There are some fun projects to be shared to day with this sketch challenge.
I’ve chosen to use the Cheerful Daisy Stamp set and it’s coordinating Cheerful Daisy Dies. They are so great – love the layering possibilities and the texture as well. Above you see the NEW Copper Clay card base. What a beauty this paper is… The DSP is from Fresh As A Daisy and is one of the panels on the first page of the Designer Series Paper.. I attached that front piece to a Basic White panel cut to the same size (3 1/8 x 4 14). I then took a small rectangle DSP on that front panel and cut it down so it shares the stage by sticking out at each side. I adhered that to the card front, then added the two panels with dimensionals. I die cut the daisy outline in Boho Blue (NEW), then the two coordinating layers in Basic White and adhered them all together with liquid glue. I popped it up on dimensionals & added it to the card front. I cut a length of this gorgeous Texture Ribbon in Copper Clay, folded it over and added it in place with Stampin Seal+. The final touch for the front was the 2023-2025 In Colt Dots – in Boho Blue of course.
I cut a piece of Boho Blue 3 3/8 x 4 3/4 and adhered it in place on the inside of the card. I added the Basic White piece on top (3 1/4x 4 5/8).
Again the daisy has three parts: the outline is Copper Clay, the two top portions are Basic White – all adhered together and added to the inside of the card.
For the envelope… a bit of DSP on the bottom front of the envelope, to carry over a bit of the front of the card. For the flap, a different piece of Fresh As A Daisy DSP, adhered & trimmed to fit. What a fun project ~ and I loved every minute of putting it together.
Now it’s time to see what the other team members have to share. Click a link and have fun hopping
How do you get your hands on these items? Easy peasy… these will be available May 2 and are found in the catalog on pages 110-111. If you do not have a demonstrator or a catalog, please reach out to me… we can fix that! Another way to get your hands on them is to JOIN MY TEAM. Yep, become a demonstrator: hobby or business. Make it your own. Become a demonstrator and always get 20% off your purchases. You can be a hobby demo or go full steam ahead to do more. Either way, here to support you however you need. You may join my team here. We have many hobby demonstrators who strictly maintain their demonstrator status just for the discount, and other demonstrators who wish to grow a business. Either way, we have loads of FUN! Look at all of the smiling faces!
Becoming a Demonstrator offers some great benefits:
20%+ Discount on your demonstrator orders
Be a part of a fun and supportive team and the Stampin’ Up!
community
Early access to new catalogs and promotion information
Early ordering for new products
Be a hobby demonstrator or start a business
No pressure to sell products
My full support when you join my team
If you have questions, please reach out to me: tlsbrightspot@gmail.com
SHOP Last Chance Products here
SHOP CLEARANCE RACK HERE. This is really the way to save! The items in the Clearance Rack are highly discounted.
USE MY CURRENT HOST CODE K4PPCYJA when you order
Stock Up Now Because Prices Are Increasing – As of May 2nd, prices will increase with the new Annual Catalog. Right now is the best time to stock up on basics and carryover products. New prices will be in effect (including for all catalog-related promotions, such as the catalog preorder) within the following product categories:
Cardstock
Designer Series Paper
Specialty Paper
Notecards and Envelopes
Classic Stampin’ Ink Pads and Refills
Stampin’ Blends
Stampin’ Write Markers
Select Specialty Inks
Stampin’ Cut & Emboss Machines and plates
Embossing Folders
Punches
Take Your Pick products
Storage
Clear Blocks
Select tools
Select adhesives
Select stamp sets
Paper Pumpkin
With the new catalog comes NEW Designer Series Paper ~ and I’m offering Paper Shares.
New Designer Series Paper Share –
$70.00 plus $8.50 for Priority Mail shipping
12-Bright & Beautiful 6 x 6
6-Countryside Inn
12- Delightfully Eclectic
6-Earthen Elegance
6-Fresh As A Daisy
5-Glorious Gingham 6 x 6
12-Inked Botanicals 6 x 6
6-Let’s Go Fishing
6-Les Shoppes
6-Masterfully Made
6-Stargazing
6-Zoo Crew
10-2023-2025 In Color 6 x 6
10-2022-2024 In Color 6 x 6
20-Brights 6 x 6
20-Neutrals 6 x 6
20-Regals 6 x 6
20-Subtles 6 x 6
3-Gold Celebrations acetate
3-Holographic Trio Specialty Paper
5-White Center Specialty
2-More Dazzle Specialty 6 X 6
5-Soft Shimmer Paper Combo Pack
5-2022-2024 In-Color Textured Specialty Paper
5-2023-2025 In-Color Luster Specialty Paper
Anyone is welcome to join in my share, just remember, I can only ship to addresses within the US. If you’d like to join, email the following information to tlsbrightspot@gmail.com. Make sure you indicate a single share or double share :
Your first and last name
The email address that is connected to your PayPal account. I only accept PayPal for payment. ***You do not need to have a PayPal account to pay the invoice, you can choose to pay by credit card without having a PayPal account
Deadline to sign up for my share is Sunday, April 30th at 5:00 PM ET.
Good morning! I have a bright, cheerful card for you today. It uses retiring Rain or Shine DSP and the carrying over Playing in the Rain stamps & Dies.. You might remember that I’m making daisy cards for a couple of folks as I’m attending a convention the first weekend in May. As I was pulling retiring items I saw this adorable paper and quickly made this card.
All the DSP used for this card are from the Rain or Shine collection. I only have a bit left, which is good since it’s retiring. :o) I cut the DSP panel with the second largest of the retiring Stitched Rectangles Dies, then adhered it to a slightly larger panel of Old Olive. I took another piece of the DSP (see the raindrops strip behind), it’s 1 3/4 x 5 1/2 and adhered it to the Balmy Blue card base. The Old Olive piece is adhered, centering, with dimensionals. I die cut the turtle from one of the Designer Series Papers in this pack and adhered it with dimensionals as though he were walking through the field of flowers. I added a white bow from the Baker’s Twine Essentials Pack using the white twine and pulling two threads from a length to make the bow. I stamped the sentiment in Old Olive ink on a Basic White scrap and die cut it with the Stylish Shapes Dies. I cut a strip about 5/8 x 3″ from another piece of the DSP and added it to the back of the circle with Stampin’ Seal+, then attached the circle with dimensionals to the card front. I trimmed the ends of the strip after adhering it. I added three Glossy Dots to the circle for some added sparkle.
For the inside, I added a strip of Old Olive to the Basic White panel, then used another Stylish Shapes Die to cut this fun flower image and adhered it over the Old Olive strip. The panel was adhered to the inside of the card and done!
For the envelope… the backside of this particular piece of DSP is this fun check – and I adhered it to the envelope flap and trimmed to fit. For the front, I stamped the adorable daisies in Memento ink and colored with Daffodil Delight Blends. This creates a fun, cheerful card for any occasion.
Couple of things…
LAST CHANCE PRODUCTS are only available through May 1 You may find that link here
As the 2023-2024 Annual catalog launch is nearing, I am offering a Designer Series Paper share of all the new Designer Series Papers.
New Designer Series Paper Share –
$70.00 plus $8.50 for Priority Mail shipping
12-Bright & Beautiful 6 x 6
6-Countryside Inn
12- Delightfully Eclectic
6-Earthen Elegance
6-Fresh As A Daisy
5-Glorious Gingham 6 x 6
12-Inked Botanicals 6 x 6
6-Let’s Go Fishing
6-Les Shoppes
6-Masterfully Made
6-Stargazing
6-Zoo Crew
10-2023-2025 In Color 6 x 6
10-2022-2024 In Color 6 x 6
20-Brights 6 x 6
20-Neutrals 6 x 6
20-Regals 6 x 6
20-Subtles 6 x 6
3-Gold Celebrations acetate
3-Holographic Trio Specialty Paper
5-White Center Specialty
2-More Dazzle Specialty 6 X 6
5-Soft Shimmer Paper Combo Pack
5-2022-2024 In-Color Textured Specialty Paper
5-2023-2025 In-Color Luster Specialty Paper
Anyone is welcome to join in my share, just remember, I can only ship to addresses within the US. If you’d like to join, email the following information to tlsbrightspot@gmail.com. Make sure you indicate a single share or double share :
Your first and last name
The email address that is connected to your PayPal account. I only accept PayPal for payment. ***You do not need to have a PayPal account to pay the invoice, you can choose to pay by credit card without having a PayPal account
Deadline to sign up for my share is Sunday, April 30th at 5:00 PM ET.
WooHoo – welcome to Tuesday! The other day I tore into my package of Fresh As A Daisy DSP and the very first sheet is full of card front panels, which I immediately cut apart. I shared my first card using the coordinating Cheerful Dies and Cheerful Daisy stamp set – you may find thathere. Today’s cards – yep, two of them, use more of that DSP but very little of the dies. Here is card 1…
The panel is layered onto an Early Espresso panel, then wrapped in this gorgeous Wild Wheat Textured Ribbon and added to the Thick Basic White card base with dimensionals. I stamped the sentiment from Cheerful Daisies stamp set with Early Espresso ink on Basic White and die cut it with the banner die from Cheerful Daisy Dies. This was adhered over the ribbon. I looped a length of the same ribbon around the band and tied a single knot., then added a glue dot under the knot to secure in place. Final touches: Brushed Metallic Adhesive-Backed Dots on the sentiment and Wink of Stella on each of the brown flower centers.
For the inside, I stamped the daisy in Wild Wheat and the center in Early Espresso, using Wink of Stella on the brown center of the flower :O) This was a Basic White panel and was adhered directly to the inside of the card. I stamped the same images on the envelope front, same inks and everything. I’m hoping you can see the Wink of Stella shine in this single photo.
For the second card… totally different colors but from that same Fresh As A Daisy sheet as the card above.
How different is this card from the previous, right?! The main color that pops is the new Bubble Bath. I adhered this DSP front to a slightly larger piece of Crushed Curry. I ran a Garden Green piece through the Basic 3D embossing folder called Cross Hatch (purchased from the Online Store!) I added this directly to the Thick Basic White card base, then added the DSP panel with dimensionals on top of it. I stamped the sentiment on a 1/2″ strip of Basic White with the new Bubble Bath ink and added it to the card front with dimensionals. The banner got two Glossy Dots Assortment in Daffodil Delight, then I added three more to the DSP panel. The final touch was this bow made with the Gold & Vanilla Satin Edge Ribbon, added with a glue dot.
Again, a super simple inside: this daisy stamp from Cheerful daisies, stamped in Crushed Curry ink on the Basic White panel. This piece was attached to the inside of the card. The envelope got the same treatment, one on the envelope front and one on the flap. Done, done.
I am making a group of about five cards (maybe more) to give to a friend – all daisy inspired. I’m attending a convention first weekend in May and that’s when I’ll give them to her :O)
Speaking of May… couple of things… May 2 is when the new 2023-2024 Annual Catalog goes live. If you do not have a demonstrator and are interested in a catalog, let me know I am also offering a Designer Series Paper share – see below. There are just a couple more days to sign up for that. AND Last Chance Products are available through May 1
Products to make today’s cards are available May 2. BUT… if you think you might want to get these products early, you can do that. JOIN MY TEAM, become a demonstrator and always get 20% off your purchases. You can be a hobby demo or go full steam ahead to do more. Either way, here to support you however you need. You may join my team here. We have many hobby demonstrators who strictly maintain their demonstrator status just for the discount, and other demonstrators who wish to grow a business. Either way, we have loads of FUN! Look at all of the smiling faces!
Becoming a Demonstrator offers some great benefits:
20%+ Discount on your demonstrator orders
Be a part of a fun and supportive team and the Stampin’ Up! community
Early access to new catalogs and promotion information
Early ordering for new products
Be a hobby demonstrator or start a business
No pressure to sell products
My full support when you join my team
If you have questions, please reach out to me: tlsbrightspot@gmail.com
GO TO MY ONLINE STORE AND ORDER…order from me here The embossing folder can be purchased now :O)
SHOP CLEARANCE RACK HERE. This is really the way to save! The items in the Clearance Rack are highly discounted.
USE MY CURRENT HOST CODE K4PPCYJA when you order
Stock Up Now Because Prices Are Increasing – As of May 2nd, prices will increase with the new Annual Catalog. Right now is the best time to stock up on basics and carryover products. New prices will be in effect (including for all catalog-related promotions, such as the catalog preorder) within the following product categories:
Cardstock
Designer Series Paper
Specialty Paper
Notecards and Envelopes
Classic Stampin’ Ink Pads and Refills
Stampin’ Blends
Stampin’ Write Markers
Select Specialty Inks
Stampin’ Cut & Emboss Machines and plates
Embossing Folders
Punches
Take Your Pick products
Storage
Clear Blocks
Select tools
Select adhesives
Select stamp sets
Paper Pumpkin
New Designer Series Paper Share –
$70.00 plus $8.50 for Priority Mail shipping
12-Bright & Beautiful
6-Countryside Inn 6 x 6
12- Delightfully Eclectic
6-Earthen Elegance 6 x 6
6-Fresh As A Daisy 6 x 6
5-Glorious Gingham 6 x 6
12-Inked Botanicals
6-Let’s Go Fishing 6 x 6
6-Les Shoppes 6 x 6
6-Masterfully Made 6 x 6
6-Stargazing 6 x 6
6-Zoo Crew 6 x 6
10-2023-2025 In Color 6 x 6
10-2022-2024 In Color 6 x 6
20-Brights 6 x 6
20-Neutrals 6 x 6
20-Regals 6 x 6
20-Subtles 6 x 6
3-Gold Celebrations acetate
3-Holographic Trio Specialty Paper
5-White Center Specialty
2-More Dazzle Specialty 6 X 6
5-Soft Shimmer Paper Combo Pack
5-2022-2024 In-Color Textured Specialty Paper
5-2023-2025 In-Color Luster Specialty Paper
Anyone is welcome to join in my share, just remember, I can only ship to addresses within the US. If you’d like to join, email the following information to tlsbrightspot@gmail.com. Make sure you indicate a single share or double share :
Your first and last name
The email address that is connected to your PayPal account. I only accept PayPal for payment. ***You do not need to have a PayPal account to pay the invoice, you can choose to pay by credit card without having a PayPal account
Deadline to sign up for my share is Sunday, April 30th at 5:00 PM ET.
I have a pretty card for you today, using a retiring stamps and dies. It’s called Wisteria Wishes, but they are made into Lupine instead :O) And I confess (confession is good for the soul), the design is from a demonstrator in Australia, Gail Ellis. We made this in card class Thursday.
I’ve used Basic White Thick card stock for the card base, fence posts, flowers & stems. Soft Sea Foam card stock was used for the die cut leaves. Inks were Orchid Oasis and Soft Sea Foam.
Begin with a card base 8 1/2 x 5 1/2 scored at 4 1/4. Remove 4 -5/8 x 5 1/2″ strips from the card front and set aside. Die cut 6 ‘posts’ using the long banner die from the Harvest Dies. These dies and coordinating stamp set, Quiet Meadow, are carrying over to the new 2023-2024 Annual Catalog.
Close the card with the short front side facing up. Place a long length of washi tape or something similar, and with the sticky side up, attach in the center of the short front side. The tape should form a sort of ‘T’ when looking at the card front. Lay a 5/8 x 5 1/2″ strip so it aligns with the card back and sticks to the tape. Place two other lengths in between the spacing of the short front and bottom edge of the front. It is helpful to have this card on a grid paper to keep everything straight. Adhere the two outside posts to the ‘fencing’. Once this is done the card will be much more stable. :O) When adhering the posts, I did not use the full length of the post. It should be about 5/8″ up on the card front and about 3/8″ from the edge. Remove the sticky tape and adhere the center post. Turn the card over and adhere three posts on the inside. Cut off the overhanging edges of the ‘posts’. That was the hard part! The rest is pretty easy.
Stamp the set of three wisteria flowers in stamped off Orchid Oasis ink. Stamp the detail stamp in full strength Orchid Oasis ink.. Do this twice so there are two sets of blooms, then die cut with the Wisteria Dies.
Stamp the stems in Soft Sea Foam ink, also twice, and die cut with the appropriate die from Wisteria Dies. Adhere the first set of stems to the far right edge of the card and attach with with liquid glue. Attach one set of blooms with dimensionals overlapping the stems. Use the photo for reference. Adhere the other set of stems with liquid glue. Note placement by referring to the photo. Adhere second set of blooms, also with dimensionals, overlapping as necessary.
Die cut the sentiment banner from Basic White Thick card stock. Stamp the sentiment in Orchid Oasis ink. (The sentiment I chose required me to tape off a portion of the sentiment, ink, remove tape and stamp on the banner.) Adhere banner in place with dimensionals.
Leaves: I die cut three bunches of the leaves from Soft Sea Foam card stock, then used a sponge dauber and Soft Sea Foam ink to darken areas of the leaves. I trimmed down the second bunch of leaves: one branch to fit under the sponged leaves and another to fit on top. Again, refer to photo for placement. I added retiring 2022-2024 In Color Matte Dots in Orchid Oasis and the front was complete.
For the inside… on a 4 x 5 1/4 in panel of Basic White, I adhered the third branch of leaves to the far upper right. I wanted to make sure, it would be covered by the largest part of the card front. I stamped the rest of the sentiment in Orchid Oasis ink. Just as before, I taped off what I didn’t want, inked the stamp, removed the tape and stamped on the panel. This was adhered to the inside of the card & voila! Love, love, love!
Click on the Last Chance icon above to see the list of what is still available. Last Chance products are only until May 1, then go away.
GO TO MY ONLINE STORE AND ORDER…order from me here
SHOP CLEARANCE RACK HERE. This is really the way to save! The items in the Clearance Rack are highly discounted.
USE MY CURRENT HOST CODE K4PPCYJA
Stock Up Now Because Prices Are Increasing – As of May 2nd, prices will increase with the new Annual Catalog. Right now is the best time to stock up on basics and carryover products. New prices will be in effect (including for all catalog-related promotions, such as the catalog preorder) within the following product categories:
Cardstock
Designer Series Paper
Specialty Paper
Notecards and Envelopes
Classic Stampin’ Ink Pads and Refills
Stampin’ Blends
Stampin’ Write Markers
Select Specialty Inks
Stampin’ Cut & Emboss Machines and plates
Embossing Folders
Punches
Take Your Pick products
Storage
Clear Blocks
Select tools
Select adhesives
Select stamp sets
Paper Pumpkin
When you place an order of $50 or more (before shipping & taxes), you receive from me a SU! item valued up to $10 + Star-Studded Rewards. If your order exceeds $150, do not use my HOST CODE as SU! has it’s own rewards from which you may choose. You will still receive that FREE ITEM from me up to $10 + the Star-Studded Rewards. And if your order is $50 or more I will also send you my monthly class tutorials. BONUS! :O)
USE MY CURRENT HOST CODE K4PPCYJA
THANKS FOR STOPPING BY. MAY YOU HAVE A BEAUTIFUL DAY!
MAKE SOMEONE HAPPY SENDING THEM A HANDMADE CARD FILLED WITH LOVE.