Hi Folks! I have a slew of – well, five – cards that were all in various stages of incompleteness on my desk and it was time to CLEAN UP THE DESK! 😁😁😁 So here goes… I’l show the card and list the products to make it.

Botanical Prints stamp set, Botanical Prints Dies
Card 1

Botanical Prints stamp set, inside
Card 1
Card 1 –
- Botanical Prints stamp set
- Botanical Prints Dies
- Botanical Prints DSP
- Dark Daffodil Delight Blends
- Light Old Olive Blends
- Rhinestone Basic Jewels
- Terracotta Tile cs base
- Whisper White cs
- Inks: Tuxedo Black Memento, Terracotta Tile

Botanical Prints stamp set, Botanical Prints Dies
Card 2

Botanical Prints stamp set, inside Card 2
Card 2
- Botanical Prints stamp set
- Botanical Prints Dies
- Botanical Prints DSP
- Stitched Shapes Dies – carrying over!
- Inks: Highland Heather, Tuxedo Black Memento, Highland Heather Blends, So Saffron Blends, Old Olive Blends, Light Soft Suede Blends
- Rhinestone Basic Jewels

Peaceful Poppies DSP, Peaceful Poppies Elements
Card 3
Card 3
- Peaceful Poppies DSP
- Peaceful Poppies Elements
- Timeless Tropical for the sentiment on the front of the card – carrying over!
- Thick Whisper White card base
- Poppy Parade cs
- Blends: Poppy Parade and Old Olive
- Wink of Stella on the envelope poppy

Painted Poppies stamp set, Peaceful Moments stamp set
Card 4
Card 4
- Poppy Parade Card base
- Painted Poppies DSP
- Crinkled Steam Binding Ribbon 1/4″, stamped with Old Olive – carrying over!
- Whisper White
- Sentiment from Peaceful Moments – carrying over!
- Inks: Old Olive and Poppy Parade

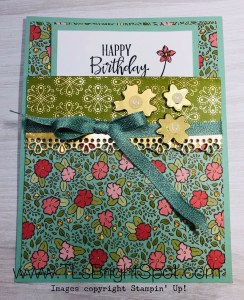
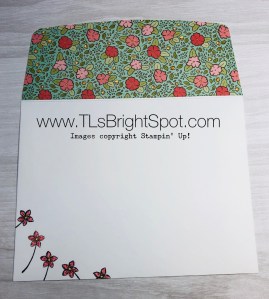
Ornate Garden Specialty DSP
Ornate Frames Dies
Nature’s Thoughts Dies
Card 5
Card 5
- Scalloped Notecards and Envelopes – retiring product
- Ornate Garden Specialty DSP (NEW IN ANNUAL CATALOG)
- Ornate Frames Dues (NEW IN ANNUAL CATALOG)
- Nature’s Thoughts Dies – carrying over!
- Woven Heirlooms for the sentiment – carrying over!
- Early Espresso ink – carrying over
WOW – it feels good to have an almost clean desk and lots of cards completed. Since so many of these cards are made with retiring products, please see the attached list. Be sure to use my CURRENT HOST CODE: J2E4VDGM when shopping 😏
Thanks for stopping by
May you have a beautiful day
Make someone happy by sending them a handmade card ❤️