Black Friday Sale Coming Soon
You asked, and we listened! Announcing our first-ever Black Friday sale! From November 25 to December 1, get up to 40% off select products.

SHOP WITH ME HERE
FROM NOVEMBER 25 – DECEMBER 1, GET40% OFF SELECT PRODUCTS

Black Friday Sale Coming Soon
You asked, and we listened! Announcing our first-ever Black Friday sale! From November 25 to December 1, get up to 40% off select products.
SHOP WITH ME HERE
FROM NOVEMBER 25 – DECEMBER 1, GET40% OFF SELECT PRODUCTS
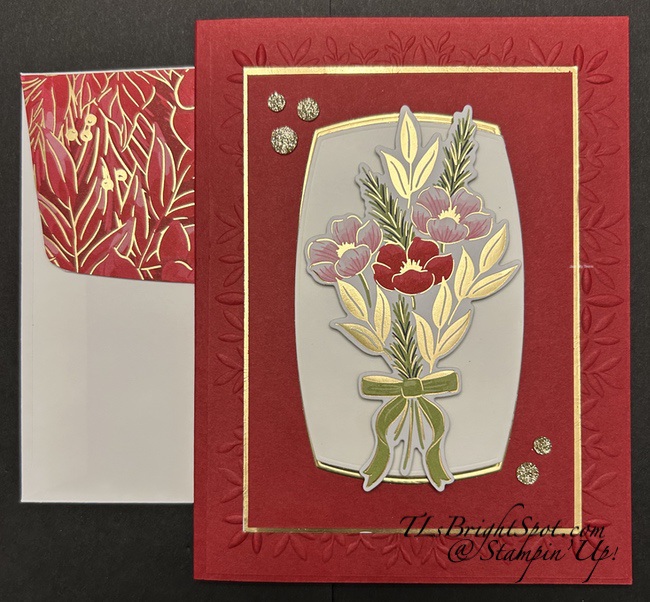
Welcome to our Thursday hop! Thanks for jumping in… If you came from Tara, I’m sure you were inspired by her creation – and I hope you will be inspired here as well. We have a color challenge today & I chose to work with the Traditions of Christmas Specialty DSP. What makes it specialty you ask – the gold! And it’s gorgeous!

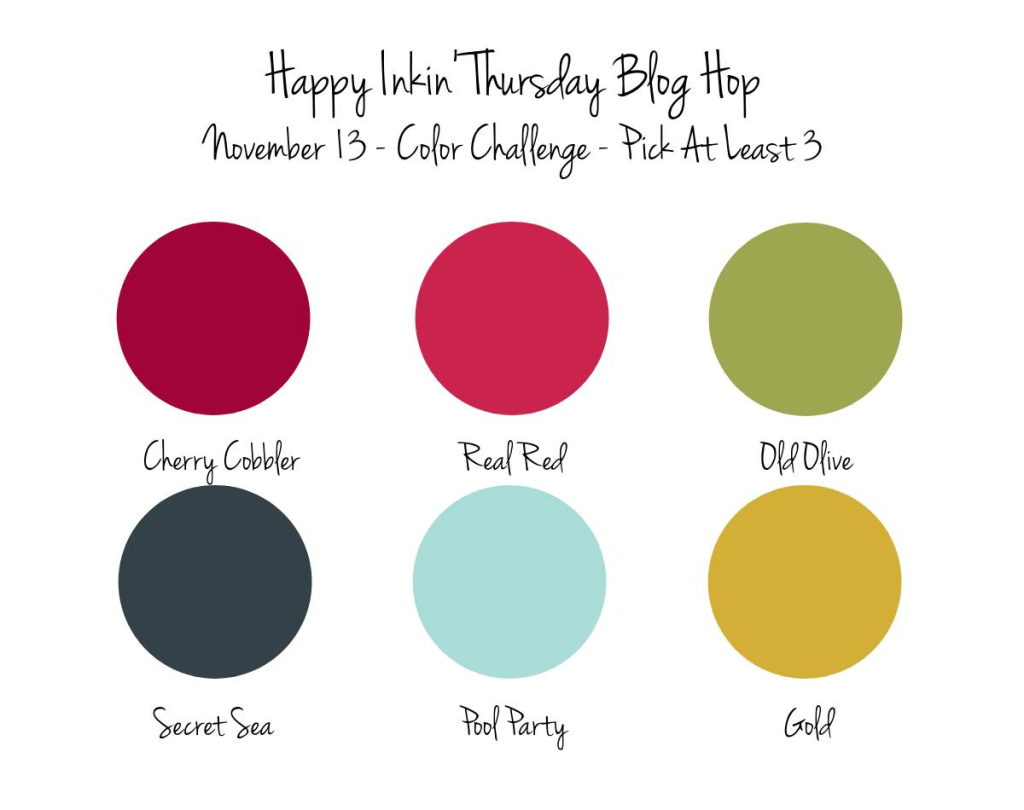
I think I incorporated all the colors but Secret Sea by using the Traditions of Christmas SDSP. This is such gorgeous paper and my pack is nearly gone. Of course, my card class is using it to make this exact card today 😀
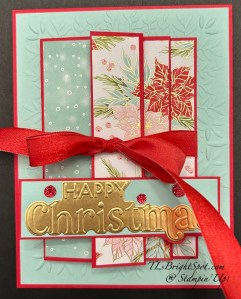
To make this beauty… begin with a card base of 4 1/4 x 5 1/2 and layer it with a panel of Pool Party that is embossed with the Peaceful Greenery embossing folder. Yes, I used this embossing folder in yesterdays card as well. Set this aside to create the fun fold front… cut 4 1/4 x 11 & score. (see below for all card cuts & scoring info) Attach Traditions of Christmas SDSP panels as shown in next photo. The Basic White panels: the smaller is stamped in Real Red ink using the Traditional Labels stamp set. The larger Basic White panel has the 5/8 wide SDSP strip. The Nests of Winter panel is attached on the ‘back’ of the front fold. Again – see the photo below for reference. I kept the photo in large size in order for you to see all the panels.
Once all pieces are attached to the folded panels, attach ribbon to the back of the folded section, then attach that entire folded section to the embossed panel, centering all around. Tie ribbon into bow to determine placement of sentiment.
Sentiment piece is Real Red & Pool Party layered. The gold foil sentiment is created with the fabulous Christmas Words Collage Hybrid Embossing Folder & Dies. All are attached with adhesive, then attached to the card front, centering.
For the envelope I used the same piece of Traditions of Christmas SDSP as the front panels of the card. And that was it. This card is not too heavy and the bulk is enhanced by the bow. In lieu of the bow, a belly band could easily be used.

Finis! What do you think? I love the softness & contrast of the Pool Party against the Real Red. And this would be fun with other papers than this Christmas – I can’t wait to try another.
Now on with the hop. Don’t miss a single post – they should be extra special today. Click on the ‘next’ button or click on a name. Happy hopping!

Want to purchase the products to make this card? Shop my online store here. Want to consider joining my team? JOIN MY TEAM HERE
CARD CUTS FOR THIS PROJECT:
Product List
![Real Red Classic Stampin' Pad [ 147084 ]](https://assets1.tamsnetwork.com/images/EC042017NF/147084s.jpg "Real Red Classic Stampin' Pad [ 147084 ]")
![Traditional Sparkling Sequins [ 165875 ]](https://assets1.tamsnetwork.com/images/EC042017NF/165875s.jpg "Traditional Sparkling Sequins [ 165875 ]")
![Pool Party 8-1/2" X 11" Cardstock [ 122924 ]](https://assets1.tamsnetwork.com/images/EC042017NF/122924s.jpg "Pool Party 8-1/2\" X 11\" Cardstock [ 122924 ]")
![Real Red 8-1/2" X 11" Cardstock [ 102482 ]](https://assets1.tamsnetwork.com/images/EC042017NF/102482s.jpg "Real Red 8-1/2\" X 11\" Cardstock [ 102482 ]")
![Gold Foil Sheets [ 132622 ]](https://assets1.tamsnetwork.com/images/EC042017NF/132622s.jpg "Gold Foil Sheets [ 132622 ]")
![Basic White 8 1/2" X 11" Cardstock [ 166780 ]](https://assets1.tamsnetwork.com/images/EC042017NF/166780s.jpg "Basic White 8 1/2\" X 11\" Cardstock [ 166780 ]")
![Clear Wink Of Stella Glitter Brush [ 141897 ]](https://assets1.tamsnetwork.com/images/EC042017NF/141897s.jpg "Clear Wink Of Stella Glitter Brush [ 141897 ]")
![Basic White Medium Envelopes [ 159236 ]](https://assets1.tamsnetwork.com/images/EC042017NF/159236s.jpg "Basic White Medium Envelopes [ 159236 ]")
![Stampin' Cut & Emboss Machine [ 149653 ]](https://assets1.tamsnetwork.com/images/EC042017NF/149653s.jpg "Stampin' Cut & Emboss Machine [ 149653 ]")
![Paper Trimmer [ 152392 ]](https://assets1.tamsnetwork.com/images/EC042017NF/152392s.jpg "Paper Trimmer [ 152392 ]")
![Stampin' Dimensionals [ 104430 ]](https://assets1.tamsnetwork.com/images/EC042017NF/104430s.jpg "Stampin' Dimensionals [ 104430 ]")
![Multipurpose Liquid Glue [ 110755 ]](https://assets1.tamsnetwork.com/images/EC042017NF/110755s.jpg "Multipurpose Liquid Glue [ 110755 ]")
![Mini Glue Dots [ 103683 ]](https://assets1.tamsnetwork.com/images/EC042017NF/103683s.jpg "Mini Glue Dots [ 103683 ]")
![Paper Snips [ 103579 ]](https://assets1.tamsnetwork.com/images/EC042017NF/103579s.jpg "Paper Snips [ 103579 ]")
![Take Your Pick [ 144107 ]](https://assets1.tamsnetwork.com/images/EC042017NF/144107s.jpg "Take Your Pick [ 144107 ]")
![Tuxedo Black Memento Ink Pad [ 132708 ]](https://assets1.tamsnetwork.com/images/EC042017NF/132708s.jpg "Tuxedo Black Memento Ink Pad [ 132708 ]")
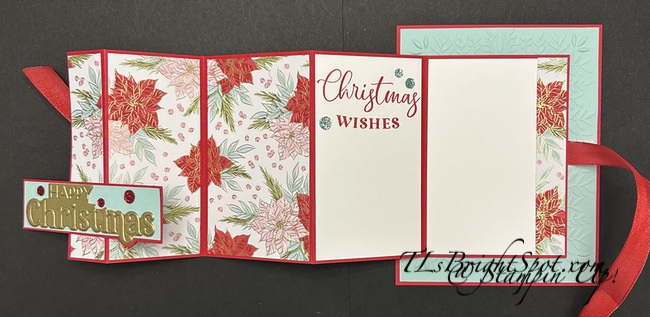
Embossing folders help create wonderful texture on a card and I’ve used the Peaceful Greenery embossing folder to do just that – it’s a great background embossing folder.
I’m leaving the photo in large format so you can really see the embossing folder & how that added texture really makes the. card – at least it does for me! Of course the wonderful die cut from the Traditions of Christmas SDSP is pretty special too. Add in the gold foil and the Traditional Sparkling Sequins and the card is a win/ win. To create the background the floral die cut sits on, I used the Label Me Grateful Dies to die cut from the center of the gold foil used to surround the Cherry Cobbler smaller panel. I cut it in half across the center and adhered a the Basic White die cut from the same Label Me Grateful Dies. The floral die cut is attached with dimensionals while everything else is added with adhesive directly to each layer. Those card cuts will be listed below.

For the inside of the card, I used the Christmas Gallery stamp set to stamp this gorgeous poinsettia in Cherry Cobbler ink and the leaves in Old Olive ink. In the center of the flower is another Traditional Sparkling Sequin in Gold. The Basic White panel was added to the inside of the card.
For the envelope, another panel of the Traditions of Christmas SDSP was added to the flap and another poinsettia & leaves was stamped on the envelope front, which I forgot to photograph!
Here’s the 2nd card… no embossing folder used and while it’s nice, I really prefer the card with the embossing folder. The inside and envelope had the same treatment – and I’ve left them in large format so you can see the difference. :O) Just curious – do you prefer one over the other?

Card cuts:
Thanks for Stopping by. May you have a beautiful day. Make someone happy by sending them a handmade card filled with ❤️
Want these products) See the list below and simply click all to purchase. Want other Stampin’ Up! products in my shop – click here to shop with me and get anything from ONLINE EXCLUSIVES to Paper Pumpkin to last chance items. To JOIN MY TEAM – click the link. 😀 We have tons of fun, sharing projects, collaborating, learning new tricks. Would love to have you. 🎁
Product List
![Christmas Greenery Bundle [ 165873 ]](https://assets1.tamsnetwork.com/images/EC042017NF/165873s.jpg "Christmas Greenery Bundle [ 165873 ]")
![Label Me Grateful Bundle (English) [ 166112 ]](https://assets1.tamsnetwork.com/images/EC042017NF/166112s.jpg "Label Me Grateful Bundle (English) [ 166112 ]")
![Old Olive Classic Stampin' Pad [ 147090 ]](https://assets1.tamsnetwork.com/images/EC042017NF/147090s.jpg "Old Olive Classic Stampin' Pad [ 147090 ]")
First of all, happy Veterans Day to all our veterans out there. Thank you for your sacrifices and service to our country. You are amazing human beings and I am so grateful. Big salutes to those who have served in the past, and to those currently serving – bless you… and your families, for they have served in a different way and suffered too. ❤️
Now – my card for today is a NEW November ONLINE EXCLUSIVE release called Friendly Foliage.
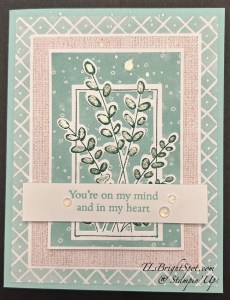
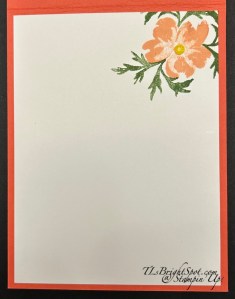
This card has some layers… and begins with a card base in Pool Party with a layer of Nests of Winter DSP. The next two layers are Basic White and Woven Textures DSP. These all all attached directly to the card base. The next layers are attached with dimensionals: Basic White layered with another pattern in Nests of Winter then the Basic White stamped & die cut image from Friendly Foliage. This image is the focal point of the card… stamped in Shaded Spruce ink, die cut and attached with liquid glue. I then added Wink of Stella to all the leaves, bringing more attention to the pretty image. I splattered Wink of Stella to the entire card as well. While that was drying, I stamped the sentiment from Friendly Foliage in Pool Party ink on the Basic White strip and added it with dimensionals as well. Final touch… three Opal Rounds.
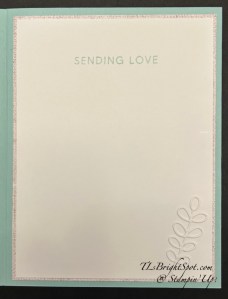
For the inside of my card I added a layer of Woven textures DSP as a background to my Basic White stamped panel. The sentiment is from Friendly Foliage stamp set and stamped in Pool Party ink. The sweet leaves are a die cut from the beautiful Friendly Foliage Dies.
For the envelope… more of the Nests of Winter DSP was added to the envelope – no naked envelopes for me.
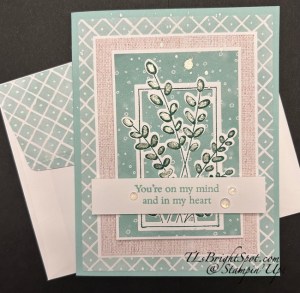
Due to the colors, this is a definite feminine card. When I create with this next, I’m going to really try to make a more masculine one. When my hubby saw this card, he called the image pussy willows and I hadn’t thought of that. Pussy Willows are definitely brown, so next time, masculine, in brown tones. Card cuts for this card are listed below.
Want to purchase this beautiful new bundle? You can have a look see at my online store here or see below all the products to make this card and purchase from me there. In my online store, there are items in the Kits Collection, ONLINE EXCLUSIVES, Stamp Class, Paper Pumpkin, Last Chance Products – you name it, it’s all in one place. 😀 Want to JOIN MY TEAM to be a part of this amazing community? You can do that by JOINING MY TEAM HERE.
Thanks for stopping by. May you have a beautiful day. Make someone happy by sending them a handmade card filled with ❤️
Product List![Friendly Foliage Bundle (English) [ 167308 ]](https://assets1.tamsnetwork.com/images/EC042017NF/167308s.jpg "Friendly Foliage Bundle (English) [ 167308 ]")
Card cuts for this project
Card base: Pool Party 8 1/2 x 5 1/2 scored at 4 1/4
DSP layers: Nests of Winter – 4 x 5 1/4; 2 1/2 x 3 3/4; 2 1/4 x 6 (flap); Woven Textures – 3 1/4 x 4 1/2; 4 x 5 1/4 (inside)
Basic White: 3 3/8 x 4 5/8; 2 5/8 x 3 7/8; 2 1/2 x 4 (stamped & die cut); 3 7/8 x 5 1/8 (inside)
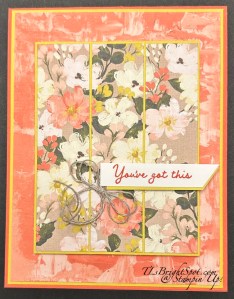
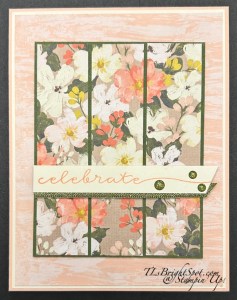
Hello Saturday! I have two cards for you today – both Triple Panel Cards (my name for them :O) made with a single piece of the Thoughtful Journey DSP. Because of the colors that ebb and flow in this extraordinary DSP, each card has a different color card base – reflecting & highlighting the main ‘theme’ color. Again, these two cards are from the same panel of Thoughtful Journey DSP!
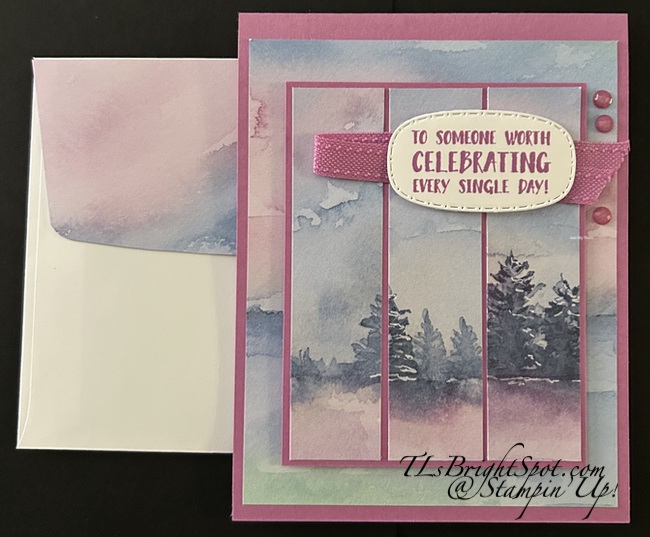
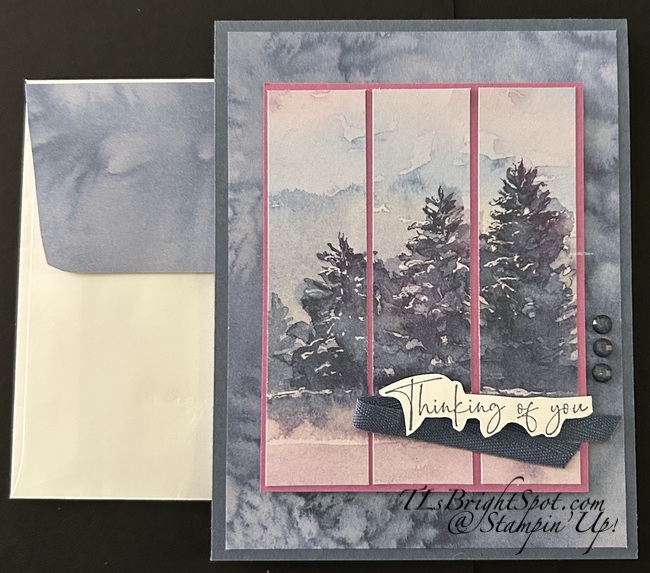
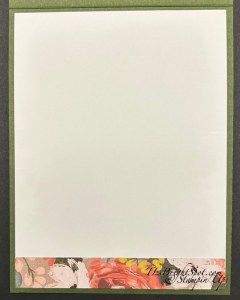
Each of the triple panels are 1 x 4 layered on card stock 3 1/4 x 4 1/8. Another layer of Thoughtful Journey DSP (4 x 5 14) was added to the card base (4 1/4 x 11 scored at 5 1/2). The triple panel was attached to the card base with dimensionals. Each has a coordinating ribbon: 3/8″ Bordered Ribbon in Petunia Pop & 1/4″ Misty Moonlight Ribbon. Both also have Charming Shimmer Faceted Dots on appropriate cards: Berry Burst & Night of Navy. The sentiments are from The Right Words stamp set: Petunia Pop ink die cut with Traditional Labels Dies & Misty Moonlight ink, fussy cut. The sentiments were added with dimensionals over the ribbon.
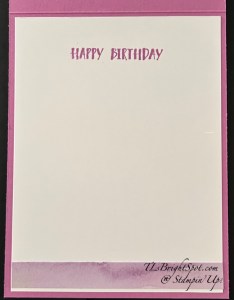
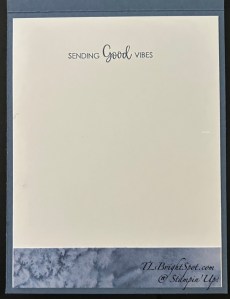
A strip of Thoughtful Journey was added to each inside panel, one is 1/2″, the other 5/8″. Again, sentiments are in Petunia Pop ink & Misty Moonlight ink using The Right Words stamp set.
What is so interesting about these two cards, is how totally different they are, yet the same design from the same 6×6 piece of Designer Series Paper. Stampin’ Up! just makes it so easy! Love, love.
Thanks for stopping by. May you have a beautiful day. Make someone happy by sending them a handmade card filled with ❤️
Stampin’ Up! has all manner of products available for crafters of various levels of need and creativity: kits that are quick and easy from cards to decorations; Paper Pumpkin, a box that arrives monthly and includes creations of cards to tags to boxes; scrapbooking supplies and layout ideas; annual catalogs and ONLINE EXCLUSIVES. Online Exclusives are those products that are never highlighted in a catalog. Want to shop and see more? Connect to my ONLINE STORE HERE.
To make the cards you see today – and to purchase those products, see below.
Product List
![Petunia Pop 8 1/2" X 11" Cardstock [ 163801 ]](https://assets1.tamsnetwork.com/images/EC042017NF/163801s.jpg "Petunia Pop 8 1/2\" X 11\" Cardstock [ 163801 ]")
![Charming Shimmer Faceted Dots [ 166139 ]](https://assets1.tamsnetwork.com/images/EC042017NF/166139s.jpg "Charming Shimmer Faceted Dots [ 166139 ]")
Hello from my craft room in New Jersey. Yesterday I was creating a notepad holder for my purse. It’s a notepad I purchased some time ago and I like to dress things up a bit when I carry them with me, so no simple ‘just a notepad’ kind of gal 😀 I could give you measurements, but this is not a standard notepad to purchase from a store like Staples; this is a notepad I had on hand. I got my inspiration by looking at several notepads on Pinterest and then settled on one from The Paper Pixie, and made adjustments for this particular notepad.
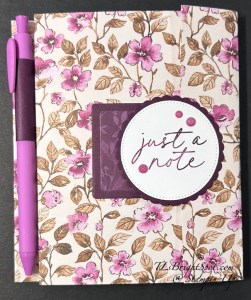
This just turned out so much better than I thought it would that I’m extra pleased. I began using the backing from our Stampin’ Up! DSP papers – you know, the ones that tell you what the DSP is. They are white and fairly sturdy, not too bulky. I wanted something more than just card stock since I would have it in my handbag. Once I cut it down to the size I needed, I added the Floral Charm DSP, then scored and burnished. Additional supplies used were: the new Creative Haven Dies (Nov. ONLINE EXCLUSIVE), Round We Go Dies (the larger scalloped circle), Stylish Shapes Dies (the stamped circle), Notes & Totes stamp set for the sentiment and finally Charming Shimmer Faceted Dots, oh, and Blackberry Bliss ink for the sentiment on front. I also used Velcro dots and in my stash- a perfect matching pen from an ON Stage event – bonus! 😁 It even writes in purple!
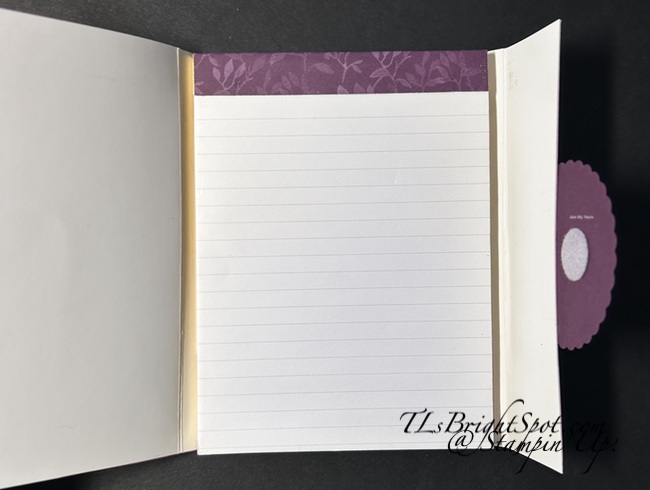
Here are additional photos… the one on left shows the top decorated notepad – love this added ‘charm’! The photo on right shows the ‘holder’ for the notepad. Since I have another notepad that will fit in this holder, this makes it extra nice to replace. I made this support 3 1/2″ for added support. The width of this is the width of the notepad plus an additional 1″ on each end to secure into the inside of the notepad holder. When securing it, I found it best to add adhesive to the ends while it was wrapped around the notepad & add it in place. This way, it is in the proper place to hold the notepad. Once the adhesive is dry, remove the notepad.
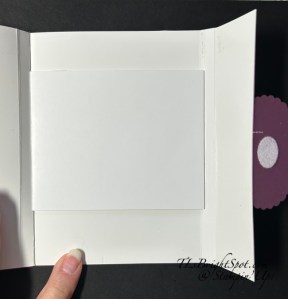
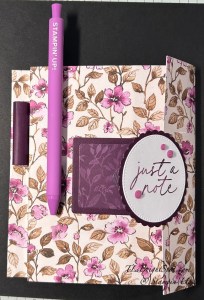
Here you can see the extension to hold the pen – and that in fact it really is a SU!~ pen!!! The holder for the pen is wide (1 3/4″), again for security, so it doesn’t flop but is held in place. It is approximately 1 7/8 and scored at each end 3/8″. I used a bone folder to ’round’ the area between the score lines so it would wrap easily around the pen. Each pen is a bit different in dimension, so I encourage you to know what pen you will be using so this ‘pen holder’ fits the individual pen.
I hope you enjoyed this project today. I had extra fun creating it. Thanks for stopping by. May you have a beautiful day. Make someone happy by sending them a handmade card (or project) filled with ❤️
YOU MAY ORDER THE PRODUCTS BELOW FROM MY ONLINE STORE. IF YOU ARE INTERESTED IN SEE OTHER PRODUCTS IN MY ONLINE SHOP, PLEASE CLICK HERE.
Product List ![Round We Go Dies [ 163729 ]](https://assets1.tamsnetwork.com/images/EC042017NF/163729s.jpg "Round We Go Dies [ 163729 ]")
![Stylish Shapes Dies [ 159183 ]](https://assets1.tamsnetwork.com/images/EC042017NF/159183s.jpg "Stylish Shapes Dies [ 159183 ]")
![Notes & Totes Dies [ 165240 ]](https://assets1.tamsnetwork.com/images/EC042017NF/165240s.jpg "Notes & Totes Dies [ 165240 ]")
![Creative Haven Dies [ 167208 ]](https://assets1.tamsnetwork.com/images/EC042017NF/167208s.jpg "Creative Haven Dies [ 167208 ]")
Welcome to our blog hop! We have a fun sketch challenge today ands I’ve chosen to work with the new November ONLINE EXCLUSIVE suite of products called Brushed with Beauty. As a demonstrator I was able to purchase this early in a pre-order and I l-o-v-e it! The colors are really ‘up my alley’ so to speak. Yesterday I shared several links to cards I made with this suite of products. You can see that post here
And … today is hubby & my anniversary… of several/ many years. I am so blessed and thankful. So, today’s card is in celebration of that. ❤️


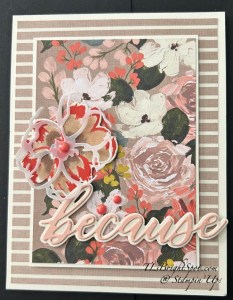
I started with a Very Vanilla card base and adhered this striped pattern (it’s the ‘b’side to the floral paper showing) directly to the base. I then cut a smaller piece of the same DSP (the ‘a’side) and adhered it to Very Vanilla just slightly larger. This was added to the front with dimensionals. Next I stamped the larger floral outline stamp in Calypso Coral on a scrap of Very Vanilla and colored it with Stampin’ Blends Bronze & Ivory. I die cut this and the detail die (this one is from the Vellum in the suite of products) and attached the two together with a glue dot in the center of the flower. I attached a Pearls of Beauty embellishment to the flower center in Calypso Coral and added it to the card front with liquid adhesive. I die cut two elements from the Words of Beauty Dies: the background layer in very Vanilla and the detail of the word in Petal Pink that had an adhesive sheet attached to it. After die cutting I put them together & added them to the card front with mini dimensionals. I added two more of the Pearls of Beauty in Calypso Coral.
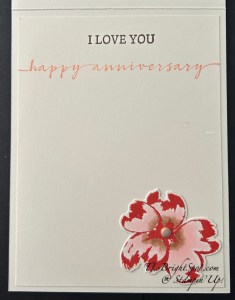
For the inside… I was playing around with color for the flower… stamped the outline stamp on a Very Vanilla scrap in Calypso Coral but colored this one with Stampin’ Blends 1000 & 500. The 1000 is the pinkish color and the 500 is the soft shade of brown. After die cutting the flower & adhering it to a Very Vanilla insert, I added a single Pearls of Beauty embellishment in the Crumb Cake kind of color. The top sentiment is stamped in Early Espresso using the Words of Beauty stamp set. The lower sentiment is stamped in Petal Pink ink using the Sweetly Scripted stamp set.
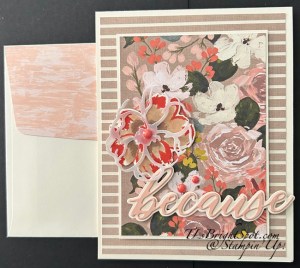
Keeping this envelope really simple… another panel of the Brushed with Beauty DSP showcasing a Petal Pink coloring, was added to the flap and trimmed to fit. You can purchase these products from my online store – see the link below!
Now… time to continue the journey to see what others have created for today’s hop. Click the ‘next’ link or click a name. Don’t miss anyone!

This same link will allow you to view anything in my store – from items in the Sep-Dec Mini Catalog to Online Exclusives, to Kit Collections to items in the 2025-2026 Annual Catalog.The above link will do it all!
Thanks for stopping by. May you have a beautiful day. Make someone happy by sending them a handmade card filled with ❤️
Stampin’ Up! is offering a Brushed with Beauty CRAFT CLASS November 20 @ 2 pm MT. That class code is 170074 and the cost is $30.00 US – open to demonstrators AND CUSTOMERS. You may place your order for the class (170074) AND the Brushed with Beauty Suite of Products (167100 – $136.25) here
Product List![Petal Pink 8-1/2" X 11" Cardstock [ 146985 ]](https://assets1.tamsnetwork.com/images/EC042017NF/146985s.jpg "Petal Pink 8-1/2\" X 11\" Cardstock [ 146985 ]")
![Very Vanilla Medium Envelopes [ 107300 ]](https://assets1.tamsnetwork.com/images/EC042017NF/107300s.jpg "Very Vanilla Medium Envelopes [ 107300 ]")
Good day stamping buddies. Yesterday, November 4, Stampin’ Up! did a big release of new ONLINE EXCLUSIVES that you (& I) are going to love. The Brushed with Beauty Suite is one I purchased when it became available to demonstrators – and I just c an’t quite playing with it. The Designer Series Paper is just soooo very pretty and the stamp bundle, well, they are wonderful too. I’ll post some links to cards I’ve made with this suite of products – to give some inspiration. Try here, here and here. Stampin’ Up! is offering a virtual craft class November 20, 2025, with this suite of products and it’s open to customers!!! I think you won’t want to miss this class. The code for the class is 170074 and it’s a very reasonable $30 US. That does not include the suite of products (this is the number for that…167100), just the class. You can place your order through my ONLINE SHOP HERE.
There’s another bundle that I have enjoyed that was released as part of the Nov 4 ONLINE EXCLUSIVES – Swirled Designs. I have not created as many cards with it, but it too is worth pointing out. Check out my card here.
During the night last night I received another package of a couple of new release products & other items – the Friendly Foliage Bundle and the Creative Haven Bundle. Naturally, I haven’t played with either one yet since they arrived during the night 🥴. You’ll just have to wait with baited breath for those. See all the ONLINE EXCLUSIVE PRODUCTS HERE
Stampin’ Up! also released a couple of new kits in their kit collection yesterday… check out those kits here & place your order
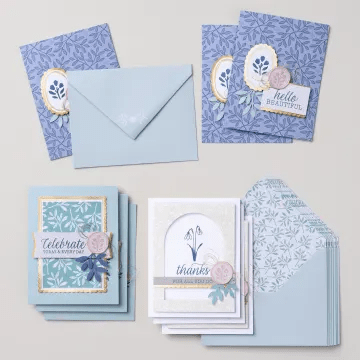
Everyday Beauty Kit – 166808 – $25.00 US
DETAILS
– Makes 9 cards: 3 each of 3 designs
– Folded card size: 5-1/2″ x 4-1/4″ (14 x 10.8 cm)
– Colors: Basic Beige, gold, Gray Granite, Lost Lagoon, Night of Navy, Petal Pink
– Also available in French
Kit includes one of each item listed below.
– Everyday Beauty Photopolymer Stamp Set
– Clear stamp block
– Night of Navy Classic Stampin’ Spot
– Step-by-step instructions
– 9 printed envelopes
– Faux wax seal stickers
– Metallic thread
– Adhesive
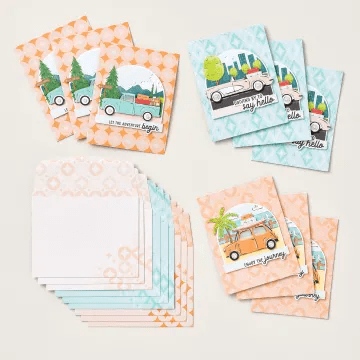
Adventure Awaits Kit – 167235 – $14.00 US
DETAILS
– Makes 9 cards: 3 each of 3 designs
– Folded card size: 5-1/2″ x 4-1/4″ (14 x 10.8 cm)
– Colors: Basic Black, Coastal Cabana, Crushed Curry, Garden Green, Granny Apple Green, Pecan Pie, Petal Pink, Poppy Parade, Pretty Peacock, Timid Tiger
– Sentiments printed in English, French, and German
Kit includes one of each item listed below.
– Step-by-step instructions
– 9 printed envelopes
– Vellum
– Adhesive
Thanks for stopping by. May you have a beautiful day. Make someone happy by sending them a handmade card filled with ❤️
WOW – November! Halloween is behind us & Thanksgiving is coming soon. What a time to be be thankful & grateful… yes, yes. I’m thankful for all of you & grateful for this fun craft which I so enjoy. So MANY blessings… lest I get sappy… let me share today’s card.
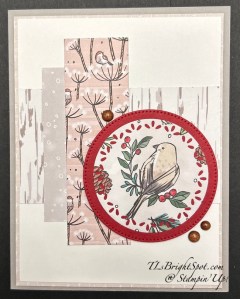
This cute little bird has been sitting on my desk for a bit. He was supposed to be used on another project & well, I got busy with other cards, designs & stuff. He was die cut using a Spotlight on Nature Die, cut directly from the Nests of Winter DSP. I mounted him on a Cherry Cobbler circle die cut with the Stitched Shapes Dies. Then I pulled various papers from the Nests of Winter DSP pack.
These were adhered on the Basic White 3 7/8 x 5 1/8 pice which was attached to yet another panel of DSP 4 x 5 1/4. These were added to the Gray Granite card base (8 1/2 x 5 1/2 scored at 4 1/4) with dimensionals. The circles were also added to the card with dimesnionals. Then these wonderful Streaked Dots were scattered for additional charm.
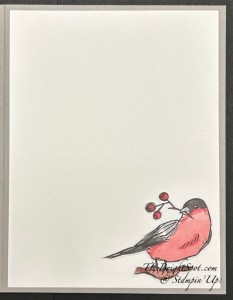
For the inside of the card I fussy cut with my paper snips this adorable bird & adhered it with liquid glue to the Basic White insert (4 x 5 1/4).
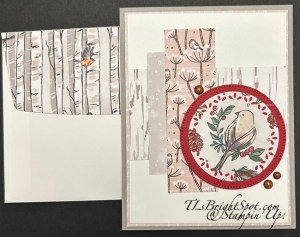
For the envelope… more of the Nests of Winter DSP attached to the flap & trimmed to fit. DONE! Cut the DSP panels ahead of time & this card layout is a quick 1, 2, 3. Add a sentiment depending on the front focal point, or not, as I didn’t here. It’s easy to add a message inside when this card is needed for something special.
Want to purchase these products – see the info below for the easy shopping experience. OR …
to view ALL the stampin’ Up! products available: kits’, ONLINE EXCLUSIVES, SU! classes & more.
Thanks for stopping by. Masy you have a beautiful day. Make someone happy by sending them a handmade card filled with ❤️
Product List![Spotlight On Nature Dies [ 163580 ]](https://assets1.tamsnetwork.com/images/EC042017NF/163580s.jpg "Spotlight On Nature Dies [ 163580 ]")
![Stitched Shapes Dies [ 152323 ]](https://assets1.tamsnetwork.com/images/EC042017NF/152323s.jpg "Stitched Shapes Dies [ 152323 ]")
![Streaked Dots [ 165902 ]](https://assets1.tamsnetwork.com/images/EC042017NF/165902s.jpg "Streaked Dots [ 165902 ]")
![Low Profile Sparkle Dots [ 166157 ]](https://assets1.tamsnetwork.com/images/EC042017NF/166157s.jpg "Low Profile Sparkle Dots [ 166157 ]")
![Linen Thread [ 104199 ]](https://assets1.tamsnetwork.com/images/EC042017NF/104199s.jpg "Linen Thread [ 104199 ]")
![Heat Tool (Us And Canada) [ 129053 ]](https://assets1.tamsnetwork.com/images/EC042017NF/129053s.jpg "Heat Tool (Us And Canada) [ 129053 ]")
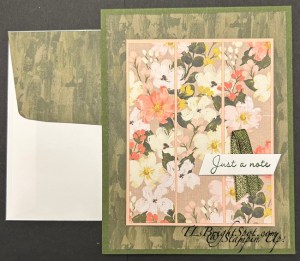
Can you tell? I am obsessed with Brushed with Beauty DSP 🥴 and today’s cards – all three – use the same pattern of DSP but different card bases & layers. How I determined which card bases & layers was by the colors in that particular set of three panels, what really showed off the colors in that set of panels. Here are the three cards…
Calypso Coral card base with Darling Duckling for layers with a Linen Thread double bow, no additional embellishment.
Petal Pink card base with Very Vanilla & Mossy Meadow layers; 1/4″ Mossy Meadow & Gold Ribbon under the sentiment & Low Profile Sparkling Dots in Mossy Meadow for embellishment.

Mossy Meadow card base with a single layer of Petal Pink behind triple panel & 1/4″ Mossy Meadow & Gold Ribbon with Basic White.
On the inside of each card…
Petal Pink & Mossy Meadow for stamping the flower & leaf images. A single Low Profile Sparkle Dot in Darling Duckling for the flower center.

Again, Petal Pink and Mossy Meadow inks for the flower & leaf images and again the Low Profile Sparkle Dots for the flower center.
And finally, a 5/8″ wide strip of the Brushed with Beauty DSP adhered to the Basic White insert.
And here they are with their envelopes…
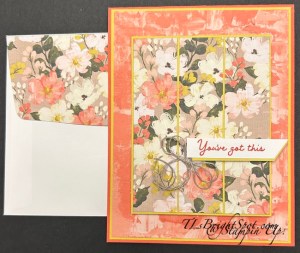
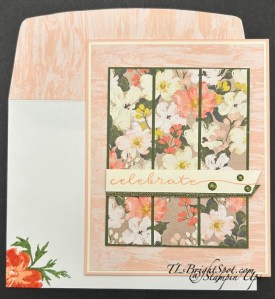
Remember, this DSP will be available November 4 as part of a new release of ONLINE EXCLUSIVE products. Want to purchase these sooner than later – become a Demonstrator with me! These can be purchased as part of your demonstrator starter kit 😀 then after joining always get that 20% discount on all your purchases. 👍
Each of these shows a different part of the Brushed with Beauty DSP available Nov 4. Of course… if you are a demonstrator (hint, hint!) these items can be ordered NOW! It’s getting really close… Stampin’ Up! has this incredible DEAL for joining as a demonstrator through Oct 31 – and folks, that is TODAY!!! Just sayin’ it’s the v-e-r-y last day to join with these deals. Check it out, cuz it goes away S-O-O-N.

From October 1 to 31, anyone who purchases the Starter Kit can choose between two amazing offers. In addition to FREE shipping, FREE business supplies, and a FREE Paper Pumpkin kit, you can either get $125 worth of products for just $35, an amazing first time ever offer, OR $189 worth of products for just $99!


What are the benefits of joining…???
2) exclusive early access to the latest releases online and in catalogs
3) the opportunity to earn a modest supplemental income
4) the chance to attend incredible training and crafting events
5) Scrapbooking has never been better in Stampin’ Up! history. Have you seen all the new scrapbook products Stampin’ Up! has? It’s amazing…
6) There’s never an obligation to sell, you can join to enjoy the discount for yourself.
It’s also fun to learn new skills, develop new crafting techniques & share your passion for crafting. If you’re like me, it’s really fun to meet new people & connect with fellow crafters. How can I help & support you – lots of ways… through connection, team meetings, our team facebook page, updates. Feel free to connect with me – ask questions – get excited.
Thanks for stopping by, may you have a beautiful day! Make someone happy by sending them a handmade card filled with ❤️

Brushed with Beauty Suite – available as an ONLINE EXCLUSIVE NOVEMBER 4, 2025
Product List
![Traditions Of Christmas 12" X 12" (30.5 X 30.5 Cm) Specialty Designer Series Paper [ 165853 ]](https://assets1.tamsnetwork.com/images/EC042017NF/165853s.jpg "Traditions Of Christmas 12\" X 12\" (30.5 X 30.5 Cm) Specialty Designer Series Paper [ 165853 ]")
![Nests Of Winter 12" X 12" (30.5 X 30.5 Cm) Designer Series Paper [ 164183 ]](https://assets1.tamsnetwork.com/images/EC042017NF/164183s.jpg "Nests Of Winter 12\" X 12\" (30.5 X 30.5 Cm) Designer Series Paper [ 164183 ]")
![Traditional Labels Bundle (English) [ 165865 ]](https://assets1.tamsnetwork.com/images/EC042017NF/165865s.jpg "Traditional Labels Bundle (English) [ 165865 ]")
![Real Red 1/2" (1.3 Cm) Shiny Ribbon [ 165876 ]](https://assets1.tamsnetwork.com/images/EC042017NF/165876s.jpg "Real Red 1/2\" (1.3 Cm) Shiny Ribbon [ 165876 ]")
![Peaceful Greenery 3 D Embossing Folder [ 165928 ]](https://assets1.tamsnetwork.com/images/EC042017NF/165928s.jpg "Peaceful Greenery 3 D Embossing Folder [ 165928 ]")
![Christmas Words Collage Hybrid Embossing Folder (English) [ 165912 ]](https://assets1.tamsnetwork.com/images/EC042017NF/165912s.jpg "Christmas Words Collage Hybrid Embossing Folder (English) [ 165912 ]")
![Cherry Cobbler 8-1/2" X 11" Cardstock [ 119685 ]](https://assets1.tamsnetwork.com/images/EC042017NF/119685s.jpg "Cherry Cobbler 8-1/2\" X 11\" Cardstock [ 119685 ]")
![Cherry Cobbler Classic Stampin' Pad [ 147083 ]](https://assets1.tamsnetwork.com/images/EC042017NF/147083s.jpg "Cherry Cobbler Classic Stampin' Pad [ 147083 ]")
![Woven Textures 12" X 12" (30.5 X 30.5 Cm) Designer Series Paper [ 165560 ]](https://assets1.tamsnetwork.com/images/EC042017NF/165560s.jpg "Woven Textures 12\" X 12\" (30.5 X 30.5 Cm) Designer Series Paper [ 165560 ]")
![Shaded Spruce Classic Stampin' Pad [ 147088 ]](https://assets1.tamsnetwork.com/images/EC042017NF/147088s.jpg "Shaded Spruce Classic Stampin' Pad [ 147088 ]")
![Pool Party Classic Stampin' Pad [ 147107 ]](https://assets1.tamsnetwork.com/images/EC042017NF/147107s.jpg "Pool Party Classic Stampin' Pad [ 147107 ]")
![Thoughtful Journey 6" X 6" (15.2 X 15.2 Cm) Designer Series Paper [ 163303 ]](https://assets1.tamsnetwork.com/images/EC042017NF/163303s.jpg "Thoughtful Journey 6\" X 6\" (15.2 X 15.2 Cm) Designer Series Paper [ 163303 ]")
![The Right Words Cling Stamp Set (English) [ 165316 ]](https://assets1.tamsnetwork.com/images/EC042017NF/165316s.jpg "The Right Words Cling Stamp Set (English) [ 165316 ]")
![Misty Moonlight 8-1/2" X 11" Cardstock [ 153081 ]](https://assets1.tamsnetwork.com/images/EC042017NF/153081s.jpg "Misty Moonlight 8-1/2\" X 11\" Cardstock [ 153081 ]")
![Petunia Pop 3/8" (1 Cm) Bordered Ribbon [ 163785 ]](https://assets1.tamsnetwork.com/images/EC042017NF/163785s.jpg "Petunia Pop 3/8\" (1 Cm) Bordered Ribbon [ 163785 ]")
![Misty Moonlight & White 1/4" (6.4 Mm) Starter Ribbon Pack [ 165276 ]](https://assets1.tamsnetwork.com/images/EC042017NF/165276s.jpg "Misty Moonlight & White 1/4\" (6.4 Mm) Starter Ribbon Pack [ 165276 ]")
![Petunia Pop Classic Stampin Pad [ 163811 ]](https://assets1.tamsnetwork.com/images/EC042017NF/163811s.jpg "Petunia Pop Classic Stampin Pad [ 163811 ]")
![Misty Moonlight Classic Stampin' Pad [ 153118 ]](https://assets1.tamsnetwork.com/images/EC042017NF/153118s.jpg "Misty Moonlight Classic Stampin' Pad [ 153118 ]")
![Floral Charm 12" X 12" (30.5 X 30.5 Cm) Designer Series Paper [ 166125 ]](https://assets1.tamsnetwork.com/images/EC042017NF/166125s.jpg "Floral Charm 12\" X 12\" (30.5 X 30.5 Cm) Designer Series Paper [ 166125 ]")
![Blackberry Bliss Classic Stampin' Pad [ 147092 ]](https://assets1.tamsnetwork.com/images/EC042017NF/147092s.jpg "Blackberry Bliss Classic Stampin' Pad [ 147092 ]")
![Blackberry Bliss 8-1/2" X 11" Cardstock [ 133675 ]](https://assets1.tamsnetwork.com/images/EC042017NF/133675s.jpg "Blackberry Bliss 8-1/2\" X 11\" Cardstock [ 133675 ]")
![Brushed With Beauty Suite Collection (English) [ 167100 ]](https://assets1.tamsnetwork.com/images/EC042017NF/167100s.jpg "Brushed With Beauty Suite Collection (English) [ 167100 ]")
![Sweetly Scripted Cling Stamp Set (English) [ 163600 ]](https://assets1.tamsnetwork.com/images/EC042017NF/163600s.jpg "Sweetly Scripted Cling Stamp Set (English) [ 163600 ]")
![Very Vanilla 8-1/2" X 11" Cardstock [ 101650 ]](https://assets1.tamsnetwork.com/images/EC042017NF/101650s.jpg "Very Vanilla 8-1/2\" X 11\" Cardstock [ 101650 ]")
![Bronze & Ivory Stampin' Blends Combo Pack [ 154922 ]](https://assets1.tamsnetwork.com/images/EC042017NF/154922s.jpg "Bronze & Ivory Stampin' Blends Combo Pack [ 154922 ]")
![Petal Pink Classic Stampin' Pad [ 147108 ]](https://assets1.tamsnetwork.com/images/EC042017NF/147108s.jpg "Petal Pink Classic Stampin' Pad [ 147108 ]")
![Early Espresso Classic Stampin' Pad [ 147114 ]](https://assets1.tamsnetwork.com/images/EC042017NF/147114s.jpg "Early Espresso Classic Stampin' Pad [ 147114 ]")
![Gray Granite 8-1/2" X 11" Cardstock [ 146983 ]](https://assets1.tamsnetwork.com/images/EC042017NF/146983s.jpg "Gray Granite 8-1/2\" X 11\" Cardstock [ 146983 ]")
![Mossy Meadow & Gold 1/4" (6.4 Mm) [ 166158 ]](https://assets1.tamsnetwork.com/images/EC042017NF/166158s.jpg "Mossy Meadow & Gold 1/4\" (6.4 Mm) [ 166158 ]")
![Just A Note Cling Stamp Set (English) [ 166098 ]](https://assets1.tamsnetwork.com/images/EC042017NF/166098s.jpg "Just A Note Cling Stamp Set (English) [ 166098 ]")
![Blooming Phrases Photopolymer Stamp Set (English) [ 165523 ]](https://assets1.tamsnetwork.com/images/EC042017NF/165523s.jpg "Blooming Phrases Photopolymer Stamp Set (English) [ 165523 ]")
![Calypso Coral 8-1/2" X 11" Cardstock [ 122925 ]](https://assets1.tamsnetwork.com/images/EC042017NF/122925s.jpg "Calypso Coral 8-1/2\" X 11\" Cardstock [ 122925 ]")
![Calypso Coral Classic Stampin' Pad [ 147101 ]](https://assets1.tamsnetwork.com/images/EC042017NF/147101s.jpg "Calypso Coral Classic Stampin' Pad [ 147101 ]")
![Mossy Meadow 8-1/2" X 11" Cardstock [ 133676 ]](https://assets1.tamsnetwork.com/images/EC042017NF/133676s.jpg "Mossy Meadow 8-1/2\" X 11\" Cardstock [ 133676 ]")
![Mossy Meadow Classic Stampin' Pad [ 147111 ]](https://assets1.tamsnetwork.com/images/EC042017NF/147111s.jpg "Mossy Meadow Classic Stampin' Pad [ 147111 ]")
![Darling Duckling 8 1/2" X 11" Cardstock [ 165622 ]](https://assets1.tamsnetwork.com/images/EC042017NF/165622s.jpg "Darling Duckling 8 1/2\" X 11\" Cardstock [ 165622 ]")
![Very Vanilla 8 1/2" X 11" Cardstock [ 166784 ]](https://assets1.tamsnetwork.com/images/EC042017NF/166784s.jpg "Very Vanilla 8 1/2\" X 11\" Cardstock [ 166784 ]")
