Stampin’ Up Birds and Branches

Hi Everyone – it’s Wednesday… do you need to know that? During this time of isolation it seems necessary to KNOW what day it is… they seem to run together otherwise. Hubby and daughter have been working on our little 16′ Bullseye sailboat, painting the bottom, sanding and sealing the teak. Last week we took it to the marina so they could step the mast and put it in the water for us to sail to our slip for the summer. And guess what – today is the day we are doing just that! We have had such nasty winds that even though the boat was ready, the winds were too strong. Remember this is just a 16 footer, but it’s perfect for us. It’s a bit on the cold side this morning (40 degrees when we got up at 5 am), so we will have to bundle. It’s always colder on the water than we expect!

Todays card … Birds and Branches stamp set again (I really like this set) and I paired it with the new Forever Gold Specialty DSP. and the new Forever Greenery DSP. What I chose from the Forever Gold SDSP fits perfectly on the SU! Notecards – and that’s what I’ve done. Take a look see…

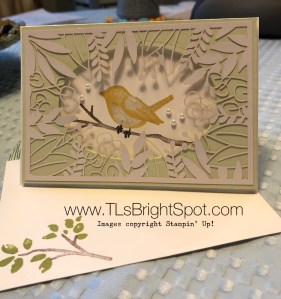
Birds and Branches, SU! Notecards #1

What is it you notice? Oh… that the Forever Gold SDSP isn’t gold after all? Well, it is – on the other side! I wanted something soft so simply turned it over :O) After studying this panel for a bit, I decided I wanted to remove the center of the Soft Sea Foam, so cut that with the largest oval from the Stitched Shapes Dies. The SDSP was adhered to Soft Sea Foam card stock 3 3/8 x 4 7/8 with liquid glue, put on dimensionals and set aside.

Next I took out the Birds and Branches stamp set and one of the Notecards and Envelopes,. Centering everything,I  stamped the more solid bird stamp in Sahara Sand stamped off once. Then I stamped the bird outline in So Saffron full strength. The branch was stamped in Early Espresso and finally the feet in Black Memento ink.

Since I had the stamps right there, I decided to do the envelop as well. I took the leaf cluster and stamped it first and in Pear Pizzazz, then the smaller branch in Early Espresso. I adhered a panel of the Forever Greenery DSP to the envelop flap with liquid glue, trimmed it and it was complete.

Then I went back to the notecard itself. With the front panel already having dimensionals, I adhered that to the notecard, then added some Pearl Basic Jewels and the card was done!

This card has no sentiment. I decided to make a set that was blank and ready for just the right words – sympathy or hello, or thinking of you or just a note to add later.


Birds and Branches, Forever Greenery DSP #2

Thanks for stopping by

May you have a beautiful day

Make someone happy by sending them a handmade card.

NEW 2020-2021 Annual Catalog

Shop with me and receive a free product of your choice up to a $10 value. New Catalogue goes LIVE June 3!  Need a catalog and you don’t have a demonstrator? Spend $35 in my online shop prior to Jun 1 and I’ll send a free copy. Remember those retired items and the Clearance Rack too! Perfect opportunity for picking up some fabulous items… just sayin’.

Last Chance Products JJ (US).        Last Chance Products AC (US)

Since the winds are mild this morning, we are headed out early to move that sweet little boat – our first sail of the season. Woohoo! It will feel so good to be out there on the water, with the wind in our faces and the freshness of the day. It’s a perfect time for communing with Mother Nature and the God that made us all.

Just for fun, I’m adding a picture of a puzzle hubby and I just completed late yesterday afternoon. It was very difficult – only 500 pieces – but the colors were so similar that it took a lot of doing to put it together. Fun, right?

Beetle puzzle


Stampin’ Up! AMY’S INKIN’ KREW Blog Hop

The theme for this month’s Blog Hop is all about “For the boys/ men…” and we could interpret that any way we wanted. Hubby’s birthday is in June and he is a sailing man. The new blue in the 2020-2021 In Colors for Stampin’ Up! is titled Misty Midnight. I love that! And it’s perfect to work with for a man – my man. And the Sailing Home carrying over stamp set is a perfect match in many ways. I also used the NEW Tasteful Labels Dies (eek! – fun!) and the Many Mates stamp set (love this too!)

You may be joining me today from the talented Julie Johnston. Thanks for following the blog hop!

The card is a take-off of a Gate Fold card – modified version. I actually followed the really good directions of my upline Mary Deatherage, who created a card using this fun fold. It’s easy!

For the boys/ men #1

  • Cut your card base 4 1/4 x 11, score at 5 1/2. I used Whisper White
  • Cut another piece of card stock (I used Night of Navy 5 1/4 x 8, score at 2″ and 6″
  • Mark the center of each of the short panels( 2 5/8). Cut to the center of each short panel (or gates) creating a V – see photo… I apologize… should have taken a photo PRIOR to completing the card – grrr

For the boys/ men #2

  • Cut a piece of  In Good Taste DSP 1 7/8 x 5 (2 of these) Follow the same procedure for cutting.  Adhere DSP panels to the card front “gates” using liquid glue. (This DSP is available to customers June 3!)
  • Cut apiece of the 2020-2021 6 x 6 DSP  Misty Midnight 3 7/8 x 5 1/8 and adhere using liquid glue to the inside of the Night of Navy panel (This DSP is available to customers June 3!)
  • Using the Stitched so Sweetly Dies, cut a panel for the sentiment and the sailboat. The sentiment, sailboat and birds are from Sailing Home stamp set.  I used Night of Navy ink. Adhere to the inside front panel with liquid glue.
  • Adhere this modified gate-fold to your card base with liquid glue.
  • Cut a strip 1 x 10 for the belly band. I used the new 2020-2021 IN COLOR Bumblebee. Don’t you love that name? It is so descriptive.
  • Cut another panel using a smaller Stitched So Sweetly Dies and Bumblebee card stock. Adhere to the belly band with dimensionals.
  • * Using two of the Tasteful Labels Dies (available to customers June 3!), cut panels, one in Night of Navy and one in Whisper White. Adhere with liquid glue to the Bumblebee diecut.
  • Stamp your sentiment using the new Many Mates stamp set. I added three of the new 2020-2021 In Color Enamel Dots. They are so cute! (Both of these are also available to customers June 3)

The front of your card is complete! Yay! And it’s gorgeous already. 😏 Now for the inside…

For the boys/ men… #3

  • Cut a piece of Night of Navy 5 3/8 x 4 1/8. Adhere using liquid glue.
  • Cut a Whisper White 5 x 3 7/8. Stamp with your sentiment and the anchor from the Sailing Home stamp set and Night of Navy ink. Adhere using liquid glue. Done!

Remember your envelope…Cover the envelope flap with the new 2020-2021 6 x 6 In Color DSP, adhering with liquid glue. Trim. Done, done, done…

For the boys/ men #


This was such a fun card to do. It looks complicated but isn’t at all and is just stunning.

Remember all those products I mentioned that are NEW! Purchasing from me is easy and when buying product between $50 – $150 you receive free product from me :O) Please use my current HOST CODE… J2E4VDGM .

Thanks for stopping by.

May you have a beautiful day.

Make someone happy by sending them a handmade card.


Now on with the hop…. to the very creative Amy Koenders.

If you get lost or disconnected along the way, you may get back in by connecting with any of these participating members today… Enjoy the hop!

  1. Mary Deatherage – https://wp.me/p5snyt-cPT
  2. Karen Ksenzakovic – https://wp.me/paaNf4-2ap
  3. Sue Prather – https://wp.me/p5yitZ-1Ua
  4. Jaimie Babarczy – https://wp.me/p79UhD-3Rf
  5. Leslie Larkin – https://leslielarkin.com/friendlikeyoubundle
  6. Karen Finkle – https://karenscardkorner.blogspot.com/2020/05/stampin-up-tropical-oasis-masculine.html
  7. Connie Troyer – http://constantlycreating.me/2020/05/12/masculine-unisex-card-with-stampin-ups-come-sail-away-memories-and-more-card-pack-for-stamp-with-amy-ks-tuesday-blog-hop
  8. Akiko Sudano – https://wp.me/paOv8E-1bb
  9. Julie Johnston – https://wp.me/p8SzmQ-2kc
  10. Terry Lynn Bright – https://wp.me/p8fxPh-tt
  11. Amy Koenders – https://wp.me/p2SFwf-juR


Stampin’ Up! Birds and Branches with matching Dies

Hi Folks! Guess what I received in the mail today… my NEW 2020-2021 ANNUAL CATALOGUE!  Woohoo!!! Oh my, so many special new products that I think you are going to love…

NEW 2020-2021 Annual Catalog

Today’s card is made using the brand new Birds and Branches stamp set, the matching Birds and More Dies, Lovely Joy stamp set and Field of Flowers stamp set and the new Just Jade 2020-2021 In Color. Let’s take a peek…

Birds & Branches stamp set w/ matching dies #1

This was fun using so many new products to make this card – got me all fired up!

  • Use the diecut for the inset from Birds and More dies to do this gorgeous green piece. The green is one of the new In Colors – Just Jade, kind of a blue-green, wonderful shade.
  • Using a sponge dauber, highlight just the leaves/ branches with Shaded Spruce.
  • Color the berries with Real Red Stampin’ Blends, then add sparkle with your Wink of Stella.
  • Using the Stitched Shapes largest circle die, cut the front of a Whisper White panel. Emboss it with the new Tasteful Texture 3D embossing folder. Adhere the Just Jade diecut to the backside of this panel using liquid glue.
  • Cut a length of ribbon from the Forever Greenery Trim Combo Pack and angle the ends as shown.
  • Run snail across the middle portion of the ribbon and wind the A in loops as shown.
  • Die cut the banner from the new Tasteful Labels Dies in Sahara Sand. This banner has the same wonderful stitches around it as so many of the stitches dies :o). Adhere to the ribbon with dimensionals
  • Lay this on the card front and make note of where to stamp the bird and branch. I used my Stamparatus to do this so it was easy to position the bird in the proper place. I then removed the panel, stamped the more solid bird stamp in stamped off Sahara Sand, then stamped the detail bird portion in So Saffron full strength. Stamp the feet in Black Memento ink. Then stamp the branch in Early Espresso.
  • With dimensionals, adhere the panel over this and your card front is complete! Here’s a close-up of the inset and bird.

    Birds and Branches w/ matching dies #3

For the inside…

Lovely Day, Field of Flowers stamp sets #2

  • Cut a piece of Just Jade 4 1/8 x 5 3/8 and adhere to the inside with liquid glue.
  • Stamp your sentiment in Sahara Sand on a Whisper White panel – it’s from the new Lovely Day stamp set and the fonts are gorgeous.
  • With Garden Green ink, stamp the border from the new Field of Flowers stamp set. Adhere over the Just Jade panel and your card is complete!

For the envelope…

  • Cut a piece of Just Jade (new In Color) and run it through the Tasteful Textures 3D Embossing Folder. Adhere to the envelope flap with liquid glue and trim. Done, done, done!

I love everything about this bird… it looks as though he is outside singing his heart out!

Birds & Branches w/ matching dies #4

Shop with me using my CURRENT HOST CODE J2E4VDGM and if your purchase is $50- $150 in a single order, you will receive a free item of your choice worth up to $10 😏 Sounds like a deal doesn’t it? And if you shop with me prior to June 1 purchasing $35 worth of product, and you do not have a demonstrator, you will receive a FREE 2020-2021 Annual Catalogue. While you cannot purchase from the NEW Catalog just yet (it goes LIVE June 3), there are some great buys on the Retiring List and in the Clearance Rack – so check those out. To make it easy for you, click on the photo below to get you to my online shopping site. Happy shopping!

Last Chance Products JJ (US)

Last Chance Products AC (US)

Card Cuts for today’s card:

  • Thick Whisper White 4 1/4 x 11, scored at 5 1/2
  • Whisper White panel 4 x 5 1/4 (cut 2)
  • Just Jade 4 1/8 x 5 3/8; 3 1/4 x 3 1/4 for the diecut
  • Sahara Sand scrap about 3 x 3/4 for the banner

Thanks for stopping by

May you have a beautiful day

Make someone happy by sending them a handmade card

Stampin’ Up! Old and New

Hi All! It’s Thursday, May 7 and I desperately hoping for my order from the NEW 2020-2021 ANNUAL CATALOG to arrive today. I will be very anxious to share the new products with you once they arrive. But for today, what I’m showing is something I made for a friend of mine. We were to have had our state convention last weekend and these were to have been given to her then – as a thank you for her leadership. Take a peek…

Best Dressed 3×3 Notecards repurposed

These are just adorable in person. Photos just don’t quite show how cute they really are. I think there are 12 notecards in a set – I forget really… but I have three left and will finish them up today. I made nine but only took a photo of these as they wouldn’t all fit in the photo frame!

Mini pizza box #1

Mini pizza box #2

Mini pizza box side view


There are some carryover products used and some new and some retiring. The new items are ribbons from the Ornate Garden Suite and I used Old Olive. But I’m getting ahead of myself. Here is the list of all the products used to create these fun gift cards.

  • Small Bloom Punch – carrying over from the recent mini catalog
  • Medium Daisy Punch – carrying over
  • Large Daisy Punch – carrying over
  • Leaf Punch – I thought it was carrying over, but maybe not – I have to look again

That’s it for the punches, now for the ribbons and accessories…

  • Crinkle Seam Binding – carrying over from the mini catalog
  • Old OliveOld Olive from the Ornate Garden Combo – new item
  • Flax ribbon 5/8″ – retiring – I cut a length and pulled individual strings from it to make a bow :O)
  • Pearlized Doilies – retiring
  • Clear and Gold Faceted Gems – retiring
  • Perennial Essence Floral Centers – retiring

Papers, notecards, ink and boxes…

  • Mini Pizza boxes – carrying over
  • Best Dressed 3×3 Notecards & Envelopes – retiring
  • Designer Series Paper 6×6 – retiring (this is a variety pack)
  • Come Sail Away DSP – retiring
  • Pearl Essence Vellum
  • Noble Peacock Foil Sheets
  • Balmy Blue ink and Purple Posy (you can use stampin’ Blends)

Fun project and knowing to whom I’m sending them makes it more fulfilling somehow. Anyway – hope you enjoyed seeing these today.

Thanks for stopping by

May you have a beautiful day

Make someone happy by sending them a handmade card 

Stampin’ Up! Bird Ballad Laser Cut Cards and Tin

Hi Everyone- BEAUTIFUL day today here – hope yours is as well. I brought out my Bird Ballad Laser Cut Cards and Tin to share with you. This set is just so stunning and takes my breath away a bit. It doesn’t need very much to decorate, unless you want to. I wanted these to be very un-fussy so here’s what I did…

Bird Ballad Laser Cut Cards #1

Bird Ballad Laser Cut cards #2


These first two have Perennial Essence DSP layered behind the laser front and then a bit of extra trim on the inside. Because the DSP is two-sided, it is sometimes difficult to decide which you want for the focal point. One side is about as stunning as the other.

Then I decided to add a bit of ribbon and it a different look. Not sure I like it quite as much, what do you think? Any opinions? Here’s a list of the various ribbons…

Bird Ballad Laser Cut Card with ribbon #3

  • Metallic Edge ribbon 3/8″ in gold (very vanilla) and silver (white) – – carrying over to the new catalogue
  • Metallic ribbon 1/4″ Seaside Spray – –  carrying over to the new catalogue
  • Ruched ribbon 1/4″ in Daffodil Delight – – also carrying over
  • Metallic Edge ribbon 1/4″ in Petal Pink (retiring, sadly – but on sale!)

Here’s a couple individually with the ribbon for a closer look…

Bird Ballad Laser Cut Card w/ ribbon #4

Bird Ballad Laser Cut Cards w/ ribbon #5


And here’s the gorgeous tin for holding all the beauteous cards…

Bird Ballad Laser Cut Cards and Tin #6

So tomorrow – TOMORROW – I have the privilege as a demonstrator for Stampin’ Up! to place a preorder of some of the new items offered in the NEW 2020-2021 ANNUAL CATALOG. EEEK! So excited… And then – I will be able to share the new goodies with you when they arrive. 😁  😏 Want to be apart of that group who can place preorders and receive discounts? Ask me how you can JOIN MY TEAM!

Thanks for stopping by

May you have a beautiful day

Make someone happy by sending them a handmade card

Stampin’ Up! Peaceful Moments and Coordinating DSP

Double Z Fold with Peaceful Poppies DSP #1Hi Everyone! Yesterday was so delightful, I played in the yard ALL DAY. Today is a wonderful light rain to help with all the transplanting I did 🥵 It was hard work, but I enjoyed every moment of it. Speaking of moment… good segue into today’s card made with the Peaceful Moments  stamp set and the Coordinating Peaceful Poppies DSP. Here it is…

Double Z Fold with Peaceful Poppies DSP #1

And here’s how to create this fun double z-fold card…

  • Thick Whisper White 4 1/4 x 11, scored at 5 1/2 & 2 3/4
  • Old Olive 2 1/2 x 4 for the front panel
  • Blackberry Bliss 2 1/2 x 4, 4 x 5 1/4
  • Peaceful Poppies DSP 2 3/8 x 3 7/8 (cut 2) 3 7/8 x 5 1/8; for the panel…1 1/8 x 5 3/8, 1 1/8 x 2 1/8 (cut 2)
  • Whisper White 1 1/8 x 5 1/4, 1/2 x 2 5/81 1/8  x 2 5/8

Double Z Fold with Peaceful Poppies DSP

  • Adhere appropriate panels to your Thick Whisper White cs using liquid glue. Refer to the photo for guidance.
  • Adhere the DSP to the smaller z fold piece using liquid glue
  • Stamp your sentiments in Black Memento ink on the appropriate Whisper White strips
  • Adhere the longest Whisper White with sentiment with liquid glue to the longest z fold panel – add the Peaceful Poppies element with liquid glue
  • Color the Peaceful Poppies element with Light Blackberry Bliss Blends. Cover with the coordinating vellum, attaching jsut at the base with snail. Adhere to the middle panel with liquid glue. Adhere the narrow stamped piece over this with liquid glue.
  • For the last portion of the narrow z-fold panel, stamp your sentiment and adhere with liquid glue.
  • Tricky part… adhering the narrow z fold to the card… adhere the longest panel first, remembering to just adhere to the front left panel of the card. Close the card and adhere the far right panel. Using your grid paper to. line up this panel helps to keep it straight. Card is done!

For the envelope, simply adhere a 2 1/4 x 6 panel of coordinating DSP to the envelope flap; trim and your card is complete – YAY!

Double Z Fold with Peaceful Poppies DSP #1

Double Z Fold with Peaceful Poppies DSP #2


I hope you feel a sense of accomplishment in creating this fun Double Z Fold card. This layout has so many possibilities, I would love to see what you do with it.

The new 20220-2021 Annual Catalogue is going live to those folks who are demonstrators in just a few days Want to be a part of that “in” group? Join my team and I will help you develop your skills both in card making and in the realm of developing your business (unless you simply want to be a hobby demo and get the incredible discounts, which is TOTALLY OK!)

Thanks for stopping by.

May you have a beautiful day.

Make someone happy by sending them a handmade card.


Stampin’ Up! and Mosaic Mood SDSP, Butterfly Gala

Hi Folks – it’s Friday, May 1! Aren’t we supposed to have a maypole with streamers and dance around it? If that’s the case, why is it raining so stinking hard? At least the temp is not so terrible… at 5 AM it’s reading 53 degrees!So I guess we COULD go out and dance in the rain, couldn’t we… might be fun. 😂 Well thank you very much, right now I’m writing :o)

For today’s card the focus is on the Mosaic Mood Specialty DSP. It’s the standout… a rather modern look and shiny and can easily be a masculine card. And here’s how we do it…

Mosaic Mood Specialty
DSP, #1

  • Garden Green is the card base 4 1/4 x 11, scored at 5 1/2
  • Mint Macaron 4 x 5 1/4 (cut 2, one is for the inside)
  • Mosaic Mood Specialty DSP 3 3/4 x 5. Adhere to the Mint Macaron panel with liquid glue.
  • Wrap with Very Vanilla twine (is this retired???), tie a bow. Put this on dimesnionals and adhere to the card front.
  • Stamp your sentiment from the Butterfly Gala stamp set in Garden Green ink. Punch this with your Tag Topper punch. Do another out of Garden Green cs, Adhere together with liquid glue keeping a bottom border.
  • Put dimensionals on just at the top point and bottom point to adhere over the twine.
  • Bingo – your card front is complete!

The inside…

Butterfly Gala #2

  • Adhere the extra Mint Macaron panel to the inside.
  • Cut a piece of Very Vanilla cs 3 3/4 x 5. Stamp your sentiment, again from the Butterfly Gala stamp set, in Garden Green ink.
  • At the bottom, adhere a thin strip of Garden Green cs with liquid glue, then a 1/2 x 4 strip of Mosaic Mood SDSP. Adhere this to the mint Macaron and your card is done!

The envelope got a little extra treatment today…

  • Mosaic Mood SDSP adhered to the flap
  • Butterfly Gala butterflies stamped in the front in Black Memento ink. I love how there is a separate stamp for the body AND for the antennae – for both the small butterfly and the large one.

Mosaic Mood, Butterfly Gala #3

Here’s a reminder…. The Mosaic Mood Specialty DSP is retiring! But… the Butterfly Gala stamp set is not 😁

I was going to save this next card for tomorrow, but just couldn’t wait. it’s too much fun…  the technique is called Scrappy Strip and was developed by Bruno Bertucci. I used scraps from my Mosaic Mood stash to cut strips at an angle and the Butterfly Gala stamp set for the sentiment. Stitched Rectangles Dies were used for the sentiment.Please take special note of the envelope, cuz I like that as much as the card!

Mosaic Mood SDSP & Scrappy Strip technique

Mosaic.Mood SDSP & Scrappy Strip technique


Thanks for stopping by

May you have a beautiful day

Make someone happy by sending them a handmade card 


Stampin’ Up! Forever Blossoms and Parisian Blossoms SDSP

Hi Everyone – it’s Wednesday – hump day as many folks call it. Guess that means mid week 😉 Today’s card is a rather fun fold – maybe accordion (?) and uses a bit more than the usual Specialty DSP. I like it, but it needed LOTS of card cuts cuz I did multiple layering (which I really like). This has two additional layers to each panel…

Forever Blossoms stamp set & Parisian Blossoms SDSP #1

And here’s how it happens…

  • Basic Gray cs 8 1/2 x 5 1/2, scored at 4 1/4. Cut diagonally from the score line to 2″ up from the bottom of the left side of the card stock.
  • Petal Pink cs 4 1/8 x 5 3/8, 2 x 5 1/4, 2 x 3 1/2, 2 x 5 3/8
  • Parisian Blossoms DSP 4 x 5 1/4,1 7/8 x 5 1/8, 1 7/8 x 1 3/8, 1 7/8 x 5 1/4
  • Whisper White scraps approx 1/2 x 4 1/4 fro front sentiment, 4 x 5 1/4 sentiment panel on inside and stamped flowers die cut.  Take a peek  how the panels adhere…

Forever Blossoms #2 – open front

Forever Blossoms #3 – open back


  • The tricky part is the angle for the supplementary panels… but I hope to make this real easy for you 😏… I used the card stock base and the angle already cut as my guideline. For instance, in picture #3 that panel is Petal Pink 2 x 5 1/4. Lay the Petal Pink under the Basic Gray (Basic Gray is on top) and softly pencil the angle onto the Petal Pink. Trim on that pencil line. If it needs more length removed, cut it off the straight bottom.This keeps the angle correct and simply adjusts the length of the new panel. Now do the same for the Parisian SDSP: lay it under the Basic Gray, draw a thin pencil line for the angle (making certain the SDSP is going in the appropriate direction) and trim along the pencil line. Adjust the length to fit 1/8″ smaller than the Petal Pink. Adhere the Petal Pink o the “back” as shown in picture #3, then the SDSP.
  • Now go back to picture #2 and do the same steps for cutting the angle for the front panels – do the Petal Pink first, then the SDSP.
  • Adhere SDSP to the appropriate Petal Pink panel, then adhere to the Basic Gray card base.
  • TIP: Adhering each panel as you go saves you from making mistakes in cutting and adhering.

Now you are ready for the largest panel…

  • Adhere the 4 1/8 x 5 3/8 Petal Pink to the Basic Gray cs, then adhere the SDSP 4 x 5 1/4 to the Petal Pink
  • Stamp the large flower from Forever Blossoms stamp set in Black Memento ink. Color using the Dark Petal Pink Blends. Die cut this with the Cherry Blossoms Dies and adhere using liquid glue.
  • Using the Stitched Rectangles Dies, cut a piece from Whisper White and adhere using liquid glue
  • Stamp your sentiment from the Forever Blossoms stamp set on the 1/2 x 4 1/4 strip, using Black Memento ink. Cut to size
  • Cut a strip of Petal Pink for the scallop under the sentiment, from Be Mine Stitched Framelits. Adhere to the sentiment strip with liquid glue and attach to the far left front panel using liquid glue.

For the envelope..

  • Adhere a 2 1/4 x 6 strip of the SDSP to the envelope flap using liquid glue; trim to fit
  • Stamp the single flower from Forever Blossoms stamp set in Back Memento ink and color using Dark Petal Pink Blends

Done, done, done. Now you have completed an accordion card with multiple layers and it wasn’t so hard. Do you love it? My hubby did and that made me very happy.

What’s retiring from the items used today… only the Parisian Specialty DSP – and folks, it is beautiful and right now a real bargain.. Love love love this paper and I am so glad this stamp set is carrying over into the new 2020-2021 catalogue. If youy would like to shop with me (I like that idea by the way!), please use my CURRENT HOST CODE J2E4VDGM for purchases between $50 – $150 to receive a free item of your choice from me – up to a $10 value. If your purchase is over $150, you will receive not only your free item of choice from me, but Stampin’ Up will offer you something as well. Shop now looking at not only the CLEARANCE RACK but also the RETIRING LIST…


Last Chance Products JJ (US)

Last Chance Products AC (US)

Thanks for stopping by

May you have a beautiful day

Make someone happy by sending them a handmade card


Stampin’ Up! and Bonanza Buddies and Bonanza Dies

Hi Everyone… Back for my second post of the day – yes, unusual it is! I needed a birthday card and this struck my fancy – today’s card is made using SU! Bonanzas Buddies, Bonanza Dies and Birthday Bonanza DSP. How fun is that!!! This card was inspired by one I saw by
Dawn Olchefske. Thank you Dawn for sharing.

The card cuts are just a bit different and you can see it so clearly in this first photo…

Bonanza Buddies #1

  • Bermuda Bay cs 8 1/2 x 5 1/2, scored at 4 1/4. Remove 1″ from each FRONT SIDE

For the card front…

  • Cut Grapefruit Grove cs 3 3/8 x 4 1/8 and adhere to from panel with liquid glue
  • Cut Birthday Bonanza  DSP 3 1/4 x 4 1/8 and adhere to Grapefruit Grove with liquid glue
  • The tag is made with Whisper White scrap about 2 1/2 x 4 1/4 – cut with the fabulous tag from the Bonanza Dies
  • Stamp your sentiment onto the tag using Memento Black ink and your Stamparatus. I find I get the stamp just so perfectly straight and I don’t have so many mistakes – just sayin’
  • Fussy cut – yes, I did say fussy cut… a toucan and balloons from another of the Birthday Bonanza DSP. This is such fun paper!!!
  • Attach a Grapefruit Grove  twine from the Nature’s Twine set then adhere the tag to the card front with dimensionals. Attach the fussy cut toucan with balloons with liquid glue and dimensionals on the far right of the Crushed Curry and Bermuda Bay balloons.

For the inside…

Bonanza Buddies #2

  • Cut two (2) Grapefruit Grove cs 1 x 4 1/8 and adhere to the far left and far right sides.
  • Cut two (2) Birthday Bonanza DSP 7/8 x 4 and adhere to the Grapefruit Grove panels
  • Cut Grapefruit Grove cs 3 1/4 x 4 1/8 and adhere to the center of your inside
  • Cut Whisper White cs 3 1/8 x 4. Stamp your sentiment from the Bonanza Buddies stamp set in Memento Black ink. Again I used the Stamparatus to make the sentiment straight and centered.
  • Cut a banner using the Bonanza Dies and the Birthday Bonanza DSP and adhere with liquid glue.

YAY! Your card is complete… ready to send to someone with a sense of fun n- and who doesn’t need a bit of fun these days to lighten their heart?

Remember this stamp set, dies and DSP retire as of Jun 2 – and they make a birthday card  so easy… Join the fun and order today. Remember to use my CURRENT HOST CODE if your order is between $50 and $150 to receive a free item of your choice worth up to $10 😁😁😁

CURRENT HOST CODE J2E4VDGM


Bonanza Buddies
#3

Thanks for stopping by

May you have a beautiful day

Make someone happy by sending them a handmade card

Stampin’ Up and Class Kits

Hi Folks – Monday – oh it’s Monday… And two more card kits prepared for the mail. Here’s the packaging, which I wanted to share ‘cuz I think they are cute. What’s fun about the packaging is that each one has looked so very different while still using the same products… acetate card boxes, DSP, ribbon, pearlized doilies and further decorations.  Depending on the DSP used sort of determines what you create for the decorations.

Cornonavirus Card Kit #1

Here are pictures of what I created before – all still part of the same “theme” but each unique on it’s own.

Acetate Card box – Corona Card Kit #1

Acetate card box, Corona Card kit #1

Acetate Card Boxes and Detailed Bee Dies

Fun, right? I should have taken a picture of them all together, but oh well. I think that’s the last of the kit preparations. Up I go to prepare a card for today :o) – I’;ll be back later to share that with you, so do stop back, ya hear?

Thanks for stopping by.

May you have a beautiful day.

Make someone happy by sending them a handmade card.