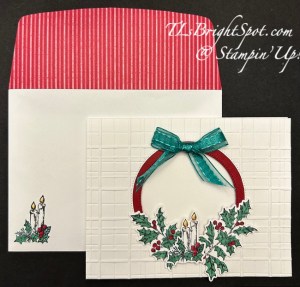
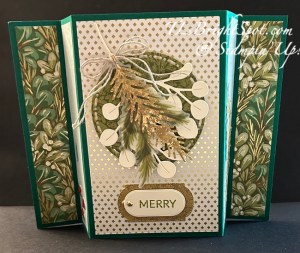
Happy Sunday morning – crispy air here today at 48 degrees. I have an easy fun fold today, one I found on Pinterest – hope you like it.
Susan Campfield created this card in a video tutorial and I liked the ease of it, then did my own thing.
Card Cuts:
- 5 1/2 x 5 1/4, score on short side at 4 1/4 (here I used Real Red)
- 4 x 4 (again, Real Red)
- DSP panels: 3/4 x 4 (cut 2); 3/4 x 5 1/4; contrasting DSP 3 x 3 3/4 (here I used Take A Bow 6×6)
- Basic White: 3 x 3 (circle on front) 2 x 3 (stamped holly); 4 x 3 3/4 (inside)
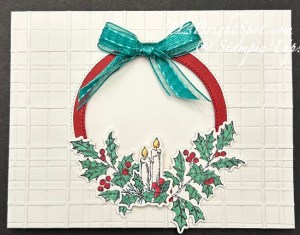
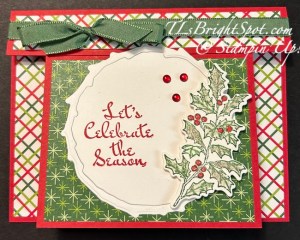
The first step is to burnish the score line on the card base, then add the 4 x 4 panel, centering it left & right & even with the bottom of the card base. This means it does not attach all the way to the score line! Now adhere the DSP panels: the 3/4 x 5 1/4 across the top and the two 3/4 x 4 panels on. the inside – keeping an even border on each – and the 3 x 3 3/4 on the front panel. Wrap a ribbon around the top & tie a bow. Here I used a retired Garden Green ribbon and kept it in place with a glue dot. As an option you could use that top area for a sentiment.
For the front… with Decked Circles Dies (6th from center), die cut a circle in Basic White and stamp with Sentimental Wishes stamp set and Real Red ink. Add it to the card front with dimensionals. Stamp the holly image from Sentimental Wishes in Garden Green ink and with a water painter very slightly damp, pull the color on the holly leaves. Don’t over work this step. With a Real Red Marker, color the berries, then die cut the image with the coordinating Sentimental Wishes Dies. Attach with dimensionals to the circle. Add Cherry Cobbler Adhesive-Backed Berries – and the card front is complete. :O)
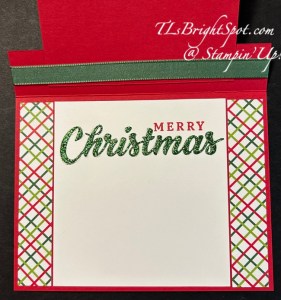
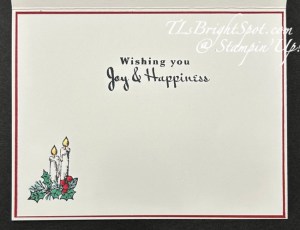
On the inside… with Peaceful Season Dies and Festive 12×12 Glimmer paper in Garden Green, die cut the word Christmas and adhere to the inside of the card. Remember to save the dot on the ‘i’ and attach it as well. Now stamp the word ‘merry’ from Peaceful Season stamp set in Real Red ink. Adhere the Basic White panel to the inside of the card & voila – the card is complete.
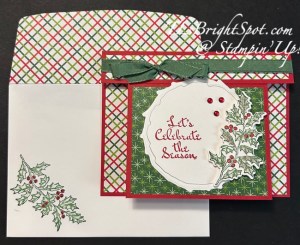
For the envelope … more of the Take A Bow DSP is adhered to the flap & trimmed to fit. AgainI stamped the holly using the Sentimental Wishes stamps in Garden Green ink, used the water painter barely damp to pull the color into the leaves. I used a Real Red marker to color the berries.

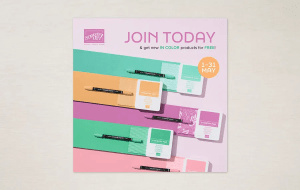
There’s only a few more days to take advantage of our Starter Kit Special! Those who sign up to be Stampin’ Up! demonstrators by October 31 will get $125 USD | $165 CAD $155 USD | $206 CAD worth of products in their Starter Kit for just $99 USD | $135 CAD! This offer also includes FREE business supplies and FREE shipping. Not to mention all the FUN that comes with being part of our fantastic crafting community. Join with me here…
The Kits Collection Sale Ends Soon
Our Kits Collection sale is coming to an end. These are the last few days for you to shop all our kits at up to 30% off. Shop our wide selection of kits before it’s too late! See the Kits Collections here.
OK – so time to order… don’t forget to use a HOST CODE FYAH4HG3 when placing a $50 order or more. This gets you a free item from me valued up to $10 for a Stampin’ Up! item.
Thanks for stopping by… love to hear from you, thank you for comments shared. May you have a beautiful day!