Stampin’ Up! and a Fun Fold and DSP

Today’s card is made using Stampin’ Up! products and a very fun fold… Since we can’t be with our grands this Easter, with all the coronavirus about us, making and sending is the best I can do. I’ve gotten a bit of a late start but will finish up today so you may see the other items in a future post šŸ˜ But for now, here we go…

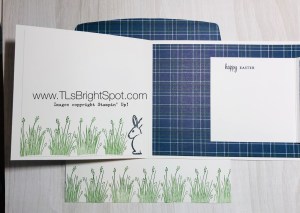
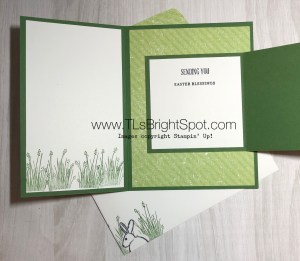
Fun Fold with PP bunny, grass

DSP Treat holders


Items needed for the card…

  • Garden Green 5 1/2″ x 8 1/2″, scored at 4 1/4″, then 1″ removed from the front; 3 1/4″ x 6 1/2″, scored at 3 1/4″ (this is the insert); approximately 3″ x 3″ for front of insert; 2 1/4″ x 6″ for the envelope flap
  • Designer Series Paper (DSP) of choice 3″ x 5 1/4″ for the left front; 4″ x 5 1/4″ for the inside
  • Whisper White 3 x 5 1/4″ for inside the front flap; 3″ x 3″ for the left part of the insert; approximately 3″ x 3″ for the front of the insert
  • Iridescent Sequins Assortment from the SAB catalogue
  • Basic Pearl Jewels
  • Assorted Pom-Poms from the SAB catalogue
  • Layering Squares Dies
  • March PP stamps
  • Garden Green ink & Memento black ink

Directions…

  • Adhere DSP to the card front, the inside and the insert plus your envelope flap
  • Stamp your bunny in Memento Black ink for the insert front, create a mask for the bunny, place it over the stamped bunny on the Whisper White cs, and stamp the grass with your Garden Green ink (I love this grass!!!)
  • Using just the grass stamp, stamp the Whisper White piece for inside the front of the card, stamping twice (Did I say I love this grass?)
  • Go ahead and stamp your envelope while you have everything handy 😁
  • Die cut your bunny that is on the 3″ x 3″ piece with a Layering Squares Die
  • Die cut the 3″ x 3″ Garden Green with the scalloped Layering Squares Die. Adhere the two together with liquid glue, put on dimensionals and adhere to the insert piece, MAKING CERTAIN THE FOLD IS ON THE RIGHT.
  • Adhere this to the inside of your card – almost finished…
  • Stamp your 3″ x 3″ piece with sentiment of choice. Mine came from A Wish For Everything stamp set and Itty Bitty Greetings stamp set

Fun Fold inside

Items needed for the treat bags…

  • 6″ x 6″ DSP of choice (Our grands are 19, 12 and 10, the girl being the 10 yr old. Can you tell which treat bag goes to which grand?)
  • Buttons (these are retired ones in my stash!)
  • Thread or twine to coordinate (again retired items in my stash)
  • Tear n Tape
  • Glue dots

Directions for the treat bags…

  • Choosing one side, adhere Tear n Tape almost to end of paper
  • Fold DSP into a cone shape carefully rounding the paper so it doesn’t fold, adhere together
  • Thread button and tie a bow, adhere to DSP with glue dots
  • FILL – this is important 😳

Thanks for stopping by today. It was nice being with you to share my creations.Ā 

May you have a beautiful day.

Make someone happy by sending them a handmade card – or a treat!

Fun Fold with PP bunny, grass

DSP Treat holders

Stampin’ Ip! Ornate Garden Specialty DSP, Ornate Borders Dies

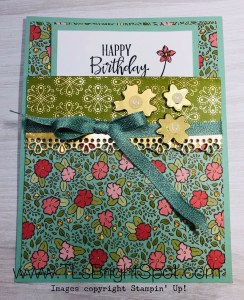
Todays Card is a fun use of the Stampin’ Up! Ornate Garden Specialty DSP and the Ornate Borders Dies. It’s a panel card, at least that’s what I’m calling it, meaning it doesn’t open šŸ™‚ It simply has a panel that fits inside the folded DSP. Let’s take a look….

This Ornate Garden Specialty DSP is so sweet and I wanted to emphasize this particular pattern for as much of the card as possible. This is what I did…

  • Mint Macaron card base cut to 4 1/4″ x 5 1/2″; also cut 3 1/2″ x 4 1/2″ for the inside panel
  • Ornate Garden SDSP cut to 4″ x 5 1/4″; another with same dimension but score this at 4″
  • Adhere the 4 “x 5 1/4” SDSP to the card base using liquid glue
  • Cut a panel 1/2″ x 4″ from Gold foil. Using a die from the Ornate Borders Dies, run it through your embossing/ diecut machine. Adhere this diecut to the fold-over piece of SDSP. Cut about a 20″ length of Mint Macaron 1/4″ ribbon, run over it with your snail adhesive and adhere evenly around the back and front, covering slightly where the Gold Foil diecut was attached.Tie a bow. TIP: use your grid paper to make certain the ribbon is attached evenly.Ā 
  • Using tear ‘n tape, adhere to the sides and bottom of this panel and attach to the card base.
  • Cut three flowers from Gold Foil scrap using the Ornate Border Dies. Adhere Glitter Enamel Dots to the center of each flower. Put on dimensionals and attach accordingly.

Now for the inside…

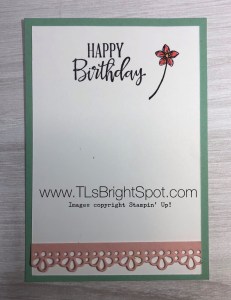
  • Whisper White cut to 2 is 7/8″ x 4 1/4″. Stamp your sentiment (I used the Peaceful Moments stamp set) with Stazon Jet Black ink. I like how clear this ink stamps! I also added a sweet flower from the Special Someone stamp set. This was colored using Flirty Flamingo and Daffodil Delight markers. TIP: When using Stazon Jet Black ink, DO NOT USE BLENDS TO COLOR! It simply smears the ink instead of adding color.
  • Using the Ornate Borders Dies once more, cut the same border die from Blushing Bride cs (approx. 1/2″ x 4″). Adhere to the Whisper White panel using liquid glue.
  • Adhere this Whisper White panel to the 3 1/2″ x 4 1/2″ Mint Macaron piece. Cute, cute!

The envelope…

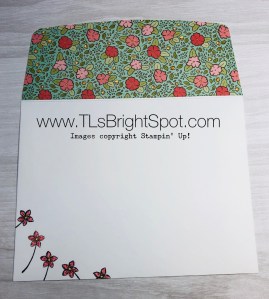
  • Cut a piece of matching SDSP from the Ornate Garden SDSP pack 2 1/4″ x 6″. Adhere with liquid glue and trim.
  • Stamp the adorable flower used on the card panel insert on the envelope front (I did it five times!) Color using Flirty Flamingo marker for the petals and Daffodil Delight marker for the flower center.

Isn’t this card sweet?!

Thanks so much for stopping by.. May you have a beautiful day.

Make someone happy by sending them a handmade card.


Triple Fold Card

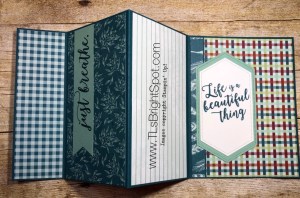
Fun fold cards are just that – FUN to create! One of the best parts of card making is creating something for a special someone. Somehow for me, it’s easier to make a card when I have a reason for that card. This card is for that woman who is struggling with some health issues, is getting better but needs encouragement. Let’s take a look.


The card was created with a 12″ x 5 1/2″ piece of Pretty Peacock. Score it on the long side at 4 1/4″, 7 1/4″ and 10 1/4″. The elegant papers used to decorate this project were taken from the Come to Gather Designer Series papers in the Holiday catalogue shown on page 48. Here are the stats for the card cuts:

  • for the front and reverse side of that fold, 1 5/8″ x 5 3/8″, cut two, using one side for the front of the card and thew other side of the card stock for the reverse side.
  • for the next two sections, 2 3/4″ x 5 3/8″, cutting two. Again use alternating sides of the DSP for each section.
  • For the last section, 4″ x 5 3/8″. What I did here is slice off 1/2″ the long side, turn that small piece to the reverse side.

Adhere all pieces to the appropriate panels. That third panel could easily be a piece of plain card stock for writing a lovely note :o) ~ just sayin’. On the last panel I have used the 2nd (on mint macaron card stock) and 3rd (on whisper white card stock) largest dies in the Stitched Nested Labels set shown on page 92 in the annual catalogue to include a sentiment. That nice saying came from the Colorful Seasons stamp set shown on page 56 in the annual catalogue. I used another of it’s sayings on the second panel, stamped on a 1 1/8″ piece of mint macaron card stock. It was originally cut as a 4″ length, then I cropped it using the banner triple punch shown on page 186 in the annual catalogue.

The belly band is 1″ x 12″. You may find when you gently wrap it around the card, that it needs to be shortened a bit.Ā  Do that before adhering together with snail. Then decorate the belly band. I used the beautiful whisper white 5/8″ Flax Ribbon found on page 174 in the annual catalogue and adhered that also with snail. Using the Gathered Together stamp set (pages 47 & 48 in the Holiday catalogue), I stamped that gorgeous large leaf and colored it with several stamping blends: Pretty Peacock,Ā  Granny Apple Green and just a hint of Cherry Cobbler. (see the full range of colors available in the Annual Catalogue on page 179. I then cut it with the Gathered Leaves dies (pg. 47 HC) and adhered with snail.

Notice how Stampin’ Up! products can be used in so many different ways? They coordinate like no other products out there! If you would like to place an order, please use my host code that is good until Oct 31, 2019. If your order is over $150, don’t use the host code – get your own free products SU! offers! If your orders are $50 or more, you will receive a free product from me ~ doesn’t that seem fun?

May you have a beautiful day! Make someone happy by sending them a handmade cardĀ  <:o)