SU! So Much Happy

Hello Everyone! Today’s card is made with the brand new So Much Happy Stamp Set and matching dies… Happy Dies. You are going to love this set… it has so much to offer and I had the best time making today’s card.

And thank you for stopping by… Amy’s Inkin’ Krew Blog Hop is full of fabulous cards and inspiration. Here’s mine…

So Much Happy stamp set
Happy Dies
Playing with Patterns DSP
#1

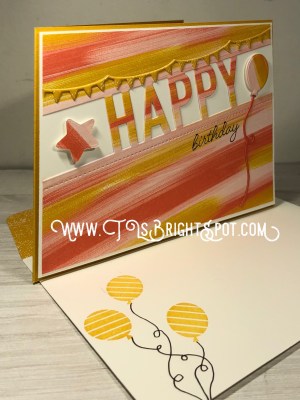
Oh so much to share about this card… first of all, masculine or feminine, child or adult – it fits!  Next – the dies (Happy Dies) and paper (Playing With Patterns 6×6 DSP) make this card so easy. And the stamp set ( So Much Happy) allows you to make this not just a birthday card but also a graduation or a celebration of a wonderful person.

Here’s a list of supplies…

  • So Much Happy stamp set (card front and envelope front)
  • Happy Dies (card front)
  • Playing with Patterns 6×6 DSP (card front)
  • Whisper White cs (background for card front and inside panel)
  • 2020-2022 In Color 6×6 ( banner on card front and envelope flap)
  • Best Year stamp set (for the inside sentiment)
  • Bumblebee cs and ink (card base and balloons on envelope)
  • Calypso Coral cs (balloon tail and inside panel)
  • Stazon black ink (sentiments)
  • Journaling pen (balloon tails on envelope)

And here’s the how to…

I started by choosing to play with the Playing With Patterns 6×6 DSP – so many fun papers in this stack! Because it already had this wonderful angle design, I followed that angle and used the die cut from the Happy Dies.  OK, what else? I played around with some other options for the balloon and star but returned to the scraps of the Playing With Patterns 6×6 DSP and came up with a match for the balloon tail as well (Calypso Coral) die cut both the balloon and star  and the tail at the same time. :o) Next I stamped the birthday sentiment. Then I wanted just one more accent… the Happy Dies have two dies that do not cut but EMBOSS your paper with a design. I used the one that looks like a broken underscore line and embossed it between the HAPPY and the birthday. Can you see it in the photo? If you put your curser on the photo and enlarge it, it’s visible and really adds a fun touch to the card. I adhered the balloon tail where I wanted it then adhered this DSP panel to Whisper White, put dimensionals on the balloon and star and attached. I wasn’t quite ready to stop – – I die cut the banner twice using the Happy Dies and the 2020-2022 In Color 6×6 DSP (Bumblebee). I die cut it twice to add dimension to the banner. This was adhered with small dots of liquid glue. This completed panel was adhered to the Bumblebee cs with dimesnionals. Card front complete!

The inside…

Best Year stamp set
#2

Don’t you love the different fonts in this sentiment?  And the sentiment is pretty darn neat too :o) This was stamped in Stazon black ink onto a Whisper White panel for a very crisp look – using the Best Year stamp set. This in turn, was adhered to Calypso Coral with liquid glue then attached to the card inside, again with liquid glue. Your card is done!

Now for the envelope… let’s take a peek at that envelope again…

So Much Happy stamp set
2020-2022 In Color 6×6 DSP
#3

I stamped the balloons with Bumblebee ink (new In Color!) and added the tails with my black Journaling pen. The envelope flap got covered with the 2020-2022 In Color 6×6 Bumblebee paper and the card set was done!

Now let me show you one of the other dies in this Happy Dies package that allows you to emboss a pattern on the card. You may need to enlarge the photon to see it though. I stamped the sentiment, added the embossing to the left and at near the bottom of the panel and adhered it to a Calypso Coral panel before realizing it was going in the wrong direction for my card! It’s been saved, have no worries there, but look for the embossing in the photo below.

Happy Dies
Best Year stamp set
#4

Such a fun cheerful card. I hope you enjoyed… Thanks for stopping by. May you have a beautiful day. Make someone happy by sending them a handmade card ❤️

Now on to the next person on the hop or go to the person before me… enjoy! And if you get lost along the way, here’s a list of those participating today.

  1. Karen Ksenzakovic: https://wp.me/paaNf4-2lT
  2. Leslie Larkin: https://leslielarkin.com/beautiful-world-bundle/
  3. Akiko Sudano: https://wp.me/paOv8E-1hC
  4. Karen Finkle: https://karenscardkorner.blogspot.com/2020/06/stampin-up-amys-inkin-krew-blog-hop.html
  5. Jaimie Babarczy: https://wp.me/p79UhD-3WJ
  6. Mary Deatherage: https://wp.me/p5snyt-dhf
  7. Terry Lynn Bright: https://wp.me/p8fxPh-y7
  8. Donna Leonard: http://stampdabbles.com/?p=2030
  9. Amy Koenders: https://wp.me/p2SFwf-jMS


SU!Thank You with DSP Focus

Hi Everyone! Today’s card was created for our neighbor who so generously gave us unused mulch… of course, I had to cart it uphill to our yard, but hey, it was free…  useful… and needed. So there you have it.😉 We have great neighbors! And I totally cased this card from Amy Koenders!

Here’s the card…

Ornate Thanks stamp set
Ornate Layers Dies
#1

And here’s a list of supplies…

  • Ornate Thanks stamp set
  • Ornate Layers Dies
  • Stitched Rectangles Dies
  • Misty Moonlight 2020-2022 In Color ribbon
  • In Good Taste DSP
  • Neutral 6×6 DSP – Night of Navy
  • Night of Navy ink & cs
  • Whisper White cs
  • Smokey Slate cs
  • Versamark
  • White embossing powder

And here’s how I did it…

I started by die cutting the two rectangles for the front using the Stitched Rectangles Dies. I adhered these two together with the new Stampin Seal (it works great… has an end cap so it doesn’t stick to anything else when you put it away. I’m happy with it.) I then adhered them to the card front (Smokey Slate) with the same Stampin Seal. With Night of Navy cs I stamped the card front sentiment with Versamark ink using the Ornate Thanks stamp set, sprinkled it with White Embossing powder and heat set it. TIP… this needs to cool a bit before handling as it’s kinda sticky while still warm. I then die cut it using the Ornate Layers Dies. This was put on dimensionals and set aside. I cut a length of ribbon from the Misty Moonlight 2020-2022 In Color spool and adhered it with the Stampin Seal. The sentiment on dimesnionals was placed over the top and centered on the card.

For the inside…

Ornate Thanks stamp set
#2

With a panel of Whisper White cs, I stamped the sentiment from Ornate Thanks stamp set in Night of Navy. I adhered a strip of the Neutral 6×6 DSP in Night of Navy 1/4″ from the bottom and added another strip of the In Good Taste DSP over the top. This was adhered to the Smokey Slate card base and the card was complete!

The envelope…

Ornate Thanks stamp set #3

Stamp the sentiment in Night of Navy from the Ornate Thanks stamp set. Adhere the Neutrals 6×6 Night of Navy to the envelope flap and the envelope is complete. Wheee. Easy peasy and so perfect for our neighbors.

All of these products may be found in the new 2020-2021 SU! catalog. If you do not have a demonstrator and wish to have a catalog, contact me. Either way, here’s a PDF copy for you to browse at your leisure.

2020 AC US

It is such a beautiful day and I am so very thankful…

for my health, for life, for sun, for rain, for nature, for all of God’s world.

It is not a perfect place, especially right now. But I am still thankful.

Thanks for stopping by.

Make someone happy by sending them a handmade card.

SU! Prized Peony

Hello! Using several new products today ~ it was hard to decide exactly what items to use as there are so many fun new stamp sets/ dies, Designer Papers… I finally settled on the Prized Peony stamp set and it is a gorgeous set complete with matching dies. Let’s take a look…

Prized Peony
Peony Dies
#1

What new items do you see? Well, the stamp set for sure (Prized Peony); it’s the focal point, and the Peony Dies. And notice the entire floral piece is raised… bingo! foam adhesive SHEETS!  I can see myself using these a LOT! It’s sticky on both sides (similar to dimensionals, but about a 4 1/2″ square sheet) and so easy to use. You can find these on pg 162 in the new catalogue and listed as #12. OK, what else is new on this card? Yep ~ the Peony Garden Designer Series Paper AND the wonderful Elegant Faceted Dots. What’s so cool about these is they come in a pack of clear, Petal Pink and pearlized. I used the clear from this set.

I also used Whisper White cs to stamp the focal peony and as an inside panel, Basic Gray for the card base, Petal Pink to back the DSP AND the Whisper White inside panel, Petal Pink inks to stamp the peony, Smokey Slate ink for the additional peonies as well as the sentiment, and finally the Organdy Striped 5/8″ ribbon. I think that’s it.

Let’s get busy and make this card…

  • Stamp the large peony from the Prized Peony stamp set on Whisper White. Cut it out using the matching die from the Peony Dies. Use that same die and cut a peony from the Foam Adhesive Sheet. Adhere the peony to the Adhesive sheet and set aside.
  • Cut a strip of Petal Pink cs 2 1/8 x 5 3/8.
  • Cut a panel of Peony Garden DSP 2 x 5 1/4. Adhere this to the Petal Pink panel.
  • Wrap a piece of the Organdy Striped 5/8″ Ribbon around these two panels then adhere to the left of the card front.
  • I laid but did not adhere the peony where I wanted it, then stamped the sentiment in Smokey Slate stamping off once. Now adhere the peony by simply removing the sticky from the foam adhesive and adhere to the card front. “Color” the peony and bud with Wink of Stella.
  • Add five of these very sweet Elegant Faceted Gems and your card front is done!

The inside and envelope…

Prized Peony
#2

Prized peony
Peony Dies
Peony Garden DSP
#3

  • Stamp the sentiment in the upper left corner in Smokey Slate onto a Whisper White panel 5 x 5 1/4. In the lower right corner, stamp the smallest peony in Smokey Slate stamping off TWICE.
  • While you have this sweet flower handy, stamp your envelope: once on the front and once on the flap. Adhere a strip of Petal Pink next to the flap fold with liquid glue – trim excess.
  • Adhere the Whisper White stamped piece to Petal Pink 4 1/8 x 5 3/8 and adhere this to the inside of your card. Card is complete – easy peasy!

So what do you think? Elegant, easy, stunning peony ~ a very special card of sympathy. The Peony Garden Suite is shown on pages 82-84 in the new 2020-2021 Annual Catalog. When you decide to shop with me, please use my CURRENT HOST CODE J2E4VDGM and if your product purchase is between $50-$150 you will receive a free SU! gift from me worth $10

Thanks for stopping by.

May you have a beautiful day.

Make someone happy by sending them a handmade card.


Stampin’ Up! In Good Taste, Mix and Match

Hi Everyone! Hope you had a nice Memorial Day weekend… it was cloudy and overcast, perfect for yard work, not so much for partying… and with the pandemic, not really possible anyway.Still, so thankful and appreciative to those who served our country, sometimes losing their lives, and those who still serve… Grateful, thankful, appreciative…

Today’s card is masculine! I know, a bit unusual for me. I like the simplicity of this card, yet it still has several elements and dimension. This could so easily be a Father’s Day card or birthday card, or a card of thanks and appreciation. Let’s take a look…

In Good Taste DSP Well Said stamp set #1

And here’s what you need to make this card…

  • In Good Taste DSP
  • 2020-2022 In Color 6 x 6 DSP
  • 2020-2022 In Color Enamel Dots
  • Misty Moonlight cs and ink
  • Whisper White cs
  • Braided Linen Trim
  • Lovely Labels Pick a Punch
  • Well Said stamp set
  • Ornate Style stamp set

And here’s how to do it…

  • Cut a piece of Misty Moonlight for your card base 8 1/2 x 5 1/2, scored at 4 1/4. Set aside
  • Cut a piece of 2020-2022 In Color 6 x 6 using the Misty Moonlight color, 4 x 5 1/4 and adhere to Whisper White cs 4 1/8 x 5 3/8.
  • Fussy cut a panel of the In Good Taste DSP and adhere to a panel of Whisper White about 1 1/2 width for stability. I like this blue/ white piece as it reminds me of Delft and Bing and Grondahl plates. Does it for you? I put this panel on dimensions and set it aside for now.
  • Next I cut a 1/2 strip of Misty Moonlight for a background for my sentiment. I punched the one end using the Lovely Labels Pick a Punch.
  • Stamp your sentiment using the Misty Moonlight ink spot provided in the May PP. (I used the Well Said stamp set and taped off the IS YOU. to use for the inside) on a Whisper White scrap, punch the end with the same Lovely You Pick a Punch and adhered to the Misty Moonlight piece.
  • I laid this on the card front and decided something was missing – so the Braided Linen Thread to the rescue! This is a nice masculine type trim and I like the neutral and how it seemed to tie everything together (PUN :)) Add snail to the back of the 2020-2022 In Color DSP and Whisper White panel, placing the trim 3/4 from the bottom of your panel.
  • Since the sentiment is going over the braided trim, cut your dimensionals in half and place on opposite sides so the sentiment panel doesn’t wobble (ask me how I know that!). Once you have your sentiment strip where you want it, adhere over the trim and cut off the extended end.
  • I added three 2020-2022 In Color Enamel Dots to the sentiment panel and felt something was still missing. Braided Linen trim to the rescue again! I cut a length and tied a half knot just beyond the sentiment panel and adhered it with a glue dot. Then I frayed the ends of the braided trim cuz I like the look 🙂
  • Let’s see, did we do everything?   Yikes – remember the In Good Taste panel – it has dimensionals on it ready to be adhered – do that and your card front is nearly complete.
  • Put this entire panel on the Misty Moonlight card base in the very first step and your card front is done… yay.

For the inside…

Well Said stamp set
Misty Moonlight
#2

  • Cut a panel of Whisper White 4 x 5 1/4,.
  • Adhere a 1/2 strip of the 2020-2022 In Color DSP to the right  about 1/4 from the edge.
  • Stamp the rest of the sent (is you.) with the Misty Moonlight ink spot
  • Adhere to the inside of your card with liquid glue

Remember to do your envelope… See photo..

  • I adhered the 2020-2022 In Color 6 x 6 DSP to the envelope flap and trimmed to fit
  • I stamped this fun decoration that seemed to fit the Delft look – using the Ornate Style stamp set and the Misty Moonlight ink spot.

In Good Taste DSP
2020-2022 In Color 6 x 6
Well Said stamp set
Ornate Style stamp set
#3

Done done done… And as I said earlier, this card could fit so many occasions for a man.It’s also feminine enough for a woman as well. So many of these products will be available to customers beginning Jun 3. They are part of the NEW and exciting  2020-21 Annual Catalogue. Shop with me, join my team (for those extra discounts!) – lots of bonuses either way. When shopping with me please use my CURRENT HOST CODE J2E4VDGM to receive an item of your choice worth $10 when your purchase is between $50- $150. One free item per customer per month please… Feel free to contact me for further details.

Thanks for stopping by.

May you have a beautiful day.

Make someone happy by sending them a handmade card.

Stampin’ Up! Paper Pumpkin Alternatives

Hello All! Today’s post is all about Paper Pumpkin, primarily the May ’20 PP. The colors in this kit show off the new In Colors: Bumblebee, Cinnamon, Just Jade, Magenta Madness, Misty Midnight. I really like the names AND the colors themselves – together, well, not so much 😏. Included in the kit was a new ink spot from the new In Color Misty MidnightLet’s take a look…

This first card is made just as suggested…

PP April ’20
Card 1

Card #2 is similar, except I cut it apart vertically in various widths and mounted it on Magenta Madness cs. Everything else is the same.

PP Alternative 1
Card 2

Card 3 I cut apart again making various sizes of squares. They didn’t fit together quite the way I wanted (ugh!) Again I mounted the squares on Magenta Madness. I used a sentiment from Silhouette Scenes. 

PP Alternative #2
Card 3

Card 4 wasn’t cut at all, simply mounted on the Magenta Madness and put on dimensionals, again using the sentiment from Silhouette Scenes.

PP Alternative #3
Card 4

The second set of cards I chose to do was a bit more of a challenge and I made not one the way it was suggested. Card 5…  I removed the card front and cut it in fourths, adhered to Misty Madness cs and mounted on dimensionals, adhering to Thick Whisper White cs. I cut a 1 1/2″ banner from the In Color 2020-2021 6 x 6 DSP using the Triple Banner Punch and adhered to the vellum banner that was part of the kit. I trimmed the vellum banner point to match. I stamped a sentiment on a  1 1/4″ banner from Silhouette Scenes stamp set and adhered that to the same banner. I wrapped the Ruched Daffodil Delight 1/4″ Ribbon around and tied a knot, adhering with a glue dot. The full banner then got dimensionals and was placed as you see it.

PP Alternative #4
Card 5

Card 6 was done similarly except… I placed a 1/2″ strip in the middle from the In Color 2020-2021 6×6 DSP pack (new and available Jun 3), included the vellum panel from the kit, cut a label from Tasteful Labels Dies (new in catalog and available Jun 3) in the In Color 6×6 DSP pack and adhered in the center with dimensionals. I cut another label from the same die set (this is an awesome die set folks!), stamped the sentiment using the ink spot Misty Midnight from the Well Said stamp set. (Father’s Day is JUST around the corner and I thought this could be a fun masculine card)This was adhered to the blue label with dimensionals. I added three 2020-2021 n Color Enamel Dots

PP Alternative #5
Card 6

Card 7 I got a bit more creative and decided a lighthearted Father’s Day card would be fun. I again removed the card front, then used the Balloon Punch to create two balloons. Using the colors in the stripes, I punched additional balloons from Bumblebee cs, Misty Midnight and Pumpkin Pie. I stamped the sentiment on various balloons using the Well Said stamp set. Special Someone stamp set was used to create the rest of the card: tails on the balloons, the raccoon (Soft Suede), the mouse (Smokey Slate). The little embellishments were included in the kit. I added a banner at the bottoms from leftover parts of the card front. This Whisper White got dimesnionals and adhered to Misty Midnight card base.

PP Alternative #6
Card 7

Card 8 and I went a little crazy over the top…  There were left overs from the previous card front so I cut it down to make a square (about 3″), adhered that to a Misty Midnight scallop square cut from the Squares Dies and adhered this to a Bumblebee 3 1/2 x 7 panel (scored at 3 1/2). I used a section of the card front for the inside that shows a bit of the colors where I removed the card front 😉

PP Alternative #7
Card 8

PP Alternative #7
Card 8 small panel inside


Using a Misty Midnight card base, I adhered a panel 4 x 5 1/2 from the 2020-2021 In Color 6×6 pack to the card front . I then adhered the Bumblebee piece all the way to the top of the fold with liquid glue. I stamped a sentiment from the Dressed to Impress stamp set to a piece of Whisper White and cut a banner from the Tasteful Labels Dies (did I say I love these dies?). I adhered one of the fun embellishments from the PP kit to the banner, added dimensionals and adhered to this Bumblebee panel. For the bottom of this card, I stamped another sentiment from the Dressed to Impress stamp set using the included ink spot and cut it using another banner from the Tasteful Labels Dies. I stamped the show in Melon Mambo, colored in with Wink of Stella to give it some glimmer and fussy cut it and adhered to this banner with liquid glue. This banner was added to the card with dimensionals. Again, more embellishments from the PP kit.

Since this card was made with someone special in mind, I wanted lots of room to write something. I simply adhered another of the leftover pieces from the removed card front to a Whisper White 4 x 5 1/4. This was adhered with liquid glue and this card was now complete.

PP Alternative #7
Card 8

Whew! That was fun… 4 more cards in the PP kit to make, but not today. Paper Pumpkin is a fun “gift” to receive each month. It most often has cards to make, but sometimes includes bags or boxes. Each kit includes a stamp set, an ink spot, embellishments such as seen today, also ribbon, adhesives, AND instructions – how great is that?! Consider a PP kit for one month, six months or a years subscription. Ship with me now…

The new Annual 2020-2021 Catalog goes live Jun 3. Start making your list and checking it twice. When shopping with me, include my CURRENT HOST CODE J2E4VDGM  for a free gift from me when your purchase is between $50 – $150. No more than one free gift per customer per month though – let’s not be greedy, ok? That free gift is an item of your choice worth $10.

Thanks for stopping by.

May you have a beautiful day.

Make someone happy by sending them a handmade card. 


Stampin’ Up! Cards made with New and Retiring Stamps and Dies

Hi Folks! I have a slew of – well, five – cards that were all in various stages of incompleteness on my desk and it was time to CLEAN UP THE DESK! 😁😁😁 So here goes… I’l show the card and list the products to make it.

Botanical Prints stamp set, Botanical Prints Dies
Card 1

Botanical Prints stamp set, inside
Card 1


Card 1 –

  • Botanical Prints stamp set
  • Botanical Prints Dies
  • Botanical Prints DSP
  • Dark Daffodil Delight Blends
  • Light Old Olive Blends
  • Rhinestone Basic Jewels
  • Terracotta Tile cs base
  • Whisper White cs
  • Inks: Tuxedo Black Memento, Terracotta Tile

Botanical Prints stamp set, Botanical Prints Dies
Card 2

Botanical Prints stamp set, inside Card 2


Card 2

  • Botanical Prints stamp set
  • Botanical Prints Dies
  • Botanical Prints DSP
  • Stitched Shapes Dies – carrying over!
  • Inks: Highland Heather, Tuxedo Black Memento, Highland Heather Blends, So Saffron Blends, Old Olive Blends, Light Soft Suede Blends
  • Rhinestone Basic Jewels

Peaceful Poppies DSP, Peaceful Poppies Elements
Card 3

Card 3

  • Peaceful Poppies DSP
  • Peaceful Poppies Elements
  • Timeless Tropical for the sentiment on the front of the card – carrying over!
  • Thick Whisper White card base
  • Poppy Parade cs
  • Blends: Poppy Parade and Old Olive
  • Wink of Stella on the envelope poppy

Painted Poppies stamp set, Peaceful Moments stamp set
Card 4

Card 4

  • Poppy Parade Card base
  • Painted Poppies DSP
  • Crinkled Steam Binding Ribbon 1/4″, stamped with Old Olive – carrying over!
  • Whisper White
  • Sentiment from Peaceful Moments – carrying over!
  • Inks: Old Olive and Poppy Parade

Ornate Garden Specialty DSP
Ornate Frames Dies
Nature’s Thoughts Dies
Card 5

Card 5

  • Scalloped Notecards and Envelopes – retiring product
  • Ornate Garden Specialty DSP (NEW IN ANNUAL CATALOG)
  • Ornate Frames Dues (NEW IN ANNUAL CATALOG)
  • Nature’s Thoughts Dies – carrying over!
  • Woven Heirlooms for the sentiment – carrying over!
  • Early Espresso ink – carrying over

WOW – it feels good to have an almost clean desk and lots of cards completed. Since so many of these cards are made with retiring products, please see the attached list. Be sure to use my CURRENT HOST CODE: J2E4VDGM when shopping 😏

Last Chance Products JJ (US)

Last Chance Products AC (US)

Thanks for stopping by

May you have a beautiful day

Make someone happy by sending them a handmade card ❤️

Stampin’ Up! Forever Gold Specialty DSP, Note cards and Envelopes

Today is TGIF day! Woohoo! For me, it doesn’t matter for everything has changed. Early this morning hubby had a Zoom meeting for Kiwanis. It seems the way we define what day it is, is by the zoom obligations… odd, right? While he was participating in his ZOOM meeting, I created this quick and easy card. I love this new In Color – Magenta Madness… 😁

Forever Gold SDSP, Notecards & envelopes

Made with SU! Notecards and Envelopes, new In Color Magenta Madness (new and available to customers Jun 3) cut to 3 3/8 x 4 7/8, Forever Gold Specialty DSP (new and available to customers Jun 3), Whisper White for the sentiment panel, Greenery Embossing Folder (new and available to customers Jun 3), Tasteful Touches stamp set (new and yes! available to customers Jun 3) for both the sentiment and the sprig. I used Pretty Peacock for stamping.

Details…

  • The white decorated piece that covers most of the Magenta Madness is one of the gorgeous foils in the Forever Gold Specialty DSP. And yes, it is gold on the other side. Adhere with liquid glue to the Magenta Madness cs, then adhere this to the note card with more liquid glue.
  • The next layer is another of the papers in the Forever Gold Specialty DSP. To give it strength to put on dimensionals, I adhered some card stock to the back, then adhered the piece to the front of the card with dimesnionals.
  • Stamp your sentiment using Pretty Peacock ink (here I used Night of Navy) and the Many Mates stamp set (new and available to customers Jun 3).Cut that sentiment with a circle from the Tasteful Labels Dies (new and available to customers Jun 3) out of Whisper White. Adhere with dimensionals.
  • Stamp the inside with the leaf spray from Tasteful Touches stamp set using Pretty Peacock.
  • Stamp the envelope with the same spray.
  • Run the Magenta Madness through your embossing machine using the NEW  Greenery Embossing Folder (yep! new and available to customers Jun 3). Be sure to spritz the paper lightly with water to get a really nice dry embossing. Isn’t this leaf imprint gorgeous!

Forever Gold SDSP, Notecards & envelopes

Your card is complete and ready to mail. This card is being sent today as a sympathy card. Although the Magenta Madness is bright, it is softened with the overlay of the Foil paper. It still comes across as elegant and prepared with loving care.

Thanks for stopping by.

May you have a beautiful day.

Make someone happy by sending them a handmade card.


Shop with me… Now is the perfect time to stock up on those retiring items, many at a reduced price. Please refer to the graphic for that information. And don’t forget the Clearance Rack – it has some really fabulous deals!

Last Chance Products JJ (US)

Last Chance Products AC (US)

The new catalogue goes LIVE Jun 3. My catalogs for the 2020-2021 year should be arriving any day. If you have shopped with me in the last 3 months, you will receive a catalog from me. If you do not have a demonstrator, please, let’s connect so that I may send you the newest of the new 😁

Please use my current host code when shopping with me. That way I will be able to send

you a special surprised from me, worth $10. You must purchase between $50 – $150 to qualify.

HOST CODE J2E4VDGM

Another puzzle complete – this was sooo hard! The colorsvery similar and the pieces were curvy more that anything else. A definite challenge…

flowers puzzle


Stampin’ Up Birds and Branches

Hi Everyone – it’s Wednesday… do you need to know that? During this time of isolation it seems necessary to KNOW what day it is… they seem to run together otherwise. Hubby and daughter have been working on our little 16′ Bullseye sailboat, painting the bottom, sanding and sealing the teak. Last week we took it to the marina so they could step the mast and put it in the water for us to sail to our slip for the summer. And guess what – today is the day we are doing just that! We have had such nasty winds that even though the boat was ready, the winds were too strong. Remember this is just a 16 footer, but it’s perfect for us. It’s a bit on the cold side this morning (40 degrees when we got up at 5 am), so we will have to bundle. It’s always colder on the water than we expect!

Todays card … Birds and Branches stamp set again (I really like this set) and I paired it with the new Forever Gold Specialty DSP. and the new Forever Greenery DSP. What I chose from the Forever Gold SDSP fits perfectly on the SU! Notecards – and that’s what I’ve done. Take a look see…

Birds and Branches, SU! Notecards #1

What is it you notice? Oh… that the Forever Gold SDSP isn’t gold after all? Well, it is – on the other side! I wanted something soft so simply turned it over :O) After studying this panel for a bit, I decided I wanted to remove the center of the Soft Sea Foam, so cut that with the largest oval from the Stitched Shapes Dies. The SDSP was adhered to Soft Sea Foam card stock 3 3/8 x 4 7/8 with liquid glue, put on dimensionals and set aside.

Next I took out the Birds and Branches stamp set and one of the Notecards and Envelopes,. Centering everything,I  stamped the more solid bird stamp in Sahara Sand stamped off once. Then I stamped the bird outline in So Saffron full strength. The branch was stamped in Early Espresso and finally the feet in Black Memento ink.

Since I had the stamps right there, I decided to do the envelop as well. I took the leaf cluster and stamped it first and in Pear Pizzazz, then the smaller branch in Early Espresso. I adhered a panel of the Forever Greenery DSP to the envelop flap with liquid glue, trimmed it and it was complete.

Then I went back to the notecard itself. With the front panel already having dimensionals, I adhered that to the notecard, then added some Pearl Basic Jewels and the card was done!

This card has no sentiment. I decided to make a set that was blank and ready for just the right words – sympathy or hello, or thinking of you or just a note to add later.


Birds and Branches, Forever Greenery DSP #2

Thanks for stopping by

May you have a beautiful day

Make someone happy by sending them a handmade card.

NEW 2020-2021 Annual Catalog

Shop with me and receive a free product of your choice up to a $10 value. New Catalogue goes LIVE June 3!  Need a catalog and you don’t have a demonstrator? Spend $35 in my online shop prior to Jun 1 and I’ll send a free copy. Remember those retired items and the Clearance Rack too! Perfect opportunity for picking up some fabulous items… just sayin’.

Last Chance Products JJ (US).        Last Chance Products AC (US)

Since the winds are mild this morning, we are headed out early to move that sweet little boat – our first sail of the season. Woohoo! It will feel so good to be out there on the water, with the wind in our faces and the freshness of the day. It’s a perfect time for communing with Mother Nature and the God that made us all.

Just for fun, I’m adding a picture of a puzzle hubby and I just completed late yesterday afternoon. It was very difficult – only 500 pieces – but the colors were so similar that it took a lot of doing to put it together. Fun, right?

Beetle puzzle


Stampin’ Up! AMY’S INKIN’ KREW Blog Hop

The theme for this month’s Blog Hop is all about “For the boys/ men…” and we could interpret that any way we wanted. Hubby’s birthday is in June and he is a sailing man. The new blue in the 2020-2021 In Colors for Stampin’ Up! is titled Misty Midnight. I love that! And it’s perfect to work with for a man – my man. And the Sailing Home carrying over stamp set is a perfect match in many ways. I also used the NEW Tasteful Labels Dies (eek! – fun!) and the Many Mates stamp set (love this too!)

You may be joining me today from the talented Julie Johnston. Thanks for following the blog hop!

The card is a take-off of a Gate Fold card – modified version. I actually followed the really good directions of my upline Mary Deatherage, who created a card using this fun fold. It’s easy!

For the boys/ men #1

  • Cut your card base 4 1/4 x 11, score at 5 1/2. I used Whisper White
  • Cut another piece of card stock (I used Night of Navy 5 1/4 x 8, score at 2″ and 6″
  • Mark the center of each of the short panels( 2 5/8). Cut to the center of each short panel (or gates) creating a V – see photo… I apologize… should have taken a photo PRIOR to completing the card – grrr

For the boys/ men #2

  • Cut a piece of  In Good Taste DSP 1 7/8 x 5 (2 of these) Follow the same procedure for cutting.  Adhere DSP panels to the card front “gates” using liquid glue. (This DSP is available to customers June 3!)
  • Cut apiece of the 2020-2021 6 x 6 DSP  Misty Midnight 3 7/8 x 5 1/8 and adhere using liquid glue to the inside of the Night of Navy panel (This DSP is available to customers June 3!)
  • Using the Stitched so Sweetly Dies, cut a panel for the sentiment and the sailboat. The sentiment, sailboat and birds are from Sailing Home stamp set.  I used Night of Navy ink. Adhere to the inside front panel with liquid glue.
  • Adhere this modified gate-fold to your card base with liquid glue.
  • Cut a strip 1 x 10 for the belly band. I used the new 2020-2021 IN COLOR Bumblebee. Don’t you love that name? It is so descriptive.
  • Cut another panel using a smaller Stitched So Sweetly Dies and Bumblebee card stock. Adhere to the belly band with dimensionals.
  • * Using two of the Tasteful Labels Dies (available to customers June 3!), cut panels, one in Night of Navy and one in Whisper White. Adhere with liquid glue to the Bumblebee diecut.
  • Stamp your sentiment using the new Many Mates stamp set. I added three of the new 2020-2021 In Color Enamel Dots. They are so cute! (Both of these are also available to customers June 3)

The front of your card is complete! Yay! And it’s gorgeous already. 😏 Now for the inside…

For the boys/ men… #3

  • Cut a piece of Night of Navy 5 3/8 x 4 1/8. Adhere using liquid glue.
  • Cut a Whisper White 5 x 3 7/8. Stamp with your sentiment and the anchor from the Sailing Home stamp set and Night of Navy ink. Adhere using liquid glue. Done!

Remember your envelope…Cover the envelope flap with the new 2020-2021 6 x 6 In Color DSP, adhering with liquid glue. Trim. Done, done, done…

For the boys/ men #


This was such a fun card to do. It looks complicated but isn’t at all and is just stunning.

Remember all those products I mentioned that are NEW! Purchasing from me is easy and when buying product between $50 – $150 you receive free product from me :O) Please use my current HOST CODE… J2E4VDGM .

Thanks for stopping by.

May you have a beautiful day.

Make someone happy by sending them a handmade card.


Now on with the hop…. to the very creative Amy Koenders.

If you get lost or disconnected along the way, you may get back in by connecting with any of these participating members today… Enjoy the hop!

  1. Mary Deatherage – https://wp.me/p5snyt-cPT
  2. Karen Ksenzakovic – https://wp.me/paaNf4-2ap
  3. Sue Prather – https://wp.me/p5yitZ-1Ua
  4. Jaimie Babarczy – https://wp.me/p79UhD-3Rf
  5. Leslie Larkin – https://leslielarkin.com/friendlikeyoubundle
  6. Karen Finkle – https://karenscardkorner.blogspot.com/2020/05/stampin-up-tropical-oasis-masculine.html
  7. Connie Troyer – http://constantlycreating.me/2020/05/12/masculine-unisex-card-with-stampin-ups-come-sail-away-memories-and-more-card-pack-for-stamp-with-amy-ks-tuesday-blog-hop
  8. Akiko Sudano – https://wp.me/paOv8E-1bb
  9. Julie Johnston – https://wp.me/p8SzmQ-2kc
  10. Terry Lynn Bright – https://wp.me/p8fxPh-tt
  11. Amy Koenders – https://wp.me/p2SFwf-juR


Stampin’ Up! Old and New

Hi All! It’s Thursday, May 7 and I desperately hoping for my order from the NEW 2020-2021 ANNUAL CATALOG to arrive today. I will be very anxious to share the new products with you once they arrive. But for today, what I’m showing is something I made for a friend of mine. We were to have had our state convention last weekend and these were to have been given to her then – as a thank you for her leadership. Take a peek…

Best Dressed 3×3 Notecards repurposed

These are just adorable in person. Photos just don’t quite show how cute they really are. I think there are 12 notecards in a set – I forget really… but I have three left and will finish them up today. I made nine but only took a photo of these as they wouldn’t all fit in the photo frame!

Mini pizza box #1

Mini pizza box #2

Mini pizza box side view


There are some carryover products used and some new and some retiring. The new items are ribbons from the Ornate Garden Suite and I used Old Olive. But I’m getting ahead of myself. Here is the list of all the products used to create these fun gift cards.

  • Small Bloom Punch – carrying over from the recent mini catalog
  • Medium Daisy Punch – carrying over
  • Large Daisy Punch – carrying over
  • Leaf Punch – I thought it was carrying over, but maybe not – I have to look again

That’s it for the punches, now for the ribbons and accessories…

  • Crinkle Seam Binding – carrying over from the mini catalog
  • Old OliveOld Olive from the Ornate Garden Combo – new item
  • Flax ribbon 5/8″ – retiring – I cut a length and pulled individual strings from it to make a bow :O)
  • Pearlized Doilies – retiring
  • Clear and Gold Faceted Gems – retiring
  • Perennial Essence Floral Centers – retiring

Papers, notecards, ink and boxes…

  • Mini Pizza boxes – carrying over
  • Best Dressed 3×3 Notecards & Envelopes – retiring
  • Designer Series Paper 6×6 – retiring (this is a variety pack)
  • Come Sail Away DSP – retiring
  • Pearl Essence Vellum
  • Noble Peacock Foil Sheets
  • Balmy Blue ink and Purple Posy (you can use stampin’ Blends)

Fun project and knowing to whom I’m sending them makes it more fulfilling somehow. Anyway – hope you enjoyed seeing these today.

Thanks for stopping by

May you have a beautiful day

Make someone happy by sending them a handmade card