Stampin’ Up! Side Step Fun Fold with Bauble Blooms

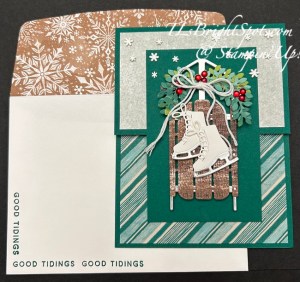
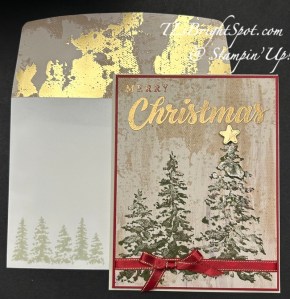
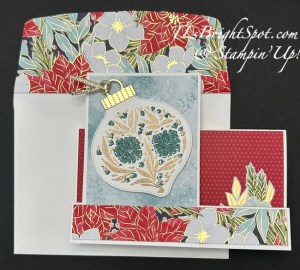
Good morning! We seem to have a more stable Internet today – thank goodness! Today’s card is extra easy & fun made with the Bauble Blooms bundle as well as Traditions of Christmas 12×12 DSP.

Stampin' Up! Bauble Blooms step card front

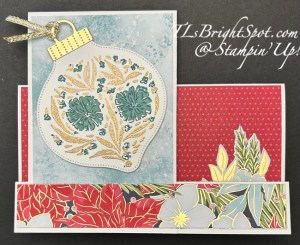
Putting this card together… card cuts are important and coordinating papers as well. Here I used the Traditions of Christmas SDSP plus Subtles 6×6 DSP in Pool Party. I also created the ‘Bauble’ first so I knew the contrasting to work with the focal image, the bauble.

  • I used the embossing buddy to eliminate any any static from the Basic White panel on which I was stamping. With Versamark, stamp the leaves, sprinkle with WOW! Metallic embossing powder in gold and heat set.
  • Stamp the ‘filler’ image of flowers in Lost Lagoon then stamp the detail image in Pretty Peacock. Die cut the bauble with the Bauble Blooms Dies
  • With Gold Foil sheets, die cut the bauble top and add with liquid glue; add the gold ribbon from the Silver & Gold ribbon combo pack – set aside
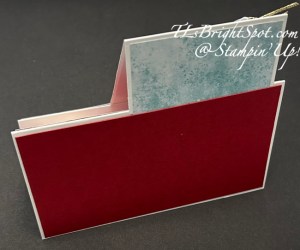
Card stock cuts:

  • card base: Basic White 5 1/2 x 8 scored at 3, 6, & 7. Burnish – 3″ mountain, 6″ valley and 7″ mountain
  • step panel: 3 x 6 scored at 4 1/4

DSP pieces:

  • card panels: 2 7/8 x 5 3/8 – center front – adhere now; 7/8 x 5 3/8 -save
  • step panel pieces: 2 7/8 x 3 1/2 – front of step, adhere; 2 7/8 x 1 3/4 – back of step, adhere

Directions:

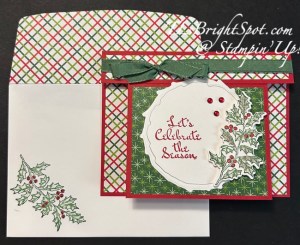
Add step panel (long section is the front) to the very front 1″ section, making it even at the bottom. Fold the card flat and adhere the short end of the step panel to the back. Add a card stock layer (here it is Cherry Cobbler) 2 7/8 x 5 3/8 to back panel. You can add a Basic White panel to this for additional sentiment or writing, I chose not to do that.

Stampin' Up! Bauble Blooms Step Panel card back

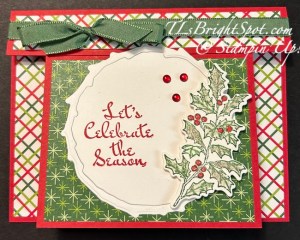
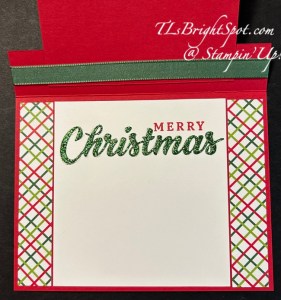
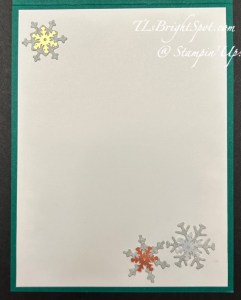
On the inside, add a piece of Cherry Cobbler 2 7/8 x 5 3/8. Add a Basic White 2 3/4 x 5 1/4 and stamp or decorate. I chose no sentiment but did add a fussy cut poinsettia & leaf image from the Traditions of Christmas 12×12 SDSP.

Time to add the set aside bauble and any additional decorations… The Bauble is added with dimensionals to the step front. An additional fussy cut image from the Traditions of Christmas SDSP was added to the front center panel – and the card is done!

Stampin' Up! Bauble Blooms Step card front, showing angle

To the envelope… I added more of the Traditions of Christmas SDSP (2 1/4 x 6) to the envelope flap & trimmed to fit. Yay! – love how simple and pretty this looks.

Stampin' Up! Bauble Blooms Side Step card & envelope

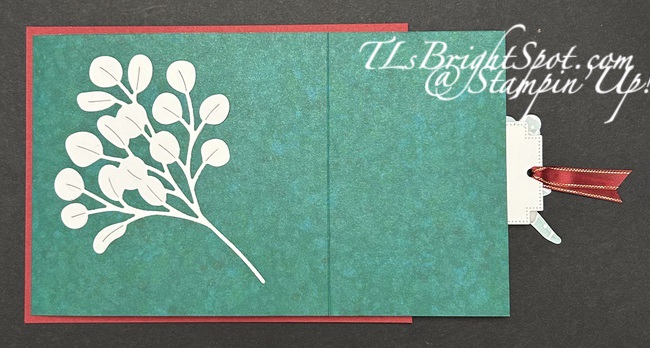
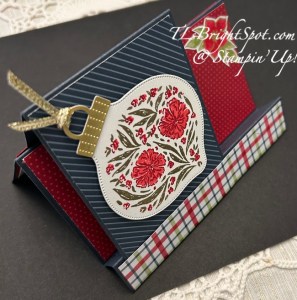
Here’s another I created with the same Bauble Blooms bundle and Traditions of Christmas SDSP. The card base & step panel are Secret Sea. Ink colors for the flowers are Strawberry Slush and Cherry Cobbler.

Stampin' Up! Bauble Blooms Side Step card in Secret Sea

You can see the products made to make this card below but some products are not available until Wednesday Sep 3. You can Still create this fun fold with several other designer series papers and colors. Be creative, share with me what you have done.

Need catalogs? Connect with me as I would love to share Stampin’ Up! information and products to purchase.

Stampin' Up! Sep-Dec 2025 Mini Catalog

Click the image below to shop with me for the2025-2027 In Color SALE!

Stampin' Up! In Color 2025-2027 Sale

Last Chance products are just that – once gone, gone for good. There are some super buys in this list. Click the image below to shop with me from this list.

Stampin' Up! LAST CHANCE PRODUCTS

Thanks for stopping by. May you have a beautiful day making someone happy with a card made with ❤️


Product List

Stampin’ Up! Traditions of Christmas ~ Sending Love & Joy

Yesterday was a blog hop & I used the Traditions of Christmas SDSP for my focal point. Today – still the same package of Designer Series Paper, but used very differently. First of all, there is a coordinating stamp & die bundle that coordinates and die cuts images in the paper – the Christmas Greenery bundle, available Sep 3 in the Sep-Dec 2025 Mini Catalog.

Stampin' Up! Traditions of C'mas - sending love

I began with one of those die cuts – of this beautiful ‘swag’. I then stamped some extra leaves from the Christmas Greenery stamp set in Old Olive ink on Old Olive card stock scraps – and die cut them as well. I adhered the ‘swag’ with dimensionals and the leaves directly to a Basic White panel. Next I die cut this gorgeous bow from Real Red and adhered it together, placed a cut dimensional and put it in place. Pulling out another bundle that coordinates is the Traditional Labels bundle that has all sentiments and label dies. I stamped on Basic White in Real Red ink, then die cut the label – love this curve die! I also die cut the same lable from Old Olive cardstock, cut it min half lengthwise to give a ‘shadow effect’ or frame to the white label. I added this to the card front with dimensionals. Once that was inn place, I felt the white space was ‘too white’ – too much white space (for me). So I pulled out the Christmas Greenery stamp that had the three berries and stamped those in Real Red all over the open spaces. As a final touch I added Traditional Sparkling Sequins in gold to the sentiment banner. This entire panel was adhered to an Old Olive card base.

Stampin' Up! Traditions of C'mas, sending love card inside

For the inside of the card, I stamped the sentiment from the Traditional Labels stamp set in Old Olive on a Basic White panel, then added berries in Real Red using the Christmas Greenery stamp set. This was adhered to the inside of the card – and done!

Stampin' Up! Traditions of C'mas, sending love card & envelope

For the envelope… more of the Traditions of Christmas SDSP but using this fun olive plaid pattern, was adhered to the flap & trimmed to fit.

Don’t have a demonstrator & need/ want a Sep-Dec 2025 Mini Catalog?

Reach out to me so I can fix that!

The 2025-2027 IN COLOR SALE continues through the end of August.

See all that’s available by clicking here.

Stampin' Up! 2025-2027 In Color Sale

Last chance products are those that are closing out & MANY at a fabulous sale price. Click the image below to take you right there.

Stampin' Up! Last Chance Products

Kits collection… Three new kits available. Click the image below to visit and see ALL THE KITS

Stampin' Up! Kits Collection

Remember that shopping with me has benefits… Stampin’ Up! already gives it’s own product credits when shopping with me – and when your order is $50 & up, you will receive the monthly tutorial (this month is the Painterly Pears) via email, which has lots of ideas. And Daisy points add up – sometimes I offer double Daisy Points :O)

Thanks for stopping by. May you have a beautiful day.

Make someone happy sending them a handmade card filled with love ❤️

Product List

Stampin’ Up! Sneaky Peek: Book fold with Peace on Earth Bundle

Today’s card highlights the Peace on Earth bundle, which includes an embossing folder. This is part of a suite that will be available in the 2025 Sep-Dec Mini Catalog. This embossing folder makes a stunning leaf imprint with a center area open for a sentiment panel. I made a similar card a while back and my card class students wanted to give it a try. We made one of each – the original card in blues and this in Shaded Spruce. Here is the link to the original card.

The card base is 4 1/4 x 11 scored at 4 1/2 & 5 1/2. Burnish the score lines well – fold the card in half (that’s the 5 1/2 score), then fold the 4 1/2 score forward. Add glue to that 1″ area and close the card base. This makes it a book fold! Now decorate… I ran a Basic White panel (4 1/8 x 4 3/8) through the Peaceful Garden embossing folder and adhered it to the card front. I cut a piece of Nests of Winter DSP 7/8 x 4 1/8 and adhered that to the 1″ area. With my Cut & emboss machine, I die cut the banner and leaf image from Shaded Spruce, and the dove from Basic White. I used a sponge dauber and Cloud Cover ink to add color around the feathers of the dove, then added an eye with just a dot of the Journaling pen. I set the dove aside. For the sentiment banner, Inused an embossing buddy to remove any finger marks, stamped the sentiment in VersaMark ink and sprinkled it with Wow! Polished Silver embossing powder & heat set with my heat tool. I added this to the card front with dimensionals, then added the dove with dimensionals. With dabs of liquid glue, I added the leaf die cut to the Nests of Winter DSP. I made a tiny bow from Bakers Twine – and the card front was complete!

For the inside – a Basic White panel 4 1/8 x 4 3/8 stamped in Shaded Spruce ink using the Jolly Holly stamp set – a July ONLINE EXCLUSIVE. Note the photo of the top view of the book fold.

Stampin' Up! Book fold Peace on Earth card & envelope

For the envelope – more of the Nests of Winter DSP adhered to the flap & trimmed to fit. An ‘olive branch’ is stamped on the envelope front from the Jolly Holly stamp set (the same July ONLINE EXCLUSIVE)- in Shaded Spruce ink.

Now… let’s talk about the September-December 2025 Mini Catalog 😀 As a demonstrator, we have the opportunity to view the new catalog early, before it’s released to customers. If you would like that opportunity I encourage you to consider becoming a demonstrator on my team. We have lots of fun, team workshops, team demonstrations and shared team info. At least 20% off every order & other benefits as well. Join my team here!

Thanks for stopping by. May you have a beautiful day!

Make someone happy sending them a handmade card filled with love. ❤️

Product List

Stampin’ Up! DSP Fun Fold

Good Saturday morning! It is crisp this morning on the East coast, which made for a beautiful walk. For my card this morning, I’m using a retired DSP as the fun fold part and DSP from the Sep-Dec 2024 Mini Catalog. It made for a fun creation.

Stampin' Up! DSP Fun Fold

The retired DSP is Joy of Christmas 12×12 and the birds are directly die cut from the Nests of Winter 12×12 DSP using the Winterly Tree Tops Dies. The birds are dimensionals on a Basic White banner die cut from the Greetings of the Season Dies. The ribbon is Cherry Cobbler Satin Ribbon. Now let’s open the card to see what’s inside.

Stampin' Up! DSP Fun Fold inside

The Basic White panel is stamped in Cherry Cobbler ink and comes from the Greetings of the Season stamp set – so I used the bundle on this card. The pine frond on this panel is a Shaded Spruce die cut from the Golden Greenery Dies. The larger pine branch is a die cut from the Graceful Greenery Vellum using a matched die from the Golden Greenery Dies. And because it’s vellum and see through, I added a Basic White behind it, die cut with the same die. Now let’s open this the other way to see the other side of the DSP.

Stampin' Up! DSP Fun fold, reverse side

I added this beautiful die cut in Basic White – just cuz – the panel needed something more. This also comes from the Golden Greenery Dies. And in this photo, you can see the DSP is adhered to a Cherry Cobbler base. For the measurements and card cuts, see below.

Want to remake this card? The Sep-Dec 2024 Mini Catalog has lots of choices of 12×12 DSP that can be used. See all the items in that catalog here. Remember when shopping with me to use my host code and make sure my name is listed as your demonstrator. If your order is $50 or more, I like to send a little giftie of a stampin’ Up! item valued up to $10 and you will also receive a copy of the monthly tutorial :O). If your order is over $150, don’t use the HOST CODE as Stampin’ Up! has it’s own rewards, but I will still send that valued item & the monthly tutorial. Joining my team will afford you the opportunity to view & play with products before being sold to the public. Join with me here for more fun. Need more information? Let me help.

HOST CODE VU3NPRY9

Card cuts:

  • DSP: 4 x 12 scored @ 2 1/2 & 6 3/4. Be careful of direction as this opens from the side.
  • Card base: 4 1/4 x 5 1/2 – Cherry Cobbler
  • Inside panel: 3 3/4 x 3 3/4, Basic White for sentiment
  • additional pieces: 1 3/4 x 3 (banner); 4 x 4 (large die cut spray & backing for vellum) – all Basic White; Shaded Spruce scrap for the pine frond

Stampin’ Up! Sentimental Wishes Fun Fold with Take A Bow 6×6 DSP

Happy Sunday morning – crispy air here today at 48 degrees. I have an easy fun fold today, one I found on Pinterest – hope you like it.

Stampin' Up! Sentimental Wishes Fun Fold card front

Susan Campfield created this card in a video tutorial and I liked the ease of it, then did my own thing.

Card Cuts:

  • 5 1/2 x 5 1/4, score on short side at 4 1/4 (here I used Real Red)
  • 4 x 4 (again, Real Red)
  • DSP panels: 3/4 x 4 (cut 2); 3/4 x 5 1/4; contrasting DSP 3 x 3 3/4 (here I used Take A Bow 6×6)
  • Basic White: 3 x 3 (circle on front) 2 x 3 (stamped holly); 4 x 3 3/4 (inside)

The first step is to burnish the score line on the card base, then add the 4 x 4 panel, centering it left & right & even with the bottom of the card base. This means it does not attach all the way to the score line! Now adhere the DSP panels: the 3/4 x 5 1/4 across the top and the two 3/4 x 4 panels on. the inside – keeping an even border on each – and the 3 x 3 3/4 on the front panel. Wrap a ribbon around the top & tie a bow. Here I used a retired Garden Green ribbon and kept it in place with a glue dot. As an option you could use that top area for a sentiment.

For the front… with Decked Circles Dies (6th from center), die cut a circle in Basic White and stamp with Sentimental Wishes stamp set and Real Red ink. Add it to the card front with dimensionals. Stamp the holly image from Sentimental Wishes in Garden Green ink and with a water painter very slightly damp, pull the color on the holly leaves. Don’t over work this step. With a Real Red Marker, color the berries, then die cut the image with the coordinating Sentimental Wishes Dies. Attach with dimensionals to the circle. Add Cherry Cobbler Adhesive-Backed Berries – and the card front is complete. :O)

Stampin' Up! Sentimental Wishes Fun Fold card inside

On the inside… with Peaceful Season Dies and Festive 12×12 Glimmer paper in Garden Green, die cut the word Christmas and adhere to the inside of the card. Remember to save the dot on the ‘i’ and attach it as well. Now stamp the word ‘merry’ from Peaceful Season stamp set in Real Red ink. Adhere the Basic White panel to the inside of the card & voila – the card is complete.

Stampin' Up! Sentimental Wishes Fun Fold card & envelope

For the envelope … more of the Take A Bow DSP is adhered to the flap & trimmed to fit. AgainI stamped the holly using the Sentimental Wishes stamps in Garden Green ink, used the water painter barely damp to pull the color into the leaves. I used a Real Red marker to color the berries.

Stampin' Up! Joining Promotion

There’s only a few more days to take advantage of our Starter Kit Special! Those who sign up to be Stampin’ Up! demonstrators by October 31 will get $125 USD | $165 CAD $155 USD | $206 CAD worth of products in their Starter Kit for just $99 USD | $135 CAD! This offer also includes FREE business supplies and FREE shipping. Not to mention all the FUN that comes with being part of our fantastic crafting community. Join with me here…

The Kits Collection Sale Ends Soon

Our Kits Collection sale is coming to an end. These are the last few days for you to shop all our kits at up to 30% off. Shop our wide selection of kits before it’s too late! See the Kits Collections here.

OK – so time to order… don’t forget to use a HOST CODE FYAH4HG3 when placing a $50 order or more. This gets you a free item from me valued up to $10 for a Stampin’ Up! item.

Thanks for stopping by… love to hear from you, thank you for comments shared. May you have a beautiful day!

Stampin’ Up!Front Flap & Gate Fold for the Happy Inkin’ Thursday Blog Hop

Welcome to the HOP! Our theme today is fun folds – and there will be some extraordinary ones, I am certain. I have chosen a tried & true front flap fun fold for today, using the WinterlyTree Tops bundle, the
Christmas Labels bundle and Nests of Winter 12 x 12 DSP.

Stampin' Up! Happy Inkin' Thursday Blog Hop
Stampin' Up! Front Flap Fun Fold with Winterly Tree Tops - card front

I’m going to be honest, I haven’t played with this set and I’ve had it for a bit. I… LOVE… IT… The pine frame is from Basic White card stock (3 5/8 x 5) and die cut with Winterly Tree Tops Dies. The birds are fussy cut (paper snips) from the Nests of Winter 12×12 DSP and added with dimensionals. The background (stripes) is also from this DSP pack (3 7/8 x 5 1/8) and was layered on Cherry Cobbler (4 x 5 3/8), and adhered to the Basic Black card front. I added three Pecan Pie Ribboned Adhesive-Backed Dots (an ONLINE EXCLUSIVE). Let’s look at how this card opens… the front flap opens from the top to show the gatefold, below.

Stampin' Up! Front Flap & Gatefold partially open

The layers are Cherry Cobbler (2 x 5 3/8 – cut 2) and a smaller Nests of Winter 12×12 DSP (1 7/8 x 5 1/4- cut 2) and adhere together and then to the Basic Black card baseThe sentiment panel is stamped on Basic White with Cherry Cobbler ink using the Christmas Labels stamp set then die cut with the coordinating Christmas Lablels Dies. Only the left side of the label was attached to the left ‘gate’.

Here is the inside…

Stampin' Up! Front Flap  & Gate Fold, inside

The inside… a panel of Basic White (3 7/8 x 5 1/8) with another fussy cut bird from the Nests of Winter 12×12 DSP attached with liquid glue. This panel was added to Cherry Cobbler (4 x 5 1/4) then to the inside of the Basic Black card base. All opened out the card looks like this…

Stampin' Up! Front Flap & Gate Fold fully  opened

And the envelope I kept very simple… more of the Nests of Winter 12×12 DSP on the flap & trimmed to fit, and a sentiment stamped in Cherry Cobbler ink from the Christmas Labels stamp set.

Stampin' Up! front Flap & Gate Fold card & envelope

These two bundles and the DSP may be found in the Stampin’ Up! Sep-Dec 2024 Catalog. The card stock & adhesive, scissors, paper trimmer, bone folder are in the Stampin’ Up! 2024 Annual Catalog. And the adhesive dots part of the Stampin’ Up! ONLINE EXCLUSIVES. You can find more information about shopping with me below the list of names of those participating in the hop today – so scroll down to learn more.

Carol is the next participant on the hop and she always has something amazing to share. Click the next button or click on a name to take you on an extraordinary adventure.

Stampin' Up! Happy Inkin' Thursday Blog hop next button

Amy Koenders

Mary Deatherage

Karen Finkle

Akiko Sudano

Karen Ksenzakovic

Tara Carpenter

Terry Lynn Bright

Carol Buckalew

LOTS GOING ON IN THE STAMPIN’ UP! WORLD – give me a few minutes to share the excitement…

Kits Collection Sale started Oct 1!

Exciting news! We’re having a huge sale on our Kits Collection beginning October 1! All kits will be available at a discounted price. Save up to 30% off on all your favorite kits October 1–31! Our kits come with everything you need to create a unique paper craft. We have crafting options for card kits, treat packaging, home decor, and so much more!  Click here

Stampin' Up! Kits Collection SALE

Clearance Rack Refresh – click here!

Santa Claus is comin’ to town a bit early this year—and he’s brought a holiday Paper Pumpkin sale! Starting September 11, 2024, at 12:01 a.m. (MT) until October 10, 2024, at 11:50 p.m. (MT), anyone who signs up for our monthly Paper Pumpkin subscription as a new subscriber will receive 40% off their first kit. That’s right, 40% OFF!

Stampin' Up! Paper Pumpkin new subscriber promotion

Where This Discount Is Applied
This discount will be applied to one kit in the first kit shipment of the Paper Pumpkin subscription, which means new subscribers will get 40% off the October Nests of Christmas Paper Pumpkin Kit. After that, each month’s kit will return to the regular price of $25.00.

Qualifying for This Discount
This offer is only for new month-to-month subscribers and is not valid on purchased or redeemed prepaid subscriptions.

Now that you’ve read through all the details, it’s time to head to paperpumpkin.com to subscribe and use code HOLIDAY40 to get 40% off.

Click here to take you to the Sep-Dec 2024 Mini Catalog

Stampin' Up! Joining Promotion

Promotion Period: October 1–31

Ordering Deadlines

  • Phone: October 31 2024, at 6:59 p.m. (MT)
  • Online: October 31 2024, at 11:59 p.m. (MT)

Become a demonstrator between October 1–31 can get $125 USD | $165 CAD $155 USD | $206 CAD worth of products for just $99 USD | $135 CAD.

Being a part of Stampin’ Up!’s creative community also comes with several perks, including early access to products, special discounts, a chance to earn product credits, access to exclusive trainings, demonstrator-only events, and so much more.

As a demonstrator, I am here to help you through the join process and beyond. Join with me here.

Stampin' Up! ONLINE EXCLUSIVES

Click the image above to take you to the ONLINE EXCLUSIVES!

Want to just shop? You can do that too. I appreciate your business and welcome any questions regarding sales or creating or joining my team. Make sure when shopping with me, that you see my name at the top as your demonstrator. That way I can send you a Stampin’ Up! giftie and you can earn rewards – with a $50 order or more. You also receive the monthly tutorial for that particular month – for October, it is More Than Autumn bundle.

HOST CODE … SEP 26- OCT 15 NDADFHMR

Thanks for stopping by. May you have a beautiful day!

Stampin’ Up! Sophisticated Sled Bundle in Shaded Spruce

Good Saturday! What is your day like where you live? Here in New Jersey it is rainy and about 71 degrees. A day for staying inside! Wednesday I had a card class using the super fun Sophisticated Sled bundle. I love this card and this bundle…

Stampin' Up! Sophisticated Sled card front

I used several different products to make this card, but let’s begin with the card base – Shaded Spruce 4 1/4 x 11 scored at 5 1/2, then trim off on the long side 2 3/4. This panel becomes the background for the sled. :O) Next
I cut pieces of Sentimental Christmas DSP and adhered them to the card base: 4 x 2 1/2 (cut 2, one for card front top and one for inside); 4 x 2 3/4 (this is my stripe panel). And since there is some overlap here, I added a strip of Shaded Spruce 1/2 x 4.

Stampin' Up! Sophisticated Sled card inside

I stamped the inside top panel in Shaded Spruce ink with a stamp from Sophisticated Sled stamp set. Back to the card front… with the DSP
adhered, I added the 2 3/4 x 4 1/4 panel removed from the card base by centering it and added adhesive just to the top portion. Now the super fun part – the sled.

  • From Silver Foil Sheet (2 x 4) die cut the sled rungs and skate bottoms
  • From Basic White (2 x 2 3/4) die cut the skate shoes and laces
  • From Country Woods DSP (2 x 3 & note the direction of the grain) die cut the sled.
  • From Full of Life DSP die cut the green leaf spray. There are two layered together here, offset, so the variegation of the DSP shows.

Putting it all together…

  • Adhere the wood-grain Country Woods sled top to the silver sled rungs. NOTE: the sled top has tiny holes on each side – line those up with the silver cross bars. There are two parts to the sled top die cut, the second does not show as it is under the green spray, but that portion used to ‘guide’ the sled if someone was riding it. (Remember those days?) Adhere this piece in place at a silver cross bar.
  • Glue the two leaf sprays together in the center only, then add to the sled ‘cross bar’ in center only.
  • Skates shoes … there is a tiny slit to insert the laces, adhere those in place; add silver ‘skate’ to shoe bottom. Add left skate shoe to sled with dimesnionals, then right skate shoe with dimensionals on bottom of skate
  • Add sled to Shaded Spruce panel with dimensionals
  • Add Add Cherry Cobbler Adhesive-Backed Berries to green spray
  • Add White Loose Snowflakes as shown with dots of liquid glue. This is a bit fiddly but worth the effect/ look!

Now turn the card over to the back… to a Basic White 4 x 5 1/4 panel, add 3 die cut snowflakes using the Frozen Edges Dies. I die cut these from scraps of the Sentimental Christmas DSP. I added Adhesive-Backed Snowflakes on each of these – in gold, copper and white, adhered the panel in place and the card was complete!

Stampin' Up! Sophisticated Sled card back
Stampin' Up! Sophisticated Sled full card
Stampin' Up! Sophisticated Sled card & envelope

For the envelope… I cut a panel of Sentimental Christmas DSP 2 1/4 x 6 and adhered it to the flap & trimmed to fit. On the front I stamped the sentiment from Sophisticated Sled in Shaded Spruce ink. I stamped the bottom two times, then the final stamp on the side.

Love, love, love this card! Maybe because it brings back such fond memories of snow & sledding the hills of a golf course back home – really good memories.

LOTS GOING ON IN THE STAMPIN’ UP! WORLD – give me a few minutes to share the excitement…

Upcoming Kits Collection Sale

Exciting news! We’re having a huge sale on our Kits Collection beginning October 1! All kits will be available at a discounted price. Save up to 30% off on all your favorite kits October 1–31! Our kits come with everything you need to create a unique paper craft. We have crafting options for card kits, treat packaging, home decor, and so much more! 

Stampin' Up! Kits Collection Sale

Santa Claus is comin’ to town a bit early this year—and he’s brought a holiday Paper Pumpkin sale! Starting September 11, 2024, at 12:01 a.m. (MT) until October 10, 2024, at 11:50 p.m. (MT), anyone who signs up for our monthly Paper Pumpkin subscription as a new subscriber will receive 40% off their first kit. That’s right, 40% OFF!

Stampin' Up! Paper Pumpkin Promotion

Where This Discount Is Applied
This discount will be applied to one kit in the first kit shipment of the Paper Pumpkin subscription, which means new subscribers will get 40% off the October Nests of Christmas Paper Pumpkin Kit. After that, each month’s kit will return to the regular price of $25.00.

Qualifying for This Discount
This offer is only for new month-to-month subscribers and is not valid on purchased or redeemed prepaid subscriptions.

Now that you’ve read through all the details, it’s time to head to paperpumpkin.com to subscribe and use code HOLIDAY40 to get 40% off

We’ve added new items to the Clearance Rack in our online store. Reach out to your customers so they can shop and save up to 60% off select products. 

As we evaluated inventory levels from our 2024 Sale-A-Bration offering, we decided to provide you and your customers with a second chance to add different products to your craft supplies.

These items are only available while supplies last, so act quickly to spread the word! Visit the CLEARANCE RACK  store to start shopping.

Upcoming Starter Kit Special!

Stampin' Up! Starter kit promotion

I appreciate your business and welcome any questions regarding sales or creating or joining my team. Make sure when shopping with me, that you see my name at the top as your demonstrator. That way I can send you a Stampin’ Up! giftie and you can earn rewards – with a $50 order or more. You also receive the monthly tutorial for that particular month – September is Autumn Expressions.

NEW HOST CODE … SEP 26- OCT 15 NDADFHMR

Thanks for stopping by. May you have a beautiful day!

Stampin’ Up! Sentimental Wishes in Elegant Mode

Good Friday morning! We had a team meeting recently and the Sentimental Wishes bundle was used for three presentations. This card is elegant and stunning.

Stampin' Up! Elegant Sentimental Wishes card front

First of all, I love the Forever Plaid 3D embossing folder from the Sep-Dec 2024 Mini Catalog. It adds wonderful texture to this card. The Stitched Shapes Dies (circles) feel as though I’m looking through a special window – and I love the Shaded Spruce Satin and Sheer Ribbon bow! Let’s create this together.

  • Cut a Thick Basic White card base 8 1/2 x 5 1/2, score at 4 1/4 and set aside.
  • Cut a Basic White panel 4 1/4 x 5 1/2, place the largest Stitched Shape circle die in the center and die cut. Take this same piece and run it through the Forever Plaid 3D embossing folder. Hint: Because this is a linear folder, I tend to use the black line as my guide for making sure the lines are straight and square using this folder.
  • Cut a Cherry Cobbler panel 4 x 5 1/4 and with the next to largest circle in the Stitched Shapes Dies, center the die and die cut. Layer this panel to the back side of the embossed panel with adhesive of choice. Add to the Thick Basic White card front with dimensionals.
  • On Basic White scraps, stamp the candle image and two holly images from Sentimental Wishes stamp set in Memento ink. Color with Stampin’ Blends: flame- Lemon Lolly and Light Pumpkin Pie; holly leaves – Shaded Spruce; berries – Cherry Cobbler; candle shading – Light Gray Granite. Add Wink of Stella to the flame & the dripping wax for a bit of sparkle. Die cut pieces with the Sentimental Wishes Dies.
  • Add holly branches with glue dots and candles w/ holly on dimensionals to the card front circle.
  • Add the bow made from Shaded Spruce Satin & Sheer Ribbon with a glue dot – and the front is complete – elegance personified!

For the inside…

Stampin' Up! Elegant Sentimental Wishes card inside

On the Basic White panel 4 x 5 1/4, stamp the sentiment from Sentimental Wishes stamp set in Memento ink. Stamp the candle image from this set, also in Memento ink. Color as on card front. Adhere this to a Cherry Cobbler panel 4 1/8 x 5 3/8 and add to inside of card. Fait accomplis’ – and beautiful!

Stampin' Up! Elegant Sentimental Wishes card & envelope

For the envelope I added a panel of Regals 6×6 DSP to the envelope flap and trimmed to fit. On the front, I stamped the candle image once more in Memento ink and colored as before. Love, love this card! Thank you Karen Ksenzakovich, for your creation and demonstration during our team meeting.

Want to make this card? All items, except the card stock, may be found in the Sep-Dec 2024 Mini Catalog. Click the image below.

Stampin' Up! Sep-Dec 2024 Mini Catalog

I appreciate your business and welcome any questions regarding sales or creating or joining my team. Make sure when shopping with me, that you see my name at the top as your demonstrator. That way I can send you a Stampin’ Up! giftie and you can earn rewards – with a $50 order or more. You also receive the monthly tutorial for that particular month – September is Autumn Expressions.

Click here to view the 2024-2025 Annual Catalog – card stock, adhesives, more stamps and die sets, cut & emboss machines, tools and more tools for creating awesome cards and gifts. – all are available in this catalog.

There are new kits available beginning Sep 4 – check by clicking here.

Stampin' Up! Christmas Ornament kit
Christmas Ornament kit – NEW!
Stampin' Up! Card Keeper Kit
Card Keeper kit – NEW!

There are new scrapbooking supplies available, click here! Also – click on the brochure for other information. This is a digital-only scrapbooking brochure, full of scrapbooking essentials and exciting new products. As a companion brochure to the September–December 2024 Mini Catalog, the products inside coordinate with products from the mini catalog (and some online only products, too!). With Workshop Kits and some new product releases *hint* Two-Tone Cardstock *hint*, we hope this adds variety and inspiration to your and your customers’ holiday crafts this year!

Stampin' Up! Scrapbooking Brochure

Products will be available like our Online Exclusive releases, meaning that some products will be reordered when inventory is low, and others will only be available while supplies last.

Stampin' Up! Paper Pumpkin SALE!

Santa Claus is comin’ to town a bit early this year—and he’s brought a holiday Paper Pumpkin sale! Starting September 11, 2024, at 12:01 a.m. (MT) until October 10, 2024, at 11:50 p.m. (MT), anyone who signs up for our monthly Paper Pumpkin subscription as a new subscriber will receive 40% off their first kit. That’s right, 40% OFF!

Where This Discount Is Applied
This discount will be applied to one kit in the first kit shipment of the Paper Pumpkin subscription, which means new subscribers will get 40% off the October Nests of Christmas Paper Pumpkin Kit. After that, each month’s kit will return to the regular price of $25.00.

Qualifying for This Discount
This offer is only for new month-to-month subscribers and is not valid on purchased or redeemed prepaid subscriptions.

Now that you’ve read through all the details, it’s time to head to paperpumpkin.com to subscribe and use code HOLIDAY40 to get 40% off your first month!

Stampin' Up! ONLINE EXCLUSIVES

Click the image above to see that’s available in the ONLINE EXCLUSIVES!

Use my HOST CODE so I recognize you!

host code ZBAU6PKX

Thanks for stopping by. May you have a beautiful day. Make someone happy sending them a handmade card filled with lovem a handmade card filled with love

Stampin’ Up! Peaceful Evergreen ‘Strip’ Tree

Good Saturday! What is new in your corner of the world? Now that it is just a bit cooler, hubby and I have been trimming bushes that desperately need it and doing some other yard work … consequently had to purchase some new tools as well. Interesting how tools wear out – just as we do! :O) Anyway – I’ve made a very clean and simple card for you today using the Peaceful Evergreen Dies and the Peaceful Season stamp set. As an FYI, each of these comes as a bundle for 10% savings and can be found in the Sep-Dec 2024 Mini Catalog pages 24-25.

Stampin' Up! Peaceful Evergreens card front

This is pretty much an all white card except for the DSP strips for the tree. I love this clean look, but it is a bit on the plain side. Perhaps I should have run it through an Snowflake Sky 3D embossing folder. Next time! To make this card..

  • Start with a 3 3/4 x 5 Basic White panel and die cut the largest tree using the Peaceful Evergreen Dies, centering it.
  • Using the die cut tree, lay strips across it to your liking. I used the Take A Bow 6×6 DSP in 1/2″ wide strips. Adhere to the die cut.
  • Place this tree on a 4 x 5 1/4 Basic White panel, using the cut out tree panel as a guide for placement. Adhere.
  • Add dimensionals to the cut out tree panel and place on top, centering.
  • Add to a Thick Basic White card base 8 1/2 x 5 1/2 scored at 4 1/4
  • On a 1/2 x 3 3/4 strip of Basic White, stamp the sentiment in Real Red ink using the Peaceful Seasons stamp set. Adhere with adhesive only on the ends.
  • Add embellishments of choice. Here I used the Cherry Cobbler & Pearl Adhesive-Backed Berries
  • As a final touch I added this Granny Apple Green star at the top, die cut from Festive 12×12 Glimmer Paper.
Stampin' Up! Peaceful Evergreen 'strip' tree card inside

For the inside… I created another ‘strip’ tree in a smaller size laying the strips on a Basic White panel and die cutting with the smallest of the trees in Peaceful Evergreen Dies. I adhered this to the 4 x 5 1/4 basic White panel, then stamped the sentiment from Peaceful Seasons stamp set in real Red ink. I adhered the panel to the inside of the card and done…

For the envelope, I took a 2 1/4 x 6 piece of Take A Bow DSP and adhered it to the flap and that was it.

OK – how to get the items used to make this card…

Use this link to take you to the mini catalog and view all the awesome items available.

I appreciate your business and welcome any questions regarding sales or creating or joining my team. Make sure when shopping with me, that you see my name at the top as your demonstrator. That way I can send you a Stampin’ Up! giftie and you can earn rewards – with a $50 order or more. You also receive the monthly tutorial for that particular month – September is Autumn Expressions.

There are new kits available beginning Sep 4 – check by clicking here.

Stampin' Up! Christmas Ornaments kit
Christmas Ornaments kit

Scrapbooking… This is a digital-only scrapbooking brochure, full of scrapbooking essentials and exciting new products. As a companion brochure to the September–December 2024 Mini Catalog, the products inside coordinate with products from the mini catalog (and some online only products, too!). With Workshop Kits and some new product releases *hint* Two-Tone Cardstock *hint*, we hope this adds variety and inspiration to your and your customers’ holiday crafts this year! If you are into making memories – click here to see the products available in the Stampin’ Up! Scrapbooking Brochure.

Use my HOST CODE so I recognize you!

host code ZBAU6PKX

Thanks for stopping by. May you have a beautiful day. Make someone happy sending them a handmade card filled with love

Stampin’ Up! The Sep-Dec Mini Catalog is LIVE!

WooHoo! The catalog you have been waiting for is live and purchases may begin… My card today features Season of Elegance SDSP and two bundles – the Peaceful Evergreens and Peaceful Seasons. It also uses the Cherry Cobbler & Gold 3/8″ Satin Ribbon that is part of the suite of products.

Stampin' Up! Season of Elegance SDSP card front

I began by stamping these beautiful trees in Mossy Meadow ink on a 4 x 5 1/4 panel of the Seasons of Elegance SDSP. I stamped the ‘Merry’ from the Peaceful Season stamp set in Cherry Cobbler, then the ‘Christmas’ in VersaMark and sprinkled in Gold embossing powder, then heat set it. Oh my goodness – so pleased with how this large sentiment heat embossed! The ink on the word ‘Merry’ must have still been a bit wet as it also took some of the gold embossing powder. I die cut the star from Gold Foil scrap and adhered it with a mini dimensional. I adhered this panel to Cherry Cobbler 4 1/8 x 5 3/8 then wrapped the Cherry Cobbler Satin Ribbon around it and secured it in back with Seal+. I tied a bow and adhered it with a glue dot. Both panels were added to a Basic Beige card base 4 1/4 x 11. I added Wink of Stella to various parts of all the stamped trees.

Stampin' Up! Peaceful Evergreens card inside

On the inside, I stamped this single stamp of five trees in Basic Beige, then the sentiment in Cherry Cobbler and adhered the 4 x 5 1/4 panel of Basic Beige to the inside of the card.

Stasmpin' Up! Season of Elegance card & envelope

For the envelope, I stamped the same single stamp of five trees in Basic Beige on the front and more of the Season of Elegance SDSP on the flap – this time showing off the other side of this gorgeous SDSP.

You can find these items on pages 24-25 of this new Sep-Dec Mini Catalog. And if you do not have a demonstrator or a catalog – reach out to me so we can remedy that situation. Below is an image of the cover of this catalog. Click on the image to see what’s inside!

Stampin' Up! Sep-Dec 2024 Mini Catalog

To shop the mini catalog, click on the link in the catalog photo above.

To shop the Kits Collection, click here. New kits will be posted Sep 4.

Stampin' Up! Scrapbooking

This is a digital-only scrapbooking brochure, full of scrapbooking essentials and exciting new products. As a companion brochure to the September–December 2024 Mini Catalog, the products inside coordinate with products from the mini catalog (and some online only products, too!). With Workshop Kits and some new product releases *hint* Two-Tone Cardstock *hint*, we hope this adds variety and inspiration to your and your customers’ holiday crafts this year! If you are into making memories – click the image below to view the Stampin’ Up! Scrapbooking Brochure

Stampin' Up! Scrapbooking Catalog

OK, how else may I help you? Remember that when you shop with me, there are benefits… with a $50 order, receive a SU! item valued up to $10. Use my HOST CODE so that I’m sure to get that item to you. Plus monthly tutorials are sent with a $50 order as well – for September it features the Autumn Expressions Bundle, a new bundle in the Sep-Dec Mini Catalog.

host code ZBAU6PKX

Thanks for stopping by. May you have a beautiful day. Make someone happy sending them a handmade card filled with love!