Stampin’ UP! New ONLINE EXCLUSIVES and MORE

Welcome, welcome! It’s that time of year again – changes all around us: time change, outside gbrowth change, temperature change and Stampin’ Up! changes too. Tomorrow I head to Houston for a Stampin’ Up! convention that will feature new items from the upcoming 2024-2025 Annual Catalog. There will be presentations and awards ceremonies, crafting, learning, encaging with long lost friends – you name it. So think of all the fun things we’re doing as part of the Stampin’ Up! team. Maybe even consider if that’s something you would like to do. :O)

Stampin’ Up! has some new Online Exclusive items that are available to order – just released March 5!!  You won’t find these products in any catalog, they’ll only be listed in the online store.  

Stampin' Up! ONLINE EXCLUSIVES

The Online Exclusive product releases will continue to be released throughout the year. Stampin’ Up! has changed the way they are doing things and the ONLINE EXCLUSIVES is one way of doing that.

Stampin' Up! Online Exclusives new products

Click here to see all the products in that line

Stampin’ Up! Kits Collection

Stampin' Up! Frog & Friends kit
Frog & Friends kit item # 163874 $12
Stampin' Up! Your Day to Shine kit
Your Day to Shine kit item #163875 $14

The kits Collection is all about making crafting fun, quick, easy – and being handmade too. Aren’t these frogs just adorable? This is a classic cup & ball game.

Click here to see all the kits available.

As you know, each year there is a new catalog – which means new items available and some retiring items as well – as in the IN COLORS: Starry Sky, Orchid Oasis, Parakeet Party, Sweet Sorbet and Tahitian Tide. If you need ink refills, ink pads, card stock, Stampin’ Blends in these colors I encourage you to get them now. You may purchase those in my shop here

The Jan-April 2024 Mini Catalog retires the end of April Click here and get those items before they retire

When clicking those links above, you will shopping with me :O) and I like to treat my customers generously. When placing an order that amounts to at least $50 before taxes & shipping, you have the opportunity to choose a SU! item valued up to $10 as a free gift! So use my current host code. I will also send you a monthly tutorial that has several ideas for a special Stampin’ Up! bundle when your purchase is over $50 :O) If your purchase is $150 & above, don’t use the host code as SU! has its own rewards. I’ll still be notified though and will send the free gift and the tutorial!

Thanks for joining me today. May you have a beautiful day. Make someone happy sending them a handmade card created with love.

Stampin’ Up! Simply Zinnia for Amy’s Inkin’ Krew Blog Hop Group

The theme for today is ‘celebrate spring’ and I’m using the ONLINE EXCLUSIVE Simply Zinnia bundle and the Zinnia 3D Embossing Folder.

Stampin' Up! Amy's Inkin' Krew Blog Hop Group
Stampin' Up! Simply Zinnias Birthday

This Simply Zinnia stamp set spray is just so pretty. The colors I chose for these are Pumpkin Pie, Flirty Flamingo, and Real Red with Daffodil Delight for middles and Old Olive for leaves – Stampin’ Blends of course. They almost look real. They were die cut with the coordinating Simply Zinnia Dies. The sentiment comes from Charming Sentiments and is die cut with the coordinating Sentiment Silhouettes Dies – stamped in Flirty Flamingo ink. Adhesive-Backed Shiny Sequins are the added touch of sparkly . My layers are… Flirty Flamingo card base with Lemon Lolly adhered directly to it. The top layer is the Zinnia 3D Embossing Folder in Basic White. It is just gorgeous. It’s definitely a directional embossing folder, so know which way it’s going to be on your card.

Stampin' Up! Simply Zinnia Birthday, inside card

For the inside: a layer of Lemon Lolly then the Basic White layer for writing on and a narrow strip of the Flowering Zinnias DSP along the side. It’s the little touches that make a card special.

For the envelope… Flowering Zinnias 12 x 12 DSP on the flap and trimmed to fit. And yes, that’s a Pumpkin Pie color layer. Then along the bottom front, another strip of DSP that shows a bit of zinnia.

Stampin' Up! Simply Zinnias Birthday card & envelope

The Simply Zinnia stamp set & dies, the Zinnias EF and the Adhesive-Backed Shiny Sequins are all ONLINE EXCLUSIVES and you can find them in my online shop right here. LOOK FOR MORE SHOPPING BENEFITS AFTER THE LIST OF NAMES PARTICIPATING IN TODAY’S HOP!

  1. Nel Thames
  2. Carol Buckalew
  3. Karen Finkle
  4. Tara Carpenter
  5. Karen Ksenzakovic
  6. Terry Lynn Bright
  7. Akiko Sudano
  8. Shirley Gentry
  9. Mary Deatherage
  10. Ann Louise Fodgaard
  11. Amy Koenders

The Jan-Apr 2024 Mini Catalog will be retiring then end of April and so many stunning stamp & die set, Designer Series Papers and just LOTS. Shop for those products here

The 2023-2024 Annual Catalog is about to retire as well – find all the basics, card stock die cutting machine and of course tons more stamps & die sets. Inspiration is just all over. Shop here for those items.

While you’re looking around in my store, remember there are some stunning kits available, for all ages and all seasons – even Christmas! And while you’re shopping, I offer fringe benefits to my customers: free tutorial of the month and a FREE Stampin’ Up! item valued to $10 – all for a $50 order, before shipping and taxes. Use my current host code to receive those benefits.

HOST CODE A9DDBEPZ

THANKS FOR STOPPING BY!

Stampin’ Up! Simply Zinnia Flip Front Fun Fold

Good morning – we had a team meeting yesterday by ZOOM or in person, whichever folks could do and several of us presented or demonstrated a card. This was mine…

Stampin' Up! Simply Zinnia Flip Front Fun Fold

This card uses several NEW ONLINE EXCLUSIVE items: Simply Zinnia Bundle, Flowering Zinnias 12 x 12 DSP and Adhesive-Backed Shiny Sequins. You can see three of the DSP patterns on the front of this card. They go from soft to vivid bright.

To make this card: Cut the card base (here I used Melon Mambo) 4 1/4 x 11 and score at 2 1/8 & 5 1/2. Burnish in a mountain. valley – the front folds back on itself and the other folds to the inside. On the 4 1/4 side and the end with the first score, mark the center point on the edge at 2 1/8. Cut from first score line to that center point, both from the top & the bottom, creating a point at that end. This is the flip end where the die cut flower will be placed. Cut DSP panels from the Flowering Zinnias DSP: 2 7/8 x 2 7/8 for the flip; 3 1/4 x 4 1/8 for the front left behind the flip; and 5 3/8 x 4 1/8 for the far right side (that’s the green panel in the photo). Adhere each of those to their respective places.

Using the Simply Zinnia Dies, create die cuts for the flower: Melon Mambo (2 1/4 x 2 1/4) for the backing of the flower petals; Flirty Flamingo (2 1/4 x 2) for the back petals layer; Petal Pink (2 1/4 x 2) top petals layer; scrap of Daffodil Delight for flower center and scrap of Lemon Lolly for the overlay of the floral center. Curl the petals with a bone folder then adhere together: Flirty Flamingo petals to Melon Mambo flower base with liquid glue; Petal Pink to Flirty Flamingo with dimensional; then add flower centers with liquid glue. Yay – the flower itself is complete!

With the card closed (as shown) adhere flower petal to the flip of the card, high enough and off the flip a bit so it does not go beyond the card edges. Remember only the bottom portion of the flower should be adhered to the flip! :O) Die cut the two stems (Mossy Meadow & Lemon Lime Twist adhering slightly together to create a shadow, then to the card front adhering under the flower head and just to the flip portion. Stamp the double leaf in Lemon Lime Twist ink on Lemon Lime Twist card stock and die cut with the appropriate die from Simply Zinnia Dies. Adhere to flip panel as shown. Stamp the sentiment from Simply Zinnia stamp set in Melon Mambo ink, trim edges, adhere to flip with dimensionals. Add three Adhesive-Backed Shiny Sequins and the card front is complete.

For the inside…

Stampin' Up! Simply Zinnia Flip Front Fun Fold, inside

Here you see another panel of the DSP on the inside – it is 3 1/4 x 4 1/8. Adhere it to the inside of the card base. Cut a panel of Basic White 3 1/8 x 4 and stamp with the leaf in Lemon Lime Twist ink; adhere to the inside panel as shown.

For the envelope…

Stampin' Up! Simply Zinnia Flip Front card & envelope back
Stampin' Up! Simply Zinnia Flip Front card & envelope front

Adhere more of the Flowering Zinnias DSP to the envelope flap and trim. On the envelope front, stamp the double leaf image in Lemon Lime Twist ink – and your card is ready for most any occasion.

As I mentioned earlier, supplies for this card are mostly ONLINE EXCLUSIVE items. That means you will not find them in a catalog.

Click here to see all the products in that line. This is a new product just offered as of Mar 5.

Stampin’ Up! has two catalogs right now from which to shop…

the Jan-Apr 2024 Mini Catalog which you may find here

the 23-24 Annual Catalog may be found here

When clicking those links above, you will shopping with me :O) and I like to treat my customers generously. When placing an order that amounts to at least $50 before taxes & shipping, you have the opportunity to choose a SU! item valued up to $10 as a free gift! So use my current host code. I will also send you a monthly tutorial that has several ideas for a special Stampin’ Up! bundle when your purchase is over $50 :O) If your purchase is $150 & above, don’t use the host code as SU! has its own rewards. I’ll still be notified though and will send the free gift and the tutorial!

Thanks for stopping by today. I hope you like the new ONLINE EXCLUSIVE bundle: I have made several cards with this suite of products. You may find those here, here and here. Can you tell I like this set of products? And tomorrow is another card using these products, so stay tuned!

Thanks for joining me today. May you have a beautiful day. Make someone happy sending them a handmade card created with love.

Stampin’ Up! Encircled in Nature Thank You card

Time change – how you doing with it? Today’s card uses an ONLICE EXCLUSIVE bundle called Encircled in Nature and I’m really liking it. I also pulled out some card stocks from the Annual Catalog I hadn’t used in a while: Rose Gold Specialty DSP and 23-25 In Color Luster Specialty DSP.

Stampin' Up! Encircled in Nature thank You card front

See the reflection on the card stock? Part of that is because it’s sparkly and created a reflection when the bulb flashed. The card base itself is Boho Blue cut in a standard A2 size. The Basic White layer is 4 1/8 x 5 3/8 and the Boho Blue 23-25 In Color Luster SDSP is 4 x 5 1/4. The wreath is die cut from Rose Gold SDSP and is beautiful. The die cut flowers off to the left are die cut from 23-25 In Color Luster SDSP Wild Wheat & Boho Blue and Basic White card stock. The floral spray is stamped on Basic White in Memento ink using the Encircled in Nature stamp set, then colored with Stampin’ Blends: Highland Heather, Orchid Oasis, Daffodil Delight, Granny Apple Green and Color Lifter .All the die cuts use this new and fabulous Encircled in Nature Dies. The bow is a double bow tied with Baker’s Twine three-Color Pack from the Jan-Apr 2024 Mini Catalog. The sentiment comes from the Encircled in Nature stamp set and is stamped in Orchid Oasis ink on a Basic White strip It was attached with dimensionals. I added three Iridescent Foil Gems.

Stampin' Up! Encircled in Nature Thank You card, inside

The inside of the card has more of the die cuts flowers from 23-25 In Color Luster SDSP in Wild Wheat & Boho blue + Basic White card stock. These were adhered with liquid glue. A strip of the 23-25 In Color Luster SDSP in Boho Blue was added to the bottom.

Stampin' Up! Encircled in Nature thank you card & envelope

Because the card itself looks very Victorian to me, I pulled out the Poetic Expressions DSP in Boho Blue & added it to the envelope flap. This DSP comes from the Jan-Apr 2024 Mini Catalog. I stamped the leaf image from the Encircled in Nature stamp set in Granny Apple Green ink.

I’m hoping you would like to get your hands on this bundle! It may be found in the ONLINE EXCLUSIVES of Stampin’ Up! Click here to see all the products in that line. This is a new product just offered as of Mar 5.

Stampin’ Up! has two catalogs right now from which to shop…

the Jan-Apr 2024 Mini Catalog which you may find here

the 23-24 Annual Catalog may be found here

When clicking those links above, you will shopping with me :O) and I like to treat my customers generously. When placing an order that amounts to at least $50 before taxes & shipping, you have the opportunity to choose a SU! item valued up to $10 as a free gift! So use my current host code. I will also send you a monthly tutorial that has several ideas for a special Stampin’ Up! bundle :O)

Thanks for stopping by today. I hope you like the new ONLINE EXCLUSIVE bundle:

Encircled in Nature – It’s a gem!

Stampin’ Up! Translucent Florals Fun Fold for the Happy Inkin’ Thursday Blog Hop

Welcome to another Happy Inkin’ Thursday Blog Hop! We have a color challenge today and I have chosen to work with the Delightful Floral 12×12 DSP to fulfill that challenge.

Stampin' Up! Happy Inkin' Thursday Blog Hop
Stampin' Up! Blog Hop Color Challenge
Stampin' Up! Translucent Florals Fun Fold

Isn’t this a fun card? I love the 3D effect with the flower on the front. And here’s how I created this card…

  • * The card base is Pretty Peacock cut 5 1/2 x 11 and scored @ 1 11/16, 3 3/8, 7 5/8 & 9 5/16
  • * Burnish folds: mountain, valley, valley, mountain. It will look like this from the top.
Stampin' Up! Translucent Florals Fun Fold, top view
  • * The Designer Series Paper is Delightful Floral 12×12 DSP and the front panel you see in the top view is cut 4 x 5 1/4. Additional DSP panels are 1 3/8 x 5 1/4 (cut 2). One is adhered to the front right section, the other is adhered over it after die cutting with the Everyday Details Dies. It simply creates this beautiful design for contrast, but not a bold one.
  • * The flower itself is die cut from Bubble Bath card stock and each die cut is ‘colored’ with a Blending Brush and Bubble Bath ink – to lightly shade the edges. The flower sections are die cut with the Translucent Florals Dies, and each of the petals are curled a bit to added depth and contrast, making it look almost real when adhered together. I adhered these together with liquid glue.
  • * Die cut the flower centers (2 of them & different sizes) from Lemon Lolly card stock using the Translucent Florals Dies. The two die cuts were adhered together with liquid glue and attached to the flower with a trimmed down to fit dimensional. I added this stunning Adhesive-Backed Shiny Sequin for added glam.
  • * From the Delightful Floral DSP, I die cut 3 stems using the Translucent Florals Dies – and adhered them together, creating a nice layer.
  • * Again from the Delightful Florals DSP, I die cut two leaves – with Translucent Florals Dies, and curled the leaves a bit with my bone folder.
  • * From Basic White I die cut the backdrop for the flower using the Everyday Details Dies. I attached the flower head first, then the stem and finally the leaves – all with liquid glue.
  • * I added scrap lengths of Thick Basic White card stock in about 3-4 layers on the back of the die cut, so that when adhered to the card front, the front right section would fold under it – between the die cut and the Designer Series paper. The panel was added to the card front with Seal+ as I wanted a strong hold.
  • * I wanted a sentiment and stamped it in Bubble Bath ink on a Basic White piece using the Translucent Florals stamp set. I die cut it with another die from the Everyday Details Dies. This was adhered in place with dimesnionals, leaving the right of it free to ‘hold’ the right section closed.
  • * You can see in the photo below I added more of the gorgeous Adhesive-Backed Shiny Sequins and they really show off :O)
Stampin' Up! Translucent Florals Fun Fold, closed
closed w/ right tab under large rectangular die cut

The inside… a 4 x 5 1/4 Basic White panel is stamped in Bubble Bath ink for the bud – yep, Translucent Florals stamp set, then the stem & decorative part of the flower are stamped in Pretty Peacock ink. This was adhered to the center section of the inside.

Stampin' Up! Translucent Florals Fun Fold, inside card

The envelope… More of the Delightful Floral DSP on the flap, adhered & trimmed to fit. I stamped a different flower using the Translucent Florals stamp set, this time in Fresh Freesia ink and the stamin in Pretty Peacock ink.

Stampin' Up! Translucent Florals Fun Fold card & envelope

Such a pretty card! Love the colors, the Delightful Floral DSP and the Translucent Florals Stamps & Dies. Of course, the Everyday Details Dies are extra special as well. You can find more information on how to purchase these products below.

Check out the projects my teammates have created by following the various links or clicking the ‘next’ button. Happy hopping!

Stampin' Up! Blog Hop 'next' button

Amy Koenders

Mary Deatherage

Jaimie Babarczy

Karen Finkle

Akiko Sudano

Karen Ksenzakovic

Tara Carpenter

Terry Lynn Bright

Carol Buckalew

Nel Thames

Stampin’ Up! Celebrating ONLINE EXCLUSIVES

On March 5 there are several new ONLINE EXCLUSIVE sets that will be available for purchase. As a demonstrator, we have an advantage of viewing/ purchasing/ playing with products before they become available to the general public. This Zinnia suite of products is one of them – and I’ve been having a ton of fun with them. For this project I’m making ‘mini cards. Essentially they are 6 x 3 to begin and finished is 3 x 3 ‘gift cards’. I used the Zinnia Dies and another ONLINE EXCLUSIVE, the Basic 3D Embossing Folders (set of 3, this in particular is the Cross Hatch). I also incorporated the Postage Stamp Punch, a part of the 2023-2024 Annual Catalog, on which to adhere the die cuts. And the embellishments are Petal Pink……. The sentiment is from Garden Meadow stamp set, another ONLINE EXCLUSIVE item., stamped in Petal Pink ink. The die cuts are cut from Granny Apple Green card stock & petal Pink card stock, adhered together with liquid glue.

Here you can see the inside of the 3 x 3 card… I had trimmed the stamped sentiment into segments, and fussy cut them. This is adhered directly to the inside of the 3 x 3 card. The envelope has this very sweet Petal Pink Polka dot from the Zinnia 12×12 DSP.

On the second notecard, I used the Zinnia 3D embossing Folder that is part of the bundle (stamps, dies & EF) and Basic White card stock. I stamped the sentiment in Melon Mambo ink from the Simply Zinnia stamp set and fussy cut it as well, putting dimensionals on the back and adding it to the embossed front. I had adhered the Zinnia 12×12 DSP to the 3×3 card front, wrapped a 2022-2024 In Color Twine around it and tied aknot, then added the embossed layer with dimensionals. I added three Petal Pink embellishments…. I used the same DSP for the envelope flap.

The last 3×3 card is the Zinnia 3D embossing Folder embossed on Basic White and adhered. I tied a bow from the 2022-2024 In Color Bakers Twine and adhered it with a glue dot. The sentiment was again stamped in Melon Mambo ink on Basic White and fussy cut with paper snips, adhered with dimensionals. More Adhesive-Backed Shiny Sequins were added to the front for glam. The inside of the card got the rest of the sentiment adhered with liquid glue; the envelope more of the Flowering Zinnias 12×12 DSP on the flap. And done…

Click here to view the ONLINE EXCLUSIVES (Basic 3D Embossing Folders, set of 3) Simply Zinnia Suite, Adhesive-Backed Shiny Sequins)

Click here for the 2023-2024 Annual Catalog for the card stock, inks, embellishments, paper snips, acrylic blocks for stamping, adhesives, twine and the paper trimmer

You will be shopping with me when you click that ‘here’ place – so remember, I have generous bonuses when shopping with me. Use my current HOST CODE G4G2CPRB to help me get the Stampin’ Up! giftie to you when making a qualified order of $50 or more before shipping & taxes. If your purchase is over $150, do NOT use the host code as SU! has rewards of it’s own. You STILL receive the FREE ITEM FROM ME. :O) And with that purchase of at least $50 (before shipping & taxes), you will also receive a BONUS fabulous array of “ideas of the month” with card cuts & all the information to make the designs. (The month of March features the Painted Lavender suite of products in the Jan-Apr 2024 Mini Catalog)

I hope you like todays card. I would love to hear from you. Make this day special by sending someone a handmade card filled with with love. Blessings!

Here are additional photos of cards I have created with the Simply Zinnia suite of products. Click on the photo to take you to the post of the card.

Stampin’ Up! Everyday Details Bundle In White

It’s rainy here today and should get to 51 degrees – spring IS in the air… I’m a latecomer to getting the Everyday Details bundle but I couldn’t resist the dies a moment longer. They arrived in the mail yesterday and I made this pretty card.

Stampin' Up! Everyday Detail Bundle in White

I paired the stamp set with the Basics 3D Embossing Folder and several Stampin Blends to color the stamped image. What do you think? Here’s how to replicate.

  • * Run the top half of the Thick Basic White card base through the Basic 3D Embossing folder (Crosshatch)
  • * Stamp the image from the Everyday Details stamp set on Basic White card stock in Memento ink
    • Color with Stampin Blends: Petal Pink, Flirty Flamingo, Melon Mambo, Granny Apple Green, Light Shaded Spruce and Blueberry Bushel
  • * Die cut with the largest of the rectangle dies in Everyday Details Dies. This creates two cuts… the outer one that I adhered directly to the card front and the stamped panel as well. I did have to trim edges of the outer one to the size you see.
  • * Adhere the stamped image with dimensionals inside the outer ‘frame’
  • * add Brushed Basics Butterflies for a final touch

The inside..

Stampin' Up! Garden Meadow sentiment

For the inside of the card I used a stamp from Garden Meadow stamp set in Melon Mambo ink on the Basic White panel. This was adhered to the inside of the card.

Stampin' Up! Everyday Details Bundle  card & envelope

On the envelope… run the flap through the same Basics 3D embossing folder (Crosshatch) and stamp the cute grass and flower image in Granny Apple Green ink on the front. This image is from the Garden Meadow stamp set – and the card and envelope are ready to send. This card is specifically for a woman whose hubby has some health issues and she’s struggling to keep up with all the responsibilities. I should make a dozen of these and send to various folks. It seems lots of individuals are having a hard time these days :O(

If you would to purchase these products…

Click here to see the Jan-April 2024 Mini catalog (page 28) to order Everyday Details Bundle

Click here to view the ONLINE EXCLUSIVES (Basic 3D Embossing Folders, set of 3)

Click here for the 2023-2024 Annual Catalog for the Brushed Basics Butterflies

You will be shopping with me when you click that ‘here’ place – so remember, I have generous bonuses when shopping with me. Use my current HOST CODE G4G2CPRB to help me get the Stampin’ Up! giftie to you when making a qualified order of $50 or more before shipping & taxes. If your purchase is over $150, do NOT use the host code as SU! has rewards of it’s own. You STILL receive the FREE ITEM FROM ME. :O) And with that purchase of at least $50 (before shipping & taxes), you will also receive a BONUS fabulous array of “ideas of the month” with card cuts & all the information to make the designs. (The month of March features the Painted Lavender suite of products in the Jan-Apr 2024 Mini Catalog)

I hope you like todays card. I would love to hear from you. Make this day special by sending someone a handmade card filled with with love. Blessings!

Stampin’ Up! Seasonal Branches & Flight & Airy for the Happy Inkin’ Thursday Blog Hop

We have a fun sketch challenge for our hop today and I’m choosing to again highlight the Flight & Airy DSP – because I love this DSP and because it’s a FREE Product with a qualifying order that ends at close of day MT 2/29. I paired it with Seasonal Branches Bundle from the 2023-2024 Annual Catalog that is just gorgeous and coordinates!

Stampin' Up! Happy Inkin' Thursday Blog Hop
Stampin' Up! Hop Sketch Challenge

My sentiment banner is in a different location than the sketch, but other than that – pretty darn close to the sketch. :O)

My card base is Misty Moonlight. I cut a piece of the Flight & Airy DSP to 4 x 5 1/4, layered a coordinating piece of the Flight & Airy DSP cut 2 1/4 x 5 1/8 and added that to the left side as shown. I added both of these to a Basic White 5 1/8 x 5 3/8 for a contrast & border. I die cut from another piece of Flight & Airy DSP, the two branches using the Seasonal Branches Dies and added them with tiny dabs of liquid glue. I stamped the sentiment in Misty Moonlight ink on a Basic White strip using the Seasonal Branches stamp set. To follow the sketch, I added another strip of Misty Moonlight card stock to the sentiment with liquid glue, put dimensionals on the back and added it to the card. I added Iridescent Foil Gems for accent. This completed front was added to the card base with dimensionals

Stampin' Up! Seasonal Branches sympathy, inside

For the inside… on a Basic White piece I stamped the Misty Moonlight sentiment from Seasonal Branches stamp set and adhered the panel to the inside of the card.

Stampin' Up! Seasonal Branches & Flight & Airy card & envelope

For the envelope… more of the Flight & Airy DSP adhered to the flap & trimmed to fit. On the front, I fussy cut with my paper snips the sweet bird from the Flight & Airy DSP and added it with liquid glue.

Remember this Designer Series Paper will no longer be available after end of day MT, today 2/29/ 2024! See below how to get yours with a qualifying purchase.

Now – time to see what others have created for the hop today. Click on the ‘next’ button to see the creative Carol Buckelew – or click on a name to take you elsewhere.

Stampin' Up! next blog

Amy Koenders

Mary Deatherage

Jaimie Babarczy

Karen Finkle

Akiko Sudano

Karen Ksenzakovic

Tara Carpenter

Terry Lynn Bright

Carol Buckalew

Nel Thames

With just three days before this DSP goes away, click here to see the Jan-Apr 2024 Mini Catalog and purchase the Thoughtful Expressions Bundle… then …

Click here to see the FREE Products available with a $50 purchase & get the Flight & Airy DSP when making that qualifying purchase.

Click here to view the products available with a larger purchase

So, how to get your hands on the elements to make this card.?

Click HERE to shop with me!

You will be shopping with me when you click that ‘here’ place – so remember, I have generous bonuses when shopping with me. Use my current HOST CODE G4G2CPRB to help me get the Stampin’ Up! giftie to you when making a qualified order of $50 or more before shipping & taxes. If your purchase is over $150, do NOT use the host code as SU! has rewards of it’s own. You STILL receive the FREE ITEM FROM ME. :O) And with that purchase of at least $50 (before shipping & taxes), you will also receive a BONUS fabulous array of “ideas of the month” with card cuts & all the information to make the designs.

During Sale-a-Bration (Jan – end of Feb) is the best time to JOIN as a demonstrator – as there are all kinds of benefits. Nothing brings people together quite like creativity. As an independent demonstrator, you can share what you love and expand your circle of friends to build a close-knit, collaborative community of crafters. You’ll meet, connect, learn from, and create with other demonstrators from all around the world through virtual events, in-person conventions, support groups, and social media. And don’t forget the importance of hosting your own crafting parties! You can host events with your favorite people and show off your favorite Stampin’ Up! projects.Let’s discover the joy of being a demonstrator together!

Stampin' Up! Joining Promotion

Join by end of day MT, 29 February 2024 – that TODAY – and choose between two fabulous offers:

Option 1: Get $125 worth of product PLUS our new Stampin’ Glass Mat Studio (a $60 value) for just $99!

Option 2: Get $125 worth of product PLUS an additional $30 worth of product of your choice when you join for $99. That’s a $155 value!

Click here to JOIN MY TEAM

The Jan- April 2024 Mini Catalog is good through the end of April. Click HERE to see those products.

Thanks for stopping by. May you have a beautiful day!

Make someone happy by sending them a handmade card made with love.

Stampin’ Up! Flight & Airy Triple Panel Fold

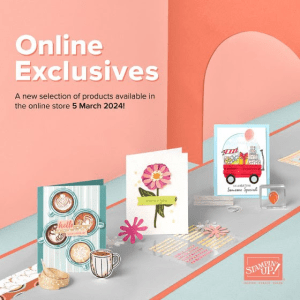
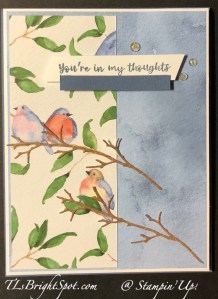
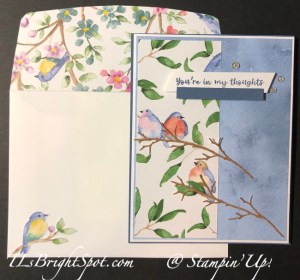
Three more days to get this FREE Flight & Airy Designer Series Paper! With a qualifying purchase of $50 (before shipping & taxes, this designer series paper can be yours. This is such a sweet paper – let me share the card for today, which really shows off one of the designs.

Stampin' Up! Flight & Airy Triple Panel Fold

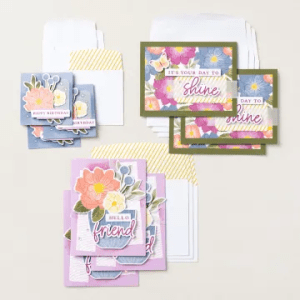
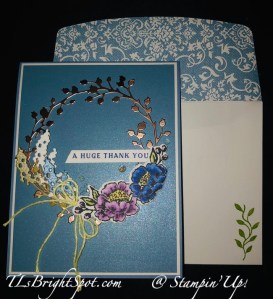
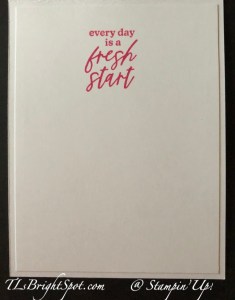
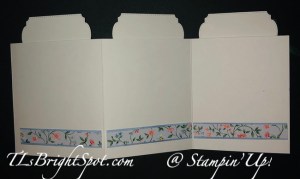
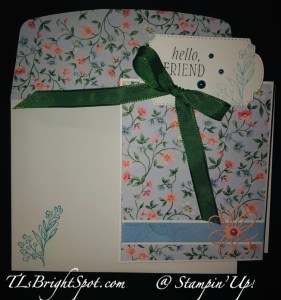
When closed the panels are directly on top of one another, and then it opens and you see this display of beauty. This is a birthday card, as you see in the middle panel, but it could be for anything, depending on what you used for sentiments. Let’s make this…

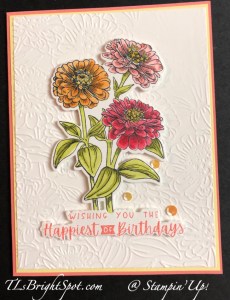
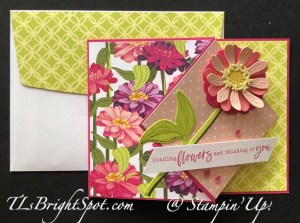
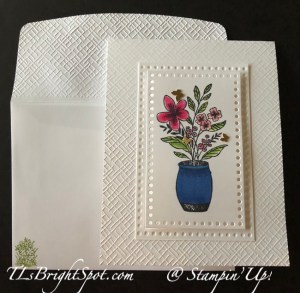
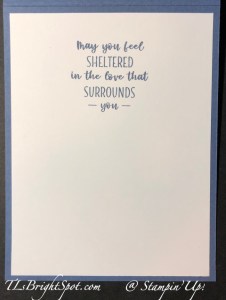
I used Thick Basic White for the card base 4 1/4 x 10. 3/4 scored at 3 1/2 & 7. I then cut the Flight & Airy DSP sequentially, so the pattern flows across each panel – 4 1/8 x 3 3/8 (cut 3). Adhere to each panel. Cut three Basic White strips 5/8 x 3 3/8 and three more coordinating DSP strips 1/2 x 3 3/8 and adhere those about 1/2″ up from bottom. Now die cut three panels for stamping the top – I used Thoughtful Expressions Dies, stamping each one with Balmy Blue ink for the floral design. I used the Inked & Tiled stamp set for the sentiments and they are stamped in Memento Black ink. The first sentiment piece was adhered, then the last panel sentiment, by closing the card so when closed they are in the same location. Lastly, I did the center sentiment panel. Then time to decorate & embellish :O)

  • * For the first panel this sweet die cut flower from Petal Pink card stock using the Thoughtful Expressions Dies. I embellished the center of it with a Blooming Pearl in Petal Pink
  • * The center panel is a bit more elaborate – this beautiful floral spray was stamped in Memento Black ink using another stamp in Thoughtful Expressions stamp set, then colored with Stampin’ Blends: Petal Pink & Flirty Flamingo for the petals, Lemon Lolly for the center of the flower, Shaded Spruce for the leaves. I die cut this with the coordinating Thoughtful Expressions Dies and adhered it in place.
  • * The last panel is a simple die cut leaf in Garden Green using a die from the Thoughtful Expressions Dies.
  • * Finally, I added a Garden Green bow adhering it in place with a glue dot and three more Blooming Pearls, this time in Pretty Peacock

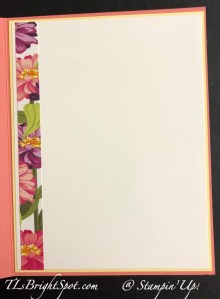
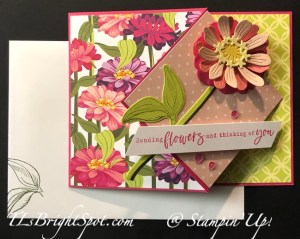
Now lets, turn the card over, as that’s where you will write your message.

Stampin' Up! Flight & Airy Triple Panel card back

Again I cut strips of Flight & Airy DSP to decorate the back – a Balmy Blue pattern 5/8 x 3 3/8 (cut 3) and the floral pattern as used on the card front, 1/2 x 3 3/8 (cut 3) – adhering them together, then to the card back about 1/2″ from bottom.

Stampin' Up! Flight & Airy Triple Panel Fold card & envelope

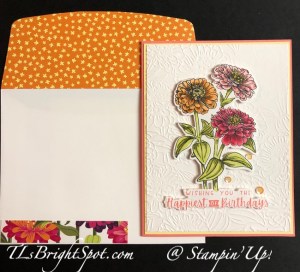
For the envelope… more of the same pattern Flight & Airy DSP on the flap trimmed to fit. On the envelope front, this sweet floral stamp from Thoughtful Expressions stamp set in Balmy Blue ink. Such a fun and easy card and so cheerful & sweet. I would love to see what YOU do with this fun fold.

With just three days before this DSP goes away, click here to see the Jan-Apr 2024 Mini Catalog and purchase the Thoughtful Expressions Bundle.

Click here to see the FREE Products available with a $50 purchase & get the Flight & Airy DSP when making that qualifying purchase.

Click here to view the products available with a larger purchase

So, how to get your hands on the elements to make this card.?

Click HERE to shop with me!

You will be shopping with me when you click that ‘here’ place – so remember, I have generous bonuses when shopping with me. Use my current HOST CODE G4G2CPRB to help me get the Stampin’ Up! giftie to you when making a qualified order of $50 or more before shipping & taxes. If your purchase is over $150, do NOT use the host code as SU! has rewards of it’s own. You STILL receive the FREE ITEM FROM ME. :O) And with that purchase of at least $50 (before shipping & taxes), you will also receive a BONUS fabulous array of “ideas of the month” with card cuts & all the information to make the designs.

During Sale-a-Bration (Jan – end of Feb) is the best time to JOIN as a demonstrator – as there are all kinds of benefits. Nothing brings people together quite like creativity. As an independent demonstrator, you can share what you love and expand your circle of friends to build a close-knit, collaborative community of crafters. You’ll meet, connect, learn from, and create with other demonstrators from all around the world through virtual events, in-person conventions, support groups, and social media. And don’t forget the importance of hosting your own crafting parties! You can host events with your favorite people and show off your favorite Stampin’ Up! projects.Let’s discover the joy of being a demonstrator together!

Stampin' Up! Joining Promotion

Join by 29 February 2024 and choose between two fabulous offers:

Option 1: Get $125 worth of product PLUS our new Stampin’ Glass Mat Studio (a $60 value) for just $99!

Option 2: Get $125 worth of product PLUS an additional $30 worth of product of your choice when you join for $99. That’s a $155 value!

Click here to JOIN MY TEAM

The Jan- April 2024 Mini Catalog is good through the end of April. Click HERE to see those products.

Thanks for stopping by. May you have a beautiful day!

Make someone happy by sending them a handmade card made with love.

Stampin’ Up! Inspirational Thoughts Just a Note

I absolutely love the images in the Inspirational Thoughts stamp set! But my favorite is the daisy bunch. I stamped it in Pebbled Path ink on a Basic White piece cut 4 3/4 x 3 1/2. I colored it with Stampin’ Blends Lemon Lolly, just on the flower centers. It doesn’t show but I also added Wink of Stella in those same spots. I ran this through the Softly Sophisticated embossing folder (a FREE item with a qualifying order through Feb 29.). I then added a slightly larger piece of Lemon Lolly card stock to it and wrapped a length of Lemon Lolly Sheer Ribbon around both and tied a knot, holding it in place with a glue dot. I stamped the sentiment from the Inked & Tiled stamp set, again in Pebbled Path ink. I die cut the sentiment with the Something Fancy Dies, put dimensionals on the back and attached it over the ribbon. This entire piece was added to a Thick Basic White card base 4 1/4 x 11 scored at 5 1/2. I added three Adhesive-Backed Solid Gems in Lemon Lolly for more charm.

Stampin' Up! Inspirational Thoughts card front

For the envelope I again used the Softly Sophisticated embossing folder to add pattern to the flap. On the front of the envelope, I stamped this ‘chicken scratch’ image, just for decoration :O)

Stampin' Up! Inspirational Thoughts card & envelope

What do you think? My inclination is to make several cards with the daisy bunch, but maybe changing out the colors, maybe color the flower petals in a pink & add a pink ribbon & embellishments. Anyway, this would make a fun gift with a set of five of these. Of course there are other images in this stamp set that could also be used. This image is just my favorite. You may see more of these in the future :O)

So, how to get your hands on the elements to make this card.?

Click HERE to shop with me!

You will be shopping with me when you click that ‘here’ place – so remember, I have generous bonuses when shopping with me. Use my current HOST CODE G4G2CPRB to help me get the Stampin’ Up! giftie to you when making a qualified order of $50 or more before shipping & taxes. If your purchase is over $150, do NOT use the host code as SU! has rewards of it’s own. You STILL receive the FREE ITEM FROM ME. :O) And with that purchase of at least $50 (before shipping & taxes), you will also receive a BONUS fabulous array of “ideas of the month” with card cuts & all the information to make the designs.

Only a couple more days to get your hands on FREE product during the Jan- Feb Sale-a-bration – like the gorgeous Softly Sophisticated embossing folder.

Those FREE PRODUCTS in the Sale-a-Bration Catalog will no longer be available come March 1, so don’t wait to make those purchases.

Click HERE to see those FREE Items when making a $50 purchase

Click HERE to see those FREE items when making a $100 purchase

During Sale-a-Bration (Jan – end of Feb) is the best time to JOIN as a demonstrator – as there are all kinds of benefits. Nothing brings people together quite like creativity. As an independent demonstrator, you can share what you love and expand your circle of friends to build a close-knit, collaborative community of crafters. You’ll meet, connect, learn from, and create with other demonstrators from all around the world through virtual events, in-person conventions, support groups, and social media. And don’t forget the importance of hosting your own crafting parties! You can host events with your favorite people and show off your favorite Stampin’ Up! projects.Let’s discover the joy of being a demonstrator together!

Stampin' Up! Joining Promotion

Join by 29 February 2024 and choose between two fabulous offers:

Option 1: Get $125 worth of product PLUS our new Stampin’ Glass Mat Studio (a $60 value) for just $99!

Option 2: Get $125 worth of product PLUS an additional $30 worth of product of your choice when you join for $99. That’s a $155 value!

Click here to JOIN MY TEAM

The Jan- April 2024 Mini Catalog is good through the end of April. Click HERE to see those products.

Thanks for stopping by. May you have a beautiful day!

Make someone happy by sending them a handmade card made with love.