Stampin’ Up! Forever Blossoms Anniversary Card Fun Fold

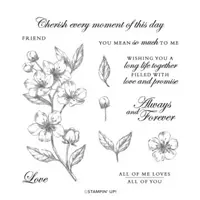
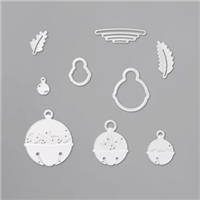
December seems to be a month of anniversaries – our #2 daughter was married on the 27th several years ago, so my mind turned to making one. On my desk for some time has been the Forever Blossoms floral bunch, ready for me to color and I began working on it. I had stamped the bunch in Tuxedo Black Memento ink, so knew I could color with the Stampin Blends. Let’s take a look…

Forever Blossoms Fun Fold – #1

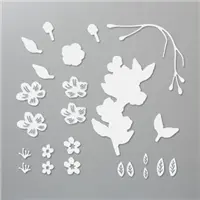
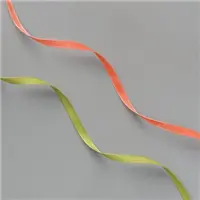
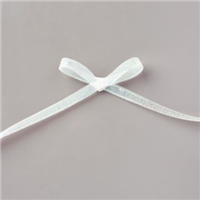
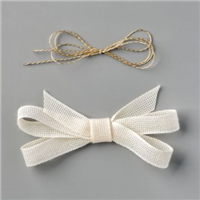
It’s the wrong time of year for cherry blossoms, but aren’t they pretty? On that gray background they really stand out. I used Calypso Coral Stampin Blends for the flowers and Old Olive Stampin Blends for the leaves. This was stamped on Thick Whisper White and it tends to dry the ink faster than the regular Whisper White, so I did just a portion of the flower at a time and used a lighter touch at the same time.Once colored, die cut with the Cherry Blossoms Dies. I tied a double Linen Thread bow, adhered it to the bottoms of the floral bunch with a glue dot, put dimensionals on the back of the floral bunch and set it aside to prepare the papers.

  • Thick Whisper White card base 8 1/2 x 5 1/2, scored at 4 1/4 & 6 1/2. Note this second score line is folded back, creating a z-fold.
  • Calypso Coral 1 7/8 x 5 3/8 (front panel), 2 1/8 x 5 3/8 (inside panel), and 4 1/8 x 5 3/8. Adhere with liquid glue to the appropriate panel
  • Peony Garden DSP for the front panel 1 3/4 x 5 1/4 + 2 1/4 x is 6 for the envelope flap. Adhere with liquid glue to the front panel.
  • Whisper White 1 3/4 x 5 1/4 (inside panel), 4 x 5 1/4 for the far right panel + enough for the cherry blossom bunch, the single flower, the cherry bud and the sentiment (about 2 1/2 x 6 should do all that).
    Adhere the small panel to the appropriate place.
  • On the larger Whisper White panel, stamp the leaves at the top right and bottom right in Old Olive ink. These will be embellished later with the die cut bud and die cut flower
  • Stamp the single flower from the Forever Blossoms stamp set using Tuxedo Black Memento ink and color with Stampin Blends – Calypso Coral. Put a dimensional on the back and adhere to the lower leaves.
  • Stamp the flower bud from the Forever Blossoms stamp set in Old Olive ink and color carefully with Stampin Blends – Calypso Coral. Die cut this and adhere to the upper leaves with liquid glue.
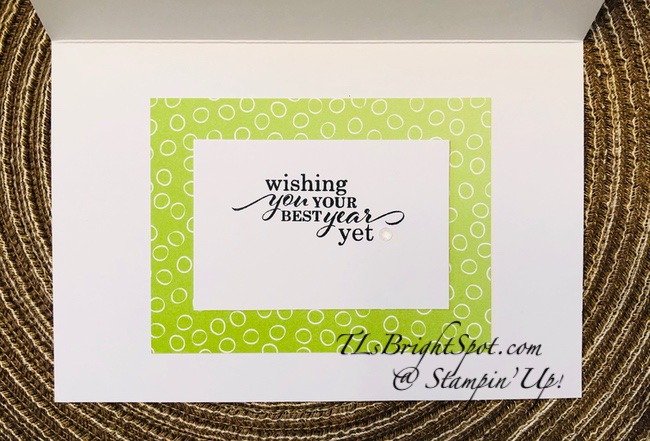
  • Stamp the sentiment from Forever Blossoms stamp set in Tuxedo Black Memento ink between the two flowers.
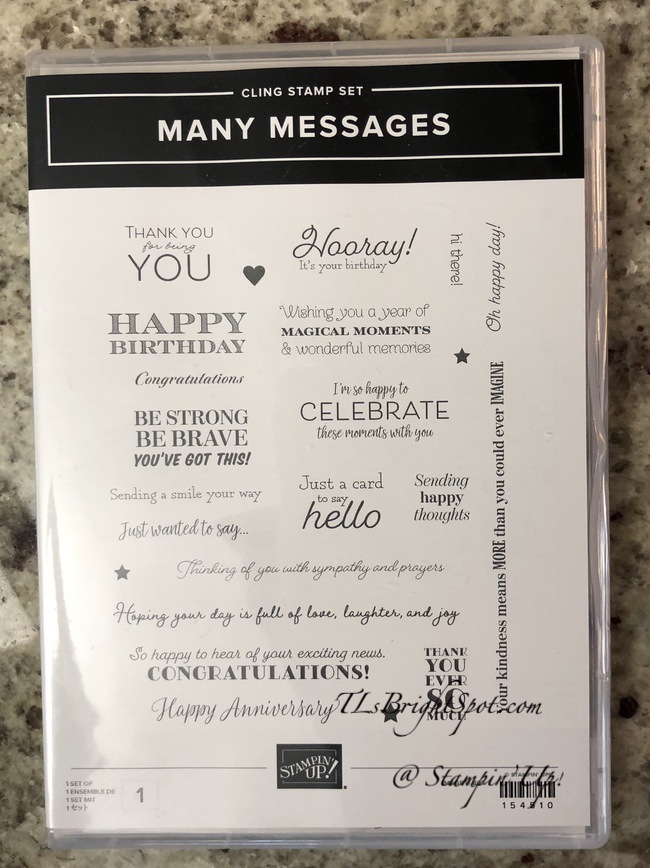
  • Back to the front panel… Stamp the sentiment in Tuxedo Black Memento ink & die cut. This sentiment/ die cut comes from the new stamp set Many Messages & Messages Dies (available to customer Jan 5, 2021), but you could easily use something else.

Add the cherry blossom bunch on dimensionals to that small front panel, then the die cut sentiment and the card itself is complete!

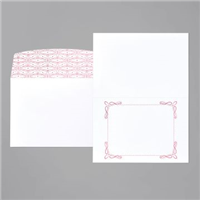
For the envelope, adhere the 2 1/4 x 6 Peony Garden DSP to the flap with liquid glue and trim to fit. On the envelope front, stamp just a portion of the cherry blossom with Tuxedo Black Memento ink. I chose not to color this as the simplicity of the flower ‘speaks’ for itself – in other words, is enough.

Forever Blossoms Fun Fold – #4

What do you think? Do you like this? Products to make this card may be found below.

As a thank you to my customers, when the order is between $50-$150 I offer a SU! item of your choice valued at $10. Remember to use MY CURRENT HOST CODE SVFB9YJY – good until Dec 3, 2020 (that’s today!). When the order is over $150, you still receive that free gift from me, but SU! has Stampin’ Rewards that may be used for additional products 😁

Thanks for stopping by.

May you have a beautiful day.

Make someone happy sending them a handmade card filled with love.

Stampin’ Up! Garden Wishes & Dragonfly Garden

I started working with the new Dragonfly Punch and was having way too much fun… mixed in Garden wishes stamp set and some Dandy Garden Memories & More cards plus a bit of Dandy Garden 6×6 DSP.

Here are two cards to add to my sympathy stash…

The Garden Wishes card is created with a Calypso Coral card base 8 1/2 x 5 1/2, scored at 4 1/4. The next layer is Dandy Garden 6×6 DSP 2 1/8 x 5 1/4 with Whisper White card stock on top 1 7/8 x 5 1/4 ~ both adhered with liquid glue. My next step was to cut a panel of Whisper White 2 5/8 x 4 and stamp it in Smokey Slate ink with the Garden wishes stamp set. I adhered this to a Calypso Coral piece 2 3/4 x 4 1/8 and attached dimensionals to it and popped it in the center of the card. For the sentiment I pulled out my Dandy Garden Memories & More Card Pack and peeled a sticky sentiment and just added it to the small panel. I really like that burst of color on the card – not too overwhelming, but adds something to it. Next I had already punched a dragonfly from the Dandy Garden 6×6 DSP, covered it in Wink of Stella for some galm, put a couple of dimensionals on it and on it went. The bow is from the Ornate Garden Ribbon Combo (Terracotta Tile) and goes perfectly. Card front complete!

For the inside I stamped the sentiment in Smokey Slate ink from Woven Heirlooms stamp set on a panel of Whisper White 3 1/4 x 5. I added a smaller panel at the bottom to create something different – 1/2 x 5. I had a piece of the DSP left from the front of the card so added it with liquid glue.

The envelope flap got a strip of the same Dandy Garden 6×6 DSP plus a strip of Calypso Coral to finish. The front was stamped in Smokey Slate ink with the Garden Wishes stamp set.

Card #2 is the Dragonfly Garden bundle – and of course more…

Dragonfly Garden Bundle – #5

The card base is Thick Whisper White 8 1/2 x 5 1/2, scored at 4 1/4. The next layer is regular Whisper White 4 x 5 1/4 run through new Painted Texture Embossing Folder and adhered with liquid glue. I stamped the floral bunch in Tuxedo Black Memento ink so I could color it with Stampin Blends. It was stamped on a piece of the Dandy Garden 6×6 DSP 1 3/4 x 4 3/4. The Stampin Blends used were: Daffodil Delight, Old Olive, Highland Heather, Bronze and a bit of the Color Lifter. I adhered this to a panel of Bumblebee card stock just a bit larger 1 7/8 x 4 7/8. I cut yet another piece of Whisper White 2 1/4 x 5 1/4, ran it through the Tasteful Texture Embossing Folder, adhered it with liquid glue to the card front, then added the Bumblebee/ stamped panel with dimensionals. A dragonfly punched from a piece of the Dandy Garden 6×6 DSP was covered in Wink of Stella and added to the panel with more dimensionals. A smaller dragonfly was also added to the panel – on dimensionals. Finally I added the sentiment panel created days ago with the Many Messages stamp set & coordinating die – liquid glue on the right, directly on the panel and a mini dimensional or two on the left side. For a final touch I added one of the Ladybug Trinkets with a glue dot and the front was complete.

For the inside I stamped the small ‘squadron’ of dragonflies in Tuxedo Black Memento ink on a 4 x 5 1/4 Whisper White card stock and colored with the Highland Heather Stampin Blends. I then stamped the sentiment from the Dragonfly Garden stamp set in the same ink. I adhered this to the inside of the card with liquid glue and the card was complete. For the envelope, I covered the flap with the same Dandy Garden 6×6 DSP as card #1 and stamped the ‘squadron’ of dragonflies on top of it. Love Black Memento ink then stamped the wings with Bumblebee ink, from the same stamp set. And yes, I covered the wings with Wink of Stella.

These are my two cards for the day. I had such fun working with these new supplies and can’t wait until you can have them in your stash. Jan 5, 2021 is the order date for customers – so put it on your calendar.

As a thank you to my customers, when the order is between $50-$150 I offer a SU! item of your choice valued at $10. Remember to use MY CURRENT HOST CODE SVFB9YJY – good until Dec 3, 2020. When the order is over $150, you still receive that free gift from me, but SU! has Stampin’ Rewards that may be used for additional products 😁

Thanks for stopping by.

May you have a beautiful day.

Make someone happy sending them a handmade card filled with love.

Stampin’ Up Dragonfly Garden

Hello folks… yesterday was a rainy day, a perfect opportunity to create indoors – and I did just that. I used the Dragonfly Garden stamp set with coordinating Dragonfly Punch and the such fun to use, Blending Brushes.

Dragonfly Garden Bundle – #1

Don’t you appreciate the softness of this card? The background is a Whisper White panel 4 x 5 1/4 colored with So Saffron ink and the NEW Blending Brushes. I basically covered the entire panel but made it a bit darker in the middle area – to highlight the dragonfly and the lovely floral bunch which I added next. The floral bunch comes from the Dragonfly Garden stamp set and was stamped in Misty Moonlight ink. The dragonfly was punched with the new Dragonfly punch, from one of the papers in the Dandy Garden 6×6 DSP pack. I added Wink of Stella to the entire dragonfly for a bit of sparkle, put dimensionals on the back and adhered it to the card front.

oops – upside down… Dragonfly Garden Bundle

The sentiment comes from the new Many Messages stamp set & coordinating Messages Dies. A couple of days I stamped this full sheet of sentiments in Tuxedo Black Memento ink and die cut them with the full sheet die. It’s really handy to have these all ready! This sentiment was also put on dimensionals and adhered to the card front.

I added three 2020-2022 In Color Enamel Dots and the card front panel was complete. Put dimensionals on the panel and adhere to the Thick Whisper White card base (8 1/2 x 5 1/2 scored at 4 1/4.

Dragonfly Garden Bundle – #1

For the inside I again used the wonderful Blending Brushed to create an oval coloring with So Saffron ink. I then stamped the sentiment in Misty Moonlight ink using the Woven Heirlooms stamp set.

Dragonfly Garden Bundle – inside – #2

For the envelope I used the Blending Brushes and So Saffron Ink to go around the entire envelope, including the flap. I then stasmped a portion of the floral bunch from Dragonfly garden stamp set in Misty Moonlight ink and the envelope & card were done!

Each of these items will be available to you as a customer Jan 5, 2021. The 2020-2021 Enamel Dots are available now as are the inks and papers and Woven Heirlooms stamp set. I will have those products listed below for your convenience.

As a thank you to my customers, when the order is between $50-$150 I offer a SU! item of your choice valued at $10. Remember to use MY CURRENT HOST CODE SVFB9YJY – good until Dec 3, 2020. When the order is over $150, you still receive that free gift from me, but SU! has Stampin’ Rewards that may be used for additional products 😁

Thanks for stopping by.

May you have a beautiful day.

Make someone happy sending them a handmade card filled with love.

Stampin’ Up! Art Gallery & More

Hello Everyone… Today’s card with made with the fabulous NEW Art Gallery stamp set , the Fine Art Gallery Floral DSP, & the incredible Golden Garden Designer Specialty Acetate. Of course I used other new products as well… 😏

Art Gallery & More – #1

Can you tell the other new products in this photo? The obvious are the Fine Art Floral DSP and the Golden Garden Designer Specialty Acetate layers. The background is made with the super cool Painted Texture 3D embossing folder. The Whisper White panel was colored with Petal Pink ink using the fabulous NEW Blending Brushes. The ribbon is the gold toned Fine Art Ribbon – love.

I used the Many Messages stamp set & coordinating Messages Die (yep – it’s all in one!) to create the sentiment on the card front. I inked the entire stamp with Tuxedo Black Memento ink & die cut all these incredible messages. :O)

For the inside of the card & the envelope…

Here i used the NEW Art Gallery stamp set – a two-step set ands it’s w-o-n-d-e-r-f-u-l… I used Flirty Flamingo ink then the ‘filler’ stamp with Poppy Parade ink. I colored the Pearl Basic Jewels with Poppy Parade Stampin Blends.

Art Gallery & More – #8

A final photo of the card…

Art Gallery & More

All NEW products will be available for customers Jan 5 in the 2021 Jan-Jun Mini Catalog. Join my team and be able to order new products Dec 1!!!

Thanks for stopping by.

May you have a beautiful day.

Make someone happy by sending them a handmade card filled with love.

Stampin’ Up! Woven Heirlooms Sympathy Part 2

Hello again! How are you after all the Black Friday hullabaloo? Do you feel good about your purchases? As for me… a tiny bit of online shopping, but nothing else. And the turkey… it is boned and ready for an awesome soup – yay…I will chop & cook the veggies this morning so we can have it for lunch. My mouth is watering already… Is this a card blog? Oh yes… must get back on track 😜…

I liked the result of the Woven Heirlooms card yesterday, that I made two more ~ similar. I’m calling this Part 2.

Just as a comparison, here is yesterday’s card.

Woven Heirlooms Sympathy

The Misty Moonlight card above could easily be sent to a man: the others, well, not so much.

Deets for Misty Moonlight card:

  • Misty Moonlight card stock 8 1/2 x 5 1/2, scored at 4 1/4: remove 1/2″ from front
  • Run a panel of Misty Moonlight ( through the Tasteful Textile Embossing folder; adhere to the card front with liquid glue
  • Die cut a panel of Misty Moonlight card stock with the Ornate Layers Dies
  • Stamp the sentiment from Woven Heirlooms stamp set, on a Whisper White card stock (2 3/16 x 3 9/16) in Misty Moonlight ink. Adhere to the die cut with liquid glue. Attach to the card front with dimensionals as shown.
  • Adhere a strip of the 2020-2022 In Color 6×6 DSP in Misty Moonlight (1/2 x 3 3/4) with liquid glue
  • Add Pearl Basic Jewels & a bow tied with the Flowers For Every Season Misty Moonlight/ Silver baker’s twine. The bow is adhered weith a rolled up glue dot.

For the inside of the card, I stamped the sentiment from Woven Heirlooms stamp set in Misty Moonlight ink on a panel of Whisper White 3 3/8 x 4 3/4. This was adhered to the card inside with liquid glue.

For the envelope I used the same 2020-2022 In Color 6×6 DSP (2 1/4 x 6), adhered it to the flap & trimmed to fit. I then stamped a fun design in Misty Moonlight ink on the envelope front. This came from Woven Heirlooms stamp set.

The next card uses Purple Posy for the card base but is less fussy and is done on a regular card base, no trimming from the front.

Woven Heirlooms Sympathy Part 2 – Purple Posy
  • Purple Posy card base 8 1/2 x 5 1/2 scored at 4 1/4
  • Panel of Purple Posy (4 x 5 1/4) run through the Tasteful Textile embossing folder and adhered with liquid glue to the card front.
  • Die cut a Purple Posy panel (3 1/2 x 5)using the Ornate Layers Dies and reserve the outline.
  • Cut a panel of Feels Like Frost 6×6 DSP (2 3/16 x 3 9/16) and adhere to the die cut with liquid glue. Put the die cut on dimensionals and adhere to the center of the card.
  • Cut a strip of Whisper White 1 x 4, stamp the sentiment in Highland Heather ink using Woven heirlooms stamp set. Trim ends using the Lovely Labels Pick a Punch. Adhere to the card front with dimensionals.
  • Add Playing with Patterns Resin Dots

For the inside of the card, stamp the sentiment from Woven Heirlooms stamp set in Highland Heather ink on a Whisper White panel 3 1/4 x 4 3/4. Adhere to the inside of the card with liquid glue. Using the die cut ‘frame’ of the Ornate Layers Die cut from the card front, adhere over the Whisper White panel. Just lovely…

For the envelope, I was running out of the Feels Like Frost 6×6 DSP, so I added a strip of Purple Posy card stock, then the remaining amount of DSP. Stamp the fun design from Woven Heirlooms stamp set on the envelope front in Highland Heather ink.

These turned out beautifully; I think, and different enough I didn’t feel as though I was mass producing. I love the ‘frame’ around the sentiment on the purple Posy card. It really adds aa nice touch.

If you have questions about today’s post ~ or a previous post for that matter, please do not hesitate to post a note here or send to my email: tlsbrightspot.com. Products for today’s card may be found below.

As a thank you to my customers, when the order is between $50-$150 I offer a SU! item of your choice valued at $10. Remember to use MY CURRENT HOST CODE SVFB9YJY – good until Dec 3, 2020. When the order is over $150, you still receive that free gift from me, but SU! has Stampin’ Rewards that may be used for additional products 😁

Thanks for stopping by

May you have a beautiful day.

Make someone happy by sending them a handmade card filled with love.

Stampin’ Up! Woven Heirlooms Sympathy

Hello there! Happy POST Thanksgiving or Black Friday shopping? What are you doing today? Are you recuperating from over-eating? Are you shopping ’til you drop? Whatever it is, be safe, ok!!!

Yesterday I was talking with our daughter and she said she needed several sympathy cards. I try to keep her supplied – ya know? She’s one of my ‘backbones’ and it’s a small way of saying thanks. :O)

Woven Heirlooms Sympathy #1

When hubby saw this, he said ‘oh, very Victorian. I like it.’ I guess the soft Petal Pink, that gorgeous die cut AND the bow make it seem so. Here are the deets:

  • Thick Whisper White 8 1/2 x 5 1/2 scored at 4 1/4. Remove 1″ from the front.
  • Whisper White panel 3 3/8 x 5 1/4 run through the Subtle 3D Embossing Folder and adhered with liquid glue to the card front.
  • Whisper White panel for the die cut using Ornate Layers Dies. This is just a stunning die cut.
  • New Fine Art Floral DSP (available to customers Jan 5 in the 2021 Jan – Jun Mini Catalog) cut 2 1/4 x 3 5/8. Adhere either with liquid glue or Stampin Seal to the Whisper White Ornate Layer die cut.
  • Put dimensionals on the die cut panel and adhere to the card front as shown – with the die cut OVER the open edge of the cut off card front. This really makes it sow off!
  • Cut a panel of Whisper white 1 x 3 1/2 and stamp the sentiment in Petal Pink ink using the Woven Heirlooms stamp set. Add dimensionals to the back and adhere to the card front.
  • Tie a sweet bow with the Organdy Striped Ribbon (in Petal Pink) and adhere with a glue dot. Fini!
Woven Heirlooms Sympathy, inside – #2
  • On a Whisper White Panel cut 4 x 5 1/4, stamp the Woven Heirlooms sentiment in Petal Pink.
  • Adhere to the inside of the card with liquid glue or Stampin Seal. Voila!
Woven Heirlooms Sympathy – #3
  • Cover the envelope flap with a strip of the same Fine Art Floral DSP (2 1/4 x 6) and trim to fit. Adhere with liquid glue.
  • Stamp a fun design using the Woven Heirlooms stamp set and Petal Pink ink on the front of the envelope.

I took my inspiration for this card on the very first page of the 2020-2021 Annual Catalog and adapted it for my purposes. Thanks Stampin’ Up!

If you have questions about today’s post ~ or a previous post for that matter, please do not hesitate to post a note here or send to my email: tlsbrightspot.com. Products for today’s card may be found below.

As a thank you to my customers, when the order is between $50-$150 I offer a SU! item of your choice valued at $10. Remember to use MY CURRENT HOST CODE SVFB9YJY – good until Dec 3, 2020. When the order is over $150, you still receive that free gift from me, but SU! has Stampin’ Rewards that may be used for additional products 😁

Thanks for stopping by.

May you have a beautiful day.

Make someone happy by sending them a handmade card filled with love.

Stampin’ Up! New Year’s Card

Wow! Can you believe this is a New Year’s card? It’s not even Thanksgiving yet… but it was asked for, so there it is… Let’s get to it.

New Year Card – #1

This card uses lots of ‘schtuff’ to make it… Foam Adhesive Sheets, Adhesive Sheets, Red Foil Sheets, and more! It starts with the base being a Wonder of The Season Memories & More Cards & Envelopes pack. To that I adhered with Stampin Seal a panel of Red Foil Sheet cut 4 x 3. More steps:

  • Cut one of the cards apart, using the inside of the card to cut panels 2 x 3. It will make at least four panels. I did this as sometimes the whites don’t exactly match and of course it will if it’s cut from the same source!
  • Using the Playful Alphabet Dies, die cut the word Happy from Black Glitter Paper that has been backed with Foam Adhesive Sheet. Mine was 1″ x 3 1/4″.
  • Die cut the fun banner using Happy Dies and Artistry Blooms DSP that has Adhesive Sheet adhered to it. (This is a different adhesive than the Foam Adhesive Sheet ~ this will lay flat on the paper and not be raised.)
  • Die cut the balloon tail from the same Artistry Blooms DSP with Adhesive Sheet adhered to it ~ again using Happy Dies.
  • Die cut the ballon using the same Happy Dies ~ this time using Oh So Ombre 6×6 DSP (new in the Sale-A-Bration catalog). This also has Foam Adhesive Sheet added to it.
  • Die cut the super – uber cute bow from Green Foil Sheet and the Happy Dies.
  • Stamp the sentiment in Granny Apple Green ink on a scrap of the Artistry Blooms DSP and cut with the Classic Label Punch. I separated mine, but you wouldn’t have to. The sentiment comes from the A Wish for Everything stamp set.

Now all the little pieces are cut out ~ let put it together…

  • Cut a panel of Red Foil Sheet 4 x 3 and adhere to the card front of the Wonders of The Season Memories & More card.
  • Remove the backing on the Black Glitter Paper die cut letters and adhere across the center of the 2 x 3 card panel previously cut.
  • Remove the backing on the green banner and adhere at the top of the 2 x 3 card panel.
  • Adhere the white card panel to the Red Foil Sheet panel using Stampin’ Seal.
  • Remove the backing on the balloon tail and adhere to the card front.
  • Remove the backing on the balloon and adhere to the ‘tail’. Cover the balloon with Wink of Stella.
  • Add the super- uber cute Green Foil bows with just a dot of liquid glue.
  • Adhere the sentiment ‘New Year’s Day’ with dimensionals ~ and your card front is done!

For the inside…

New Year Card inside – #2
  • Stamp the sentiment in Memento Tuxedo Black ink on one of the 2 x 3 white panels previously cut. The sentiment comes from Best Year stamp set. I used this as it fits the card and I really like how the scrolly words coordinate with the scrolls on the card front. 👍 I added a single Elegant Faceted Gem for more sparkle.
  • Adhere the white panel to Oh So Ombre 6×6 DSP panel cut 4 x 3 ~ then adhere this to the inside of the card. VOILA!

New Year Card – #3

Fun card, right?! Products for this card may be found below. If you have any questions, please feel free to ask, either here on my post or send to my email at TLsBrightSpot@gmail.com.

As a thank you to my customers, when the order is between $50-$150 I offer a SU! item of your choice valued at $10. Remember to use MY CURRENT HOST CODE SVFB9YJY – good until Dec 3, 2020. When the order is over $150, you still receive that free gift from me, but SU! has Stampin’ Rewards that may be used for additional products 😁

REMEMBER… due to some glitches at Stampin’ Up!, they decided the 10% off SALE EXTRAVAGANZA of most items in the 2020-2021 Annual Catalog is going through today Nov 25! Shop til you drop!

Thanks for stopping by.

May you have a beautiful day.

Make someone happy by sending them a handmade card filled with love.

Stampin’ Up! 10% OFF SALE EXTENDED

Due to some technical difficulties experienced today Stampin’ Up! has extended it’s 10% off SALE through tomorrow Nov 25… Woohoo!

Online Extravaganza 2020

Not all items are on sale but nearly all ARE! Please see my post from a couple of days ago with complete listing. Happy shopping!!!

Remember to use my current host code… SVFB9YJY to receive a free SU! item valued at $10 when your purchase is over $50.

Thanks for stopping by.

Make someone happy by sending them a handmade card filled with love.

Stampin’ Up! Packaging with Designer Series Paper

Oh I DID have fun yesterday ya’ll. I wrapped packages! They are prayer books for a group of folks that walk beside another when they are ‘hurting’, when they are in need of comfort, when they need to hear God loves them and we, as people, do too. The group is called Stephen Ministry and everyone is specially trained to listen. That’s the hardest thing in the world for everyone… it seems we always have an opinion. so in Stephen Ministry we don’t do opinions: we listen, intentionally listen. And these sweet packages are for those Stephen Ministers.

The packaging… I used Trimming The Town Designer Series Paper and I’m really pleased with how they turned out. I made the packaging like an envelope.

Packaging with DSP

Pictures don’t do these items justice – in person they are cute, cute. The above package uses Trimming The Town DSP, Diagonal Stripe Ribbon in Old Olive, So Many Snowflakes Dies, Blue Adhesive-Backed Gems and one Glitter Star Ornaments. Stampin’ Up! makes a list on their DSP packaging, of all the coordinating colors for that particular design. It makes it so much easier to make a card – or in this case, a package, look marvelous.

Let me share with you how I did this…

Packaging with DSP

This is the inside and it’s all trimmed of the excess paper. You can see at the far right and at the bottom, the Tear n Tape used for sealing. I used the Detailed Trio Punch to round the edges of the top & bottom flaps. This makes a perfect envelope for the book. Measurements vary for your own book; for this one it’s 10″ wide x 9 1/4″ in height.

  • Score at the top 1 3/8″
  • Score at the bottom 3/8″ & 1″
  • Score the sides at 2 3/4″ & 7″
  • I then laid my book on the score lines, wrapped each side over the book and gently pressed with my bone folder to create the depth for the book and another score line. The reason for this process is the depth of the book did not fall into a score line and I wanted the book to fit snugly, not be moving around.
  • Burnish all score lines then trim as shown above.
  • Once you have trimmed, put the book back on the DSP, remove the Tear n Tape and wrap the right side over the left to seal.
  • Fold in the short tabs at the bottom, remove the Tear n Tape and fold over the book. :O) A perfect envelope…. the book can be pulled out with ease as the top is not sealed. The ribbon keeps the package closed.
  • Decorate with ribbon and embellishments to your hearts content.

Below is a list of all the products I used for my packaging – and remember what today is… 24 HOUR SALE on nearly all products in the 2020-2021 Annual Catalog. Some of the products listed below are not in the Annual Catalog, but many are. Happy Shopping!

Thanks for stopping by.

May you have a beautiful day.

Make someone happy by sending them a handmade card filled with love.

Stampin’ Up! Playing with New Art Gallery

Hello All! I played with the Art Gallery/ Floral Gallery Dies for this bright birthday card today. Loving this Fine Art Floral Designer Series Paper – I’m certain it’s a Van Gogh 😏

So shall we taker a peek? Let’s do…

Art Gallery -#1

Isn’t this pretty Designer Series Paper? And because it’s artsy, I did a fun angle cut and stamped the sentiment between the two segments of Fine Art Floral DSP.

  • Thick Whisper White card base 8 1/2 x 5 1/2, scored at 4 1/4
  • Whisper White 4 1/8 x 5t 3/8
  • Fine Art Floral DSP 4 x 5 1/4 then cut on an angle for the appropriate sentiment.
  • Adhere the two portions of the Fine Arts Floral DSP to the the Whisper White panel.
  • Stamp the sentiment in Poppy Parade ink between the two panels using the Art Gallery stamp set
  • Add some fun Playing with Patterns Resin Dots to the sentiment area – these are Bumblebee in color.
  • Stamp the medium floral design in Poppy Parade ink on a Whisper White scrap, run it through the new Painted Texture 3D Embossing Folder and die cut with the Floral Gallery Dies.
  • Cover with Wink of Stella for a beautiful sheen. Do this carefully as this product can move the colors making it smear – and we don’t want that for this flower. Put the flower on dimensionals and adhere to the card front.
  • Put dimensions on the back of this panel and adhere to the card front.

For the inside and the envelope…

Art Gallery is a two-step stamp set and it’s lovely.

  • On a panel of Whisper White 4 x 5 1/4, stamp the lighter color first in Flirty Flamingo ink. Then stamp the darker or ‘filler’ in Poppy Parade ink. Stamp the stem/ leaves in Old Olive ink– this is one stamp.
  • Do the same on the envelope front, having it just at the edge. I like how it’s subtle that way.
  • Cut a panel of the Fine Art Floral DSP 2 1/4 x 6 and adhere to the envelope flap, trim to fit and voila! The card & envelope are complete. This is the reverse side of the front panel – isn’t it a fun pattern?!

These are brand new products: the Art Gallery stamp set/ Floral Gallery Dies, the Fine Arts Floral DSP AND the Painted Texture 3D Embossing Folder. They will be available for purchase Jan 5 when the 2021 Jan-Jun Catalog goes live. Of course, If you decide to join my team and become a demonstrator…. these can be available to you Dec 4. Just sayin’…. 😁

Ok, what else is going on in the Stampin’ Up! world? Tomorrow Nov 24, is a 24 hour sale of MOST products in the 2020-2021 Annual Catalog. There are some exclusions, but not many. See my blog post yesterday for a listing of the exclusions and some product ideas.

As a thank you to my customers, when the order is between $50-$150 I offer a SU! item of your choice valued at $10. Remember to use MY CURRENT HOST CODE SVFB9YJY – good until Dec 3, 2020. When the order is over $150, you still receive that free gift from me, but SU! has Stampin’ Rewards that may be used for additional products 😁 If you have questions, do not hesitate to contact me either here on my blog or at tlsbrightspot@gmail.com. Thanks for shopping with me.

Thanks for stopping by.

May you have a beautiful day.

Make someone happy by sending them a handmade card filled with love.