
Wow! Can you believe this is a New Year’s card? It’s not even Thanksgiving yet… but it was asked for, so there it is… Let’s get to it.

This card uses lots of ‘schtuff’ to make it… Foam Adhesive Sheets, Adhesive Sheets, Red Foil Sheets, and more! It starts with the base being a Wonder of The Season Memories & More Cards & Envelopes pack. To that I adhered with Stampin Seal a panel of Red Foil Sheet cut 4 x 3. More steps:
- Cut one of the cards apart, using the inside of the card to cut panels 2 x 3. It will make at least four panels. I did this as sometimes the whites don’t exactly match and of course it will if it’s cut from the same source!
- Using the Playful Alphabet Dies, die cut the word Happy from Black Glitter Paper that has been backed with Foam Adhesive Sheet. Mine was 1″ x 3 1/4″.
- Die cut the fun banner using Happy Dies and Artistry Blooms DSP that has Adhesive Sheet adhered to it. (This is a different adhesive than the Foam Adhesive Sheet ~ this will lay flat on the paper and not be raised.)
- Die cut the balloon tail from the same Artistry Blooms DSP with Adhesive Sheet adhered to it ~ again using Happy Dies.
- Die cut the ballon using the same Happy Dies ~ this time using Oh So Ombre 6×6 DSP (new in the Sale-A-Bration catalog). This also has Foam Adhesive Sheet added to it.
- Die cut the super – uber cute bow from Green Foil Sheet and the Happy Dies.
- Stamp the sentiment in Granny Apple Green ink on a scrap of the Artistry Blooms DSP and cut with the Classic Label Punch. I separated mine, but you wouldn’t have to. The sentiment comes from the A Wish for Everything stamp set.
Now all the little pieces are cut out ~ let put it together…
- Cut a panel of Red Foil Sheet 4 x 3 and adhere to the card front of the Wonders of The Season Memories & More card.
- Remove the backing on the Black Glitter Paper die cut letters and adhere across the center of the 2 x 3 card panel previously cut.
- Remove the backing on the green banner and adhere at the top of the 2 x 3 card panel.
- Adhere the white card panel to the Red Foil Sheet panel using Stampin’ Seal.
- Remove the backing on the balloon tail and adhere to the card front.
- Remove the backing on the balloon and adhere to the ‘tail’. Cover the balloon with Wink of Stella.
- Add the super- uber cute Green Foil bows with just a dot of liquid glue.
- Adhere the sentiment ‘New Year’s Day’ with dimensionals ~ and your card front is done!
For the inside…
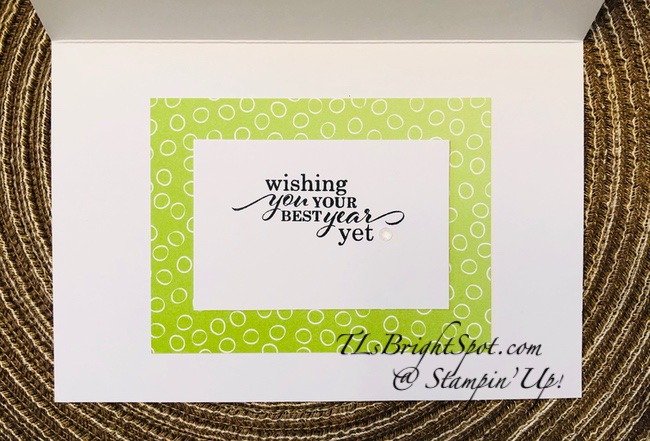
- Stamp the sentiment in Memento Tuxedo Black ink on one of the 2 x 3 white panels previously cut. The sentiment comes from Best Year stamp set. I used this as it fits the card and I really like how the scrolly words coordinate with the scrolls on the card front. 👍 I added a single Elegant Faceted Gem for more sparkle.
- Adhere the white panel to Oh So Ombre 6×6 DSP panel cut 4 x 3 ~ then adhere this to the inside of the card. VOILA!

Fun card, right?! Products for this card may be found below. If you have any questions, please feel free to ask, either here on my post or send to my email at TLsBrightSpot@gmail.com.
As a thank you to my customers, when the order is between $50-$150 I offer a SU! item of your choice valued at $10. Remember to use MY CURRENT HOST CODE SVFB9YJY – good until Dec 3, 2020. When the order is over $150, you still receive that free gift from me, but SU! has Stampin’ Rewards that may be used for additional products 😁
REMEMBER… due to some glitches at Stampin’ Up!, they decided the 10% off SALE EXTRAVAGANZA of most items in the 2020-2021 Annual Catalog is going through today Nov 25! Shop til you drop!


Thanks for stopping by.
May you have a beautiful day.
Make someone happy by sending them a handmade card filled with love.

Great card! Love the sparkle for the new year! 🙂
LikeLiked by 1 person
What a fun and happy card! And no…I can’t believe we’re almost to 2021! I love the pop of green on the inside!
LikeLiked by 1 person
Thanks Ladies!!
LikeLike