Stampin’ Up! Magnolia Lane Memories and More Card Pack

Today’s post is all about the fun Stampin’ Up! Magnolia Lane Memories and More Card Pack with the coordinating Magnolia Lane Large Specialty Memories and More Cards and Envelopes.. Do you hoard some of your card making products? Let’s say I used to but am getting better at actually making use of most everything. So why do I ask about hoarding? I have had this card pack for quite some time, used one or two then set it aside. I even made a fun “album” of sorts very early on. There were so many new products I think I got a bit overwhelmed. Yesterday I pulled out that card pack and went to ‘town’. I think this would make a lovely gift package as there are birthday, wedding, and congratulations cards made from this set. Enjoy.

These large specialty cards and envelopes are of a lighter weight paper than our regular cardstock, so you will notice I have used additional cardstock behind all the cards. I just felt it needed it and even more importantly, I liked the look. šŸ˜ Here’sĀ  what I used on various cards along with the Magnolia Lane Memories and More Card Pack … Notice nearly every card has aspects on dimensionals. I really like the layered look

Card #1…. Large Specialty Cards and Envelopes and the Magnolia Lane Ribbon Combo pack, Early Espresso cardstock, Glitter Enamel Dots, Whisper White and the Woven Heirlooms stamp set

Magnolia Lane Memories and More Card Pack card #1

Inside card #1


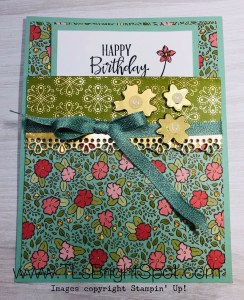
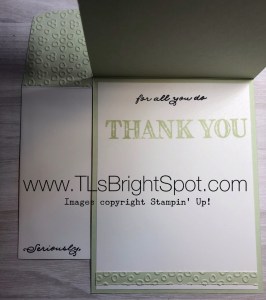
Card #2…. Magnolia Lane Ribbon Combo pack, Garden Green cardstock, Good Morning Magnolia stamp set in Mossy Meadow ink

Magnolia Lane Memories and More Card Pack card #2
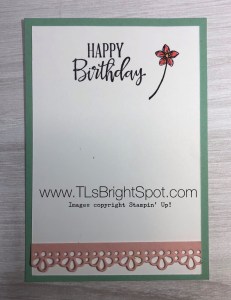
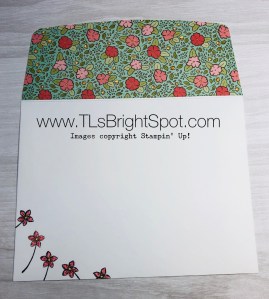
Inside card #2


Card #3….Mossy Meadow cardstock, Basic Pearls colored with Light and Dark Petal Pink Stampin’ Blends, Whisper White cardstock. Yes I split the Whisper White inside… ‘cuz I wanted to!

Magnolia Lane Memories and More Card Pack card #3

Inside card #3


Card #4….Mossy Meadow cardstock, Whisper White cs, Positive Thoughts stamp set in Mossy Meadow ink

Magnolia Lane Memories and More Card Pack card #4

Inside card #4


Card #5…. Whisper White cardstock and Basic Pearls. I did nothing special on the inside, just added Whisper White cardstock. Yes, itg will need a swentiment but I couldn’t figure out what at the time. šŸ˜”

Magnolia Lane Memories and More Card Pack card #5

Card #6….Linen Thread in a triple bow, Whisper White cardstock, Petal Pink cs, Good Morning Magnolia stamp set for the flower, Light and Dark Petal Pink and Old Olive Stampin’ Blends for coloring the flower, Peaceful Moments for the sentiment stamped in Early Espresso ink

Magnolia Lane Memories and More Card Pack card #6

Inside card #6


Card #7….Early Espresso cardstock, Magnolia Lane Ribbon Combo Pack, Crumb Cake ink, Good Morning Magnolia stamp set for the sentiment

Magnolia Lane Memories and More Card Pack card #7

Inside card #7


So do you have a favorite. I think mine are cards #1, #6 and #7. Sometimes I liked the inside better than the outside! Imagine that. Thanks to those who inspired these creations. If I found something I liked, I put my own twist on it.

Thanks for stopping by today.

May you have a beautiful day.

Make someone happy by sending them a handmade card.


Stampin’ Up! Golden Honey Bee SDSP and Poppies Elements

Today’s card is made with the Golden Honey Bee Specialty Designer Series Paper and the Poppies Elements and also uses the new Ornate Layers Dies. It’s a sympathy card for a teammate who lost her adult son very suddenly. I am so sorry, but we shouldn’t have to bury our children….

Golden Honey Bee SDSP, Poppies Elements

  • We start with a 4 1/4″ x 11″ Thick Whisper White for the card base. Score at 5 1/2″.
  • Cut a piece of the Golden Honey SDSP 3 1/4″ x 4 1/4″
  • Using a scrap of Poppy ParadeĀ  (about 1/2″ in width) and one of the edging dies in the Ornate Layers Dies, cut two lengths of edges. Adhere these edges with liquid glue to the Golden Honey SDSP.
  • Cut a 1″Ā  x 4 1/4″ strip of Poppy Parade for the sentiment. Rub with the embossing buddy. Stamp your sentiment with Versamark ink – I used one of my favorites, Woven Heirlooms. Sprinkle with white embossing powder and heat until set. Adhere to the card with liquid glue.
  • I punched out two of the colorful Poppies Elements, one medium vellum poppy and one small vellum leaf. I wrapped a green linen thread around the poppy and tied a bow.(sorry – this is a retired item!). i adhered the double flower onto the standing tall poppy with glue dots, adhered the vellum leaf and the vellum medium flower to this with glue dots. Adhere to the card/ and sentiment using dimensionals.

For the inside…

Woven Heirlooms Sympathy

  • I used the same stamp set for the inside sentiment, Woven Heirlooms, stamped in Black Memento ink onto Whisper White 3 3/4″ x 5″.
  • Adhere the Whisper White to a Basic Black 4″ x 5 1/4″ with liquid glue. Attach this to the inside of the card.

For the envelope, I simply used 3/4″ x 6″ of Poppy Parade and a scrap of the Golden Honey SDSP 1 1/2″ x 6″ and adhered with liquid glue. Your card is done and ready for mailing!

I hope you like todays card. It was certainly made with love for a vey sad friend.

What’s on your agenda today? Hubby and I have worked diligently in cleaning our flower beds of winter’s debris and leaves and I think they are now ready for mulching. It’s interesting what this forced sequestering has encouraged us to accomplish. I’m very pleased with the clean flower beds. We have also been going through some saved pictures and papers and freed ourselves of quite a load of unnecessary items. Yes, there is more to do, there is always more to do, but we have so far at least, used this time productively. Oh, and there’s always card making! How about you? What are you doing to keep yourself occupied?

Stampin’ Up! Ornate Garden Suite

Today’s cards feature the Ornate Garden Specialty DSP and Ornate Layer Dies. You know this Ornate Garden Suite is available for a limited time, right? Not to scare you, what that means is it is an early release product premier showing of specialty items available for a short time, then it will be in the new 2020-21 Annual Catalogue. This premier gives you the wonderful opportunity to play with the product early. Here are the cards…

Ornate Garden Specialty DSP / Ornate Layers Dies card #1


Ornate Garden Specialty DSP / Ornate Layers Dies card #2


Card #1 shows one of the papers and card #2 shows the other side of the same paper, both quite elegant.

Details: Card #1…

  • Whisper White Notecard & envelope
  • Ornate Garden SDSP 3 1/2″ x 5″ + scrap approx 1/2″ x 3 1/2″
  • Vellum 3 3/8″ x 4 7/8″
  • So Saffron 2 1/4″ x 3 1/2″ + scrap 3/4″ x 3 1/2″
  • Whisper White 1 1/2″ x 2 3/4″
  • Stazon Saddle Brown
  • Gilded Gems
  • Ornate Thanks stamp set
  • Ornate Style stamp set
  • Stitched Rectangles Dies

How to…

  • Adhere the SDSP to the notecard using liquid glue
  • Adhere the vellum to the notecard using liquid glue but just in the centerTIP: Any type of glue shows through on vellum. In this case the die cut will cover the center of the vellum so it won’t matter.
  • With the So Saffron and the Ornate Layers Dies, cut your piece. Adhere with liquid glue directly to the vellum
  • With the Whisper White and the Stitched Rectangles Dies, cut your piece. Stamp your sentiment with Stazon Saddle Brown ink using sentiments from Ornate Thanks. Adhere one Gilded Gem. Adhere to the So Saffron die cut with dimensionals

The inside…

Inside card #1

  • Adhere the SDSP scrap to the So Saffron scrap.
  • Stamp your sentiment from Ornate Thanks stamp set in Stazon Saddle Brown ink

The envelope…

  • Using So Saffron ink, stamp the pretty floral design from Ornate Style stamp set, both on the front and on the envelope flap. DONE!

    Ornate Style stamp set card #1


Details – Card #2

Ornate Garden Specialty DSP / Ornate Layers Dies card #2

  • Whisper White Notecard and envelope
  • Melon Mambo 3 3/8″ x 4 7/8″ (cut 2, one is for the the inside)
  • Ornate Garden Specialty DSP 3 1/4″ x 4 3/4″
  • Whisper White 1 1/2″ x 2 3/4″, 3 1/4″ x 4 3/4″ for the inside
  • Black Memento ink
  • Shimmer Ribbon
  • Ornate Thanks stamp set
  • Ornate Style stamp set

How to…

  • Adhere the Melon Mambo directly to the Notecard with liquid glue.
  • Adhere the SDSP directly to the melon Mambo with liquid glue
  • Using the Ornate Layers Dies, cut your piece from Melon Mambo
  • Using the Stitched Layers Dies, cut your piece from Whisper White. Stamp your sentiment from Ornate Thanks stamp set in Memento Black ink. Adhere with liquid glue to the Melon Mambo die cut.
  • Adhere the combined Melon Mambo & Whisper White to the card front with dimensionals.
  • Using your Shimmer Ribbon 1/4″, tie a bow and adhere with a glue dot. Your front is done!

The inside…

Ornate Thanks stamp set card #2

  • Stamp your sentiment from the Ornate Thanks stamp set in Memento black ink
  • Stamp the sweet flower from the Ornate Style stamp set in Memento black ink. Color with Stampin’ Blends Lovely Lipstick and Light Old Olive.Ā  Adhere to the Merlon Mambo.
  • Adhere the combined Melon Mambo and the
    Whisper White to the card inside. Your card is done!


The envelope… OOPS, I didn’t take a picture of it…

  • Stamp the same flower from the Ornate Style stamp set in Memento Black ink in the lower front corner. I did not color it.
  • With that same flower and same ink, stamp all over the envelope flap.

What a fun set of cards – same layout, same SDSP but reversed, same die cuts, yet each is unique and wonderful. These are going out to a couple of friends today in hopes of brightening their days of disciplined isolation… May you all remain safe and well during these quarantined times. Special hugs….

Thanks for stopping b y. May you have a beautiful day.

Make someone happy by sending them a handmade card.

Ornate Garden Specialty DSP / Ornate Layers Dies card #1

Ornate Garden Specialty DSP / Ornate Layers Dies card #2

Stampin’ Up! Watercolored Happy Birthday To You, Birthday Dies

Today’s card features the Stampin’ Up! Happy Birthday To You stamp set and matching Birthday Dies available during Sale-a-bration. This set is so versatile: birthdays, anniversaries, weddings, or using the flower, leaf and berry dies on their own to create a wreath – the ideas abound! Let’s see…

Happy Birthday To You #1

This card has such visual appeal in person… all the layers make it pop. And here’s how I did it…

  • On Shimmer Paper, stamp the cake image twice with Stazon Jet Black ink. The second image really only needs to be the flowers as that will be diecut.
  • With your aqua painter and Flirty Flamingo, color the flower petals on both stamped images. Why you ask? Because you do not want a blank image behind the flowers.Ā 
  • With your aqua painter, color the leaves first with Mint Macaron, then darken areas with Garden Green.
  • Go ahead and color the cake stand at this point, with the rim being the darker portion. Do you remember our mothers or grandmothers green glass (also pink glass)? That’s what this cake stand reminds me.
  • Using your aqua painter color the berries with Poppy Parade. Here’s what it looks like before putting the images together.

Happy Birthday To You watercolor first, then the additional flowers.

Now it is time to diecut your various pieces.

  • Diecut the full cake first then your additional flowers.
  • While you’re at it, diecut the leaf image twice out of Garden Green.
  • Diecut the berries twice out of Shimmer paper.
  • Diecut the second largest circle from the Layering Circles framelits, out of vellum.

Layer your pieces. This is a matter of preference in placement. I used not only glue dots, but also snail and dimensionals. Some pieces went behind the vellum and some went on top of the vellum but behind the cake. Here’s how I put it together…

  • Vellum on dimensionals
  • Cake on dimensionals
  • Flowers on dimensionals

Happy Birthday To You #3

Happy Birthday To You #4


Paper layers:

  • Card base is Soft Sea Foam 8 1/2″ x 5 1/2″, scored at 4 1/4″
  • Mint Macaron 4 1/8″ x 5 1/4″
  • Garden Lane DSP 3 7/8″x 5″
  • Final layer is the vellum, cake and diecuts.

The inside is super simple and easy…

Happy Birthday To You, inside

  • Stamp the sentiment from Happy Birthday To You in Stazon Jet Black ink on a Whisper White 4″ x 5 1/4″.
  • With glue dots add the remainder of the berry and leaf diecuts. I put a glue dot under the berry diecut, then under two of the Garden Green leaves, tucked the stem of the leaves under the berries and covered the glue dot under the berrries.
  • Adhere the Whisper White to the card base using liquid glue.

Remember your envelope…

  • Find a coordinating piece of Garden Lane DSP 2 1/4″ x 6″, adhere to the envelope flap with liquid glue and trim.
  • Stamp the envelope front in Garden Green ink.

YAY! Your card is complete and ready to send to a favorite person. This one is going to a S-I-L whose birthday is right around the corner.

Happy Birthday To You #1

Thanks for stopping by. I hope you enjoyed today’s project and that you try your hand at watercoloring.

May you have a beautiful day.

Make someone happy by sending them a handmade card.


Stampin’ Up! Good Morning Magnolia

Today’s card is made with the amazing Stampin’ Up! Good Morning Magnolia stamp set from the 2019-2020 Annual Catalogue. This stamp set has additional options … first there are the two stamp sets, then matching dies and finally an embossing folder. Today we use just the one stamp set and the embossing folder. The card is elegant and depending on the sentiment used, could be for many purposes. This is a thank you card, for I’m grateful for a lot, and during this time especially it seems appropriate to give thanks. Let take a look…

And here are the details on how to make it:

  • Smokey Slate card stock 4 1/4″ x 11″
  • Night of Navy 4″ x 5 1/4″ (cut 2, one for the inside)
  • Silver Foil 4 1/8″ x5 1/8″, 2 7/8″ x 4 1/8″
  • Whisper White 3 7/9″ x 5 1/8″ (for the inside)


  • With your embossing buddy, rub one panel of the Night of Navy,. With Versamark ink, stamp the large flower from Good Morning Magnolia, sprinkle with silver embossing powder and heat set. Make certain all is glistening silver before setting aside to cool.

Let’s create the inside at this point and come back to the front later.

  • Adhere the second panel of Night of Navy to the inside, using liquid glue.
  • With your Whisper White cs, stamp the sentiment and leaves with Night of Navy ink. Adhere this panel to the inside Night of Navy.

Now back to the front..

  • With the Stitched Rectangles, cut the center of that magnificent magnolia.
  • Adhere the larger section of the magnolia to the larger silver foil using snail.
  • Adhere the smaller piece to the smaller Silver Foil with snail. Add dimensionals to this piece and adhere to the larger magnolia, matching all of the floral design.
  • TIP…AdheringĀ  to foil with liquid glue is slippery and the paper often moves. I strongly encourage using snail or dimensionals when adhering to foil papers.

The envelope…

  • Cut a piece of Night of Navy 2 1/4″ x 6″, spritz with water to soften the paper fibers and run through the Magnolia Lane 3D embossing folder.
  • Adhere to the envelope flap with liquid glue and trim.
  • Stamp the leaf in the lower left corner of the envelope front with Night of Navy ink. (I might have taken my picture a bit early and didn’t capture this, but I did do it!)

Good Morning Magnolia

Good Morning Magnolia inside

Thanks for stopping by today. Please use my CURRENT HOST CODE XYW2SYNV when shopping with me. With a $50 purchase you will receive an item of your choice of $10 value. If your purchase is over $150, please do not use my host code, as Stampin’ Up! will offer you free product. Just remember, you will still get that free product from me! One item per customer/ month, thank you.

Sale-a-bration is quickly coming to an end – March 31. It’s during this time you receive free product from SU! for every $50 purchase.

May you have a beautiful day.

Make someone happy by sending them a handmade card!


Stampin’ Up! Good Morning Magnolia

Today’s card uses the Stampin’ Up! Good Morning Magnolia stamp set, heat embossing and sponge daubers. I’ve created this as a birthday card, but it could so easily be sympathy, wedding, anniversary, or just a note. It is soft and it is feminine. Let’s look….

Good Morning Magnolia #1

Here are the details:

  • Thick Whisper White card stock 8 1/2″ x 5 1/2″, scored at 4 1/4″, another piece 4 1/8″ x 5 3/8″ for the card front.
  • Rub the smaller cs with your embossing buddy, making certain to cover the entire area.
  • Using Versamark ink, stamp the Good Morning Magnolia stamp on the right hand corner, stamping as much of the magnolia as you desire. Ink a portion of the stamp again and stamp in the upper left corner.
  • Sprinkle with white embossing powder and heat emboss. Set aside to cool.
  • On a scrap, of vellum, rub with your embossing buddy and with Versamark ink stamp the flower bud. Sprinkle with white embossing powder then heat emboss until all the powder has melted. Set aside to cool. Once cool, use the Magnolia Memory Dies to cut out the flower bud.
  • On another scrap of vellum approximately 1/2″ x 3″, rub with the embossing buddy, ink your sentiment and stamp. Sprinkle with the white embossing powder and heat emboss until all powder has melted. Set aside to cool.
  • Using Blushing Bride and sponge daubers, lightly rub the color exactly where you want it. I made it darker in the center and lighter toward the outside. For the leaves, do exactly the same with Old Olive ink. Do the same on the vellum flower bud but color on the backside of the vellum.
  • Attach the flower bud with a mini dimensional at the base of the bud.
  • Attach the vellum sentiment in the same spot using a glue dot. I used a second glue dot, placing it just under the word happy, so it wouldn’t show through.
  • Now you are ready to adhere this directly to your card base, using liquid glue or snail.

For the inside… I’ve kept this very simple.

Timeless Tulips sentiment – inside

  • Choose your sentiment… this is from the Timeless Tulip stamp set (available during Sale-a-bration), and using Stazon Jet Black ink..

Thanks for stopping by today.Ā 

May you have a beautiful day.

Make someone happy by sending them a handmade card.

Good Morning Magnolia #2


Stampin’ Ip! Ornate Garden Specialty DSP, Ornate Borders Dies

Todays Card is a fun use of the Stampin’ Up! Ornate Garden Specialty DSP and the Ornate Borders Dies. It’s a panel card, at least that’s what I’m calling it, meaning it doesn’t open šŸ™‚ It simply has a panel that fits inside the folded DSP. Let’s take a look….

This Ornate Garden Specialty DSP is so sweet and I wanted to emphasize this particular pattern for as much of the card as possible. This is what I did…

  • Mint Macaron card base cut to 4 1/4″ x 5 1/2″; also cut 3 1/2″ x 4 1/2″ for the inside panel
  • Ornate Garden SDSP cut to 4″ x 5 1/4″; another with same dimension but score this at 4″
  • Adhere the 4 “x 5 1/4” SDSP to the card base using liquid glue
  • Cut a panel 1/2″ x 4″ from Gold foil. Using a die from the Ornate Borders Dies, run it through your embossing/ diecut machine. Adhere this diecut to the fold-over piece of SDSP. Cut about a 20″ length of Mint Macaron 1/4″ ribbon, run over it with your snail adhesive and adhere evenly around the back and front, covering slightly where the Gold Foil diecut was attached.Tie a bow. TIP: use your grid paper to make certain the ribbon is attached evenly.Ā 
  • Using tear ‘n tape, adhere to the sides and bottom of this panel and attach to the card base.
  • Cut three flowers from Gold Foil scrap using the Ornate Border Dies. Adhere Glitter Enamel Dots to the center of each flower. Put on dimensionals and attach accordingly.

Now for the inside…

  • Whisper White cut to 2 is 7/8″ x 4 1/4″. Stamp your sentiment (I used the Peaceful Moments stamp set) with Stazon Jet Black ink. I like how clear this ink stamps! I also added a sweet flower from the Special Someone stamp set. This was colored using Flirty Flamingo and Daffodil Delight markers. TIP: When using Stazon Jet Black ink, DO NOT USE BLENDS TO COLOR! It simply smears the ink instead of adding color.
  • Using the Ornate Borders Dies once more, cut the same border die from Blushing Bride cs (approx. 1/2″ x 4″). Adhere to the Whisper White panel using liquid glue.
  • Adhere this Whisper White panel to the 3 1/2″ x 4 1/2″ Mint Macaron piece. Cute, cute!

The envelope…

  • Cut a piece of matching SDSP from the Ornate Garden SDSP pack 2 1/4″ x 6″. Adhere with liquid glue and trim.
  • Stamp the adorable flower used on the card panel insert on the envelope front (I did it five times!) Color using Flirty Flamingo marker for the petals and Daffodil Delight marker for the flower center.

Isn’t this card sweet?!

Thanks so much for stopping by.. May you have a beautiful day.

Make someone happy by sending them a handmade card.


Stampin’ Up! Scalloped Notecards and Thoughtful Blooms

Today’s post is another of the Stampin’ Up! Scalloped Notecards, but this time using Thoughtful Blooms stamp set and the Small Blooms Punch, which are free items during Sale-a-bration when you purchase $xxx. šŸ™‚

Isn’t this cute? It’s feminine and easy peasy. Here are the details..

  • Using Old Olive ink, stamp the leaves all over the card.
  • Again using Old Olive ink, stamp the leaves on a scrap of Whisper White and cut out using one of the circle dies.
  • Using Old Olive ink, stamp the flower on Old Olive cs. Punch out using the Small Blooms Punch. A single Rhinestone as added to the center of each.
  • The sentiment piece was created by first stamping the sentiment from the SAB Honey Bee stamp set.Ā I then took a small circle punch and as uniformly as possible created the the edge. This piece was adhered to the card front with dimensionals. The circle was added with liquid glue. Two of the flowers were adhered with glue dots. The last flower was adhered with a dimensional. Card is complete!
  • For the envelope, I stamped the leaf stamp first followed by the flower stamp – both in Old Olive ink.

Thanks for stopping by today. I promise we’ll do something besides Scalloped Notecards for tomorrow. But this was a bit of a fun exercise, to create each one so differently but using the same card base. Hope you liked it too.

May you have a beautiful day. Make someone happy by sending them a handmade card.

Stampin’ Up! Ornate Thanks, Ornate Borders Dies, So Very Vellum Specialty DSP

Today’s card makes use of the Stampin’ Up! Ornate Thanks and Ornate Borders Dies, and So Very Vellum Specialty DSP and the Eyelet Lace embossing folder. It was inspired by TGIF Challenges #tgifc255. Here it is in all it’s glory – feminine and fresh, bringing a note of thanks to the receiver…

Here are the details for the card front:

  • Soft Seafoam 8 1/2″ x 5 1/2″, scored at 4 1/4″
  • So Very Vellum 3 3/4″ x 5 1/2″
  • Whisper White 1/2″ x 5 1/2″, 1/2″ x 3″ strip for the sentiment


  • Use the border die from the Ornate Borders dies to create this wonderful delicate edge. Adhere this to the left front of the So Very Vellum SDSP. This takes a very thin line of liquid glue. Adhere this, again with liquid glue, just along where the die edge is attached to the vellum.Ā This is important – if glue is anywhere else on the vellum it will show. You don’t want that!
  • Stamp the sentiment from Ornate Thanks with Tuxedo Black Memento ink. Angle the one end. Put on dimesionals – I used three – and add to card front. Mine is placed 3/4″ up from the bottom. Add bling with the Noble Peacock Rhinestones. Front is complete!

Inside the card:

  • Whisper White 4″ x 5 1/4″ Stamp the sentiments from the Ornate Thanks stamp set using Tuxedo Black Memento ink and Soft Seafoam ink. Use a leftover strip from the embossed piece from the envelope flap and adhere to the bottom. This strip isĀ  1/4″ x 5 1/4″

The envelope:

  • Nary a “neked” envelope to be found – right? Right! Cut a piece of Soft Seafoam 2 1/4″ x 6″, spritz lightly with water and run through the Eyelet Lace embossing folder. Adhere to the envelope flap using liquid glue. Trim. The leftover scrap was cut down and used on the inside of the card šŸ™‚
  • Stamp the sentiment from Ornate Thanks in Tuxedo Black Memento ink.

I love this card! It is just so sweet. I hope you like it too. Remember that this stamp and die set can be yours beginning Apr 1- May 1. It is part of the Early Release Ornate Garden Suite of products.Ā  While the items will be be available in the Annual 2020-2021 catalogue, they most likely will not be as a suite of products – and therefore will be more expensive.

I would love to have you shop with me. When you purchase product $50- $149 from me, you receive a free item of choice up to $10. A deal right? Use my current HOST CODE XYW2SYNV.

May you have a beautiful day. Make someone happy by sending them a handmade card.


Stampin’ UP! Clubhouse fun fold card

Hello – today’s card is definitely masculine and I hope you like it. It can be used for a birthday, congratulations or simply a friendly card. I created it for someone who is a golfer and just needs a ‘pick me up’. Here it is…

What do you think? One of the aspects about SU! that I like so much is that colors coordinate pretty much across the board. When they package their Designer Series Paper, it lists on the back of the package coordinating colors for that particular design. And what I’ve learned is often other shades of a particular color,Ā  say green, may work in nicely as well. And that’s what I did on this card – worked in a different shade of green.

Here are the details…

  • Cut a piece of thick Whisper White cs 6 1/4″ x 5 1/2″, scoring on the long side at 2″.
  • Cut a piece of Country Club DSP 1 3/4″ x 5 1/4″ and adhere using liquid glue to the left portion of the card front. Refer to the photo for help.
  • Using Night of Navy ink, stamp both the sentiment as well as the golfer from the Clubhouse stamp set on Whisper White card stock. Using the Golf Club dies cut out the golfer and JUST the Greatest Guy part of the sentiment.
  • Using the Stitched So Sweetly dies and Pear Pizzaz cs, cut out a rectangle large enough for the golfer.
  • Using the next larger die from Stitched So Sweetly dies, cut a piece of Night of Navy cs.
  • Using liquid glue, adhere the Pear Pizzaz to the Night of Navy cs. Using dimensionals, adhere the golfer to these two pieces. See photo for placement. Set aside.
  • Cut another piece of DSP 4″ x 5 1/4″ and adhere to the inside of the card.
  • Cut a piece of Whisper WhiteĀ  2 1/2″ x 3 3/4″ for the inside. Stamp in Night of Navy ink accordingly. I used the golf ball and this wonderful sentiment. When you look at the photo of the inside of the card, you will see that I separated this into two sections. There’s a simple explanation for that… I goofed when stamping and stamped the sentiment upside down!Ā I was so annoyed with myself. So how to fix it? I simply cut it into two sections šŸ™‚

Back to the front and adhering the panel to the card front.

With the card closed adhere the panel approximately 5/8″ from the left, top and bottom. This will mean it is pretty well centered on the card. I put the glue on the card front instead of the panel cuz I wanted to be sure not to have glue where it wasn’t needed.

Now complete the inside. Open the card and adhere the Whisper White panel to the inside so it is approx. 7/8″ from the fold, bottom and and right edges. What you want to be certain of is that this panel does not show when the card front is closed.

Remember to decorate the envelope – no “naked” envelopes please! And be certain to sign your card. People love to see your name or initials on there.

I hope you like today’s card. Masculine cards are sometimes tricky to create but I like the way this turned out.

Sale-a bration is quickly coming to an end – Mar 31. If you are still wanting to pick up any of these fabulous products do so right away. Reach out to me if you have questions – love to hear from you.

May you have a beautiful day. Make someone happy by sending them a handmade card.