Window Pop-Out Card with Florals in Bloom DSP & More

Hello Monday! It’s a new week, actually a new day – – and it is NOT raining here. Whew! We need the rain to fill our reservoirs; I like rain; but the days are a bit gloomy. We had sunshine for a bit of the day & it felt good. Thank you for the rain; and thank you for the sunshine!

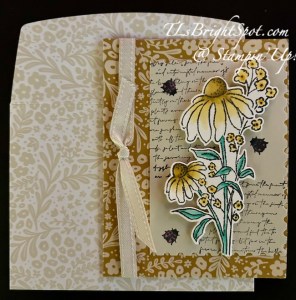
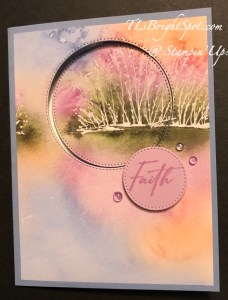
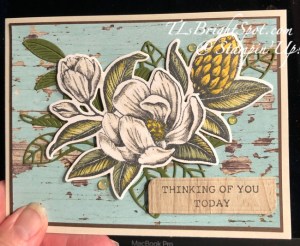
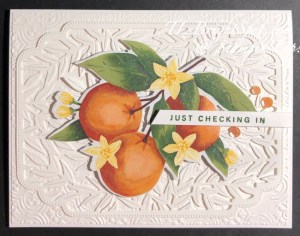
My card today uses the ever-popular Arches Dies found in the ONLINE EXCLUSIVES. I’ve paired it with one of the new In Colors for 2025-2026 called Cloud Cover plus a beautiful Florals In Bloom DSP. I either fussy cut the flowers with my paper snips, or die cut them with a die from Pretty Florals Dies or Sweet Blooms Dies. Both of these dies and the DSP are part of a new suite of products in the 2025-2026 Annual Catalog – the Florals In Bloom Suite.

Stampin' Up! Window Pop-Out card front with Florals in Bloom Suite

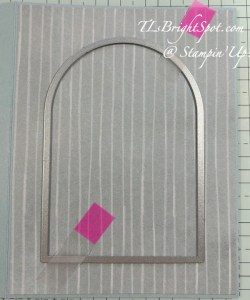
This card begins with a standard A2 card base in Cloud Cover. The DSP layer is just 1/8″ smaller all around and is from the Florals In Bloom pack. It is from the other side of this sheet that I either fussy cut or die cut the flowers for the front of this card. :O) Ah, but I jump ahead… after adhering the DSP to the card front, open card & use the 4th largest die in the Arches Dies to center it on the front & die cut the arch. This may take running it back & forth a couple of times.

Stampin' Up! Window Pop-Out Card, die cutting front

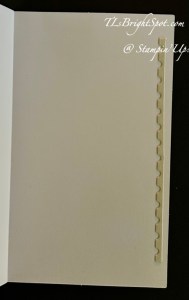
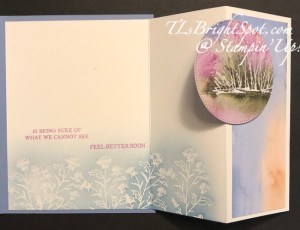
Now prepare the inside panel… 6 1/2 x 5 3/8 scored at 2 & 4 on the long side. Prepare two ‘hinges’ cutting 3″ x 1 1/4″, scored @ 1 1/2. Add Tear n’ Tape in several places then cut in half lengthwise, thereby creating 2 hinges. Add Tear n’ Tape to the BACK SIDE of the 2 1/2″ panel. On that same back side, add the hinges with the fold at the outside edge, one at top & one at bottom. Refer to photos below.

Stampin' Up! Window Pop-Out Card template 1
Stampin' Up! Window Pop-Out Card front side of insert - template 2

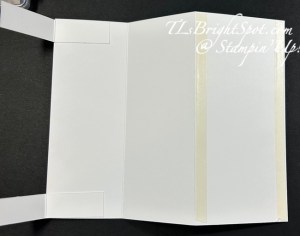
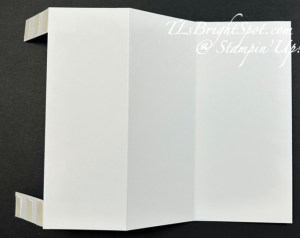
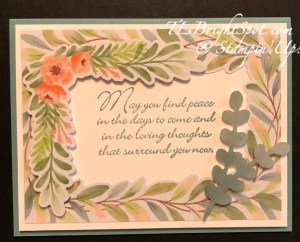
back side of card insert front side of card insert

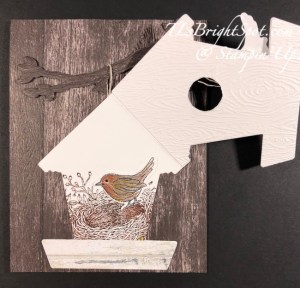
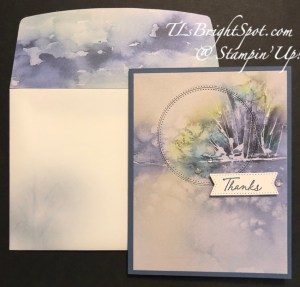
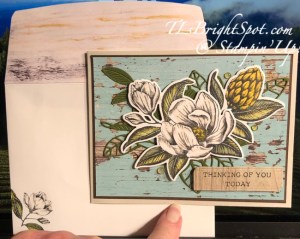
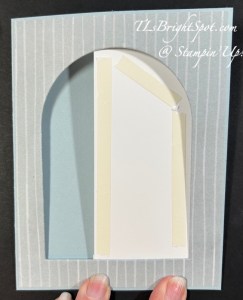
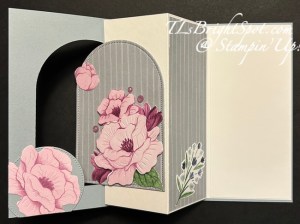
Remove tape cover & add insert to to inside of card with 1/8″ edge top, right & bottom. Fold insert along score lines, remove tape cover on hinges and with them flat & sticky side up, close card front. Boom! Now, with card closed & ‘window’ uncovered, add adhesive or Tear n’ Tape to open area – see photo… & attach die cut arch & decorate! ….

Stampin' Up! Window Pop-Out Card Template 3
Stampin' Up! Window Pop-Out Card front.2

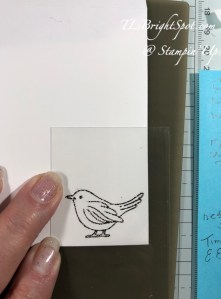
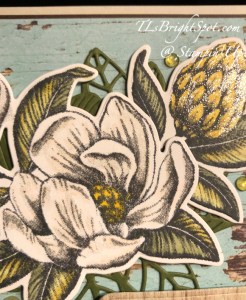
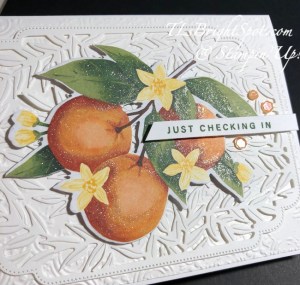
As mentioned earlier, I either fussy cut with my paper snips or die cut with appropriate dies all the flowers. On the bottom right, this flower was Cloud Cover so that when the card is opened, there is a ‘like’ image inside – cut 2. After adhering, circle & flower were trimmed to card front edges.

Stampin' Up! Window Pop-Out card inside.

Additional info:

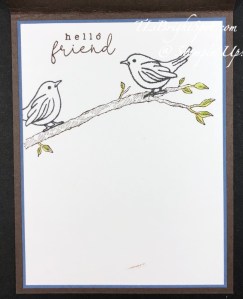
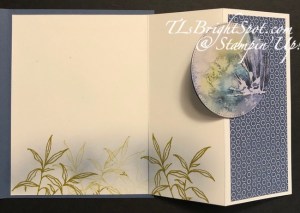
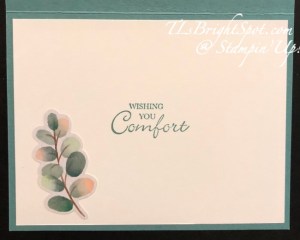
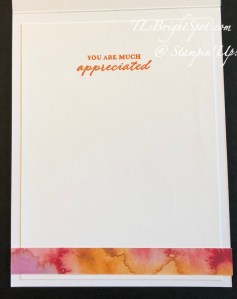
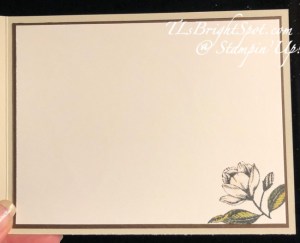
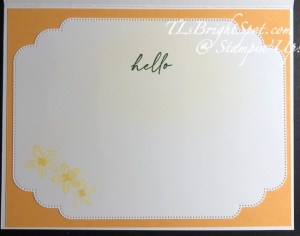
  • DSP added to inside of card is 1 7/8 x 5 1/4, decorated with a die cut from the DSP (Sweet Blooms Dies)
  • Basic White panel on far right is 2 3/8 x 5 1/4
  • Embellishments on fron are 2024-2026 In Color Shimmer Gems
  • Wink of Stella was added to shaded areas of all flowers
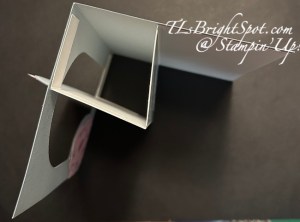
  • This is what the card looks like from the top
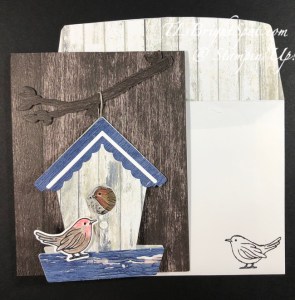
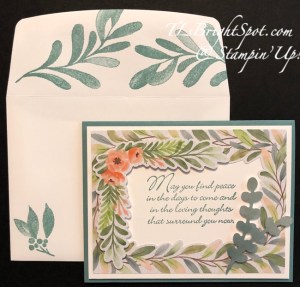
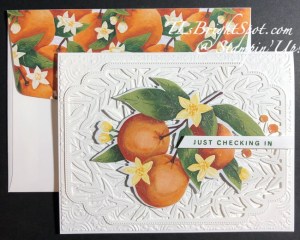
Stampin' Up! Window Pop-Out card, top down photo

For the envelope…

Stampin' Up! Window Pop-Out card & envelope

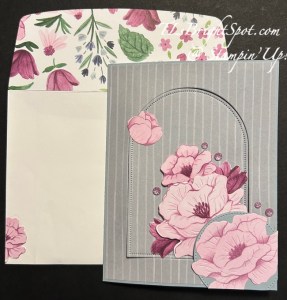
More of the same DSP from Florals In Bloom DSP pack (just the other side) adhered to the flap & trimmed to fit. On the front, another fussy cut flower added to the edge of the envelope front.

I had so much fun creating this card. It was pretty easy really and the fun came in the decorating. I would love to see what you do with this Window Pop-Out card design.

As I mentioned earlier, this suite of products are all available in the 2025-2026 Annual catalog, which goes live to customer May 6. That’s a few short weeks away. But… if you were to join my team, you could purchase the items to make this card (& more) as part of your starter kit. Wouldn’t that be fun? And in any future orders you would always get at least 20% off your purchase, just for being a demonstrator. And being a part of this team – well, lots of creative folks to inspire & encourage and learn more & more. so, think about it & come join the fun. Join with me here.

Want to just shop? You can see everything in my store by clicking here… Kits Collections, Last chance Products, ONLINE EXCLUSIVES, specials, Paper Pumpkin – it’s all in that link. Need a new 2025-2026 Annual Catalog – just let me know!

In just a couple of days… April 15 to be exact, Stampin’ Up! is going to be offering rewards to every customer beginning with a $20 purchase & above. No more host codes to worry about, just order & reap the benefits.

Thanks for stopping by.

May you have a beautiful day!

Stampin’ Up! Fun Fold with Calming Creek Cards & Mixed Florals Bundle

Oh my – tomorrow – Jan 7 is the BIG DAY for ordering from the Jan-Apr 2025 Mini Catalog AND using benefits from the Jan-Feb Sale-a-Bration Catalog. WooHoo! Excitement is building!!! My card today uses the Calming Creek Cards & Envelopes from the 2024-2025 Annual Catalog and the Mixed Florals Bundle from an ONLINE EXCLUSIVE. I love this bundle (and it’s part of a suite of products too). So… here’s the card.

Stampin' Up! Calming Creek Card w/ Mixed Florals Bookfold

I folded the Calming Creek card on it’s score line then scored again at 3 1/4. Between the 4 1/4 & 3 1/4 scores I added adhesive to secure it in place. I wrapped that section with Bordered Ribbon in Basic Beige and secured it with a glue dot at the knot. I took one of the Elements of Text stamps (also an ONLINE EXCLUSIVE) and stamped a Basic Beige panel in two places with Memento Ink – see the image. I die cut the panel with second from the largest Perennial Postage Dies then removed just enough from the left edge for it to fit on the book fold front. Save this removed piece!

On a Basic White piece, I stamped the floral image in Memento ink and colored it with Stampin’ Blends: Wild Wheat, Daffodil Delight and Summer Splash. Once the coloring was complete, I added Wink of Stella to many of the small flowers, to the large flowers and to some areas of the leaves. I die cut this with the appropriate die from the Mixed Florals Dies, added dimensionals to the back and attached it to the card front. I then stamped the super cute lady bugs from Mixed Florals stamp set in Memento ink and colored with Petunia Pop Blends.

Stampin' Up! Calming Creek Book fold card inside

On the inside of the card I added the removed cut strip from the Perennial Postage die cut and that was it.

Stampin' Up! Calming Creek card & envelope

Here is the card with it’s own envelope. I love how they coordinate. And yes, I could have stamped a portion of the floral stamp, but chose to keep it simple.

Want to order these products from me? When you shop with me and your purchase is $50 or more – you will receive a free giftie valued up to $`10 that is a Stampin’ Up! item. You will also receive the monthly tutorial – January is the Toadstool and it has some really cute ideas.

Use my

CURRENT HOST CODE WTGKS9DH

when purchasing and

make certain my name is listed as your demonstrator :O

To view the LAST CHANCE PRODUCTS – CLICK HERE

To view the ONLINE EXCLUSIVES – CLICK HERE

Want to see the 2024-2025 Annual Catalog? Click HERE

Want to JOIN MY TEAM? Click HERE!

And finally – click HERE for the Kits Collection

What is a Stampin’ Up! demonstrator?

Stampin’ Up! demonstrators are creative consultants who help others learn card making and paper crafting techniques using our high quality products and pre-designed kits. They get early access to the latest products and catalogs, receive discounts, earn commission, and are part of an exciting, global community.

Starter Kit

The Starter Kit gives you lots of fabulous Stampin’ Up! products at a great price: $99 for $125 worth of products (including shipping and FREE business supplies).

Best of all, you choose which products will arrive in your kit so you can start crafting right away!

Lots of info to share – questions? Connect with me! Always happy to help. Until later – May you have a beautiful day. Make someone happ[y sending them a handmade card filled with love.

THANKS FOR STOPPING BY!

Stampin’ Up! Country Birdhouse for Amy’s Inkin’ Krew Blog Hop Group

Welcome! It is the 2nd Tuesday of the month and time for Amy’s Inkin’ Krew Blog Hop. I hope you enjoy the creations you see today. The theme is ‘celebrate summer’ and we can interpret that any way that inspires. I think you may see a lot of different ideas here today. I have chosen to work with the Country Woods Designer Series Paper and the Country Birdhouse bundle to prepare today’s card.

Stampin' Up! AIK Blog Hop Group
Stampin' Up! Country birdhouse card front

This card uses two particular bundles: Country Birdhouse and it’s coordinating dies and Nested Friends and it’s coordinating dies. Nested Friends is now an ONLINE EXCLUSIVE set, while Country Birdhouse is in the new 2024-2025 Annual Catalog. I began by making the birdhouse portion first then the rest of the card followed.

Directions:

  • Fold a piece of the Country Woods DSP (8 1/2 x 11 to 4 1/4 x 11)
  • Lay the birdhouse die (from Country Birdhouse Dies) along the fold line with one side of the roofline extending beyond the cutting line until it is OVER the fold – meaning it will NOT cut along the fold. (You can place either side of the roof beyond the fold). Die cut. You now have a birdhouse that opens & closes along one side of the roof. :O) YAY!
  • Die cut the hole opening using the appropriate die
  • Die cut the additional roof decorations from Country Woods DSP – noting the direction of the grain (this happens to be the Misty Moonlight color in the pack)
  • Die cut the bottom panel on the birdhouse – adhere all pieces. There is one die cut from Basic White and I layered it over the other two, where they are adhered together.
  • See that little small circle piece below the opening – that is supposed to indicate a landing spot for the birds!
  • Stamp the bird on the front in Memento ink and color with Watercolor Pencils: Real Red, Early Espresso, Basic Gray
    • These are house finches – the male has the red head and a bit of red down the front breast. Intermixed is some gray & brown.
    • I used short strokes, not covering the entire bird at once, to make it look more like feathers.
    • I colored the eye with a Basic Black Marker using the fine tip end
    • I clipped the beak down the center of it, cut a short length of Linen Thread, took the fibers apart and ‘encouraged’ them into the cut of the beak. I turned this item over and added a dot of liquid glue to secure the thread in place. I put dimensional on the bird and added it to the birdhouse front. The male finch is helping it’s partner build a nest – it’s what they do!
  • To create the opposite facing bird is called ‘reverse stamping’.
    • Using Memento ink, ink the stamp and stamp a Window Sheet, then turn the window sheet over and place it on a Basic White scrap. Rub over the window sheet without it moving, then lift window sheet. A bird stamped in reverse has been created!
    • Color it with Watercolor Pencils: mostly Early Espresso, Basic Gray, just a bit of real Red and some Crushed Curry. Keep going over this until satisfied with the result. This is a female finch!
Stampin' Up! Step 1 Reverse Stamping
Step 1: stamp window sheet
Stampin' Up! Step 2, turn window sheet over onto card stock, ink side down
Step 2: turn window sheet over, ink side on card stock
Stampin' Up! Reverse stamping - bird

First of all, more photos should have been taken! What you are seeing is the female finch bird already die cut & adhered in place. :O(

I used the Nested Friends stamp set for the nest, inked with Early espresso ink then used a sponge dauber to add a bit of Copper Clay in places, then stamped it directly to the inside of the birdhouse. I adhered the female finch inplace with liquid glue. I diec ut another piece of Country Woods DSP for the bottom strip on the birdhouse inside.

The card base is Early Espresso, 4 1/4 x 11 scored at 5 1/2. Adhered to that is a Country Woods panel 4 1/4 x 5 1/2 that I ran through the Timber 3D embossing folder. I stamped this wonderful branch in Early espresso ink using the Nested Friends stamp set, then die cut it with Nested Friends Dies. I adhered the tree branch in place with mini stampin’ dimensionals. I took a length of Linen Thread and put it over the branch and adhered it in place with Seal+. I adhered the birdhouse over that with liquid glue – to make it appear as though the birdhouse was hanging from the tree branch.

With the card front complete, I worked on the inside of the card.

Stampin' Up! Country Birdhouse card w/ Nested Friends

I began by stamping the branch from Nested Friends in Early Espresso ink on the Basic White panel. Using the Country Birdhouse stamps, I stamped the bird on the left in Memento ink, then stamped the bird on the right using the Reverse Stamping method. I colored the leaves with Stampin’ Blends: Granny Apple Green. I stamped the sentiment from Country Birdhouse in Early espresso ink. With the stamping complete, I adhered this to a slightly larger Misty Moonlight, then to the inside of the card.

Stampin' Up! Country Birdhouse card & envelope

For the envelope, I used more of the Country Woods DSP to add to the flap, trim to fit. I stamped the bird on the right side using the reverse stamping technique as mentioned above.

Now … time to see what the others on the team have created. click the previous button or the next button… or click on a name. Remember to also read more info below on how to purchase these products from me.

  1. Tara Carpenter
  2. Karen Ksenzakovic
  3. Mary Deatherage
  4. Ann Louise Fodgaard
  5. Karen Finkle
  6. Terry Lynn Bright
  7. Carol Buckalew
  8. Christie King
  9. Amy Koenders
Stampin' Up! 10% off Stamp & Die Bundles

here’s a link to take you directly to the items available in this catalog –

and to shop with me.

STAMPIN’ UP! STAMP & DIE BUNDLE 10% OFF SALE!!

Sales Period: 5–30 June 2024
Ordering Deadlines
Phone: 28 June 2024 at 6:59 p.m. (MT)  
Online: 30 June 2024 at 11:59 p.m. (MT)

Get an additional 10% discount on stamp and die bundles only (that’s a total of 20% discount on stamp and die bundles!). This excludes suite collections, stamp and punch bundles, bundles not yet released to customers, and any other bundles*.

Save 10% on Stampin’ Cut & Emboss Machine and Mini Stampin’ Cut & Emboss Machine (white and Boho Blue). 

The 10% discount applies automatically to stamp and die bundles in all orders… including Starter Kit orders.

See and shop all qualifying bundles in the online store.

Please note Close to My Heart products are not included in this promotion.

Stampin' Up! 10% off machine sale

Stampin’ Up! Demonstrators get the SAME discounts and sales that CUSTOMERS do – on TOP OF their demonstrator discount

Keeping that information in the forefront of your mind,

NOW is a perfect time to JOIN THE TEAM!

Join with me by following this link...

To view all the available ONLINE EXCLUSIVES, click here.

Clearance items may be found here

While you’re looking around in my store, remember there are some stunning kits available, for all ages and all seasons – even Christmas! And while you’re shopping, I offer fringe benefits to my customers: free tutorial of the month and a FREE Stampin’ Up! item valued to $10 – all for a $50 order, before shipping and taxes. Use my current host code to receive those benefits – especially when your order does not exceed $150. Make certain my name is listed as your demonstrator when checking out! :O)

HOST CODE  BAQG9RSE

Thanks for stopping by. May you have a beautiful day. Make someone happy when sending them a handmade card filled with love.

Stampin’ Up! w/ Thoughtful Journey DSP & Emboss Resist

Good morning, good morning! It’s cool this AM – 57 – after a couple of days of 100% humidity and 87 temps. This feels much more refreshing :O) Thursday was my card class and we did a window z-fold card, similar to what I posted a week or so ago, which you see here. I’m hooked on this style card – just sayin’. I needed a couple of cards – thank you and another for a friend recovering from surgery – and here’s what I did.

Stampin' Up! Thoughtful Journey Window z-fold Thank You

I really like the colors of the thank you card with the Misty Moonlight card base than the other card. However, when making a card for a specific person, and the card on the right was, we follow what would be best for them. The card cuts and basic directions are the same for both cards. The main difference is the inside on the second card using the emboss resist technique. The Stitched Shapes Dies were used for the circles and the banner die cuts.

Stampin' Up! Window z-fold and emboss resist technique

I stamped the partial image of these flowers in VersaMark ink using the Thoughtful Wishes stamp set – re-inking and stamping across the bottom five times. I sprinkled white embossing powder over the image, heat embossed with the heat tool and let it cool for a bit. Once cool, I took a Blending Brush and Boho Blue ink and with swirling/ circling strokes went over the stamped images. Here’s a close-up.

Stampin' Up! Emboss Resist Technique

I love this effect and it mimics the Thoughtful Journey 6×6 DSP. I stamped the sentiments in Fresh Freesia ink using the Unbounded Love stamp set.

Here’s the inside of the ‘thanks’ card.

On this card I stamped the partial image in Wild Wheat ink, mimicking the image on the front of this card. I used a Blending Brush and Misty Moonlight ink to add color over this.

Stampin' Up! Window z-fold thank you card & envelope

After stamping the image on the inside of the card and not really ‘sold’ on the image, I looked over my stamps and found another image I liked better to use on the envelope front. I stamped it in Whisper White ink then heat set it since it is a pigment ink and takes a bit to dry. I then used that same Blending Brush that I had used on the inside with Misty Moonlight ink and colored over the image. In person, the image is obvious – in the photo it is not. The stamp set used for that was the Charming Ducks stamp set.

Thoughtful Journey 6×6 DSP item 163303

Thoughtful Wishes stamp set, also on pg 47 – item 163305 HOWEVER… there are coordinating dies, and when purchased as a bundle during the month of June, it is 20% off – Thoughtful Wishes bundle item 163314

These may be found on page 47 in the 2024-2025 Annual Catalog.

here’s a link to take you directly to the items available in this catalog –

and to shop with me.

Stampin' Up! Stamp & Die Bundle Sale

STAMPIN’ UP! STAMP & DIE BUNDLE 10% OFF SALE!!

Sales Period: 5–30 June 2024
Ordering Deadlines
Phone: 28 June 2024 at 6:59 p.m. (MT)  
Online: 30 June 2024 at 11:59 p.m. (MT)

  • Get an additional 10% discount on stamp and die bundles only (that’s a total of 20% discount on stamp and die bundles!). This excludes suite collections, stamp and punch bundles, bundles not yet released to customers, and any other bundles*.
  • Save 10% on Stampin’ Cut & Emboss Machine and Mini Stampin’ Cut & Emboss Machine (white and Boho Blue). 
  • The 10% discount applies automatically to stamp and die bundles in all orders… including Starter Kit orders.
  • See and shop all qualifying bundles in the online store.

*Please note Close to My Heart products are not included in this promotion.

Stampin' Up! Machine Sale

Stampin’ Up! Demonstrators get the SAME discounts and sales that CUSTOMERS do – on TOP OF their demonstrator discount

Keeping that information in the forefront of your mind,

NOW is a perfect time to JOIN THE TEAM!

Join with me by following this link...

To view all the available ONLINE EXCLUSIVES, click here.

Clearance items may be found here

While you’re looking around in my store, remember there are some stunning kits available, for all ages and all seasons – even Christmas! And while you’re shopping, I offer fringe benefits to my customers: free tutorial of the month and a FREE Stampin’ Up! item valued to $10 – all for a $50 order, before shipping and taxes. Use my current host code to receive those benefits – especially when your order does not exceed $150. Make certain my name is listed as your demonstrator when checking out! :O)

HOST CODE  BAQG9RSE

Thanks for stopping by. May you have a beautiful day. Make someone happy when sending them a handmade card filled with love.

CARD CUTS:

  • Card base 8 1/2 x 5 1/2 scored at 4 1/4
  • Basic White inside: 8 1/2 x 5 1/4 scored at 4 & 6 1/4, burnishing to make it a z-fold.

ITEMS USED:

  • Thoughtful Journey 6×6 DSP
  • Thoughtful Wishes stamp set / bundle available!
  • Stitched Shapes Dies
  • Blending Brush
  • Boho Blue nink
  • Misty Moonlight ink
  • VersaMark ink
  • White embossing powder
  • Heat tool
  • Stampin’ Die Cut machine
  • Paper Trimmer
  • Bone folder

Stampin’ Up! Frames & Flowers Sympathy Card

Frames & Flowers 12 x 12 Designer Series Paper is simply gorgeous – soft colors, leaf & flower themed, the pack of papers includes die cut images as well. This paper may be found on page 29 in the 2024-2025 Annual Catalog. To make today’s card, I used several of the die cuts, You are Beautiful stamp set and the Hope You Know stamp set for the sentiments. The card base is Lost Lagoon cut 8 1/2 x 5 1/2, scored @ 4 1/4 with a layer of Basic White 4 x 5 1/4.

Stampin' Up! Frames & Flowers Sympathy card front

I began by adhering the frame die cut from the pack of Frames & Flowers 12 x 12 DSP onto a basic White panel. I stamped the sentiment in Lost Lagoon ink using the Hope You Know stamp set. I added a couple of die cuts from the DSP pack attaching them with dimensionals: the leaves in the lower right and the flower & leaves corner die cut. I added Wink of Stella to the several of the darkest leaves on the lower left and on the flowers of the corner die cut. This doesn’t show in the photo, but in person it adds a beautiful touch of elegance.

Stampin' Up! Frames & Flowers Sympathy card inside

For the inside of the card, I stamped the sentiment in Lost Lagoon ink using the Hope You Know stamp set. The leaf image is another of the die cuts from the Frames & Flowers 12 x 12 DSP pack, and was adhered with dabs of liquid glue. And yes, I added Wink of Stella to several of the leaves here as well.

Stampin' Up! Frames & Flowers 
Sympathy Card & envelope

For the Basic White envelope I stamped the leaf images using the You are Beautiful stamp set and Lost Lagoon ink. This is a ‘distinctive’ stamp set, meaning when the images are stamped there is depth. Notice how some of the leaves on the flap are darker than others – that’s what I mean.

Frames & Flowers 12 x 12 DSP may be found on page 29 – item 163765

Hope You Know stamp set may be found on page 85 – item 161409

You Are Beautiful stamp set may be found on page 93 – item 163704

The 24-25 Annual Catalog is now live… here’s a link to take you directly to the items available in this catalog – and to shop with me.

Stampin' Up! Stamp & Die bundle sale

STAMPIN’ UP! STAMP & DIE BUNDLE 10% OFF SALE!!

Sales Period: 5–30 June 2024
Ordering Deadlines
Phone: 28 June 2024 at 6:59 p.m. (MT)  
Online: 30 June 2024 at 11:59 p.m. (MT)

  • Get an additional 10% discount on stamp and die bundles only (that’s a total of 20% discount on stamp and die bundles!). This excludes suite collections, stamp and punch bundles, bundles not yet released to customers, and any other bundles*.
  • Save 10% on Stampin’ Cut & Emboss Machine and Mini Stampin’ Cut & Emboss Machine (white and Boho Blue). 
  • The 10% discount applies automatically to stamp and die bundles in all orders… including Starter Kit orders.
  • See and shop all qualifying bundles in the online store.

*Please note Close to My Heart products are not included in this promotion.

Stampin’ Up! Demonstrators get the SAME discounts and sales that CUSTOMERS do – on TOP OF their demonstrator discount

Keeping that information in the forefront of your mind,

NOW is a perfect time to JOIN THE TEAM!

Join with me by following this link...

To view all the available ONLINE EXCLUSIVES, click here.

Clearance items may be found here

While you’re looking around in my store, remember there are some stunning kits available, for all ages and all seasons – even Christmas! And while you’re shopping, I offer fringe benefits to my customers: free tutorial of the month and a FREE Stampin’ Up! item valued to $10 – all for a $50 order, before shipping and taxes. Use my current host code to receive those benefits – especially when your order does not exceed $150. Make certain my name is listed as your demonstrator when checking out! :O)

HOST CODE  BAQG9RSE

Thanks for stopping by. May you have a beautiful day. Make someone happy when sending them a handmade card filled with love.

Stampin’ Up! Full of Life & Flowers of Beauty Dies for the Happy Inkin’ Thursday Blog Hop

It’s Thursday and time for another Happy Inkin’ Thursday Blog Hop. We have a color challenge today and I can hardly wait to see what others on the team have created.

Stampin' Up! Happy Inki9n' Thursday Blog Hop color challenge
Stampin' Up! Full of Life DSP & Flowers of Beauty Dies card front

Aren’;t these great colors? Bright, cheery, happy colors. I have someone specific in mind for this card. It was really quite quick and simple – and sometimes that’s best.

I began with a 4 1/4 x 11, scored at 5 1/2, Basic White card base and adhered a piece of the Full of Life 6×6 DSP to the front (4 1/4 x 5 1/2). I die cut the fronds using the Flowers of Beauty Dies and adhered with dabs of glue. I stamped the sentiment on a piece of Basic White using Pumpkin Pie ink and the Wonderful Thoughts stamp set. I die cut this with the Stitched Shapes Dies. I folded over a piece of the Bordered Ribbon in Peach Pie and added it with glue dots over the fronds. I put dimensionals on the die cut circle sentiment and placed it over the ribbon. Finally, I added three Opal Rounds Assortment in Night of Navy.

Stampin' Up! Full of Life, card inside

For the inside, I stamped the sentiment in Pumpkin Pie ink using another stamp in the Wonderful thoughts stamp set and another panel of Basic White 4 x 5 1/4. I added this to the inside of the card, then adhered a strip of the Full of Life DSP at the bottom, full width of 4 1/4.

Stampin' Up! Full of Life & Flowers of Beauty Dies card & envelope

For the envelope, I took a piece of the Full of Life 6×6 DSP cut 2 1/4 x 6, adhered it to the envelope flap – and that was it. I love the simplicity but also the effectiveness of this card – full of thanks and appreciation.

Now, time to see what fabulous creation Carol is sharing… click the ‘next’ button or follow the links as you see fit. Remember to look below the list of names for some fantastic opportunities from me & Stampin’ Up!

Amy Koenders

Mary Deatherage

Jaimie Babarczy

Karen Finkle

Karen Ksenzakovic

Tara Carpenter

Terry Lynn Bright you are here!

Carol Buckalew

Nel Thames

The 2024-2026 In Color Starter Kit promotion ends on 31 May and here’s the information about that…

Stampin' Up! Joining Promotion

To join is $99 and what comes with joining, besides your 15-20% discount on every order…

FOUR FREE IN COLOR PRODUCTS valued to $82

  • Those FREE items – the IN COLOR products
    • Classic stampin’ pad bundle – 5 of them
    • package of 8 1/2 x 11 cardstock – 5 of those
    • 6×6 Designer Series Paper – 5 colors in the pack
    • coordinating Stampin’ Write markers. That’s $82 worth of products – for FREE if you join between now and May 31
  • your choice of $125 worth of products. . You will also receive free shipping on these products + free business supplies. What’s not to like about this joining special!

Join with me by following this link...

Join now and when the fabulous BUNDLE AND MACHINE SALE goes live June 5 – you will get even more off as a demonstrator! :O)

Stampin' Up! 10% off Bundle and Machine SALE

Sales Period: 5–30 June 2024
Ordering Deadlines
Phone: 28 June 2024 at 6:59 p.m. (MT)  
Online: 30 June 2024 at 11:59 p.m. (MT) 

  • Get an additional 10% discount on stamp and die bundles only (that’s a total of 20% discount on stamp and die bundles!). This excludes suite collections, stamp and punch bundles, bundles not yet released to customers, and any other bundles*.
  • Save 10% on Stampin’ Cut & Emboss Machine and Mini Stampin’ Cut & Emboss Machine (white and Boho Blue). 
  • The 10% discount applies automatically to stamp and die bundles in all orders… including Starter Kit orders (June 5 – 30)
  • See and shop all qualifying bundles in the online store.

*Please note Close to My Heart products are not included in this promotion.

REMEMBER…

Stampin’ Up! Demonstrators get the SAME discounts and sales that CUSTOMERS do – on TOP OF their demonstrator discount

To view all the available ONLINE EXCLUSIVES, click here.

Clearance items may be found here

The 24-25 Annual Catalog is now live… here’s a link to take you directly to the items available in this catalog – Happy shopping!

While you’re looking around in my store, remember there are some stunning kits available, for all ages and all seasons – even Christmas! And while you’re shopping, I offer fringe benefits to my customers: free tutorial of the month and a FREE Stampin’ Up! item valued to $10 – all for a $50 order, before shipping and taxes. Use my current host code to receive those benefits – especially when your order does not exceed $150. Make certain my name is listed as your demonstrator when checking out! :O)

HOST CODE  BAQG9RSE

Thanks for stopping by. May you have a beautiful day. Make someone happy when sending them a handmade card filled with love.

Stampin’ Up! Big Sale Coming June 5

Oh my goodness – excitement is in the air – Stampin’ Up! is hosting a 10% off sale of all stamp & die bundles – and that includes the 10% off when purchasing bundles, so an additional 10%! WooHoo… AND 10% off die cut and embossing machines, both the mini and the regular size. Keep reading for more info…

Sales Period: 5–30 June 2024
Ordering Deadlines
Phone: 28 June 2024 at 6:59 p.m. (MT)  
Online: 30 June 2024 at 11:59 p.m. (MT) 

  • Get an additional 10% discount on stamp and die bundles only (that’s a total of 20% discount on stamp and die bundles!). This excludes suite collections, stamp and punch bundles, bundles not yet released to customers, and any other bundles*.
  • Save 10% on Stampin’ Cut & Emboss Machine and Mini Stampin’ Cut & Emboss Machine (white and Boho Blue). 
  • The 10% discount applies automatically to stamp and die bundles in all orders… including Starter Kit orders.
  • See and shop all qualifying bundles in the online store.

*Please note Close to My Heart products are not included in this promotion.

Stampin' Up! 10% off bundles & machines

And here’s the thing… with the joining promotion – you should know

Stampin’ Up! Demonstrators get the SAME discounts and sales that CUSTOMERS do – on TOP OF their demonstrator discount

Keeping that information in the forefront of your mind,

NOW is a perfect time to JOIN THE TEAM!

The 2024-2026 In Color Starter Kit promotion ends on 31 May and here’s the information about that…

Stampin' Up! Joining Promotion

To join is $99 and what comes with joining, besides your 15-20% discount on every order… FOUR FREE IN COLOR PRODUCTS valued to $82 plus your choice of $125 worth of products. Those FREE items – the IN COLOR products – Classic stampin’ pad bundle – 5 of them, package of 8 1/2 x 11 cardstock – 5 of those, 6×6 Designer Series Paper – 5 colors in the pack, and the coordinating Stampin’ Write markers. That’s $82 worth of products – for FREE if you join between now and May 31. You will also receive free shipping on these products + free business supplies. What’s not to like about this joining special!

Join with me by following this link...

To view all the available ONLINE EXCLUSIVES, click here.

Clearance items may be found here

The 24-25 Annual Catalog is now live… here’s a link to take you directly to the items available in this catalog – Happy shopping!

While you’re looking around in my store, remember there are some stunning kits available, for all ages and all seasons – even Christmas! And while you’re shopping, I offer fringe benefits to my customers: free tutorial of the month and a FREE Stampin’ Up! item valued to $10 – all for a $50 order, before shipping and taxes. Use my current host code to receive those benefits – especially when your order does not exceed $150. Make certain my name is listed as your demonstrator when checking out! :O)

HOST CODE  BAQG9RSE

Thanks for stopping by. May you have a beautiful day. Make someone happy when sending them a handmade card filled with love.

Stampin’ Up! Magnolia Mood Thinking of you

Good morning – and today is Memorial Day – a time of remembering those who gave their lives for our country, that we might have the freedoms we all share. Whatever you plan for today – honor & remember these individuals.

My card today uses the absolutely gorgeous Magnolia Mood bundle that can be found in the ONLINE EXCLUSIVES.

Stampin' Up! Magnolia Mood Bundle, card front

Basic Beige is the card base, a wonder neutral, and is 4 1/4 x 11 scored at 5 1/2. I added a layer of Early Espresso 4 x 5 1/4, then a layer of Country Woods DSP 3 7/8 x 5 1/8. I die cut the very delicate image and additional leaves in Mossy Meadow card stock – from the Magnolia Mood Dies. Unfortunately, on this card, much of that is covered up, but it does show around the fringes of the hand-colored magnolia and seed pod.

Next, stamp the magnolia is Memento ink and color it with Stampin’ Blends: Petal Pink for the magnolia and buds; Daffodil Deloight for the flower center; leaves are a mix of Light Mossy Meadow, Light Old Olive and Light Wild Wheat. The seed pod is Daffodil Delight with shading of Light Wild Wheat at it’s base. I put a squeeze of Wink of Stella on an acrylic block and brushed that on the main flower & buds, following the shading lines on the image. In other words, I did not cover the entire flower! I also used Wink of Stella in the same fashion on the seed pod. Once colored, die cut both the seed pod and the flower images.

Stampin' Up! Magnolia Mood image w/ Wink of Stella

I tried to photograph the image to show how it glitters. It shows just a bit.

I played with all the parts before settling with the final layout above. The delicate mossy meadow die cut was adhered with liquid glue, the large hand-colored image with dimensionals; the seed pod was tucked under & added with dabs of liquid glue, as were the additional leaves. For the sentiment, I turned over a remaining piece of the Country Woods DSP used on the card front and stamped the sentiment in Early Espresso ink. The sentiment comes from the Hope You Know stamp set, another ONLINE EXCLUSIVE. It is die cut with a die from Wonderful Thoughts Dies. As a final touch, I added three Opal Rounds Assortment in Daffodil Delight.

Stampin' Up! Magnolia Mood card, inside

On the inside of the card… a layer of Early Espresso 4 x 5 1/4 adhered to the card base, inside. The flower bud was stamped in Memento ink (Magnolia Mood stamp s et) on the Basic White panel 3 7/8 x 5 1/8. I colored it similarly as the flowers on the card front: Stampin’ Blends – Light Petal Pink on the flower & bud, Light Mossy Meadow, Light Old Olive, Light Wild Wheat on the leaves. I added Wink of Stella to the flower & bud, same as the card front. This panel was adhered to the inside of the card.

Stampin' Up! Magnolia Mood card & envelope

For the envelope, another piece of the Country Woods DSP was adhered to the flap and trimmed tom fit. On the envelope front, same small flower from the Magnolia Mood stamp set, stampedn in Memento ink and colored with Stampin’ Blends as done on the inside of the card. I also added Wink of Stella to this flower & bud. TIP: remember when using Stampin’ Blends on an envelope, to slip another piece of scrap card stock inside so the blends do not bleed through to the envelope back!

The 24-25 Annual Catalog is now live… here’s a link to take you directly to the items available in this catalog – Happy shopping!

Choose this link to subscribe to Paper Pumpkin with me

Stampin’ Up! has a fabulous joining opportunity from May 1-31.

Stampin' Up! Joining Promotion

To join is $99 and what comes with joining, besides your 15-20% discount on every order… FOUR FREE IN COLOR PRODUCTS valued to $82 plus your choice of $125 worth of products. Those FREE items – the IN COLOR products – Classic stampin’ pad bundle – 5 of them, package of 8 1/2 x 11 cardstock – 5 of those, 6×6 Designer Series Paper – 5 colors in the pack, and the coordinating Stampin’ Write markers. That’s $82 worth of products – for FREE if you join between now and May 31. You will also receive free shipping on these products + free business supplies. What’s not to like about this joining special!

Join with me by following this link...

To view all the available ONLINE EXCLUSIVES, click here.

Clearance items may be found here

While you’re looking around in my store, remember there are some stunning kits available, for all ages and all seasons – even Christmas! And while you’re shopping, I offer fringe benefits to my customers: free tutorial of the month and a FREE Stampin’ Up! item valued to $10 – all for a $50 order, before shipping and taxes. Use my current host code to receive those benefits – especially when your order does not exceed $150. Make certain my name is listed as your demonstrator when checking out! :O)

HOST CODE  BAQG9RSE

Thanks for stopping by. May you have a beautiful day. Make someone happy when sending them a handmade card filled with love.


Stampin’ Up! Citrus Blooms Checking In

Playing with the Citrus Blooms bundle… and made this simple. but layered card. With the Mediterranean Blooms DSP and a couple of coordinating Dies, it’s super easy. Here are two dies that fit this particular sheet.

Stampin' Up! Citrus Blooms Dies on Mediterranean Blooms DSP

Is this stunning DSP or what?! And here’s the card I created using that larger die and the Mediterranean Blooms DSP.

Stampin' Up! Citrus Blooms Bundle card front

And here’s how I did this…

  • Thick Basic White for the card base 8 1/2 x 5 1/2 scored at 4 1/4
  • Layer: Basic White 4 1/8 x 5 3/8 run through the Distressed Tile 3D embossing folder and adhered to the card front
  • Using three dies that ‘fit’ together, die cut Basic White 4 x 5 1//4. This creates the gorgeous leafy background, frame and inner leafy pattern. Adhere these as another layer to the card front
  • The large orange pattern from the Mediterranean Blooms is added with dimensionals, centering it. I added Wink of Stella to the shaded portions of the leaves & oranges. TIP: you get a better glitter of the Wink of Stella if you squeeze a bit on an acrylic block and add it to the desired area.
Stampin' Up! Mediterranean Blooms  DSP with Wink of Stella
Stampin' Up! Mediterranean Blooms w/ Wink of Stella.2

Can you see the sparkle? It doesn’t show well at all in photos!!!

To complete the card front, I stamped the sentiment on Basic White strip using a stamp from Citrus Blooms stamp set and Garden Green ink. I attaached it with dimensionals and added three Adhesive-Backed Shiny Sequins in Peach Pie. I may have to add two more on the lower left!

Stampin' Up! Citrus Blooms Dies, inside

For the inside, I added a piece of Peach Pie card stock 4 1/8 x 5 3/8 to the inside of the card. I die cut a Basic White panel with Citrus Blooms frame die, stamped the sentiment in garden Green ink, then added the three blooms on the lower left in Lemon Lolly ink and a Peach Pie Marker for dots in the center of the flowers. These stamps are part of the Citrus Blooms stamp set. And this panel was added to the inside of the card.

Stampin' Up! Citrus Blooms Bundle card & envelope

For the envelope I cut a piece of a different pattern from Mediterranean Blooms DSP 2 1/4 x 6, added it to the flap & trimmed it to fit. Done! Such an elegant look! I toyed with the inside, whether to leave it all white or not. I think if I do this card again, I would make the inside all white. Thoughts? Opinions?

OK – now for some links to purchase these gorgeous items…

The 24-25 Annual Catalog is now live… here’s a link to take you directly to the items available in this catalog – Happy shopping!

Stampin’ Up! has a fabulous joining opportunity from May 1-31.

Stampin' Up! Joining Promotion

To join is $99 and what comes with joining, besides your 15-20% discount on every order… FOUR FREE IN COLOR PRODUCTS valued to $82 plus your choice of $125 worth of products. Those FREE items – the IN COLOR products – Classic stampin’ pad bundle – 5 of them, package of 8 1/2 x 11 cardstock – 5 of those, 6×6 Designer Series Paper – 5 colors in the pack, and the coordinating Stampin’ Write markers. That’s $82 worth of products – for FREE if you join between now and May 31. You will also receive free shipping on these products + free business supplies. What’s not to like about this joining special!

Join with me by following this link...

To view all the available ONLINE EXCLUSIVES, click here.

The adhesive-Backed Shiny Sequins are an ONLINE Exclusive item.

Clearance items may be found here

While you’re looking around in my store, remember there are some stunning kits available, for all ages and all seasons – even Christmas! And while you’re shopping, I offer fringe benefits to my customers: free tutorial of the month and a FREE Stampin’ Up! item valued to $10 – all for a $50 order, before shipping and taxes. Use my current host code to receive those benefits – especially when your order does not exceed $150. Make certain my name is listed as your demonstrator when checking out! :O)

HOST CODE  BAQG9RSE

Thanks for stopping by. May you have a beautiful day. Make someone happy when sending them a handmade card filled with love.


Stampin’ Up! Wildly Flowering DSP for the Happy Inkin’ Thursday Blog Hop

Good morning! Happy Thursday and welcome to our hop… We have a sketch challenge today and I have chosen to create two cards using the Wildly Flowering 12 x 12 Designer Series Paper. One is a bit simpler than the other, just to show a comparison.

Stampin' Up! Wildly Flowering DSP card front

This DSP is so stunning… love the colors and pretty images too! You notice I took a bit of liberty with the sketch by changin g where I placed the sentiment. I did not want to cover up the flower! Here are the basics:

  • Card base is 8 1/2 x 5 1/2 scored at 4 1/4 (Misty Moonlight)
  • DSP largest layer 4 1/4 x 5 1/2 adhered directly to card front
  • Bubble Bath layer 3 1/4 x 4 1/2 adhered directly to DSP layer
  • DSP layer 3 1/8 x 4 3/8 adhered directly to Bubble Bath layer
  • Sentiment is stamped in Moody Mauve ink on 5/8 x 3 Basic White (Sweetly Scripted stamp set – ONLINE ONLY). This was added with dimensionals
  • Embellishment: Flat Adhesive-Backed Pearls, 3
Stampin' Up! Textured Floral stamp set, inside of card

For the inside… A layer of Bubb leBath card stock cut 4 x 5 1/4 was adhered directly to the inside of the card. A Basic White panel was stamped with images from the Textured Floral stamp set: Bubble Bath for the flower/ Moody Mauve for the stamen. For the leaves, I inked them with Old Olive ink then used the Mossy Meadow Marker to add some depth and shadow. This panel (3 7/8 x 4 1/8) was added to the inside – and the card was complete.

Stampin' Up! Wildly Flowering DSP card & envelope

For the envelope… more of the same Wildly Flowering 12 x 12 DSP on the flap, trimmed to fit. On the front, Textured Floral stamp set, Bubble Bath ink for the flower and Moody Mauve for the stamen. This completes the look and coordinates the entire card. :O)

Here is the other, more minimalistic card – no stamping except for the sentiment: Sweetly Scripted in Moody Mauve ink and same Flat Adhesive- Backed Pearls.

Stampin' Up! Wildly Flowering DSP  Card 2, card & envelope
Stampin' Up! Wildly Flowering DSP, card 2, inside

This card 2 is so similar, yet, simpler. Forthe beginning crafter, little stamping and supplies needed. Must the sentiment be on dimensionals – no! Must the beginning crafter add embellishments – no! I did because I like the look of layers and depth dimensionals create, and I like the added embellishments, but it is NOT necessary. Use what you have. Could I have added a Linen Thread bow behind the sentiment – on both cards? Absolutely!!! But for this, I kept it fairly simple.

Now, on with the hop… I can’t wait to see what others on the team have created! Click on the ‘next’ button or click on a name. Either way, enjoy the hop! See below how to purchase the products shown in this cardn. – from me!

Amy Koenders

Mary Deatherage

Jaimie Babarczy

Karen Finkle

Akiko Sudano

Karen Ksenzakovic

Tara Carpenter

Terry Lynn Bright ~ you are here!

Carol Buckalew

Nel Thames

The 24-25 Annual Catalog is now live… here’s a link to take you directly to the items available in this catalog – Happy shopping!

Stampin’ Up! has a fabulous joining opportunity from May 1-31.

Stampin' Up! Joining Promotion

To join is $99 and what comes with joining, besides your 15-20% discount on every order… FOUR FREE IN COLOR PRODUCTS valued to $82 plus your choice of $125 worth of products. Those FREE items – the IN COLOR products – Classic stampin’ pad bundle – 5 of them, package of 8 1/2 x 11 cardstock – 5 of those, 6×6 Designer Series Paper – 5 colors in the pack, and the coordinating Stampin’ Write markers. That’s $82 worth of products – for FREE if you join between now and May 31. You will also receive free shipping on these products + free business supplies. What’s not to like about this joining special!

Join with me by following this link...

To view all the available ONLINE EXCLUSIVES, click here.

Clearance items may be found here

While you’re looking around in my store, remember there are some stunning kits available, for all ages and all seasons – even Christmas! And while you’re shopping, I offer fringe benefits to my customers: free tutorial of the month and a FREE Stampin’ Up! item valued to $10 – all for a $50 order, before shipping and taxes. Use my current host code to receive those benefits – especially when your order does not exceed $150.

HOST CODE WDY4XUVD

Thanks for stopping by. May you have a beautiful day. Make someone happy when sending them a handmade card filled with love.