Stampin’ Up! Peaceful Poppies, Peaceful Moments

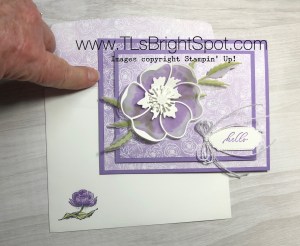
Today’s card features the fabulous Peaceful Poppies Designer Series paper, Stitched So Sweetly dies, Peaceful Moments for sentiments and finally, a gorgeous diecut from Nature’s Thoughts Dies. Let’s take a look…

Here are the deets:

  • Whisper White 8 1/2″ x 5 1/2″, scored at 4 1/4″;  3″ x 1 1/4″; for the inside 4 x 3 3/4″
  • Basic Black 4 / 5 1/4″
  • Peaceful Poppies DSP 3 3/4″ x 5″
  • Old Olive 4 1/8″ x 3 7/8″

Details:

  • Adhere the Peaceful Poppies DSP to the Basic Black with liquid glue
  • With the smallest Whisper White, stamp the sentiment for the card front from Peaceful Moments stamp set using Stazon Black ink, cut with the Stitched So Sweetly Dies. Put dimenionals on the back but do not attach yet. Determine it’s location and where exactly you want the Baker’s twine for a bow.
  • Using the Small Daisy Punch, with one of the petals, punch notches in appropriate place for the Baker’s Twine on the joined DSP/ Basic Black piece. I suggest you mark your paper so it’s even! Wrap a length of Baker’s twine, place the sentiment piece, then tie the bow. Adhere three Glitter Enamel Dots and voila – the card front is complete!

The inside:

  • Stamp the sentiment from Peaceful Moments stamp set in Stazon Black ink on the remaining piece of Whisper White.
  • Adhere this with liquid glue to Old Olive cs.
  • Using a scrap from the Peaceful Poppies DSP, diecut the gorgeous scroll with Nature’s Thoughts Dies. Adhere with liquid glue in teeny tiny amounts.
  • Adhere the Old Olive/ Whisper White piece to the inside and the card is complete.

The envelope… Adhere a coordinating piece of the Peaceful Poppies to the envelope flap.

Today’s card was created using products from the SAB catalogue. There is still time to order from it, but only until Mar 31 can you receive the free items offered with the appropriate purchase amounts. In other words, with a $50 purchase you can receive one free item offered by Stampin’ Up! Such a deal! What are you waiting for… order today.

20200103_JANJUN20_en-US        20200303_SAB20-2_en-US.    01.01.20_COORDINATION_FLYER_OOP_Q1_NA.    2020 SAB 2nd Release

Thanks for stopping by. I hope you enjoyed the card.

May you have a beautiful day. Make someone happy by sending them a handmade card.

Stampin’ Up! Scalloped Notecards and Tulip Builder Punch

Today’s card is made using the Stampin’ Up! Scalloped Notecards and Tulip Builder Punch AND the Pleased as Punch DSP that is a free item when purchasing at least $50 worth of product during the final days of Sale-a-bration.

Before we get to the card… how are you doing? With the health crisis everyone is experiencing, are you feeling closed in or is this a time to “get things done” or a time to meditate or a time to be outside? Before we see the card for today, I will share a picture of myself with our dear English Springer Spaniel Rusty. He is eight but thinks he is 2! We three, hubby was along too, visited a state park nearby and took a wonderful walk. Rusty loved every step and smell! Hubby took the picture so obviously isn’t in it… We live on the East Coast and the water in these photos  is leading to Barnegat Bay. Here they are…

Peaceful, right? It is definitely a great place to visit, walk around, feel connected to Mother Nature and our Almighty Maker.

Please follow the guidelines the CDC is recommending. May you and family be safe and stay well.


Now to the card of today…

Does this card shout Spring or what? Here are the details…

  • Using the Pleased as Punch DSP, use the Tulip Builder Punch to punch the desired tulips. I did three. What’s kind of fun is the reverse side of this paper is the wonderful green design you see used for the leaves on this card. Pretty neat, huh? Stampin’ Up! does it right!
  • Using the Timeless Tulips stamp set, stamp the stems in Granny Apple Green.
  • Adhere the Tulip punches… the bottom or tulip on the far right is adhered with liquid glue. The yellow tulip is adhered with one layer of dimensionals. The pink tulip is adhered using two layers of dimensionals.
  • Next I placed the leaves: far right is adhered with liquid glue; bottom left tulip is adhered with one layer of dimensionals; the middle leaf is adhered with a double layer of dimensionals.
  • Oh I love this bow… it is Petal Pink silver edge ribbon and just really adds a special touch to the card. It was adhered with a dimensional cut in half.
  • The sentiment was stamped with the Ornate Thanks stamp set in Tuxedo Black Memento ink on a 1/2′ strip of Whisper White. Trim as shown and adhere with dimesnionals.
  • For the inside I adhered a 1/2″ x 5″ strip of the Pleased As Punch DSP to the far right edge. When the card is closed it shows beyond the scalloped edge 🙂 I also stamped the sentiment THANKS from the Ornate Thanks stamp set. CARD IS COMPLETE!!! So fun.
  • On the envelope front I stamped the word ‘seriously,’ from the Ornate Thanks stamp set. It helps the individual understand even before opening the card that there is a special note inside.

Thank you for stopping by. I hope you like… I wish I could see the person who is receiving this card when they open it – but it’s going in the mail. You know how that is…

May you have a beautiful day. Make someone happy by sending them a handmade card.


Stampin’ Up! Flowering Foils Card and Gift Bag

My card today uses the stunning Stampin’ Up! Flowering Foils papers that can be earned with a $50 order. It also uses Daisy Lane Stamp set, Around the Corner stamp set, Beautiful Bouquet stamp set, the Medium Daisy punch and the Bouquet Bunch dies.Sounds like a lot doesn’t it? But the card was super fun and easy to create. Here it is…

Isn’t this fun? I really, really like it. This Flowering Foils paper has some body to it, was easy to work with and is stunning in person. Pictures really does not do it justice. My intension was to make a masculine card but once I got started, well, you see what happened. It isn’t masculine at all!

Here are the details:

  • Smokey Slate card stock cut to 8 1/2″ x 5 1/2″, scored at 4 1/4″
  • Blueberry Bushel cut to 4 3/4″ x 3 1/4″
  • Flowering Foils cut to 4 1/2″ x 3″

So how did I get this wonderful ombre effect? By using a brush roller! Using the roller, roll over the ink pad GOING IN ONE DIRECTION ONLY, NOT BACK AND FORTH. This allows the ink to cover the entire roller, not just sections of it. Put roller to paper starting at the top of the foils paper and moving downward. I did not go to the end of the piece as I wanted a gradient color. Continue this process until it’s to the depth of shade desired. Allow to dry a few minutes then buff lightly with a soft cloth to remove ink from the foil design. This is a bit of a messy process as it gets ink on your hands during the handling and holding of the paper. Just make certain the ink on your hands is dry before handling other papers!

  • Adhere the Flowering Foils piece to the Blueberry Bushel using liquid glue. Wrap braided linen thread around these two pieces and tie in a knot
  • Using the Daisy Lane stamp set stamp three daisies on Whisper White card stock and punch out with the Medium Daisy punch. Curl the petals by running a bone folder over the petals and lifting them. Adhere daisies together with glue dots. Adhere over the ribbon with a dimensional. Adhere a Gold Faceted Gem in the daisy center.
  • Stamp the “for you” using Blueberry Bushel ink and the Beautiful Bouquet stamp set onto a Whisper White scrap. Cut out using the Bouquet Bunch dies. Put a dimensional on the back, slip a length of linen thread through the hole and tie in a knot to the braided linen ribbon.
  • Adhere all this with dimenionals to the Smokey Slate cs and the card front is complete!

This card is for a friend who will be running a convention in a couple of months, and that’s why the sentiment on the inside. Here it is…

  • Blueberry Bushel 4 3/4″ x 3 1/4″
  • Whisper White 4 1/2″ x 3″
  • Stamp the sentiment with Blueberry Bushel ink
  • Add a Noble Rhinestone jewel and the card is complete.

The envelope…

  • The envelope got the same treatment on the flap, using a piece of the Flowering Foils cut 2 1/4″ x 6″, adhering with liquid glue and trimming to size.
  • On the envelope front I stamped the sentiment from Around the Corner stamp set in Blueberry Bushel. Since this card will be hand delivered, I adhered five jewels from the Noble Peacock Rhinestone pack

I love this card – did I say that already? Hope you do as well. Now – on with the matching gift bag..


  • Cut a piece of Flowering Foils paper 6″ x 12″. Create the ombre effect as described above.
  • Score on the long side 1 1/2″, 5 3/4″, 7 1/4″ and 11 1/2″.
  • With the ombre on the right, score on the short side 1 1/2″
  • Burnish all score lines.
  • Remove the small 1/2″ section below the 1 1/2″ score line. Adhere Tear n’ Tape to the long 1/2″ section
  • Cut up to the 1 1/2″ score line
  • Fold over the bag to the Tear n’ Tape; fold up the bottom and adhere with Tear n’ Tape
  • Pinch top; Wrap a length of Braided Linen Ribbon around the bag, tie in a bow
  • Stamp the ‘Smile’ sentiment from the Daisy Lane stamp set in Blueberry Bushel. Punch out with the Tailored Tag Punch. Add you own ‘scrolly’ around the edge. Using the Tailored Tag Punch , punch another from Blueberry Bushel cs and cut in half. Adhere the white punched piece to the two sections of Blueberry Bushel creating an even border. Adhere with dimensionals to the bag. DONE!
  • I want to give credit to Pootles for the wonderful video on YouTube that inspired this fun set. Thank you!

Thanks for stopping by today. I hope you liked this fun set. Remember this Flowering Foils paper is available during the rest of Sale-a-bration (Mar 31!) with a $50 order. In other words it;s a FREE ITEM!

May you have a beautiful day. Make someone happy by sending them a handmade card.


Stampin’ Up! Peaceful Moments and Painted Poppies

This card is made with the Stampin’ Up! Painted  Poppies stamp set AND the Peaceful Moments stamp set for the sentiment. This is so bright and cheery – it would definitely lift someone’s spirits! I’m feeling so much better today after being a bit punky with a cold all week. Even went to the gym and did the eliptical for 25 minutes! YAY!! But on with the card. Here it is…

Here are the details…

  • Thick Whisper White card base cut to 8 1/2″ x 5 1/2″, scored at 4 1/4″
  • Layer Lovely Lipstick  4″ x 5 1/4″
  • Cut Whisper White 3 3/4″ x 5″; stamp the single poppy from the Painted Poppies stamp set in the middle of the card with Tuxedo Black Memento ink, then stamp the string of Poppies in Tuxedo Black Memento ink so they surround the larger poppy.
  • Using the second largest circle die, cut out the center. Using both light and dark Poppy Parade Stampin’ blends, color the poppies that were cut from the circle. Notice I left many of the tips of the flowers without color. I think it makes them look more real, plus it gives them depth.
  • Using the largest circle die, cut a circle in Poppy Parade. Adhere the Painted Poppies circle to the Poppy Parade circle using liquid glue. You could put this section on dimensionals and it would look awesome too. I simply chose not to.
  • Adhere this entire poppy design to the Lovely Lipstick paper using liquid glue.
  • Take a piece of Real Red ribbon about 7 1/4″ in length and wrap around both these pieces. One way to keep it in place is to use snail directly to the ribbon then lay it on the paper. Works like magic! And if you use the grid paper while placing that ribbon, it will be super straight – works every time. Take another length of ribbon, make a bow and attach in the center with a glue dot.
  • Put dimensionals on the back of the Lovely lipstick and adhere to the thick Whisper White card base.
  • Take a Whisper White scrap, stamp the sentiment from Peaceful Moments in Tuxedo Black Memento ink and trim the ends as shown. Add dimensionals to the back of the strip and adhere to the card front. Voila!!!

I’ve used three shades of red on this card (Lovely Lipstick, Poppy Parade and Real Red) and they look great together – at least I think so. Stampin’ Up! does such a good job of coordinating their colors that it is easy to combine various shades of one color. After all – it’s what Mother Nature does 🙂

Thanks for stopping by. I hope you like this Painted Poppies card. It was extra fun to create. Want to join me in creating cards? Please contact me at TLsBrightSpot@gmail.com. It’s always more fun to have a partner with whom to brainstorm, connect and create.

Remember that Sale-a-bration ends March 31 with all those free products. It will still be possible to order from the catalogue until Jun 1 but all those freebies ends Mar 31. Just sayin’.

When you order from me, please use the current HOST CODE: XYW2SYNV. With a purchase of $50, you receive a free item of your choice not to exceed $10. Just let me know what that item is so I can place the order and get it on it’s way to you. One item per customer per month please. Thank you!

May you have a beautiful day. Make someone happy by sending them a handmade card. 


Stampin’ UP! Clubhouse fun fold card

Hello – today’s card is definitely masculine and I hope you like it. It can be used for a birthday, congratulations or simply a friendly card. I created it for someone who is a golfer and just needs a ‘pick me up’. Here it is…

What do you think? One of the aspects about SU! that I like so much is that colors coordinate pretty much across the board. When they package their Designer Series Paper, it lists on the back of the package coordinating colors for that particular design. And what I’ve learned is often other shades of a particular color,  say green, may work in nicely as well. And that’s what I did on this card – worked in a different shade of green.

Here are the details…

  • Cut a piece of thick Whisper White cs 6 1/4″ x 5 1/2″, scoring on the long side at 2″.
  • Cut a piece of Country Club DSP 1 3/4″ x 5 1/4″ and adhere using liquid glue to the left portion of the card front. Refer to the photo for help.
  • Using Night of Navy ink, stamp both the sentiment as well as the golfer from the Clubhouse stamp set on Whisper White card stock. Using the Golf Club dies cut out the golfer and JUST the Greatest Guy part of the sentiment.
  • Using the Stitched So Sweetly dies and Pear Pizzaz cs, cut out a rectangle large enough for the golfer.
  • Using the next larger die from Stitched So Sweetly dies, cut a piece of Night of Navy cs.
  • Using liquid glue, adhere the Pear Pizzaz to the Night of Navy cs. Using dimensionals, adhere the golfer to these two pieces. See photo for placement. Set aside.
  • Cut another piece of DSP 4″ x 5 1/4″ and adhere to the inside of the card.
  • Cut a piece of Whisper White  2 1/2″ x 3 3/4″ for the inside. Stamp in Night of Navy ink accordingly. I used the golf ball and this wonderful sentiment. When you look at the photo of the inside of the card, you will see that I separated this into two sections. There’s a simple explanation for that… I goofed when stamping and stamped the sentiment upside down! I was so annoyed with myself. So how to fix it? I simply cut it into two sections 🙂

Back to the front and adhering the panel to the card front.

With the card closed adhere the panel approximately 5/8″ from the left, top and bottom. This will mean it is pretty well centered on the card. I put the glue on the card front instead of the panel cuz I wanted to be sure not to have glue where it wasn’t needed.

Now complete the inside. Open the card and adhere the Whisper White panel to the inside so it is approx. 7/8″ from the fold, bottom and and right edges. What you want to be certain of is that this panel does not show when the card front is closed.

Remember to decorate the envelope – no “naked” envelopes please! And be certain to sign your card. People love to see your name or initials on there.

I hope you like today’s card. Masculine cards are sometimes tricky to create but I like the way this turned out.

Sale-a bration is quickly coming to an end – Mar 31. If you are still wanting to pick up any of these fabulous products do so right away. Reach out to me if you have questions – love to hear from you.

May you have a beautiful day. Make someone happy by sending them a handmade card.


Poppies Moments Dies

Hi All… Oh gosh – I so love today’s card…made with the SU! Poppy Moments Dies and a couple of other stamp sets and another die. 😏 As yesterday’s card, this is primarily monochromatic with Highland Heather the paper of choice. What did I do? Here are the details…

  • Card stock layer is Highland Heather (8 1/2″ x 5 1/2″ scored at 4 1/4″), with DSP from Best Dressed  6 x 6 DSP. (4″ x 5 1/4″). Adhere the DSP with liquid glue to the Highland Heather card base.
  • Layer… 3 1/2″ x 4 1/2″ Highland Heather with the Best Dressed 6 x 6  DSP (3 1/4″ x 4/ 1/4″) adhered with liquid glue. Put on dimensionals and adhere to card base, centering the layer.
  • Die cuts: Using the Poppy Moments dies, Whisper White for the outline poppy, and the two centers; vellum for the larger poppy and the leaves,  green vellum from Perennial Essence for the accent on the leaves. Color the large poppy vellum with Highland Heather dark Stampin’ blends. Adhere the poppy outline to the vellum with glue dots in the3 center only. Adhere each of the centers with mini dimensionals. Adhere the green outline vellum to the plain vellum with glue dots and slip under the poppy to your satisfaction.
  • Stamp the front sentiment  from Timeless Tropical stamp set (available as part of the SAB. catalogue) in Memento Tuxedo Black ink. Cut out with Ornate Frames dies. Adhere with dimensionals.
  • The bow – so cute, so fun… I pulled apart three (3) small strands from the flax ribbon and tied in a bow. Adhere with a glue dot.
  • The outside is done!!!

Inside…

  • Whisper White card stock cut to 4″ x 5 1/4″.
  • Adhere 3/8″ strip of Highland Heather to your liking, then add the Best Dressed 6 x 6 DSP.
  • Stamp the sentiment from Rare Blessings stamp set with Tuxedo Black Memento ink.
  • Adhere with liquid glue to the inside of the card.

Envelope…

  • Stamp the flower from Rare Blessings stamp set in Tuxedo Black Memento ink and color using Stampin’ blends markers Highland Heather light and dark and light Old Olive. I LOVE this little flower!
  • Make certain when coloring the flower that you slip a barrier inside the envelope as the Stampin’ blends bleed through. I use old card stock scrap and that works just fine.
  • Adhere a piece of the remainder of the Best Dressed 6 x 6 DSP piece to the envelope flap.

YAY! Card is complete… be sure you sign it on the back so the receiver knows you made it 😉

This is such a beautiful card. Make certain you send it to someone who could use a brightening of their day.

Timeless Tulips

Hello! The birds are singing wildly this morning. Isn’t it amazing how bulbs popping out of the ground can get us all enthused? It happens to me for sure. So today’s card is a hint of Spring – Pool Party is the lead color with just a hint of Petal Pink and Soft Seafoam. Here it is…

  • Card base is 4 1/4″ x 11″, scored at 5 1/2″ – Pool Party
  • Layer 4″ x 4 1/4″ Pool Party dry embossed with the beautiful Parisian Flourish 3D embossing folder. Adhere with liquid glue directly to the card base
  • Layer #2: 3 1/4″ x 4 1/4″ Pool Party. Cut 3″ x 4″  Parisian Blossoms Specialty DSP and adhere with liquid glue to the smaller Pool Party. Put dimesnionals on the back and adhere to the card base by centering it on the card.
  • Layer #3: Using the Stitched So Sweetly dies and second from largest scalloped edge, cut a piece of Whisper White. Stamp the sentiment in Tuxedo Black Memento ink, the stamp the smaller tulip in Petal Pink, followed by the stem and leaves in Soft Seafoam.
  • Adhere pearls from Share What You Love OR color pearls using Stampin Blends markers.

Love the simplicity of this primarily monochromatic look. The sentiment chose lends itself to being used as a birthday, sympathy, congratulations or just a note card.

Thanks for stopping by. I hope you enjoyed the card today. This kind of card lifts my spirits and I hope it does the recipient as well.

When you’re ordering from me, Please use my current HOST CODE 2TMMA9HX if your order is between $50- $150 and I’ll send you a product of your choice not to exceed $10. If your purchase is over $150, don’t use a host code – accept the freebies offered by Stampin’ UP! and I’ll still send you a product of your choice not to exceed $10. One fvrfee item per month per customer, thank you.

May you enjoy your day. Make someone happy by sending them a handmade card!

Painted Poppies

I just cannot get enough of the Painted Poppies stamp set! Today’s post was inspired by another demonstrator – Sharon Burkert – must give credit where credit is due!

Using Tuxedo Memento Black, I stamped the Painted Poppies on Whisper White CS then colored them with Rich Razzleberry blends. I wanted this card simple so used no other colors. While the Rich Razzleberry blends was in my hand I colored the Metallic edge ribbon until I liked the depth of color. The blends dry so quickly and easily and doesn’t rub off on your fingers either. It allows us / you to coordinate with whatever is being created. Fun right?

OK – on with the directions… I cut out the Painted Poppies to the size I wanted with the Layering Squares dies then used the scalloped die from the same set to create this delicate edge, cutting it in Rich Razzleberry. I adhered the Painted Poppy to the Rich Razzleberry scalloped edge, adhered dimensionals to the back and set aside.

Using the Scripty 3D embossing folder, run a 4 1/8″ x 5 3/8″ piece of Whisper White through the embosser. Remember to lightly spritz the paper with water to get a wonderful indentation. Adhere another piece of Whisper White cs with liquid glue behind this to give this layer more sturdiness. Wrap the blends colored ribbon around these two layers and tie a knot. Place the Painted Poppy squares where you want them and voila! Put dimensionals on this layer OR adhere directly to the Whisper White card base (8 1/2″ x 5 1/2″ scored at 4 1/4″).

This card could fit so many occasions depending on the sentiment used on the inside. I see this as a sympathy or birthday or thinking of you card – so many possibilities.

I hope you enjoyed todays card. Please share a photo of your creation if you are inspired by this post. When ordering from me, pleaser use my HOST CODE: 2TMMA9HX if your order is over $50. I’ll send you a product of your choice not to exceed $10 – yay! a freebie for ordering from me. If your order is over $150 SU! allows you to order freebies.

May you have a beautiful day. Make someone happy by sending them a handmade card!