
Today’s card is made with a FREE product during Sale=a=bration and that is Stampin’ Up! So Very Vellum. I haven’t made a pocket card before and it was surprisingly easy. I kept the inside very simple. Let’s take a look…
So Very Vellum & Happy Birthday To You plus Thoughtful Blooms
It’s interesting how the process happens when making a card. I started out with one idea and went totally another! I knew I wanted to make a pocket card and I knew I wanted to use vellum e as the pocket. And the So Very Vellum with its embossed pattern seemed perfect. Here’s how the vellum looked before putting it together.

So Very Vellum pocket card prep
- So Very Vellum 8″ x 5 1/2″ Funny thing is, I started with a piece cut to 8 1/2″ but was using the paper trimmer to score it and scored too hard and tore the paper.😔 First lesson… So I moved to the scoring tool and was much more gentle and it worked perfectly.
- Score on the long side 1/2″ and trim. See the photo for how to trim.
- Score on the short side 1/2″ and again at 3 3/4″. Trim the 1/2″ side
- Add tear n tape to the 1/2″ edges – see photo. Remove the short side of tape and close, then do the same with the bottom, as it goes on the outside. This becomes the BACK of the pocket!
- Decorate as desired… Because I was thinking of doing something else, I began by stamping four partials of the Happy Birthday To You cake on Shimmer paper.

Happy Birthday To You
cake partials

Happy Birthday To You cake partials colored with Stampin’ Blends
You can see that I colored each of the flowers on the cakes using different shades of yellows and greens. It was fun to see the contrasts side by side. Then I cut them all out using the Birthday Dies. By this time I had changed my direction for completing this particular card, but am ready with the extra pieces for another project – yay! If you are looking at the photo of the colored florals, I chose #3 to decorate the pocket.
- I colored the flowers on #3 with Dark Daffodil Delight and Light So Saffron Stampin’ Blends, the leaves with Dark Soft Sea Foam Blends. I used the Color Lifter in places to highlight areas.
- Using the Birthday Dies again, I cut out leaves twice and the berries also twice. The leaves are cut from Garden Green and the berries from Shimmer paper.
- These leaves and berries were adhered to the back of the floral diecut using glue dots, but you could swipe snail on the back and use that just as well. I then attached dimensionals over several areas of the back further holding these small pieces in place.
- The floral section was adhered to a Whisper White circle diecut with the Layering Circles Dies.
- The circle also got dimensionals and was adhered to the vellum pocket.
Now to the inside…
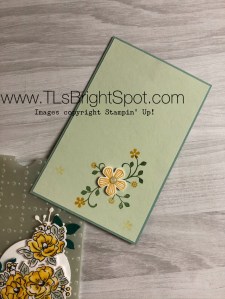
Thoughtful Blooms pocket card insert
- Cut mint macaron 3 1/2″ x 5 1/2″
- Cut Soft Sea Foam 3 3/8″ x 5 3/8″
- Stamp the Thoughtful Blooms leaf spray with Garden Green ink
- Stamp the flower with Daffodil Delight and punch out with the Small Bloom Punch
- Stamp additional small flowers using both Daffodil Delight and So Saffron for a nice contrast.
- Adhere the punched flower to the center of the leaf spray using one dimensional
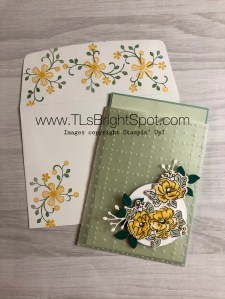
Envelope… we never ever forget to do something with the envelope. I must say, I got a bit carried away but I like the finished product.
- Stamp the leaf spray with Garden Green; the flowers with Daffodil Delight and So Saffron, according to your choice.
So Very Vellum & Happy Birthday To You plus Thoughtful Blooms
- I did the same on the envelope flap, stamping three bouquets.
Your card, pocket and envelope are now complete! Isn’t it sweet? I really like how it turned out even though I had something else in mind altogether… Another day 😏
Sale-a-bration is over March 31, but you will be able to continue ordering from the Mini Catalogue until June 1 – just no freebies involved.
April 1 Stampin’ Up! is offering a Premier Ornate Gardens SuiteCatalogue, but this Premier Suite gives you the opportunity to play! How fun is that?!

Ornate Garden Suite video – available for. purchase April 1!

Ornate Garden Suite
Thanks for stopping by today.
May you have a beautiful day.
Make someone happy by sending them a handmade card!


