Gosh – we are heading into Memorial Day weekend – how did that happen?! We are having unseasonably cool weather here in South Jersey – and hubby has built a fire for us. Who would have thought the end of May and 48 degrees at night…
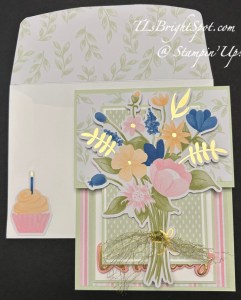
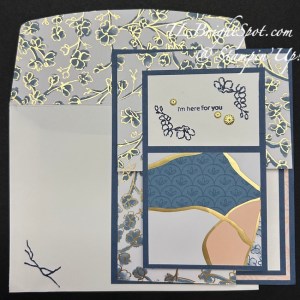
To my card… this is a fun fold using the brand new suite in the 2025-2026 Annual Catalog titled Kintsugi Inspirations. It has stunning Specialty Designer Series Paper, meaning there is gold running through it, Flower Accents a 3D Embossing Folder and of course the Inspiring Imperfections Bundle. The only item I did not use on this card is the embossing folder.
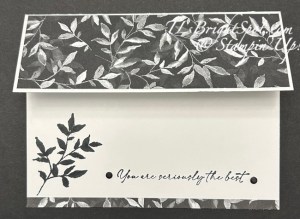
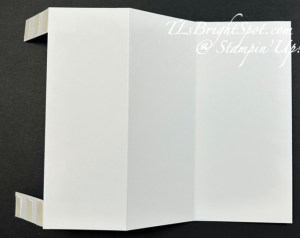
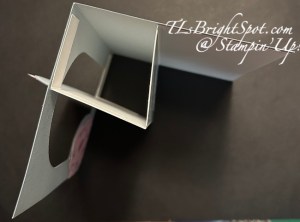
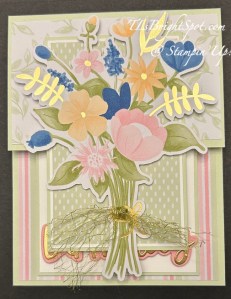
This fun fold is called an Exploding Corner Card. This particular card is made in the portrait style, with the exploding corner in the upper left. Let’s take a look.
I began with a a piece of the Kintsugi Inspirations Specialty 12×12 DSP cut 6 3/4 x 8. With the short side against the trimmer, score at 2 3/4″. Turn paper to the left & along the long side, score at 2 3/4″. Burnish those score lines. With the short side at the top and the score on the left, mark 2 3/4″ to the right of the score line. Turn paper to the right with long side at top and mark 2 3/4″ to the left of the score line. Place this in the paper trimmer & score from mark to mark & burnish. It should look like this. Notice how the diagonal score line goes directly through the intersection of the other two score lines!
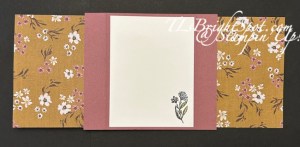
Add this fun folded DSP to a Misty Moonlight panel 4 1/4 x 5 1/2.
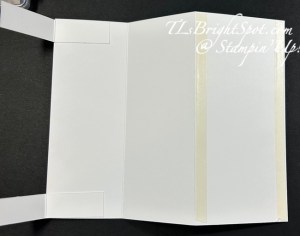
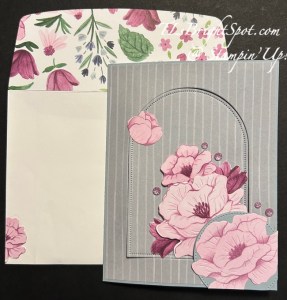
Because of the designs I chose in the Kintsugi Inspirations SDSP pack, Misty Moonlight was used as the card base, cut 4 1/4 x 5 1/2. While still having Misty Moonlight in your hands, make these cuts: 2 3/4 x 4 1/2 (this is the card front panel); 2 1/2 x 2 1/2 ( this is for the inside square corner); and 3 3/4 x 5 (this is the inside right panel layer). Now cut Basic White: 1 5/8 x 2 1/2 (for front panel) & 3 1/2 x 4 3/4 (for inside panel.)
Additional DSP cuts: 2 1/2 x 2 1/2 (cut 2), cutting one on diagonal; 2 1/4 x 2 1/4.
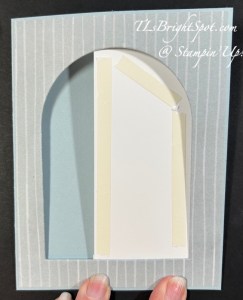
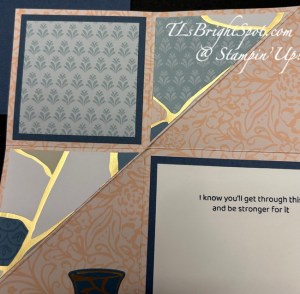
- Add the 2 1/4 SDSP square to Misty Moonlight 2 1/2 square then add to inside corner (refer to photo above)
- Add diagonal cut SDSP pieces as shown in photo above
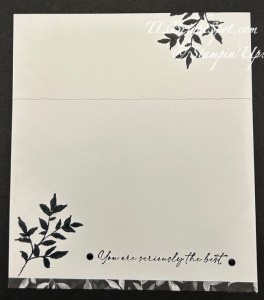
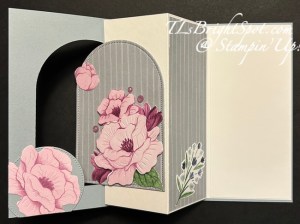
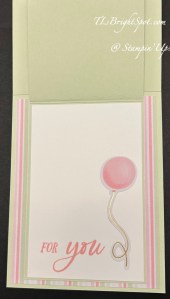
- Add the 3 3/4 x 5 Misty Moonlight to the inside right section of the card
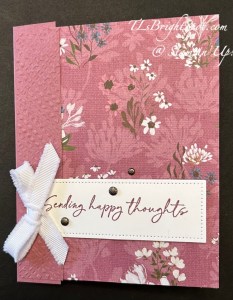
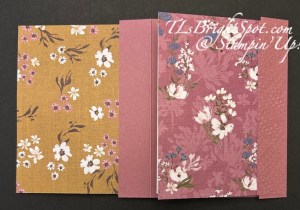
- Stamp the Basic White 3 1/2 x 4 3/4 as desired & add over the Misty Moonlight piece. I used the Inspiring Imperfections stamp set & Misty Moonlight ink for this.
- Die cut the vase using the Inspiring Inspiration Dies directly from the Kintsugi Inspirations SDSP 😀 (love being able to do this!) Add to inside panel as shown
- Die cut the flower from the same piece of SDSP and add to the Basic White stamped inside panel
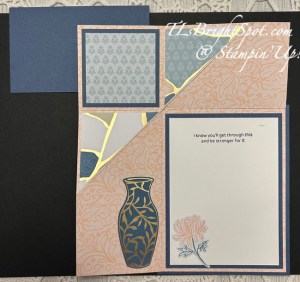
Now that the inside is complete – let’s finish the card front.
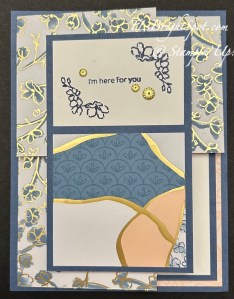
- On the remaining piece of Misty Moonlight, add the 2 1/2 x 2 1/2 SDSP to the bottom half.
- Stamp the 1 5/8 x 2 1/2 Basic White piece using Inspiring Imperfections stamp set and Misty Moonlight ink then add to the top of the Misty Moonlight panel.
- Add this piece to the card front adhering ONLY to the upper left corner.
- Add three Flower Accents to the sentiment piece and the card is complete!
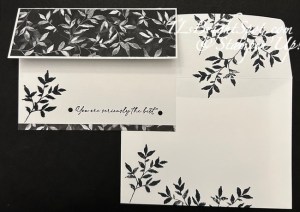
Envelope… Add Kintsugi Inspirations SDSP to flap & trim to fit. Stamp image from the Inspiring Imperfections stamp set with Misty Moonlight ink.
WooHoo! Fun fold and fun card to make… It’s not super thick either so should be able to send this with regular postage – and that’s big!
So much going on in the Stampin’ Up! world – Joining promotion ends May 31 so let’s take a look at that special.
Have you heard? From May 6–31, new demonstrators get $165 USD | $220 CAD worth of products in their Starter Kit for just $99 USD | $135 CAD. (That’s $66 USD | $85 CAD in extra products—our biggest Starter Kit Special yet!) As a bonus, new demonstrators also score FREE shipping on their Kit, FREE business supplies, and a FREE Paper Pumpkin kit! Become a demonstrator and enjoy all the perks that come with that, like a 20–25% product discount, exclusive early access to products, the opportunity to earn a modest supplemental income, the chance to attend incredible training and crafting events, and so much more! Click the link in the JOIN MY TEAM image to do that.


If you want to order – check out this…OK – info on ordering from me…. first of all – no more HOST CODE is needed – YAY! Instead for every order of $20 + Stampin’ Up! has it’s own rewards. And for every $50 order from me in my ONLINE STORE you will earn Daisy Patch Points – one Daisy for every $50 purchase from me. Save those Daisy Patch Points up to 8 points and you’ll be able to order a free gift from me valued to $40. And for that $50 purchase from me, you’ll also receive the monthly tutorial – and for May it features the Gallery Blooms bundle.
THANKS FOR STOPPING BY! MAY YOU HAVE A BEAUTIFUL DAY – MAKE SOMEONE HAPPY BY SENDING THEM A HANDMADE CARD!
- Product List
- Inspiring Imperfections Bundle (English)
- [165167]
- Kintsugi Inspirations 12″ X 12″ (30.5 X 30.5 Cm) Specialty Designer Series Paper
- [165159]
- Flower Accents
- [165171]
- Misty Moonlight 8-1/2″ X 11″ Cardstock
- [153081]
- Misty Moonlight Classic Stampin’ Pad
- [153118]
- Basic White 8 1/2″ X 11″ Cardstock
- [166780]
- Basic White Medium Envelopes
- [159236]
- Early Espresso Classic Stampin’ Pad
- [147114]
- Paper Trimmer
- [152392]
- Stampin’ Cut & Emboss Machine
- [149653]
- Stampin’ Dimensionals
- [104430]
- Adhesive Backed Textured Dots
- [163338]
- Multipurpose Liquid Glue
- [110755]
- Stampin’ Seal
- [152813]
- Bone Folder
- [102300]
- Take Your Pick
- [144107]