Happy Thursday! It’s almost the weekend… do you have something fun planned? Welcome to the Happy Inkin’ Thursday Blog Hop! If you have come from Tara’s fun creation, welcome to the hop here at my blog. There will be lots of variety today, I betcha!
It’s the Happy Inkin’ Thursday Blog Hop… with a challenge, of course…


And here’s what I did…

I began with a piece of Hues of Happiness 12 x 12 DSP, a blending Brush or two and several ink colors to create a brilliant sun: Whisper White, Mango Melody, Pale Papaya, Calypso Coral, Pumpkin Pie and Cajun Craze. I also some sticky notes so as I created the gradient, I was keeping kind of a line as I varied the colors. I really like how these just flow together. Once I got it sort of the way I wanted it, I removed the sticky notes and with Pale Papaya and Calypso Coral, went over the entire area to remove distinguishing lines. I then die cut two circles using the Stylish Shapes Dies. Next I took the long stamp in Let’s Set Sail stamp set and Balmy Blue ink and began creating a water layer on a panel of Basic White. These were the beginning steps for my scene. I adhered the largest circle with liquid glue to this Basic White panel, then put dimensionals on the smaller circle and layered it on top, matching the lines created when using the sticky notes and Blending Brush. I wanted some sparkle, so pulled out the 2022-2024 In Color 6×6 Glimmer Paper in Tahitian Tide and with the Sailboat Builder Punch, punched a sailboat. I placed the various pieces of the sailboat then added mini dimensionals in all the right places and dabs of liquid glue in others and put it in place. I stamped the water shadow just beneath the boat in Pacific Point ink. The birds were stamped with Memento ink. The sentiment also comes from Let’s Set sail stamp set and it was stamped in Balmy Blue and fussy cut. I put dimensionals on the back and adhered it to the card. I then colored two Rhinestone Basic Jewels with Dark Balmy Blue Stampin’ Blends and put them in place – card front was ready to put together.
I adhered the completed front to a piece of Balmy Blue just slightly larger, put dimensionals on the back and added it to a Thick Basic White card base. Front done!

For the inside I cut two very thin strips: one from the paper I had colored to create the suns and another from the 2022-2024 In Color 6×6 Glimmer paper in Tahitian Tide. These were adhered with liquid glue to the Basic White panel. I then stamped the sentiment – yep! – Let’s Set Sail stamp set, in Balmy Blue ink. This panel was adhered to another piece of Balmy Blue card stock then added to the inside of the card. This card is perfect for so many occasions: graduation, Father’s Day, promotion, retirement, etc.

For the envelope, I took another part of the Hues of Happiness 12 x 12 DSP and added it to the flap, trimmed to fit. For the front, I stamped the water in stamped-off Balmy Blue ink then stamped the boat/ mast in Pacific Point ink and the two sails in Pale Papaya ink. All done! What do you think? Does the envelope look a bit like a scene in itself? I think so :O)
Products to make this card are listed below. If you do not have a demonstrator and need an Annual Catalog please reach out to me (the 2022-2023 AC) – happy to send one to you. When ordering, please also use current host code: AZQDZ4U4. I offer my customers a free item from Stampin’ Up! item valued to $10 with your order of $50 and above. Click here to go my store. When the order is over $150, you still receive that free gift from me, but SU! has Stampin’ Rewards that may be used for additional products, so don’t use the host code at that time. If you have questions just let me know. If you would like to be able to order products early from catalogs AND enjoy that 20% discount, join my team now… you may do that here. WooHoo! We have lots of fun and are a creative bunch that encourages & supports one another. Would love to have you. :O)
Now, it’s time to move on with the hop! If you click the ‘next’ button, it will take you to Amy Koenders. If you click on a name, it will take you to that persons creation. Happy hopping!

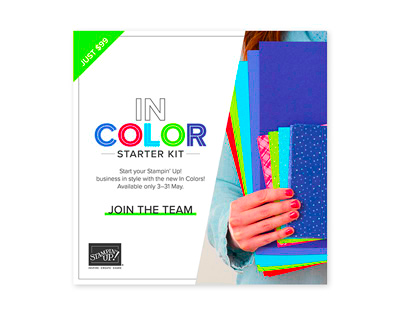
Let’s talk starter kit… New In Colors, New 2022-2023 Annual Catalog release
Starter Kit Price: $99 USD | $135 CAD
Redemption Value: $125 USD | $165 CAD
Additional In Color Products: $66.50 USD | $91.25 CAD
In Color Grid Paper, In Color Ink Pad Collection, In Color Cardstock Collection, and In Color 6″ x 6″ (15.2 x 15.2 cm) Designer Series Paper Assortments.
You’ll also get a free Paper Pumpkin kit!
PROMOTION DATES: 3–31 MAY 2022

Join our incredible group of crafters and creators.
If you would like to be able to order products early from catalogs AND enjoy that 20% discount, join my team now… you may do that here.
Just a few of the perks of being a Stampin’ Up! Demonstrator AND part of our Critters ‘n Creatin’ Krew Team:
- At least a 20% discount on everything that you order as a Demonstrator!
- Early peeks at new release items and preorders for new items about a month before they are available to customers!
- The ability to attend Demonstrator exclusive Stampin’ Up! events!
- No pressure to sell to anyone, hold classes or workshops or run a business. You can simply order for yourself and get the discount! And as long as you have at least $300 in sales per quarter, you’ll continue as an active Demonstrator and continue to get the discount. If you aren’t able to maintain the $300 per quarter minimums, you simply go back to being a customer, no commitment required and no penalty if decide that being a Demonstrator isn’t right for you.
- Stampin’ Up! does have an extensive library of class and project ideas for those wishing to jump into hosting classes as well as training to help start your business, should you choose to do that.
If you join with me, you’ll also get:
- Monthly team meetings via video conference where we talk about the latest happenings at Stampin’ Up! and share project ideas. Team members are located all over the United States, but we still get together in person online and have lots of fun.
- Quarterly in-person meetings if you live in the NJ or surrounding area, where we get together to do a little stamping, creating, getting to know one another and most of all SHARE inspiration. If you live outside the NJ area you can join us through that wonderful ZOOM video conference.
- Free access to our online class tutorials. These are exceptional!
- A private Facebook page where we can chat, ask questions and share ideas.
- Team giveaways and prizes for reaching sales and team goals or attending specific meetings. 😉
- The best part is the laughing and kidding and sharing of information/ creativity/ talent ~ following the SU! adage: Inspire. Create. Share. ❤️ 😁
Join our incredible group of crafters and creators.
If you would like to be able to order products early from catalogs AND enjoy that 20% discount, join my team now… you may do that here

Remember to connect with me if you need a catalog!