Stampin’Up! More of Celebrate Sunflowers

Woohoo – it’s Saturday! How are you doing during this time of isolation? I’m praying you and your family are well and safe. It’s a scary time for sure and awkward to not be able to hug one another, console one another in the way we used to. In the meantime…. I couldn’t resist making another card using the Stampin’ Up! Celebrate Sunflower and Sunflower Dies – just too beautiful and fun! Take a look at today’s card…

Celebrate Sunflowers
Sunflowers Dies
#1

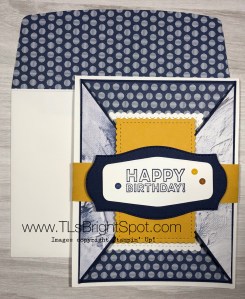
Items I used for this card:

  • Mango Melody Blends and marker
  • Bronze Blends
  • Light and Dark Soft Suede Blends
  • Gilded Gems
  • Antiqued Corners and Slides Elements
  • Wink of Stella
  • Daffodil Delight 1/4″ Ruched Ribbon
  • Tasteful Textile 3D Embossing Folder
  • So Saffron cs
  • Seaside
  • Spray cs
  • Misty Moonlight cs
  • Shimmer paper or Thick Whisper White cs
  • Sissix adhesive sheets

How to:

  • Adhere the Sissix adhesive sheet to the back of the Shimmer or Thick Whisper White cs
  • Die cut the sunflower from Shimmer paper or Whisper White. Here’s why I say OR… Originally I wanted the sunflower to be all white with just the center colored, but I didn’t like it once I die cut the sunflower. So, we adapt!!! But on with the directions … The sunflower is die cut, still on the cutting plate, now what… Remove the top cutting plate keeping all the die cut pieces in place. Put a layer of Press n Seal over the sunflower and press firmly so all pieces stick to it.. This will help keep everything right where it needs to be. Here’s the point – you want to raise the die cut pieces of the sunflower by putting dimensionals on as many of those little sunflower petals as possible, and not lose the petals from their designated place. Pull on the Press n Seal lifting all the die cut pieces off the cutting platform. Pretty cool, right? You are now ready to put dimensionals on those petals. Add mini dimensionals to as many of the flower petals as you so desire, cutting some dimensionals to fit the petal. Some are soooo tiny. And I did not put dimensionals on all of the petals  – as you see empty spaces in the photo – as though some of the petals have fallen off the sunflower. :o) Carefully remove the backing on the dimensionals.
  • Place a 3 1/8 square of Seaside Spray over the sunflower so the sunflower petals adhere to it. What should still be on your Press n Seal is the outline die cut of the sunflower. Isn’t it gorgeous?
  • Now is when I colored the petals with Dark and Light Mango Melody Blends 
  • Remove the outline die cut from the Press n Seal and color the center: Bronze for the very center, then Light and Dark Soft Suede Blends. Put a dimensional on the small center piece and set aside.
  • Remove the Sissix adhesive backing from the remaining outline die cut Place it onto the Seaside Spray, lining it up over the appropriate petals. Press it down so it adheres to the Seaside Spray. Gorgeous and stunning! You have done the hard part – whew…
  • Adhere the Seaside Spray to Misty Moonlight 3 3/8 square with liquid glue. Add these fun Antiqued Corners with glue dots, Put dimensionals on the back and set aside.
  • Run a  4 1/8 x 5 3/8 panel of So Saffron through the Tasteful Textured 3D Embossing Folder.
  • Adhere the Misty Moonlight decorated panel to the embossed So Saffron.
  • Stamp your sentiment with Misty Moonlight ink spot (that’s all we have right now until we can order the ink pad on June 3! It came from the May PP) The sentiment is from the Celebrate Sunflowers stamp set.
  • Wrap a length of Daffodil Delight 1/4″ Ruched Ribbon around, adhering with a glue dot , then attach the buckle and adhere that in place with a glue dot as well.
  • Add three Gilded Gems around the sunflower and the card front is done!

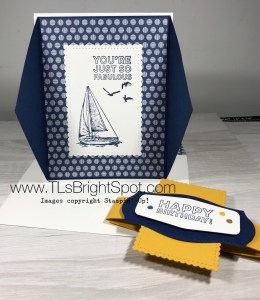
The inside and envelope is easy peasy:

Celebrate Sunflowers
#2

  • Stamp the sentiment with the ink spot Misty Moonlight, then stamp the sunflowers in Mango Melody. I took the Light Mango melody Blends and created an abbreviated outline, just cuz. It makes it look similar to the sunflower on the front.
  • Adhere this panel to the inside of your card with liquid glue. Card is complete!!!
  • Stamp the envelope flap and front with the same sunflower and mango Melody. Done, done done.

Don’t you love this? Here’s another picture.

Celebrate Sunflowers
Sunflowers Dies
#3

Ordering for all these supplies begins Jun 3. Would you like to join me in ordering supplies or bering part of my team? Use my current HOST CODE J2E4VDGM to get a free gift worth $10 in product from me when your order is $50-$150. Woohoo!

Thanks for stopping by.

May you have a beautiful day.

Make someone happy by sending them a handmade card.

Stampin’ Up Tasteful Touches and Forever Fern

Hi Everyone ~ it’s Sat and Memorial Day weekend. Do you have big plans? It’s raining here this weekend so outdoor activities are pretty much canceled – ugh… Mon. the actual day to memorialize those who have sacrificed their lives for all of us, may be a clear day. We’ll see. At any rate, the traditional picnic is called off due to the pandemic. I’m all for being safe and staying well, so I’m ok with that, but I do miss some of the tradition in which we have participated. Thank you to all those who have served our country, sacrificed time with family and sometimes lost their lives to protect our rights. Blessings on ever one… so grateful.

Today’s card began with the flower made a couple of days ago that I never used. Here it is…

Tasteful Touches
#1

Aren’t these gorgeous? I’m using the flower on the right today… and here’s the card…

Tasteful Touches and Forever Fern stamp sets
Forever Fern Dies

I REALLY like how this card turned out. Here are the items used to make this card:

  • Thick Whisper White cs for the base
  • Soft Suede cs and ink
  • In Good Taste DSP
  • Forever Greenery DSP
  • Forever Flourishing Dies
  • Pear Pizzazz cs and ink
  • Tasteful Touches flower
  • Organdy Striped Ribbon 5/8″
  • Forever Greenery Trim Combo Pack
  • Champagne Rhinestone Basic Jewels
  • In Good Taste Wooden Elements

And here’s to pull it all together…

  • Stamp the flower from Tasteful Touches stamp set in Soft Suede; color with Petal Pink and Mango Melody Stampin’ Blends and Fussy cut
  • Cut Soft Suede cs 2 1/8 x 5 3/8, trim diagonally so right side is 1 1/8″
  • Cut In Good Taste DSP 2 x 5 1/4, trim diagonally so right side is 1″. Adhere with liquid glue to the Soft Suede.
  • Adhere both of these to Thick Whisper White 8 1/2 x 5 1/2, scored at 4 1/4
  • Stamp the tall thin fern from the Forever Fern stamp set onto Pear Pizzazz cs using Pear Pizzazz ink. Cut out with the Forever Flourishing Dies and your die cutting machine
  • Find the coordinating DSP in the Forever Greenery DSP that matches the leaf die used and cut out with your die cut machine
  • Pull out coordinating elements from the In Good Taste Wooden Elements.

Further directions

  • Begin by gluing the Pear Pizzazz fern in place with liquid glue
  • Adhere the fernie type wooden element with glue dots
  • Adhere the wooden leaf element similarly
  • Adhere the leaf die cut from the Forever Greenery DSP using dimensionals
  • Make a few loops (I did three) with the braided gold trim in the Forever Greenery Trim Combo Pack and adhere with a glue dot or two
  • Add the flower with dimensionals
  • Add the bow made using the Organdy Striped Ribbon 5/8″ with glue dots
  • Stamp your sentiment in Soft Suede ink using the Forever Fern stamps
  • Embellish using the wonderful Champagne Rhinestone Basic Jewels. They tie the pink in the DSP, the Petal Pink in the flower and the Soft Suede together so wonderfully

Here’s the card again – what do you think?

Tasteful Touches and Forever Fern stamp sets
Forever Fern Dies

Thanks for stopping by

May you have a beautiful day

Make someone happy by sending them a handmade card

And …. Happy Memorial Day! Stay safe and be well

Stampin’ Up! Tasteful Touches

Hi Everyone! It is a cool Thursday here on the East Coast, much cooler than usual for May 21. It is however, sunny – yay… Today’s project began because I saw a card in the new catalogue that had a flower that I really, really liked (see pg 19)and I didn’t know to what stamp set it belonged as it is a new item. I searched and searched and finally found it 😁 (now go to pg. 124) And guess what… I have the stamp from my preorder!!! Little did I know/ realize. So I pulled it out and began playing. The set is called Tasteful Touches and I love everything about this set – from the sentiment fonts to the beautiful images. Here is the start of my playing…

Tasteful Touches
#1

Since I was playing, I first stamped in Soft Suede and prepped two flowers. Aren’t they stunning? I was thinking sepia tone. I colored in all the flower petals for the flower on the left using Wink of Stella – can you see the sparkle in the photo? Then I used Dark So Saffron Blends to color the center. I like it but the flower appears more yellow than sepia tone so I continued playing. The flower to the right is colored using both Light and Dark Petal Pink Blends and Mango Melody for the center. I like this too! In this stamp set is a lovely leaf bunch and I began playing with that… stamping in Soft Suede and coloring in the leaves with Granny Apple Green Blends – again doing two of them. I fussy cut them and decided to make my card with this bunch.  What to do… Here’s the final card – waaay different than my original intention. My hubby calls it ‘rustic’.

Tasteful Touches
#2

  • Crumb Cake cs – roughed the edges by moistening on the back side with an aqua painter then scruffing with my open scissors
  • In Good Taste DSP
  • Soft Sea Foam cs cut with Stitched Shapes Dies
  • Gold Hoop Embellishments
  • Forever Greenery Trim Combo Pack
  • Gilded Gems
  • Linen Thread
  • Soft Suede ink
  • Thick Whisper White cs

The inside…

Tasteful Touches
#3

And another view…

Tasteful Touches
#4

What do you think? It is definitely not my ‘run of the mill’ card but I like it a lot. Hope you do as well. The sentiment on the card front is fussy cut and set on dimensionals. The envelope got it’s special treatment as well: In Good Taste DSP on the envelope flap and sentiment from Tasteful Touches on the card front stamped in Soft Suede.

Perhaps tomorrow I will have something creative using the beautiful flowers I prepared today! In the meantime…

Thanks for stopping by.

May you have a beautiful day.

Make someone happy by sending them a handmade card. 😘


Stampin’ Up! Cards made with New and Retiring Stamps and Dies

Hi Folks! I have a slew of – well, five – cards that were all in various stages of incompleteness on my desk and it was time to CLEAN UP THE DESK! 😁😁😁 So here goes… I’l show the card and list the products to make it.

Botanical Prints stamp set, Botanical Prints Dies
Card 1

Botanical Prints stamp set, inside
Card 1


Card 1 –

  • Botanical Prints stamp set
  • Botanical Prints Dies
  • Botanical Prints DSP
  • Dark Daffodil Delight Blends
  • Light Old Olive Blends
  • Rhinestone Basic Jewels
  • Terracotta Tile cs base
  • Whisper White cs
  • Inks: Tuxedo Black Memento, Terracotta Tile

Botanical Prints stamp set, Botanical Prints Dies
Card 2

Botanical Prints stamp set, inside Card 2


Card 2

  • Botanical Prints stamp set
  • Botanical Prints Dies
  • Botanical Prints DSP
  • Stitched Shapes Dies – carrying over!
  • Inks: Highland Heather, Tuxedo Black Memento, Highland Heather Blends, So Saffron Blends, Old Olive Blends, Light Soft Suede Blends
  • Rhinestone Basic Jewels

Peaceful Poppies DSP, Peaceful Poppies Elements
Card 3

Card 3

  • Peaceful Poppies DSP
  • Peaceful Poppies Elements
  • Timeless Tropical for the sentiment on the front of the card – carrying over!
  • Thick Whisper White card base
  • Poppy Parade cs
  • Blends: Poppy Parade and Old Olive
  • Wink of Stella on the envelope poppy

Painted Poppies stamp set, Peaceful Moments stamp set
Card 4

Card 4

  • Poppy Parade Card base
  • Painted Poppies DSP
  • Crinkled Steam Binding Ribbon 1/4″, stamped with Old Olive – carrying over!
  • Whisper White
  • Sentiment from Peaceful Moments – carrying over!
  • Inks: Old Olive and Poppy Parade

Ornate Garden Specialty DSP
Ornate Frames Dies
Nature’s Thoughts Dies
Card 5

Card 5

  • Scalloped Notecards and Envelopes – retiring product
  • Ornate Garden Specialty DSP (NEW IN ANNUAL CATALOG)
  • Ornate Frames Dues (NEW IN ANNUAL CATALOG)
  • Nature’s Thoughts Dies – carrying over!
  • Woven Heirlooms for the sentiment – carrying over!
  • Early Espresso ink – carrying over

WOW – it feels good to have an almost clean desk and lots of cards completed. Since so many of these cards are made with retiring products, please see the attached list. Be sure to use my CURRENT HOST CODE: J2E4VDGM when shopping 😏

Last Chance Products JJ (US)

Last Chance Products AC (US)

Thanks for stopping by

May you have a beautiful day

Make someone happy by sending them a handmade card ❤️

Stampin’ Up! AMY’S INKIN’ KREW Blog Hop

The theme for this month’s Blog Hop is all about “For the boys/ men…” and we could interpret that any way we wanted. Hubby’s birthday is in June and he is a sailing man. The new blue in the 2020-2021 In Colors for Stampin’ Up! is titled Misty Midnight. I love that! And it’s perfect to work with for a man – my man. And the Sailing Home carrying over stamp set is a perfect match in many ways. I also used the NEW Tasteful Labels Dies (eek! – fun!) and the Many Mates stamp set (love this too!)

You may be joining me today from the talented Julie Johnston. Thanks for following the blog hop!

The card is a take-off of a Gate Fold card – modified version. I actually followed the really good directions of my upline Mary Deatherage, who created a card using this fun fold. It’s easy!

For the boys/ men #1

  • Cut your card base 4 1/4 x 11, score at 5 1/2. I used Whisper White
  • Cut another piece of card stock (I used Night of Navy 5 1/4 x 8, score at 2″ and 6″
  • Mark the center of each of the short panels( 2 5/8). Cut to the center of each short panel (or gates) creating a V – see photo… I apologize… should have taken a photo PRIOR to completing the card – grrr

For the boys/ men #2

  • Cut a piece of  In Good Taste DSP 1 7/8 x 5 (2 of these) Follow the same procedure for cutting.  Adhere DSP panels to the card front “gates” using liquid glue. (This DSP is available to customers June 3!)
  • Cut apiece of the 2020-2021 6 x 6 DSP  Misty Midnight 3 7/8 x 5 1/8 and adhere using liquid glue to the inside of the Night of Navy panel (This DSP is available to customers June 3!)
  • Using the Stitched so Sweetly Dies, cut a panel for the sentiment and the sailboat. The sentiment, sailboat and birds are from Sailing Home stamp set.  I used Night of Navy ink. Adhere to the inside front panel with liquid glue.
  • Adhere this modified gate-fold to your card base with liquid glue.
  • Cut a strip 1 x 10 for the belly band. I used the new 2020-2021 IN COLOR Bumblebee. Don’t you love that name? It is so descriptive.
  • Cut another panel using a smaller Stitched So Sweetly Dies and Bumblebee card stock. Adhere to the belly band with dimensionals.
  • * Using two of the Tasteful Labels Dies (available to customers June 3!), cut panels, one in Night of Navy and one in Whisper White. Adhere with liquid glue to the Bumblebee diecut.
  • Stamp your sentiment using the new Many Mates stamp set. I added three of the new 2020-2021 In Color Enamel Dots. They are so cute! (Both of these are also available to customers June 3)

The front of your card is complete! Yay! And it’s gorgeous already. 😏 Now for the inside…

For the boys/ men… #3

  • Cut a piece of Night of Navy 5 3/8 x 4 1/8. Adhere using liquid glue.
  • Cut a Whisper White 5 x 3 7/8. Stamp with your sentiment and the anchor from the Sailing Home stamp set and Night of Navy ink. Adhere using liquid glue. Done!

Remember your envelope…Cover the envelope flap with the new 2020-2021 6 x 6 In Color DSP, adhering with liquid glue. Trim. Done, done, done…

For the boys/ men #


This was such a fun card to do. It looks complicated but isn’t at all and is just stunning.

Remember all those products I mentioned that are NEW! Purchasing from me is easy and when buying product between $50 – $150 you receive free product from me :O) Please use my current HOST CODE… J2E4VDGM .

Thanks for stopping by.

May you have a beautiful day.

Make someone happy by sending them a handmade card.


Now on with the hop…. to the very creative Amy Koenders.

If you get lost or disconnected along the way, you may get back in by connecting with any of these participating members today… Enjoy the hop!

  1. Mary Deatherage – https://wp.me/p5snyt-cPT
  2. Karen Ksenzakovic – https://wp.me/paaNf4-2ap
  3. Sue Prather – https://wp.me/p5yitZ-1Ua
  4. Jaimie Babarczy – https://wp.me/p79UhD-3Rf
  5. Leslie Larkin – https://leslielarkin.com/friendlikeyoubundle
  6. Karen Finkle – https://karenscardkorner.blogspot.com/2020/05/stampin-up-tropical-oasis-masculine.html
  7. Connie Troyer – http://constantlycreating.me/2020/05/12/masculine-unisex-card-with-stampin-ups-come-sail-away-memories-and-more-card-pack-for-stamp-with-amy-ks-tuesday-blog-hop
  8. Akiko Sudano – https://wp.me/paOv8E-1bb
  9. Julie Johnston – https://wp.me/p8SzmQ-2kc
  10. Terry Lynn Bright – https://wp.me/p8fxPh-tt
  11. Amy Koenders – https://wp.me/p2SFwf-juR


Stampin’ Up! Peaceful Moments and Coordinating DSP

Double Z Fold with Peaceful Poppies DSP #1Hi Everyone! Yesterday was so delightful, I played in the yard ALL DAY. Today is a wonderful light rain to help with all the transplanting I did 🥵 It was hard work, but I enjoyed every moment of it. Speaking of moment… good segue into today’s card made with the Peaceful Moments  stamp set and the Coordinating Peaceful Poppies DSP. Here it is…

Double Z Fold with Peaceful Poppies DSP #1

And here’s how to create this fun double z-fold card…

  • Thick Whisper White 4 1/4 x 11, scored at 5 1/2 & 2 3/4
  • Old Olive 2 1/2 x 4 for the front panel
  • Blackberry Bliss 2 1/2 x 4, 4 x 5 1/4
  • Peaceful Poppies DSP 2 3/8 x 3 7/8 (cut 2) 3 7/8 x 5 1/8; for the panel…1 1/8 x 5 3/8, 1 1/8 x 2 1/8 (cut 2)
  • Whisper White 1 1/8 x 5 1/4, 1/2 x 2 5/81 1/8  x 2 5/8

Double Z Fold with Peaceful Poppies DSP

  • Adhere appropriate panels to your Thick Whisper White cs using liquid glue. Refer to the photo for guidance.
  • Adhere the DSP to the smaller z fold piece using liquid glue
  • Stamp your sentiments in Black Memento ink on the appropriate Whisper White strips
  • Adhere the longest Whisper White with sentiment with liquid glue to the longest z fold panel – add the Peaceful Poppies element with liquid glue
  • Color the Peaceful Poppies element with Light Blackberry Bliss Blends. Cover with the coordinating vellum, attaching jsut at the base with snail. Adhere to the middle panel with liquid glue. Adhere the narrow stamped piece over this with liquid glue.
  • For the last portion of the narrow z-fold panel, stamp your sentiment and adhere with liquid glue.
  • Tricky part… adhering the narrow z fold to the card… adhere the longest panel first, remembering to just adhere to the front left panel of the card. Close the card and adhere the far right panel. Using your grid paper to. line up this panel helps to keep it straight. Card is done!

For the envelope, simply adhere a 2 1/4 x 6 panel of coordinating DSP to the envelope flap; trim and your card is complete – YAY!

Double Z Fold with Peaceful Poppies DSP #1

Double Z Fold with Peaceful Poppies DSP #2


I hope you feel a sense of accomplishment in creating this fun Double Z Fold card. This layout has so many possibilities, I would love to see what you do with it.

The new 20220-2021 Annual Catalogue is going live to those folks who are demonstrators in just a few days Want to be a part of that “in” group? Join my team and I will help you develop your skills both in card making and in the realm of developing your business (unless you simply want to be a hobby demo and get the incredible discounts, which is TOTALLY OK!)

Thanks for stopping by.

May you have a beautiful day.

Make someone happy by sending them a handmade card.


Stampin’ Up! and Bonanza Buddies and Bonanza Dies

Hi Everyone… Back for my second post of the day – yes, unusual it is! I needed a birthday card and this struck my fancy – today’s card is made using SU! Bonanzas Buddies, Bonanza Dies and Birthday Bonanza DSP. How fun is that!!! This card was inspired by one I saw by
Dawn Olchefske. Thank you Dawn for sharing.

The card cuts are just a bit different and you can see it so clearly in this first photo…

Bonanza Buddies #1

  • Bermuda Bay cs 8 1/2 x 5 1/2, scored at 4 1/4. Remove 1″ from each FRONT SIDE

For the card front…

  • Cut Grapefruit Grove cs 3 3/8 x 4 1/8 and adhere to from panel with liquid glue
  • Cut Birthday Bonanza  DSP 3 1/4 x 4 1/8 and adhere to Grapefruit Grove with liquid glue
  • The tag is made with Whisper White scrap about 2 1/2 x 4 1/4 – cut with the fabulous tag from the Bonanza Dies
  • Stamp your sentiment onto the tag using Memento Black ink and your Stamparatus. I find I get the stamp just so perfectly straight and I don’t have so many mistakes – just sayin’
  • Fussy cut – yes, I did say fussy cut… a toucan and balloons from another of the Birthday Bonanza DSP. This is such fun paper!!!
  • Attach a Grapefruit Grove  twine from the Nature’s Twine set then adhere the tag to the card front with dimensionals. Attach the fussy cut toucan with balloons with liquid glue and dimensionals on the far right of the Crushed Curry and Bermuda Bay balloons.

For the inside…

Bonanza Buddies #2

  • Cut two (2) Grapefruit Grove cs 1 x 4 1/8 and adhere to the far left and far right sides.
  • Cut two (2) Birthday Bonanza DSP 7/8 x 4 and adhere to the Grapefruit Grove panels
  • Cut Grapefruit Grove cs 3 1/4 x 4 1/8 and adhere to the center of your inside
  • Cut Whisper White cs 3 1/8 x 4. Stamp your sentiment from the Bonanza Buddies stamp set in Memento Black ink. Again I used the Stamparatus to make the sentiment straight and centered.
  • Cut a banner using the Bonanza Dies and the Birthday Bonanza DSP and adhere with liquid glue.

YAY! Your card is complete… ready to send to someone with a sense of fun n- and who doesn’t need a bit of fun these days to lighten their heart?

Remember this stamp set, dies and DSP retire as of Jun 2 – and they make a birthday card  so easy… Join the fun and order today. Remember to use my CURRENT HOST CODE if your order is between $50 and $150 to receive a free item of your choice worth up to $10 😁😁😁

CURRENT HOST CODE J2E4VDGM


Bonanza Buddies
#3

Thanks for stopping by

May you have a beautiful day

Make someone happy by sending them a handmade card

Stampin’ Up! Acetate Card Boxes and DSP

Acetate Card Boxes and Detailed Bee Dies

It’s Sunday! Today on the coast of Jersey we have a sunshiny day, a bit cool at just 32 degrees but it is to get up to 61 before the day begins to cool again. I have to say, the daffodils and pansies and Hellebores (Lenten Rose) love these cool temps and are thriving. What’s our card for today? There isn’t one – it’s a box 😁. Todays post is all about the Stampin’ Up! Acetate Card Boxes, a bit of ribbon and Designer  Series Paper. Let’s take a look…

Acetate Card Box #1

Acetate Card Box #2

I’m going to walk you through this with photos and it’s really quite easy…

  • Cut your Acetate Card Box in half before opening it – at 4″. Put each half together, folding in the tabs and bottom.
  • Add Tear n Tape about 1/2″ from edge, beginning at the cut edge of the box and wrapping around the bottom to the next cut edge. Do this for both sides of each box.

Adding Tear n Tape & Ribbon

  • Cut ribbon 24″. The purple ribbon is NOT a Stampin’ Up! product – shame on me… but the other is Gray Granite Textured Weave 1/2′ ribbon
  • Beginning at bottom of box and on the back side, wrap ribbon up to cut edge, create a loop and then back down on the same side of the box, then turning box over continue the wrapping process. TIP: You will notice in the picture that I unraveled only a portion of the Tear n Tape as I went – this prevents sticking to any of your surface area if you put the box down. I used glue dots at the end of the ribbon to hold it in place.

Adding ribbon

Adding Tear n Tape & Ribbon

Picture from the top after ribbon added

  • Cut your DSP 6 x 4 3/8, and score at 2 3/4 and 3 1/4. Burnish. This becomes your bottom. I used Golden Honey Specialty DSP for both boxes. Add a glue dot to each side of the “bottom” about 1/2″ in from edge. This holds the paper in place and is covered by the ribbon. Slip your DSP inside the box. Adhere a glue dot at the top, also where the ribbon is, again to hold the paper in place.
  • Embellish you Acetate Box front… I used Pearlized Doilies and colored them. The purple is done with Blackberry Bliss ink and a roller. It creates a soft look. The Daffodil Delight doily was colored using Dark Daffodil Delight Stampin Blends. I wanted it to really stand out.

Acetate Card Box #2

  • Using your Stitched Shapes Dies, cut a circle. Stamp your sentiment: for the purple box I used Part of My Story stamp set in Blackberry Bliss ink; for the Daffodil Delight box I used the Honey Bee stamp set and Memento Black ink.
  • Adhere the circle to the doily with liquid glue. Adhere to the box with dimensionals. Add Glitter Enamel Dots.
  • Using the Detailed Bee Dies, cut two bees for each box from another piece of the Specialty DSP. Color the stripes on the bees with Dark Basic Black Stampin Blends. Adhere with dimensionals.

Acetate Card Boxes and Detailed Bee Dies

I love these little boxes and so fun to decorate. I’m preparing card kits for some of my students and will fill these with the card cuts. I think they will enjoy the little extra surprise for them.

Thanks for stopping by. Please check out the Clearance Rack as it has some really awesome products at a very reduced price. And the Honey Bee Dies are back in stock so order those quickly before they disappear.

May you have a beautiful day today.

Make someone happy by sending them a special gift!


Stampin’ Up! Ornate Borders and Ornate Layers Dies

Whoa – it’s Friday! And what are your plans this weekend – stay at home you say? Us too. Praying things will turn around soon – so many lives lost and families heartbroken….

The card for today is made using Stampin’ Up! Ornate Borders Dies and Ornate Layers Dies. It’s nice they work together so well.This particular border I had not played with yet and it is so gorgeous – it could become a favorite very easily. Here it is…

Ornate Borders Dies, Ornate Layers Dies

The details:

  • Pool Party cs 4 1/4 x 5 1/2
  • Thick Whisper White 4 1/4 x 11, scored at 5 1/2
  • Regular Whisper White 2 x 5 plus diecut  panel
  • Tropical Oasis DSP 2 1/4 x 5 for the diecut plus 2 1/4 x 6 for the envelope flap
  • Shimmer Ribbon 1/4″ (from the holiday catalogue
  • Praiseworthy Prose stamp set


Ornate Borders Dies Ornate Layers Dies

  • Place the floral die cut from the Ornate Borders Dies on the edge of your Pool Party on the long side and run through your die cutting machine. Voila – you have this gorgeous edge! Isn’t it beautiful? There are some leaf like pieces that come out of this you will definitely want to save – just sayin’.
  • Adhere this directly to your Thick Whisper White with liquid glue
  • With your Ornate Layers Dies, run this through your die cutting machine using the Tropical Oasis DSP 
  • Run your Whisper White panel through this same machine using the stitched rectangle  from the Ornate Layers Dies.
  • Using your stamparatus, stamp your sentiment from the Praiseworthy Prose stamp set with Memento Black ink. Adhere this with liquid glue to the die cut DSP, then to the Whisper White 2 x 5 panel. Isn’t this a perfect sentiment for our times right now? It’s perfect for any time really, but certainly fits what’s going on in the world right now.
  • Wrap a length of the Shimmer Ribbon 1/4″ around and tie a bow. Hold in place with a glue dot
  • Adhere to the card front with liquid glue and your card front is complete!

For the envelope…

  • Adhere 2 1/4 x 6 piece of DSP to the envelope flap. Trim to fit.
  • Stamp the heart in the corner of the flap then several hearts on the front with Memento Black ink. This heart is also from Praiseworthy Prose stamp set

I cannot share the inside as this will be for a specific family member and just in case they see this post – well, I can’t share it yet.  I’ll definitely share after I’ve given it to them 😘

A couple of things before I sign off…

Stampin’ Up! has updated it’s Clearance Rack and there are some real deals – so check it out!

The Ornate Garden Suite is a premier promotion for the 2020-21 Annual Catalogue. Since it is a premier it is available for a limited time as a suite of products – therefore a much better deal than if purchased individually.

And lastly – there will be anew set of In Colors for 2020-21, so shop those retiring In Colors before it’s too late!

Thanks for stopping by.

May you have a beautiful day.

Make someone happy by sending them a handmade card!

Ornate Borders Dies Ornate Layers Dies

Stampin’ Up! Ornate Layers Dies and Stitched Rectangles Dies

Hi Folks – it’s Thursday! Did you know that already? Well, my days are all mixed up… just sayin’. The card for today features the fabulous Stampin’ Up! Ornate Layers Dies (NEW!) and the Stitched Rectangles Dies and oh yes… the fun Tropical Oasis DSP. What a combination! The other factor about this gem is… it’s a gift card! Let’s take a look.

Ornate Layers Dies, Stitched Rectangles Dies, Tropical Oasis DSP

Gift Card
Ornate Layers Dies, Tropical Oasis DSP

Don’t you love this combination? So, how did I do that? Here are the deets…

  • Terracotta Tile  4 1/4 x 11, scored at 5 1/2 and 9; additional piece for diecut approx 3 3/4 x 2 1/2
  • Whisper White 4 x 5 1/4 (for inside panel; additional piece for diecut approx 3 1/2 x 2 1/4
  • Tropical Oasis DSP 3 1/4 x 4 (front of card) and 1 3/4 x 4 (for the fold over for the gift card

Ornate Layers Dies, Stitched Rectangles Dies, Tropical Oasis DSP

  • Adhere the DSP to the front panel and also to the fold over for the gift card. Make certain the DSP is going in the right direction! Using a 3/4″ circle punch, punch a ‘half moon’ to easily remove the gift card
  • Die cut the 4 x 5 1/4 panel of Whisper White close to the right edge, for a delicate wonderful border
  • Diecut the smaller panel of Whisper White for the card front using the Ornate Layers Dies
  • Diecut the smaller panel of Terracotta Tile for the card front using the Stitched Rectangles dies.
  • Stamp your sentiment for the card front from the Floral Essence stamp set. Stamp the inside sentiment using the same stamp set.
  • Adhere the inside panel using liquid glue
  • Using Tear ‘Whisper Whitew diecut to the Terracotta Tile diecut with liquid glue. Adhere this to the card front with either liquid glue OR snail. I tend to use snail when I am attaching a panel like this

For the envelope…

  • Adhere a panel of the Tropical Oasis DSP 2 1/4 x 6, to the envelope flap using liquid glue and trim to fit.
  • I also stamped a hello sentiment on the front of the card from the Timeless Tropical stamp set but covered it up when I took the picture… silly me! 😳

Your card is complete! I am using this card for a woman graduating from Hairdressing School in a couple of weeks. She’s a sweetheart of a young lady, has a wonderfully refreshing personality and will do well in her future. I wish her well.

Thanks for stopping by.

May you have a beautiful day.

Make someone happy by sending them a handmade card.


Remember to look for the Ornate Garden Suite of products premiered right now prior to the launch of the 2020-21 Annual Catalogue. Here is a flyer to refresh your memory.