I love to be creative - in the garden, crafting, and in leadership roles. There is something wonderful that happens when we design something new and share it with others. It's fun and makes everyone happy.
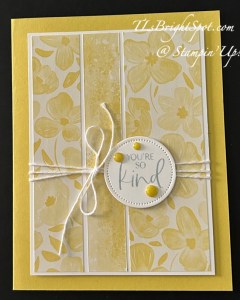
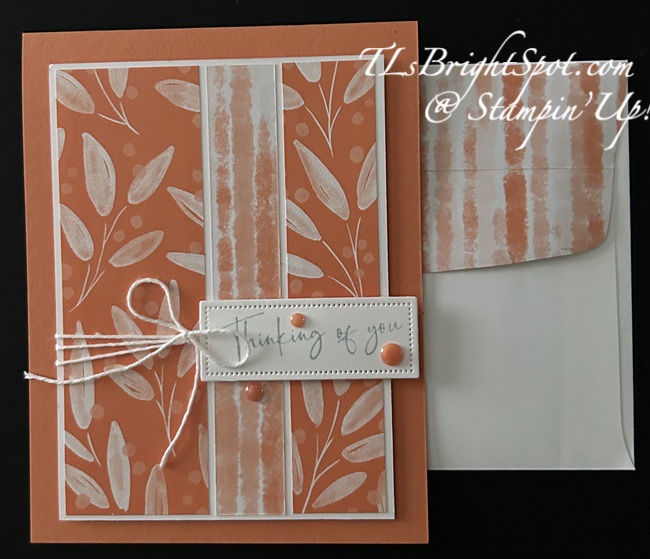
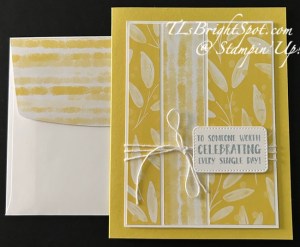
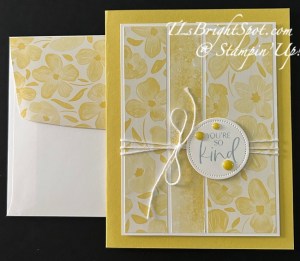
Good Monday morning. How was your weekend.? I’m making progress after knee replacement: can’t drive yet as it’s the right knee, so chauffeuring is the mode of transportation for a while yet. I’ve set up a table on our main floor for card making and was finally able to work at the table for more than 15 minutes! In shifts of time, I’ve made these four cards – all with the 25-27 In Color 6×6 DSP pack Timid Tiger and Darling Duckling. For the sentiments I used the new The Right Words stamp set and cut them out with Nested Essential Dies or the Everyday Details Dies. I added White Bakers Twine from the Twine Essentials Pack and on some, 25-27 In color Flat Pearls. Let’s look.
These two cards are the same except the panels widths were switched, making the largest panel to the right as opposed to the left.
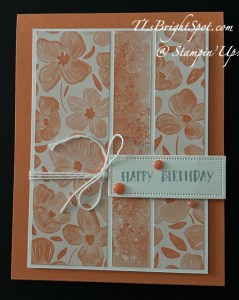
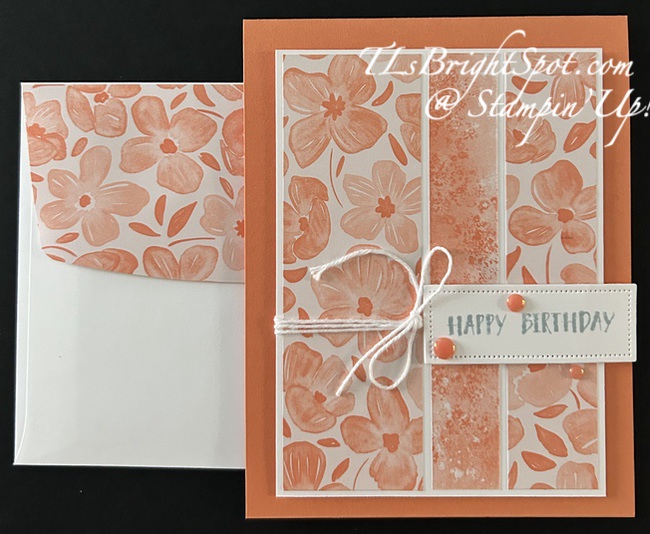
Here I did the same, reversed the largest panel and used another of the fun papers in the 25-27 In Color 6×6 DSP pack with the same colors Timid Tiger and Darling Duckling.
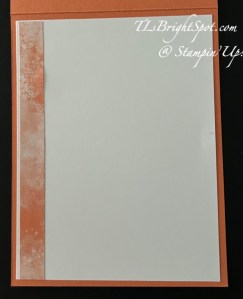
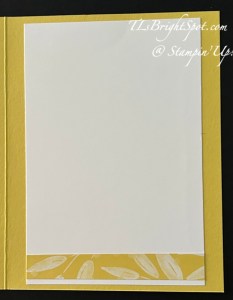
I kept the inside very simple – no stamping, just a strip of the DSP either on the side or at the bottom of the Basic White panel.
Just this little strip dresses up the inside :O) One of the nice aspects of using a layout like this is one full 6×6 will make one card, using the extra pieces for the inside of the card and the envelope flap.
Card cuts…
Begin by cutting a panel 3 1/4 x 4 3/4, then trimming that to: 3/4 x 4 3/4, 1 x 4 3/4 and 1 1/2 by 4 3/4. (this will leave a 2 3/4 x 6 strip for covering the flap and adding a strip to the inside of the card)
Adhere panels, reversing sides of the DSP as desired to a Basic White cut 3 9/16 x 4 7/8
Wrap with Bakers Twine 3 times and tie a bow
Stamp sentiment in Cloud Cover ink on Basic White scraps and die cut, adding to the panel with dimensionals.
Add finished panel to card front with dimensionals: 8 1/2 x 5 1/2 scored at 4 1/4, or 4 1/4 x 11 scored at 5 1/2
Add embellishments
Add 2 1/4 x 6 strip to envelope flap, trim to fit. This will leave about 1/2″ for card inside
Add cut down strip to inside of card
Now you have a small stack of cards for various occasions – and this can be done with the other colors in this pack as well, making certain some can be used for masculine cards.
Want to purchase the products to make these cards? Check the items below as they will take you directly to my shop. Product List
If you are a scrapbooker, this could be right for you… see the details below.
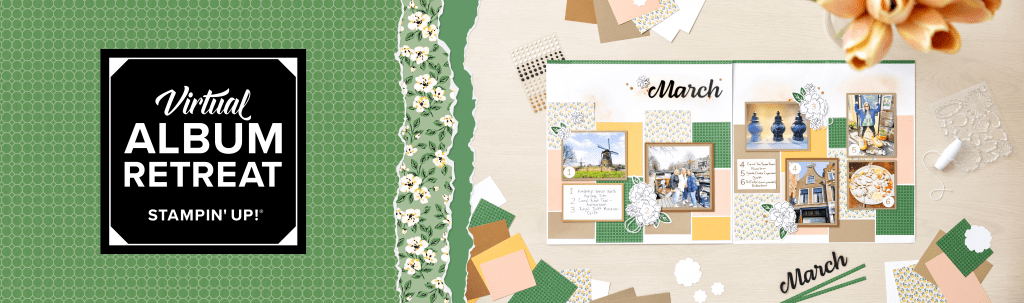
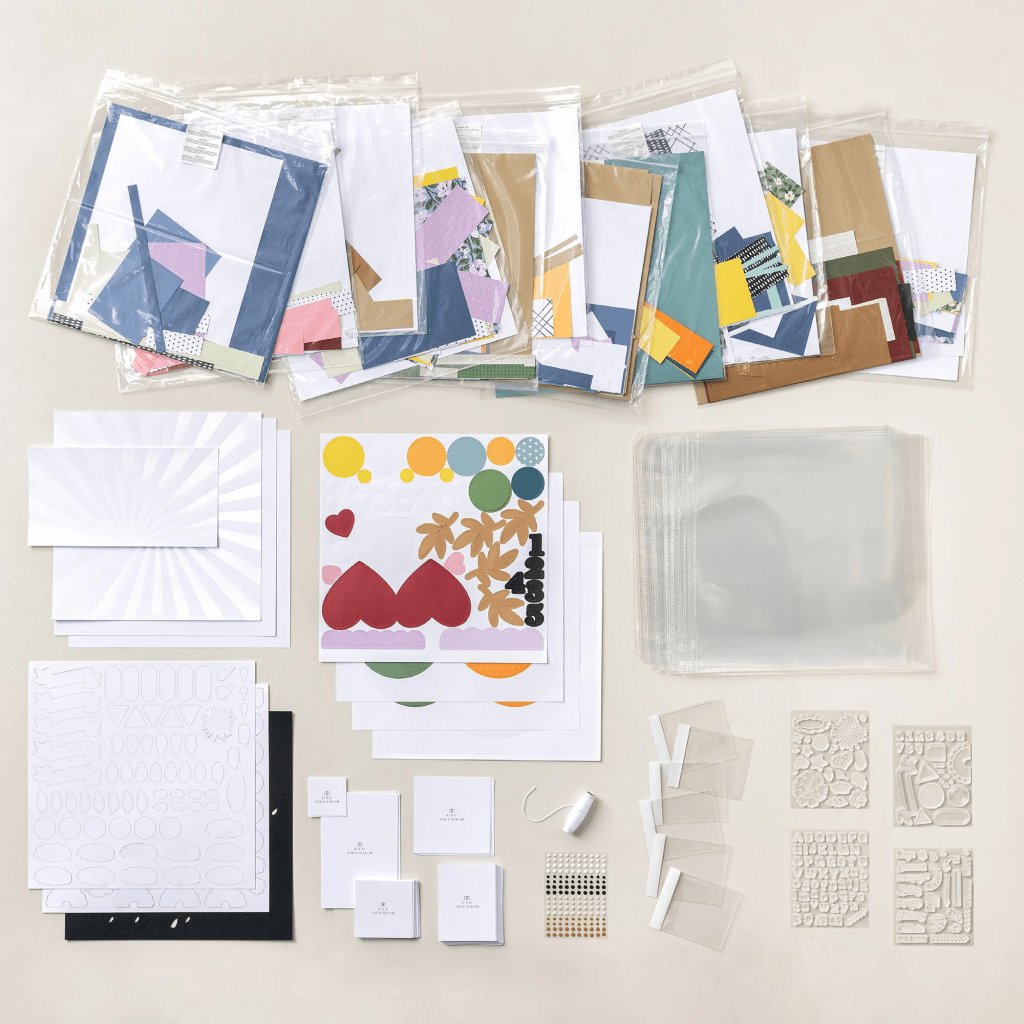
Introducing the Virtual Album Retreat, a brand-new event that’s unlike anything we’ve ever done before! During this three-day, virtual event, you’ll create 12 scrapbook spreads using the Month by Month Album Retreat 2025 kit, craft with customers and fellow demonstrators who love scrapbooking, learn new techniques, and connect on a personal level with fellow crafters and Stampin’ Up! staff. We’ll even have some fun giveaways!
Important Dates
Month by Month Album Retreat 2025 kit available for purchase
May 28, 2025
Virtual Album Retreat
July 16–18, 2025, 2:00–10:30 p.m. (MT)
Virtual Album Retreat Facebook Live recorded videos available
Available immediately following each session
When: July 16–18, 2025, 2:00–10:30 p.m. (MT)
Where: Private Facebook Group
Registration: There is no registration for this event! By purchasing the Month by Month Album Retreat 2025 kit, you’ll get access to an exclusive Facebook group where the live event will stream.
Price of Month by Month Album Retreat 2025 kit: $250 USD | $340 CAD
Language of Event: This event will be presented in English only.
After the Event: You can access the recorded event videos on the Virtual Album Retreat Facebook group page.
Item: Month by Month Album Retreat 2025 (167338)
Includes: Exclusive stamp sets, designed precut sheets, cardstock, embellishments, and more
Price: $250 USD | $340 CAD
Ordering Begins: May 28, 2025 (Kits are only available while supplies last, so be sure to order ASAP! And you’ll want to order early to make sure you get your products in time for the event!)
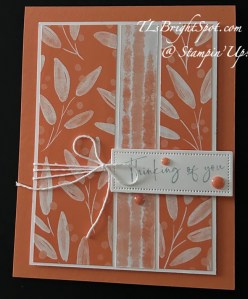
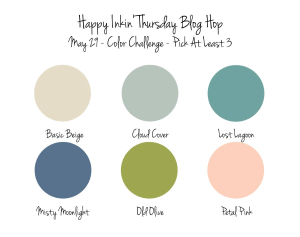
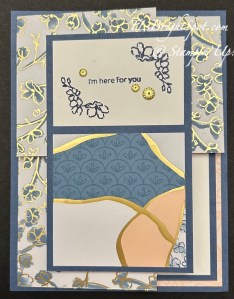
We have a color challenge this week and I can’t wait to see what the others participating have created. I’m still post knee replacement – 3 weeks out now – so lots of elevating and icing and PT and resting! This DOES make it challenging to create cards – an understatement for sure… but here we go. I’ve used Cloud Cover, Misty Moonlight, Petal Pink and Old Olive.
The card base is Misty Moonlight, Petal Pink for the strip, the SDSP is Kintsugi Inspirations SDSP, the Inspiring Imperfections bundle and The Right Words stamp set and Cloud Cover 3/8″ Faux Linen Ribbon – to make this card.
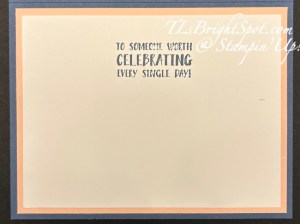
For the inside of the card Petal Pink & Basic White card stock stamped with Misty Moonlight ink.
Please follow the others participating today – by clicking the next button or by clicking on a name. Enjoy the hop!
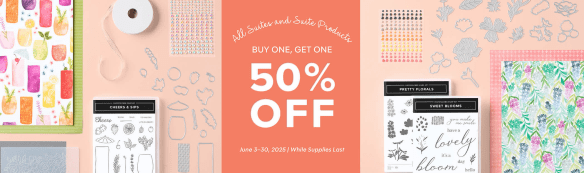
Stampin’ Up! is putting forth some bargains that are extraordinary… here is the most recent…
BUY ONE GET ONE 50% OFF STARTING SOON
On All SUITES and SUITE PRODUCTS!
Starting June 3, all available suites and suite products from the 2025–2026 Annual Catalog and Online Exclusives are buy one, get one 50% off! If you’ve had your eye on a new suite from the annual catalog or you really like the look of a stamp set from an Online Exclusives suite, you don’t have to choose—you can get both!
Sales Period: June 3–30, 2025
Ordering Deadlines
Here are the details:
All available suites and suite products from the 2025–2026 Annual Catalog and Online Exclusives are buy one, get one 50% off.
When you shop the sale, the 50% off discount will apply to the lower-priced item (for example, if you buy a suite collection and a stamp set from a suite, the suite would be full price, and the stamp set would be 50% off).
Suite collections are available if all items are in stock; if all items are not in stock, you can still shop the available suite products.
You don’t have to buy a suite and suite products all from the same suite collection for the discount to apply. You can buy any suite products from any suite.
The discount will appear in your cart once you’ve added two items within the sale parameters to your cart.
Products are available only while supplies last.
See and shop all qualifying suites in the online store.
A couple of things while we’re at it… Through May 31, 2025 Stampin’ Up! has a super JOIN PROMOTION and I bring that up because as a demonstrator, there is an automatic 20% off the purchase price of items even when there are bargains as mentioned above.
Starter Kit Special is NOW AVAILABLE!
Have you heard? From May 6–31, new demonstrators get $165 USD | $220 CAD worth of products in their Starter Kit for just $99 USD | $135 CAD. (That’s $66 USD | $85 CAD in extra products—our biggest Starter Kit Special yet!) As a bonus, new demonstrators also score FREE shipping on their Kit, FREE business supplies, and a FREE Paper Pumpkin kit! Become a demonstrator and enjoy all the perks that come with that, like a 20–25% product discount, exclusive early access to products, the opportunity to earn a modest supplemental income, the chance to attend incredible training and crafting events, and so much more!
Become a Stampin’ Up! demonstrator between May 6–31 and choose $165 worth of products for only $99! (And did we mention your Starter Kit comes with FREE shipping, FREE business supplies, AND a bonus, FREE Paper Pumpkin kit?) Click HERE to join with me & create your Starter Kit! What’s to lose – 20% discount/ 20% commission on all orders.
Stampin’ Up! is putting forth some bargains that are extraordinary… here is the most recent…
BUY ONE GET ONE 50% OFF STARTING SOON
On All SUITES and SUITE PRODUCTS!
Starting June 3, all available suites and suite products from the 2025–2026 Annual Catalog and Online Exclusives are buy one, get one 50% off! If you’ve had your eye on a new suite from the annual catalog or you really like the look of a stamp set from an Online Exclusives suite, you don’t have to choose—you can get both!
Sales Period: June 3–30, 2025
Ordering Deadlines
Phone: June 30, 2025, at 6:59 p.m. (MT)
Online: June 30, 2025, at 11:59 p.m. (MT)
Here are the details:
All available suites and suite products from the 2025–2026 Annual Catalog and Online Exclusives are buy one, get one 50% off.
When you shop the sale, the 50% off discount will apply to the lower-priced item (for example, if you buy a suite collection and a stamp set from a suite, the suite would be full price, and the stamp set would be 50% off).
Suite collections are available if all items are in stock; if all items are not in stock, you can still shop the available suite products.
You don’t have to buy a suite and suite products all from the same suite collection for the discount to apply. You can buy any suite products from any suite.
The discount will appear in your cart once you’ve added two items within the sale parameters to your cart.
Products are available only while supplies last.
See and shop all qualifying suites in the online store.
A couple of things while we’re at it… Through May 31, 2025 Stampin’ Up! has a super JOIN PROMOTION and I bring that up because as a demonstrator, there is an automatic 20% off the purchase price of items even when there are bargains as mentioned above.
Starter Kit Special is NOW AVAILABLE!
Have you heard? From May 6–31, new demonstrators get $165 USD | $220 CAD worth of products in their Starter Kit for just $99 USD | $135 CAD. (That’s $66 USD | $85 CAD in extra products—our biggest Starter Kit Special yet!) As a bonus, new demonstrators also score FREE shipping on their Kit, FREE business supplies, and a FREE Paper Pumpkin kit! Become a demonstrator and enjoy all the perks that come with that, like a 20–25% product discount, exclusive early access to products, the opportunity to earn a modest supplemental income, the chance to attend incredible training and crafting events, and so much more!
Become a Stampin’ Up! demonstrator between May 6–31 and choose $165 worth of products for only $99! (And did we mention your Starter Kit comes with FREE shipping, FREE business supplies, AND a bonus, FREE Paper Pumpkin kit?) Click HERE to join with me & create your Starter Kit! What’s to lose – 20% discount/ 20% commission on all orders.
THANKS FOR STOPPING BY – MAY YOU HAVE A BEAUTIFUL DAY!
Gosh – we are heading into Memorial Day weekend – how did that happen?! We are having unseasonably cool weather here in South Jersey – and hubby has built a fire for us. Who would have thought the end of May and 48 degrees at night…
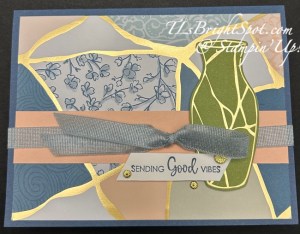
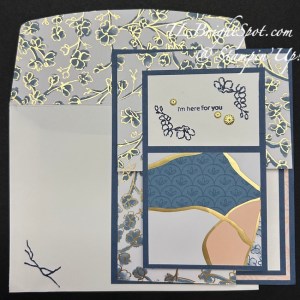
To my card… this is a fun fold using the brand new suite in the 2025-2026 Annual Catalog titled Kintsugi Inspirations. It has stunning Specialty Designer Series Paper, meaning there is gold running through it, Flower Accents a 3D Embossing Folder and of course the Inspiring Imperfections Bundle. The only item I did not use on this card is the embossing folder.
This fun fold is called an Exploding Corner Card. This particular card is made in the portrait style, with the exploding corner in the upper left. Let’s take a look.
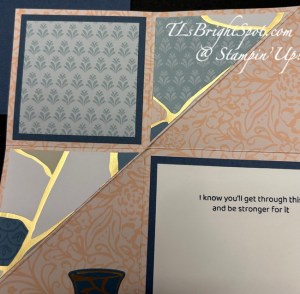
I began with a a piece of the Kintsugi Inspirations Specialty 12×12 DSP cut 6 3/4 x 8. With the short side against the trimmer, score at 2 3/4″. Turn paper to the left & along the long side, score at 2 3/4″. Burnish those score lines. With the short side at the top and the score on the left, mark 2 3/4″ to the right of the score line. Turn paper to the right with long side at top and mark 2 3/4″ to the left of the score line. Place this in the paper trimmer & score from mark to mark & burnish. It should look like this. Notice how the diagonal score line goes directly through the intersection of the other two score lines!
Add this fun folded DSP to a Misty Moonlight panel 4 1/4 x 5 1/2.
Because of the designs I chose in the Kintsugi Inspirations SDSP pack, Misty Moonlight was used as the card base, cut 4 1/4 x 5 1/2. While still having Misty Moonlight in your hands, make these cuts: 2 3/4 x 4 1/2 (this is the card front panel); 2 1/2 x 2 1/2 ( this is for the inside square corner); and 3 3/4 x 5 (this is the inside right panel layer). Now cut Basic White: 1 5/8 x 2 1/2 (for front panel) & 3 1/2 x 4 3/4 (for inside panel.)
Additional DSP cuts: 2 1/2 x 2 1/2 (cut 2), cutting one on diagonal; 2 1/4 x 2 1/4.
Add the 2 1/4 SDSP square to Misty Moonlight 2 1/2 square then add to inside corner (refer to photo above)
Add diagonal cut SDSP pieces as shown in photo above
Add the 3 3/4 x 5 Misty Moonlight to the inside right section of the card
Stamp the Basic White 3 1/2 x 4 3/4 as desired & add over the Misty Moonlight piece. I used the Inspiring Imperfections stamp set & Misty Moonlight ink for this.
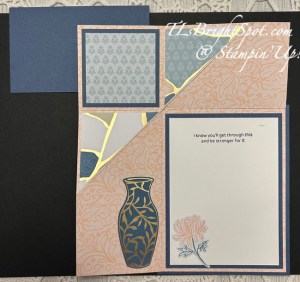
Die cut the vase using the Inspiring Inspiration Dies directly from the Kintsugi Inspirations SDSP 😀 (love being able to do this!) Add to inside panel as shown
Die cut the flower from the same piece of SDSP and add to the Basic White stamped inside panel
Now that the inside is complete – let’s finish the card front.
On the remaining piece of Misty Moonlight, add the 2 1/2 x 2 1/2 SDSP to the bottom half.
Stamp the 1 5/8 x 2 1/2 Basic White piece using Inspiring Imperfections stamp set and Misty Moonlight ink then add to the top of the Misty Moonlight panel.
Add this piece to the card front adhering ONLY to the upper left corner.
Add three Flower Accents to the sentiment piece and the card is complete!
Envelope… Add Kintsugi Inspirations SDSP to flap & trim to fit. Stamp image from the Inspiring Imperfections stamp set with Misty Moonlight ink.
WooHoo! Fun fold and fun card to make… It’s not super thick either so should be able to send this with regular postage – and that’s big!
So much going on in the Stampin’ Up! world – Joining promotion ends May 31 so let’s take a look at that special.
Have you heard? From May 6–31, new demonstrators get $165 USD | $220 CAD worth of products in their Starter Kit for just $99 USD | $135 CAD. (That’s $66 USD | $85 CAD in extra products—our biggest Starter Kit Special yet!) As a bonus, new demonstrators also score FREE shipping on their Kit, FREE business supplies, and a FREE Paper Pumpkin kit! Become a demonstrator and enjoy all the perks that come with that, like a 20–25% product discount, exclusive early access to products, the opportunity to earn a modest supplemental income, the chance to attend incredible training and crafting events, and so much more! Click the link in the JOIN MY TEAM image to do that.
If you want to order – check out this…OK – info on ordering from me…. first of all – no more HOST CODE is needed – YAY! Instead for every order of $20 + Stampin’ Up! has it’s own rewards. And for every $50 order from me in my ONLINE STORE you will earn Daisy Patch Points – one Daisy for every $50 purchase from me. Save those Daisy Patch Points up to 8 points and you’ll be able to order a free gift from me valued to $40. And for that $50 purchase from me, you’ll also receive the monthly tutorial – and for May it features the Gallery Blooms bundle.
THANKS FOR STOPPING BY! MAY YOU HAVE A BEAUTIFUL DAY – MAKE SOMEONE HAPPY BY SENDING THEM A HANDMADE CARD!
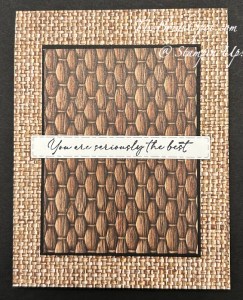
Hello again to this weekly Happy Inkin’ Thursday Blog hop! We have a sketch challenge today that is quick & easy and can be used for any sentiment or card needed – depending on the DSP (Designer Series Paper) used & the stamp set. I’ve used the Woven Textures 12×12 DSP and the Textured Notes Bundle for the sentiments & die cutting.
I hope you like the updates made to my blog – still a work in progress. Thanks to a special teammate for their help and my daughter Wendy as well. I have more work to do on it, but I’m liking what’s happening :O) I’m still recovering from a knee replacement on 5/5, so limited in what I can really do yet.
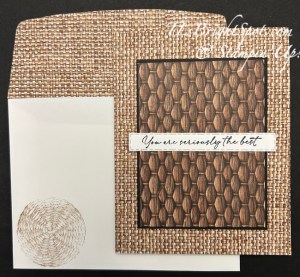
I began with an Early Espresso card base 84 1/4 x 11 and scored at 5 1/2. I added this gorgeous pattern directly to the card base, from the Woven Textures 12×12 DSP cut at 4 1/4 x 5 1/2. Use the adhesive of choice, but I tend to use liquid glue. I then cut a piece of Early Espresso 3 1/8 x 4 1/8 and added a different pattern from the Woven Textures DSP cut 3 x 4 to it – again with liquid glue. These were attached to the card front with dimensionals. I then stamped the sentiment from the Textured Notes Bundle on a scrap of Basic White using Early Espresso ink – then die cut it with the Textured Notes Dies. I added this to the card front with liquid glue. And while you cannot see them, I also added Adhesive-Backed Textured Dots – and the card front was complete.
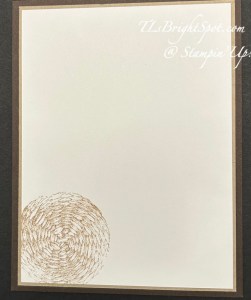
For the inside.. I cut a Crumb Cake piece 4 x 5 1/4 and added it to the inside of the card, trimmed a Basic White panel to 3 7/7 x 5 1/8, stamped it with the fun basket weave image from textured Notes stamp set with Crumb Cake ink. This was added to the Crumb Cake piece already attached to the inside of the card – and bingo – card is ready.
For the envelope… more of the Woven Textures 12×12 DSP was added to the flap & trimmed to fit. I again used the same basket weave stamp from the Textured Notes stamp set and Crumb Cake ink to stamp the front of the envelope. Yay! Such a nice masculine card – and can be a thank you, or thinking of you – again, versatility.
Below is information on how to purchase products from me, but please don’t forget to make your way around those participating in today’s hop. Click on the ‘next’ button to take you to Amy or click on a name to take you to another person’s blog.
Thanks to everyone already making the most of our newly added Notify Me feature in the online store. If selected, this tool sends an email notification when an out-of-stock item becomes available—it’s already proving helpful to streamline the ordering process for demonstrators. Unfortunately, the notification service experienced a disruption from May 6 to 11. As a result, back-in-stock emails weren’t sent for the following items:
Mixed Florals Dies (164641), Mixed Florals Bundle (164642), Mixed Florals Suite Collection (164659), and Fleurs et Techniques Mixtes Suite Collection (164660)
Elements of Text Cling Stamp Set (164774)
This issue was resolved on May 12. However, back-in-stock emails that should have sent during the impacted timeframe will not send for the items listed above. All messages moving forward should function properly. Just remember to ask for that option to be notified when placing the order if it comes up not currently available.
OK – info on ordering from me…. first of all – no more HOST CODE is needed – YAY! Instead for every order of $20 + Stampin’ Up! has it’s own rewards. And for every $30 order from me in my ONLINE STORE you will earn Darling Daisy Points – one Darling Daisy for every $30 purchase from me. Save those Darling Daisy Points up to 15points and you’ll be able to order a free gift from me valued to $40. And for that $30 purchase from me, you’ll also receive the monthly tutorial – and for May it features the Gallery Blooms bundle.
As you probably already know, the 2025-2026 Annual Catalog is now LIVE to customers AND there were two new kits unveiled in the Kits Collection, PLUS more ONLINE EXCLUSIVES released! Stampin’ Up! is ROCKIN’ IT. And here’s another thing – the JOINING PROMOTION. Become a demonstrator (would love to have you on my team!)
Starter Kit Special is NOW AVAILABLE!
Have you heard? From May 6–31, new demonstrators get $165 USD | $220 CAD worth of products in their Starter Kit for just $99 USD | $135 CAD. (That’s $66 USD | $85 CAD in extra products—our biggest Starter Kit Special yet!) As a bonus, new demonstrators also score FREE shipping on their Kit, FREE business supplies, and a FREE Paper Pumpkin kit! Become a demonstrator and enjoy all the perks that come with that, like a 20–25% product discount, exclusive early access to products, the opportunity to earn a modest supplemental income, the chance to attend incredible training and crafting events, and so much more!
Become a Stampin’ Up! demonstrator between May 6–31 and choose $165 worth of products for only $99! (And did we mention your Starter Kit comes with FREE shipping, FREE business supplies, AND a bonus, FREE Paper Pumpkin kit?) Clickthe link in the image above to join with me & create your Starter Kit! What’s to lose – 20% discount/ 20% commission on all orders.
See the list below of items used for this card. Questions? Connect with me! Thanks for stopping by today – may you have a beautiful day! Send a card – make someone happy. 😀
***************************************************************************************************************** Product List
Welcome to this fabulous weekly hop. We have a theme challenge today and I’ve created a sympathy card.
For the card front, I stamped this gorgeous tree using the Loveliest Tree stamp set, Basic Gray ink and Basic White cut 3 1/2 x 4 3/4. After stamping, I used a Blending Brush to gently add color all around the edges of the card. I added this panel to Basic Gray cut 3 3/4 x 5, put dimensionals on the back and attached it to a Thick Basic White card base, 8 1/2 x 5 1/2 scored at 4 1/4, creating a top fold card. For this sentiment, I stamped using Basic Gray ink and the Loveliest Tree stamp set on a scrap of Basic White, then die cut it with Tailor Made Tags Dies. I used Bakers Twine Essential Pack to thread through the hole and frayed the ends. I put dimensionalson this tage and added it to the card front.
For the inside of the card, I used Basic Gray ink, but also used the Comforting Thoughts stamp set for the sentiment and the small leaf image from Loveliest Tree stamp set – stamped on a Basic White panel 3 1/2 x 4 3/4, adhered to Basic Gray 3 3/4 x 5, then popped into the inside of the card.
For the envelope… I stamped this sweet leaf image from Loveliest Tree in Basic Gray ink both on the flap and on the front of the envelope. Simple, elegant, peaceful.
Want to purchase this set from me – or something more? See below how to do that. For now – visit tthe others participating in the hop – theme challenge – outdoors.. Click on the icons or on a name to visit the remaining participants.
OK – info on ordering from me…. first of all – no more HOST CODE is needed – YAY! Instead for every order of $20 + Stampin’ Up! has it’s own rewards. And for every $50 order from me in my ONLINE STORE you will earn Daisy Patch Points – one Daisy for every $50 purchase from me. Save those Daisy Patch Points up to 8 points and you’ll be able to order a free gift from me valued to $40. And for that $50 purchase from me, you’ll also receive the monthly tutorial – and for May it features the Gallery Blooms bundle.
Now, here’s the deal… I’ve had a knee replacement recently and staples will be removed May 20 – so between now (May 12) and May 20, 2025 at end of day, I’m offering double Daisy Patch Points for every purchase of $50+.Check out my Daisy Patch Rewards Program.
As you probably already know, the 2025-2026 Annual Catalog is now LIVE to customers AND there were two new kits unveiled in the Kits Collection, PLUS more ONLINE EXCLUSIVES released! Stampin’ Up! is ROCKIN’ IT. And here’s another thing – the JOINING PROMOTION. Become a demonstrator (would love to have you on my team!)
Starter Kit Special is NOW AVAILABLE!
Have you heard? From May 6–31, new demonstrators get $165 USD | $220 CAD worth of products in their Starter Kit for just $99 USD | $135 CAD. (That’s $66 USD | $85 CAD in extra products—our biggest Starter Kit Special yet!) As a bonus, new demonstrators also score FREE shipping on their Kit, FREE business supplies, and a FREE Paper Pumpkin kit! Become a demonstrator and enjoy all the perks that come with that, like a 20–25% product discount, exclusive early access to products, the opportunity to earn a modest supplemental income, the chance to attend incredible training and crafting events, and so much more!
Become a Stampin’ Up! demonstrator between May 6–31 and choose $165 worth of products for only $99! (And did we mention your Starter Kit comes with FREE shipping, FREE business supplies, AND a bonus, FREE Paper Pumpkin kit?) Click HERE to join with me & create your Starter Kit! What’s to lose – 20% discount/ 20% commission on all orders.
THANKS FOR STOPPING BY – MAY YOU HAVE A BEAUTIFUL DAY!
Welcome to Amy’s Inkin’ Krew Blog Hop. Today’s challenge is ‘for the boys/ men’ and I’ve created a sailing card. This is a favorite hobby for my hubby & several of his buddies – me too. Having said that – there are LOTS of women who sail so don’t discount them for competition!!!
I started with a Secret Sea card base 4 1/4 x 11 scored at 5 1/2 with the fold to the left. The Sunrise Sailing bundle includes a hybrid embossing folder, which means it embosses but can also die cut certain images with coordinating dies – and that’s what I did, I used a Basic White panel about 6×6 (the embossing folder is large), added the sailboat die cutting side up in the proper place on the embossing folder, and ran it through my die cutting/ embossing machine. And what happens? A gorgeously embossed background and a die cut sailboat. :O) With Balmy Blue ink and a Blending Brush, I gently highlighted the clouds and the bottom of the boat. I switched inks to first Misty Moonlight then Secret Sea to highlight the water with a Blending Brush. I stamped the sails of the boat with Real Red ink – still using the Sunrise Sailing stamp set. There are bird dies in this Sunrise Sailing Dies, so I cut 3 birds from Basic Black card stock, added the two to the front covering the embossed birds, and reserved the other bird for the inside of the card. I cut down the embossed Basic White panel to 4 x 5 and adhered it to a Balmy Blue 4 1/8 x 5 1/8. I added the sailboat over the opening with dimensionals. These were added to the Secret Sea card base with dimensionals. I stamped the sentiment in Secret Sea ink on a Basic White scrap, fussy cut it and added it to the card front with glue. Of course it was from the Sunrise Sailing stamp set! Final touch – 2025-2027 In Color Flat Pearls.
For the inside… I had a leftover piece of the water that had been highlighted with Misty Moonlight & Secret Sea and adhered that to a 4 x 5. I adhered the remaining bird from the die cut birds- Sunrise Sailing Dies of course – as though it was ‘fishing’ for it’s lunch. This I added to a Balmy Blue panel 4 1/8 x 5 1/8, then to the inside of the card.
For the envelope… I embossed a piece of Misty Moonlight card stock 2 1/4 x 6 with the So Swirly embossing folder (more water image), adhered it to the flap & trimmed to fit. For the front, I stamped this water image in Misty Moonlight ink then the birds in Secret Sea – these come from the Sunrise Sailing Bundle . WooHoo! Love this set – so versatile, easy to use, and fabulous.
Want to purchase this set from me – or something more? See below how to do that. For now – visit tthe others participating in the hop – “for the men/ boys”. Click on the icons or on a name to visit the remaining participants.
OK – info on ordering from me…. first of all – no more HOST CODE is needed – YAY! Instead for every order of $20 + Stampin’ Up! has it’s own rewards. And for every $30 order from me in my ONLINE STORE you will earn Darling Daisy Points – one Darling Daisy for every $30 purchase from me. Save those Darling Daisy Points up to 15points and you’ll be able to order a free gift from me valued to $40. And for that $30 purchase from me, you’ll also receive the monthly tutorial – and for May it features the Gallery Blooms bundle.
Now, here’s the deal… I’ve had a knee replacement recently and staples will be removed May 20 – so between now (May 12) and May 20 at end of day, I’m offering double Darling Daisy Points for every purchase of $30+.
As you probably already know, the 2025-2026 Annual Catalog is now LIVE to customers AND there were two new kits unveiled in the Kits Collection, PLUS more ONLINE EXCLUSIVES released! Stampin’ Up! is ROCKIN’ IT. And here’s another thing – the JOINING PROMOTION. Become a demonstrator (would love to have you on my team!)
Starter Kit Special is NOW AVAILABLE!
Have you heard? From May 6–31, new demonstrators get $165 USD | $220 CAD worth of products in their Starter Kit for just $99 USD | $135 CAD. (That’s $66 USD | $85 CAD in extra products—our biggest Starter Kit Special yet!) As a bonus, new demonstrators also score FREE shipping on their Kit, FREE business supplies, and a FREE Paper Pumpkin kit! Become a demonstrator and enjoy all the perks that come with that, like a 20–25% product discount, exclusive early access to products, the opportunity to earn a modest supplemental income, the chance to attend incredible training and crafting events, and so much more!
Become a Stampin’ Up! demonstrator between May 6–31 and choose $165 worth of products for only $99! (And did we mention your Starter Kit comes with FREE shipping, FREE business supplies, AND a bonus, FREE Paper Pumpkin kit?) Click HERE to join with me & create your Starter Kit! What’s to lose – 20% discount/ 20% commission on all orders.
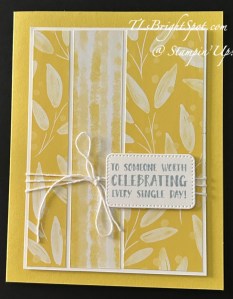
Happy Thursday and welcome to this special hop. We have a sketch challenge today and I’ve used the Country Woods DSP & the Textured Notes stamp set to create it.
I began with a Thick Basic White card base standard A2 size. Using the Textured Notes stamp set, I stamped these awesome leaves: the smaller ones in Crushed Curry and the larger ones in Memento ink. For the first card I cut he Country Woods DSP 1 1/4 x 5 1/2 and attached that to a panel of Basic Gray 1 1/2 x 5 12, put dimensionals on the back and added it to the card, centering the panel. My last step was to add Iridescent Floral Gems.
The sentiment is stamped in VersaMark ink using the Textured Notes stamp set, sprinkled with white WOW embossing powder & heat set it with the heat gun. I popped it up with dimensionals.
For the inside… on a Basic White panel 4 x 5 1/4, I stamped the smaller leaves from the Textured Notes stamp set in Crushed Curry ink and stamped again without reinking. I did that on the top left of the panel and the bottom right, then adhered it to the inside of the card. This card seems like a masculine card to me & I love the versatility of it.
For the envelope front I stamped the smaller leaves from the Textured Notes stamp set in Crushed Curry ink and continued stamping without reinking – inked the stamp and did the same on the flap. then followed the same process on the flap.
On the second card I used the very same process but the card base is Smoky Slate and the DSP is just a teeny bit wider – maybe 1 3/8 x 5 1/2 and the attached paper is Crushed Curry 1 1/2 x 5 1/2. Everything else is the same. :o) The sentiment is stamped in VersaMark ink using the Textured Notes stamp set, sprinkled with white WOW embossing powder & heat set it with the heat gun. I popped it up with dimensionals.
I prefer the first card – what is your preference?
Now, on with the hop – click on the next button to take you to the fabulous Amy or click on a name to visit another team member.
As you probably already know, the 2025-2026 Annual Catalog is now LIVE to customers AND there were two new kits unveiled in the Kits Collection, PLUS more ONLINE EXCLUSIVES released! Stampin’ Up! is ROCKIN’ IT. And here’s another thing – the JOINING PROMOTION. Become a demonstrator (would love to have you on my team!)
Starter Kit Special is NOW AVAILABLE!
Have you heard? From May 6–31, new demonstrators get $165 USD | $220 CAD worth of products in their Starter Kit for just $99 USD | $135 CAD. (That’s $66 USD | $85 CAD in extra products—our biggest Starter Kit Special yet!) As a bonus, new demonstrators also score FREE shipping on their Kit, FREE business supplies, and a FREE Paper Pumpkin kit! Become a demonstrator and enjoy all the perks that come with that, like a 20–25% product discount, exclusive early access to products, the opportunity to earn a modest supplemental income, the chance to attend incredible training and crafting events, and so much more!
If you do not have a catalog, click the image below to see the new In Colors and all the wonderful products.
Get Notified When Products Are Back in Stock!
One request we hear often is, “Can I get notified when an unavailable item comes back in stock?” We are excited to announce that in the next week or so, you will be able to do just that!
If a product is currently unavailable, a box will appear above the product detail where you can request an email notification when/if the product returns. This feature will be available to demonstrators, customers, and guests. If you are logged in as a demonstrator or customer, your email address will automatically populate, with the option to edit it if needed. Guests will need to enter their email address manually.
After your preferred email address is entered, check the box to agree to receive the notification email, then click Notify Me. You will then receive a confirmation email that includes the item number and name of the product you signed up to be notified about. If you change your mind, you can click the unsubscribe button in the confirmation email and it will unsubscribe you only from that specific product notification.
When/if the product becomes available, you will receive a single email notifying you it’s back in stock. The email will include the item number, name, and an image of the product. If the product sells out again, you will need to sign up again to be notified when/if it returns. Perfect, right?!
The Latest on Cloud Cover Ink
The clouds have parted, and we have more to share about our new In Color, Cloud Cover. In the March 18 Weekly Update, we announced we wouldn’t release the Cloud Cover Classic Stampin’ Pad (165284) and Classic Stampin’ Ink Refill (165279) with our 2025–2026 Annual Catalog preorder. This was due to unforeseen quality issues—the ink color was shifting beyond our quality parameters. Since our initial announcement, we’ve been hard at work researching the matter. Here’s what we know:
A chemical reaction between our Cloud Cover ink formula and the chemical makeup of the firm foam used in our Classic Stampin’ Pads has been determined to be the cause of the color shift.
Such a reaction is rare, but the chemistry can play tricks, even after development and our rigorous quality testing.
Because this was an unforeseen issue, we are unable to predict when the shift in color will occur. In one batch of pads, the color accuracy met quality standards. In another, the shift is too significant to pass our tests. Because we pride ourselves on offering beautiful coordinating colors, this inconsistency simply won’t do. Therefore, we will not release Cloud Cover Classic Stampin’ Pads to customers.
Classic Stampin’ Pad aside, there IS a Cloud Cover ink option for customers—Stampin’ Spots!
Classic Stampin’ Spot Small Assortment 1 (166716) – this includes Real Red, Petal Pink, Garden Green, Cloud Cover & Early Espresso
OR
Classic Stampin’ Ink Refill (165279)
Uninked Stampin’ Spots (141822)
Questions? Please reach out to me.
May you have a beautiful day. Thanks for stopping by.
Hello Saturday! It’s beautiful here in New Jersey – and I’m INSIDE… attending a convention for a women’s organization. The great part is that I’m seeing folks I haven’t seen in a while; the unfortunate part is that I’m not out gardening or enjoying the sun. Having said all that – let me share today’s card…
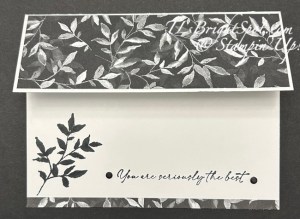
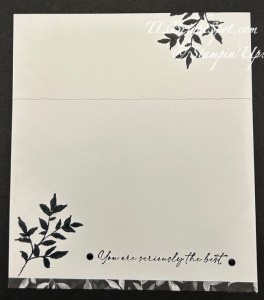
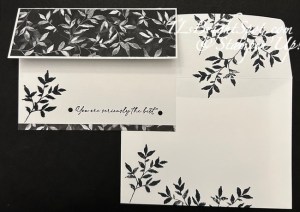
This card is made with items from the Botanical Textures Suite of products: the Botanical Textures 12×12 DSP and the Textured Notes stamp set (which is also a bundle with dies). Black & white cards stand out and this one is no different. It’s made with Thick Basic White card stock 8 1/2 x 5 12, scored at 4 1/4 then 2 1/4 removed. I cut a Botanical Textured DSP1 7/8 x 5 3/8 and adhere to the remaining top portion. Open the card & stamp the inside :O) This is an easy, easy card to make… just stamps, ink, paper!
Using the Textured Notes stamp set and Memento ink, I stamped this stunning leaf on the upper right corner and the bottom left corner. I added a 3/8″ strip of the Botanical Textures DSPn to the bottom, then stamped this sentiment – also from the Textured Notes stamp set. LOVE THIS FONT! On each end of the sentiment I added black dots from … I forget which embellishments- maybe the Neutral embellishments from the suite?! And the card itself is done.
The envelope… Using Memento ink and another leaf stamp in this Textured Notes stamp set, I stamped on the flap 3 times, reinking the stamp each time. I did the same on the front of the envelope – & boom, complete! Such a quick and gorgeous card. Well, maybe I shouldn’t say that since I made it 🙂


![Textured Notes Bundle (English) [ 165556 ]](https://assets1.tamsnetwork.com/images/EC042017NF/165556s.jpg "Textured Notes Bundle (English) [ 165556 ]")
![Woven Textures 12" X 12" (30.5 X 30.5 Cm) Designer Series Paper [ 165560 ]](https://assets1.tamsnetwork.com/images/EC042017NF/165560s.jpg "Woven Textures 12\" X 12\" (30.5 X 30.5 Cm) Designer Series Paper [ 165560 ]")
![Early Espresso 8-1/2" X 11" Cardstock [ 119686 ]](https://assets1.tamsnetwork.com/images/EC042017NF/119686s.jpg "Early Espresso 8-1/2\" X 11\" Cardstock [ 119686 ]")
![Crumb Cake 8-1/2" X 11" Cardstock [ 120953 ]](https://assets1.tamsnetwork.com/images/EC042017NF/120953s.jpg "Crumb Cake 8-1/2\" X 11\" Cardstock [ 120953 ]")
![Basic White 8 1/2" X 11" Cardstock [ 166780 ]](https://assets1.tamsnetwork.com/images/EC042017NF/166780s.jpg "Basic White 8 1/2\" X 11\" Cardstock [ 166780 ]")
![Basic White Medium Envelopes [ 159236 ]](https://assets1.tamsnetwork.com/images/EC042017NF/159236s.jpg "Basic White Medium Envelopes [ 159236 ]")
![Early Espresso Classic Stampin' Pad [ 147114 ]](https://assets1.tamsnetwork.com/images/EC042017NF/147114s.jpg "Early Espresso Classic Stampin' Pad [ 147114 ]")
![Paper Trimmer [ 152392 ]](https://assets1.tamsnetwork.com/images/EC042017NF/152392s.jpg "Paper Trimmer [ 152392 ]")
![Stampin' Cut & Emboss Machine [ 149653 ]](https://assets1.tamsnetwork.com/images/EC042017NF/149653s.jpg "Stampin' Cut & Emboss Machine [ 149653 ]")
![Stampin' Dimensionals [ 104430 ]](https://assets1.tamsnetwork.com/images/EC042017NF/104430s.jpg "Stampin' Dimensionals [ 104430 ]")
![Adhesive Backed Textured Dots [ 163338 ]](https://assets1.tamsnetwork.com/images/EC042017NF/163338s.jpg "Adhesive Backed Textured Dots [ 163338 ]")
![Multipurpose Liquid Glue [ 110755 ]](https://assets1.tamsnetwork.com/images/EC042017NF/110755s.jpg "Multipurpose Liquid Glue [ 110755 ]")
![Stampin' Seal [ 152813 ]](https://assets1.tamsnetwork.com/images/EC042017NF/152813s.jpg "Stampin' Seal [ 152813 ]")
![Bone Folder [ 102300 ]](https://assets1.tamsnetwork.com/images/EC042017NF/102300s.jpg "Bone Folder [ 102300 ]")
![Take Your Pick [ 144107 ]](https://assets1.tamsnetwork.com/images/EC042017NF/144107s.jpg "Take Your Pick [ 144107 ]")