Unknown's avatar

About TL's Bright Spot

I love to be creative - in the garden, crafting, and in leadership roles. There is something wonderful that happens when we design something new and share it with others. It's fun and makes everyone happy.

Stampin’ Up! Tasteful Touches, Forever Fern and Forever Flourishing Dies

Hi Folks! Gosh, yesterday it was 74 and rainy, today is 58 and a bit cloudy but sun should come through. Quite a disparity still in weather temps. I’ll be working out in the front later this morning as we had to remove a tree a couple of years ago and the pachysandra got fried last year in the summer sun. Removing pachysandra is a job and a half! Plus the soil needs amending a bit as it’s very sandy and new plants are going in. I just may be out there a while…

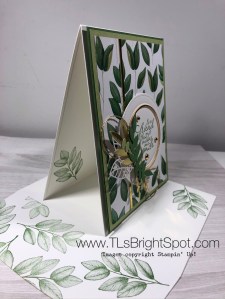
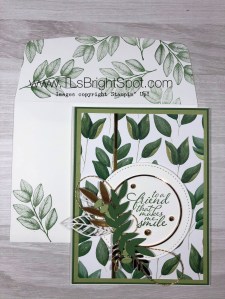
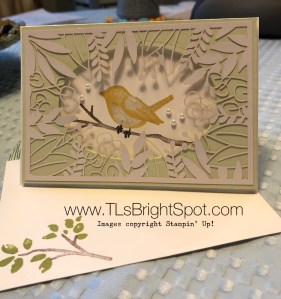
So here’s today’s card… I love the soft colors used here and the fonts in the Forever Fern stamp set are just lovely

Tasteful Touches flower
Forever Flourishing Dies
#1

Here are all the goodies I used to make this beautiful card…

  • Petal Pink cs
  • Crumb Cake cs
  • Soft Sea Foam cs and ink
  • Whisper White cs
  • Polka Dot Tulle Ribbon 5/8″ white
  • Braided Linen Trim 3/16″
  • In Good Taste DSP
  • Ornate Floral 3D Embossing folder
  • Forever Fern stamp set
  • Forever Flourishing Dies:
  • For the flower… Tasteful Touches stamp set; Soft Suede ink, Wink of Stella and Dark So Saffron Stampin’ Blends

Here’s a photo of the flower created a few days ago and sitting on my desk just waiting 😏 Remember I used the flower on the right in yesterday’s post.

Tasteful Touches
#1

Here are the details for making this card…

  • Using the Forever Flourishing Dies, die cut sprig and spray in Soft Sea Foam cs and sponge dauber the edges to give them more dimension
  • Again using the Forever Flourishing Dies, cut the berry spray in Crumb Cake and “color” with Wink of Stella. This helps tie in the flower that is covered in Wink of Stella and gives it glimmer, sparkle and glam!
  • Cut a 1/2  x 4 strip of the In Good Taste DSP. Gosh there are some gorgeous patterns in this pack!
  • Petal Pink is cut 4 x 5 1/4 and is embossed with the Ornate Floral 3D Embossing folder. Spritz lightly with water prior to sending it through your embossing machine. This allows the paper to have a bit more ‘give and flexibility’ to take on the design of the folder. This is a must have folks – just sayin…

Putting it all together…

  • Adhere the DSP about 1 1/4″ from the bottom using liquid glue.
  • Cover this with a strip of the Polka Dot Tulle 5/8″ ribbon. Adhere in back with snail.
  • Wrap a piece of the Braided Linen Trim over this, centering, and adhere in back with tape.
  • Slip the larger foliage die cut between ribbon and DSP and adhere with liquid glue., leaving many of the leaves loose to curl for texture and dimension.
  • Adhere the Crumb Cake berries with a glue dot, then add the leaf swag over this adhering with a glue dot
  • Add the prepped flower with dimensionals.
  • Finally add the linen and Polka Dot Tulle bow with a glue dot.
  • Adhere this embossed panel to Petal Pink cs cut to 4 1/4 x 11 and scored at 5 1/2. Your card front is complete! Easy peasy…

For the inside…

Forever Fern stamp set
#2

  • Stamp the leaf and berry stamp from the Forever Fern stamp set with Soft Sea Foam. While it’s readily available, go ahead and stamp your envelope flap and front as well
  • Stamp the sentiment from the same set using Soft Suede.
  • Adhere to the inside of your card and voila – all done! Even your envelope is ready 😉

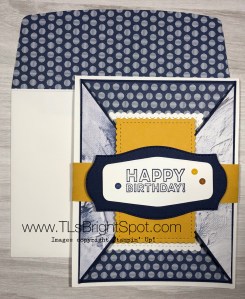
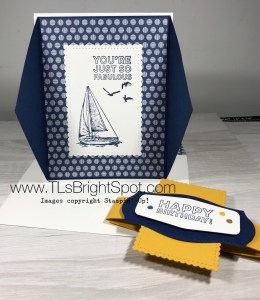
This would make a fabulous wedding or anniversary card! So what do you think? This stamp set – Forever Fern with matching dies, Forever Flourishing Dies, are must haves for this next year. Matter of fact, I just might wear them out from use!!! And Tasteful Touches is another equally beautiful set, They coordinate so well together. I love how Stampin’ Up! does that.

Tasteful Touches stamp set
Forever Flourishing Dies
#3

Tasteful Touches stamp set
Forever Fern w/ matching Dies
#4

Ship with me using my CURRENT HOST CODE J2E4VDGM and remember the 2020-2021 Annual Catalog goes LIVE Jun 3 about 3 PM ET.  Get a bonus from me when you spend $50 – $150… an item of your choice worth up to $10. One item per customer per month please.

I look forward to hearing from you. Tell me what you like about the card and share a picture of yours with me too.

Thanks for stopping by.

May you have a beautiful day

Make someone happy by sending them a handmade card.

And… Happy Memorial Day weekend. Special thanks to all those in the armed services who have served and continue to serve our country. You are amazing people!

Stampin’ Up Tasteful Touches and Forever Fern

Hi Everyone ~ it’s Sat and Memorial Day weekend. Do you have big plans? It’s raining here this weekend so outdoor activities are pretty much canceled – ugh… Mon. the actual day to memorialize those who have sacrificed their lives for all of us, may be a clear day. We’ll see. At any rate, the traditional picnic is called off due to the pandemic. I’m all for being safe and staying well, so I’m ok with that, but I do miss some of the tradition in which we have participated. Thank you to all those who have served our country, sacrificed time with family and sometimes lost their lives to protect our rights. Blessings on ever one… so grateful.

Today’s card began with the flower made a couple of days ago that I never used. Here it is…

Tasteful Touches
#1

Aren’t these gorgeous? I’m using the flower on the right today… and here’s the card…

Tasteful Touches and Forever Fern stamp sets
Forever Fern Dies

I REALLY like how this card turned out. Here are the items used to make this card:

  • Thick Whisper White cs for the base
  • Soft Suede cs and ink
  • In Good Taste DSP
  • Forever Greenery DSP
  • Forever Flourishing Dies
  • Pear Pizzazz cs and ink
  • Tasteful Touches flower
  • Organdy Striped Ribbon 5/8″
  • Forever Greenery Trim Combo Pack
  • Champagne Rhinestone Basic Jewels
  • In Good Taste Wooden Elements

And here’s to pull it all together…

  • Stamp the flower from Tasteful Touches stamp set in Soft Suede; color with Petal Pink and Mango Melody Stampin’ Blends and Fussy cut
  • Cut Soft Suede cs 2 1/8 x 5 3/8, trim diagonally so right side is 1 1/8″
  • Cut In Good Taste DSP 2 x 5 1/4, trim diagonally so right side is 1″. Adhere with liquid glue to the Soft Suede.
  • Adhere both of these to Thick Whisper White 8 1/2 x 5 1/2, scored at 4 1/4
  • Stamp the tall thin fern from the Forever Fern stamp set onto Pear Pizzazz cs using Pear Pizzazz ink. Cut out with the Forever Flourishing Dies and your die cutting machine
  • Find the coordinating DSP in the Forever Greenery DSP that matches the leaf die used and cut out with your die cut machine
  • Pull out coordinating elements from the In Good Taste Wooden Elements.

Further directions

  • Begin by gluing the Pear Pizzazz fern in place with liquid glue
  • Adhere the fernie type wooden element with glue dots
  • Adhere the wooden leaf element similarly
  • Adhere the leaf die cut from the Forever Greenery DSP using dimensionals
  • Make a few loops (I did three) with the braided gold trim in the Forever Greenery Trim Combo Pack and adhere with a glue dot or two
  • Add the flower with dimensionals
  • Add the bow made using the Organdy Striped Ribbon 5/8″ with glue dots
  • Stamp your sentiment in Soft Suede ink using the Forever Fern stamps
  • Embellish using the wonderful Champagne Rhinestone Basic Jewels. They tie the pink in the DSP, the Petal Pink in the flower and the Soft Suede together so wonderfully

Here’s the card again – what do you think?

Tasteful Touches and Forever Fern stamp sets
Forever Fern Dies

Thanks for stopping by

May you have a beautiful day

Make someone happy by sending them a handmade card

And …. Happy Memorial Day! Stay safe and be well

Stampin’ Up! Tasteful Touches

Hi Everyone! It is a cool Thursday here on the East Coast, much cooler than usual for May 21. It is however, sunny – yay… Today’s project began because I saw a card in the new catalogue that had a flower that I really, really liked (see pg 19)and I didn’t know to what stamp set it belonged as it is a new item. I searched and searched and finally found it 😁 (now go to pg. 124) And guess what… I have the stamp from my preorder!!! Little did I know/ realize. So I pulled it out and began playing. The set is called Tasteful Touches and I love everything about this set – from the sentiment fonts to the beautiful images. Here is the start of my playing…

Tasteful Touches
#1

Since I was playing, I first stamped in Soft Suede and prepped two flowers. Aren’t they stunning? I was thinking sepia tone. I colored in all the flower petals for the flower on the left using Wink of Stella – can you see the sparkle in the photo? Then I used Dark So Saffron Blends to color the center. I like it but the flower appears more yellow than sepia tone so I continued playing. The flower to the right is colored using both Light and Dark Petal Pink Blends and Mango Melody for the center. I like this too! In this stamp set is a lovely leaf bunch and I began playing with that… stamping in Soft Suede and coloring in the leaves with Granny Apple Green Blends – again doing two of them. I fussy cut them and decided to make my card with this bunch.  What to do… Here’s the final card – waaay different than my original intention. My hubby calls it ‘rustic’.

Tasteful Touches
#2

  • Crumb Cake cs – roughed the edges by moistening on the back side with an aqua painter then scruffing with my open scissors
  • In Good Taste DSP
  • Soft Sea Foam cs cut with Stitched Shapes Dies
  • Gold Hoop Embellishments
  • Forever Greenery Trim Combo Pack
  • Gilded Gems
  • Linen Thread
  • Soft Suede ink
  • Thick Whisper White cs

The inside…

Tasteful Touches
#3

And another view…

Tasteful Touches
#4

What do you think? It is definitely not my ‘run of the mill’ card but I like it a lot. Hope you do as well. The sentiment on the card front is fussy cut and set on dimensionals. The envelope got it’s special treatment as well: In Good Taste DSP on the envelope flap and sentiment from Tasteful Touches on the card front stamped in Soft Suede.

Perhaps tomorrow I will have something creative using the beautiful flowers I prepared today! In the meantime…

Thanks for stopping by.

May you have a beautiful day.

Make someone happy by sending them a handmade card. 😘


Stampin’ Up! Paper Pumpkin Alternatives

Hello All! Today’s post is all about Paper Pumpkin, primarily the May ’20 PP. The colors in this kit show off the new In Colors: Bumblebee, Cinnamon, Just Jade, Magenta Madness, Misty Midnight. I really like the names AND the colors themselves – together, well, not so much 😏. Included in the kit was a new ink spot from the new In Color Misty MidnightLet’s take a look…

This first card is made just as suggested…

PP April ’20
Card 1

Card #2 is similar, except I cut it apart vertically in various widths and mounted it on Magenta Madness cs. Everything else is the same.

PP Alternative 1
Card 2

Card 3 I cut apart again making various sizes of squares. They didn’t fit together quite the way I wanted (ugh!) Again I mounted the squares on Magenta Madness. I used a sentiment from Silhouette Scenes. 

PP Alternative #2
Card 3

Card 4 wasn’t cut at all, simply mounted on the Magenta Madness and put on dimensionals, again using the sentiment from Silhouette Scenes.

PP Alternative #3
Card 4

The second set of cards I chose to do was a bit more of a challenge and I made not one the way it was suggested. Card 5…  I removed the card front and cut it in fourths, adhered to Misty Madness cs and mounted on dimensionals, adhering to Thick Whisper White cs. I cut a 1 1/2″ banner from the In Color 2020-2021 6 x 6 DSP using the Triple Banner Punch and adhered to the vellum banner that was part of the kit. I trimmed the vellum banner point to match. I stamped a sentiment on a  1 1/4″ banner from Silhouette Scenes stamp set and adhered that to the same banner. I wrapped the Ruched Daffodil Delight 1/4″ Ribbon around and tied a knot, adhering with a glue dot. The full banner then got dimensionals and was placed as you see it.

PP Alternative #4
Card 5

Card 6 was done similarly except… I placed a 1/2″ strip in the middle from the In Color 2020-2021 6×6 DSP pack (new and available Jun 3), included the vellum panel from the kit, cut a label from Tasteful Labels Dies (new in catalog and available Jun 3) in the In Color 6×6 DSP pack and adhered in the center with dimensionals. I cut another label from the same die set (this is an awesome die set folks!), stamped the sentiment using the ink spot Misty Midnight from the Well Said stamp set. (Father’s Day is JUST around the corner and I thought this could be a fun masculine card)This was adhered to the blue label with dimensionals. I added three 2020-2021 n Color Enamel Dots

PP Alternative #5
Card 6

Card 7 I got a bit more creative and decided a lighthearted Father’s Day card would be fun. I again removed the card front, then used the Balloon Punch to create two balloons. Using the colors in the stripes, I punched additional balloons from Bumblebee cs, Misty Midnight and Pumpkin Pie. I stamped the sentiment on various balloons using the Well Said stamp set. Special Someone stamp set was used to create the rest of the card: tails on the balloons, the raccoon (Soft Suede), the mouse (Smokey Slate). The little embellishments were included in the kit. I added a banner at the bottoms from leftover parts of the card front. This Whisper White got dimesnionals and adhered to Misty Midnight card base.

PP Alternative #6
Card 7

Card 8 and I went a little crazy over the top…  There were left overs from the previous card front so I cut it down to make a square (about 3″), adhered that to a Misty Midnight scallop square cut from the Squares Dies and adhered this to a Bumblebee 3 1/2 x 7 panel (scored at 3 1/2). I used a section of the card front for the inside that shows a bit of the colors where I removed the card front 😉

PP Alternative #7
Card 8

PP Alternative #7
Card 8 small panel inside


Using a Misty Midnight card base, I adhered a panel 4 x 5 1/2 from the 2020-2021 In Color 6×6 pack to the card front . I then adhered the Bumblebee piece all the way to the top of the fold with liquid glue. I stamped a sentiment from the Dressed to Impress stamp set to a piece of Whisper White and cut a banner from the Tasteful Labels Dies (did I say I love these dies?). I adhered one of the fun embellishments from the PP kit to the banner, added dimensionals and adhered to this Bumblebee panel. For the bottom of this card, I stamped another sentiment from the Dressed to Impress stamp set using the included ink spot and cut it using another banner from the Tasteful Labels Dies. I stamped the show in Melon Mambo, colored in with Wink of Stella to give it some glimmer and fussy cut it and adhered to this banner with liquid glue. This banner was added to the card with dimensionals. Again, more embellishments from the PP kit.

Since this card was made with someone special in mind, I wanted lots of room to write something. I simply adhered another of the leftover pieces from the removed card front to a Whisper White 4 x 5 1/4. This was adhered with liquid glue and this card was now complete.

PP Alternative #7
Card 8

Whew! That was fun… 4 more cards in the PP kit to make, but not today. Paper Pumpkin is a fun “gift” to receive each month. It most often has cards to make, but sometimes includes bags or boxes. Each kit includes a stamp set, an ink spot, embellishments such as seen today, also ribbon, adhesives, AND instructions – how great is that?! Consider a PP kit for one month, six months or a years subscription. Ship with me now…

The new Annual 2020-2021 Catalog goes live Jun 3. Start making your list and checking it twice. When shopping with me, include my CURRENT HOST CODE J2E4VDGM  for a free gift from me when your purchase is between $50 – $150. No more than one free gift per customer per month though – let’s not be greedy, ok? That free gift is an item of your choice worth $10.

Thanks for stopping by.

May you have a beautiful day.

Make someone happy by sending them a handmade card. 


Stampin’ Up! Cards made with New and Retiring Stamps and Dies

Hi Folks! I have a slew of – well, five – cards that were all in various stages of incompleteness on my desk and it was time to CLEAN UP THE DESK! 😁😁😁 So here goes… I’l show the card and list the products to make it.

Botanical Prints stamp set, Botanical Prints Dies
Card 1

Botanical Prints stamp set, inside
Card 1


Card 1 –

  • Botanical Prints stamp set
  • Botanical Prints Dies
  • Botanical Prints DSP
  • Dark Daffodil Delight Blends
  • Light Old Olive Blends
  • Rhinestone Basic Jewels
  • Terracotta Tile cs base
  • Whisper White cs
  • Inks: Tuxedo Black Memento, Terracotta Tile

Botanical Prints stamp set, Botanical Prints Dies
Card 2

Botanical Prints stamp set, inside Card 2


Card 2

  • Botanical Prints stamp set
  • Botanical Prints Dies
  • Botanical Prints DSP
  • Stitched Shapes Dies – carrying over!
  • Inks: Highland Heather, Tuxedo Black Memento, Highland Heather Blends, So Saffron Blends, Old Olive Blends, Light Soft Suede Blends
  • Rhinestone Basic Jewels

Peaceful Poppies DSP, Peaceful Poppies Elements
Card 3

Card 3

  • Peaceful Poppies DSP
  • Peaceful Poppies Elements
  • Timeless Tropical for the sentiment on the front of the card – carrying over!
  • Thick Whisper White card base
  • Poppy Parade cs
  • Blends: Poppy Parade and Old Olive
  • Wink of Stella on the envelope poppy

Painted Poppies stamp set, Peaceful Moments stamp set
Card 4

Card 4

  • Poppy Parade Card base
  • Painted Poppies DSP
  • Crinkled Steam Binding Ribbon 1/4″, stamped with Old Olive – carrying over!
  • Whisper White
  • Sentiment from Peaceful Moments – carrying over!
  • Inks: Old Olive and Poppy Parade

Ornate Garden Specialty DSP
Ornate Frames Dies
Nature’s Thoughts Dies
Card 5

Card 5

  • Scalloped Notecards and Envelopes – retiring product
  • Ornate Garden Specialty DSP (NEW IN ANNUAL CATALOG)
  • Ornate Frames Dues (NEW IN ANNUAL CATALOG)
  • Nature’s Thoughts Dies – carrying over!
  • Woven Heirlooms for the sentiment – carrying over!
  • Early Espresso ink – carrying over

WOW – it feels good to have an almost clean desk and lots of cards completed. Since so many of these cards are made with retiring products, please see the attached list. Be sure to use my CURRENT HOST CODE: J2E4VDGM when shopping 😏

Last Chance Products JJ (US)

Last Chance Products AC (US)

Thanks for stopping by

May you have a beautiful day

Make someone happy by sending them a handmade card ❤️

Stampin’ Up! Forever Greenery Suite

Today’s card is very special to me… and made with many of the items in the Forever Greenery Suite shown on pg 108 in the New 2020-2021 Annual Catalog. And why is it special? Quite frankly, I was a bit intimidated by all the products and beauty of the papers and stamps, but I will tell you up front, I’m in love with everything about this suite!

Here’s my card…

Forever Greenery Suite

These Gold Hoops Embellishments are really fun to use – didn’t expect them to be, but they are flat top and bottom and that makes it so easy to adhere to card stock or adhere die cuts to them. I chose three leaf trims from the Forever Gold Laser-cut SDSP to adhere to the hoop, turning one of them over to show the white on the other side. Next I layered a Pear Pizzazz die cut then the top is Garden Green die cut – both from the Forever Flourishing Dies. These were all adhered to the hoop using glue dots wherever necessary to make all the items solid and not floppy. I had already used the largest circle in the Stitched Shapes Dies to cut a circle from Whisper White. I placed the hoop on the circle not adhering it yet, noting where to place the sentiment. I stamped the sentiment in Garden Green. The fonts in this stamp set are so clear and yet flourishing and gorgeous. I wanted to use the braided gold in the trim pack so wiggled it around to where I liked it and adhered with a couple of glue dots. I then adhered the hoop to the circle, adhering it with more glue dots. Gilded gems were added for a bit more sparkle.

In the pack of Forever Gold Laser-cut SDSP are several rectangular pieces that can be used for card fronts. Here are two cards I had created using these fronts… and flipped them over to use the white side.

Forever Gold SDSP, Notecards & envelopes

Birds and Branches, SU! Notecards #1

When taking these rectangles apart to use, there were lengths of the gold holding them together. I used one of those lengths to adhere to the Forever Greenery DSP with liquid glue. The circle then got dimensionals and adhered to the Forever Greenery DSP. This was adhered to Pear Pizzazz, then to Garden Green. This was given dimensionals and adhered to the Thick Whisper White.

The inside is stamped with Garden Green ink. Don’t you love this leaf? This look is not solid, it’s just soft and wonderful, with a look of 3 dimension. The leaf jumps off the page.

Forever Fern stamp set

Forever Greenery Suite


Remember to do something special to the envelope. You can clearly see I stamped this same leaf to the envelop front, then covered the flap using the same leaf and more Garden Green ink.

Items from the suite…

  • Forever Fern stamp set
  • Forever Flourishing Dies
  • Gold Hoops Embellishments
  • Forever Greenery Trim Combo Pack
  • Forever Gold Laser-Cut Specialty DSP
  • Forever Greenery DSP

What I have used to make this card…

  • Forever Greenery DSP 3 3/4 x 5
  • Pear Pizzazz cs 4 x 5 1/4 + scrap for die cut
  • Garden Green cs 4 1/8 x 5 3/8 + scrap for die cut
  • Thick Whisper White 4 1/4 x 11, scored at 5 1/2
  • Whisper White 4 x 5 1/4 for inside, + scrap about 4″ square for sentiment on front
  • Stitched Shapes Dies
  • Gilded Gems
  • Garden Green ink
  • lots of glue dots and dimensionals

Thanks for stopping by.

May you have a beautiful day.

Make someone happy by sending them a handmade card.


Stampin’ Up! Blossoms in Bloom with Matching Dies

Wheee! The NEW SU! 2020 Annual Catalogs have arrived and are going out the door today. If you are a customer of mine, you can look forward to some really special bundles, punches, stamp sets being offered – along with LOTS of other card making essentials. Todays card shows off one of those bundles… Blossoms in Bloom and the Many Layered Blossoms Dies. Let’s take a look…

Blossoms in Bloom, Many Layered Blossoms Dies


You may remember that I have said how much I like the New In Color Magenta Madness, and here it is again used as the die cut from the Many Layered Blossoms Dies. Because the new In Color ink are not yet available to demonstrators, I have paired this die cut with Melon Mambo ink and it looks really good together. I have stamped the Blossoms in Bloom on Whisper White cs, colored in the centers of the flower with Mango Melody Stampin Blends and laid the die cut over it using liquid glue to adhere.

I used the new Lovely Labels Pick a Punch to cut a banner after stamping the sentiment from  the Blossoms in Bloom stamp set. The ink here is Black Memento. I added three 2020-2022 In Color Enamel Dots to the label and adhered the label to the card front with dimensionals . I then tied a bow with the Whisper White Crinkled Seam Binding and added it with a glue dot.

This front panel was given dimensionals and adhered to the card base of Smokey Slate 4 1/4 x 11, scored at 5 1/2.

For the inside I used the new Forever Fern stamp set for the sentiment. Isn’t this a lovely font? Melt my heart…

Forever Fern font for the inside

i apologize for the shadows… guess I positioned the lighting incorrectly for the time of day – ugh. I kept this inside really simple for writing some words of encouragement. This is for a young woman who lost her mother recently and she’s really struggling. She could use your prayers!

Thanks for stopping by.

May you have a beautiful day.

Make someone happy or feel loved by sending them a handmade card.

Shop with me – used my HOST CODE J2E4VDGM and receive a free item worth $10 if your order is between $50-$150. The NEW 2020-2022 SU! Catalog goes live Jun 3 about 12 noon MT. If you do not have a demonstrator, contact me to receive a catalog!

NEW 2020-2021 Annual Catalog


Stampin’ Up! Forever Gold Specialty DSP, Note cards and Envelopes

Today is TGIF day! Woohoo! For me, it doesn’t matter for everything has changed. Early this morning hubby had a Zoom meeting for Kiwanis. It seems the way we define what day it is, is by the zoom obligations… odd, right? While he was participating in his ZOOM meeting, I created this quick and easy card. I love this new In Color – Magenta Madness… 😁

Forever Gold SDSP, Notecards & envelopes

Made with SU! Notecards and Envelopes, new In Color Magenta Madness (new and available to customers Jun 3) cut to 3 3/8 x 4 7/8, Forever Gold Specialty DSP (new and available to customers Jun 3), Whisper White for the sentiment panel, Greenery Embossing Folder (new and available to customers Jun 3), Tasteful Touches stamp set (new and yes! available to customers Jun 3) for both the sentiment and the sprig. I used Pretty Peacock for stamping.

Details…

  • The white decorated piece that covers most of the Magenta Madness is one of the gorgeous foils in the Forever Gold Specialty DSP. And yes, it is gold on the other side. Adhere with liquid glue to the Magenta Madness cs, then adhere this to the note card with more liquid glue.
  • The next layer is another of the papers in the Forever Gold Specialty DSP. To give it strength to put on dimensionals, I adhered some card stock to the back, then adhered the piece to the front of the card with dimesnionals.
  • Stamp your sentiment using Pretty Peacock ink (here I used Night of Navy) and the Many Mates stamp set (new and available to customers Jun 3).Cut that sentiment with a circle from the Tasteful Labels Dies (new and available to customers Jun 3) out of Whisper White. Adhere with dimensionals.
  • Stamp the inside with the leaf spray from Tasteful Touches stamp set using Pretty Peacock.
  • Stamp the envelope with the same spray.
  • Run the Magenta Madness through your embossing machine using the NEW  Greenery Embossing Folder (yep! new and available to customers Jun 3). Be sure to spritz the paper lightly with water to get a really nice dry embossing. Isn’t this leaf imprint gorgeous!

Forever Gold SDSP, Notecards & envelopes

Your card is complete and ready to mail. This card is being sent today as a sympathy card. Although the Magenta Madness is bright, it is softened with the overlay of the Foil paper. It still comes across as elegant and prepared with loving care.

Thanks for stopping by.

May you have a beautiful day.

Make someone happy by sending them a handmade card.


Shop with me… Now is the perfect time to stock up on those retiring items, many at a reduced price. Please refer to the graphic for that information. And don’t forget the Clearance Rack – it has some really fabulous deals!

Last Chance Products JJ (US)

Last Chance Products AC (US)

The new catalogue goes LIVE Jun 3. My catalogs for the 2020-2021 year should be arriving any day. If you have shopped with me in the last 3 months, you will receive a catalog from me. If you do not have a demonstrator, please, let’s connect so that I may send you the newest of the new 😁

Please use my current host code when shopping with me. That way I will be able to send

you a special surprised from me, worth $10. You must purchase between $50 – $150 to qualify.

HOST CODE J2E4VDGM

Another puzzle complete – this was sooo hard! The colorsvery similar and the pieces were curvy more that anything else. A definite challenge…

flowers puzzle


Stampin’ Up Birds and Branches

Hi Everyone – it’s Wednesday… do you need to know that? During this time of isolation it seems necessary to KNOW what day it is… they seem to run together otherwise. Hubby and daughter have been working on our little 16′ Bullseye sailboat, painting the bottom, sanding and sealing the teak. Last week we took it to the marina so they could step the mast and put it in the water for us to sail to our slip for the summer. And guess what – today is the day we are doing just that! We have had such nasty winds that even though the boat was ready, the winds were too strong. Remember this is just a 16 footer, but it’s perfect for us. It’s a bit on the cold side this morning (40 degrees when we got up at 5 am), so we will have to bundle. It’s always colder on the water than we expect!

Todays card … Birds and Branches stamp set again (I really like this set) and I paired it with the new Forever Gold Specialty DSP. and the new Forever Greenery DSP. What I chose from the Forever Gold SDSP fits perfectly on the SU! Notecards – and that’s what I’ve done. Take a look see…

Birds and Branches, SU! Notecards #1

What is it you notice? Oh… that the Forever Gold SDSP isn’t gold after all? Well, it is – on the other side! I wanted something soft so simply turned it over :O) After studying this panel for a bit, I decided I wanted to remove the center of the Soft Sea Foam, so cut that with the largest oval from the Stitched Shapes Dies. The SDSP was adhered to Soft Sea Foam card stock 3 3/8 x 4 7/8 with liquid glue, put on dimensionals and set aside.

Next I took out the Birds and Branches stamp set and one of the Notecards and Envelopes,. Centering everything,I  stamped the more solid bird stamp in Sahara Sand stamped off once. Then I stamped the bird outline in So Saffron full strength. The branch was stamped in Early Espresso and finally the feet in Black Memento ink.

Since I had the stamps right there, I decided to do the envelop as well. I took the leaf cluster and stamped it first and in Pear Pizzazz, then the smaller branch in Early Espresso. I adhered a panel of the Forever Greenery DSP to the envelop flap with liquid glue, trimmed it and it was complete.

Then I went back to the notecard itself. With the front panel already having dimensionals, I adhered that to the notecard, then added some Pearl Basic Jewels and the card was done!

This card has no sentiment. I decided to make a set that was blank and ready for just the right words – sympathy or hello, or thinking of you or just a note to add later.


Birds and Branches, Forever Greenery DSP #2

Thanks for stopping by

May you have a beautiful day

Make someone happy by sending them a handmade card.

NEW 2020-2021 Annual Catalog

Shop with me and receive a free product of your choice up to a $10 value. New Catalogue goes LIVE June 3!  Need a catalog and you don’t have a demonstrator? Spend $35 in my online shop prior to Jun 1 and I’ll send a free copy. Remember those retired items and the Clearance Rack too! Perfect opportunity for picking up some fabulous items… just sayin’.

Last Chance Products JJ (US).        Last Chance Products AC (US)

Since the winds are mild this morning, we are headed out early to move that sweet little boat – our first sail of the season. Woohoo! It will feel so good to be out there on the water, with the wind in our faces and the freshness of the day. It’s a perfect time for communing with Mother Nature and the God that made us all.

Just for fun, I’m adding a picture of a puzzle hubby and I just completed late yesterday afternoon. It was very difficult – only 500 pieces – but the colors were so similar that it took a lot of doing to put it together. Fun, right?

Beetle puzzle


Stampin’ Up! AMY’S INKIN’ KREW Blog Hop

The theme for this month’s Blog Hop is all about “For the boys/ men…” and we could interpret that any way we wanted. Hubby’s birthday is in June and he is a sailing man. The new blue in the 2020-2021 In Colors for Stampin’ Up! is titled Misty Midnight. I love that! And it’s perfect to work with for a man – my man. And the Sailing Home carrying over stamp set is a perfect match in many ways. I also used the NEW Tasteful Labels Dies (eek! – fun!) and the Many Mates stamp set (love this too!)

You may be joining me today from the talented Julie Johnston. Thanks for following the blog hop!

The card is a take-off of a Gate Fold card – modified version. I actually followed the really good directions of my upline Mary Deatherage, who created a card using this fun fold. It’s easy!

For the boys/ men #1

  • Cut your card base 4 1/4 x 11, score at 5 1/2. I used Whisper White
  • Cut another piece of card stock (I used Night of Navy 5 1/4 x 8, score at 2″ and 6″
  • Mark the center of each of the short panels( 2 5/8). Cut to the center of each short panel (or gates) creating a V – see photo… I apologize… should have taken a photo PRIOR to completing the card – grrr

For the boys/ men #2

  • Cut a piece of  In Good Taste DSP 1 7/8 x 5 (2 of these) Follow the same procedure for cutting.  Adhere DSP panels to the card front “gates” using liquid glue. (This DSP is available to customers June 3!)
  • Cut apiece of the 2020-2021 6 x 6 DSP  Misty Midnight 3 7/8 x 5 1/8 and adhere using liquid glue to the inside of the Night of Navy panel (This DSP is available to customers June 3!)
  • Using the Stitched so Sweetly Dies, cut a panel for the sentiment and the sailboat. The sentiment, sailboat and birds are from Sailing Home stamp set.  I used Night of Navy ink. Adhere to the inside front panel with liquid glue.
  • Adhere this modified gate-fold to your card base with liquid glue.
  • Cut a strip 1 x 10 for the belly band. I used the new 2020-2021 IN COLOR Bumblebee. Don’t you love that name? It is so descriptive.
  • Cut another panel using a smaller Stitched So Sweetly Dies and Bumblebee card stock. Adhere to the belly band with dimensionals.
  • * Using two of the Tasteful Labels Dies (available to customers June 3!), cut panels, one in Night of Navy and one in Whisper White. Adhere with liquid glue to the Bumblebee diecut.
  • Stamp your sentiment using the new Many Mates stamp set. I added three of the new 2020-2021 In Color Enamel Dots. They are so cute! (Both of these are also available to customers June 3)

The front of your card is complete! Yay! And it’s gorgeous already. 😏 Now for the inside…

For the boys/ men… #3

  • Cut a piece of Night of Navy 5 3/8 x 4 1/8. Adhere using liquid glue.
  • Cut a Whisper White 5 x 3 7/8. Stamp with your sentiment and the anchor from the Sailing Home stamp set and Night of Navy ink. Adhere using liquid glue. Done!

Remember your envelope…Cover the envelope flap with the new 2020-2021 6 x 6 In Color DSP, adhering with liquid glue. Trim. Done, done, done…

For the boys/ men #


This was such a fun card to do. It looks complicated but isn’t at all and is just stunning.

Remember all those products I mentioned that are NEW! Purchasing from me is easy and when buying product between $50 – $150 you receive free product from me :O) Please use my current HOST CODE… J2E4VDGM .

Thanks for stopping by.

May you have a beautiful day.

Make someone happy by sending them a handmade card.


Now on with the hop…. to the very creative Amy Koenders.

If you get lost or disconnected along the way, you may get back in by connecting with any of these participating members today… Enjoy the hop!

  1. Mary Deatherage – https://wp.me/p5snyt-cPT
  2. Karen Ksenzakovic – https://wp.me/paaNf4-2ap
  3. Sue Prather – https://wp.me/p5yitZ-1Ua
  4. Jaimie Babarczy – https://wp.me/p79UhD-3Rf
  5. Leslie Larkin – https://leslielarkin.com/friendlikeyoubundle
  6. Karen Finkle – https://karenscardkorner.blogspot.com/2020/05/stampin-up-tropical-oasis-masculine.html
  7. Connie Troyer – http://constantlycreating.me/2020/05/12/masculine-unisex-card-with-stampin-ups-come-sail-away-memories-and-more-card-pack-for-stamp-with-amy-ks-tuesday-blog-hop
  8. Akiko Sudano – https://wp.me/paOv8E-1bb
  9. Julie Johnston – https://wp.me/p8SzmQ-2kc
  10. Terry Lynn Bright – https://wp.me/p8fxPh-tt
  11. Amy Koenders – https://wp.me/p2SFwf-juR