Stampin’ Up! and Mosaic Mood SDSP, Butterfly Gala

Hi Folks – it’s Friday, May 1! Aren’t we supposed to have a maypole with streamers and dance around it? If that’s the case, why is it raining so stinking hard? At least the temp is not so terrible… at 5 AM it’s reading 53 degrees!So I guess we COULD go out and dance in the rain, couldn’t we… might be fun. 😂 Well thank you very much, right now I’m writing :o)

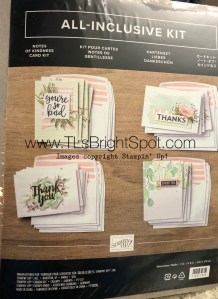
For today’s card the focus is on the Mosaic Mood Specialty DSP. It’s the standout… a rather modern look and shiny and can easily be a masculine card. And here’s how we do it…

Mosaic Mood Specialty
DSP, #1

  • Garden Green is the card base 4 1/4 x 11, scored at 5 1/2
  • Mint Macaron 4 x 5 1/4 (cut 2, one is for the inside)
  • Mosaic Mood Specialty DSP 3 3/4 x 5. Adhere to the Mint Macaron panel with liquid glue.
  • Wrap with Very Vanilla twine (is this retired???), tie a bow. Put this on dimesnionals and adhere to the card front.
  • Stamp your sentiment from the Butterfly Gala stamp set in Garden Green ink. Punch this with your Tag Topper punch. Do another out of Garden Green cs, Adhere together with liquid glue keeping a bottom border.
  • Put dimensionals on just at the top point and bottom point to adhere over the twine.
  • Bingo – your card front is complete!

The inside…

Butterfly Gala #2

  • Adhere the extra Mint Macaron panel to the inside.
  • Cut a piece of Very Vanilla cs 3 3/4 x 5. Stamp your sentiment, again from the Butterfly Gala stamp set, in Garden Green ink.
  • At the bottom, adhere a thin strip of Garden Green cs with liquid glue, then a 1/2 x 4 strip of Mosaic Mood SDSP. Adhere this to the mint Macaron and your card is done!

The envelope got a little extra treatment today…

  • Mosaic Mood SDSP adhered to the flap
  • Butterfly Gala butterflies stamped in the front in Black Memento ink. I love how there is a separate stamp for the body AND for the antennae – for both the small butterfly and the large one.

Mosaic Mood, Butterfly Gala #3

Here’s a reminder…. The Mosaic Mood Specialty DSP is retiring! But… the Butterfly Gala stamp set is not 😁

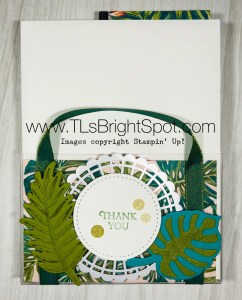
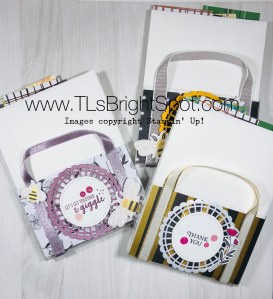
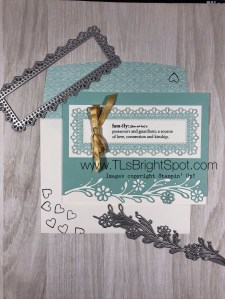
I was going to save this next card for tomorrow, but just couldn’t wait. it’s too much fun…  the technique is called Scrappy Strip and was developed by Bruno Bertucci. I used scraps from my Mosaic Mood stash to cut strips at an angle and the Butterfly Gala stamp set for the sentiment. Stitched Rectangles Dies were used for the sentiment.Please take special note of the envelope, cuz I like that as much as the card!

Mosaic Mood SDSP & Scrappy Strip technique

Mosaic.Mood SDSP & Scrappy Strip technique


Thanks for stopping by

May you have a beautiful day

Make someone happy by sending them a handmade card 


Stampin’ Up! Forever Blossoms and Parisian Blossoms SDSP

Hi Everyone – it’s Wednesday – hump day as many folks call it. Guess that means mid week 😉 Today’s card is a rather fun fold – maybe accordion (?) and uses a bit more than the usual Specialty DSP. I like it, but it needed LOTS of card cuts cuz I did multiple layering (which I really like). This has two additional layers to each panel…

Forever Blossoms stamp set & Parisian Blossoms SDSP #1

And here’s how it happens…

  • Basic Gray cs 8 1/2 x 5 1/2, scored at 4 1/4. Cut diagonally from the score line to 2″ up from the bottom of the left side of the card stock.
  • Petal Pink cs 4 1/8 x 5 3/8, 2 x 5 1/4, 2 x 3 1/2, 2 x 5 3/8
  • Parisian Blossoms DSP 4 x 5 1/4,1 7/8 x 5 1/8, 1 7/8 x 1 3/8, 1 7/8 x 5 1/4
  • Whisper White scraps approx 1/2 x 4 1/4 fro front sentiment, 4 x 5 1/4 sentiment panel on inside and stamped flowers die cut.  Take a peek  how the panels adhere…

Forever Blossoms #2 – open front

Forever Blossoms #3 – open back


  • The tricky part is the angle for the supplementary panels… but I hope to make this real easy for you 😏… I used the card stock base and the angle already cut as my guideline. For instance, in picture #3 that panel is Petal Pink 2 x 5 1/4. Lay the Petal Pink under the Basic Gray (Basic Gray is on top) and softly pencil the angle onto the Petal Pink. Trim on that pencil line. If it needs more length removed, cut it off the straight bottom.This keeps the angle correct and simply adjusts the length of the new panel. Now do the same for the Parisian SDSP: lay it under the Basic Gray, draw a thin pencil line for the angle (making certain the SDSP is going in the appropriate direction) and trim along the pencil line. Adjust the length to fit 1/8″ smaller than the Petal Pink. Adhere the Petal Pink o the “back” as shown in picture #3, then the SDSP.
  • Now go back to picture #2 and do the same steps for cutting the angle for the front panels – do the Petal Pink first, then the SDSP.
  • Adhere SDSP to the appropriate Petal Pink panel, then adhere to the Basic Gray card base.
  • TIP: Adhering each panel as you go saves you from making mistakes in cutting and adhering.

Now you are ready for the largest panel…

  • Adhere the 4 1/8 x 5 3/8 Petal Pink to the Basic Gray cs, then adhere the SDSP 4 x 5 1/4 to the Petal Pink
  • Stamp the large flower from Forever Blossoms stamp set in Black Memento ink. Color using the Dark Petal Pink Blends. Die cut this with the Cherry Blossoms Dies and adhere using liquid glue.
  • Using the Stitched Rectangles Dies, cut a piece from Whisper White and adhere using liquid glue
  • Stamp your sentiment from the Forever Blossoms stamp set on the 1/2 x 4 1/4 strip, using Black Memento ink. Cut to size
  • Cut a strip of Petal Pink for the scallop under the sentiment, from Be Mine Stitched Framelits. Adhere to the sentiment strip with liquid glue and attach to the far left front panel using liquid glue.

For the envelope..

  • Adhere a 2 1/4 x 6 strip of the SDSP to the envelope flap using liquid glue; trim to fit
  • Stamp the single flower from Forever Blossoms stamp set in Back Memento ink and color using Dark Petal Pink Blends

Done, done, done. Now you have completed an accordion card with multiple layers and it wasn’t so hard. Do you love it? My hubby did and that made me very happy.

What’s retiring from the items used today… only the Parisian Specialty DSP – and folks, it is beautiful and right now a real bargain.. Love love love this paper and I am so glad this stamp set is carrying over into the new 2020-2021 catalogue. If youy would like to shop with me (I like that idea by the way!), please use my CURRENT HOST CODE J2E4VDGM for purchases between $50 – $150 to receive a free item of your choice from me – up to a $10 value. If your purchase is over $150, you will receive not only your free item of choice from me, but Stampin’ Up will offer you something as well. Shop now looking at not only the CLEARANCE RACK but also the RETIRING LIST…


Last Chance Products JJ (US)

Last Chance Products AC (US)

Thanks for stopping by

May you have a beautiful day

Make someone happy by sending them a handmade card


Stampin’ Up! and Bonanza Buddies and Bonanza Dies

Hi Everyone… Back for my second post of the day – yes, unusual it is! I needed a birthday card and this struck my fancy – today’s card is made using SU! Bonanzas Buddies, Bonanza Dies and Birthday Bonanza DSP. How fun is that!!! This card was inspired by one I saw by
Dawn Olchefske. Thank you Dawn for sharing.

The card cuts are just a bit different and you can see it so clearly in this first photo…

Bonanza Buddies #1

  • Bermuda Bay cs 8 1/2 x 5 1/2, scored at 4 1/4. Remove 1″ from each FRONT SIDE

For the card front…

  • Cut Grapefruit Grove cs 3 3/8 x 4 1/8 and adhere to from panel with liquid glue
  • Cut Birthday Bonanza  DSP 3 1/4 x 4 1/8 and adhere to Grapefruit Grove with liquid glue
  • The tag is made with Whisper White scrap about 2 1/2 x 4 1/4 – cut with the fabulous tag from the Bonanza Dies
  • Stamp your sentiment onto the tag using Memento Black ink and your Stamparatus. I find I get the stamp just so perfectly straight and I don’t have so many mistakes – just sayin’
  • Fussy cut – yes, I did say fussy cut… a toucan and balloons from another of the Birthday Bonanza DSP. This is such fun paper!!!
  • Attach a Grapefruit Grove  twine from the Nature’s Twine set then adhere the tag to the card front with dimensionals. Attach the fussy cut toucan with balloons with liquid glue and dimensionals on the far right of the Crushed Curry and Bermuda Bay balloons.

For the inside…

Bonanza Buddies #2

  • Cut two (2) Grapefruit Grove cs 1 x 4 1/8 and adhere to the far left and far right sides.
  • Cut two (2) Birthday Bonanza DSP 7/8 x 4 and adhere to the Grapefruit Grove panels
  • Cut Grapefruit Grove cs 3 1/4 x 4 1/8 and adhere to the center of your inside
  • Cut Whisper White cs 3 1/8 x 4. Stamp your sentiment from the Bonanza Buddies stamp set in Memento Black ink. Again I used the Stamparatus to make the sentiment straight and centered.
  • Cut a banner using the Bonanza Dies and the Birthday Bonanza DSP and adhere with liquid glue.

YAY! Your card is complete… ready to send to someone with a sense of fun n- and who doesn’t need a bit of fun these days to lighten their heart?

Remember this stamp set, dies and DSP retire as of Jun 2 – and they make a birthday card  so easy… Join the fun and order today. Remember to use my CURRENT HOST CODE if your order is between $50 and $150 to receive a free item of your choice worth up to $10 😁😁😁

CURRENT HOST CODE J2E4VDGM


Bonanza Buddies
#3

Thanks for stopping by

May you have a beautiful day

Make someone happy by sending them a handmade card

Stampin’ Up and Class Kits

Hi Folks – Monday – oh it’s Monday… And two more card kits prepared for the mail. Here’s the packaging, which I wanted to share ‘cuz I think they are cute. What’s fun about the packaging is that each one has looked so very different while still using the same products… acetate card boxes, DSP, ribbon, pearlized doilies and further decorations.  Depending on the DSP used sort of determines what you create for the decorations.

Cornonavirus Card Kit #1

Here are pictures of what I created before – all still part of the same “theme” but each unique on it’s own.

Acetate Card box – Corona Card Kit #1

Acetate card box, Corona Card kit #1

Acetate Card Boxes and Detailed Bee Dies

Fun, right? I should have taken a picture of them all together, but oh well. I think that’s the last of the kit preparations. Up I go to prepare a card for today :o) – I’;ll be back later to share that with you, so do stop back, ya hear?

Thanks for stopping by.

May you have a beautiful day.

Make someone happy by sending them a handmade card.

Stampin’ Up and Notes of Kindness Card Kit

Hi Folks… Oh today is sunny and beautiful! We have had so much rain and cool temps and with having to be socially isolated, it’s a breath of fresh air. Thank you God! While the world is struggling with the Coronavirus, our yard is coming alive.. I’m going to share just a few pictures so you get the idea.

Tiarella

Variegated Solomons Seal

Very young Brunnera – look at that sweet delicate flower :o)

Bleeding Heart


Was that enough? You get why I’m all excited about the yard “coming to life.” We have a very shaded back yard and all of these are enjoying the cool weather, the rain to wet their feet and today’s sunshine.

😁 My little bit of heaven…


Yesterday I filled my card kits and I want to share the packaging. Yes, I shared it earlier in the week, but the pkg was empty – and now it’s full :o) (They are mailed already – out at 9 AM this morning!)

Acetate card box, Corona Card kit #1

Acetate Card box – Corona Card Kit #1


The box on the right was a late order and I wanted to do something slightly different. I like how it turned out.


Then… I worked on this fun card kit – Notes of Kindness. It comes complete with an acrylic block, a Stampin’ Spot, dimensionals, glue dots and supplies to make 20 – get that 20 cards to put together – oh and did I say directions too?. Love, love, love the soft pink and green together. Here’s what it looks like before opening the pkg and putting the cards together.

SU! Notes of Kindness Card Kit packaging

SU! Notes of Kindness packaging #2


And here they are completed.

SU! Notes of Kindness completed card kit

What a great kit… Just sayin ‘ – this is a great bargain and is part of the Retiring List product. Get yours now.

Thanks for stopping by…

May you have a beautiful day

Make someone happy by sending them a handmade card

Stampin’ Up! April 2020 Paper Pumpkin Alternatives

Hello again… so glad to have you visit… Todays cards were created using the April 2020 Paper Pumpkin and some additional supplies – so alternatives if you will. My hubby has a big family (I have a twin brother) and they are very close – so these family cards are really perfect for him to send. I sent one of yesterdays cards to my bro already 😏 Here are the new creations…

Apr ’20 PP alternative #1 – I used the basic plan but trimmed the Crushed Curry band with my Triple Banner Punch, stamped the sentiment in Early Espresso ink and trimmed it also with the Triple Banner Punch. Both are on dimensionals. One of the birds is adhered with a glue dot and the other with a mini dimensional cut in half.

Apr ’20 PP alternative #1

Apr ’20 PP alternative #2 – I cut off the z-fold of one of the cards and covered the pattern with Garden Lane DSP and trimmed it down to 3 7/8 x 5 3/8. The tree ‘leaves’ were stamped in Flirty Flamingo and embellished with lots of pearls from the kit; the two birds were put on mini dimensionals cut in half. The tree was adhered with glue dots. This panel was adhered with liquid glue to an Early Espresso cs 4 x 5 1/2 then wrapped with Daffodil Delight 1/4″ ribbon. I then stamped one of the banners with Early Espresso ink and trimmed the edges, put it on dimensionals and adhered it over the ribbon. This entire panel was adhered to thick Whisper White cs with dimensionals. The envelope flap got the same Garden Lane DSP adhered with liquid glue.

Apr ’20 PP alternative #2

Apr ’20 PP alternative #3 – I really like the simplicity of this card and the sentiment panel is perfect. I simply could not cover it with anything! The panel was adhered to a piece of Soft Sea Foam cs using liquid glue then attached to the left front panel of the z fold with snail. I attached several pearls from the kit. Did I say I love this? I love this!

Apr ’20 PP alternative #3

Apr ’20 PP alternative #4 – I was on a roll with these sentiment panels but wanted to step it up a bit this time… I used the Stitched Rectangles Dies to cut the sentiment panel then cut another panel with the next larger Stitched Rectangles Dies out of Soft Sea Foam cs. The sentiment panel was adhered to the Soft Sea Foam with dimensionals and these were attached to the left front panel of the z fold with snail. I punched the butterflies from the kit and adhered with a glue dot and embellished those with pearls from the kit.

Apr ’20 PP alternative #4

Apr ’20 PP Alternative #5 – Remember how I removed the z fold on a previous card? Well, I took one of those panels and stamped it in Granny Apple Green ink from the stamps provided in the kit. I adhered the tree to it with glue dots and put dimensionals on the back and set it aside. I cut a piece of Soft Sea Foam cs 4 x 5 1/4 and ran it through the Woodland embossing folder (spritzing it first to break down the fibers and get a wonderful deep design.) This panel was adhered to a 4 1/4 x 11, scored at 5 1/2,  Soft Sea Foam with liquid glue. I adhered a strip of Granny Apple Green 5/8″ ribbon with glue dots, stamped one of the banners in Early Espresso ink, cut it down and adhered it over the banner with dimensionals

Apr ’20 PP alternative #5

Apr ’20 PP alternative #6 – this was fun too! I stamped the little butterflies provided in the kit all around and in the tree, sometimes covering a portion of the stamp if it was too long. This was done in Crushed Curry ink. The tree and butterfly from the kit were adhered with glue dots. I trimmed one of the Crushed Curry banners from the kit, adhered it with dimensionals, stamped the sentiment in Early Espresso ink and adhered with glue dots.

Apr ’20 PP alternative #6

Apr ’20 PP alternative #7 – I took the card provided in the kit and adhered Mosaic Mood Specialty DSP over the pattern section. I adhered the tree with glue dots and embellished the design with more pearls. I took a  Crushed Curry banner and trimmed it, stamped a sentiment on another banner with Crushed Curry ink, trimmed it and adhered with liquid glue. I took a piece of this fun trim that was a freebie during SAB, tied a bow and adhered with a glue dot. The envelope flap got the same Mosaic Mood Specialty DSP.

Apr ’20 PP alternative #7

I’m so proud of myself… I was determined not to let the PP pumpkin kits go unused – or to be more honest with myself, to not be completed. I feel as though I have made a HUGE change and am excited about the results. I hope you like what I have done with this kit. The next PP (you must subscribe by May 10) will have 4 of the new IN COLORS – wheee! We don’t know what those are yet, but that will be their “reveal” to the world 😁

Today the RETIRING LIST has been made available!!! I will be back again to make sure you have that information.

Thanks for stopping by.

May you have a beautiful day.

Make someone happy by sending them a handmade card.


Stampin’ Up! and Paper Pumpkin

Good morning – it’s Tuesday. What are you ‘up to’ today? It is to rain here, so no gardening during that… guess I’ll have to make a card or two 😁

Do you hoard anything? I know, that’s a strong word – hoard…Let’s just say, up until yesterday I had a lot of them, some still tightly wrapped, some in incomplete stages with maybe two to three cards made. Today’s cards are all about Paper Pumpkin. I found some really cool kits and cannot believe I hadn’t finished them.So for the last couple of days I have been making the past Paper Pumpkin kits and really really had fun! Unfortunately I didn’t write down the months on all those I created but here are my favorites.

Past Paper Pumpkin #1

Past Paper Pumpkin #2

The cards on the left were extra fun and I had only three to do… go figure… why would I hold off making three cards? The cards on the right are from Dec 2017 – a l-o-o-n-g time ago. The nautical boxes are gift cards and my favorite ones to put together. They are going to be a gift for a special friend. I like that they have a destination already.

Past Paper Pumpkin #3
April 2018

I spent the morning putting the above items together and what do you suppose came in the mail – my April 2020 Paper Pumpkin! This first is per directions… I didn’t alter anything.

April 2020 PP per directions

Card #1 is first alternative. Thick Whisper White 4 1/4 x 11, scored at 2 3/4 and 5 1/2. Run the left portion through your embossing machine using the Subtle embossing folder. Cut Pear Pizzaz 4 3/4 x 3 3/4. Adhere sentiment piece from the PP directly to the Pear Pizzaz using liquid glue. Punch out leaves from the kit, add dimensionals to all leaves and adhere to the sentiment piece. Punch out butterfly and add using a glue dot. Cut a piece of the ribbon included in the kit, tie in knot and adhere with glue dot. Embellish with the blue pearls included in the kit. Adhere this to the left fold of the card with snail. For the inside, cut a piece of DSP 2 3/4 x 4 1/4 and adhere to card using liquid glue. Add sentiment from the PP kit with Pear Pizzaz ink. For the envelope, cut another piece of the DSP 2 1/4 x 6, adhere with liquid glue and trim.

Current Paper Pumpkin #1
April 2020

Card #2 – I really like this sentiment piece in the kit and did not want to cover it. I felt it needed full disclosure! With card from the kit (it is 4 1/4 x 12 BTW), use a coordinating DSP ( I used.Garden Lane) and cut a piece 3 3/4 x 4/3/4 and adhered the sentiment piece to it with liquid glue. I added SU! Basic Pearls from own stash and adhered this section to the left card front with snail. Add sentiment of choice to the inside.

Current Paper Pumpkin #2
April 2020

Card #3… I cut the cardstock included in the kit to 4 x 5 1/4. I stamped the fern from Positive Thoughts Stamp set in Pear Pizzaz ink, stamping off as I went.  Adhere the. puched out leaf from the kit direrctly to the card front with glue tos to each leaf. Stamp a banner from the kit using a sentiment from from the kit and Pear Pizzaz ink. Adhere ribbon included in the kit with glue dots, weaving it back and forth. Add blue pearls from the PP kit. Adhere this completed panel to the card front with dimensionals. Add a punched out bird from the kit to the banner. This card front gets dimensionals on the back and adhered to Blushing Bride CS cut to 4 1/4 x 11 and scored at 5 1/2. I used a coordinating envelope from the kit to complete this set.

Current Paper Pumpkin #3
April 2020

Bing bang boom – four cards from the kit completed on the day it arrived! I think I get kudos for that – at least from myself. I like how I was able to coordinate current DSP with the cards from the PP kit to make it different. And today I will complete the April PP kit. I am determined not to hold back any more.

To place an order for the May PP kit, you must be registered by May 10. And this kit will have 4 (four) of the new 2020-2022 IN COLORS! Be sure to order your PP kit soon so you can preview the early release of these new colors.

Thanks for stopping by.

May you have a beautiful day.

Make someone happy by sending them a handmade card.


Stampin’ Up! Acetate Card Boxes and DSP

Acetate Card Boxes and Detailed Bee Dies

It’s Sunday! Today on the coast of Jersey we have a sunshiny day, a bit cool at just 32 degrees but it is to get up to 61 before the day begins to cool again. I have to say, the daffodils and pansies and Hellebores (Lenten Rose) love these cool temps and are thriving. What’s our card for today? There isn’t one – it’s a box 😁. Todays post is all about the Stampin’ Up! Acetate Card Boxes, a bit of ribbon and Designer  Series Paper. Let’s take a look…

Acetate Card Box #1

Acetate Card Box #2

I’m going to walk you through this with photos and it’s really quite easy…

  • Cut your Acetate Card Box in half before opening it – at 4″. Put each half together, folding in the tabs and bottom.
  • Add Tear n Tape about 1/2″ from edge, beginning at the cut edge of the box and wrapping around the bottom to the next cut edge. Do this for both sides of each box.

Adding Tear n Tape & Ribbon

  • Cut ribbon 24″. The purple ribbon is NOT a Stampin’ Up! product – shame on me… but the other is Gray Granite Textured Weave 1/2′ ribbon
  • Beginning at bottom of box and on the back side, wrap ribbon up to cut edge, create a loop and then back down on the same side of the box, then turning box over continue the wrapping process. TIP: You will notice in the picture that I unraveled only a portion of the Tear n Tape as I went – this prevents sticking to any of your surface area if you put the box down. I used glue dots at the end of the ribbon to hold it in place.

Adding ribbon

Adding Tear n Tape & Ribbon

Picture from the top after ribbon added

  • Cut your DSP 6 x 4 3/8, and score at 2 3/4 and 3 1/4. Burnish. This becomes your bottom. I used Golden Honey Specialty DSP for both boxes. Add a glue dot to each side of the “bottom” about 1/2″ in from edge. This holds the paper in place and is covered by the ribbon. Slip your DSP inside the box. Adhere a glue dot at the top, also where the ribbon is, again to hold the paper in place.
  • Embellish you Acetate Box front… I used Pearlized Doilies and colored them. The purple is done with Blackberry Bliss ink and a roller. It creates a soft look. The Daffodil Delight doily was colored using Dark Daffodil Delight Stampin Blends. I wanted it to really stand out.

Acetate Card Box #2

  • Using your Stitched Shapes Dies, cut a circle. Stamp your sentiment: for the purple box I used Part of My Story stamp set in Blackberry Bliss ink; for the Daffodil Delight box I used the Honey Bee stamp set and Memento Black ink.
  • Adhere the circle to the doily with liquid glue. Adhere to the box with dimensionals. Add Glitter Enamel Dots.
  • Using the Detailed Bee Dies, cut two bees for each box from another piece of the Specialty DSP. Color the stripes on the bees with Dark Basic Black Stampin Blends. Adhere with dimensionals.

Acetate Card Boxes and Detailed Bee Dies

I love these little boxes and so fun to decorate. I’m preparing card kits for some of my students and will fill these with the card cuts. I think they will enjoy the little extra surprise for them.

Thanks for stopping by. Please check out the Clearance Rack as it has some really awesome products at a very reduced price. And the Honey Bee Dies are back in stock so order those quickly before they disappear.

May you have a beautiful day today.

Make someone happy by sending them a special gift!


Stampin’ Up! Ornate Borders and Ornate Layers Dies

Whoa – it’s Friday! And what are your plans this weekend – stay at home you say? Us too. Praying things will turn around soon – so many lives lost and families heartbroken….

The card for today is made using Stampin’ Up! Ornate Borders Dies and Ornate Layers Dies. It’s nice they work together so well.This particular border I had not played with yet and it is so gorgeous – it could become a favorite very easily. Here it is…

Ornate Borders Dies, Ornate Layers Dies

The details:

  • Pool Party cs 4 1/4 x 5 1/2
  • Thick Whisper White 4 1/4 x 11, scored at 5 1/2
  • Regular Whisper White 2 x 5 plus diecut  panel
  • Tropical Oasis DSP 2 1/4 x 5 for the diecut plus 2 1/4 x 6 for the envelope flap
  • Shimmer Ribbon 1/4″ (from the holiday catalogue
  • Praiseworthy Prose stamp set


Ornate Borders Dies Ornate Layers Dies

  • Place the floral die cut from the Ornate Borders Dies on the edge of your Pool Party on the long side and run through your die cutting machine. Voila – you have this gorgeous edge! Isn’t it beautiful? There are some leaf like pieces that come out of this you will definitely want to save – just sayin’.
  • Adhere this directly to your Thick Whisper White with liquid glue
  • With your Ornate Layers Dies, run this through your die cutting machine using the Tropical Oasis DSP 
  • Run your Whisper White panel through this same machine using the stitched rectangle  from the Ornate Layers Dies.
  • Using your stamparatus, stamp your sentiment from the Praiseworthy Prose stamp set with Memento Black ink. Adhere this with liquid glue to the die cut DSP, then to the Whisper White 2 x 5 panel. Isn’t this a perfect sentiment for our times right now? It’s perfect for any time really, but certainly fits what’s going on in the world right now.
  • Wrap a length of the Shimmer Ribbon 1/4″ around and tie a bow. Hold in place with a glue dot
  • Adhere to the card front with liquid glue and your card front is complete!

For the envelope…

  • Adhere 2 1/4 x 6 piece of DSP to the envelope flap. Trim to fit.
  • Stamp the heart in the corner of the flap then several hearts on the front with Memento Black ink. This heart is also from Praiseworthy Prose stamp set

I cannot share the inside as this will be for a specific family member and just in case they see this post – well, I can’t share it yet.  I’ll definitely share after I’ve given it to them 😘

A couple of things before I sign off…

Stampin’ Up! has updated it’s Clearance Rack and there are some real deals – so check it out!

The Ornate Garden Suite is a premier promotion for the 2020-21 Annual Catalogue. Since it is a premier it is available for a limited time as a suite of products – therefore a much better deal than if purchased individually.

And lastly – there will be anew set of In Colors for 2020-21, so shop those retiring In Colors before it’s too late!

Thanks for stopping by.

May you have a beautiful day.

Make someone happy by sending them a handmade card!

Ornate Borders Dies Ornate Layers Dies

Stampin’ Up! Daisy Lane, Medium Daisy Punch and Garden Lane DSP

Todays card features the Stampin’ Up! Daisy Lane stamp set, the Medium Daisy punch and the Garden Lane DSP. The soft colors used give an element of comfort and elegance, and perfect for a sympathy card.

With yesterdays beautiful weather I did NOT work on my craft room – I worked (played) in the yard, first picking up the branches down from the couple of days worth of storms, nothing big thank goodness. Then the clippers came out to cut back some overgrowing bushes, some minor trim on hydrangea and holly shaping, When I cleared the area of leaves a few weeks ago, I had taken down fencing that keeps the dog out of the flower beds. (He really likes to lie on the cool plants in the heat of summer!) I got several of those back in position. After two hours of work, it was time for a break. That’s when I created this card, still in the confusion and messiness of an incomplete craft room cleanup.

Medium Daisy punch and Garden Lane DSP

Here are the deets:

  • Thick Whisper White 8 1/2 x 5 1/2, scored at 4 1/4
  • So Very Vellum , an item free from the SAB catalogue 4 x 5 1/4
  • Garden Lane DSP 2 5/8 x 3 7/8


  • With Soft Seafoam ink, stamp the Medium daisy from the Daisy Lane stamp set 3 times on a scrap of Whisper White cs. Punch out with the Medium Daisy punch. Curl the edges inward gently using your bone folder. Adhere together with liquid glue.
  • Wrap a length of Mint Macaron 1/8″ ribbon around the DSP and tie a bow, adhering with a glue dot under the bow.
  • Attach the Daisies with two dimensionals layered together, to the DSP, and place on the wrapped ribbon. This additionally helps hold the ribbon in place. Add a Gold Faceted Gem to the daisy center.
  • Adhere the Garden Lane DSP to the So Very Vellum with several dimensionals, and glue this in place on the Thick Whisper White using liquid glue. Your card front is complete.


  • TIP… Use liquid glue only where you can see the DSP as the glue will show through if it goes outside this area!

The inside…

Woven Heirlooms inside of card

  • Stamp the sentiment using Mint Macaron ink and the Woven Heirlooms stamp set on a pice of Whisper White cs 4 x 5 1/4.  L.O.V.E. this script!
  • Adhere to the inside of the card with liquid glue. Inside done!

The envelope…

  • Adhere a 2 1/4 x 6 piece of the Garden Lane DSP to the envelope flap and your card is complete.

Medium Daisy punch and Garden Lane DSP

Woven Heirlooms inside of card

Thanks for stopping by.

May you have a beautiful day.

Make someone happy by sending them a handmade card.