Hello – welcome to the Happy Inkin’ Thursday Blog Hop – 2025!!! HAPPY NEW YEAR! We have a sketch challenge today and I have chosen to work with some of the Floral Delight Suite of products from the Jan-April 2025 Mini Catalog, which customers may begin ordering from Jan 7, 2025. WooHoo!
I started with a Daffodil Delight card base 8 1/2 x 5 1/2, scored at 4 1/4. I stamped around the edges with a leaf stamp from the fabulous Delightful Wishes stamp set – using Old Olive ink. The next layer is Basic White 3 7/8 x 5 1/8 and added with dimensionals. I cut a panel of Floral Delight 12×12 DSP 3 3/4 x 5 and ran it through my Cut & Emboss machine with the extra fun die from Delightful Wishes Dies. See those cute florals peeking through with the Basic White showing? I adhered this to the Basic White panel then proceeded to stamp the sweet flowers from another of the Delightful Wishes stamp set. This particular stamp is a two-step, so I stamped in Dasffodil Delight ink, stamped off then stamped on a Basic White panel. The second stamp was full strength Daffodil Delight. I die cut these with the coordinating die from Delightful Wishes Dies and set them aside. I pulled out a piece of crumb Cake and die cut the branch using Delightful Wishes Dies, then with a Blending Brush added some Pecan Pie ink to create depth. I added these to the card front, trimming them as needed, then added the die cut flowers on dimensionals. The sentiment is stamped in Pecan Pie ink and die cut with a label die from this same Delightful Wishes Dies. Once that was added with dimensionals, I added three Tiny Bee Trinkets with a dab of liquid glue, and the Linen T hread bow with a glue dot.
For the inside, I cut another panel of Floral Delight DSP 4 x 5 1/4 and adhered it to the inside. On a Basic White panel I stamped these sweet flowers in the same manner as those on the front – Daffodil Delight stamped off, then the detail full strength. I used the Old Olive Marker to color just the leaves I wanted to stamp around the flowers. And this was adhered to the inside.
For the envelope… I used yet another piece of Floral Delight DSP to add to the flap. And done! Now – time to see what others have created for the hop. Click the ‘next’ button or click on a name to take you on the hop. Enjoy!
For more information about how to purchase from me, see the LAST CHANCE PRODUCTS, and get benefits when purchasing from me, look below the list of names :O)
When you shop with me and your purchase is $50 or more – you will receive a free giftie valued up to $`10 that is a Stampin’ Up! item. You will also receive the monthly tutorial – January is the Toadstool and it has some really cute ideas! Use my
CURRENT HOST CODE WTGKS9DH
when purchasing and make certain my name is listed as your demonstrator :O)
Thanks for stopping by – may you have a beautiful day – make someone happy by sending them a handmade card!
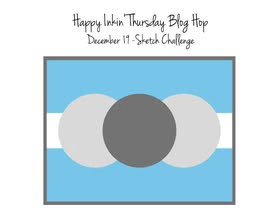
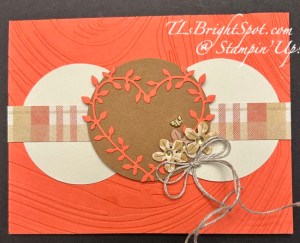
What a week this has been. As I write this on Wed, I was so sick a week ago. Not over whatever it was/ is, but am so much better! At any rate – the hop… we have a sketch challenge and I chose to work with a new bundle that is a Sale-a-bration bundle available January 7. It’s called Heart Shaped.
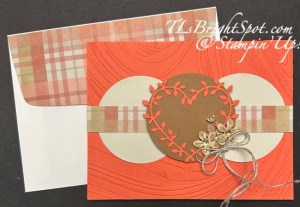
I used my 2 3/8 circle punch to create 3 circles – 2 in Basic Beige and the center in Pecan Pie. I die cut the gorgeous heart from Calypso Coral and adhered it to the Pecan Pie. The plaid paper is from the Jan-Apr Mini Catalog, also available January 7 – cut at 3/4 x 5 1/2. I cut a 4 14 x 5 1/2 Calypso Coral piece and ran it through the So Swirly embossing folder and adhered that to the same color card base. I die cut three flower centers from the other side of this same Timeless Plaid 6×6 DSP and adhered directly to the circle and also with dimensionals. I added this super Tiny Bee Trinkets with liquid glue and a double Linen Thread bow with a glue dot, and ONLINE EXCLUSIVE Low Profile Dots in gold..
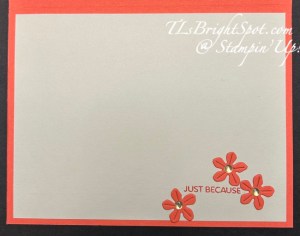
On the inside, I cut a panel of Basic Beige 4 x 5 1/4, stamped just a portion of the sentiment from Heart Shaped stamp set in Calypso Coral in, then die cut three more flowers from Calypso Coral card stock I added each with just a dab of liquid glue then added the ONLINE EXCLUSIVE Low Profile Dots in gold.
For the envelope, I added a 2 1/4 x 6 Timeless Plaid 6×6 to the flap and that was it.
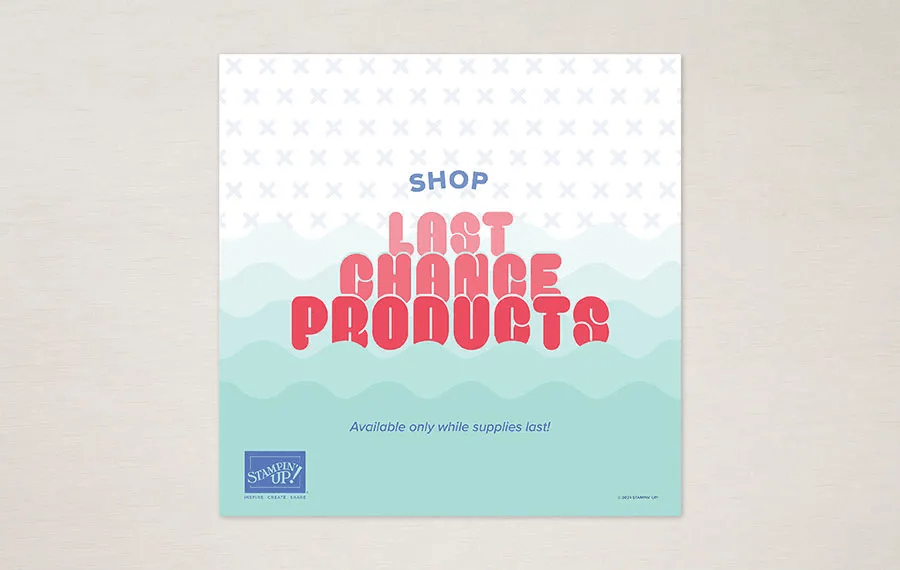
LAST CHANCE PRODUCTS are those items in the Sep-Dec 2024 Mini Catalog and the 2024-2025 Annual Catalog that will not longer be carried. See those items here.
When shopping with me, please use my current
HOST CODE XWYSCA7F
which is good now to 30 December. Also remember that with a $50 purchase you will receive a SU! item valued up to $10. If your order exceeds $150, do not use my HOST CODE as SU! has it’s own rewards for that, but make sure my info is listed as your demonstrator when you check out. :O)
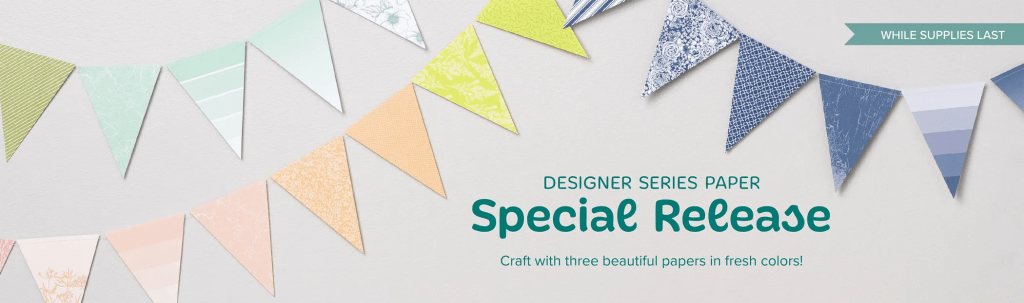
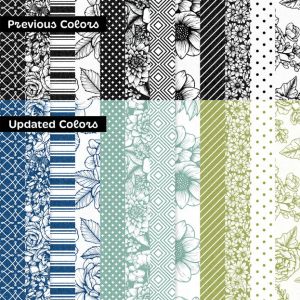
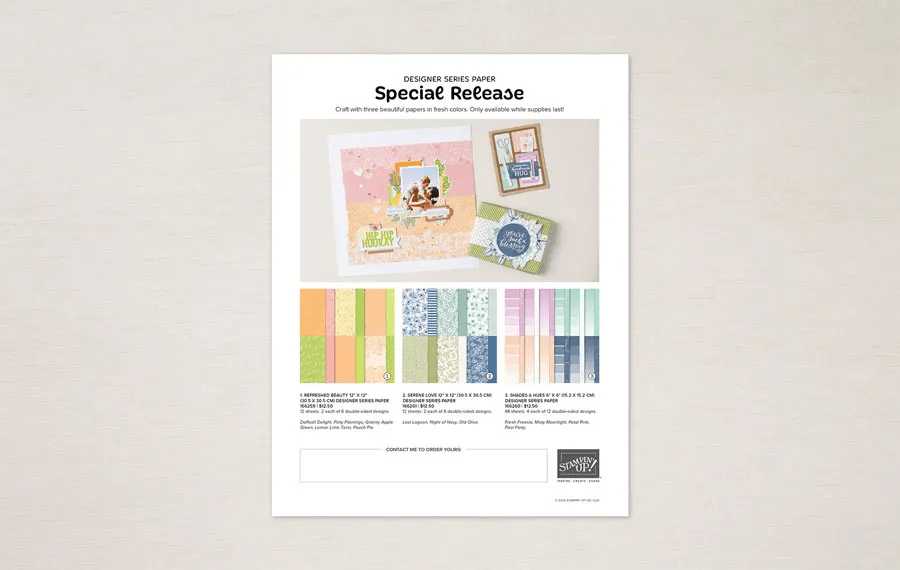
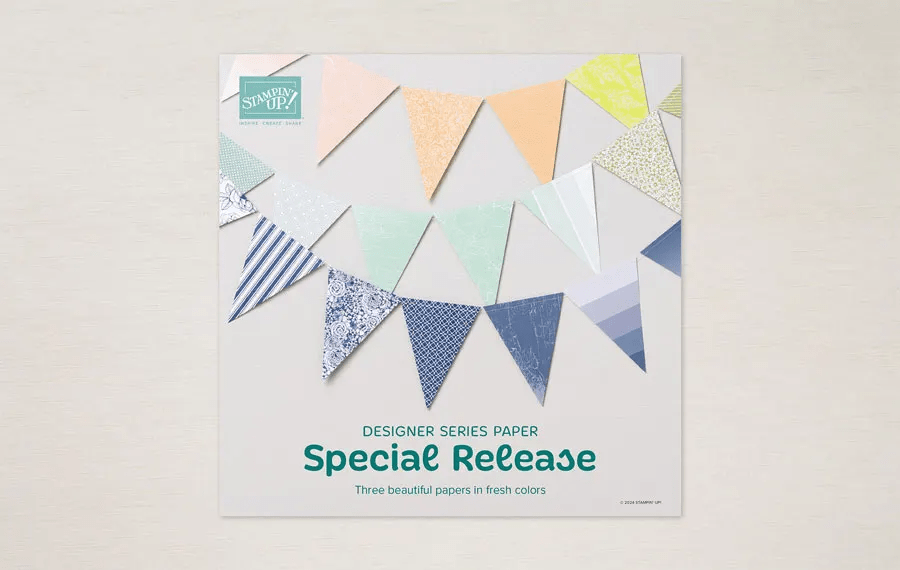
As a special release, we’re offering three previously released Designer Series Papers with a twist: we’ve recolored them!
Serene Love 12 x 12 166261
This is by far my favorite and I can’t wait for it to arrive so I can play!
If you do not have a demonstrator, and are looking for the Jan-Apr 2025 Mini Catalog and the Jan/ Feb 2025 Sale-a-bration Catalog, please reach out to me! We got you covered!
Now – time to see what others have prepared for you for this hop. Please click the next button to take you to our dear Carol Buckalew.
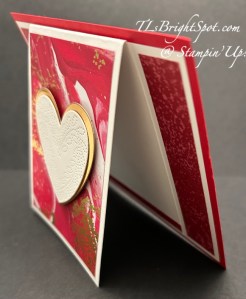
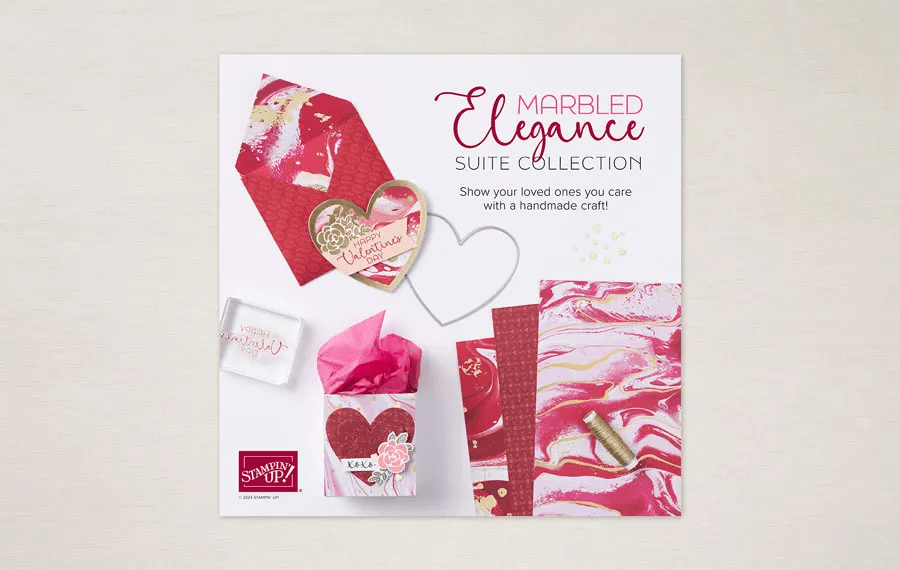
Good day sweet folks… we had card class yesterday using the the Marbled Elegance products from the suite – ONLINE EXCLUSIVES. This is a sweet, sweet set of stamps/ dies – the Heart of Elegance Bundle. Take a peek at the card and notice the deep embossing on the white heart – love! And what I like a lot is that this card could be a masculine card, birthday card, anniversary card, thinking of you card, or a LOVE card :O) It’s versatile. And… this is a fun fold.
I wanted you to see the side view to notice how the center is the fold fold portion. So maybe we call this a ‘center fun fold’??? If you have a better name for it, let me know!
I began with a card base of Real Red 4 1/4 x 5 1/2 and layered a Basic White panel 4 x 5 1/4. Cut a Basic White 3 1/4 x 8 and score on long side at 4. Attach to card base, centering and even with the Basic White at top & bottom. Cut two strips of DSP 7/8 x 3 3/4 and add to side edges. They will lay up against the center folded panel. (my DSP strips are 3/4″ wide and I didn’t like all the white. Trust me, it looks better with wider strips!) Add the Marbled Elegance DSP 3 x 3 3/4 to the front of this panel. Now cut a heart from Gold Foil and another from Basic White and adhere together. Attach with dimensionals to the fun fold panel. I stopped here but there is more that could be done: add adhesive-backed gold hearts from the suite, add a bow using the gold twine in the suite; or add a sentiment banner across the front. Because I have someone specific in mind for this card, I knew they would prefer something more on the simple side – and it’s gorgeous as is – in my opinion that is.
For the inside.. my students (remember this was a card class) chose to heat emboss with the Gold WOW embossing powder, the sentiment ‘Love you” from the Heart of Elegance stamp set. I took a scrap strip of the DSP and adhered it across the bottom. I will heat emboss a sentiment, just not now.
Click here to watch an unveiling video of how the papers were created and some samples created.
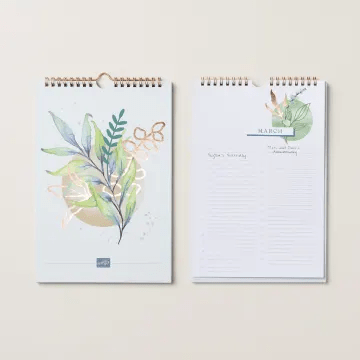
Perpetual Beauty Calendar Kit available 12/3
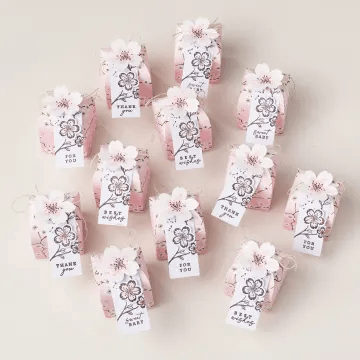
Cherry Blossom Treats Kit, available 12/3
There are two NEW KITS available in the Kits Collection. They are shown below. To view other kits available, click here.
I am always so sad to see products go away, but what it means is… make room for NEW! If you do not have a demonstrator, I would be happy to send you a copy of the NEW 2025 January-April Mini Catalog and the accompanying Jan/ Feb 2025 Sale-a-Bration catalog.
Last Chance Products include retiring products from both catalogs and online releases, excluding Paper Pumpkin.
Last Chance Products in this category are available while supplies last and will be discontinued when they sell out. Items will be automatically removed from the category and the online store when they are discontinued.
Discounts vary and are subject to change. Also, depending on inventory, these products may or may not have discounts.
We may add individual items from bundles or suite collections to our Last Chance Products category. If one or more products from the suite collection or bundle are in the Last Chance Products category, then the bundle and suite collection will also appear in this category. The bundle or suite will not be orderable if one or more of the items in the bundle or suite collection sell out. Our standard 10% bundle discounts will be available if one or more of the items move to the Last Chance Product category; however, the item in the Last Chance Products category may have a deeper discount.
Stampin’ Up! refreshed these previous Designer Series Papers using some of our best-selling colors!
Serene Love is recolored from True Love.
Refreshed Beauty is recolored from Blackberry Beauty.
Shades & Hues is recolored from Color Theory.
Available while supplies last.
Sales begin Dec. 3, 2024 as part of the ONLINE EXCLUSIVES – click to see what’s available right now!
When shopping with me, please use the new host code listed below. This is good 11/20 – 12/11. Use it when your order is $50 to just less than $150 to receive a free gift from me + the monthly tutorial. If your order is over $150, SU! has it’s own rewards so don’t use my code… but I will still send that free SU! item to you valued up to $10. Got that? If not, connect with me to talk you through it. :O) I would love to have you join my team and we can create & have some fun together. Please make certain my name is on as your demonstrator when ordering :O)
HOST CODE Q4Y3MQEU
Thanks so much for joining me today. I hope you enjoyed my card and this hop. May you have a beautiful day!
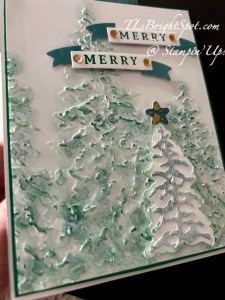
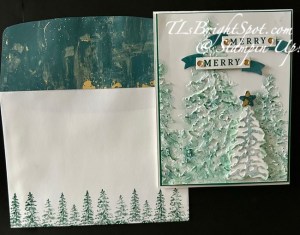
HAPPY THANKSGIVING EVERYONE! We have a fantastic theme today – Evergreen Trees 😀 perfect timing, right? I’ve pulled together a card using the Painted Trees 3D EF + the Peaceful Evergreen bundle & Peaceful Season bundle to create my card for you today.
I took this photo in hopes you would be able to see the texture provided by the embossing folder and also the Pearlized Enamel Effects that I added in various places on the trees. Can you see the Pearlized Enamel? I’m pretty certain you can see the texture – it shows easily in this photo. Let me tell you how I created this card.
Directions:
On a 4 x 5 1/4 piece of Basic White, I embossed the trees using the Painted Trees 3D EF. I then used a sponge dauber and dabbed Shaded Spruce ink on the tree-raised portions. With another sponge dauber & Pretty Peacock ink, I added some color, but less than with the Shaded Spruce.
I die cut from Basic White, the tree outline image (Peaceful Evergreens Dies), then with the dauber & Shaded Spruce ink, colored just the edges.
I die cut the center of the tree (Peaceful Evergreen Dies) from Winter Meadow DSP and attached it with dots of liquid glue, to the tree outline.
I added these to the embossed panel with dimensionals.
I die cut the star (Peaceful Evergreens Dies) from Season of Elegance SDSP and attached with a mini dimensional.
At this point, I added the Pearlized Enamel Effects to various tips of the embossed trees and to the tree on dimensionals – and set this aside to dry while creating the sentiment pieces.
Using the Peaceful Season Dies… I die cut from Winter Meadow DSP two banners, then die cut two from Basic White. I stamped the Merry in two different inkson the basic white pieces: the upper in Pretty Peacock and the lower in Shaded Spruce, then I cut them apart so just the center remained and attached it to the Winter Meadow DSP piece.
I added these to the card with mini dimensionals.
I added Neutral Adhesive-Backed Sequins in gold to the banner.
I added this to a 4 1/8 x 5 3/8 panel of Shaded Spruce, then to the Thick Basic White card base 4 1/4 x 11 scored at 5 1/2
On the inside… I stamped the sentiment in Shaded Spruce ink using the Peaceful Season stamp set on a 4 x 5 1/4 Basic White panel. I again used the Pearlized Enamel Effects to highlight along the top of each letter of the sentiment. Then I used Shaded Spruce ink & the Peaceful Evergreens stamp set to stamp the trees along the bottom of the panel. Once the Pearlized Enamel Effgects was dry, I added the panel to the inside of the card.
For the envelope… I used the same Season of Elegance SDSP to adhere to envelope flap, trimming it to fit, then stamped the same trees along the bottom of the envelope in Shaded Spruce ink. My hubby LOVES these trees! I like this… what do you think?
OK – time to visit others participating in the hop… click the ‘next’ button to see what Carol has to share. For more information about how to purchase the products used to make this card, see below the list of names!
Stampin’ Up! refreshed these previous Designer Series Papers using some of our best-selling colors!
Serene Love is recolored from True Love.
Refreshed Beauty is recolored from Blackberry Beauty.
Shades & Hues is recolored from Color Theory.
Available while supplies last.
Sales begin Dec. 3, 2024 as part of the ONLINE EXCLUSIVES – click to see what’s available right now!
To see the items from the Sep-Dec 2024 Mini Catalog, click here
Today’s card featured items from this catalog :O)
When shopping with me, please use the new host code listed below. This is good 11/20 – 12/11. Use it when your order is $50 to just less than $150 to receive a free gift from me + the monthly tutorial. If your order is over $150, SU! has it’s own rewards so don’t use my code… but I will still send that free SU! item to you valued up to $10. Got that? If not, connect with me to talk you through it. :O) I would love to have you join my team and we can create & have some fun together. Please make certain my name is on as your demonstrator when ordering :O)
HOST CODE Q4Y3MQEU
Thanks so much for joining me today. I hope you enjoyed my card and this hop. May you have a beautiful day!
Wow – another week has flown by… and next week is Thanksgiving – AAAgh! Welcome to the blog hop – we have a sketch challenge today that I think you’ll enjoy. I’ve used some new ONLINE EXCLUSIVE products that I’m loving. This is a suite called Marbled Elegance Suite and I’ve used a bit of all of it :O) Let’s take a peek. What I saw in the sketch is three same images.
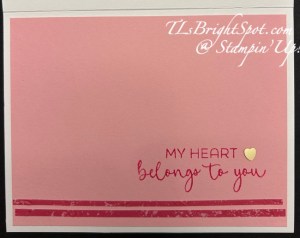
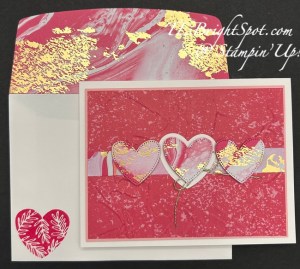
This Designer Series Paper is called Marbled Elegance Specialty DSP – cuz one side has specks or ‘rivers’ of gold. It’s stunning! The coordinating colors list Melon Mambo & Petal Pink. For me, I chose to use Pretty in Pink as a layer for the SDSP. The three hearts (from Hearts of Elegance Dies) are cut from a strip 1 1/2 x 4 that showcases some of the gold. These hearts have a tiny holes as a border and just add an elegant touch to the heart. The layer of a white heart is a scrap of Basic White., again die cut using the Hearts of Elegance Dies. This heart is very plain and is perfect for a border around the SDSP heart die cuts. Each of the hearts is on dimensionals and the strip of SDSP behind them is 5/8 x 5 and adhered to a different panel of the Marbled Elegance SDSP, 3 3/4 x 5, that I embossed for a bit of texture with the Painted Texture 3D embossing folder. I slipped a bow made from the Gold Twisted Thread that’s part of the suite of products, behind the center heart and attached with a glue dot. So… what we have for the card front… Thick Basic White, standard A2 size, Pretty In Pink w/ adhered embossed SDSP attached with dimensionals. The SDSP strip is adhered with Stampin’ Seal, the Basic White heart is adhered with liquid glue and the three SDSP hearts are on dimensionals. Now… let’s look at the inside.
This is interesting… true confessions once again. I adhered strips of the SDSP to the Petal Pink instead of the Basic White panel I had set aside…, go figure. I decided to just go with it – why not? I stamped the sentiment from the Hearts & Elegance stamp set in Melon Mambo ink, then added this gold Adhesive-Backed Heart Sequin… so very sweet.- which completes using all the items in this online suite. L-O-V-E! Just sayin’
For the envelope… here you can easily see this gorgeous Marbled Elegance SDSP that I used for the hearts – adhered to the flap and trimmed to fit. The heart on the front is stamped in Melon Mambo ink and is from the Hearts of Elegance stamp set.
This is a gorgeous suite of products new to the ONLINE EXCLUSIVES products and you may find them here.
Please continue along the hop, visiting everyone who is participating today. I think you will find some wonderful ideas. Click the ‘next’ button or click on a name to take you to a specific blogger. Enjoy the hop!
Would you like to join this fabulous group of crafters? Be a part of the fun of making for others in whatever way you choose. Join with me here.
When shopping with me, please use the new host code listed below. This is good 11/20 – 12/11. Use it when your order is $50 to just less than $150 to receive a free gift from me + the monthly tutorial. If your order is over $150, SU! has it’s own rewards so don’t use my code… but I will still send that free SU! item to you valued up to $10. Got that? If not, connect with me to talk you through it. :O) I would love to have you join my team and we can create & have some fun together. Please make certain my name is on as your demonstrator when ordering :O)
HOST CODE Q4Y3MQEU
Thanks so much for joining me today. I hope you enjoyed my card and this hop. May you have a beautiful day!
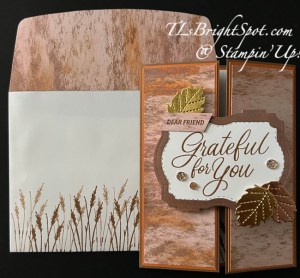
Welcome, welcome! Welcome to this blog hop group! Our theme this month is ‘Giving Thanks’ in whatever way that means for us… and I have lots for which to be thankful: people, support, this team and other teams, family, a roof over my head – just LOTS! I chose to use the Autumn Expressions bundle – beautiful script stamps, great dies (I’m a succor for leaf dies) and a host of other beautiful Stampin’ Up! products.
Stunning leaf die cut from Textured Metallic 12×12 Specialty DSP in both gold (2) and copper (1). And the very swirly script and framing – all from the Autumn Expressions bundle. Such a great set! The additional DSP is an online product – Meandering Meadows 6s6 DSP. I cut the front panels to look like sunset, the oranges and pinks streaking across the sky. The ‘frame’ is from another panel of the Meandering Meadows DSP.
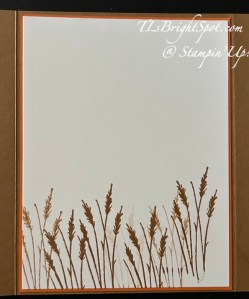
For the inside, I used this wonderful ‘grass’ stamp and Pecan Pie ink – first generation and 2nd generation – to stamp across the bottom. How to do that? Ink the stamp, stamp the paper, stamp again without re-inking. This second stamping is called second generation.
Card Cuts/ directions:
Pecan Pie for the card base – 8 1/2 x 5 1/2, scored at 2 1/8 on the long side. Burnish and fold other side to meet it, burnishing it as well. Why do I do this in lieu of scoring on each side at 2 1/8? ‘Cuz it doesn’t always come together in the middle – and I want them to. I have found this to be the easiest way to make sure that happens.
Cut Pumpkin Pie 2 x 5 3/8 (2) and adhere to each side front panel
Cut Meandering Meadows 6×6 DSP 1 7/8 x 5 1/4 (2) and adhere to the Pumpkin Pie
On Basic White 2 3/4 x 3 3/4, stamp the sentiment from Autumn Expressions stamp set in Pecan Pie ink. Die cut with the smaller ‘frame’ from Autumn Expressions Dies. Die cut the outside ‘frame’ for this using the larger ‘frame’ die. Attach together with dots of liquid glue.
Die cut the gorgeous leaves from 1 1/4 square Textured Metallic 12×12 SDSP – two in gold and one in copper. Attach one go0ld leaf to the top of the sentiment frame with liquid glue, then the copper leaf on the opposite corner also with liquid glue. Attache the other gold leaf with a dimensional. Add three Drusy Adhesive-Backed Embellishments on the sentiment panel. Add sentiment panel to the left side of the gate fold – and the card front is complete!
For the envelope… I added more of the same Meandering Meadows 6×6 DSP to the flap and trimmed to fit. Do the same stamping technique as before along the envelope front.
This can so easily be a masculine card if needed. I like that versatility! And many of these products may be found in the Sep-Dec 2024 Mini Catalog, Card Stocks & inks, acrylic blocks, paper trimmer – these ‘staples’ are in the Annual Catalog.
Time to continue the hop – click on a name or use the previous & next buttons to take you to specific folks. Thanks for dropping in!
Click on the image above to shop the Stampin’ Up! stamp sale.
If you’ve had your eye on a certain stamp set or two (or ten) from the 2024–2025 Annual Catalog, then we have some exciting news! From October 7–9, all the stamp sets (excluding bundles) from the 2024–2025 Annual Catalog will be 15% off!
Here are the details:This stamp sale only happens once a year!
The sale will run for three days.
The 15% off discount will apply to all stamp sets (photopolymer and cling) from the 2024–2025 Annual Catalog.
Bundles are not included in this sale.
Stamp sets are available while supplies last.
Sales Period: October 7, 2024, at 12:00 a.m. to October 9, 2024, at 11:59 p.m. (MT)
Ordering Deadlines: By Phone – October 9, 2024, at 6:59 p.m. (MT), or Online – October 9, 2024, at 11:59 p.m. (MT)
Promotion Period: October 1–31
Ordering Deadlines
Phone: October 31 2024, at 6:59 p.m. (MT)
Online: October 31 2024, at 11:59 p.m. (MT)
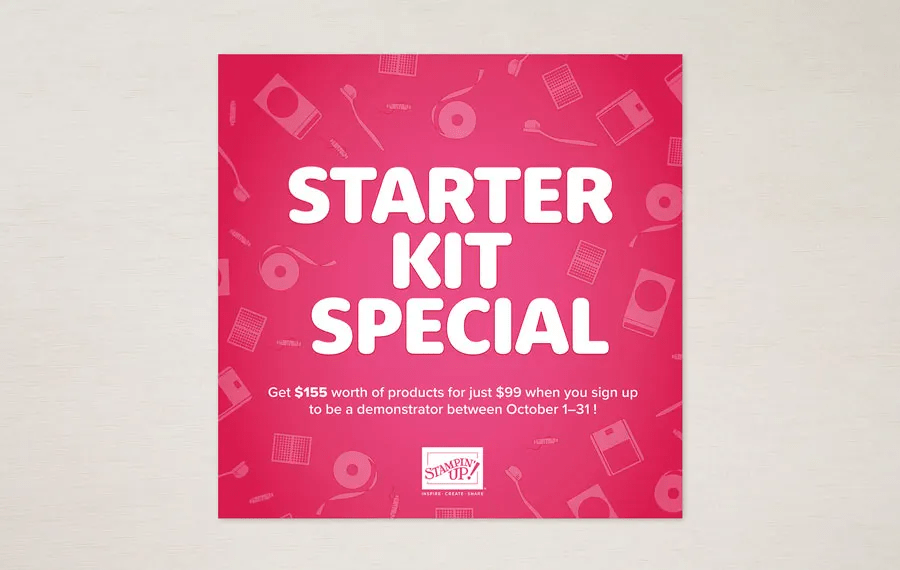
Become a demonstrator between October 1–31 can get $125 USD | $165 CAD$155 USD | $206 CAD worth of products for just $99 USD | $135 CAD.
Being a part of Stampin’ Up!’s creative community also comes with several perks, including early access to products, special discounts, a chance to earn product credits, access to exclusive trainings, demonstrator-only events, and so much more.
As a demonstrator, I am here to help you through the join process and beyond.Join with me here.
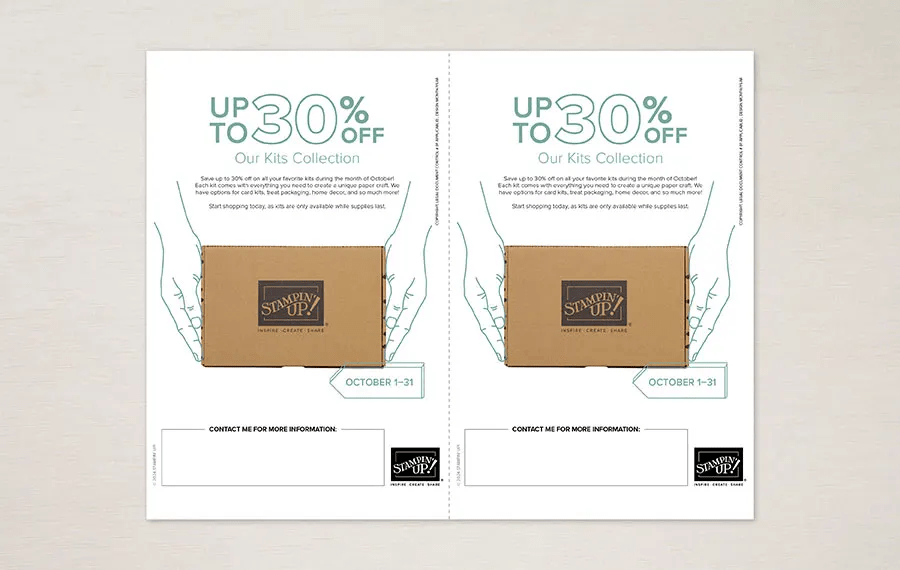
Kits Collection Salestarted Oct 1!
Exciting news! We’re having a huge sale on our Kits Collection beginning October 1! All kits will be available at a discounted price. Save up to 30% off on all your favorite kits October 1–31! Our kits come with everything you need to create a unique paper craft. We have crafting options for card kits, treat packaging, home decor, and so much more! Click here
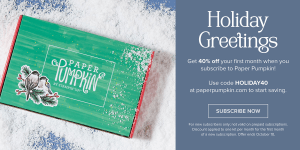
Santa Claus is comin’ to town a bit early this year—and he’s brought a holiday Paper Pumpkin sale! Starting September 11, 2024, at 12:01 a.m. (MT) until October 10, 2024, at 11:50 p.m. (MT), anyone who signs up for our monthly Paper Pumpkin subscription as a new subscriber will receive 40% off their first kit. That’s right, 40% OFF!
Where This Discount Is Applied This discount will be applied to one kit in the first kit shipment of the Paper Pumpkin subscription, which means new subscribers will get 40% off the October Nests of Christmas Paper Pumpkin Kit. After that, each month’s kit will return to the regular price of $25.00.
Qualifying for This Discount This offer is only for new month-to-month subscribers and is not valid on purchased or redeemed prepaid subscriptions.
Now that you’ve read through all the details, it’s time to head to paperpumpkin.com to subscribe and use code HOLIDAY40 to get 40% off.
Click the link above to take you to the ONLINE EXCLUSIVES!
I appreciate your business and welcome any questions regarding sales or creating or joining my team. Make sure when shopping with me, that you see my name at the top as your demonstrator. That way I can send you a Stampin’ Up! giftie and you can earn rewards – with a $50 order or more. You also receive the monthly tutorial for that particular month – for October, it is More Than Autumn bundle.
Click the image above to take you to the ONLINE EXCLUSIVES!
I appreciate your business and welcome any questions regarding sales or creating or joining my team. Make sure when shopping with me, that you see my name at the top as your demonstrator. That way I can send you a Stampin’ Up! giftie and you can earn rewards – with a $50 order or more. You also receive the monthly tutorial for that particular month – for October, it is More Than Autumn bundle.
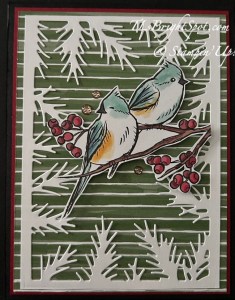
Welcome to the HOP! Our theme today is fun folds – and there will be some extraordinary ones, I am certain. I have chosen a tried & true front flap fun fold for today, using the WinterlyTree Tops bundle, the Christmas Labels bundle and Nests of Winter 12 x 12 DSP.
I’m going to be honest, I haven’t played with this set and I’ve had it for a bit. I… LOVE… IT… The pine frame is from Basic White card stock (3 5/8 x 5) and die cut with Winterly Tree Tops Dies. The birds are fussy cut (paper snips) from the Nests of Winter 12×12 DSP and added with dimensionals. The background (stripes) is also from this DSP pack (3 7/8 x 5 1/8) and was layered on Cherry Cobbler (4 x 5 3/8), and adhered to the Basic Black card front. I added three Pecan Pie Ribboned Adhesive-Backed Dots (an ONLINE EXCLUSIVE). Let’s look at how this card opens… the front flap opens from the top to show the gatefold, below.
The layers are Cherry Cobbler (2 x 5 3/8 – cut 2) and a smaller Nests of Winter 12×12 DSP (1 7/8 x 5 1/4- cut 2) and adhere together and then to the Basic Black card baseThe sentiment panel is stamped on Basic White with Cherry Cobbler ink using the Christmas Labels stamp set then die cut with the coordinating Christmas Lablels Dies. Only the left side of the label was attached to the left ‘gate’.
Here is the inside…
The inside… a panel of Basic White (3 7/8 x 5 1/8) with another fussy cut bird from the Nests of Winter 12×12 DSP attached with liquid glue. This panel was added to Cherry Cobbler (4 x 5 1/4) then to the inside of the Basic Black card base. All opened out the card looks like this…
And the envelope I kept very simple… more of the Nests of Winter 12×12 DSP on the flap & trimmed to fit, and a sentiment stamped in Cherry Cobbler ink from the Christmas Labels stamp set.
These two bundles and the DSP may be found in the Stampin’ Up! Sep-Dec 2024 Catalog. The card stock & adhesive, scissors, paper trimmer, bone folder are in the Stampin’ Up! 2024 Annual Catalog. And the adhesive dots part of the Stampin’ Up! ONLINE EXCLUSIVES. You can find more information about shopping with me below the list of names of those participating in the hop today – so scroll down to learn more.
Carol is the next participant on the hop and she always has something amazing to share. Click the next button or click on a name to take you on an extraordinary adventure.
LOTS GOING ON IN THE STAMPIN’ UP! WORLD – give me a few minutes to share the excitement…
Kits Collection Salestarted Oct 1!
Exciting news! We’re having a huge sale on our Kits Collection beginning October 1! All kits will be available at a discounted price. Save up to 30% off on all your favorite kits October 1–31! Our kits come with everything you need to create a unique paper craft. We have crafting options for card kits, treat packaging, home decor, and so much more! Click here
Santa Claus is comin’ to town a bit early this year—and he’s brought a holiday Paper Pumpkin sale! Starting September 11, 2024, at 12:01 a.m. (MT) until October 10, 2024, at 11:50 p.m. (MT), anyone who signs up for our monthly Paper Pumpkin subscription as a new subscriber will receive 40% off their first kit. That’s right, 40% OFF!
Where This Discount Is Applied This discount will be applied to one kit in the first kit shipment of the Paper Pumpkin subscription, which means new subscribers will get 40% off the October Nests of Christmas Paper Pumpkin Kit. After that, each month’s kit will return to the regular price of $25.00.
Qualifying for This Discount This offer is only for new month-to-month subscribers and is not valid on purchased or redeemed prepaid subscriptions.
Now that you’ve read through all the details, it’s time to head to paperpumpkin.com to subscribe and use code HOLIDAY40 to get 40% off.
Click here to take you to the Sep-Dec 2024 Mini Catalog
Promotion Period: October 1–31
Ordering Deadlines
Phone: October 31 2024, at 6:59 p.m. (MT)
Online: October 31 2024, at 11:59 p.m. (MT)
Become a demonstrator between October 1–31 can get $125 USD | $165 CAD$155 USD | $206 CAD worth of products for just $99 USD | $135 CAD.
Being a part of Stampin’ Up!’s creative community also comes with several perks, including early access to products, special discounts, a chance to earn product credits, access to exclusive trainings, demonstrator-only events, and so much more.
As a demonstrator, I am here to help you through the join process and beyond.Join with me here.
Click the image above to take you to the ONLINE EXCLUSIVES!
Want to just shop? You can do that too. I appreciate your business and welcome any questions regarding sales or creating or joining my team. Make sure when shopping with me, that you see my name at the top as your demonstrator. That way I can send you a Stampin’ Up! giftie and you can earn rewards – with a $50 order or more. You also receive the monthly tutorial for that particular month – for October, it is More Than Autumn bundle.
HOST CODE … SEP 26- OCT 15 NDADFHMR
Thanks for stopping by. May you have a beautiful day!
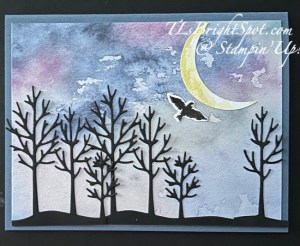
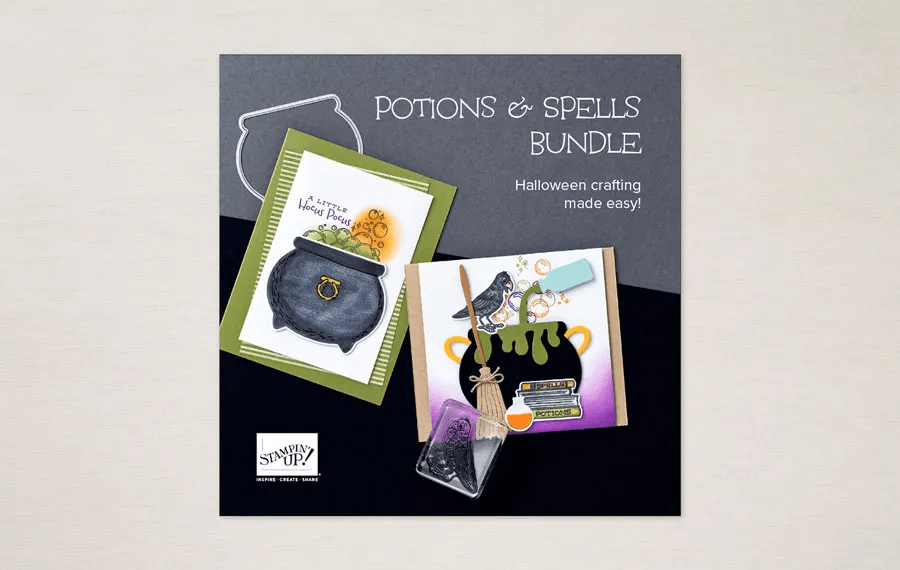
Welcome to Amy’s Inkin’ Krew Blog Hop Group! We have a theme challenge today – Halloween – and I have to say up front, I am not a Halloween kinda gal, so this was a bit of a struggle for me. But I have to say, I like my card and I had fun creating it. :O)
This card started with a Misty Moonlight card base 8 1/2 x 5 1/2 scored at 4 1/4. I layered a Thoughtful Journey 6×6 DSP to the front cut at 4 x 5 1/4. The blues and purples create a spooky kind of look to me. Next I stamped a gorgeous moon from Under the Moon stamp set in Lemon Lolly ink. It was waaay too large for this card so I punched it with a 1 3/4″ circle punch, then trimmed it down again with the same punch to create this moon image. I set the moon aside while I die cut the trees from Basic Black using dies in the Frosted Forest Dies. They are gorgeous! I die cut three full images, then trimmed them down to get seven trees in all, layering as needed. I added these with liquid adhesive so that every branch wasn’t flat – a bit of dimension please. Once the trees were in place I adhered the moon. Bats are perfect in a Halloween picture, so I stamped the bird in Memento ink and colored it with a Basic Black Marker, die cut it with the Frosted Forest Dies and attached it – close enough for a bat, right?!
For the inside… On a 4 x 5 1/4 Basic White panel I added more of the same image from the Thoughtful Journey 6×6 DSP – 2 x 4 – and attached a remaining tree with liquid glue. I pulled out the Alphabet Dies and more Basic Black, die cut the letters BOO! and attached them at an angle. Yep – another bird was needed so I did the same as the bird image on front: stamped in Memento ink and colored with Basic Black Marker. Believe it or not, the bird is part of the Frosted Forest stamp set and has a coordinating die!
For the envelope I used more of the Thoughtful Journey 6×6 DSP that coordinated with what I used on the card front, to adhere to the flap & trimmed to fit. I stamped three images of the bird on the envelope front.
To purchase the products to make this card, see below. When you’re ready be sure to visit the others participating in this Halloween card challenge by using the previous & next buttons – or click on a name instead.. Any way you do it… be sure you check out what folks have created.
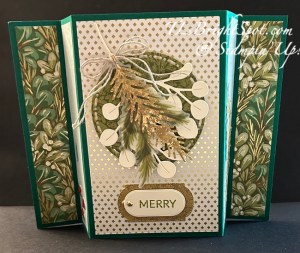
Good Sunday morning. One of the Online Exclusive bundles/ Suites is the Season of Green & Gold Suite – perfect for Christmas/ holiday cards. I have used the papers in this suite to create a fun fold.
Can you see how it stands on it’s own? And it’s decorated on both sides of the card.
Here are the basics – just remember, any papers can be used to create this card and many different dies as well. I used the items from the Season of Green & Gold Suite: Season of Green SDSP, Graceful Greenery Vellum, Greetings of the Season Bundle and Golden Greenery Bundle. I also used the Spotlight on Nature Dies to create the circle on the card front with the Seasons of Green SDSP.
Card base and basics:
5 1/2 x 8 1/2 scored on the long side at 1 1/4, 2 1/2, 6 & 7 1/4
Designer Series Papers for the folds are all cut 1 x 5 1/4. Cut 8
Center panels are 3 1/2 x 5 1/4
For the die cuts on the card front, I used Very Vanilla, Distressed Gold SDSP and Graceful Greenery Vellum and the Golden Greenery Dies. For the sentiment panels on front and back I used the Greetings of the Season Bundle, Old Olive ink, Cherry Cobbler ink, more of the Distressed Gold SDSP, Very Vanilla and Season of Green and Gold SDSP. The embellishments are not from this suite, but are Adhesive-Backed Metallic Gems. And the Linen Thread bow is a double bow adhered with a glue dot.
Here’s a top view of how the card looks:
And the card & envelope
For the envelope, more of the Season of Green & Gold SDSP on the flap trimmed to fit – and on the front, this beautiful pine bow frond stamped in Old Olive ink: the inner is full strength and the main is second generation stamped.
We have a fun fold challenge for this Tuesday team blog hop and I’m using several of the new ONLINE EXCLUSIVE products from the Season of Green & Gold Suite Collection. Let’s take a peek.
This card is called a Front Flap Fun Fold.n I did a bit of die cutting using the Golden Greenery Dies and Season of Green & Gold Specialty Designer Series Paper (better known as SDSP) and the Graceful Greenery Vellum. The bells are die cut from the SDSP and the wonderful fronds from the vellum.
Card instructions:
Card base is Mossy Meadow 5 1/2 x 4 1/4
Layer a panel of SDSP (here I used the Season of Green & Gold SDSP, plaid pattern), attaching with adhesive.
Cut a 3 x 8 1/2 Mossy Meadow piece and score at 4 1/4: attach to center of card, with fold at top of card base.
Cut 2 panels of Basic White 2 3/4 x 4 1/4 & decorate
Front panel of Basic White
I cut two Garden Green fronds and one Old Olive frond from the Graceful Greenery Vellum and adhered to one of the Basic White panels, centering them at top
I die cut the single bells from the Season of Green & Gold SDSP, adhered them together then added them over the fronds with dimensionals
I added a double Linen Thread bow to the top of the bells with a glue dot.
Stamp the sentiment and ampersand sign in Cherry Cobbler ink using the Greetings of the Season stamp set (this also comes as a bundle – with dies – but I did not use those for this card)
Embellish with several Adhesive-Backed Sparkle Gems
Adhere this panel to the folded Mossy Meadow
Inside panel of Basic White
Stamp the sentiment in Mossy Meadow ink using the Greetings of the Season stamp set
Stamp the fronds detail stamp in stamped off once Mossy Meadow ink
Stamp the fronds full stamp in stamped off twice Mossy Meadow ink
Add panel to inside of flap card panel – and done!
Now for the envelope… cover the flap in a piece of the Season of Green & Gold SDSP and trim to fit. On the envelope front, stamp a different detail front in stamped off once Old Olive ink. Stamp the full frond in stamped off twice Old Olive ink – and this card is ready for that Christmas card pile.
For more information about my card and purchasing these products from my ONLINE EXCLUSIVES, see below the list of Krew participants!
Now it’s time to head over to the rest of the Krew to see what fun folds they have created for the challenge today. Click on the icon or click on a name to take you visiting the others. Have fun hopping!
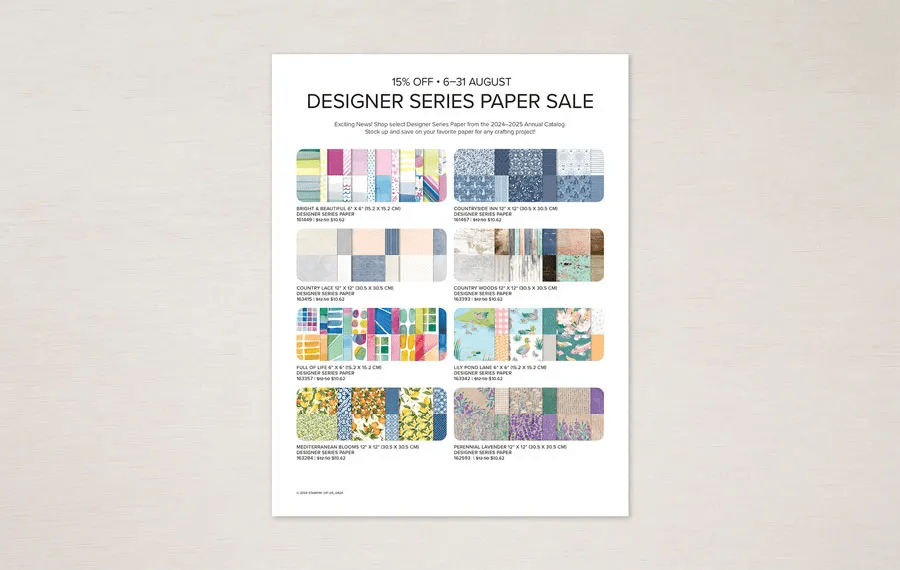
Bonus Days are an exciting time of receiving $5 coupons for every $50 purchase. Below are ALL the details for this Stampin’ Up! promotion. Are you ALL IN? I certainly hope so, ‘cuz I certainly am.
PROMOTION DETAILS
Earning Period: 3–31 July 2024 Ordering Deadlines Phone: 31 July 2024 at 6:59 p.m. (MT) Online: 31 July 2024 at 11:59 p.m. (MT)
All coupon codes will be emailed right after a qualifying purchase has been made. Encourage your customers to create an account on our online store.
If a participant earns multiple codes from a single order, they will receive one email with multiple codes. If they earn multiple codes from multiple orders, they will receive separate emails for each code earned.
All order types qualify for this promotion. Phone and email orders still require an email address.
Orders started before the promotion begins will not count toward earning coupon codes. For example, if you add items to your cart before 3 July and wait to purchase until that date or later, then those items will not qualify towards earning coupons. You must add items to your cart and complete your purchase during the earning period.
There is no limit to the number of coupon codes participants can earn per order or throughout the duration of the earning period.
Coupon codes can only be earned on commissionable items. Non-commissionable items (such as catalogs) do not count towards coupon earnings.
Customers must use a valid email address during checkout in order to receive their coupon code. If a customer places an order over the phone, they must still provide a valid email address to receive their coupon code.
Starter Kit orders are excluded from this offer. All other order types qualify.
For workshop orders, each customer who reaches a qualifying amount will receive a coupon code to their provided email address.
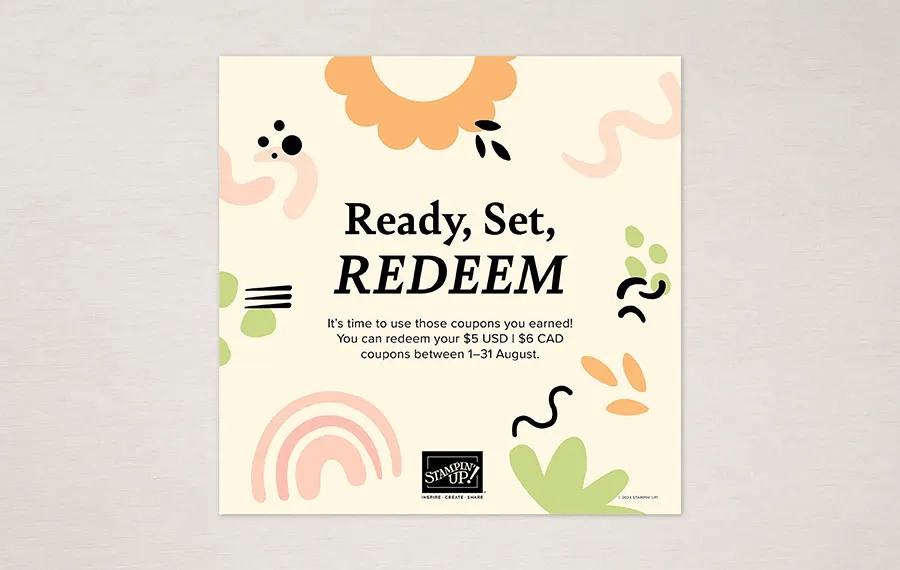
After earning those coupons, it’s important to know how to use/n redeem them :O)
Redemption Period: 1–31 August 2024 Ordering Deadlines Phone: 30 August 2024 at 6:59 p.m. (MT) Online: 31 August 2024 at 11:59 p.m. (MT)
There is no limit to the number of coupon codes participants can redeem on an order during the redemption period. If using multiple codes, they must be separated by a space.
Coupon codes may be redeemed one time only. They cannot be redeemed after the 31 August.
Coupon codes may be redeemed for any product (excluding Starter Kits and demonstrator supply items). They cannot be used on exchanges.
Bonus Days coupon codes can be applied to new prepaid Paper Pumpkin subscriptions.
Coupon codes will reduce the commissionable amount of an order.
Check out this video to see what Stampin’ Up! says about BONUS DAYS. Just click on the red arrow
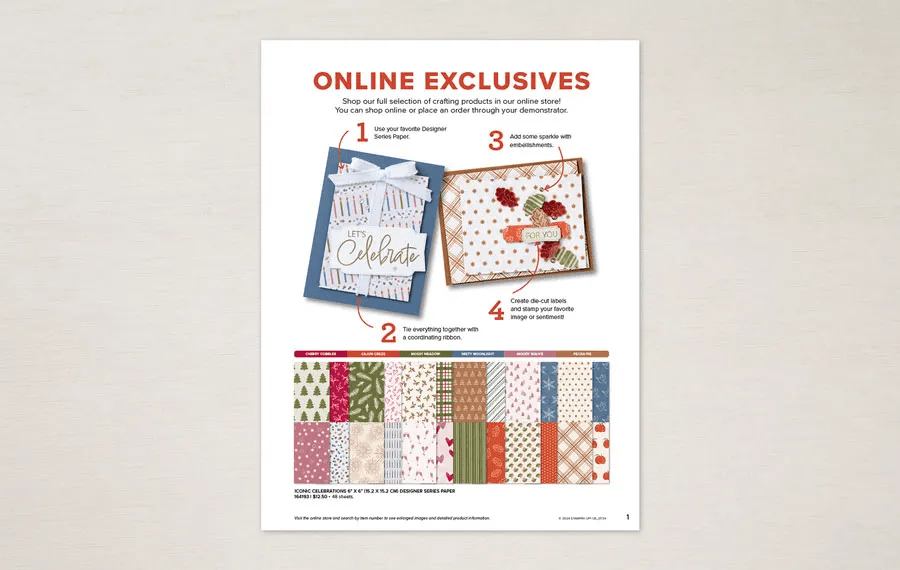
Here are some of the ONLINE EXCLUSIVE PRODUCTS AVAILABLE JUL3
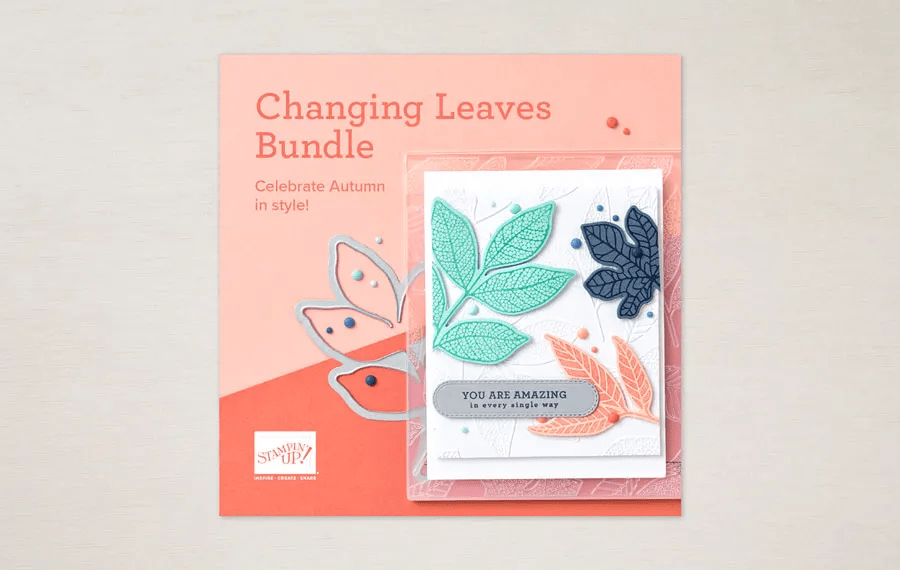
Iconic Celebrations SuiteSeason of Green & Gold Suite CollectionChanging Leaves Bundle includes Hybrid Embossing Folder
While you’re looking around in my store, remember there are some stunning kits available, for all ages and all seasons – even Christmas! And while you’re shopping, I offer fringe benefits to my customers: free tutorial of the month and a FREE Stampin’ Up! item valued to $10 – all for a $50 order, before shipping and taxes. Use my current host code to receive those benefits – especially when your order does not exceed $150. Make certain my name is listed as your demonstrator when checking out! :O)
HOST CODE HFXSJCNB
Thanks for stopping by. May you have a beautiful day. Make someone happy when sending them a handmade card filled with love.