Today’s cards feature the Ornate Garden Specialty DSP and Ornate Layer Dies. You know this Ornate Garden Suite is available for a limited time, right? Not to scare you, what that means is it is an early release product premier showing of specialty items available for a short time, then it will be in the new 2020-21 Annual Catalogue. This premier gives you the wonderful opportunity to play with the product early. Here are the cards…

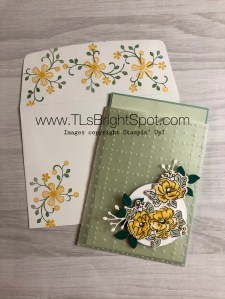
Ornate Garden Specialty DSP / Ornate Layers Dies card #1

Ornate Garden Specialty DSP / Ornate Layers Dies card #2
Card #1 shows one of the papers and card #2 shows the other side of the same paper, both quite elegant.
Details: Card #1…
- Whisper White Notecard & envelope
- Ornate Garden SDSP 3 1/2″ x 5″ + scrap approx 1/2″ x 3 1/2″
- Vellum 3 3/8″ x 4 7/8″
- So Saffron 2 1/4″ x 3 1/2″ + scrap 3/4″ x 3 1/2″
- Whisper White 1 1/2″ x 2 3/4″
- Stazon Saddle Brown
- Gilded Gems
- Ornate Thanks stamp set
- Ornate Style stamp set
- Stitched Rectangles Dies
How to…
- Adhere the SDSP to the notecard using liquid glue
- Adhere the vellum to the notecard using liquid glue but just in the center… TIP: Any type of glue shows through on vellum. In this case the die cut will cover the center of the vellum so it won’t matter.
- With the So Saffron and the Ornate Layers Dies, cut your piece. Adhere with liquid glue directly to the vellum
- With the Whisper White and the Stitched Rectangles Dies, cut your piece. Stamp your sentiment with Stazon Saddle Brown ink using sentiments from Ornate Thanks. Adhere one Gilded Gem. Adhere to the So Saffron die cut with dimensionals
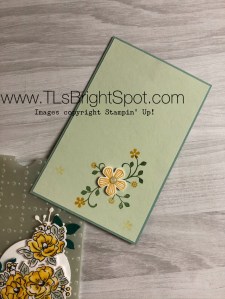
The inside…

Inside card #1
- Adhere the SDSP scrap to the So Saffron scrap.
- Stamp your sentiment from Ornate Thanks stamp set in Stazon Saddle Brown ink
The envelope…
- Using So Saffron ink, stamp the pretty floral design from Ornate Style stamp set, both on the front and on the envelope flap. DONE!

Ornate Style stamp set card #1
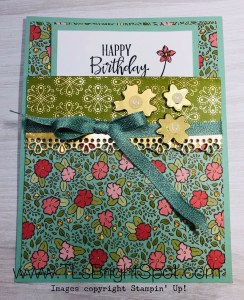
Details – Card #2
Ornate Garden Specialty DSP / Ornate Layers Dies card #2
- Whisper White Notecard and envelope
- Melon Mambo 3 3/8″ x 4 7/8″ (cut 2, one is for the the inside)
- Ornate Garden Specialty DSP 3 1/4″ x 4 3/4″
- Whisper White 1 1/2″ x 2 3/4″, 3 1/4″ x 4 3/4″ for the inside
- Black Memento ink
- Shimmer Ribbon
- Ornate Thanks stamp set
- Ornate Style stamp set
How to…
- Adhere the Melon Mambo directly to the Notecard with liquid glue.
- Adhere the SDSP directly to the melon Mambo with liquid glue
- Using the Ornate Layers Dies, cut your piece from Melon Mambo
- Using the Stitched Layers Dies, cut your piece from Whisper White. Stamp your sentiment from Ornate Thanks stamp set in Memento Black ink. Adhere with liquid glue to the Melon Mambo die cut.
- Adhere the combined Melon Mambo & Whisper White to the card front with dimensionals.
- Using your Shimmer Ribbon 1/4″, tie a bow and adhere with a glue dot. Your front is done!
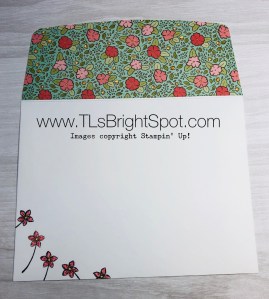
The inside…

Ornate Thanks stamp set card #2
- Stamp your sentiment from the Ornate Thanks stamp set in Memento black ink
- Stamp the sweet flower from the Ornate Style stamp set in Memento black ink. Color with Stampin’ Blends Lovely Lipstick and Light Old Olive. Adhere to the Merlon Mambo.
- Adhere the combined Melon Mambo and the
Whisper White to the card inside. Your card is done!
The envelope… OOPS, I didn’t take a picture of it…
- Stamp the same flower from the Ornate Style stamp set in Memento Black ink in the lower front corner. I did not color it.
- With that same flower and same ink, stamp all over the envelope flap.
What a fun set of cards – same layout, same SDSP but reversed, same die cuts, yet each is unique and wonderful. These are going out to a couple of friends today in hopes of brightening their days of disciplined isolation… May you all remain safe and well during these quarantined times. Special hugs….
Thanks for stopping b y. May you have a beautiful day.
Make someone happy by sending them a handmade card.
Ornate Garden Specialty DSP / Ornate Layers Dies card #1
Ornate Garden Specialty DSP / Ornate Layers Dies card #2