Hello Saturday! It’s beautiful here in New Jersey – and I’m INSIDE… attending a convention for a women’s organization. The great part is that I’m seeing folks I haven’t seen in a while; the unfortunate part is that I’m not out gardening or enjoying the sun. Having said all that – let me share today’s card…
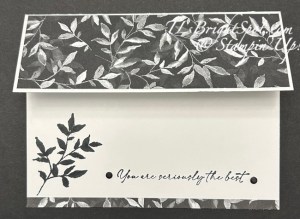
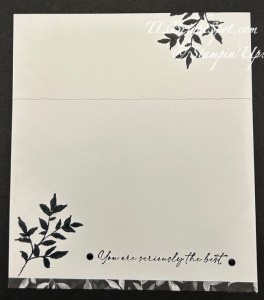
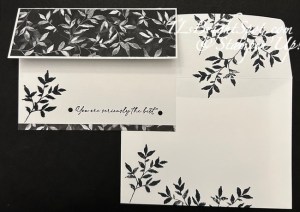
This card is made with items from the Botanical Textures Suite of products: the Botanical Textures 12×12 DSP and the Textured Notes stamp set (which is also a bundle with dies). Black & white cards stand out and this one is no different. It’s made with Thick Basic White card stock 8 1/2 x 5 12, scored at 4 1/4 then 2 1/4 removed. I cut a Botanical Textured DSP1 7/8 x 5 3/8 and adhere to the remaining top portion. Open the card & stamp the inside :O) This is an easy, easy card to make… just stamps, ink, paper!
Using the Textured Notes stamp set and Memento ink, I stamped this stunning leaf on the upper right corner and the bottom left corner. I added a 3/8″ strip of the Botanical Textures DSPn to the bottom, then stamped this sentiment – also from the Textured Notes stamp set. LOVE THIS FONT! On each end of the sentiment I added black dots from … I forget which embellishments- maybe the Neutral embellishments from the suite?! And the card itself is done.
The envelope… Using Memento ink and another leaf stamp in this Textured Notes stamp set, I stamped on the flap 3 times, reinking the stamp each time. I did the same on the front of the envelope – & boom, complete! Such a quick and gorgeous card. Well, maybe I shouldn’t say that since I made it 🙂
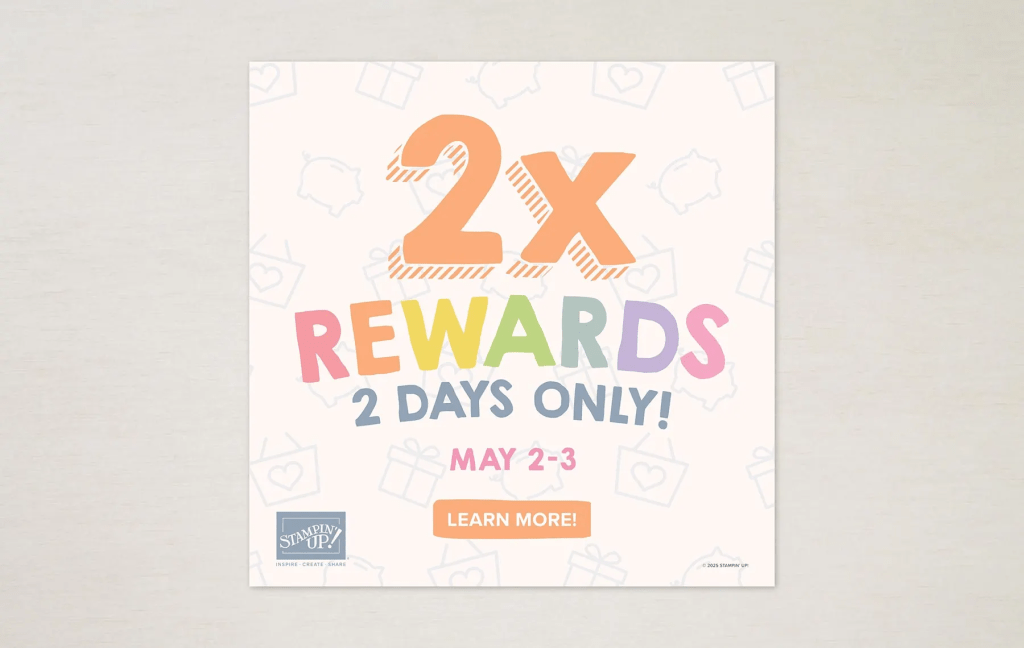
Today is THE day of a two day 2x Stampin’ Rewards for purchases $20 & up. 2 fun! Celebrate National Scrapbooking Day with 2x Rewards for 2 Days!
Have you heard? The global crafting community will be celebrating National Scrapbooking Day on May 3 —and we’re joining in the fun by offering you 2x Stampin’ Rewards for 2 days! Opt in if you haven’t done so yet! What better way to celebrate one of our favorite crafting holidays? And the best part? This offer applies to ALL products, not just scrapbooking items! (Non-commissionable items and existing Paper Pumpkin subscriptions are excluded.)
Earn double rewards (2x rewards) for two days only, from May 2–3!
This offer applies to ALL products (excluding non-commissionable products and existing Paper Pumpkin subscriptions).
All orders qualify once the rewards threshold of $20 USD | $25 CAD is met.
To participate, customers must have a Stampin’ Up! account and be opted in to Stampin’ Rewards.
This includes LAST CHANCE PRODUCTS, items in the Jan-Apr 2025 Mini Catalog, the 2024-2025 Annual Catalog – scrapbooking supplies too!
Now – to the card for this post…
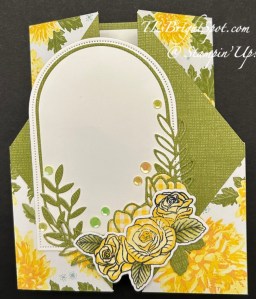
I made this card and was not going to post it, but… here it is. :O) It’s made with the retiring Floral Delight 12×12 DSP, Everyday Arches Dies (an ONLINE EC) AND the wonderful carrying over bundle, Lifetime of Love.
Notice – there is no sentiment on here, and it needs one. It’s screaming for one. I just couldn’t decide. It could be a Mother’s Day card or a birthday card or thinking of you… I need to figure that out. Here are basic directions for this layout.
Cut DSP 5 1/2 x 12 and score @ 2, 4, 8, 10. Be award of the direction when cutting AND since both sides show, be aware of that too.
On the short side of both ends, make a mark at 2 5/8″ from the top & cut from the closest score line to the mark. (Make certain when cutting each end that the cut is on the top side.) Save those trimmed pieces.
Fold mountain, valley, valley & mountain; burnish
Adhere those trimmed pieces to each front side
Decorate as desired making certain when adding the die cut front pieces, that they adhere to only one side
I used the 4th from largest of the Everyday Arches & Basic White card stock
The green die cut if from a leftover piece of this same Floral Delight DSP and using the lifetime of Love Dies
I stamped the the floral design in Memento ink – again from Lifetime of Love stamp set & colored it with Stampin. Blends Daffodil Delight and Old Olive, then highlighted the flowers with Wink of Stella
Final touch on the front was several of the Adhesive Backed Shiny Sequins, another ONLINE EXCLUSIVE
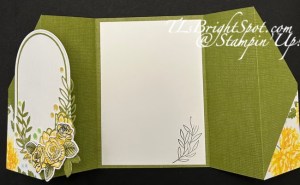
For the inside… on a Basic White 3 3/4 x 5 1/4 stamp the image in Old Olive ink using the Lifetime of Love stamp set. Adhere the Basic White panel to the inside.
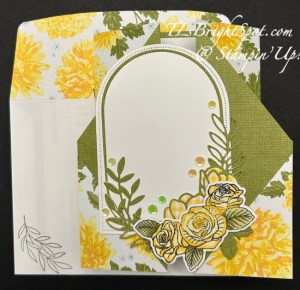
For the envelope… more Floral Delight DSP on the flap, adhered & trimmed to fit – and on the front, the same leaf stamped in Old Olive ink using the Lifetime of Love stamp set.
Shop with me by clicking here. For purchases of $50+ from me, you will receive the May Tutorial bundle in your in-box. Make sure my name is listed as your demonstrator when you check out :O)
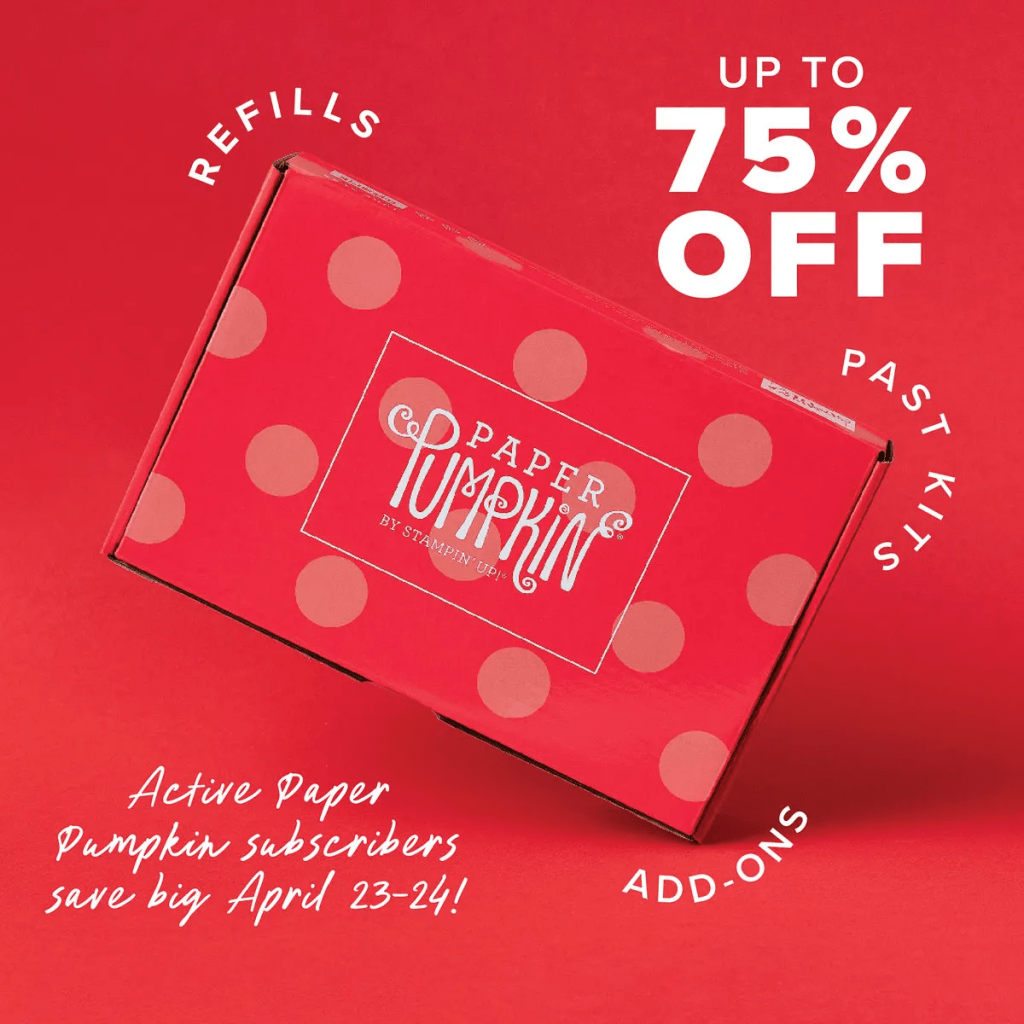
TODAY, my friends, is the last day for FREE SHIPPING offered by Stampin’ Up! with purchases of $75+ AND up to 75% off some Paper Pumpkin items.
All order types qualify for this promotion.
Free shipping is for three days only. Orders must be opened and closed April 23–25.
Free shipping automatically applies to your cart after the qualifying amount has been met, which is $75 USD | $100 CAD (before tax).
Coupon codes and product credits are non-commissionable and will lower your order’s retail amount. Orders must meet the qualifying amount to be eligible for free shipping.
The additional cost for expedited shipping is not covered by this promotion.
Prepaid 3-, 6-, and 12-month Paper Pumpkin subscriptions and month-to-month subscriptions do not qualify for free shipping. Refills, past kits and add-ons do qualify toward free shipping, but you must be a subscriber to purchase. Subscriptions billed and shipped this month will be charged for the normal amount ($25.00 USD | $34.75 CAD shipping included) + tax.
What are your favorite items to purchase during FREE SHIPPING? With paper costs going up with the new annual catalog, card stocks are a perfect choice. I also stock up on envelopes which I use a lot, and your adhesives of choice are also a good purchase during free shipping.
Today is the last day (4/25, 2025) of FREE SHIPPING WITH an order of $75 + from STAMPIN’ UP! Not only that, but some Paper Pumpkin items are available @ 75% off. Take advantage, making certain my name is listed as your demonstrator :O) Click here to go to my store
Thanks for stopping by. May you have a beautiful day!
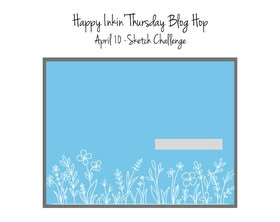
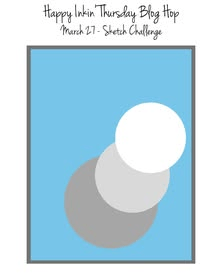
Hello – and WELCOME to the Happy In kin’ Thursday Blog Hop. We have a sketch challenge today & I’ve maybe stretched the parameters just a bit, but I like the card and think it works.
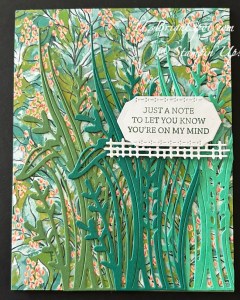
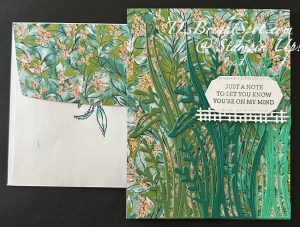
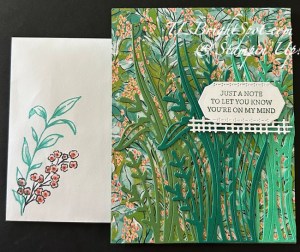
I’ve used some ONLINE EXCLUSIVE products for this card – primarily the Mixed Media Florals DSP, the Mixed Labels Bundle and the Mixed Florals Bundle. I LOVE this DSP for the background. It reminds me a bit of a jungle and it was adhered directly to the Garden Green card base. The multiple die cut leaves are in Garden Green, Shaded Spruce and Shy Shamrock & I used the Mixed Florals Dies to create them. I simply adhered them with dabs of liquid glue but could very easily have used Adhesive Sheets as a backing, I just didn’t. The next step was to stamp the sentime on a Basic White scrap in Garden Green ink using the Mixed Labels stamp set. I die this and the rectangular piece using the Mixed Labels Dies. I adhered the fence-like piece to the back of the sentiment label then added dimensionals to the sentiment & attached it to the card. Viola!
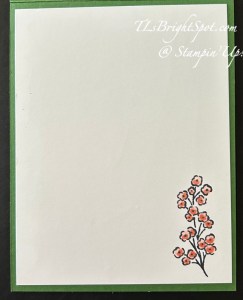
For the inside… I stamped this beautiful floral image in Memento ink on the Basic White panel then colored it with Calypso Coral Stampin’ Blends. Done!
For the envelope… I added more of the Mixed Media Florals DSP to the flap (after messing up the stamp image of the leaf!), trimmed the paper to fit. Since the mess-up of the stamped image on the flap, I decided to add some ink ‘edging’ to the remaining leaves, making them look like the leaves on the DSP :O) I added some extra ‘doodles’ for fun – all this with a SU! Journaling Pen. For the envelope front, I stamped the image of the leaves (just fine) with Shy Shamrock ink & used a Blends in Shy Shamrock to add some extra color depth. I also stamped the same sweet image as on the inside of the card in Memento ink & colored the flowers with Calypso Coral Stampin’ Blends. Finis…
This is such pretty DSP and the coordinating bundles are so perfect to layer or use individually. I encourage you to visit my ONLINE EXCLUSIVE store – see info below.
Now, make the rounds of the hop – don’t miss a single one :O) & have fun! Click on the next button or click on a name to make the rounds.
When shopping with me and your purchase is $50 or more, you will receive a SU! item valued up to $10 and the current months fabulous tutorial – for April, it’s Memorable Blooms. And use my HOST CODE until April 12. If you do not have a demonstrator, I would love to support, encourage and help you create your best. Contact me!
HOST CODE Y3TPZVYN
HOST CODES are going away April 12, but something even better for you is happening – you will be earning Stampin’ Rewards when your purchases are $20 or more.
Remember the LAST CHANCE LIST ? Click here to shop that list.
Click this link to see all that’s available in the Stampin’ Up! world – this includes the link to ONLINE EXCLUSIVES – and make sure my name is at the top when checking out. This link allows you to see the online exclusives, Kits Collection, The Paper Pumpkin information, etc., etc. If you have questions, please connect with me!
Thanks for stopping by. May you have a beautiful day!
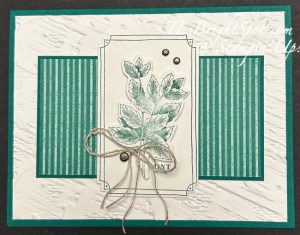
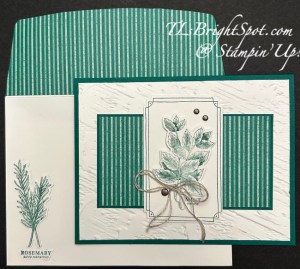
Online Exclusives are just that – items not in any of the Stampin’ Up! Catalogs. This Grow with Love bundle is perfect for cards for no specific reason. I like sending cards just for fun and it makes the receiver feel special.
The card base is a standard A2 size in Shaded Spruce. I layered an embossed Basic White panel 4 x 5 1/4. The embossing folder is another ONLINE EXCLUSIVE called Plaster Painting 3D embossing folder. It has lots of texture. The next layer is Shaded Spruce 2 3/8 x 4 3/8 with Regals 6×6 cut 2 1/4 x 4 1/4 adhered directly to the card front. The center Basic White panel is 2 1/4 x 3 3/4 stamped in Shaded Spruce ink with another of the stamps in Grow With Love, then die cut with the appropriate Grow With Love Dies. I really like the corner edges! Again, this was adhered directly to the card front, centering. The mint leaves were stamped again and die cut and attached with dimensionals over the stamped image. I tied a double Linen Thread and attached it with a glue dot. Lastly, Adhesive-Backed Dots were added for contrast.
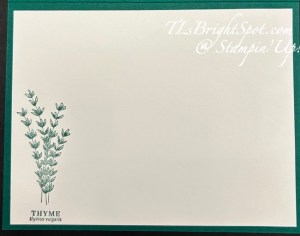
For the inside… another stamp in the Grow with Love is Thyme – and it’s stamped here in Shaded Spruce on the Basic White 4 x 5 1/4 panel.
The envelope… more of the Regals 6×6 DSP in Shaded Spruce added to the flap & trimmed to fit (2 1/4 x 6) and on the front another image – this time it’s Rosemary :O). I messed up when stamping the image so did it again on a scrap, die cut it and adhered with liquid glue. When die cutting the image, it cuts off the name of the plant, so I fussy cut that with my paper snips and added it.
Fun, easy card, could be masculine if one is needed. It shows appreciation and care for another human being – which the world always needs.
You may this Grow With Love bundle in my store – look around at all the possibilities, kits, last chance products and more . When shopping with me and your purchase is $50 or more, you will receive a SU! item valued up to $10 and the current months fabulous tutorial – for April, it’s Memorable Blooms. And use my HOST CODE until April 12.
HOST CODE Y3TPZVYN
Remember the LAST CHANCE LIST I mentioned in an earlier post? Click here to shop that list.
Click this link to see all that’s available in the Stampin’ Up! world and make sure my name is at the top when checking out.
Thanks for stopping by. May you have a beautiful day!
SHOP Last Chance Products here. And remember to make certain my name is at the top of the page when you check out so you receive my bonus gifts when your order is over $50: SU! item valued up to $10 & the April Tutorial for the Memorable Blooms Bundle. Use my HOST CODE until April 12.
HOST CODE Y3TPZVYN
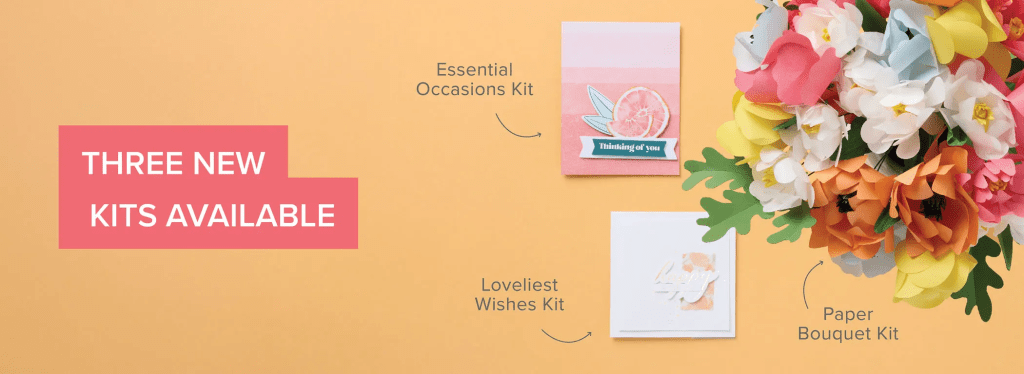
Three new kits available..
65635
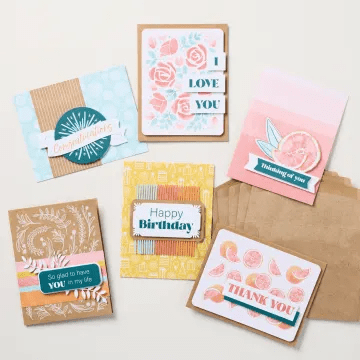
ESSENTIAL OCCASIONS KIT
$13.00
With hand-illustrated elements, die cut sentiments, and six card designs, the Essential Occasions Kit comes with everything you need to celebrate birthdays, share well wishes, or send a thank-you message. From graduations to anniversaries—and everything in between—celebrate the most important moments in your life with this kit!
165636
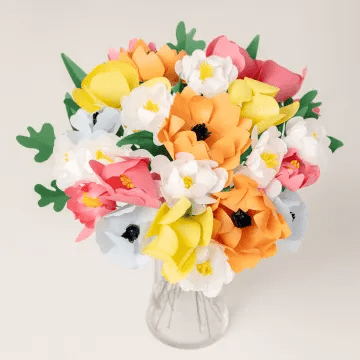
PAPER BOUQUET KIT
$22.00
166284
LOVELIEST WISHES KIT
$14.00
Elevate your birthday cards with the Loveliest Wishes Kit! Craft cards that speak volumes through sophisticated simplicity. With precut images and gold foil sentiments, you can create nine stunning cards that lend an air of elegance to every, “Happy birthday!”
Good Monday! It’s turned cold again after a very beautiful day of 81 degrees – ah, that’s Spring. That 81 degrees made the hostas pop up, helebores are in full bloom (they love the cool!), daffodils & crocus are blooming as well. I really enjoy this time of year.
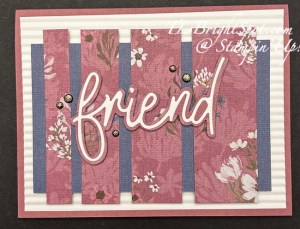
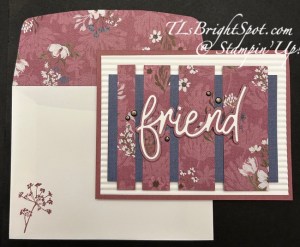
My card today is for a friend who isn’t feeling all that great, I’ve combined the Friends For Life Dies and the Wanted To Say Dies to create my messages – and the last of my Wildly Flowering 12×12 DSP.
To make this card I began with my card base: Moody Mauve cut 8 1/2 x 5 1/2 and scored at 4 1/4. I layered a panel of Basic White 4 x 5 1/4 that I ran through a brand new Mini Corrugated 3D embossing folder, a new favorite. This piece was adhered directly to the card base. Next I cut a piece of the Wildly Flowering DSP 4 x 3, that coordinates with the strips of another piece of the Wildly Flowering DSP. This was cut 3 1/2 x 3 1/2, then into strips 1/2, 3/4, 1 & 1 1/4. I spaced then evenly along the 4 x 3 panel & adhered with Stampin’ Seal. I took a scrap of the Wildly Flowering DSP 4 x 2 1/2 & die cut the background for the word ‘friend’ from the Friends For Life Dies. Next I took a piece of Basic White 4 x 2 5/8 and covered the back with Adhesive Sheets. I then die cut the word ‘friend’ from that, removed the backing of the Adhesive Sheet and attached it to the DSP background die cut. I put this on dimensionals and adhered it over the DSP strips, added dimensionals to the 4 x 3 DSP panel and attached to the card front. As a final touch, I added five (5) Adhesive-Backed Textural Dots and the card front was complete.
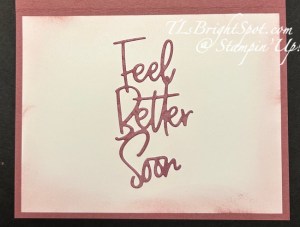
For the inside, I took another piece of the Wildly Flowering DSP in Moody Mauve, 2 1/2 x 3 1/2, attached aAdhesive Sheet to that & die cut the sentiment from the Wanted To Say Dies. I attached this to the center of a Basic White piece 4 x 5 1/4. I then used a Blending Brush & Moody Masuve ink to add some color to the edges of this Basic White panel, then attached it to the inside of the card.
For the envelope, more Wildly Flowering DSP, 2 1/4 x 6, attached to the flap & trimmed to fit. A simple flower from the Wildflower Designs stamp set was stamped in Moody Mauve ink on the envelope front. Done, ready to send in hopes my friend will ‘feel better soon’!
The 2024-2025 Annual Catalog is quickly coming to an end – and the 2025-2026 catalog will be released soon. I believe this Wildly Flowering DSP is on the Last Chance List. Tomorrow, the list will be updated with all the retiring items and I’ll include it in my post. If there is something you want, get it quickly as once it is gone, it will not be replaced. Use my host code below to receive benefits from me when you purchase is $50 & up… a SU! item valued up to $10 & the monthly tutorial.
HOST CODE Y3TPZVYN
The 2025-2026 Annual Catalog will be released May 6. Items from that catalog can be viewed then, but not until then :O) – unless you are a Demonstrator, then that’s different. Preorders for demonstrators have begun. Want to be a demonstrator and always get at least 20% off each order? Sign up with me now & you will be able to order items for your Starter Kit from the new catalog. For $99 you will be able to order $125 worth of products. click this link, then the join menu :O)
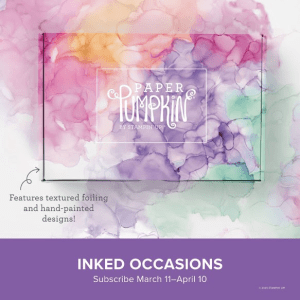
Inked Occasions Paper Pumpkin
Subscribe March 11 – April 10
Subscribe March 11 – April 10
I’m extra excited about this particular PP. We had something similar in the past & it was gorgeous – looking forward! Craft stunning cards with hand-painted, alcohol ink designs! • Makes 9 cards: 3 each of 3 designs with 9 coordinating envelopes • Textured gold foil on the card bases and sentiments • Precut paper pieces and butterfly embellishments • Coordinating colors: Berry Burst (Classic Stampin’ Spot), Flirty Flamingo, Fresh Freesia, Gorgeous Grape, Peach Pie, Pool Party
Cards come in a beautiful coordinating box!
Subscribe to the April Paper Pumpkin Kit between 11 March and 10 April by clicking here.
Thanks for stopping by. May you have a beautiful day!
It is amazing what one finds when tidying their desk! That would be me :O) What I found is this pretty piece of watercolor paper and I decided not to set it aside any longer. I stamped this gorgeous image of the flower from the You Are Remarkable stamp set – in Secret Sea ink – one of the new In Colors available May 6. This is a two step stamp, so the flowers have a ‘filler’ stamp and I used Melon Mambo ink for that; again the leaves have a ‘filler’ stamp and I used Granny Apple Green; and finally, the center is a stamp that is Crushed Curry ink. I stamped the sentiment, also from the You Are Remarkable stamp set, in Secret Sea ink. I adhered this panel to Melon Mambo card stock, giving it a small border, put dimensionals on that and adhered to a 4 x 5 1/4 Secret Sea panel die cut with the largest Textures Notes Dies. This was adhered directly to the 8 1/2 x 5 1/2 card front, scored at 4 1/4 of course. Two steps more for the card front – Wink of Stella on the flower – petals & center and three Iridescent Pearls Basic Jewels scattered in a bit of triangle.
For the inside… I used the second largest die from Textured Notes Dies – again available May 6 – and Basic White card stock, to die cut the inside panel. I then stamped the very cute bee buzzing in Secret Sea ink.
The envelope… Another sweet buzzing bee stamped in Secret Sea ink in the front and another of the same flower stamped on the flap, just a portion of it though – with same coloring as the card front. Silly me did not photograph that! :O(
The stamp set, Secret Sea ink and dies will all be available May 6. The other products are in the annual catalog.
Thanks for stopping by. May you have a beautiful day!
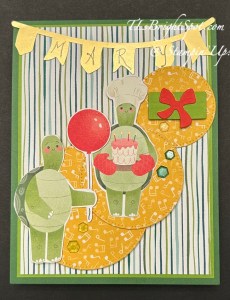
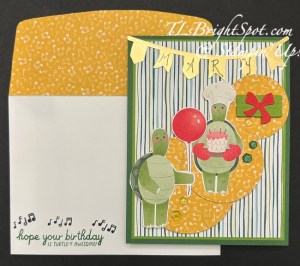
Welcome to our fun weekly hop. We have a sketch challenge today that stumped me for a bit. I hope you find it still fits the sketch as it’s a bit ‘outside the box’.
This is a brand newy suite of products that I used on this card… the Turtle-Y Awesome Suite: DSP, stamp set/ dies, embellishments & ribbon. I did not use the dies for this project – I fussy cut the turtles, and I did not use the ribbon. This is a cute set – very different than we’ve had in the past. I don’t see this as a totally kids kind of suite of products. It’s light and fun – at least, that’s the way I look at it!
So the circles are die cut using the Stitched Shapes Dies, second from largest for the bottom circle; 3rd from largest for the next circle and then one more. Honestly I forget where it fits in. I die cut circles from the Turtle-Y Awesome 12 x 12 DSP specifically cuz this card is for a retired piano teacher and there are music notes all over this sheet- and she was fun! And this card, to me, is fun Because the circles were die cut from DSP which is not as strong as cardstock, I layered each on a die cut Basic White circle and adhered them together for strength. The bottom one and middle circles are on dimensionals. The smallest is adhered directly to the card. The turtles, as I mentioned, were fussy cut with my paper snips from the Turtle-Y Awesome DSP and attached with liquid glue. Additional dimensionals were added under the balloon & the chefs cap. The birthday package is die cut from Granny Apple Green and Poppy Parade using the Wanted To Say Dies. I found this gold banner in the Wildflower Birthday SDSP, wrote the recipients name with a fine tip marker and attached it with glue dots. The last touch was the Shades of Green Hexagons from this Turtle-Y Awesome Suite. All these will become available May 6 as part of the ONLINE EXCLUSIVES. Now that I look at this card – some Wink of Stella is called for: balloon, icing on the cake and the bow!
For the inside… I pulled out two sets of dies for the inside: the Wanted to Say Dies for the Happy birthday sentiment and background, and the Alphabet A La Mode Dies for the #90. I used adhesive sheets on the back of the DSP for the numbers as well as for the Happy Birthday. It made attaching those to the inside of the card so easy! The numbers were die cut from the Turtle-Y Awesome 12×12 DSP. The background of the happy birthday was die cut from the same DSP. The words themselves were from Petal Pink card stock.
For the envelope… more of the Turtle-Y Awesome DSP (do you notice the music notes on the paper?) attached to the flap & trimmed to fit. For the card front I used Garden Green ink for the sentiment, pulled from the Turtle-Y Awesome stamp set and memento ink for the music notes, also from the Turtle-Y Awesome stamp set. Card cuts are listed at the bottom of this post.
For information to order from me – see below the list of names.
Time to see what everone else has created. Follow the links below & enjoy the hop!
Ordering from me… click this link to look & shop in my store. At the top of the page is a menu: what’s new, specials, join – and my name should be at the top of the page. You can shop the current 2024-2025 Annual Catalog, the Jan-Apr 2025 Catalog, ONLINE EXCLUSIVES – it’s all right here! If you need help, connect with me :O) Use the HOST CODE below to receive a free gift from me when your order is $50 or above – plus my monthly tutorial. Host codes will go away mid April – but for now – use them – and make certain my name is listed as your demonstrator!
HOST CODE Y3TPZVYN
The 2025-2026 Annual Catalog will be released May 6. Items from that catalog can be viewed then, but not until then :O) – unless you are a Demonstrator, then that’s different. Preorders for demonstrators have begun. Want to be a demonstrator and always get at least 20% off each order? Sign up with me now & you will be able to order items for your Starter Kit from the new catalog. For $99 you will be able to order $125 worth of products. click this link, then the join menu :O)
Inked Occasions Paper Pumpkin
Subscribe March 11 – April 10
I’m extra excited about this particular PP. We had something similar in the past & it was gorgeous – looking forward! Craft stunning cards with hand-painted, alcohol ink designs! • Makes 9 cards: 3 each of 3 designs with 9 coordinating envelopes • Textured gold foil on the card bases and sentiments • Precut paper pieces and butterfly embellishments • Coordinating colors: Berry Burst (Classic Stampin’ Spot), Flirty Flamingo, Fresh Freesia, Gorgeous Grape, Peach Pie, Pool Party
Cards come in a beautiful coordinating box!
Subscribe to the April Paper Pumpkin Kit between 11 March and 10 April by clicking here.
Thanks for stopping by. May you have a beautiful day!
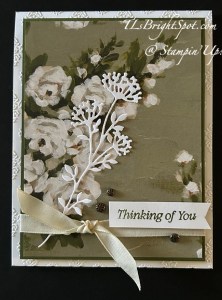
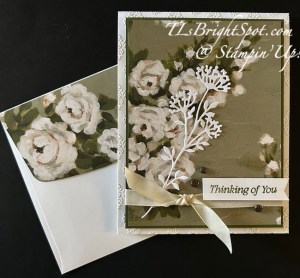
Good Saturday morning. I’v e been under the weather this week – got a full blown head cold, lost my voice, all those things. Ugh… I’m beginning to feel better and hoping to be able to play in my craft room. Today’s card is a sympathy card made with products that as demonstrators we can order early before they become available to the general population. It helps build excitement and give you, the customer a chance to see new products. These will become available May 6 as ONLINE EXCLUSIVES.
This is stunningly beautiful DSP that is called Beautiful Gallery 6×6 DSP. This photo doesn’t show the colors very well (hmmm) but they are Mossy Meadow & other similar shades of green, Basic White, Basic Beige.
I’ve cut the DSP 3 3/4 x 5 and layered it on Mossy Meadow 3 7/8 x 5 1/8. I wrapped a 3/8″ Classic Ribbon in Basic Beige around this, securing it in back with Tear n’ Tape. I took another length and tied a half knot around the ribbon and secured it in place with a glue dot. I die cut this fabulous flower in Basic White using the Beautiful Motifs Dies and slipped it under the ribbon and secured it in place with dots of liquid glue. It’s quite delicate and next time I’ll use Adhesive Sheets adhered to the card stock prior to die cutting. :O) The sentiment also comes from the Beautiful Motifs stamp set and is stamped in Mossy Meadow ink. I adhered this in place with dimensionals. I took another piece of Basic White 4 1/4 x 5 1/2 and ran it through a new embossing folder (part of this fantastic suite!) called the Damask Designs embossing folder and adhered it to the Thick Basic White card base 4 1/4 x 11 scored at 5 1/2. The entire card front was attached to the card base over the embossed front, with dimensionals. As a final touch I added three Pressed Flower Motif embellishments.
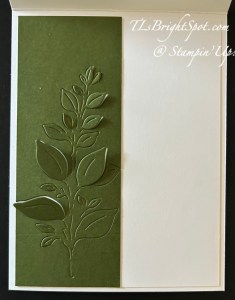
For the inside… I was playing with the gorgeous dies in this set and this leaf die fascinated me. It die cuts edges but not the entire piece, so sections can be raised. Really cool! It would be a fabulous card front – but that’s for another day… Anyway – this Mossy Meadow panel is 2 x 5 1/4 and adhered to a 4 x 51/4 Basic White and added to the inside of the card.
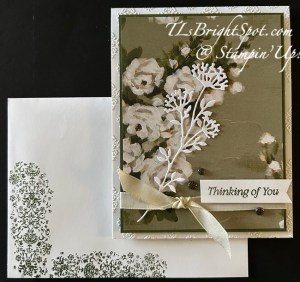
More Beautiful Gallery 6×6 DSP adhered to the flap & trimmed to fit. On the envelope front is this very fun stamp from the Beautiful Motifs stamp set, stamped in Mossy Meadow ink.
Stampin’ Up! is doing much more of an online presence these days, adding new products about every 2 months. Want early access to see what’s being added? For $99 get $125 worth of products when joining my team. Do that here… AND after joining, get 20% off all orders. Connecting with other demonstrators is part of the fun of being on a team- there’s always something new to learn. Want to look around in my store? Do that here.