Stampin’ Ip! Ornate Garden Specialty DSP, Ornate Borders Dies

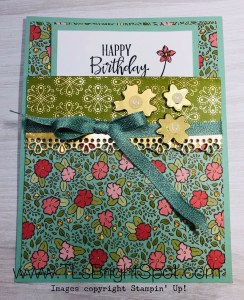
Todays Card is a fun use of the Stampin’ Up! Ornate Garden Specialty DSP and the Ornate Borders Dies. It’s a panel card, at least that’s what I’m calling it, meaning it doesn’t open 🙂 It simply has a panel that fits inside the folded DSP. Let’s take a look….

This Ornate Garden Specialty DSP is so sweet and I wanted to emphasize this particular pattern for as much of the card as possible. This is what I did…

  • Mint Macaron card base cut to 4 1/4″ x 5 1/2″; also cut 3 1/2″ x 4 1/2″ for the inside panel
  • Ornate Garden SDSP cut to 4″ x 5 1/4″; another with same dimension but score this at 4″
  • Adhere the 4 “x 5 1/4” SDSP to the card base using liquid glue
  • Cut a panel 1/2″ x 4″ from Gold foil. Using a die from the Ornate Borders Dies, run it through your embossing/ diecut machine. Adhere this diecut to the fold-over piece of SDSP. Cut about a 20″ length of Mint Macaron 1/4″ ribbon, run over it with your snail adhesive and adhere evenly around the back and front, covering slightly where the Gold Foil diecut was attached.Tie a bow. TIP: use your grid paper to make certain the ribbon is attached evenly. 
  • Using tear ‘n tape, adhere to the sides and bottom of this panel and attach to the card base.
  • Cut three flowers from Gold Foil scrap using the Ornate Border Dies. Adhere Glitter Enamel Dots to the center of each flower. Put on dimensionals and attach accordingly.

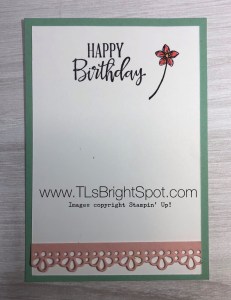
Now for the inside…

  • Whisper White cut to 2 is 7/8″ x 4 1/4″. Stamp your sentiment (I used the Peaceful Moments stamp set) with Stazon Jet Black ink. I like how clear this ink stamps! I also added a sweet flower from the Special Someone stamp set. This was colored using Flirty Flamingo and Daffodil Delight markers. TIP: When using Stazon Jet Black ink, DO NOT USE BLENDS TO COLOR! It simply smears the ink instead of adding color.
  • Using the Ornate Borders Dies once more, cut the same border die from Blushing Bride cs (approx. 1/2″ x 4″). Adhere to the Whisper White panel using liquid glue.
  • Adhere this Whisper White panel to the 3 1/2″ x 4 1/2″ Mint Macaron piece. Cute, cute!

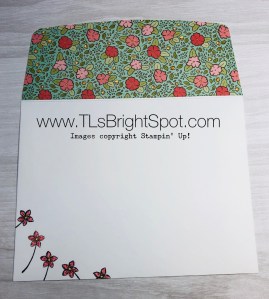
The envelope…

  • Cut a piece of matching SDSP from the Ornate Garden SDSP pack 2 1/4″ x 6″. Adhere with liquid glue and trim.
  • Stamp the adorable flower used on the card panel insert on the envelope front (I did it five times!) Color using Flirty Flamingo marker for the petals and Daffodil Delight marker for the flower center.

Isn’t this card sweet?!

Thanks so much for stopping by.. May you have a beautiful day.

Make someone happy by sending them a handmade card.


Stampin’ Up! Painted Poppies DSP and More

Today’s cards use mostly the Stampin’ Up! Painted Poppies Designer Series paper. The focus is the DSP, but there are other elements too: sentiments, die cuts – like that. Read on for more info! 🙂

I decided to share both of these cards today as the layout is so similar, but by adding another element (sentiment at the bottom) as is the case of the second card, it gives it a completely different look. Would love to hear if you prefer one card over the other.


Here are the details…

Card #1 – the red poppies

  • Whisper White card base 4 1/4″ x 11″, scored at 5 1/2″; for inside, 3 3/8″ x 4 1/8″
  • Poppy Parade layer 3 1/2″ x 4 1/4″. Cut 2, one for inside.
  • Using the 1″ x 4″ framelit from the Ornate Layers Dies, cut three pieces from the DSP, in sequential order so you see the picture/ connections to each frame. Notice how frame #1 carries over to frame #2, and that follows into frame #3? Once all are cut, put  dimensionals on the back.
  • TIP…Using your grid paper as a guideline for the best centering. place the middle frame first onto the Poppy Parade, then place the remaining two frames.
  • Wrap ribbon around this entire section (see photo), and tie a knot or bow. I like bows and nearly always do this. 🙂 This is a retired item (sorry!) but another option would be to color a length of baker’s twine using your Stampin’ Blends Old Olive, which would work beautifully!
  • Stamp your sentiment on Whisper White using Stazon Jet Black ink. This one is from Peaceful Moments stamp set but could easily be a birthday or hello friend. The options are limitless! Cut with framelit that fits your sentiment- again this diecut is from ……. Adhere with dimensionals.
  • Now adhere the entire Poppy Parade section to the card base using dimensionals and the card front is complete!

The inside is super easy…

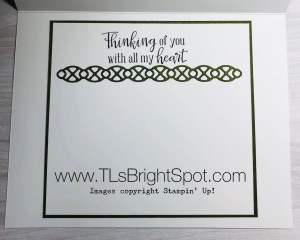
  • On the remaining section of Whisper White, stamp your sentiment in Stazon Jet Black ink. Stazon gives such a clear stamp and I like how it looks. For this sentiment, I taped off the “with all my heart” before inking the stamp, then removed the tape and voila – a perfect  “thinking of you”. This sentiment is from Peaceful Moments stamp set.
  • Adhere the Whisper White to the remaining section of Poppy Parade, using liquid glue.

The envelope get’s special treatment too…

  • Using liquid glue, adhere a 2 1/4″ x 6″ piece of coordinating DSP to the envelope flap. Trim.
  • Using the “fill in” stamp, ink with Poppy Parade, stamp off at least once, then onto your envelope front.
  • Using the smaller poppy stamp, ink with the Stazon Jet Black and stamp over the “filler” stamp.
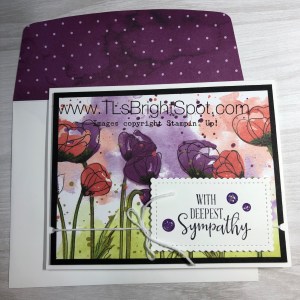
  • TIP…Because of the thickness of this card, it will need extra postage when sending in the mail. And this card is already out the door and in the mail. Our daughter asked for a card that was colorful and reflective of the woman friend who recently passed away ~ this is for her husband.

Card #2 is very similar, dimensions are a bit different for the card front and the inside. Here’s the picture again…

  • Highland Heather 4 1/4″ x 11″, scored at 5 1/2″
  • Whisper White: 3 1/4″ x 4 1/8″ for the outside, 4 x 5 1/4″ for the inside, scrap approximately 3 1/8″ x 1 1/8″
  • Scrap from the DSP for the sentiment on the front.

I wanted the sections of the DSP to be more reflective of the picture, so placed them closer together and of course, cut the Whisper White section smaller as well. Follow the above directions for placement, etc. as they are the same.

Here’s where the difference is…

  • For the sentiment at the bottom… I stamped the “hello” from the Timeless Tropical stamp set right onto a scrap from the DSP. I like how it coordinates with the upper section.
  • Cut a rectangle from Whisper White from the Stitched Rectangles Dies.
  • Adhere the hello sentiment with dimensionals to the rectangle just cut and apply dimensionals to the rectangle.
  • Placement for the card front sections… again, using your grid paper, center the bottom piece first, then center the upper section. YAY – card front is complete.

For the inside…

  • Stamp the poppy from Painted Poppies stamp set in Memento Black ink onto Whisper
    White 4″ x 5 1/4″; color using Stampin’ Blends light and dark Rich Razzleberry and light and dark Granny Apple Green for the leaf and stems. I used no sentiment on this piece as it is for a special note.
  • Adhere to the card base using liquid glue.

For the envelope…

  • Cut a piece of coordinating DSP 2 1/4″ x 6″, adhere with liquid glue to the envelope flap and trim.
  • Stamp the poppy from Painted Poppies stamp set, then color using the light and dark Rich Razzleberry Stampin’ blends, light and dark Granny. Apple Green for the stems and leaf. TIP…slip a piece of scrap into the envelope prior to using the Stampin’ Blends. Remember they bleed through, so to prevent this you need a something to bleed onto instead of the envelope back!

This card too is already in the mail – sent to a special woman who has had health struggles with cancer this year – and she loves purple. Do you think she will like this card? As in Card #1, this also needs extra postage. What I know is, even when it costs more to send, I KNOW the recipient is appreciative and that makes the difference.

Thanks for stopping by… May you have a beautiful day.

Make someone happy by sending them a handmade card.



Stampin’ Up! Peaceful Poppies, Peaceful Moments

Today’s card features the fabulous Peaceful Poppies Designer Series paper, Stitched So Sweetly dies, Peaceful Moments for sentiments and finally, a gorgeous diecut from Nature’s Thoughts Dies. Let’s take a look…

Here are the deets:

  • Whisper White 8 1/2″ x 5 1/2″, scored at 4 1/4″;  3″ x 1 1/4″; for the inside 4 x 3 3/4″
  • Basic Black 4 / 5 1/4″
  • Peaceful Poppies DSP 3 3/4″ x 5″
  • Old Olive 4 1/8″ x 3 7/8″

Details:

  • Adhere the Peaceful Poppies DSP to the Basic Black with liquid glue
  • With the smallest Whisper White, stamp the sentiment for the card front from Peaceful Moments stamp set using Stazon Black ink, cut with the Stitched So Sweetly Dies. Put dimenionals on the back but do not attach yet. Determine it’s location and where exactly you want the Baker’s twine for a bow.
  • Using the Small Daisy Punch, with one of the petals, punch notches in appropriate place for the Baker’s Twine on the joined DSP/ Basic Black piece. I suggest you mark your paper so it’s even! Wrap a length of Baker’s twine, place the sentiment piece, then tie the bow. Adhere three Glitter Enamel Dots and voila – the card front is complete!

The inside:

  • Stamp the sentiment from Peaceful Moments stamp set in Stazon Black ink on the remaining piece of Whisper White.
  • Adhere this with liquid glue to Old Olive cs.
  • Using a scrap from the Peaceful Poppies DSP, diecut the gorgeous scroll with Nature’s Thoughts Dies. Adhere with liquid glue in teeny tiny amounts.
  • Adhere the Old Olive/ Whisper White piece to the inside and the card is complete.

The envelope… Adhere a coordinating piece of the Peaceful Poppies to the envelope flap.

Today’s card was created using products from the SAB catalogue. There is still time to order from it, but only until Mar 31 can you receive the free items offered with the appropriate purchase amounts. In other words, with a $50 purchase you can receive one free item offered by Stampin’ Up! Such a deal! What are you waiting for… order today.

20200103_JANJUN20_en-US        20200303_SAB20-2_en-US.    01.01.20_COORDINATION_FLYER_OOP_Q1_NA.    2020 SAB 2nd Release

Thanks for stopping by. I hope you enjoyed the card.

May you have a beautiful day. Make someone happy by sending them a handmade card.
Stampin’ Up! Scalloped Notecards and Thoughtful Blooms

Today’s post is another of the Stampin’ Up! Scalloped Notecards, but this time using Thoughtful Blooms stamp set and the Small Blooms Punch, which are free items during Sale-a-bration when you purchase $xxx. 🙂

Isn’t this cute? It’s feminine and easy peasy. Here are the details..

  • Using Old Olive ink, stamp the leaves all over the card.
  • Again using Old Olive ink, stamp the leaves on a scrap of Whisper White and cut out using one of the circle dies.
  • Using Old Olive ink, stamp the flower on Old Olive cs. Punch out using the Small Blooms Punch. A single Rhinestone as added to the center of each.
  • The sentiment piece was created by first stamping the sentiment from the SAB Honey Bee stamp set. I then took a small circle punch and as uniformly as possible created the the edge. This piece was adhered to the card front with dimensionals. The circle was added with liquid glue. Two of the flowers were adhered with glue dots. The last flower was adhered with a dimensional. Card is complete!
  • For the envelope, I stamped the leaf stamp first followed by the flower stamp – both in Old Olive ink.

Thanks for stopping by today. I promise we’ll do something besides Scalloped Notecards for tomorrow. But this was a bit of a fun exercise, to create each one so differently but using the same card base. Hope you liked it too.

May you have a beautiful day. Make someone happy by sending them a handmade card.
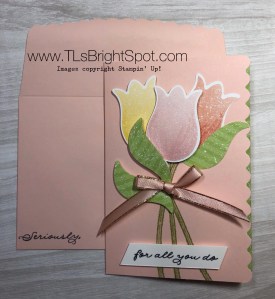
Stampin’ Up! Scalloped Notecards and Tulip Builder Punch

Today’s card is made using the Stampin’ Up! Scalloped Notecards and Tulip Builder Punch AND the Pleased as Punch DSP that is a free item when purchasing at least $50 worth of product during the final days of Sale-a-bration.

Before we get to the card… how are you doing? With the health crisis everyone is experiencing, are you feeling closed in or is this a time to “get things done” or a time to meditate or a time to be outside? Before we see the card for today, I will share a picture of myself with our dear English Springer Spaniel Rusty. He is eight but thinks he is 2! We three, hubby was along too, visited a state park nearby and took a wonderful walk. Rusty loved every step and smell! Hubby took the picture so obviously isn’t in it… We live on the East Coast and the water in these photos  is leading to Barnegat Bay. Here they are…

Peaceful, right? It is definitely a great place to visit, walk around, feel connected to Mother Nature and our Almighty Maker.

Please follow the guidelines the CDC is recommending. May you and family be safe and stay well.


Now to the card of today…

Does this card shout Spring or what? Here are the details…

  • Using the Pleased as Punch DSP, use the Tulip Builder Punch to punch the desired tulips. I did three. What’s kind of fun is the reverse side of this paper is the wonderful green design you see used for the leaves on this card. Pretty neat, huh? Stampin’ Up! does it right!
  • Using the Timeless Tulips stamp set, stamp the stems in Granny Apple Green.
  • Adhere the Tulip punches… the bottom or tulip on the far right is adhered with liquid glue. The yellow tulip is adhered with one layer of dimensionals. The pink tulip is adhered using two layers of dimensionals.
  • Next I placed the leaves: far right is adhered with liquid glue; bottom left tulip is adhered with one layer of dimensionals; the middle leaf is adhered with a double layer of dimensionals.
  • Oh I love this bow… it is Petal Pink silver edge ribbon and just really adds a special touch to the card. It was adhered with a dimensional cut in half.
  • The sentiment was stamped with the Ornate Thanks stamp set in Tuxedo Black Memento ink on a 1/2′ strip of Whisper White. Trim as shown and adhere with dimesnionals.
  • For the inside I adhered a 1/2″ x 5″ strip of the Pleased As Punch DSP to the far right edge. When the card is closed it shows beyond the scalloped edge 🙂 I also stamped the sentiment THANKS from the Ornate Thanks stamp set. CARD IS COMPLETE!!! So fun.
  • On the envelope front I stamped the word ‘seriously,’ from the Ornate Thanks stamp set. It helps the individual understand even before opening the card that there is a special note inside.

Thank you for stopping by. I hope you like… I wish I could see the person who is receiving this card when they open it – but it’s going in the mail. You know how that is…

May you have a beautiful day. Make someone happy by sending them a handmade card.
 

Stampin’ Up! Scalloped Notecards and the Ornate Garden Suite

Today’s card is made using the ultra cute Stampin’ Up! Scalloped Notecards and decorated using Ornate Garden Specialty DSP and. the Ornate Borders dies. These notecards come in a package of 20 with scalloped envelopes and in colors: Balmy Blue, Old Olive, Light Pink and Terracotta Tile. This card is made using the Old Olive. Here it is…

The card front:

  • Cut a piece of the Ornate Garden SDSP 2 3/4″ x 5″. Adhere using liquid glue.
  • Using the Ornate Borders Dies, cut a piece 1/2″ x 5″ from Gold Foil. Adhere using liquid glue.

The inside:

  • Cut a strip of the Ornate Garden SDSP 1/2″ x 5″ and adhere to the bottom. This allows this beautiful paper paper to show because of the scalloped edge of the notecard.
  • Using the Ornate Layers dies, cut a section from Old Olive cs. Adhere to the inside using liquid glue
  • Using a different die from the Ornate Layers Dies, cut a section from Gold Foil. Rub with your embossing buddy to remove any static. Using Versamark ink, stamp the sentiment from the Ornate Thanks stamp set, sprinkle with black embossing powder and heat set. Adhere this to the Old Olive piece.
  • Since this has used most of the card, prepare a Whisper White piece to slip inside. Here’s what I did with mine – using the Ornate Style stamp set and Tuxedo Black Memento ink. I cut this piece 3″ x 4″.

Voila – card is complete, ready to send an appreciative thank you!

I have had such a fun time using this Ornate Garden Suite. If you are not a demonstrator, this suite will become available to order from me Apr 1.  So think about it and let’s connect.. Should you wish to order something now and your order is between $50-$149, please use my current HOST CODEXYW2SYNV to receive an item of your choice worth up to $10. If your order is over $150, don’t use the host code as you will be offered free items to order from Stampin’ Up!. Just remember, I will also send an item of your choice not to exceed $10.

Thanks for stopping by!

May you have a beautiful day. Make someone happy by sending them a handmade card!

Stampin’ Up! Ornate Thanks, Ornate Borders Dies, So Very Vellum Specialty DSP

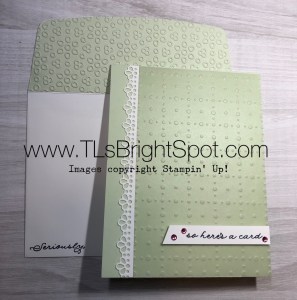
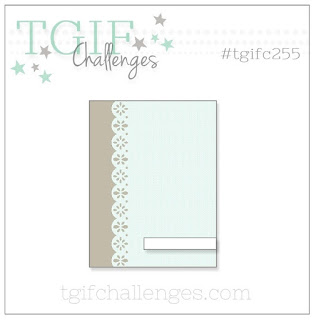
Today’s card makes use of the Stampin’ Up! Ornate Thanks and Ornate Borders Dies, and So Very Vellum Specialty DSP and the Eyelet Lace embossing folder. It was inspired by TGIF Challenges #tgifc255. Here it is in all it’s glory – feminine and fresh, bringing a note of thanks to the receiver…

Here are the details for the card front:

  • Soft Seafoam 8 1/2″ x 5 1/2″, scored at 4 1/4″
  • So Very Vellum 3 3/4″ x 5 1/2″
  • Whisper White 1/2″ x 5 1/2″, 1/2″ x 3″ strip for the sentiment


  • Use the border die from the Ornate Borders dies to create this wonderful delicate edge. Adhere this to the left front of the So Very Vellum SDSP. This takes a very thin line of liquid glue. Adhere this, again with liquid glue, just along where the die edge is attached to the vellum. This is important – if glue is anywhere else on the vellum it will show. You don’t want that!
  • Stamp the sentiment from Ornate Thanks with Tuxedo Black Memento ink. Angle the one end. Put on dimesionals – I used three – and add to card front. Mine is placed 3/4″ up from the bottom. Add bling with the Noble Peacock Rhinestones. Front is complete!

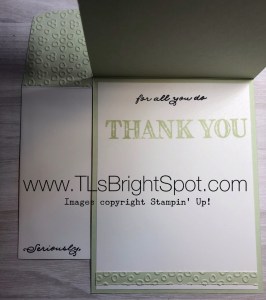
Inside the card:

  • Whisper White 4″ x 5 1/4″ Stamp the sentiments from the Ornate Thanks stamp set using Tuxedo Black Memento ink and Soft Seafoam ink. Use a leftover strip from the embossed piece from the envelope flap and adhere to the bottom. This strip is  1/4″ x 5 1/4″

The envelope:

  • Nary a “neked” envelope to be found – right? Right! Cut a piece of Soft Seafoam 2 1/4″ x 6″, spritz lightly with water and run through the Eyelet Lace embossing folder. Adhere to the envelope flap using liquid glue. Trim. The leftover scrap was cut down and used on the inside of the card 🙂
  • Stamp the sentiment from Ornate Thanks in Tuxedo Black Memento ink.

I love this card! It is just so sweet. I hope you like it too. Remember that this stamp and die set can be yours beginning Apr 1- May 1. It is part of the Early Release Ornate Garden Suite of products.  While the items will be be available in the Annual 2020-2021 catalogue, they most likely will not be as a suite of products – and therefore will be more expensive.

I would love to have you shop with me. When you purchase product $50- $149 from me, you receive a free item of choice up to $10. A deal right? Use my current HOST CODE XYW2SYNV.

May you have a beautiful day. Make someone happy by sending them a handmade card.


Stampin’ Up! Flowering Foils Card and Gift Bag

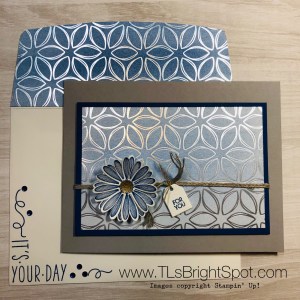
My card today uses the stunning Stampin’ Up! Flowering Foils papers that can be earned with a $50 order. It also uses Daisy Lane Stamp set, Around the Corner stamp set, Beautiful Bouquet stamp set, the Medium Daisy punch and the Bouquet Bunch dies.Sounds like a lot doesn’t it? But the card was super fun and easy to create. Here it is…

Isn’t this fun? I really, really like it. This Flowering Foils paper has some body to it, was easy to work with and is stunning in person. Pictures really does not do it justice. My intension was to make a masculine card but once I got started, well, you see what happened. It isn’t masculine at all!

Here are the details:

  • Smokey Slate card stock cut to 8 1/2″ x 5 1/2″, scored at 4 1/4″
  • Blueberry Bushel cut to 4 3/4″ x 3 1/4″
  • Flowering Foils cut to 4 1/2″ x 3″

So how did I get this wonderful ombre effect? By using a brush roller! Using the roller, roll over the ink pad GOING IN ONE DIRECTION ONLY, NOT BACK AND FORTH. This allows the ink to cover the entire roller, not just sections of it. Put roller to paper starting at the top of the foils paper and moving downward. I did not go to the end of the piece as I wanted a gradient color. Continue this process until it’s to the depth of shade desired. Allow to dry a few minutes then buff lightly with a soft cloth to remove ink from the foil design. This is a bit of a messy process as it gets ink on your hands during the handling and holding of the paper. Just make certain the ink on your hands is dry before handling other papers!

  • Adhere the Flowering Foils piece to the Blueberry Bushel using liquid glue. Wrap braided linen thread around these two pieces and tie in a knot
  • Using the Daisy Lane stamp set stamp three daisies on Whisper White card stock and punch out with the Medium Daisy punch. Curl the petals by running a bone folder over the petals and lifting them. Adhere daisies together with glue dots. Adhere over the ribbon with a dimensional. Adhere a Gold Faceted Gem in the daisy center.
  • Stamp the “for you” using Blueberry Bushel ink and the Beautiful Bouquet stamp set onto a Whisper White scrap. Cut out using the Bouquet Bunch dies. Put a dimensional on the back, slip a length of linen thread through the hole and tie in a knot to the braided linen ribbon.
  • Adhere all this with dimenionals to the Smokey Slate cs and the card front is complete!

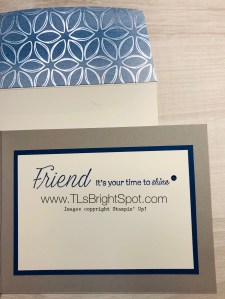
This card is for a friend who will be running a convention in a couple of months, and that’s why the sentiment on the inside. Here it is…

  • Blueberry Bushel 4 3/4″ x 3 1/4″
  • Whisper White 4 1/2″ x 3″
  • Stamp the sentiment with Blueberry Bushel ink
  • Add a Noble Rhinestone jewel and the card is complete.

The envelope…

  • The envelope got the same treatment on the flap, using a piece of the Flowering Foils cut 2 1/4″ x 6″, adhering with liquid glue and trimming to size.
  • On the envelope front I stamped the sentiment from Around the Corner stamp set in Blueberry Bushel. Since this card will be hand delivered, I adhered five jewels from the Noble Peacock Rhinestone pack

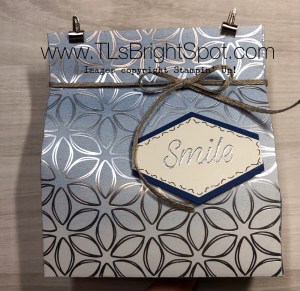
I love this card – did I say that already? Hope you do as well. Now – on with the matching gift bag..


  • Cut a piece of Flowering Foils paper 6″ x 12″. Create the ombre effect as described above.
  • Score on the long side 1 1/2″, 5 3/4″, 7 1/4″ and 11 1/2″.
  • With the ombre on the right, score on the short side 1 1/2″
  • Burnish all score lines.
  • Remove the small 1/2″ section below the 1 1/2″ score line. Adhere Tear n’ Tape to the long 1/2″ section
  • Cut up to the 1 1/2″ score line
  • Fold over the bag to the Tear n’ Tape; fold up the bottom and adhere with Tear n’ Tape
  • Pinch top; Wrap a length of Braided Linen Ribbon around the bag, tie in a bow
  • Stamp the ‘Smile’ sentiment from the Daisy Lane stamp set in Blueberry Bushel. Punch out with the Tailored Tag Punch. Add you own ‘scrolly’ around the edge. Using the Tailored Tag Punch , punch another from Blueberry Bushel cs and cut in half. Adhere the white punched piece to the two sections of Blueberry Bushel creating an even border. Adhere with dimensionals to the bag. DONE!
  • I want to give credit to Pootles for the wonderful video on YouTube that inspired this fun set. Thank you!

Thanks for stopping by today. I hope you liked this fun set. Remember this Flowering Foils paper is available during the rest of Sale-a-bration (Mar 31!) with a $50 order. In other words it;s a FREE ITEM!

May you have a beautiful day. Make someone happy by sending them a handmade card.


Stampin’ Up! Peaceful Moments and Painted Poppies

This card is made with the Stampin’ Up! Painted  Poppies stamp set AND the Peaceful Moments stamp set for the sentiment. This is so bright and cheery – it would definitely lift someone’s spirits! I’m feeling so much better today after being a bit punky with a cold all week. Even went to the gym and did the eliptical for 25 minutes! YAY!! But on with the card. Here it is…

Here are the details…

  • Thick Whisper White card base cut to 8 1/2″ x 5 1/2″, scored at 4 1/4″
  • Layer Lovely Lipstick  4″ x 5 1/4″
  • Cut Whisper White 3 3/4″ x 5″; stamp the single poppy from the Painted Poppies stamp set in the middle of the card with Tuxedo Black Memento ink, then stamp the string of Poppies in Tuxedo Black Memento ink so they surround the larger poppy.
  • Using the second largest circle die, cut out the center. Using both light and dark Poppy Parade Stampin’ blends, color the poppies that were cut from the circle. Notice I left many of the tips of the flowers without color. I think it makes them look more real, plus it gives them depth.
  • Using the largest circle die, cut a circle in Poppy Parade. Adhere the Painted Poppies circle to the Poppy Parade circle using liquid glue. You could put this section on dimensionals and it would look awesome too. I simply chose not to.
  • Adhere this entire poppy design to the Lovely Lipstick paper using liquid glue.
  • Take a piece of Real Red ribbon about 7 1/4″ in length and wrap around both these pieces. One way to keep it in place is to use snail directly to the ribbon then lay it on the paper. Works like magic! And if you use the grid paper while placing that ribbon, it will be super straight – works every time. Take another length of ribbon, make a bow and attach in the center with a glue dot.
  • Put dimensionals on the back of the Lovely lipstick and adhere to the thick Whisper White card base.
  • Take a Whisper White scrap, stamp the sentiment from Peaceful Moments in Tuxedo Black Memento ink and trim the ends as shown. Add dimensionals to the back of the strip and adhere to the card front. Voila!!!

I’ve used three shades of red on this card (Lovely Lipstick, Poppy Parade and Real Red) and they look great together – at least I think so. Stampin’ Up! does such a good job of coordinating their colors that it is easy to combine various shades of one color. After all – it’s what Mother Nature does 🙂

Thanks for stopping by. I hope you like this Painted Poppies card. It was extra fun to create. Want to join me in creating cards? Please contact me at TLsBrightSpot@gmail.com. It’s always more fun to have a partner with whom to brainstorm, connect and create.

Remember that Sale-a-bration ends March 31 with all those free products. It will still be possible to order from the catalogue until Jun 1 but all those freebies ends Mar 31. Just sayin’.

When you order from me, please use the current HOST CODE: XYW2SYNV. With a purchase of $50, you receive a free item of your choice not to exceed $10. Just let me know what that item is so I can place the order and get it on it’s way to you. One item per customer per month please. Thank you!

May you have a beautiful day. Make someone happy by sending them a handmade card. 


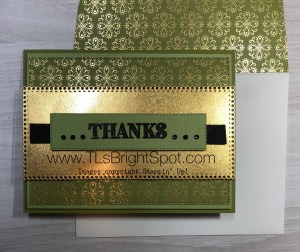
Stampin’ Up! Ornate Garden Suite Masculine Card

I used the Stampin’ Up! Ornate Thanks stamp set and Ornate Layers dies from the upcoming 2020-2021 Annual Catalogue to create my masculine thank you card today. It was quick and it was easy!

  • Starting with Old Olive 8 1/2″ x 5 1/2″ card stock, score @ 4 1/4″
  • Cut a piece of Pear Pizzazz 4 ” x 5 1/4″. I appreciate how these two greens work together.
  • Cut a piece Ornate Garden Specialty DSP with the largest die in the Stitched Rectangle dies. Using liquid glue, adhere this to the Pear Pizzazz.
  • Cut a piece of Gold Foil from the Ornate Layers dies. Put dimensionals on the back and attach to the Pear Pizzazz and Ornate Garden SDSP.
  • Cut a strip of Basic Black 1/2″ x 5″. Adhere using snail to the center of the Gold Foil.
  • Cut a piece of Pear Pizzazz about 1 1/2″ x 4 1/2″. Run your embossing buddy across this to remove all static. Stamp the front sentiment with Versamark ink and sprinkle with Black embossing powder and heat set. Once cooled, cut this out with another of the Ornate Layers dies. Color six Rhinestone Basic jewels with Black Stampin’ Up! blends and adhere as shone. Adhere dimensionals to the back of this piece and attach, centering it, over the black strip.
  • Almost done with the front… Add dimensionals to the large Pear Pizzazz and attach, centering, to the Old Olive card base. This card now has three layers on dimensionals and shows such depth and beauty. I love it!

The inside…

  • Cut a piece of Pear Pizzazz 4′ x 5 1/4″ and adhere to the card base with liquid glue.
  • Cut a piece of Whisper White 3 3/4″ x 5″. Stamp the sentiment from the Ornate Thanks stamp set using Tuxedo Black Memento ink. Adhere a strip of the Ornate Garden SDSP 1/2″ x 5″ toward the bottom as shown. Adhere the Whisper White to the Pear Pizzazz already attached to the inside of the card and voila!

The envelope flap… adhere a piece of the Ornate Garden SDSP, cut to fit. Your card is ready to share, send, give.

Thanks for stopping by today. I hope you like this masculine card. I think it looks really elegant. And.. it will fit inside the gift bag from yesterday’s post. Lucky man!!!

Remember the Ornate Garden Suite will become available to customers Apr 1 – May 31. Items will be in the Annual catalogue, but probably not listed as a suite – so definitely a deal as a suite of products.  When you shop with me please use my HOST CODE XYW2SYNV to receive a free gift from me!

May you have a beautiful day. Make someone happy by sending them a handmade card.