SU! is have a marvelous 24 hr stamp sale on certain stamps 7 AM MT (9AM ET) – 6:50 PM MT (8:50 PM ET)
see the flyer below… click the green, then click again …
09.23.20_FLYER_STAMPSALE_NA (1)

SU! is have a marvelous 24 hr stamp sale on certain stamps 7 AM MT (9AM ET) – 6:50 PM MT (8:50 PM ET)
see the flyer below… click the green, then click again …
09.23.20_FLYER_STAMPSALE_NA (1)
Howdy! It’s Sunday… do you have routines for a Sunday? We certainly do… and they have changed some ever the last several months due to the pandemic. I look back and remember the routines of my family on a Sunday – it was something that could be counted on. I wonder in our routines of a Sunday if it’s something that will be handed down. I just finished reading a book by Lisa Wingate – The Book of Lost Friends. It’s about generational history, beautifully written. I highly recommend it.
Today’s card looks like tradition to me – a stately tree, decorated for the holidays.

Winter Woods
#1
Here’s what’s needed for this project….
On a Whisper White panel, stamp this beautiful tree from Winter Woods stamp set in Just Jade ink. My inking pad is very inky so it was necessary for me to stamp off once. With another Whisper White scrap – say 1 1/4 x 3, stamp the sentiment in Cherry Cobbler ink. I love this combined font – so crisp! Using a die from Ornate Frames Dies, die cut, add dimensionals and adhere under the tree. Adhere this tree panel to Just Jade cs. It too should have dimensionals before adhering to the Thick Whisper White card base. I added the Star Element at the tree top, then the Wonderful Gems all over the tree and on the sentiment panel as well.
For the inside…

Winter Woods, inside
#2
I love how this turned out, and there’s a story here. I had cut my Whisper White panel and must have gotten distracted, cuz I stamped the trees as though it was a landscape profile, not portrait! (Yes, I needed to stamp off once more.) I went ahead and stamped the sentiment from Cherish the Season stamp set in Cherry Cobbler ink. It was then I realized the error. 😳 Instead of going into a panic, I simply cut the inked paper down to size, adhered it with liquid glue to the Just Jade panel and then into the card base. I adhered another panel below it for writing a message. Project saved!!!
For the envelope…

Winter Woods
#3
I used a strip of Just Jade cs and ran it through the Old World Paper 3D Embossing Folder, adhered it with liquid glue and cut it to fit. For the from I stamped this sweet pine needle from the Winter Woods stamp set along the side and bottom in stamped off once Just Jade ink, And the card is complete – yay…
Thanks for stopping by.
May you have a beautiful day.
Make someone happy by sending them a handmade card filled with love.
<div><div><div id=”a9bc2bf4-c30d-4dbc-8578-16f4a7709b63″>https://mystampinblog.com/Showcase/Details/91952bed-c575-4eea-b807-746c5052c2bf?layout=Tiled&showSku=True&showPrice=True&showSalePrice=True&showAddToCart=False&showAddAllToCart=True&showDownload=True&transparent=True&bordered=True&hFontHeight=14&rFontHeight=13&imageHeight=120&middleContent=False</div>https://mystampinblog.com/Script/ShowcaseDetailsScript</div></div>
Card cuts for this project:
Whisper White
Hi Everyone – it’s Saturday! It’s amazing what cool weather can do…this is that in-between season, before the leaves turn and fall – cool temps, absolutely perfect for sleeping, not quite cool enough for a fire in the fireplace though. We live in a ‘shore community’ and have lots of folks visit due to the many beaches. By now though, the beaches are OURS again….😁
Today I want to share a couple of team projects we created virtually ‘together’ last Sunday. We had been sent pictures and dimensions and instructions via email, but then created them via ZOOM. What a great tool ZOOM has become! Anyhoo – these are fun projects and primarily use the Celebration Tidings Bundle. The stamp set has stamps for Halloween, Thanksgiving, Christmas AND Valentines! Here are three of the projects…

Celebration Tidings Bundle and Poinsettia Petals
Isn’t this beautiful? Yep – the bag is empty – I had no candy to fill it, but the Celebrations Labels Dies create the ‘fold-over’ and background for the Poinsettia Dies. Plaid Tidings 6×6 DSP was used for the ‘label’, Shaded Spruce for the leaves, a bit of Brushed Metallic for the berries, Cherry Cobbler for the poinsettia and the gorgeous Beaded Pearls to accent the center of the poinsettia. . The cello bag pictured here is a retired commodity (unfortunately)n but SU! has Mosaic Gusseted Cello Bags that are very versatile.

celebrations Tidings Bundle
Project #2
Project #2 is a Christmas card… Celebration Tidings Bundle, Stitched Rectangles Dies and Winter Snow
Embossing Folder were the primary SU! items used. Another pattern from Plaid Tidings 6×6 DSP was a major focus and I love how the Celebration Dies were used for a fold-over flap for a surprise addition. It was my personal addition of the Linen Thread bow and Red Rhinestone Basic Jewels for the card front. Let me share inside the flap and the card inside as well.

Celebration Tidings Bundle, inside flap
It was my decision to add the Plaid Tidings 6×6 DSP to the top inside of the die cut. And here’s my reasoning… When using the Blends to color, the stamping element, their is some bleeding through and I didn’t like the way that looked. I simply used the smallest die to cut a piece of DSP to cover the bleeding through. It makes it look more complete and professional to me. Now for the inside…

Celebration Tidings C’mas card inside
Project #2
I chose to do no coloring for the inside – I liked the simplicity, and no additional sentiment needed – lots of room for sharing a friendly update!
Project #3 is a fall card, again using the Plaid Tidings 6×6 DSP and the Celebration Tidings Bundle.

Celebration Tidings Bundle, Fall
Project #3

Celebration Tidings Bundle, Fall
Project #3
Another gorgeous project! Plaid Tidings 6×6 DSP takes center stage again, but the stamped Celebration Die holds its own for sure. Colors here are Cinnamon Cider, Blackberry Bliss, Crumb Cake and Very Vanilla card stocks. Blends used for coloring are Pumpkin Pie, Shaded Spruce. Markers used are Early Espresso and Bumblebee.
Thanks for letting me share our team projects! They are beautiful and it’s fun to gather, even if virtually, to encourage and learn from one another. Want to be able to do this? Join my team!
SU! has a promotion going on for new recruits that is a win-win for everyone… for $99 you will get a starter kit worth of products valued at $125 – plus two card sets with instructions & an additional stamp set & Rhinestones. What’s not to like about that? Join my team- and yes, do it NOW so you get all the benefits of this awesome deal. More details below.
.
It’s Friday already – where did this week go? How was it – did you have a good week? We had lots of meetings this week, mostly virtual – and that’s OK. Being able to accomplish the goals is what matters. Ok – idle chatter… let’s get on with it shall we?
Today’s card is another fall one – a masculine birthday card. And it’s the DSP that really takes center stage, although… the Autumn Punch pack from the Beautiful Autumn bundle shows itself pretty well too. This is a CASE of a card I saw by another demo: Dawn Olchefske. Thanks for the inspiration!

Beautiful Autumn Bundle
#1
Let’s take a peek at how we made this card.
For the inside… and I really like how this turned out!

Beautiful Autumn Bundle – inside
#2
For the envelope..

Beautiful Autumn
Bundle
#3

Beautiful Autumn Bundle
#4
Hello again! The weather here in NJ is beginning to turn cool – and that means leavers are gonna fall…. and we have LOTS of trees on our property… which means raking, raking, raking. Before this sounds as though I’m in the complaint department – let’s look at today’s card – it’s an elegant fall card and it features the fabulous Love of Leaves bundle. Why a bundle? When purchasing a coordinating die set with a stamp set it’s 10% LESS when bought together – a great deal.

Love of Leaves Bundle #1
I started by choosing my paper – Gilded Autumn Specialty DSP. This guided me to Very Vanilla for a coordinating card stock (versus Whisper White). Thick Very Vanilla for the card base, Brushed Metallic 12 x 12 card stock to coordinate with the gold in the Gilded Autumn Specialty DSP and Very Vanilla – that’s it for papers. I wanted the Brushed Metallic paper to create a bit of shadow for my leaf, so I die cut this gorgeous leaf from the center of the panel I had cut. This ‘hole’ is covered by both the Very Vanilla card base and the Specialty DSP on top – so no one knows (but you and me!). Here’s a picture of how it looks from the back side.

Love of Leaves – die cut from Brushed metallic
#2
I die cut a rectangle using the Stitched Rectangle Dies and the 3rd smallest die from Very Vanilla cs and also die cut this gorgeous leaf from Very Vanilla at the same time. One of the special things about this bundle is how the leaves have an embossing portion that creates these wonderful impressions. OK… adhere the Very Vanilla leaf to the Brushed Metallic leaf using Stampin Seal. Adhere the leaf to the stitched rectangle with dimensionals. Then adhere this to the center of the Gilded Autumn Specialty DSP with liquid glue, and this to the Brushed Metallic and then onto the card base. Now all it needs is a double length of Linen Thread tied into a bow and attached with a glue dot.

Love of Leaves
Bundle
#3
For the inside, because this particular sheet of Specialty DSP coordinates with Mint Macaron, I added a panel as a layer to the card base. The Very Vanilla got special treatment along the left edge with one of the embossing dies in this die set. Then I stamped the sentiment in Mint Macaron ink. Adhere this panel to the mint Macaron and the card is complete.

Love of Leaves inside
#4
For the envelope I used a strip of the Gilded Autumn Specialty DSP to adhere to the envelope flap. For the card front I ’embossed’ a portion of one of the leaves from the die set. Elegant!

Love of Leaves Bundle #5

Love of Leaves
Bundle
#3
Such a beautiful card and so EASY to do with this gorgeous bundle. One of the items that makes this card so simple to do is the new Metallic Plate that can be used with the new Cut & Emboss machine. Because the plate is metallic all over, once the die is placed on it, it doesn’t move!!! No need to hold it down with a sticky note or anything. It’s the best ever. So I’m going to show it on the product list, along with the die cutting machine, cuz these are ‘must haves’. Remember, when you shop with me and your order is over $50, you will receive a SU! item of your choice worth $10.
<div><div><div id=”e4d5dfeb-95e0-4bbc-b8ae-92cf0315bdc6″>https://mystampinblog.com/Showcase/Details/c327d7aa-f094-45d9-b991-5005e4dc67f6?layout=Tiled&showSku=True&showPrice=True&showSalePrice=True&showAddToCart=False&showAddAllToCart=True&showDownload=True&transparent=True&bordered=True&hFontHeight=14&rFontHeight=13&imageHeight=120&middleContent=False</div>https://mystampinblog.com/Script/ShowcaseDetailsScript</div></div>
Today’s card is another using the wonderful Tag Buffet stamp set and using the stocking stamp. It’s so cute, that little stocking! Here’s the card…

Tag Buffet stamp set
#1
These are the stamp sets I used for this card:
I also used:
Papers:
All the layers are adhered with liquid glue except the stocking, which is on dimensionals. Here are more pictures…

Tag Buffet
#2

Tag Buffet, inside
#3
And here’s a final picture…

Tag Buffet
#5
This was a bit of a new format for this card, lots of layering and fairly simple, so wasn’t sure tons of directions were necessary.
Thanks for stopping by.
May you have a beautiful day.
Make someone happy by sending them a handmade card filled with love.
Below is a list of the supplies that will take you directly to my online store 😁 Enjoy shopping and creating… When you shop with me, you will receive a SU! item of choice worth $10 when your purchase is over $50. All you have to do is let me know what that is after placing your order (and yes, I WILL reach out to you when your order is placed!)
.<div><div><div id=”635c1263-e56c-4412-8ab8-2603588a2b2c”>https://mystampinblog.com/Showcase/Details/fff0eab3-4155-414f-bdb2-4ee4cf5992db?layout=Tiled&showSku=True&showPrice=True&showSalePrice=True&showAddToCart=False&showAddAllToCart=True&showDownload=True&transparent=True&bordered=True&hFontHeight=14&rFontHeight=13&imageHeight=120&middleContent=False</div>https://mystampinblog.com/Script/ShowcaseDetailsScript</div></div>
And now is the perfect time to join my team as well… SU! has this awesome deal going on until Sep 30… take a peek…
.
Helllooooo. It’s Monday, the start of a new week. What’s your plan – who are you reaching out to? My card today is guess what – a CHRISTMAS CARD! Yep – I’m back to making them and a fun fold is always a bit exciting – and creating a Z-Fold is – just – easy. Let’s take a look…

Z-Fold, Celebration Labels w/ Ornamental Envelopes
#2

Z-Fold, Celebration Labels
#1
Fun look, right? I’ve used a few stamp sets on this card to get the sentiments or images I wanted. I love these ornaments and they were so fun to color. But I’m getting ahead of myself… Choose a DSP that will add color to the background but not compete with your main image. Here I chose Snowflake Splendor DSP and adhered it to the card front (that card stock is Pacific Point 4 1/4 x 11 and scored at 5 1/2). With the Celebration Labels Dies, cut one in Whisper White for your stamping and the next size larger for a nice background. You are actually cutting through the card front and the DSP and card stock layers. AND – big tip here, listen carefully – you are cutting from the back side of the card front . The reason for this is to have the plain side behind your main image and to have a decorated side when you open the card. It makes the larger die cut stand out more as well.
Stamp the ornaments from the Ornamental Envelopes stamp set, only using the four ornaments shown. In other words using sticky notes, tape off that section on the stamp you do not want in your image prior to inking, ink the appropriate area in Tuxedo Black Memento ink – then remove the sticky notes and stamp on the die cut Whisper White. Stamp the sentiment using the Itty Bitty Greetings stamp set in Granny Apple Green. Now color the ornaments – I used: Poppy Parade, Granny Apple Green, Daffodil Delight and Shaded Spruce Stampin Blends. Put dimensionals on the back and adhere to the solid color side of the larger die cut.
For the Z-Fold: cut a strip from Whisper White 2 1/2 x 10 and score at 4 & 8. Burnish these score lines well so they make a wonderful Z. This creates ‘panels that are 4″, 4″ and 1 1/2″. The smallest panel is the end that will attach to the Celebration Dies and the opposite end will adhere to the inside of the card. With the 4″ end and the score line against the score line of the card, adhere the two together with liquid glue, centering it from top to bottom. Look at this photo again for reference… Now it is time to adhere the die cuts for the front. With the card closed and the 1 1/2 strip facing you, place the die cut panel right into it’s place and adhere with liquid glue. Voila – the Z-Fold is created! Now you are ready to create the inside. 
Z-Fold, Celebration Labels
#1For the inside, cut 2 panels of Seaside Spray cs 2 3/8 x 3 7/8; then cut two panels of Whisper White cs 2 1/4 x 3 3/4. Stamp your Whisper White panels. I used Yuletide Pasture stamp set ‘cuz these animals remind me of those in the stable with baby Jesus. 🙂 I stamped them in Soft Suede ink and then used the smallest of the Water Painters to ‘bleed’ the color. The collar of the sheep was colored with Poppy Parade, the bells with Daffodil Delight and the leaves with Granny Apple Green – all Stampin’ Blends. The sentiment on the sheep panel was from the Itty Bitty Greetings stamp set and stamped in Granny Apple Green ink. The bull got fun ornaments hung from his horns using the Little Treats stamp set and colored with Poppy Parade, Granny Apple Green and the Daffodil Delight Stampin Blends.
Now these Whisper White panels are colored, adhere them to the Seaside Spray panels with liquid glue, then adhere to the inside of the card on the strips. This picture will help you. I apologize it’s in the wrong direction! Should have fixed that… 😦

Z-Fold inside card
#3
Now flip the card over and do something for the back – – I cut a panel of Whisper White 4 x 5 1/4, stamped the sentiment from the Little Treats stamp set in Granny Apple Green ink and adhered to the card with liquid glue. And your card is complete!!! Such fun. Love doing this.

Z-Fold, back
#5

Z-Fold
#4
Thanks for stopping by today.
May you have a beautiful day.
Make someone happy by sending them a handmade card filled with love.
Hi Everyone… did I ‘get’ you with that title? Funny… what it means is Tag Buffet stamp set plus Stitched Nested Labels Dies plus Dainty Diamonds 3D embossing folder. And yes, it’s a Christmas card. I counted my cards the other day and I don’t have nearly enough. I wonder what Christmas will be like this year – with the pandemic et all? But I can’t go there yet, cuz my head is not able to wrap around all the ‘what ifs’ and it certainly won’t help me to fret about it.
We had a cord of wood delivered yesterday (that’s a stack 4’x 4′ x 8′, I think) and hubby and I carted every piece of it around to the back yard and stacked it!!! Ta da!!! Give us points folks – that’s a lot of wood to haul & stack. In fact it’s 28 cart loads – not wheelbarrow loads, cart loads. Garden carts have two wheels and are much more stable than wheelbarrows and they are larger that wheelbarrows. We would haul five loads, stacking each one as we took it ’round, then rest a bit. We did 15 before lunch and the rest after. Thank goodness it was a gorgeous day – only about 72 and very low humidity. I’ll include a photo at the end – just so you can see we did it :O)
The card…

Tag Buffet Plus
#!
This is such a cute stamp set, I especially love the Christmas images (stocking and this gorgeous ornament). And here’s what I did …
Stamp the ornament from the Tag Buffet stamp set with Tuxedo Black Memento ink and color it with the Cherry Cobbler Stampin Blends, then fussy cut. Oh, and I colored the hangy thingy with Bronze Stampin Blends and covered that with Wink of Stella.While I was at it, I stamped the sentiment (yep, it’s from the Tag Buffet stamp set!) onto Whisper White cs with the Tuxedo Black Memento ink and fussy cut that as well.
I die cut a Stitched Nested Label from Whisper White cs and a larger one from Tis the Season 6×6 DSP. By the way – my Magnetic Platform for the new SU! Cut and Emboss machine arrived the day before so I used that and oh my gosh – incredible! The dies didn’t move one bit!!!
I took another panel of Whisper White cs and ran it through the Dainty Diamonds 3D Embossing Folder.That was. adhered directly to a Thick Whisper White card base. I then adhered the DSP stitched die cut and the Whisper White stitched die cut, again with liquid glue. For the ornament, I first punched a tiny hole in the hanger thingy and slipped a length of Gold metallic trim from the Forever Greenery Trim Combo Pack and glued it in place with a dot of liquid glue. The ornament then got dimensionals and was placed atop the Whisper White stitched die cut. I put dimensionals on the Merry Christmas sentiment and attached it to the bottom of the card. For a little bling I added the stunning Wonderful Gems.

Tag Buffet Plus
#2
For the inside I adhered a panel of Cherry Cobbler to the card base. I then took a panel of Whisper White and stamped the sentiment from the Tag Buffet stamp set inCherry Cobbler ink. Then I stamped the ‘needles’ from Just Jade ink and placed another Wonderful Gem. This panel was adhered to the Cherry Cobbler with liquid glue and the card was complete.

Tag Buffet
#3
For the envelope I stamped a leaf ‘spray’ from the Tag Buffet stamp set in Just Jade ink. For the envelope flap I took several strips of Cherry Cobbler, Whisper White, Tis the Season 6×6 DSP and another Whisper White and adhered them then trimmed to fit. Fait accompli – card is ready!

Tag Buffet Plus
#4
Thanks for stopping by.
May you have a beautiful day.
Make someone happy by sending them a handmade card filled with love.
Hello again! It’s raining here today and I have a meeting OUTSIDE tomorrow for 18 folks! Please pray it stops raining so I can get yard furniture dried and moved for physically distancing… This group hasn’t been together since March and we desperately need to see one another. We lost the president of our group recently (yes, to Covid-19) and we are anxious to share with one another that loss of a special woman. She was giving and caring, a gentle spirit, gracious, and laughter came easily to her. She will be greatly missed… I’ve gotten off track – pray for the rain to stop so we can gather together.
Today’s creation is… four creations – each the same and yet, well, not.

Artistry Blooms DSP w/ Lovely You
Card #1
Artistry Blooms DSP w/ Lovely You
Card #2
Artistry Blooms w/ Lovely You
card #3

Artistry Blooms DSP w/ Lovely You
Card #4
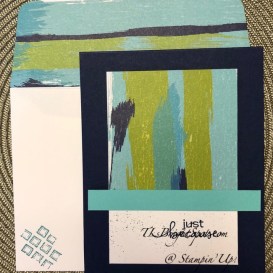
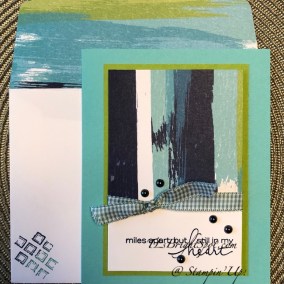
Card #1 is the base card – no dimensionals, no extras, just papers adhered to the card base and a sentiment – a perfect beginner card.DSP is adhered to the Whisper White panel, a strip added to cover the seam and stamped. Perfect for a beginner! The card base is Bermuda Bay; the strip is Night of Navy; sentiment stamped in Bermuda Bay.
Card #2 is only slightly different… DSP is adhered to a Whisper White panel, an strip isn added to cover the seam, then stamped. Now two additions: 1-splatter the sentiment section using the Night of Navy Marker and the lid and tap the longer tip end to create the light splatters. 2- put this panel on dimensionals. This is a step up due to the Marker and the dimensionals, but still a good beginner project. The card base is Night of Navy and the strip is Coastal Cabana; sentiment is stamped in Night of Navy.
Card #3 is another step up by adding ribbon (Just Jade 3/8″ Gingham Ribbon from the Flowers for Every Season Ribbon Combo Pack) and these wonderful Iridescent Pearls, dimensionals behind the main panel AND an additional layer of card stock. The card base is Coastal Cabana, the layering panel is Granny Apple Green; the sentiment is stamped in Night of Navy.
Card #4 is similar to #3 BUT – the layering panel is the one on dimensionals. This then is the DSP adhered to the Whisper White panel, ribbon added to cover the seam (Boho Indigo Product Medley – Night of Navy 1/2″ Frayed Grosgrain Ribbon) and Artistry Blooms Adhesive-Backed Sequins in Coastal Cabana). The card base is Granny Apple Green and the layering panel is Coastal Cabana; the sentiment is stamped in Coastal Cabana.
The DSP is… Artistry Blooms – 3 x 3 adhered to Whisper White panel 3 x 4 1/2; lkayering panels are 3 1/4 x 4 3/4.
The envelopes all have the Artistry Blooms DSP on the envelope flap 2 1/4 x 6, adhered with liquid glue and trimmed to fit. For the front I pulled another stamp set as it has this rather modern stamp in it, Tasteful Touches stamp set. I used a sponge dauber, one for each color of ink, and dabbed the color on the stamp, varying it each time I stamped it. I did not clean the stamp in between. Inks used were Night of Navy and Coastal Cabana.
Thanks for stopping by.
May you have a beautiful day.
Make someone happy by sending them a handmade card filled with love.
I’m trying out a new program. Below is a way to click the items used for todays project and it will take you right to my online store so you can purchase right away. Hope this works!!! AND I hope it helps you, the customer really SEE the products used. Thanks for shopping with me…
<div><div><div id=”3fdd91af-91fe-441c-8fa5-c5f6aeaa4acc”>https://mystampinblog.com/Showcase/Details/5981b84f-d507-41c1-846f-940400e5899e?layout=Tiled&showSku=True&showPrice=True&showSalePrice=True&showAddToCart=False&showAddAllToCart=True&showDownload=True&transparent=True&bordered=True&hFontHeight=14&rFontHeight=13&imageHeight=120&middleContent=False</div>https://mystampinblog.com/Script/ShowcaseDetailsScript</div></div>
.
Hello again – it’s Wednesday, hump day or haawmp day depending on the part of the country. There are probably even more pronunciations than that – but never mind…. It’s still Wednesday and we need to do something special with this day God has provided. How about … call someone whom you haven’t seen for a while and ask them how they are. I have a list of folks the church has given me and they are so appreciative of the connection. We have bonded in a new way because of a simple phone call.
On to the card… it’s another Note Card and another vase from the Boho Indigo stamp set and coordinating dies. I had originally stamped three in Memento Black ink and they sat on my desk – this is the last of those.

Boho Indigo 3
I have used the In Good Taste DSP to cover the entire front of the note card. I stamped the leaf ‘bouquet’ in Crumb Cake ink onto a piece of Whisper White cs and fussy cut it. Then I took these sweet little flowers that are part of the Boho Indigo Product Medley of products and adhered them with a glue dot. I then adhered this behind the vase (which is on dimensionals) onto the Postage Stamp Punched piece of Whisper White. I colored the decor of the vase with Dark Crumb Cake Blends except for the flower centers. Those I left White. I then took a length of Metallic Mesh ribbon, tied the center to make it gather and adhered it to the back of this with a glue dot. Then the vase panel, leaves and all, got dimensionals and put in the center of the card. I stamped the sentiment from Itty Bitty Greetings onto a Whisper White scrap with Balmy Blue ink and fussy cut it. This also got dimensionals and was placed onto the card.
For the envelope I used the same paper from In Good Taste DSP to cover the flap – liquid glue – and fussy cut. I stamped the three flowers from Boho Indigo Stamp set on the envelop front in Crumb Cake ink and the card was complete.

Boho Indigo 3
Here are the three Note Cards… the one above and two below.

Boho Indigo on a Notecard

Boho Indigo 2
These could be used as a gift set or sent individually as each is unique in itself. Love the Boho Indigo Product Medley…
So what’s topping you from buying this wonderful medley? You know you have to have it… Shop with me using my CURRENT HOST CODE Z3WFFJTH. When your order is $50-$150 it’s appropriate to use3 the host code. If it’s OVER that amount, don’t use the host code. You’ll still receive a free item from me, but SU! offers Stampin’ Rewards too. That free item from me? – a SU! item worth $10 of your choice. 😁
Card cuts for today’s card:
Thanks for stopping by.
May you have a beautiful day.
Make someone happy by sending them a handmade card filled with love.
