Stampin’ Up! Earthen Textures Thank You

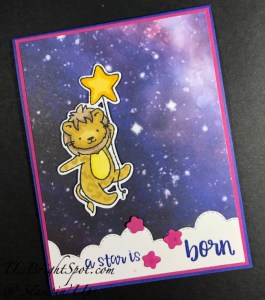
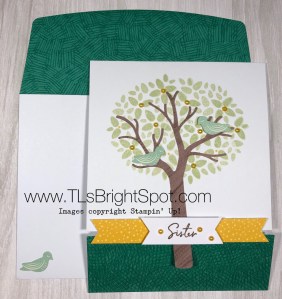
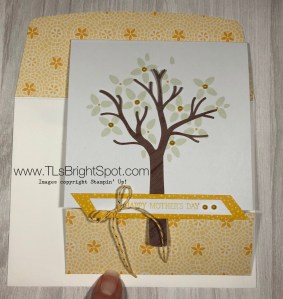
Wow! Did you see fireworks last night? Were they spectacular or what?! Hope everyone is safe… I have a quick and easy card for you today made with the Earthen Textures DSP, a die from Cheerful Daisy Dies that seems to coordinate well , and Gorgeously Made stamp set for the sentiment and a fun decorative stamp for the inside and the envelope. I also brought in a die from the Timeless Arrangement Dies for the sentiment.

Stampin' Up! Earthen Textures DSP

Isn’t this pretty DSP? It looks a bit like sea grass to me. And because of that I pulled this fun die from Cheerful Daisies Dies to accent. Those die cuts are from Copper Clay and Gray Granite. I layered the Earthen Textures DSP to a Gray Granite panel just slightly larger, then with dimensionals added it to a Copper Clay card base. The sentiment is from the Gorgeously Made stamp set stamped in Copper Clay ink on a Basic White piece. This was die cut with a die from Timeless Arrangements Dies and added with dimensionals over the ‘sea grass’ die cuts.

Stampin' Up! Gorgeously Made stamp set

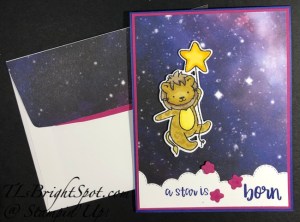
For the inside I looked for a stamp that simulated the DSP on the card front and found this stamp from Gorgeously Made stamp set – and stamped it with Copper Clay ink on the Basic White panel. This piece was attached to a Gray Granite panel slightly larger, then directly to the inside of the card base. DONE!

Stampin' Up! Earthen Textures DSP card and envelope

For the envelope… The same stamp was used for the envelope front as the inside of the card, from Gorgeously Made stamp set. Another swatch of the Earthen Textures DSP was added to the envelope – and this card is ready.

Bonus days are right around the corner… July 6 as a matter of fact. Here’s the scoop.

Stampin' Up!

BONUS DAYS! Because do you know what’s a great deal? Getting rewarded for all the crafting supplies you’re already going to buy! When you shop between 6–31 July and spend $50 USD | $60 CAD you will earn a $5 USD | $6 CAD coupon! Make sure you save all your coupons because you can redeem them (and we mean ALL of them) between 1–31 August. And there’s no limit to the number of coupons you can earn!

  • Coupon codes may be redeemed for any product (excluding Starter Kits, demonstrator supply items, and Paper Pumpkin month-to-month subscriptions).
  • New prepaid Paper Pumpkin codes may be discounted using Bonus Days coupon codes.
Stampin' Up! Paper Pumpkin

Say hello to summer and get crafting under the sun with this month’s kit! With beach designs, fun accordion-fold cards, along with sentiments to support, encourage, say hello, and more, wave at those you love through uplifting cards and send family and friends oceans of kind words all summer long!

PAPER PUMPKIN 48-HOUR SALE!

Surprise! On 6–7 July, all current Paper Pumpkin subscribers can save up to 50% on Paper Pumpkin past kits, refills, and add-ons! Items are available while supplies last n- so order EARLY!

You can purchase Paper Pumpkin from me here.

Stampin' Up! ONLINE EXCLUSIVES

ONLINE EXCLUSIVES are just that – ONLINE ONLY products not shown in any Stampin’ Up! Catalog. New products mean new inspiration and new ways to express your creativity and develop your business! 6 July, there will be even more Online Exclusive products for you to shop. The best way to see what is available is to view the online store.

Stampin' Up! Online Exclusives  beginning Jul 6

You may shop those products here.

If you have questions, please let me know. If I can help you in any way – let me know that too. Creativity and working together is what it’s all about – besides having fun :O)

KITS COLLECTION BY STAMPIN’ UP! PRICING CHANGE

Due to increased costs to produce kits for the Kits Collection by Stampin’ Up!, we need to slightly increase the prices on all the kits that were released in 2021 and some of the kits released 2022. These price changes will go into effect on 6 July. At this time, we are not increasing pricing on any kits released in 2023. 

You can shop with me here.

Thanks for joining me today. May you have a beautiful day! Make someone happy by sending them a handmade card filled with love.

Stampin’ Up! Little Dreamers Happy 4th

Happy 4th of July! Today’s card is a ‘take’ on the 4th of July using the LIttle Dreamers bundle AND the Stargazing DSP.

Stampin' Up! Little Dreamers, 4th

Isn’t this lion CUTE!? This card could so easily be given for a 4th birthday, but it is intended for the 4th of July post :O) This DSP, Stargazing is stunning, AND it has a hint of reddish color in the upper right corner. What it says on the package is Berry Burst is a coordinating color, so I did use that for accent – but pretend it’s red, ok? You know, red, white and blue… The Basic White cloud at the bottom of the card is die cut with the Basic Border Dies and 1 1`/4″ of card stock. The stamped sentiment is done with Starry Sky ink, covering a portion of the stamp in the Little Dreamers stamp set, stamping then cleaning the stamp and re-inking just the last word, also in Starry Sky ink. In between, I die cut stars using one of the dies in the Little Dreamers Dies and Berry Burst card stock. Just the top star was adhered with a mini dimensional, the other two and the cloud were added with liquid glue onto the Stargazing DSP. The lion is of course, from Little Dreamers stamp set and stamped in Memento ink on the Basic White panel. I colored it with Stampin’ Blends: Daffodil Delight for the star, Wild Wheat for the larger portion of the lion, Crumb Cake & SU300 for the mane and Lemon Lolly for the lions belly. He was die cut with the Little Dreamers lion die and attached to the card with dimensionals. This whole Stargazing panel was added to a Berry Burst piece, then to the Starry Sky card base.

Stampin' Up! Little Dreamers 4th, inside

For the inside, Starry Sky ink on the Biggest Wish stamp set ‘happy’, stamped on the Basic White panel. Then the 4th was stamped in Berry Burst ink using the Alphabest stamp set. A 1/2″ strip of the Stargazing DSp was added to the bottom to continue the theme from the front. In hindsight, it should have been adhered to the top of the Basic White panel – but you know, hindsight. This piece was added to Berry Burst and adhered to the inside of the card.

Stampin' Up! Little Dreamers card & envelope

For the envelope – real simple… a bit of the Stargazing DSP on the flap + a small strip of Berry Burst to continue the theme of red, white & blue – HAPPY 4TH OF JULY!

Be careful out there on this fourth of July. Fireworks are fun & beautiful to watch, just be careful if you light them yourself.

Bonus days are right around the corner… July 6 as a matter of fact. Here’s the scoop.

Stampin' Up! BONUS DAYS

BONUS DAYS! Because do you know what’s a great deal? Getting rewarded for all the crafting supplies you’re already going to buy! When you shop between 6–31 July and spend $50 USD | $60 CAD you will earn a $5 USD | $6 CAD coupon! Make sure you save all your coupons because you can redeem them (and we mean ALL of them) between 1–31 August. And there’s no limit to the number of coupons you can earn!

  • Coupon codes may be redeemed for any product (excluding Starter Kits, demonstrator supply items, and Paper Pumpkin month-to-month subscriptions).
  • New prepaid Paper Pumpkin codes may be discounted using Bonus Days coupon codes.
Stampin' Up! Paper Pumpkin, July

Say hello to summer and get crafting under the sun with this month’s kit! With beach designs, fun accordion-fold cards, along with sentiments to support, encourage, say hello, and more, wave at those you love through uplifting cards and send family and friends oceans of kind words all summer long!

PAPER PUMPKIN 48-HOUR SALE!

Surprise! On 6–7 July, all current Paper Pumpkin subscribers can save up to 50% on Paper Pumpkin past kits, refills, and add-ons! Items are available while supplies last n- so order EARLY!

You can purchase Paper Pumpkin from me here.

KITS COLLECTIONS:

Due to increased costs to produce kits for the Kits Collection by Stampin’ Up!, we need to slightly increase the prices on all the kits that were released in 2021 and some of the kits released 2022. These price changes will go into effect on 6 July. At this time, we are not increasing pricing on any kits released in 2023. 

You may order kits from me here.

For a list of products used in today’s post, see the link below.

Thanks for stopping by. Enjoy this beautiful day!

Stampin’ Up! Delightfully Eclectic Card Gift Bag

It’s Tuesday July 3 – and a blueberry picking day! We love blueberries and this is the right time of year… they are ripe and we are ready to go. We freeze most of them to have this first picking. Then we pick more and make muffins or pancakes or cobblers or jus eat the fresh to our hearts content.

Today’s post has nothing to do with blueberries :O). It’s a card gift bag.

Stampin' Up! Delightfully Eclectic Card Gift Bag

The card is made with Delightfully Eclectic DSP and Basic Black card stock for the sides, bottom and handles. The label is Basic Black and Basic White, stamped with the Countryside Corners stamp set. Here are the dimensions:

  • Designer Series Paper: 6 x 4 1/2, cut 2
  • Coordinating card stock 3 x 6 (bottom panel) scored on both long sides @ 1/2″
  • same coordinating card stock 3 x 5, cut 2 (side panels), score on three sides @ 1/2″. Mark center on remaining short side and score from that mark to the right bottom corner where score lines meet. Score again from that same center mark to the bottom left corner where score lines meet.
  • Burnish all score lines
  • Trim bottom corners of side panels at angle – see photo below

Directions:

  • Add Tear n tape to the 1/2″ score lines on all pieces, adding it to the scored edge, close to the score line.
  • Attach DSP panels first, then side panels as shown.
Stampin' Up! Delightfully Eclectic Card Gift bag.2
  • Do one side at a time, removing tape of bottom side panel and attaching it to the bottom panel, then attach that same side panel to the DSP piece
  • Now do the same to the other side

Handles:

  • Cut 4 handles and adhere two together for strength. Here I used the Countryside Corners Dies to create the handles
Stampin' Up! Delightfully Eclectic Gift Bag handles
Stampin' Up! Delightfully Eclectic Card Gift bag.3
  • Add Tear n Tape to the bottom portion of each handle and attach to each inside of the DSP see photo above
  • Decorate as desired:
    • Ribbon used: Satin Edged Ribbon & Baker’s Twine Essential Pack in white for bow
    • Basic Black and the Countryside Corners Dies for label
    • Basic White and Countryside Corners stamp and Countryside Corners smallest die
  • Fill with decorated cards to gift :O)
Stampin' Up! Delightfully Eclectic Card Gift bag complete

The label allows you the freedom to write in a name for the gift of goodies. And I guess you wouldn’t have to fill with cards, but could fill with just about anything. Just be careful the items aren’t too heavy! :O)

If you had a new team member, this would be a nice gift to fill with various adhesives – or as a hostess gift for someone hosting a party.

Stampin' Up! Bonus Days

BONUS DAYS! Because do you know what’s a great deal? Getting rewarded for all the crafting supplies you’re already going to buy! When you shop between 6–31 July and spend $50 USD | $60 CAD you will earn a $5 USD | $6 CAD coupon! Make sure you save all your coupons because you can redeem them (and we mean ALL of them) between 1–31 August. And there’s no limit to the number of coupons you can earn!

  • Coupon codes may be redeemed for any product (excluding Starter Kits, demonstrator supply items, and Paper Pumpkin month-to-month subscriptions).
  • New prepaid Paper Pumpkin codes may be discounted using Bonus Days coupon codes.
Stampin' Up! July Paper Pumpkin

Thanks for stopping by. May you have a beautiful day!

Stampin’ Up! Happy Inkin’ Thursday Blog Hop

My June Paper Pumpkin (Welcome Inn) arrived earlier this week and I knew I wanted to use parts of it for this hop/ challenge. The colors of Night of Navy and Calypso Coral are such a wonderful combination. I added a background piece from the Subtles 6×6 in Calypso Coral.

Stampin' Up! Happy Inkin' Thursday Blog hop
Stampin' Up! Blog hop challenge
Stampin' Up! Jun PP Alternative

As you can see, I turned the image sideways (again) to create my own version :O). The card base is from the June Paper Pumpkin kit – Night of Navy. The next layer is my addition – Subtles 6×6 in Calypso Coral (3 1/2 x 5). The floral Pattern is from the Paper Pumpkin kit as well and was added with dimensionals. The floral DSP is Countryside Inn, which this particular kit coordinates. and is 2 1/4 x 2 3/8 and adhered directly – except for the right side, which has dimensionals under it. The banner also comes from the klit and was added with dimensionals as well. The Night of Navy embellishments also come from the kit. Great alternative project, right?!

Stampin' Up! June PP Alternative, inside

For the inside, a Calypso Coral panel 4 18 x 5 38 was adhered to the base, then the Basic White panel was stamped: Night of Navy for the vase; Old Olive for the stems and Calypso Coral for the flowers – and yes… these were in the June PP kit!

Stampin' Up! June PP Alternative w/ envelope

The envelope is from the June PP kit and I chose to cover the flap with more of the Subtles 6×6 DSP in Calypso Coral & trimmed it to fit. Hope you likie!

Now – on with the hop… click the next button to take you to Carol’s fun creation, or… click on a name to hop around.

Stampin' Up! Blog Hop next button

Amy Koenders

Mary Deatherage

Jaimie Babarczy

Karen Finkle

Akiko Sudano

Karen Ksenzakovic

Tara Carpenter

Terry Lynn Bright – you are here

Carol Buckalew

Thanks for joining me today. Yesterday was FREE SHIPPING day by Stampin’ Up! and my order is already shipped – yeeha! Now is still a great time to join my team as a demonstrator and get all the fringe benefits. This special joining goes to 30 June.

Stampin' Up! Joining Promotion

When new team members purchase their Starter Kit, they will be able to redeem $155 of Starter Kit eligible products for just $99

– Shipping of your new kit is FREE!!

When you join as a Stampin’ Up! Demonstrator, you’ll get the following perks:

– 20% discount on all purchases immediately after joining (and for as long as you are an active demonstrator). Plus, you ALSO get to take advantage of any customer specials going on from Stampin’ Up!, too! (Such as the DSP SALE, also starting today.)

– Early peeks at new release items and preorders for new items. A new ONLINE list of products is available to demonstrators June 1!

Why join Stampin’ Up!?

The opportunity to attend Demonstrator exclusive Stampin’ Up! events!

– You’ll have the chance to earn a modest additional income on your sales!

– No pressure to sell to anyone, hold classes or workshops or run a business.  You can simply order for yourself and get the discount!  And as long as you have at least $300 in sales per quarter, you’ll continue as an active Demonstrator and continue to get the discount.  If you aren’t able to maintain the $300 per quarter minimums, you simply go back to being a customer, no commitment required and no penalty if you decide that being a Demonstrator isn’t right for you.

– And should you choose to use this joining special and promote the business side of things, Stampin’ Up! does have lots of class and project ideas as well as training to help start your business, should you choose to do that

You can join with me here.

And remember, the DSP sale is 15% off, also through June 30.

Stampin' Up! DSP 15% off SALE

SAVE 15% ON SELECT DESIGNER SERIES PAPERS!

We all love beautiful Designer Series Paper, and in June, you can enjoy a 15% discount on select Designer Series Papers from our new 2023–2024 Annual Catalog and Online Exclusives. Whether you’re a scrapbooker, a card maker or simply a paper lover, this is a great time to stock up and save on gorgeous paper, so you have artistic and versatile paper designs on hand for your next projects! Check the list below.

161449 Bright & Beautiful 6×6 DSP $10.62

161467 Countryside Inn 12 x 12 DSP $10.62

161640 Delightfully Eclectic 12 x 12 DSP $25.50

161503 Earthen Elegance 12 x 12 DSP $10.62

161289 Fresh As A Daisy 12 x 12 DSP $10.62

163170 Glorious Gingham 6×6 DSP $8.92

161139 Hello, Irresistible 6×6 DSP (ONLINE EXCLUSIVE) $10.62

161157 Inked Botanicals 6×6 DSP $10.62

161322 Les Shoppes 12 x 12 DSP $10.62

161534 Let’s Go Fishing 12 x 12 DSP $10.62

161192 Masterfully Made 12 x 12 DSP $10.62

161175 Stargazing 12 x 12 DSP $10.62

161304 Zoo Crew 12 x 12 DSP $10.62

You can shop with me here.

Stampin' Up! ONLOINE EXCLUSIVES

ONLINE EXCLUSIVES are just that – ONLINE ONLY products not shown in any Stampin’ Up! Catalog. You may shop those products here.

If you have questions, please let me know. If I can help you in any way – let me know that too. Creativity and working together is what it’s all about – besides having fun :O)

Thanks for joining me today. Enjoy the hop!

Stampin’ Up! Zany Zoo Birthday for the Happy Inkin’ Thursday Blog Hop

Stampin' Up! Happy Inkin' Thursday Blog Hop
Stampin' Up! Blog hop Theme Challenge
Stampin' Up! Zany Zoo b'day

Welcome to the Happy Inkin’ Thursday Blog Hop! The theme for this week is CELEBRATE and I chose birthday. I’ve had the Zany Zoo Suite of products for a bit, but hadn’t used it yet. With this challenge, it was the perfect opportunity to play. I used the 2023-2024 Annual Catalog to give me a bit of inspiration – and the rest is history. Once I got going, the inspiration just kept coming.

This little singing turtle was an image I HAD to use. I cut it out of the Zany Crew Designer Series Papers. I really like the fact that Stampin’ Up! has started creating images on their DSP that can be die cut with the coordinating Dies. ~ and so I did, then colored it with Lemon Lime Twist Stampin’ Blends. I die cut a stool for him to stand on using the same Zany Zoo Dies. I also die cut this other creature holding balloons – is it a raccoon or is it a badger? I can’t decide! I colored it as well, this time with Crumb Cake Stampin’ Blends. I also die cut the sweet tulips and the single balloon, as well as the banner with the sentiment. All these came from the Zany Zoo Dies. The cute little music notes also come from the Zany Zoo stamp set, as does the sentiment on the banner die cut. The ‘grass’ along the bottom comes from the Beautiful Balloon Dies and is die cut from Lemon Lime Twist card stock.

The card base… is Pool Party card stock 4 1/4 x 11 scored at 5 1/2. I cut a panel of the Zany Crew DSP to 4 1/4 x 5 1/2 and trimmed the opposite corners. I colored the DSP with Pool Party ink and a Blending Brush. I adhered it with liquid glue as you see it. The next layer of Pool Party is 3 1/2 x 4 1/2 and was attached with dimensionals after it was completed . The DSP under the sentiment banner is the same pattern as the Pool Party colored DSP. Can’t you just ‘hear’ this cute frog singing Happy Birthday to you?! The single balloon is attached with Black Baker’s Twine form the Twine Essentials Pack. I attached it to the back of the balloon with a dab of liquid glue, then simply ‘tucked it’ near the hand after the balloon was added to the card with a dimensional. A two-fisted animal with balloons!

Stampin' Up! Zany Zoo birthday, inside

On the inside… I added a panel of Lemon Lolly card stock to the card base. The Basic White panel has a strip of the Zany Crew DSP that was colored with Pool Party and a Blending Brush, same as the DSP on the card front. The sentiment is stamped in Memento ink and comes from Zany Zoo stamp set. The additional stamping – looks like confetti – is also from Zany Zoo stamp set and is stamped with Memento ink. I colored various aspects of the confetti with Blends: Pool Party, Lemon Lolly, Pumpkin Pie, Lemon Lime Twist and Crumb cake. Mostly it took just a touch of ink.

Stampin' Up! Zany Zoo card & envelope

For the envelope… more Zany Crew DSP added to the flap. For the front I used the 2 3/8 circle punch to punch this fun image from the Zany Crew DSP and adhered it to the envelope with Stampin’ Seal all around the edges of the circle. Tis a happy, fun birthday card.

Now – Celebrate by visiting each of the creations on the hop today. Click on a name or use the ‘next’ button to take you to Carol and her fabulous creation.

Amy Koenders

Mary Deatherage

Jaimie Babarczy

Sue Prather

Karen Finkle

Akiko Sudano

Karen Ksenzakovic

Tara Carpenter

Terry Lynn Bright

Carol Buckalew

To purchase products used to make this card, please visit my store here. My html is working properly right now so I’m unable to do a showcase of the products :O( Hopefully that will be fixed soon.

Stampin’ Up! has kits that are super quick and easy to make – great for a gathering as all elements are provided in the kit. Talk about CELEBRATE!

Stampin' Up!Confetti Birthday kit

162390

CONFETTI BIRTHDAY KIT

$23.00 USD | $32.00 CAD

Available starting 2 May

Also available in French (item 162391

This month’s kit includes: 

  • Enough supplies to create 9 cards—3 each of 3 designs
  • 9 coordinating envelopes
  • Confetti Birthday photopolymer stamp set
  • One Blueberry Bushel Ink Spot
  • Printed card bases, card fronts, self-adhesive cellophane shaker bags, die-cut pieces, holographic foil labels, adhesive, embellishments, and a clear block
  • Finished card size: 5-1/2″ x 4-1/4″ (14 x 10.8 cm)
  • Coordinating colors: Blueberry Bushel, Coastal Cabana, Crushed Curry, Flirty Flamingo, Lemon Lime Twist, Poppy Parade
Stampin' Up! Paper Pumpkin

Stampin’ Up! has a monthly subscription for Paper Pumpkin that is also a kit all in one. The first order includes an acrylic block which can be used for all Paper Pumpkin kits after that. This particular kit must be ordered by June 10. Click on the photo above to go straight to my Paper Pumpkin area to subscribe :O)

Stampin' Up! Online Exclusives

Online Exclusives are products not available in a catalog. This allows Stampin’ Up! to update, add to seasonally or when needed, products on demand. Click on the logo to go straight to my store to order.

Thanks for stopping by. May you have a beautiful day!

Stampin’ Up! October Paper Pumpkin Fun

Good morning – late publication, I know. :O( Late Tuesday my October Paper Pumpkin arrived – and it’s all about Christmas Cards. They are wonderful and I’m so excited to share them with you cuz’ well, they are sooo cute! There are three different designs and three cards for each design. And they came in a super fun box (that didn’t get all damaged in the mail!) that I will repurpose with labels and so forth for a perfect package of something.

Here’s the box followed by photos: of the completed cards.

Stampin' Up! Oct PP fun.1
Stampin' Up! Oct PP fun.2
Stampin' Up! Oct PP fun.3
Stampin' Up! Oct PP fun.4

Oh durn, that last photo didn’t turn! 😖 but you should be able to see how absolutely adorable these cards are. Embellishments, glue dots, cutouts, stamps and an ink spot are all included in these kits. And oh yes, directions too 👍 Sometimes what I have done is make one of each as suggested, then I turn the rest into alternative projects. This time I loved everything about this kit and completed them just as it. Next months kit will coordinate with this in making tags, which is such a super cool idea. There is also the possibility of an add-on with small coordinating food safe paper bags that can be added on to next months kit. You may order this kit and the add-on (or not) by clicking here.

Name: From the North Pole

This kit includes:

  • This month’s kit contains enough elements to create 12 tags—4 each of 3 designs. This all-inclusive kit includes printed die-cut paper pieces, twine, adhesive, and more!
  • Includes a Cherry Cobbler Classic Stampin’ Spot!
  • You’ll love decorating your gift tags with snowflake and banner die-cut pieces on our Mint Macaron glitter specialty paper (a Paper Pumpkin exclusive).
  • Create festive gift tags for all your packaging needs this holiday season with classic Christmas colors and designs.

Finished gift tag size: 2″ x 3″ (5.1 x 7.6 cm)

Coordinating Stampin’ Up! colors: Basic Black, Cherry Cobbler, Crumb Cake, Mint Macaron, Shaded Spruce, Sweet Sorbet

Subscribe to the November Paper Pumpkin Kit between 11 October and 10 November

North Pole Sacks Add-On

Item Number: 162416

Item Price: $4.00 USD / $5.50 CAD

Add-on details:

  • Includes 12 food-safe paper bags
  • Create fun packaging for your seasonal gifts and treats
  • Features a festive design in Crumb Cake
  • Bag size: 4″ x 6″ (10.2 x 15.2 cm)

Here are some other possibilities available that Stampin’ Up! offers ~ and you can get any of these products by joining my team (You may do that here) or by ordering from my online store (Click here to go my store).

Stampin’ Up! has an awesome joining special right now – which makes me ask – why wouldn’t you join now?It’s a fabulous time to join Stampin’ Up! For a limited time, new team members will get even MORE FREE products in their customizable Starter Kit. Sign up between 4–31 October and you’ll get $125 USD | $165 CAD $155 USD | $206 | $135 CAD worth of products + free business supplies + all the fun being a part of our fantastic community! In other words… $155 of product for $99! Benefits? Pre-ordering of products; 20% discount on all purchases; opportunities to attend both on-line and in-person events such as team meetings, conventions. You may join my team here.

Here are more really cool specials Stampin’ Up! is offering and that you can purchase through my store by clicking here .

Stampin' Up! Fitting Florets Promotion

You can see cards I have made with the Fitting Florets Suite of products here, here, and here.

Add just the right touch of elegance to any occasion, including Christmas and seasonal celebrations, with the sweet Fitting Florets Collection. From color schemes to sentiments and embellishments to dies, these unique products blend together so that your cards and crafts fit whatever occasion you might need. Send birthday wishes, express your gratitude, or spread Christmas cheer—with so many options to mix and match you’ll be set no matter the celebration all year!

Starting 1 November 2022, customers can order items from the Fitting Florets Collection. All items in the collection can be ordered separately. No limits apply during the customer sales period.

The following exclusive products are only available while supplies last:

  • Framed & Festive Cling Stamp Set (item 160888)*
  • Fitting Florets Designer Series Paper (item 161814)
  • Gold Adhesive-Backed Swirls (item 161822)

The following will be available for purchase in the Mini Catalog starting January 2023:

  • Framed Florets Bundle (item 162407)
  • Framed Florets Photopolymer Stamp Set (item 161815)*
  • Framed Florets Dies (item 160623)
Stampin' Up! Birthday Card Orgsnizer kit

161056 BIRTHDAY CARD ORGANIZER KIT. $25 USD | $34 CAD

  • Kit includes one 8″ x 10″ (20.3 x 25.4 cm) monthly planner with space to record birthdays each month as well as a pocket sleeve to hold birthday cards.
  • Includes 12 full-size birthday cards, 6 of 2 designs, and 12 coordinating envelopes.
  • Includes Glue Dots, Stampin’ Dimensionals, Adhesive-Backed Embellishments, and Tear & Tape Adhesive
  • Includes die-cut florals and pieces ready for you to use­—no prep work required!
  • Includes sticker sentiments and die-cut labels in Dutch, English, French, and German
  • Coordinating colors: Basic Black, Evening Evergreen, Petal Pink, Sahara Sand, and Soft Succulent
Stampin' Up! Christmas Gifting Kit

60342 CHRISTMAS GIFTING KIT $21 USD | $29 CAD

  • Kit includes 9 tags and 9 gift card holders—3 each of 3 designs
  • Includes the exclusive Christmas Gifting Stamp Set and a Shaded Spruce Classic Stampin’ Spot
  • Sized to fit standard gift cards
  • Coordinating colors: Basic Black, black foil, Mint Macaron, Real Red, Shaded Spruce

Thanks for stopping by.

May you have a beautiful day.

Make someone happy sending them a handmade card filled with love.

Stampin’ Up! Sale-a-bration and Paper Pumpkin

Good morning. Sale-a-bration is nearing it’s end… Aug 31 is the last day for FREEBIES; Sep 1 begins a really fun special promotion called Perfect Partners. Before I get to more of that, I do want to share some fun cards I made yesterday. I kind of went haywire and did a LOT. The first set of cards were inspired by Leann Greff (hope I spelled her name correctly!) They used the free cards & envelopes of Soft Sea Foam & Pool Party. Unfortunately they are sold out & technically I shouldn’t be sharing these since you can no longer get them. But if they are sitting on your shelf unused, perhaps this will get you using them. :O) Here they are…

Most of the cards are made using the Soft Seedlings stamp set, Scalloped Contour Dies, various ribbons, two embossing folders (Stripes & Splatters, Pretty Posies) & Layering Circles Dies. The butterfly is from Amazing Silhouettes stamp set. In each case of the stamp on the circle, It was inked with Soft Sea Foam then I used a sponger dauber to add Pool Party in various areas then it was stamped on Basic White. And I actually die cut the circle first and stamped directly on it.

The next set of cards are from the August Paper Pumpkin. Gosh, this was SUCH a gorgeous set! Here they are…

Stampin' Up! Aug. '22 Paper Pumpkin.1
Stampin' Up! August Paper Pumpkin.2
Stampin' Up! August Paper Pumpkin.3

Some of these were designed per kit instructions., others I’ve taken ‘liberties.’ This was just a spectacular kit and I loved every bit of it. Since we’re talking about Paper Pumpkin (PP is how it is endearingly shortened), let’s look at next months kit.

Stampin' Up September '22 Paper Pumpkin

Isn’t this a fun box? What I like to do with the boxes is decorate and use them to give gifts :O) Unfortunately, this months box was damaged pretty badly in the mail, so not reusable :O(

This September kit includes:

  • This month’s kit contains enough elements to create 18 treat boxes—6 each of 3 designs. This all-inclusive kit includes printed box bases and tops, die-cut paper pieces, adhesives, and more!
  • The Spooky Treats Paper Pumpkin Kit includes an Orchid Oasis Classic Stampin’ Spot!
  • This kit’s stamp set puts the TREAT in trick-or-treat with fun, Halloween-themed sentiments and designs. Embrace the spooky season with ghost, bat, spider, and star images.
  • This kit also includes a special peek-through box top on one of the box designs.

Finished box size: 2-1/2″ x 3″ x 1″ (6.4 x 7.6 x 2.5 cm)

Coordinating Stampin’ Up! colors: Basic Black, Gray Granite, Orchid Oasis, Fresh Freesia, Crushed Curry, Pumpkin Pie

I like to use this kit to give to special kids: grandkids, friends kids, neighbors kids ~ and they love the extra attention! And here’s my link if you wish to subscribe right now. Remember, you must subscribe before September 10 to get this kit.

Now… Perfect Partners…

Stampin' Up! Perfect Partners

Some things are great on their own but become epic when they are paired with something else: cereal and milk, toast and butter, Fred Astaire and Ginger Rogers. We may be biased, but our favorite combo is our stamp sets and dies—and that’s what the Perfect Partners promotion is all about! 

We created six new dies that coordinate with stamp sets in the 2022–2023 Annual Catalog and the July–December 2022 Mini Catalog. These coordinating dies will only be available during this promotion and will not be offered in any catalog.  

These stamp sets and dies are available separately or as a bundle. By buying the bundle, you and your customers will save 10% off the retail price. 

Put these wonderful stamp sets and dies together for more paper-crafting fun! Order now!

AVAILABLE 1–30 September 2022

Starting 1 September 2022, customers can order these fun and festive dies and/or bundles. Dies coordinate with stamp sets from the 2022–2023 Annual Catalog and the July–December 2022 Mini Catalog. These six new dies sets are only available for a limited time. Save 10% off when purchasing the bundle.

Items available during this promotion can be added to demonstrator, customer, workshop, and online orders.

Dies are exclusive to this promotion and are only available while supplies last. No quantity limits apply during the customer sales period.

Qualifying orders qualify for Stampin’ Rewards. Items can be added to a starter kit.

162526 Apple Harvest Bundle (EN)$53.00 USD

160255 Apple Blossoms Dies $35.00 USD
159944A pple Harvest stamp set $24.00 USD
162519 Fresh Cut Flowers$50.25 USD

160251 Fresh Cut Stems Dies $34.00 USD
159018 Fresh Cut Flowers stamp set $22.00 USD
162521 This Birthday Piggy Bundle $48.50 USD

160254 Playful Piggy Dies $31.00 USD
159107 This Birthday Piggy stamp set $23.00 USD
162522 Trimming The Tree Bundle (EN)$46.75 USD

160256Tree Trimming Dies $34.00 USD
158972Trimming The Tree stamp set $18.00 USD

162520 Waterfall Canyon Bundle $53.00 USD

160252Waterfall Canyon Dies $37.00 USD

158927Waterfall Canyon stamp set $22.00 USD

162529 Yeti To Party Bundle (EN)$41.25 USD

160253Yeti Dies $28.00 USD

159826Yeti To Party stamp set $18.00 USD 159828

Some of the products to make this card are from the Jul- Dec 2022 Annual Catalog. If you do not have a demonstrator and need catalogs please reach out to me – happy to send one to you. The other two catalogs available right now are the 2022 -2023 Annual Catalog and the Sale-a-bration Catalog which shows all the FREE items offered by Stampin’ Up! Jul 1-Aug 31. When ordering, please also use my current host code: TXBWJTMW. I offer my customers a free item from Stampin’ Up! item valued to $10 with your order of $50 and above. Click here to go my store. When the order is over $150, you still receive that free gift from me, but SU! has Stampin’ Rewards that may be used for additional products, so don’t use the host code at that time. If you have questions just let me know. If you would like to be able to order products early from catalogs AND enjoy that 20% discount, join my team now… you may do that here. WooHoo! We have lots of fun and are a creative bunch that encourages & supports one another. Would love to have you. :O)Sale-a-bration is almost over folks – only another few days If I can help you in some way, please let me know.

Star Special ENDING the Jul-Dec 2022 Mini Catalog & BEGINNING the Perfect Partners Promotion
OK – DOUBLE STAR REWARDS from today to Sep 2.

That lets you order through Sale-a-bration & INTO the Perfect Partners.


Here’s how my STAR REWARDS work:
For each $50 that you order from my online store (before shipping & taxes) and when you add my current Host Code, you will earn 1 STAR Reward.  Orders of $49.99 or below DO NOT earn any rewards.Example $50 = 1 STAR Reward, $100 = 2 STAR Rewards, $150 = 3 STAR Rewards etc.
When you have earned 8 STAR Rewards you will get a FREE product order valued up to $40.00, your choice, and mailed directly to you! Is that a deal or what???
You also earn my monthly Online Class Tutorial of exclusive projects when you place an order.
For any order $50 or more you will also receive 1 free gift from me valued up to $10.
And remember too, during this time of Sale-a-bration, for every $50 order from any catalog, you’ll earn free Sale-a-bration goodies from Stampin’ Up!
Remember to use MY current HOST CODE: TXBWJTMW Click here to go my store.
HAPPY SHOPPING!!

Stampin’ Up! Paper Pumpkin Alternatives

Hello All! Today’s post is all about Paper Pumpkin, primarily the May ’20 PP. The colors in this kit show off the new In Colors: Bumblebee, Cinnamon, Just Jade, Magenta Madness, Misty Midnight. I really like the names AND the colors themselves – together, well, not so much 😏. Included in the kit was a new ink spot from the new In Color Misty MidnightLet’s take a look…

This first card is made just as suggested…

PP April ’20
Card 1

Card #2 is similar, except I cut it apart vertically in various widths and mounted it on Magenta Madness cs. Everything else is the same.

PP Alternative 1
Card 2

Card 3 I cut apart again making various sizes of squares. They didn’t fit together quite the way I wanted (ugh!) Again I mounted the squares on Magenta Madness. I used a sentiment from Silhouette Scenes. 

PP Alternative #2
Card 3

Card 4 wasn’t cut at all, simply mounted on the Magenta Madness and put on dimensionals, again using the sentiment from Silhouette Scenes.

PP Alternative #3
Card 4

The second set of cards I chose to do was a bit more of a challenge and I made not one the way it was suggested. Card 5…  I removed the card front and cut it in fourths, adhered to Misty Madness cs and mounted on dimensionals, adhering to Thick Whisper White cs. I cut a 1 1/2″ banner from the In Color 2020-2021 6 x 6 DSP using the Triple Banner Punch and adhered to the vellum banner that was part of the kit. I trimmed the vellum banner point to match. I stamped a sentiment on a  1 1/4″ banner from Silhouette Scenes stamp set and adhered that to the same banner. I wrapped the Ruched Daffodil Delight 1/4″ Ribbon around and tied a knot, adhering with a glue dot. The full banner then got dimensionals and was placed as you see it.

PP Alternative #4
Card 5

Card 6 was done similarly except… I placed a 1/2″ strip in the middle from the In Color 2020-2021 6×6 DSP pack (new and available Jun 3), included the vellum panel from the kit, cut a label from Tasteful Labels Dies (new in catalog and available Jun 3) in the In Color 6×6 DSP pack and adhered in the center with dimensionals. I cut another label from the same die set (this is an awesome die set folks!), stamped the sentiment using the ink spot Misty Midnight from the Well Said stamp set. (Father’s Day is JUST around the corner and I thought this could be a fun masculine card)This was adhered to the blue label with dimensionals. I added three 2020-2021 n Color Enamel Dots

PP Alternative #5
Card 6

Card 7 I got a bit more creative and decided a lighthearted Father’s Day card would be fun. I again removed the card front, then used the Balloon Punch to create two balloons. Using the colors in the stripes, I punched additional balloons from Bumblebee cs, Misty Midnight and Pumpkin Pie. I stamped the sentiment on various balloons using the Well Said stamp set. Special Someone stamp set was used to create the rest of the card: tails on the balloons, the raccoon (Soft Suede), the mouse (Smokey Slate). The little embellishments were included in the kit. I added a banner at the bottoms from leftover parts of the card front. This Whisper White got dimesnionals and adhered to Misty Midnight card base.

PP Alternative #6
Card 7

Card 8 and I went a little crazy over the top…  There were left overs from the previous card front so I cut it down to make a square (about 3″), adhered that to a Misty Midnight scallop square cut from the Squares Dies and adhered this to a Bumblebee 3 1/2 x 7 panel (scored at 3 1/2). I used a section of the card front for the inside that shows a bit of the colors where I removed the card front 😉

PP Alternative #7
Card 8

PP Alternative #7
Card 8 small panel inside


Using a Misty Midnight card base, I adhered a panel 4 x 5 1/2 from the 2020-2021 In Color 6×6 pack to the card front . I then adhered the Bumblebee piece all the way to the top of the fold with liquid glue. I stamped a sentiment from the Dressed to Impress stamp set to a piece of Whisper White and cut a banner from the Tasteful Labels Dies (did I say I love these dies?). I adhered one of the fun embellishments from the PP kit to the banner, added dimensionals and adhered to this Bumblebee panel. For the bottom of this card, I stamped another sentiment from the Dressed to Impress stamp set using the included ink spot and cut it using another banner from the Tasteful Labels Dies. I stamped the show in Melon Mambo, colored in with Wink of Stella to give it some glimmer and fussy cut it and adhered to this banner with liquid glue. This banner was added to the card with dimensionals. Again, more embellishments from the PP kit.

Since this card was made with someone special in mind, I wanted lots of room to write something. I simply adhered another of the leftover pieces from the removed card front to a Whisper White 4 x 5 1/4. This was adhered with liquid glue and this card was now complete.

PP Alternative #7
Card 8

Whew! That was fun… 4 more cards in the PP kit to make, but not today. Paper Pumpkin is a fun “gift” to receive each month. It most often has cards to make, but sometimes includes bags or boxes. Each kit includes a stamp set, an ink spot, embellishments such as seen today, also ribbon, adhesives, AND instructions – how great is that?! Consider a PP kit for one month, six months or a years subscription. Ship with me now…

The new Annual 2020-2021 Catalog goes live Jun 3. Start making your list and checking it twice. When shopping with me, include my CURRENT HOST CODE J2E4VDGM  for a free gift from me when your purchase is between $50 – $150. No more than one free gift per customer per month though – let’s not be greedy, ok? That free gift is an item of your choice worth $10.

Thanks for stopping by.

May you have a beautiful day.

Make someone happy by sending them a handmade card. 


Stampin’ Up! April 2020 Paper Pumpkin Alternatives

Hello again… so glad to have you visit… Todays cards were created using the April 2020 Paper Pumpkin and some additional supplies – so alternatives if you will. My hubby has a big family (I have a twin brother) and they are very close – so these family cards are really perfect for him to send. I sent one of yesterdays cards to my bro already 😏 Here are the new creations…

Apr ’20 PP alternative #1 – I used the basic plan but trimmed the Crushed Curry band with my Triple Banner Punch, stamped the sentiment in Early Espresso ink and trimmed it also with the Triple Banner Punch. Both are on dimensionals. One of the birds is adhered with a glue dot and the other with a mini dimensional cut in half.

Apr ’20 PP alternative #1

Apr ’20 PP alternative #2 – I cut off the z-fold of one of the cards and covered the pattern with Garden Lane DSP and trimmed it down to 3 7/8 x 5 3/8. The tree ‘leaves’ were stamped in Flirty Flamingo and embellished with lots of pearls from the kit; the two birds were put on mini dimensionals cut in half. The tree was adhered with glue dots. This panel was adhered with liquid glue to an Early Espresso cs 4 x 5 1/2 then wrapped with Daffodil Delight 1/4″ ribbon. I then stamped one of the banners with Early Espresso ink and trimmed the edges, put it on dimensionals and adhered it over the ribbon. This entire panel was adhered to thick Whisper White cs with dimensionals. The envelope flap got the same Garden Lane DSP adhered with liquid glue.

Apr ’20 PP alternative #2

Apr ’20 PP alternative #3 – I really like the simplicity of this card and the sentiment panel is perfect. I simply could not cover it with anything! The panel was adhered to a piece of Soft Sea Foam cs using liquid glue then attached to the left front panel of the z fold with snail. I attached several pearls from the kit. Did I say I love this? I love this!

Apr ’20 PP alternative #3

Apr ’20 PP alternative #4 – I was on a roll with these sentiment panels but wanted to step it up a bit this time… I used the Stitched Rectangles Dies to cut the sentiment panel then cut another panel with the next larger Stitched Rectangles Dies out of Soft Sea Foam cs. The sentiment panel was adhered to the Soft Sea Foam with dimensionals and these were attached to the left front panel of the z fold with snail. I punched the butterflies from the kit and adhered with a glue dot and embellished those with pearls from the kit.

Apr ’20 PP alternative #4

Apr ’20 PP Alternative #5 – Remember how I removed the z fold on a previous card? Well, I took one of those panels and stamped it in Granny Apple Green ink from the stamps provided in the kit. I adhered the tree to it with glue dots and put dimensionals on the back and set it aside. I cut a piece of Soft Sea Foam cs 4 x 5 1/4 and ran it through the Woodland embossing folder (spritzing it first to break down the fibers and get a wonderful deep design.) This panel was adhered to a 4 1/4 x 11, scored at 5 1/2,  Soft Sea Foam with liquid glue. I adhered a strip of Granny Apple Green 5/8″ ribbon with glue dots, stamped one of the banners in Early Espresso ink, cut it down and adhered it over the banner with dimensionals

Apr ’20 PP alternative #5

Apr ’20 PP alternative #6 – this was fun too! I stamped the little butterflies provided in the kit all around and in the tree, sometimes covering a portion of the stamp if it was too long. This was done in Crushed Curry ink. The tree and butterfly from the kit were adhered with glue dots. I trimmed one of the Crushed Curry banners from the kit, adhered it with dimensionals, stamped the sentiment in Early Espresso ink and adhered with glue dots.

Apr ’20 PP alternative #6

Apr ’20 PP alternative #7 – I took the card provided in the kit and adhered Mosaic Mood Specialty DSP over the pattern section. I adhered the tree with glue dots and embellished the design with more pearls. I took a  Crushed Curry banner and trimmed it, stamped a sentiment on another banner with Crushed Curry ink, trimmed it and adhered with liquid glue. I took a piece of this fun trim that was a freebie during SAB, tied a bow and adhered with a glue dot. The envelope flap got the same Mosaic Mood Specialty DSP.

Apr ’20 PP alternative #7

I’m so proud of myself… I was determined not to let the PP pumpkin kits go unused – or to be more honest with myself, to not be completed. I feel as though I have made a HUGE change and am excited about the results. I hope you like what I have done with this kit. The next PP (you must subscribe by May 10) will have 4 of the new IN COLORS – wheee! We don’t know what those are yet, but that will be their “reveal” to the world 😁

Today the RETIRING LIST has been made available!!! I will be back again to make sure you have that information.

Thanks for stopping by.

May you have a beautiful day.

Make someone happy by sending them a handmade card.


Stampin’ Up! and Paper Pumpkin

Good morning – it’s Tuesday. What are you ‘up to’ today? It is to rain here, so no gardening during that… guess I’ll have to make a card or two 😁

Do you hoard anything? I know, that’s a strong word – hoard…Let’s just say, up until yesterday I had a lot of them, some still tightly wrapped, some in incomplete stages with maybe two to three cards made. Today’s cards are all about Paper Pumpkin. I found some really cool kits and cannot believe I hadn’t finished them.So for the last couple of days I have been making the past Paper Pumpkin kits and really really had fun! Unfortunately I didn’t write down the months on all those I created but here are my favorites.

Past Paper Pumpkin #1

Past Paper Pumpkin #2

The cards on the left were extra fun and I had only three to do… go figure… why would I hold off making three cards? The cards on the right are from Dec 2017 – a l-o-o-n-g time ago. The nautical boxes are gift cards and my favorite ones to put together. They are going to be a gift for a special friend. I like that they have a destination already.

Past Paper Pumpkin #3
April 2018

I spent the morning putting the above items together and what do you suppose came in the mail – my April 2020 Paper Pumpkin! This first is per directions… I didn’t alter anything.

April 2020 PP per directions

Card #1 is first alternative. Thick Whisper White 4 1/4 x 11, scored at 2 3/4 and 5 1/2. Run the left portion through your embossing machine using the Subtle embossing folder. Cut Pear Pizzaz 4 3/4 x 3 3/4. Adhere sentiment piece from the PP directly to the Pear Pizzaz using liquid glue. Punch out leaves from the kit, add dimensionals to all leaves and adhere to the sentiment piece. Punch out butterfly and add using a glue dot. Cut a piece of the ribbon included in the kit, tie in knot and adhere with glue dot. Embellish with the blue pearls included in the kit. Adhere this to the left fold of the card with snail. For the inside, cut a piece of DSP 2 3/4 x 4 1/4 and adhere to card using liquid glue. Add sentiment from the PP kit with Pear Pizzaz ink. For the envelope, cut another piece of the DSP 2 1/4 x 6, adhere with liquid glue and trim.

Current Paper Pumpkin #1
April 2020

Card #2 – I really like this sentiment piece in the kit and did not want to cover it. I felt it needed full disclosure! With card from the kit (it is 4 1/4 x 12 BTW), use a coordinating DSP ( I used.Garden Lane) and cut a piece 3 3/4 x 4/3/4 and adhered the sentiment piece to it with liquid glue. I added SU! Basic Pearls from own stash and adhered this section to the left card front with snail. Add sentiment of choice to the inside.

Current Paper Pumpkin #2
April 2020

Card #3… I cut the cardstock included in the kit to 4 x 5 1/4. I stamped the fern from Positive Thoughts Stamp set in Pear Pizzaz ink, stamping off as I went.  Adhere the. puched out leaf from the kit direrctly to the card front with glue tos to each leaf. Stamp a banner from the kit using a sentiment from from the kit and Pear Pizzaz ink. Adhere ribbon included in the kit with glue dots, weaving it back and forth. Add blue pearls from the PP kit. Adhere this completed panel to the card front with dimensionals. Add a punched out bird from the kit to the banner. This card front gets dimensionals on the back and adhered to Blushing Bride CS cut to 4 1/4 x 11 and scored at 5 1/2. I used a coordinating envelope from the kit to complete this set.

Current Paper Pumpkin #3
April 2020

Bing bang boom – four cards from the kit completed on the day it arrived! I think I get kudos for that – at least from myself. I like how I was able to coordinate current DSP with the cards from the PP kit to make it different. And today I will complete the April PP kit. I am determined not to hold back any more.

To place an order for the May PP kit, you must be registered by May 10. And this kit will have 4 (four) of the new 2020-2022 IN COLORS! Be sure to order your PP kit soon so you can preview the early release of these new colors.

Thanks for stopping by.

May you have a beautiful day.

Make someone happy by sending them a handmade card.