Hello Saturday! It’s beautiful here in New Jersey – and I’m INSIDE… attending a convention for a women’s organization. The great part is that I’m seeing folks I haven’t seen in a while; the unfortunate part is that I’m not out gardening or enjoying the sun. Having said all that – let me share today’s card…
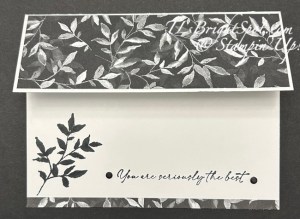
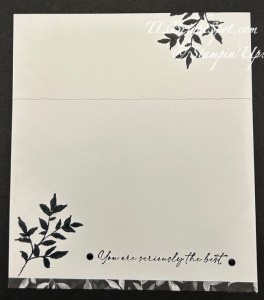
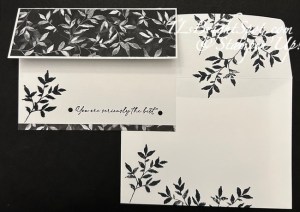
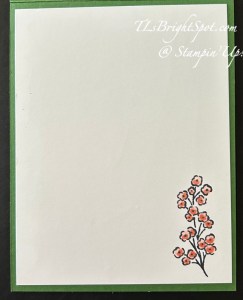
This card is made with items from the Botanical Textures Suite of products: the Botanical Textures 12×12 DSP and the Textured Notes stamp set (which is also a bundle with dies). Black & white cards stand out and this one is no different. It’s made with Thick Basic White card stock 8 1/2 x 5 12, scored at 4 1/4 then 2 1/4 removed. I cut a Botanical Textured DSP1 7/8 x 5 3/8 and adhere to the remaining top portion. Open the card & stamp the inside :O) This is an easy, easy card to make… just stamps, ink, paper!
Using the Textured Notes stamp set and Memento ink, I stamped this stunning leaf on the upper right corner and the bottom left corner. I added a 3/8″ strip of the Botanical Textures DSPn to the bottom, then stamped this sentiment – also from the Textured Notes stamp set. LOVE THIS FONT! On each end of the sentiment I added black dots from … I forget which embellishments- maybe the Neutral embellishments from the suite?! And the card itself is done.
The envelope… Using Memento ink and another leaf stamp in this Textured Notes stamp set, I stamped on the flap 3 times, reinking the stamp each time. I did the same on the front of the envelope – & boom, complete! Such a quick and gorgeous card. Well, maybe I shouldn’t say that since I made it 🙂
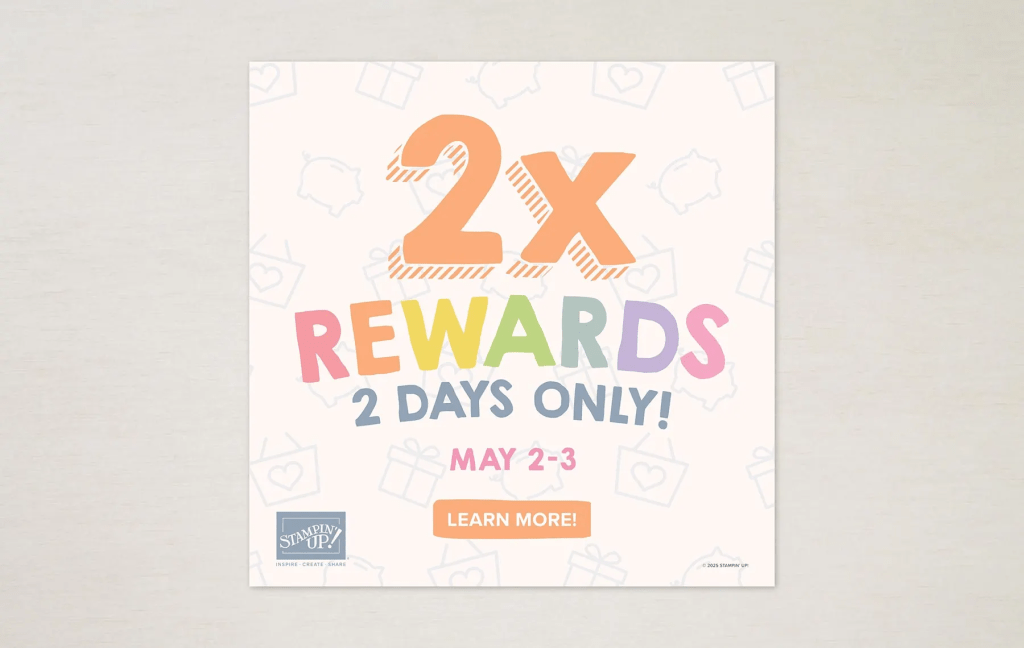
Today is THE day of a two day 2x Stampin’ Rewards for purchases $20 & up. 2 fun! Celebrate National Scrapbooking Day with 2x Rewards for 2 Days!
Have you heard? The global crafting community will be celebrating National Scrapbooking Day on May 3 —and we’re joining in the fun by offering you 2x Stampin’ Rewards for 2 days! Opt in if you haven’t done so yet! What better way to celebrate one of our favorite crafting holidays? And the best part? This offer applies to ALL products, not just scrapbooking items! (Non-commissionable items and existing Paper Pumpkin subscriptions are excluded.)
Earn double rewards (2x rewards) for two days only, from May 2–3!
This offer applies to ALL products (excluding non-commissionable products and existing Paper Pumpkin subscriptions).
All orders qualify once the rewards threshold of $20 USD | $25 CAD is met.
To participate, customers must have a Stampin’ Up! account and be opted in to Stampin’ Rewards.
This includes LAST CHANCE PRODUCTS, items in the Jan-Apr 2025 Mini Catalog, the 2024-2025 Annual Catalog – scrapbooking supplies too!
Now – to the card for this post…
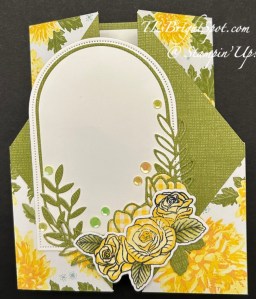
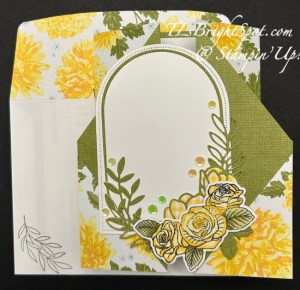
I made this card and was not going to post it, but… here it is. :O) It’s made with the retiring Floral Delight 12×12 DSP, Everyday Arches Dies (an ONLINE EC) AND the wonderful carrying over bundle, Lifetime of Love.
Notice – there is no sentiment on here, and it needs one. It’s screaming for one. I just couldn’t decide. It could be a Mother’s Day card or a birthday card or thinking of you… I need to figure that out. Here are basic directions for this layout.
Cut DSP 5 1/2 x 12 and score @ 2, 4, 8, 10. Be award of the direction when cutting AND since both sides show, be aware of that too.
On the short side of both ends, make a mark at 2 5/8″ from the top & cut from the closest score line to the mark. (Make certain when cutting each end that the cut is on the top side.) Save those trimmed pieces.
Fold mountain, valley, valley & mountain; burnish
Adhere those trimmed pieces to each front side
Decorate as desired making certain when adding the die cut front pieces, that they adhere to only one side
I used the 4th from largest of the Everyday Arches & Basic White card stock
The green die cut if from a leftover piece of this same Floral Delight DSP and using the lifetime of Love Dies
I stamped the the floral design in Memento ink – again from Lifetime of Love stamp set & colored it with Stampin. Blends Daffodil Delight and Old Olive, then highlighted the flowers with Wink of Stella
Final touch on the front was several of the Adhesive Backed Shiny Sequins, another ONLINE EXCLUSIVE
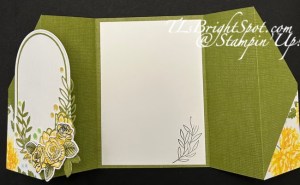
For the inside… on a Basic White 3 3/4 x 5 1/4 stamp the image in Old Olive ink using the Lifetime of Love stamp set. Adhere the Basic White panel to the inside.
For the envelope… more Floral Delight DSP on the flap, adhered & trimmed to fit – and on the front, the same leaf stamped in Old Olive ink using the Lifetime of Love stamp set.
Shop with me by clicking here. For purchases of $50+ from me, you will receive the May Tutorial bundle in your in-box. Make sure my name is listed as your demonstrator when you check out :O)
Hello Sunday! We are slated to have a pretty nice day today – after a drenching rain yesterday that we desperately needed. Those fires in South Jersey did not affect us personally, but they weren’t far. Lots of businesses destroyed & 15,000 acres burned. We needed this rain to put out remaining hot spots on the forests floor. Sigh.
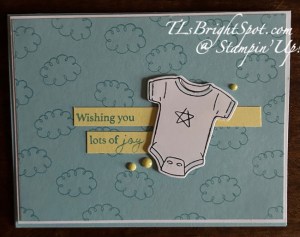
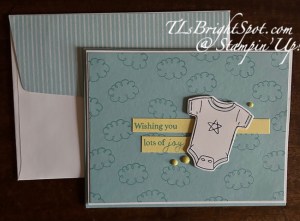
Today’s card is about new life – a baby boy – and I’ve used the carrying over Cutest Onsie Bundle to make it, and Balmy Blue.
I began with by stamping a Balmy Blue panel (4 x 5 1/4) with these cute ‘clouds’ (think dreamy 🙂 and Balmy Blue ink. I then stamped the ‘onsie’ with Memento ink and with a Balmy Blue Stampin’ Blends, colored the neck, sleeves and bottom edges. I also stamped the star in Memento ink. I die cut the onsie and set it aside. Next I stamped the sentiment on two pieces of Lemon Lolly card stock, inking just a portion of the sentiment for each stamping. It was stamped in Azure Afternoon ink I adhered the strips with liquid glue then paced the onsie on dimensionals and overlaid the strips The embellishments are Adhesive-Backed Solid Gems in Lemon Lolly. This panel was adhered to Basic White 4 1/8 x 5 3/8 then attached to a card base of Balmy Blue (8 1/2 x 5 1/2 scored at 4 1/4) with dimensionals.
For the inside of the card, I stamped the onsie with Memento ink on a piece of Subtles 6×6 DSP (Balmy Blue of course) and while die cutting, I also die cut the pocket for the onsie. I adhered it directly to the Basic White inset (4 x 5 1/4) then stamped the sentiment in Azure Afternoon ink and the hearts too. This was attached to the inside of Balmy Blue card base for the completed card.
For the envelope, more of the Subtles 6×6 DSP in Balmy Blue was added to the flap and trimmed to fit. This added touch just unifies every project – love this! And there ya go… a baby boy card for a new little one.
All the items for today’s card are in the 2024-2025 Annual Catalog, which you may find in my store by – Clicking here to go to my store – and be sure to visit the LAST CHANCE PRODUCTS and the ONLINE EXCLUSIVES too. Remember that when your order is $50+ you will receive in your inbox this months tutorial (Memorable Blooms for April) and with the new Stampin’ Up! rewards system, you will have rewards from Stampin’ Up! that can be used for your next order!
On May 6, 2025, the Stampin’ Up! 2025-2026 Annual Catalog will go ‘live’ and you’ll find this bundle in that catalog as well :O) Need a catalog and don’t have a demonstrator? Please let me know & I can quickly send one to you.
3 Days Only!! Whohooo!!! Stampin’ Up! just announced this fabulous money saving bonus… get free shipping on your papercrafting orders of $75 or more when you place them online, April 23, 24 and 25, 2025.
What are your favorite items to purchase during FREE SHIPPING? With paper costs going up with the new annual catalog, card stocks are a perfect choice. I also stock up on envelopes which I use a lot, and your adhesives of choice are also a good purchase during free shipping.
Want to shop? Click here to go to my store – and be sure to visit the LAST CHANCE PRODUCTS too n& save even more. Now is also that perfect time to check the ONLINE EXCLUSIVES as well.
Thanks for stopping by. May you have a beautiful day!
Hello – and WELCOME to the Happy In kin’ Thursday Blog Hop. We have a sketch challenge today & I’ve maybe stretched the parameters just a bit, but I like the card and think it works.
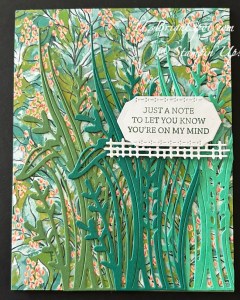
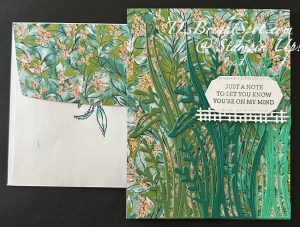
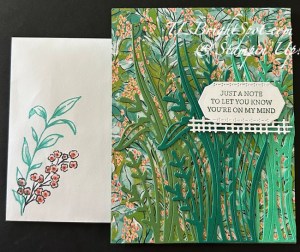
I’ve used some ONLINE EXCLUSIVE products for this card – primarily the Mixed Media Florals DSP, the Mixed Labels Bundle and the Mixed Florals Bundle. I LOVE this DSP for the background. It reminds me a bit of a jungle and it was adhered directly to the Garden Green card base. The multiple die cut leaves are in Garden Green, Shaded Spruce and Shy Shamrock & I used the Mixed Florals Dies to create them. I simply adhered them with dabs of liquid glue but could very easily have used Adhesive Sheets as a backing, I just didn’t. The next step was to stamp the sentime on a Basic White scrap in Garden Green ink using the Mixed Labels stamp set. I die this and the rectangular piece using the Mixed Labels Dies. I adhered the fence-like piece to the back of the sentiment label then added dimensionals to the sentiment & attached it to the card. Viola!
For the inside… I stamped this beautiful floral image in Memento ink on the Basic White panel then colored it with Calypso Coral Stampin’ Blends. Done!
For the envelope… I added more of the Mixed Media Florals DSP to the flap (after messing up the stamp image of the leaf!), trimmed the paper to fit. Since the mess-up of the stamped image on the flap, I decided to add some ink ‘edging’ to the remaining leaves, making them look like the leaves on the DSP :O) I added some extra ‘doodles’ for fun – all this with a SU! Journaling Pen. For the envelope front, I stamped the image of the leaves (just fine) with Shy Shamrock ink & used a Blends in Shy Shamrock to add some extra color depth. I also stamped the same sweet image as on the inside of the card in Memento ink & colored the flowers with Calypso Coral Stampin’ Blends. Finis…
This is such pretty DSP and the coordinating bundles are so perfect to layer or use individually. I encourage you to visit my ONLINE EXCLUSIVE store – see info below.
Now, make the rounds of the hop – don’t miss a single one :O) & have fun! Click on the next button or click on a name to make the rounds.
When shopping with me and your purchase is $50 or more, you will receive a SU! item valued up to $10 and the current months fabulous tutorial – for April, it’s Memorable Blooms. And use my HOST CODE until April 12. If you do not have a demonstrator, I would love to support, encourage and help you create your best. Contact me!
HOST CODE Y3TPZVYN
HOST CODES are going away April 12, but something even better for you is happening – you will be earning Stampin’ Rewards when your purchases are $20 or more.
Remember the LAST CHANCE LIST ? Click here to shop that list.
Click this link to see all that’s available in the Stampin’ Up! world – this includes the link to ONLINE EXCLUSIVES – and make sure my name is at the top when checking out. This link allows you to see the online exclusives, Kits Collection, The Paper Pumpkin information, etc., etc. If you have questions, please connect with me!
Thanks for stopping by. May you have a beautiful day!
Welcome to ‘the hop’! We have a great lineup of folks participating so be sure you visit each post. The theme for this month’s hop is “for the ladies/ girls” and we can interpret that any way that suits. Mother’s Day cards are difficult for me as my mother is gone and well, it just feels weird. April 8 is actually her birthday, so this works for me. Having said that, my card IS a Mother’s Day card and I will send it to our daughter who has three not so little ones (the oldest is 6’5″, the next is maybe 5’11” and the third is about 5’3″).
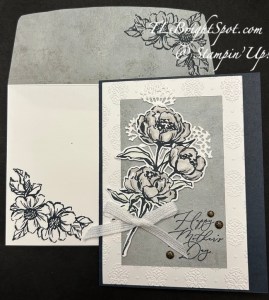
My card features products from the new 2025-2026 Annual Catalog. If you haven’t received yours from me yet, be patient… sometimes the mail takes a bit :O( Look for the Beautiful Gallery Suite of products that are showcased on pages 52-57. They are a really fun suite of products: frame dies, floral & leaf dies, stamps & more stamps, an embossing folder, a wonderful set of embellishments, ribbon, DSP – it’s quite grand! I’m also showcasing some of the new 2025-2027 In Colors: Cloud Cover and Secret Sea.
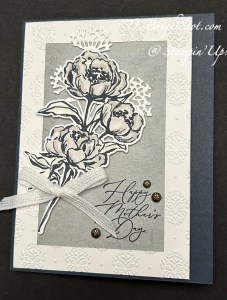
I’m loving this rose stamp & die from the Gallery Blooms bundle in this suite! And the Damask Designs embossing folder is evident on the ‘frame’ of this image. The ‘frame is also from the Gallery Blooms bundle. And the sweet background floral die cut is from the Beautiful Motifs Dies in the suite. The ribbon on this card is NOT part of this suite – it IS part of the Botanical Textured Suite of products that are ONLINE EXCLUSIVES. Lastly – the embellishments – gorgeous – are part of the Beautiful Gallery Suite and are called Pressed Flower Motifs. Let’s see, what did I leave out – oh, the DSP… is Beautiful Gallery 6×6 DSP and from the Beautiful Gallery Suite.
So, how to make this card… The card base is Secret Sea cut 8 1/2 x 5 1/2 & scored at 4 1/4. I embossed a 4 x 5 1/4 Basic White panel with the Damask Designs embossing folder; then die cut with the Gallery Blooms Dies that are the frames. This die is so cool – it die cuts two frames at the same time and creates a center panel as well. I used the larger of the frames for this card. I adhered the frame to the desired Beautiful Gallery 6×6 DSP, then trimmed the DSP even with the frame. I stamped the rose image in the new Secret Sea ink – it’s a deep blue black – on a piece of Basic White. I used Stampin’ Blends in Gray Granit &, Smoky Slate to color the roses and Dark Sea Foam to color the leaves. I die cut with the coordinating die in Gallery Blooms Dies. I then die cut from Basic White, the flower used in the background – which came from the Beautiful Motifs Dies. I placed both floral dies without adhering them so I would know where to stamp my sentiment. The sentiment is from Stippled Roses stamp set and is stamped in Secret Sea ink. I then added the two dies to the card, adhering the white die cut with dabs of liquid glue and the roses with dimensionals. I wanted a ribbon, so pulled out the 1/4″ Basic White Ribbon from the Botanical Textured Suite (an ONLINE EXCLUSIVE) and adhered that with a glue dot. I added three of these gorgeous Pressed Flower Motifs around the sentiment. The card needed some sparkle – Wink Of Stella to the rescue on all the roses! I didn’t cover them completely but that Wink of Stella did the trick I was looking for.
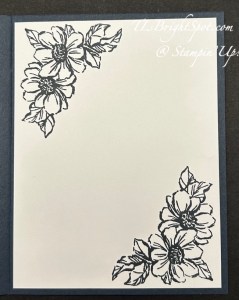
For the inside – I stamped another sweet rose stamp from the Gallery Blooms stamp set in Secret Sea ink in each corner. I decided not to color the roses – let the card front be all the glory.
For the envelope, I covered the flap in the remaining piece of the Beautiful Gallery 6×6 DSP & trimmed to fit. I used the same image as the inside of the card & Secret Sea ink to stamp on the flap & on the envelope front. Love, love. This suite of products will be available to you, the customer, on May 6, 2025, less than a month away!
Now – on to the others on the hop. Be sure to check out all the fun creations. Click the previous or the next button to make the full circuit.
When shopping with me and your purchase is $50 or more, you will receive a SU! item valued up to $10 and the current months fabulous tutorial – for April, it’s Memorable Blooms. And use my HOST CODE until April 12. If you do not have a demonstrator, I would love to support, encourage and help you create your best. Contact me!
HOST CODE Y3TPZVYN
Remember the LAST CHANCE LIST ? Click here to shop that list.
Click this link to see all that’s available in the Stampin’ Up! world and make sure my name is at the top when checking out. This link allows you to see the Kits Collection, The Paper Pumpkin information, etc., etc. If you have questions, please connect with me!
Thanks for stopping by. May you have a beautiful day!
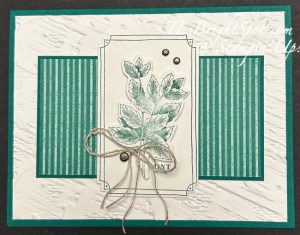
Online Exclusives are just that – items not in any of the Stampin’ Up! Catalogs. This Grow with Love bundle is perfect for cards for no specific reason. I like sending cards just for fun and it makes the receiver feel special.
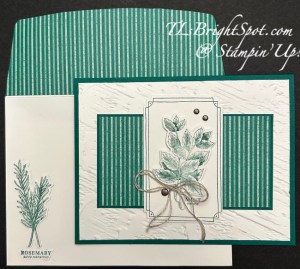
The card base is a standard A2 size in Shaded Spruce. I layered an embossed Basic White panel 4 x 5 1/4. The embossing folder is another ONLINE EXCLUSIVE called Plaster Painting 3D embossing folder. It has lots of texture. The next layer is Shaded Spruce 2 3/8 x 4 3/8 with Regals 6×6 cut 2 1/4 x 4 1/4 adhered directly to the card front. The center Basic White panel is 2 1/4 x 3 3/4 stamped in Shaded Spruce ink with another of the stamps in Grow With Love, then die cut with the appropriate Grow With Love Dies. I really like the corner edges! Again, this was adhered directly to the card front, centering. The mint leaves were stamped again and die cut and attached with dimensionals over the stamped image. I tied a double Linen Thread and attached it with a glue dot. Lastly, Adhesive-Backed Dots were added for contrast.
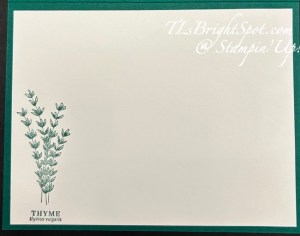
For the inside… another stamp in the Grow with Love is Thyme – and it’s stamped here in Shaded Spruce on the Basic White 4 x 5 1/4 panel.
The envelope… more of the Regals 6×6 DSP in Shaded Spruce added to the flap & trimmed to fit (2 1/4 x 6) and on the front another image – this time it’s Rosemary :O). I messed up when stamping the image so did it again on a scrap, die cut it and adhered with liquid glue. When die cutting the image, it cuts off the name of the plant, so I fussy cut that with my paper snips and added it.
Fun, easy card, could be masculine if one is needed. It shows appreciation and care for another human being – which the world always needs.
You may this Grow With Love bundle in my store – look around at all the possibilities, kits, last chance products and more . When shopping with me and your purchase is $50 or more, you will receive a SU! item valued up to $10 and the current months fabulous tutorial – for April, it’s Memorable Blooms. And use my HOST CODE until April 12.
HOST CODE Y3TPZVYN
Remember the LAST CHANCE LIST I mentioned in an earlier post? Click here to shop that list.
Click this link to see all that’s available in the Stampin’ Up! world and make sure my name is at the top when checking out.
Thanks for stopping by. May you have a beautiful day!
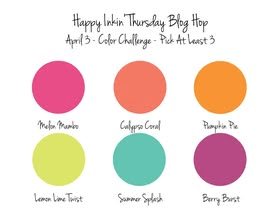
Good morning! Welcome to our Thursday hop and today we have a color challenge. I’ve used items in the Unbounded Beauty Suite to create this birthday card.
Items in this suite are on the LAST CHANCE LIST. If you want any of the items, get them now before they are gone forever. See below how to shop in my store. How to make this card…
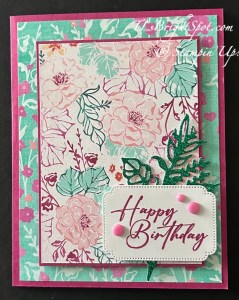
The card base is Berry Burst card stock cut 8 1/2 x 5 1/2 and scored at 4 1/4. A layer of the Unbounded Beauty DSP (4 x 5 1/4) was adhered directly to the card front. Another piece of the Unbounded Beauty DSP 3 1/8 x 4 3/8 was adhered to another Berry Burst piece 3 1/4 x 4 1/2, then added to the card front with dimensionals. I used the Unbounded Love Dies and a piece of the 24-26 In Color Shimmer Paper in Shy Shamrock (2 1/2 x 3 3/4). I used Seal+ to adhere to the card front. I stamped the sentiment using the Flowers of Beauty stamp set & Berry Burst ink on a Basic White 1 3/4 x 2 1/2. I die cut this with Unbounded Love Dies. I attached this with dimensionals on the left side and double layer of dimensionals on the right since it hangs over the layers. Finally, three 24-26 In Color Resin Dots in Petunia Pop were added to the sentiment panel.
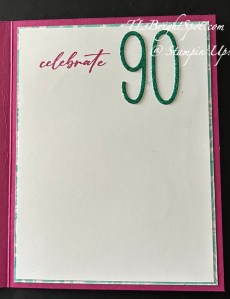
The inside… another piece of the Unbounded Beauty DSP 4 x 5 1/4 adhered to the inside of the card base. On the 3 7/8 x 5 1/8 Basic White I stamped the sentiment in Berry Burst ink using the Unbounded Love stamp set. I then used the Alphabet Dies to die cut the number 90 from the same 24-26 In Color Shimmer Paper in Shy Shamrock.
The envelope… the same Unbounded Beauty DSP used on the front of the card was adhered to the flap & trimmed to fit (2 1/4 x 6). On the front, this sweet single flower was stamped in Berry Burst ink using the Flowers of Beauty stamp set. The filler stamp for the flower was stamped off once in Berry burst ink. This suite of products may be found in the 2024-2025 Annual Catalog on pages 52-55. Click here to shop in my store.
This is a great hop – a fun color challenge and more to see from the creators listed below. Click the next button to take you to Amy Koenders.
Remember, when shopping with me & your purchase is $50 & up, you will receive a SU! item valued to $10 and the April Tutorial for the Memorable Blooms Bundle.
Thanks for stopping by. May you have a beautiful day!
SHOP Last Chance Products here. And remember to make certain my name is at the top of the page when you check out so you receive my bonus gifts when your order is over $50: SU! item valued up to $10 & the April Tutorial for the Memorable Blooms Bundle. Use my HOST CODE until April 12.
HOST CODE Y3TPZVYN
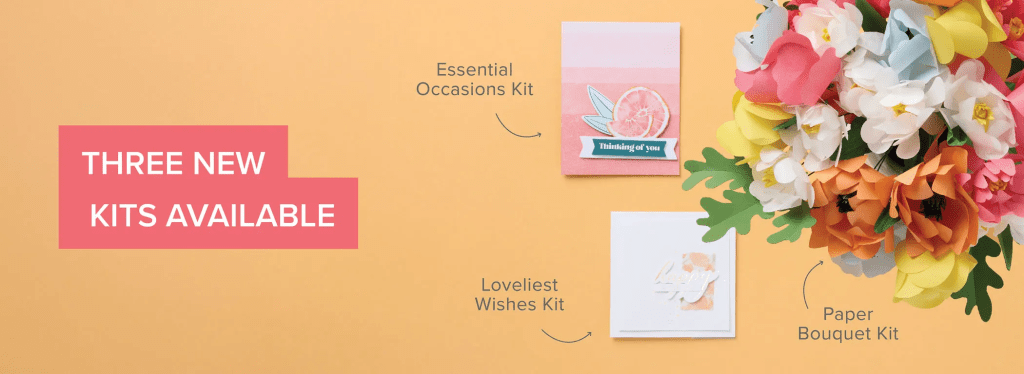
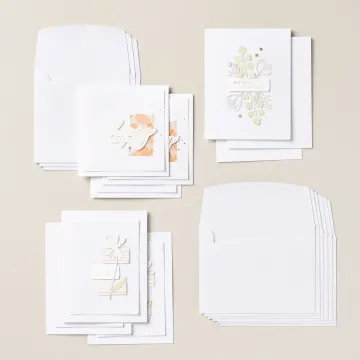
Three new kits available..
65635
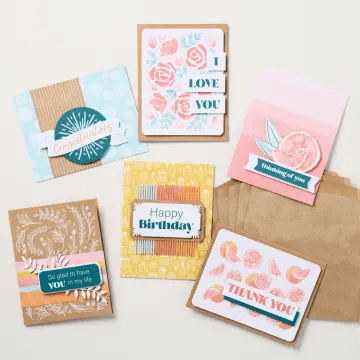
ESSENTIAL OCCASIONS KIT
$13.00
With hand-illustrated elements, die cut sentiments, and six card designs, the Essential Occasions Kit comes with everything you need to celebrate birthdays, share well wishes, or send a thank-you message. From graduations to anniversaries—and everything in between—celebrate the most important moments in your life with this kit!
165636
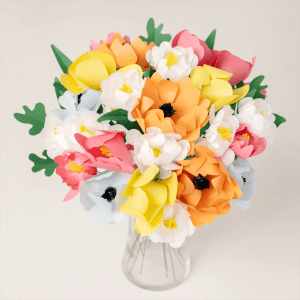
PAPER BOUQUET KIT
$22.00
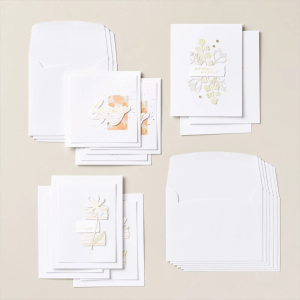
166284
LOVELIEST WISHES KIT
$14.00
Elevate your birthday cards with the Loveliest Wishes Kit! Craft cards that speak volumes through sophisticated simplicity. With precut images and gold foil sentiments, you can create nine stunning cards that lend an air of elegance to every, “Happy birthday!”
Good Monday! It’s turned cold again after a very beautiful day of 81 degrees – ah, that’s Spring. That 81 degrees made the hostas pop up, helebores are in full bloom (they love the cool!), daffodils & crocus are blooming as well. I really enjoy this time of year.
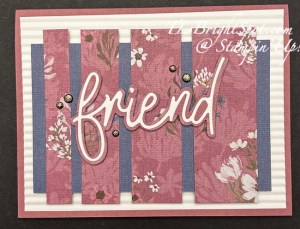
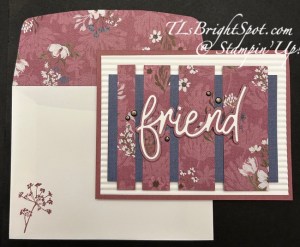
My card today is for a friend who isn’t feeling all that great, I’ve combined the Friends For Life Dies and the Wanted To Say Dies to create my messages – and the last of my Wildly Flowering 12×12 DSP.
To make this card I began with my card base: Moody Mauve cut 8 1/2 x 5 1/2 and scored at 4 1/4. I layered a panel of Basic White 4 x 5 1/4 that I ran through a brand new Mini Corrugated 3D embossing folder, a new favorite. This piece was adhered directly to the card base. Next I cut a piece of the Wildly Flowering DSP 4 x 3, that coordinates with the strips of another piece of the Wildly Flowering DSP. This was cut 3 1/2 x 3 1/2, then into strips 1/2, 3/4, 1 & 1 1/4. I spaced then evenly along the 4 x 3 panel & adhered with Stampin’ Seal. I took a scrap of the Wildly Flowering DSP 4 x 2 1/2 & die cut the background for the word ‘friend’ from the Friends For Life Dies. Next I took a piece of Basic White 4 x 2 5/8 and covered the back with Adhesive Sheets. I then die cut the word ‘friend’ from that, removed the backing of the Adhesive Sheet and attached it to the DSP background die cut. I put this on dimensionals and adhered it over the DSP strips, added dimensionals to the 4 x 3 DSP panel and attached to the card front. As a final touch, I added five (5) Adhesive-Backed Textural Dots and the card front was complete.
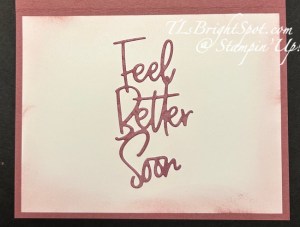
For the inside, I took another piece of the Wildly Flowering DSP in Moody Mauve, 2 1/2 x 3 1/2, attached aAdhesive Sheet to that & die cut the sentiment from the Wanted To Say Dies. I attached this to the center of a Basic White piece 4 x 5 1/4. I then used a Blending Brush & Moody Masuve ink to add some color to the edges of this Basic White panel, then attached it to the inside of the card.
For the envelope, more Wildly Flowering DSP, 2 1/4 x 6, attached to the flap & trimmed to fit. A simple flower from the Wildflower Designs stamp set was stamped in Moody Mauve ink on the envelope front. Done, ready to send in hopes my friend will ‘feel better soon’!
The 2024-2025 Annual Catalog is quickly coming to an end – and the 2025-2026 catalog will be released soon. I believe this Wildly Flowering DSP is on the Last Chance List. Tomorrow, the list will be updated with all the retiring items and I’ll include it in my post. If there is something you want, get it quickly as once it is gone, it will not be replaced. Use my host code below to receive benefits from me when you purchase is $50 & up… a SU! item valued up to $10 & the monthly tutorial.
HOST CODE Y3TPZVYN
The 2025-2026 Annual Catalog will be released May 6. Items from that catalog can be viewed then, but not until then :O) – unless you are a Demonstrator, then that’s different. Preorders for demonstrators have begun. Want to be a demonstrator and always get at least 20% off each order? Sign up with me now & you will be able to order items for your Starter Kit from the new catalog. For $99 you will be able to order $125 worth of products. click this link, then the join menu :O)
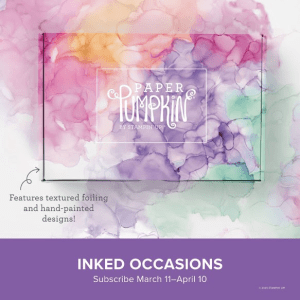
Inked Occasions Paper Pumpkin
Subscribe March 11 – April 10
Subscribe March 11 – April 10
I’m extra excited about this particular PP. We had something similar in the past & it was gorgeous – looking forward! Craft stunning cards with hand-painted, alcohol ink designs! • Makes 9 cards: 3 each of 3 designs with 9 coordinating envelopes • Textured gold foil on the card bases and sentiments • Precut paper pieces and butterfly embellishments • Coordinating colors: Berry Burst (Classic Stampin’ Spot), Flirty Flamingo, Fresh Freesia, Gorgeous Grape, Peach Pie, Pool Party
Cards come in a beautiful coordinating box!
Subscribe to the April Paper Pumpkin Kit between 11 March and 10 April by clicking here.
Thanks for stopping by. May you have a beautiful day!