SU! The Right Triangle

Hello everyone – how are you doing? It’s back to heat and humidity today – and here for two whole days I was enjoying very low humidity and wonderfully lightly cool temps. Oh well, such is nature. I’ve been playing with triangles again… this time just The Right Triangles stamp set. Each right triangle has a different pattern in it, so I took several and also played with bright colors. Here it is…

The Right Triangle

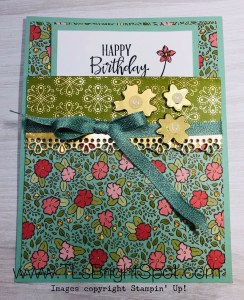
The person I made this for loves color and pattern and since this stamp set was out, well, I played. The green is a bit ‘heavy’, maybe in the wrong place, but otherwise I kinda like it. It certainly isn’t my normal card!

Here are the ink colors I used… Highland Heather, Flirty Flamingo, Coastal Cabana, Mango Melody, Granny Apple Green, and Melon Mambo.. The scripty sentiment is from the Posted For You stamp set and the block ‘TO YOU” is from Hooray To You stamp set. They were stamped on a Whisper White panel – and I used my Stamparatus to make sure everything stayed straight. The Whisper White panel was adhered to Artistry Blooms DSP with liquid glue. Then I took ribbons from The Playing with Patterns Ribbon Combo pack and adhered them to the top of the card with Stampin Seal. I created a bow and adhered that with a glue dot.. This then was adhered to a Highland Heather card base with Stampin Seal.

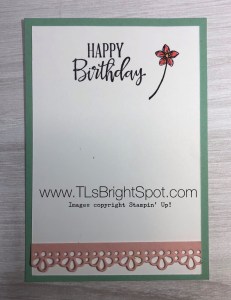
For the inside I took another panel of the Artistry Blooms DSP and adhered it to the card base with liquid glue. I took another panel of Whisper White and stamped the ‘confetti’ in Highland Heather ink and the sentiment in Melon Mambo. Both are from the Hooray to You stamp set. This was adhered to the inside with liquid glue and the card was complete. As I said, not my usual kind of card but it will be perfect for the person it is intended.
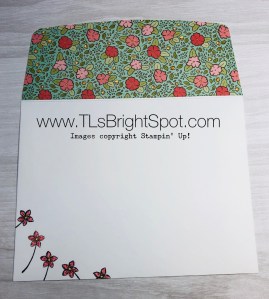
inside of card

Thanks for stopping by.

May you have a beautiful day.

Make someone happy by sending them a handmade card created with love.

The Right Triangle

20200804_AD_en_US. open this for the PDF for the August – December 2020 Mini catalog

2020 AC US open this PDF for the Annual 2020 catalog

Shop with me? Receive a SU! item worth $10 when your order is between $50-$150 and using my current host code – August Host Code 4TEZ7HWY. If your order is more than that, you STILL receive the $10 item from me but SU! has rewards for you as well :o)

Card cuts for todays card:

  • Highland Heather card base 4 1/4 x 11 scored at 5 1/2
  • Artistry Blooms DSP 4 1/4 x 5 1/2 (2)
  • Whisper White cs 3 7/8 x 4 1/2 (front), 3 3/4 x 5 (inside)

SU! So Much Happy/ Warm Hugs

Hi Everyone – gosh it is a gorgeous day today… cooler than it has been with a light breeze… this is easy to take. Remember my S-I-L who shattered his elbow? (He’s progressing very well BTW) His birthday was yesterday and I created a fun little gift bag for him using the Warm Hugs bundle, So Much Happy bundle and the Celebration Labels Dies. Let’s take a look at the final product…

Warm Hugs/ So Much Happy gift
#1

He’s a bit of a coffee person and this set just jumped out at me as a perfect little gift for him. He also loves peanut M & Ms – so…. the Heartwarming Hugs Suite is just right. It can be found on pg 8-10 in the Aug- Dec 2020 Mini catalog.

I began by putting the Mini Coffee Carrier together – just unfold and crease… no glue, nothing. But then I decided to fancy it up a bit. I covered the base with some of the Heartwarming Hugs DSP. Then I took a strip of In Good Taste DSP and adhered that over it with liquid glue. I also added a length of Early Espresso 1/4″ Faux Suede Ribbon with Tear ‘n Tape, then included a bow with a glue dot. I did the same on the back side without including the bow.

Next I took the Warm Wraps Dies and die cut the various pieces to create a trim around the Mini Coffee Cup. I used the same In Good Taste DSP for the large pieces, then the scallops were die cut from Soft Suede cs. I put these together with liquid glue then slid it onto the cup. Once I had the wrap where I wanted it I slid it down just a bit and drizzled in a bit of liquid glue and slid the wrap back into place again. This keeps it from falling off :O)

Then I did the tag for the cup… circle is die cut from Soft Suede cs, the hexagon in Whisper White. Before die cutting the hexagon, I stamped the the sentiment in Crumb Cake, then the hexagon stamp in Soft Suede. TIP: I had stamped these in reverse order and didn’t get the sentiment centered correctly in the hexagon, disappointment! There a redo…The hexagon is more open and therefore you can see better to center it over the circle sentiment. easy peasy… Die cut the stamped hexagon and affix it to the Soft Suede circle with dimensionals. This then was adhered to the cup also with dimensionals. And bingo the cup was ready. I filled a Gusseted Cellophane Bag with the peanut M & Ms and tied it with Real Red 3/16″ Braided Linen Trim and put it in the other part of the coffee carrier. Cute, right? I then created another tag, this time the circle was die cut in Mossy Meadow cs. Before die cutting the hexagon, I stamped the sentiment in Real Red ink and the hexagon stamp in Mossy Meadow ink. It was then attached to the coffee carrier with dimesnionals.

I put all of this (plus the coffee beans) in a Stampin’ Up! cello bag that I had in my stash as a demonstrator. And of course it needed a large something to hold it together…. out came the Celebration Labels Dies  – so perfect! I first cut one in the same In Good Taste DSP then another in Soft Suede cs. I then took the Happy Dies and die cut the word HAPPY from the In Good Taste label. Next I stamped the word birthday from the So Much Happy stamp set in Soft Suede ink.This panel was adhered onto the Soft Suede label and it clearly shows through just as I wanted – yay! Then I stapled it all together over the cello bag. Voila! And by the way – he loved it!!!

Warm Hugs, So Much Happy gift
#2

Thanks for stopping by.

May you have a beautiful day.

Make someone happy by giving/ sending them a handmade card made with love.

Cuts for todays project:

  • Heartwarming Hugs DSP 3 x 5 7/8 (2)
  • In Good Taste DSP 1 x 5 7/8 (2) (carrier); 2 1/2 x almost 12 for the cups wraps
  • Soft Suede – scraps (circle & trim on the coffee wrap)
  • Whisper White – scraps
  • Mossy Meadow – scraps for one circle


SU! Warm Hugs Bundle

It’s Monday – and a glorious day! I’m thankful for so much… and one of those I have the opportunity to play with some amazing SU! products. What I did prior to SU! was just muddle around in mediocre stuff. Once I found SU!, there was no turning back. All products are made well; products coordinate. I can’t say enough. So if you are ‘on the fence’, jump in. I’ll help you navigate and create – we could make a great team. Contact me at tlsbrightspot@gmail.com and let’s talk about how to make this happen.

For today’s card I pulled out a stamp set I haven’t used before – yep – from the amazing Aug-Dec 2020 Mini Catalog. It’s called the Warm Hugs Bundle and is actually part of a suite of products that can be found on pages 8-11. I used many of the products from the suite but incorporated some other items as well.

Warm Hugs Bundle #1

I started with a Crumb Cake card base. Then took a panel of Mossy Meadow cs and ran it through the Wrapped in Texture embossing folder twice. This embossing folder is narrow, and probably is not meant to emboss a card front, but I did and think it turned out really well. I took a strip of Heartwarming Hugs DSP cut a banner at the bottom and adhered it with liquid glue to the card front. I took another very narrow strip of this same DSP, cut a side angle at the bottom and slipped it under the right of the banner. Next I took the Mossy Meadow Diagonal Stripe ribbon and wrapped it back and forth on the card front, adhering in various places with Stampin Seal. The sentiment was extra fun and easy to create using the Warm Wraps Dies and the Warm Hugs stamp set. Don’t you love this hexagonal look?

Stamp the sentiment in Real Red ink on a Whisper White scrap. The sentiment comes from the Wrapped in Christmas stamp set which is part of the Heartwarming Hugs Suite of products. Stamp the hexagonal decoration around it in Mossy Meadow ink and die cut with the Warm Wraps Dies. Put dimensionals on it and adhere to a circle cut from Pear Pizzazz cs. That circle also is in this die set. The Pear Pizzazz also got dimensionals and was adhered over the Diagonal Stripe Ribbon.  Since the card front is complete, let’s move to the inside.

Warm Hugs #2

So, so simple but I love how the inside coordinates with the outside… another strip of DSP adhered to Whisper White panel. This was adhered to Mossy Meadow and attached to the Crumb Cake card base. And voila, your card is complete!

Warm Hugs Bundle #3

For the envelope I stamped a fun little cup in Mossy Meadow, then the steam rising from the cup in Crumb cake. The envelope flap got the same Heartwarming Hugs DSP as the card front. Fait accompli! While this card is done in Holiday-type colors, it could so easily be used as a card of encouragement or a birthday card, and it’s a bit masculine too.

Warm Hugs Bundle #4

Here’s a link to the cattie to help you find everything.

20200804_AD_en_US

Thanks for stopping by.

May you have a beautiful day.

Make someone happy by sending them a handmade card filled with love.

Card cuts for today’s card:

  • Crumb cake card base 4 1/4 x 11, scored at 5 1/2
  • Mossy Meadow 4 x 5 1/4 (2)
  • Heartwarming Hugs DSP – 2 1/2 x 5, 3/8 x about 5 (front), 3/8 x 5 (inside) and 2 1/4 x 6 (envelope flap)
  • Whisper White 3 3/4 x 5 (inside) + scrap for front sentiment
  • Pear Pizzazz for front circle

SU! Mini Gatefold

Hello there… Weather advisory for the East coast is to stay INSIDE today – it will feel like 104! Yeck!  Be safe…I have been doing doing several different fun folds lately and well, I just couldn’t stop… todays is a mini version, a little 3″ card for a grandson turning 20… Cannot believe he is 20! 6’4″ and handsome – oh my…I’m just a little bit prejudiced. 😍 Anyway, the card… This young man has come to expect something fun in the way of a card, not something you can buy at the store – yay.. getting them trained. :o) So here it is…

Mini Gate Fold
#1

Mini Gate Fold #2

Mini Gate Fold
#3

This is so cute – perhaps because it is small. And I just love the way the folds are… here it is from a another angle.

Mini Gate Fold
#4

Now you can really see all the folds. Here are the products used in this cute mini card:

  • Whale of a Tail DSP
  • Whisper White card base + belly band
  • Details Bands Dies – oval in Whisper White cs
  • Celebration Labels and Dies for the larger portion of the banner, Pacific Point cs
  • So Much Happy stamp set – balloons, fussy cut
  • A Grand Kid stamp set – front banner sentiment
  • Little Treats stamp set – inside sentiment
  • Pear Pizzazz and Pacific Point inks

Let’s see if I can tell you how to do this…

  • card stock base (Whisper White) is 3 x 6 scored at 1 1/2 and 4 1/2 on long side. Burnish well.
  • DSP panel (Whale of a Time) is 3 x 6. Mark center on the long side, at the top & bottom lightly with pencil. Fold from the top left to center bottom making a triangle – burnish and open. Fold from the left bottom to the center top making another triangle – burnish and open. Fold left portion to center, as in step one – burnish and open.
  • Do the same on the right side: right top to center bottom making a triangle, burnish and open. Right bottom to center top making a triangle, burnish and open. Right to center, burnish and open. It will look like picture #4 above even though it isn’t attached to anything yet. 😊
  • Cut a panel in Whisper White for inside sentiment, 2″ square. Stamp the sentiment from Little Treats stamp set in Pacific Point ink. Then stamp the party favors in Pear Pizzazz ink. Remember to stamp ON THE DIAGONAL. Adhere to the DSP.

Mini Gate Fold
#3

  • Now adhere adhere the DSP to the Whisper White card base: triangle on the left first making certain it is al the way to the edge. With the papers flat, adhere the center diagonal square then the right triangle.
  • Belly band: 1″ x about 7″ to go around in Whisper White, DSP is 3/4″ x about 7. Adhere the papers together and wrap around card. Secure in front with Tear n Tape. It should slide easily on and off the card.
  • Cut banner in Pacific Point using the smallest Celebration Labels & Dies. Put dimensionals on back and attach to belly band where it overlaps.
  • Stamp the banner sentiment from A Grand Kid in Pacific Point – off to the right side to allow room for the balloons. Cut with the oval from Detailed bands dies. Adhere with liquid glue to the Pacific Point banner.
  • Stamp balloons from the So Much Happy stamp set: one in Pacific point and one in Pear pizzazz. Fussy cut both. Adhere the larger with liquid glue and the smaller with a dimensional. Slide over the card and bingo this cute little mini is ready for giving.

I love this. Mini cards are just a different kind of treat and this one is extra special cuz it’s a Gate Fold.

That does it for today. Think about shopping during SU! Bonus Days. Items for this card are listed in the Aug-Dec 2020 Mini Catalog which goes live to customers 4 Aug. AND the 2020 – 2021Annual catalog. Don’t have a catalog or a demonstrator? Then talk to me and we can fix that 😁

SU! has some awesome items in their 2020-2021 Annual Catalog and a real bonus going on now – called BONUS DAYS. For every purchase of $50 from now until 3 Aug. you will receive from SU! by email, a $5 coupon that is redeemable 4-31 Aug. Such a deal!

Bonus Days. Earn in July, spend in August.

And when you order from me, please use my July host code to receive a SU! item worth $10 when your purchase is $50-$150. Sounds like another good deal, right?! It is…

Thanks for stopping by.

May you have a beautiful day.

Make someone happy by sending them a handmade card made with love.


SU! So Much Happy

Hello Everyone! Today’s card is made with the brand new So Much Happy Stamp Set and matching dies… Happy Dies. You are going to love this set… it has so much to offer and I had the best time making today’s card.

And thank you for stopping by… Amy’s Inkin’ Krew Blog Hop is full of fabulous cards and inspiration. Here’s mine…

So Much Happy stamp set
Happy Dies
Playing with Patterns DSP
#1

Oh so much to share about this card… first of all, masculine or feminine, child or adult – it fits!  Next – the dies (Happy Dies) and paper (Playing With Patterns 6×6 DSP) make this card so easy. And the stamp set ( So Much Happy) allows you to make this not just a birthday card but also a graduation or a celebration of a wonderful person.

Here’s a list of supplies…

  • So Much Happy stamp set (card front and envelope front)
  • Happy Dies (card front)
  • Playing with Patterns 6×6 DSP (card front)
  • Whisper White cs (background for card front and inside panel)
  • 2020-2022 In Color 6×6 ( banner on card front and envelope flap)
  • Best Year stamp set (for the inside sentiment)
  • Bumblebee cs and ink (card base and balloons on envelope)
  • Calypso Coral cs (balloon tail and inside panel)
  • Stazon black ink (sentiments)
  • Journaling pen (balloon tails on envelope)

And here’s the how to…

I started by choosing to play with the Playing With Patterns 6×6 DSP – so many fun papers in this stack! Because it already had this wonderful angle design, I followed that angle and used the die cut from the Happy Dies.  OK, what else? I played around with some other options for the balloon and star but returned to the scraps of the Playing With Patterns 6×6 DSP and came up with a match for the balloon tail as well (Calypso Coral) die cut both the balloon and star  and the tail at the same time. :o) Next I stamped the birthday sentiment. Then I wanted just one more accent… the Happy Dies have two dies that do not cut but EMBOSS your paper with a design. I used the one that looks like a broken underscore line and embossed it between the HAPPY and the birthday. Can you see it in the photo? If you put your curser on the photo and enlarge it, it’s visible and really adds a fun touch to the card. I adhered the balloon tail where I wanted it then adhered this DSP panel to Whisper White, put dimensionals on the balloon and star and attached. I wasn’t quite ready to stop – – I die cut the banner twice using the Happy Dies and the 2020-2022 In Color 6×6 DSP (Bumblebee). I die cut it twice to add dimension to the banner. This was adhered with small dots of liquid glue. This completed panel was adhered to the Bumblebee cs with dimesnionals. Card front complete!

The inside…

Best Year stamp set
#2

Don’t you love the different fonts in this sentiment?  And the sentiment is pretty darn neat too :o) This was stamped in Stazon black ink onto a Whisper White panel for a very crisp look – using the Best Year stamp set. This in turn, was adhered to Calypso Coral with liquid glue then attached to the card inside, again with liquid glue. Your card is done!

Now for the envelope… let’s take a peek at that envelope again…

So Much Happy stamp set
2020-2022 In Color 6×6 DSP
#3

I stamped the balloons with Bumblebee ink (new In Color!) and added the tails with my black Journaling pen. The envelope flap got covered with the 2020-2022 In Color 6×6 Bumblebee paper and the card set was done!

Now let me show you one of the other dies in this Happy Dies package that allows you to emboss a pattern on the card. You may need to enlarge the photon to see it though. I stamped the sentiment, added the embossing to the left and at near the bottom of the panel and adhered it to a Calypso Coral panel before realizing it was going in the wrong direction for my card! It’s been saved, have no worries there, but look for the embossing in the photo below.

Happy Dies
Best Year stamp set
#4

Such a fun cheerful card. I hope you enjoyed… Thanks for stopping by. May you have a beautiful day. Make someone happy by sending them a handmade card ❤️

Now on to the next person on the hop or go to the person before me… enjoy! And if you get lost along the way, here’s a list of those participating today.

  1. Karen Ksenzakovic: https://wp.me/paaNf4-2lT
  2. Leslie Larkin: https://leslielarkin.com/beautiful-world-bundle/
  3. Akiko Sudano: https://wp.me/paOv8E-1hC
  4. Karen Finkle: https://karenscardkorner.blogspot.com/2020/06/stampin-up-amys-inkin-krew-blog-hop.html
  5. Jaimie Babarczy: https://wp.me/p79UhD-3WJ
  6. Mary Deatherage: https://wp.me/p5snyt-dhf
  7. Terry Lynn Bright: https://wp.me/p8fxPh-y7
  8. Donna Leonard: http://stampdabbles.com/?p=2030
  9. Amy Koenders: https://wp.me/p2SFwf-jMS


Stampin’ Up! Cards made with New and Retiring Stamps and Dies

Hi Folks! I have a slew of – well, five – cards that were all in various stages of incompleteness on my desk and it was time to CLEAN UP THE DESK! 😁😁😁 So here goes… I’l show the card and list the products to make it.

Botanical Prints stamp set, Botanical Prints Dies
Card 1

Botanical Prints stamp set, inside
Card 1


Card 1 –

  • Botanical Prints stamp set
  • Botanical Prints Dies
  • Botanical Prints DSP
  • Dark Daffodil Delight Blends
  • Light Old Olive Blends
  • Rhinestone Basic Jewels
  • Terracotta Tile cs base
  • Whisper White cs
  • Inks: Tuxedo Black Memento, Terracotta Tile

Botanical Prints stamp set, Botanical Prints Dies
Card 2

Botanical Prints stamp set, inside Card 2


Card 2

  • Botanical Prints stamp set
  • Botanical Prints Dies
  • Botanical Prints DSP
  • Stitched Shapes Dies – carrying over!
  • Inks: Highland Heather, Tuxedo Black Memento, Highland Heather Blends, So Saffron Blends, Old Olive Blends, Light Soft Suede Blends
  • Rhinestone Basic Jewels

Peaceful Poppies DSP, Peaceful Poppies Elements
Card 3

Card 3

  • Peaceful Poppies DSP
  • Peaceful Poppies Elements
  • Timeless Tropical for the sentiment on the front of the card – carrying over!
  • Thick Whisper White card base
  • Poppy Parade cs
  • Blends: Poppy Parade and Old Olive
  • Wink of Stella on the envelope poppy

Painted Poppies stamp set, Peaceful Moments stamp set
Card 4

Card 4

  • Poppy Parade Card base
  • Painted Poppies DSP
  • Crinkled Steam Binding Ribbon 1/4″, stamped with Old Olive – carrying over!
  • Whisper White
  • Sentiment from Peaceful Moments – carrying over!
  • Inks: Old Olive and Poppy Parade

Ornate Garden Specialty DSP
Ornate Frames Dies
Nature’s Thoughts Dies
Card 5

Card 5

  • Scalloped Notecards and Envelopes – retiring product
  • Ornate Garden Specialty DSP (NEW IN ANNUAL CATALOG)
  • Ornate Frames Dues (NEW IN ANNUAL CATALOG)
  • Nature’s Thoughts Dies – carrying over!
  • Woven Heirlooms for the sentiment – carrying over!
  • Early Espresso ink – carrying over

WOW – it feels good to have an almost clean desk and lots of cards completed. Since so many of these cards are made with retiring products, please see the attached list. Be sure to use my CURRENT HOST CODE: J2E4VDGM when shopping 😏

Last Chance Products JJ (US)

Last Chance Products AC (US)

Thanks for stopping by

May you have a beautiful day

Make someone happy by sending them a handmade card ❤️

Stampin’ Up! AMY’S INKIN’ KREW Blog Hop

The theme for this month’s Blog Hop is all about “For the boys/ men…” and we could interpret that any way we wanted. Hubby’s birthday is in June and he is a sailing man. The new blue in the 2020-2021 In Colors for Stampin’ Up! is titled Misty Midnight. I love that! And it’s perfect to work with for a man – my man. And the Sailing Home carrying over stamp set is a perfect match in many ways. I also used the NEW Tasteful Labels Dies (eek! – fun!) and the Many Mates stamp set (love this too!)

You may be joining me today from the talented Julie Johnston. Thanks for following the blog hop!

The card is a take-off of a Gate Fold card – modified version. I actually followed the really good directions of my upline Mary Deatherage, who created a card using this fun fold. It’s easy!

For the boys/ men #1

  • Cut your card base 4 1/4 x 11, score at 5 1/2. I used Whisper White
  • Cut another piece of card stock (I used Night of Navy 5 1/4 x 8, score at 2″ and 6″
  • Mark the center of each of the short panels( 2 5/8). Cut to the center of each short panel (or gates) creating a V – see photo… I apologize… should have taken a photo PRIOR to completing the card – grrr

For the boys/ men #2

  • Cut a piece of  In Good Taste DSP 1 7/8 x 5 (2 of these) Follow the same procedure for cutting.  Adhere DSP panels to the card front “gates” using liquid glue. (This DSP is available to customers June 3!)
  • Cut apiece of the 2020-2021 6 x 6 DSP  Misty Midnight 3 7/8 x 5 1/8 and adhere using liquid glue to the inside of the Night of Navy panel (This DSP is available to customers June 3!)
  • Using the Stitched so Sweetly Dies, cut a panel for the sentiment and the sailboat. The sentiment, sailboat and birds are from Sailing Home stamp set.  I used Night of Navy ink. Adhere to the inside front panel with liquid glue.
  • Adhere this modified gate-fold to your card base with liquid glue.
  • Cut a strip 1 x 10 for the belly band. I used the new 2020-2021 IN COLOR Bumblebee. Don’t you love that name? It is so descriptive.
  • Cut another panel using a smaller Stitched So Sweetly Dies and Bumblebee card stock. Adhere to the belly band with dimensionals.
  • * Using two of the Tasteful Labels Dies (available to customers June 3!), cut panels, one in Night of Navy and one in Whisper White. Adhere with liquid glue to the Bumblebee diecut.
  • Stamp your sentiment using the new Many Mates stamp set. I added three of the new 2020-2021 In Color Enamel Dots. They are so cute! (Both of these are also available to customers June 3)

The front of your card is complete! Yay! And it’s gorgeous already. 😏 Now for the inside…

For the boys/ men… #3

  • Cut a piece of Night of Navy 5 3/8 x 4 1/8. Adhere using liquid glue.
  • Cut a Whisper White 5 x 3 7/8. Stamp with your sentiment and the anchor from the Sailing Home stamp set and Night of Navy ink. Adhere using liquid glue. Done!

Remember your envelope…Cover the envelope flap with the new 2020-2021 6 x 6 In Color DSP, adhering with liquid glue. Trim. Done, done, done…

For the boys/ men #


This was such a fun card to do. It looks complicated but isn’t at all and is just stunning.

Remember all those products I mentioned that are NEW! Purchasing from me is easy and when buying product between $50 – $150 you receive free product from me :O) Please use my current HOST CODE… J2E4VDGM .

Thanks for stopping by.

May you have a beautiful day.

Make someone happy by sending them a handmade card.


Now on with the hop…. to the very creative Amy Koenders.

If you get lost or disconnected along the way, you may get back in by connecting with any of these participating members today… Enjoy the hop!

  1. Mary Deatherage – https://wp.me/p5snyt-cPT
  2. Karen Ksenzakovic – https://wp.me/paaNf4-2ap
  3. Sue Prather – https://wp.me/p5yitZ-1Ua
  4. Jaimie Babarczy – https://wp.me/p79UhD-3Rf
  5. Leslie Larkin – https://leslielarkin.com/friendlikeyoubundle
  6. Karen Finkle – https://karenscardkorner.blogspot.com/2020/05/stampin-up-tropical-oasis-masculine.html
  7. Connie Troyer – http://constantlycreating.me/2020/05/12/masculine-unisex-card-with-stampin-ups-come-sail-away-memories-and-more-card-pack-for-stamp-with-amy-ks-tuesday-blog-hop
  8. Akiko Sudano – https://wp.me/paOv8E-1bb
  9. Julie Johnston – https://wp.me/p8SzmQ-2kc
  10. Terry Lynn Bright – https://wp.me/p8fxPh-tt
  11. Amy Koenders – https://wp.me/p2SFwf-juR


Stampin’ Up! Peaceful Moments and Coordinating DSP

Double Z Fold with Peaceful Poppies DSP #1Hi Everyone! Yesterday was so delightful, I played in the yard ALL DAY. Today is a wonderful light rain to help with all the transplanting I did 🥵 It was hard work, but I enjoyed every moment of it. Speaking of moment… good segue into today’s card made with the Peaceful Moments  stamp set and the Coordinating Peaceful Poppies DSP. Here it is…

Double Z Fold with Peaceful Poppies DSP #1

And here’s how to create this fun double z-fold card…

  • Thick Whisper White 4 1/4 x 11, scored at 5 1/2 & 2 3/4
  • Old Olive 2 1/2 x 4 for the front panel
  • Blackberry Bliss 2 1/2 x 4, 4 x 5 1/4
  • Peaceful Poppies DSP 2 3/8 x 3 7/8 (cut 2) 3 7/8 x 5 1/8; for the panel…1 1/8 x 5 3/8, 1 1/8 x 2 1/8 (cut 2)
  • Whisper White 1 1/8 x 5 1/4, 1/2 x 2 5/81 1/8  x 2 5/8

Double Z Fold with Peaceful Poppies DSP

  • Adhere appropriate panels to your Thick Whisper White cs using liquid glue. Refer to the photo for guidance.
  • Adhere the DSP to the smaller z fold piece using liquid glue
  • Stamp your sentiments in Black Memento ink on the appropriate Whisper White strips
  • Adhere the longest Whisper White with sentiment with liquid glue to the longest z fold panel – add the Peaceful Poppies element with liquid glue
  • Color the Peaceful Poppies element with Light Blackberry Bliss Blends. Cover with the coordinating vellum, attaching jsut at the base with snail. Adhere to the middle panel with liquid glue. Adhere the narrow stamped piece over this with liquid glue.
  • For the last portion of the narrow z-fold panel, stamp your sentiment and adhere with liquid glue.
  • Tricky part… adhering the narrow z fold to the card… adhere the longest panel first, remembering to just adhere to the front left panel of the card. Close the card and adhere the far right panel. Using your grid paper to. line up this panel helps to keep it straight. Card is done!

For the envelope, simply adhere a 2 1/4 x 6 panel of coordinating DSP to the envelope flap; trim and your card is complete – YAY!

Double Z Fold with Peaceful Poppies DSP #1

Double Z Fold with Peaceful Poppies DSP #2


I hope you feel a sense of accomplishment in creating this fun Double Z Fold card. This layout has so many possibilities, I would love to see what you do with it.

The new 20220-2021 Annual Catalogue is going live to those folks who are demonstrators in just a few days Want to be a part of that “in” group? Join my team and I will help you develop your skills both in card making and in the realm of developing your business (unless you simply want to be a hobby demo and get the incredible discounts, which is TOTALLY OK!)

Thanks for stopping by.

May you have a beautiful day.

Make someone happy by sending them a handmade card.


Stampin’ Up! Good Morning Magnolia

Today’s card uses the Stampin’ Up! Good Morning Magnolia stamp set, heat embossing and sponge daubers. I’ve created this as a birthday card, but it could so easily be sympathy, wedding, anniversary, or just a note. It is soft and it is feminine. Let’s look….

Good Morning Magnolia #1

Here are the details:

  • Thick Whisper White card stock 8 1/2″ x 5 1/2″, scored at 4 1/4″, another piece 4 1/8″ x 5 3/8″ for the card front.
  • Rub the smaller cs with your embossing buddy, making certain to cover the entire area.
  • Using Versamark ink, stamp the Good Morning Magnolia stamp on the right hand corner, stamping as much of the magnolia as you desire. Ink a portion of the stamp again and stamp in the upper left corner.
  • Sprinkle with white embossing powder and heat emboss. Set aside to cool.
  • On a scrap, of vellum, rub with your embossing buddy and with Versamark ink stamp the flower bud. Sprinkle with white embossing powder then heat emboss until all the powder has melted. Set aside to cool. Once cool, use the Magnolia Memory Dies to cut out the flower bud.
  • On another scrap of vellum approximately 1/2″ x 3″, rub with the embossing buddy, ink your sentiment and stamp. Sprinkle with the white embossing powder and heat emboss until all powder has melted. Set aside to cool.
  • Using Blushing Bride and sponge daubers, lightly rub the color exactly where you want it. I made it darker in the center and lighter toward the outside. For the leaves, do exactly the same with Old Olive ink. Do the same on the vellum flower bud but color on the backside of the vellum.
  • Attach the flower bud with a mini dimensional at the base of the bud.
  • Attach the vellum sentiment in the same spot using a glue dot. I used a second glue dot, placing it just under the word happy, so it wouldn’t show through.
  • Now you are ready to adhere this directly to your card base, using liquid glue or snail.

For the inside… I’ve kept this very simple.

Timeless Tulips sentiment – inside

  • Choose your sentiment… this is from the Timeless Tulip stamp set (available during Sale-a-bration), and using Stazon Jet Black ink..

Thanks for stopping by today. 

May you have a beautiful day.

Make someone happy by sending them a handmade card.

Good Morning Magnolia #2


Stampin’ Ip! Ornate Garden Specialty DSP, Ornate Borders Dies

Todays Card is a fun use of the Stampin’ Up! Ornate Garden Specialty DSP and the Ornate Borders Dies. It’s a panel card, at least that’s what I’m calling it, meaning it doesn’t open 🙂 It simply has a panel that fits inside the folded DSP. Let’s take a look….

This Ornate Garden Specialty DSP is so sweet and I wanted to emphasize this particular pattern for as much of the card as possible. This is what I did…

  • Mint Macaron card base cut to 4 1/4″ x 5 1/2″; also cut 3 1/2″ x 4 1/2″ for the inside panel
  • Ornate Garden SDSP cut to 4″ x 5 1/4″; another with same dimension but score this at 4″
  • Adhere the 4 “x 5 1/4” SDSP to the card base using liquid glue
  • Cut a panel 1/2″ x 4″ from Gold foil. Using a die from the Ornate Borders Dies, run it through your embossing/ diecut machine. Adhere this diecut to the fold-over piece of SDSP. Cut about a 20″ length of Mint Macaron 1/4″ ribbon, run over it with your snail adhesive and adhere evenly around the back and front, covering slightly where the Gold Foil diecut was attached.Tie a bow. TIP: use your grid paper to make certain the ribbon is attached evenly. 
  • Using tear ‘n tape, adhere to the sides and bottom of this panel and attach to the card base.
  • Cut three flowers from Gold Foil scrap using the Ornate Border Dies. Adhere Glitter Enamel Dots to the center of each flower. Put on dimensionals and attach accordingly.

Now for the inside…

  • Whisper White cut to 2 is 7/8″ x 4 1/4″. Stamp your sentiment (I used the Peaceful Moments stamp set) with Stazon Jet Black ink. I like how clear this ink stamps! I also added a sweet flower from the Special Someone stamp set. This was colored using Flirty Flamingo and Daffodil Delight markers. TIP: When using Stazon Jet Black ink, DO NOT USE BLENDS TO COLOR! It simply smears the ink instead of adding color.
  • Using the Ornate Borders Dies once more, cut the same border die from Blushing Bride cs (approx. 1/2″ x 4″). Adhere to the Whisper White panel using liquid glue.
  • Adhere this Whisper White panel to the 3 1/2″ x 4 1/2″ Mint Macaron piece. Cute, cute!

The envelope…

  • Cut a piece of matching SDSP from the Ornate Garden SDSP pack 2 1/4″ x 6″. Adhere with liquid glue and trim.
  • Stamp the adorable flower used on the card panel insert on the envelope front (I did it five times!) Color using Flirty Flamingo marker for the petals and Daffodil Delight marker for the flower center.

Isn’t this card sweet?!

Thanks so much for stopping by.. May you have a beautiful day.

Make someone happy by sending them a handmade card.