Stampin’ Up! Criss Cross Card w/ Painted Christmas

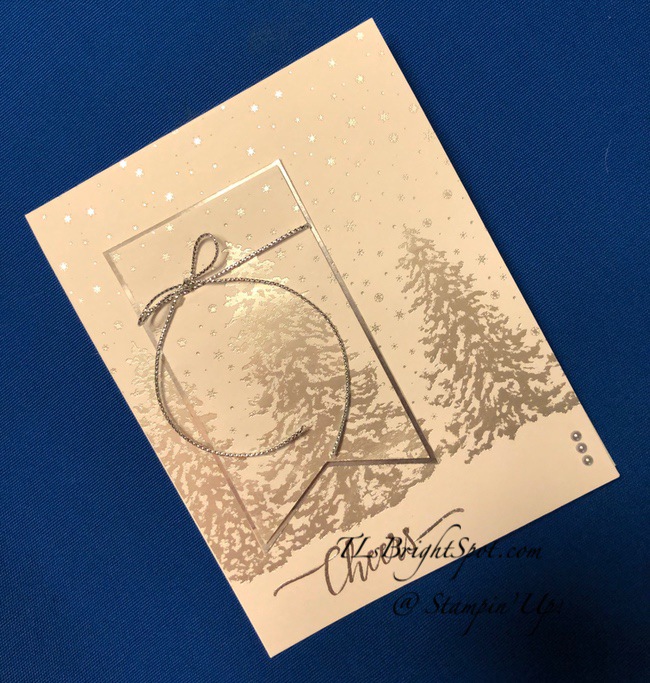
This was such a fun, easy card to make and I like that it’s an ‘out of the ordinary’ color for a Christmas card :O) Yep, I used Calypso Coral for the card base on this card. Stampin’ Up! lists all the coordinating colors for its DSP on the packaging and Calypso Coral was listed. When I put it with the DSP I wanted to use, I liked it ~ so here we are. I used Cherry Cobbler for the sentiments and i like how it coordinates and brings out the darker colors of the DSP. And these pine needles bunches were extras from a project some time ago, die cut with the Christmas Pinecone Dies: Evening Evergreen and Basic White card stocks and they bring out the pine needles of the DSP. How clever is that!

Criss Cross w/ Painted C’mas DSP.1

Basics:

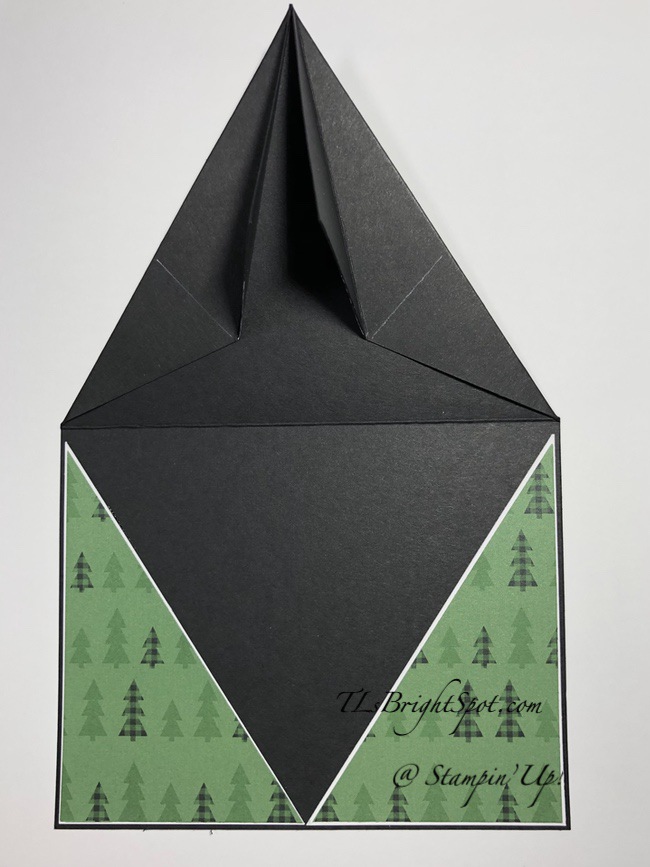
  • Cut the card stock base 4 1/4 x 11 & score at 5 1/2 (Calypso Coral)
  • Cut from outside top corner to the fold line – see photo 2
Criss Cross w/ Painted C’mas DSP.2
  • Cut a piece of DSP 4 x 5 1/4 (Painted C’mas)
  • With whatever design you want on the front right panel, have that side face up & cut it on the diagonal, corner to corner, keeping in mind the direction of the design
  • Flip one side over and adhere to card front: card front has been folded back on itself so diagonal is going different direction, see photo 3
Criss Cross w/ painted C’mas DSP.3
  • Adhere other DSP panel to remaining piece cut from original card base.
  • Adhere diagonal panel to the card front. see photo 4
Criss Cross Card w/ Painted C’mas.4

The card opens with the fold on the left, but this looks cool and is easy to do. Now we decorate the front & the inside.

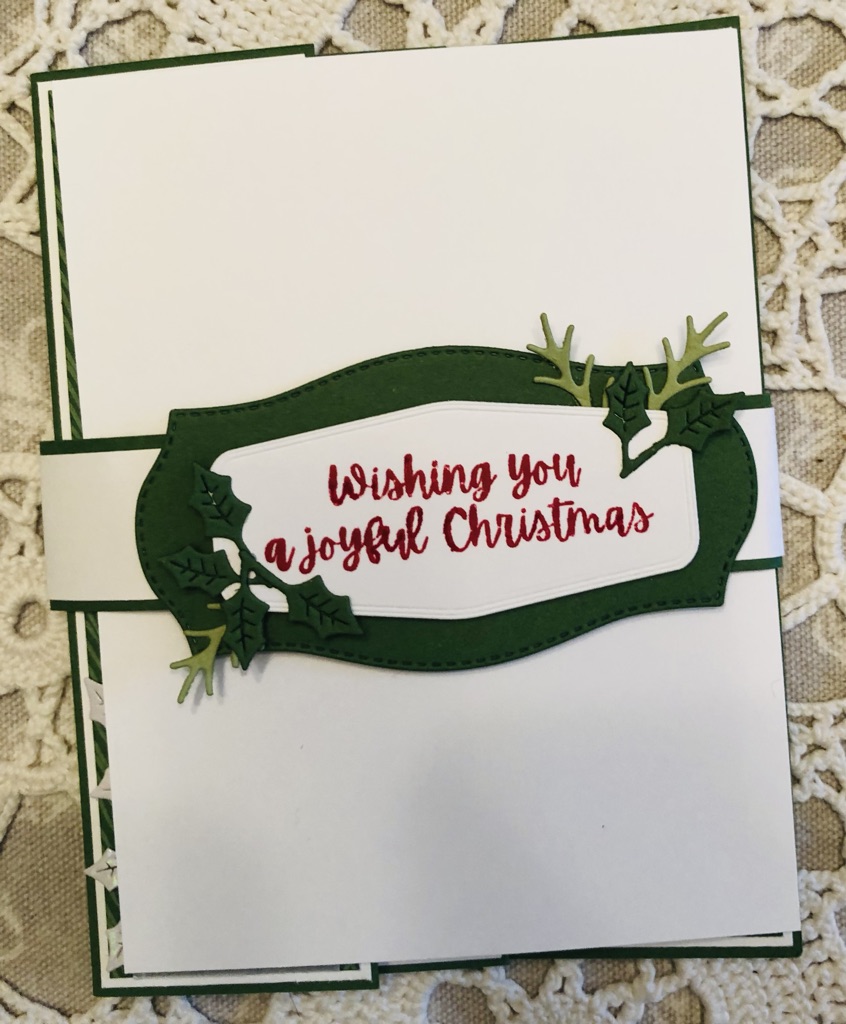
  • I used the Stitched So Sweetly Dies to cut the sentiment panels: Calypso Coral for the larger piece and Basic White for the sentiment itself.
  • The sentiment comes from C’mas to Remember stamp set & is stamped w/ Cherry Cobbler ink.
  • I added three Genial Gems to the banner in green.
  • The pine boughs were die cut using the C’mas Pinecone Dies, adhered together slightly offset then cut apart. The paper is Evening Evergreen & Basic White
  • These were adhered to the larger banner with liquid glue, then the sentiment banner atop that on dimensionals. The banner was adhered in place with liquid glue
Criss Cross card w/ Painted C’mas, inside.5

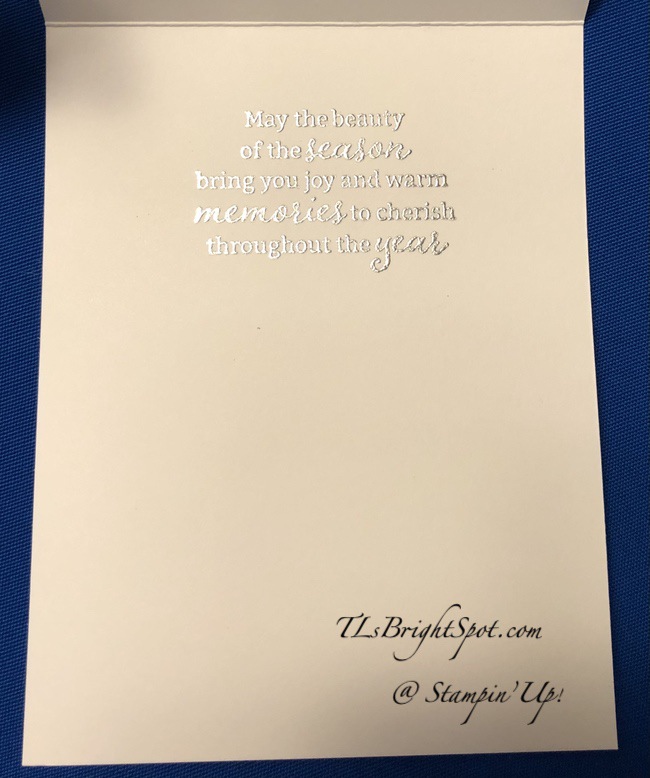
For the inside, stamp the sentiment in Cherry Cobbler ink using another phrase from C’mas To Remember stamp set. When stamping the sentiment, you do want to make certain it isn’t going to show when the card is closed. hint, hint. I stamped the pine boughs in second generation Evening Evergreen ink, then the stem for the berries in full strength. These come from the C’mas Season stamp set. The berries were stamped in Cherry Cobbler ink, also second generation. I added three more Genial Gems around the sentiment then adhered the panel to the inside of the card.And the card is done!

Criss Cross Card w/ Painted C’mas.6

For the envelope I cut a strip 2 1/4 x 6 from Soft Succulent card stock and ran it through the Wintry 3D EF, then adhered it to the flap & trimmed to fit. I then stamped the same grouping of pine boughs & berries as done on the inside of the card. They come from the C’mas Season stamp set. LOVE! This is fresh & bright. Such a fun & easy card to do.

Not have a demonstrator so you can order? If you do not have a demonstrator and need an Annual 2021 Catalog OR Jul-Dec 2021 Mini Catalog, please reach out to me – happy to send one to you. Please also use my current host code when ordering: 26QYRFXB I offer my customers a free item from Stampin’ Up! item valued to $10 with your order of $50 and above. Click here to go my store. When the order is over $150, you still receive that free gift from me, but SU! has Stampin’ Rewards that may be used for additional products, so don’t use the host code at that time. If you have questions just let me know. If you would like to be able to order products early from catalogs AND enjoy that 20% discount, join my team now… you may do that here. We have lots of fun and are a creative bunch that encourages & supports one another. Would love to have you!

Thanks for stopping by. May you have a beautiful day. Nothing beats a handmade card!

Inspire. Create. Share.

Stampin’ Up! Eden Wreath C’mas

Hello TGIF! We got our boat put away this week, before the winds and rain. When I say put away – that means we got it to our winter storage marina, they took it out, cleaned the bottom, removed the mast & put it on it’s trailer. But it isn’t parked yet in it’s permanent spot so we can’t cover it. 😦 With all the rain, it is now full of water and we’ll have to drain it before covering. Draining isn’t that difficult or time consuming, we just don’t know when it will get moved so it’s a ‘things happen in stages’ kind of thing – better known as a ‘waiting game’.

Let me tell you about getting it to the wintering marina because, you are going to belly laugh. This is a little sailboat – 16′, no motor. This time of year winds are either pretty fierce or non-existent and sailing in a little boat during fierce winds is not a good idea. We have to choose – and we chose a day when the winds were to be about 6 -8 mph, which is perfect. But guess what – there was next to no wind and we still had to move the boat, cause weather was setting in and we had to have it out of its slip. We paddled… and paddled… and paddled some more. Let me just say, we’ve had this boat since 1998 and there is always a new experience awaiting us. Thanks for listening/ reading, whatever. Life is all about new experiences and how we handle them, right?

The card for today is more of the Eden’s Garden products. It’s just beautiful DSP and the dies are fun. Remember it will be available to you Nov 2 so gear up.

Eden’s Wreath C’mas.1

The card base is Evening Evergreen; the next is Gold Foil and the gorgeous DSP is Ever Eden DSP that will be available only while supplies last – just sayin’ don’t wait if you want it. (My HOST CODE is listed later in this post!) The wreath is made with one of the dies in the Eden Dies I cut apart once it was die cut. (Let’s be clear… die cut the piece from Basic White card stock, then cut the paper apart – NOT THE DIE!) I played around with the cut pieces to make this the way I wanted it and used a circle template to try & keep it round. Once I had it the way I wanted, I put cut dimensionals on the back and adhered each section, sometimes layering. I added the bow using the Open Weave Ribbon in Soft Succulent, then added a length of Simply Elegant Trim in gold and attached it with a glue dot. The final step to the wreath was to add some Holiday Rhinestone Basic Jewels

The final step was a sentiment and I chose to use Evergreen Elegance stamp set for that. I love the font! I stamped it in VersaMark ink on a Basic White strip, sprinkled Gold Embossing Powder over it and heat set. Then I fussy cut it… the angles were just right to enhance the look of the wreath :O) I put dimensionals on the back and put it in place, then added three more Holiday Rhinestone Basic Jewels for a bit more elegance.

Eden’s Wreath C’mas.2

I stamped the sentiment – again from the Evergreen Elegance stamp set, in Evening Evergreen ink. There were some pieces of wreath remaining from the original die cut and I wanted use them, so adhered them with liquid glue. I think they add a nice touch. This was adhered to the inside of the card and the card itself was done.

Eden’s Wreath C’mas.3

For the envelope, I stamped one of the ‘fronds’ from Eden’s Garden stamp set in Soft Succulent ink onto the front of the envelope, the top & bottom in full strength, the middle in second generation. I covered the flap in another piece of the Ever Eden SDSP, trimmed it to fit & voila – the set was complete. :O) I really, really like this card: maybe it’s the colors, or the glam from the rhinestones, or the glitter of the sentiment, or the ribbon, or the SDSP ~ whatever it is, I like it.

If you would like to make this card, remember you can do one of two things: become a demonstrator & order now (you may do that here to do that with me) or order Nov 2 as a customer so you don’t miss out (Click here for that).

Not have a demonstrator so you can order? If you do not have a demonstrator and need an Annual 2021 Catalog OR Jul-Dec 2021 Mini Catalog, please reach out to me – happy to send one to you. Please also use my current host code when ordering: 26QYRFXB I offer my customers a free item from Stampin’ Up! item valued to $10 with your order of $50 and above. Click here to go my store. When the order is over $150, you still receive that free gift from me, but SU! has Stampin’ Rewards that may be used for additional products, so don’t use the host code at that time. If you have questions just let me know. If you would like to be able to order products early from catalogs AND enjoy that 20% discount, join my team now… you may do that here. We have lots of fun and are a creative bunch that encourages & supports one another. Would love to have you!

Thanks for stopping by. May you have a beautiful day. Make someone happy sending them a handmade card.

Inspire. Create. Share.

Stampin’ Up! Happy Inkin’ Thursday Blog Hop

It’s Thursday!!! And time for the Happy Inkin’ Thursday Blog Hop. We have a sketch challenge for today and it was kinda fun to play around with it.

And here’s the challenge…

May be an image of text that says 'Happy Inkin Thursday Blog Hop October 28- Sketch Challenge'
Happy Inkin’ Thursday Blog Hop Challenge. Oct 28

And here’s how I interpreted that sketch.

Wintry 3D.1

What do you think? Does it resemble the sketch challenge? The ribbon was a bit fiddly to do… I needed three hands :O] I started with Pear Pizzazz card stock for the base (4 1/4 x 11 scored at 5 1/2). I cut another panel of Pear Pizzazz (4 1/4 x 5 1/2) and ran it through the Wintry 3D embossing folder two times. Why two times? Because the width of the card and the width of the embossing folder were really not the same – and I wanted the embossing on both edges of the paper. (This is a gorgeous embossing folder set. That’s right, I did say set. There are two: one is this pine evergreen gorgeousness and the other is snowflakes. This is definitely one of those ‘must have’ embossing folders.)

I adhered the embossed panel to the card front with liquid glue. I cut a piece of Heartwarming Hugs DSP 3 x 5 1/2 and adhered that in the center of the embossed piece. Then I did the fiddly part with the ribbon. Truth be told, I’m not certain how this should be done, but I’ll share how I did it. If you know a better way (less fiddly) please let me know!!! I used Seal+ on the back of the ribbon, then on the front of the ribbon too – just at the top, and started folding and holding and folding and holding. Do you have the picture? I had the card stock held in place on my grid paper in order to keep the ribbon straight – with what else, Post-it note! Post-its are an awesomely incredible product and I use them a LOT.

But back to the ribbon… somehow I got it on the paper without losing my mind AND it was pretty straight. Next I stamped the sentiment on a Real Red panel with VersaMark ink, then sprinkled White Embossing Powder over it and heat set. The sentiment comes from Christmas to Remember stamp set and was die cut with the Seasonal Labels Dies. Once cut I put dimensionals on the back and placed it over the ribbon. I added two Genial Gems – one at each end of the banner… and the card front was done! Yay. And you know what? I really like it.

Wintry C’mas.2

For the inside I added a strip of the same Heartwarming Hugs DSP to the side of a Basic White panel. I added a sentiment with Real Red ink from Christmas to Remember stamp set. What I like to do with sentiments is use the Stamparatus to make certain the sentiment is ‘square’ with the paper. It sure beats having the sentiment crooked and having to re-do the panel… ask me how I know that. Yeah, maybe don’t. 😳 Now that the card is done, what’s next… oh yes!!! the envelope. heh heh.

Wintry C’mas,3

So, the envelope… adhere a 2 1/4 x 6 strip of the same Heartwarming Hugs DSP to the envelope flap, trim to fit and ~ DONE. That’s it… the card is now added to the Christmas card stash for sending in early December. It’s probably time to count the cards again. That way I’ll know what I have and… drum roll please, how close I am to what I need. :} Nope, not even guessing…

Not have a demonstrator so you can order? If you do not have a demonstrator and need an Annual 2021 Catalog OR Jul-Dec 2021 Mini Catalog, please reach out to me – happy to send one to you. Please also use my current host code when ordering: 26QYRFXB I offer my customers a free item from Stampin’ Up! item valued to $10 with your order of $50 and above. Click here to go my store. When the order is over $150, you still receive that free gift from me, but SU! has Stampin’ Rewards that may be used for additional products, so don’t use the host code at that time. If you have questions just let me know. If you would like to be able to order products early from catalogs AND enjoy that 20% discount, join my team now… you may do that here. We have lots of fun and are a creative bunch that encourages & supports one another. Would love to have you!

Thanks for stopping by. May you have a beautiful day. Nothing beats a handmade card.

Inspire. Create. Share.

Since this is a Blog Hop, it’s important to have a list of those participating and their links – see below. You can always use the ‘next’ button, but sometimes the idea is to jump around. Enjoy… there will be some fabulous cards today!

Amy Koenders

Mary Deatherage

Kristi Gray

Jaimie Babarczy

Sue Prather

Karen Finkle

Akiko Sudano

Karen Ksenzakovic

Tara Carpenter

Terry Lynn Bright ~ you are here

Stampin’ Up! Eden Hugs

Hello… it’s Wednesday… another 1″ of rain last night after 2 1/2″ in the early morning. That’s a lot of rain! And today ~ gale force winds starting soon @ 17 mph and going up from there. Leaves are beginning to turn, so fall it is. My card today uses the new Eden Garden bundle available to customers Nov 2. I’ll be using this bundle again on Friday in a totally different way… hint, hint. But for today..

Eden Hugs.1

There is LOTS of white space on this card. But it’s elegant with that stunning die cut along the bottom using the Eden Dies. I added Gray Granite Shimmer Ribbon & Holiday Rhinestone Gems in Night of Navy. The basic White panel is layered on Night of Navy card stock, then with dimensionals added to the Gray Granite card base. The sentiment on the front is Night of Navy ink and the Eden Garden stamp set.

Eden Hugs.2

For the inside, I stamped this distinctive bouquet in Night of Navy ink, AND the sentiment in the same ink ~ both using the Eden Garden stamp set. So this bouquet is a distinctive stamp, which means it has depth variation that creates what I’ll call multiple layers or depth to the stamp. That’s quite evident with this bouquet stamp as you can see the very dark to the light. I’ve kept this card in the muted tones, but it might be really pretty in Pale Papaya or even Polished Pink. Think I’ll have to try that… :}

Eden Hugs.3

For the envelope it’s just the same bouquet stamped in Night of Navy ink on the front. This produced a better bouquet in my opinion, less ink somehow. Let me remind you that with distinctive stamps it is better if your ink pad is not too inky. And that’s it for today. I hope you like this card. I didn’t at first but I really like that die cut and the ribbon/ bow adds a nice touch.

Not have a demonstrator so you can order? If you do not have a demonstrator and need an Annual 2021 Catalog OR Jul-Dec 2021 Mini Catalog, please reach out to me – happy to send one to you. Please also use my current host code when ordering: 26QYRFXB I offer my customers a free item from Stampin’ Up! item valued to $10 with your order of $50 and above. Click here to go my store. When the order is over $150, you still receive that free gift from me, but SU! has Stampin’ Rewards that may be used for additional products, so don’t use the host code at that time. If you have questions just let me know. If you would like to be able to order products early from catalogs AND enjoy that 20% discount, join my team now… you may do that here. We have lots of fun and are a creative bunch that encourages & supports one another. Would love to have you!

Thanks for stopping by. May you have a beautiful day. Nothing beats as handmade card!

Inspire. Create. Share.

Stampin’ Up! Encircled w/ a Snowflake

Happy Tuesday! We are having torrential rains & gale force winds today… in fact some of the state is under ‘state of emergency’ conditions because of it. Please pray for safety for everyone… Today’s card is another pretty easy to do Christmas card. I love the Wonderful Snowflakes that are part of the Wishes & Wonder Suite of products and I’m determined not to hoard them :O)

Encircled w/ a Snowflake.1

That beautiful die cut behind the snowflake is from the Encircled in Beauty Dies ~ and those dies coordinate with TWO stamp sets: Encircled in Friendship from the Annual Catalog and Encircled in Warmth from the Jul-Dec 2021 Mini Catalog. It’s. too bad it doesn’t show up more here, but that just means another card is in order to show off the dies 😏 Doesn’t this snowflake look as though it could be hanging in a window somewhere? That was the idea anyway.

How to do this… die cut the ‘wreath circle’ using the Encircled in Beauty Dies and Misty Moonlight card stock. Mount the snowflake in the center of the die cut with a dimensional. Set aside.

Cut three strips of Harvest Meadow DSP: 1 x 4; 1 1/4 x 4 & 2 3/4 x 4. I like to cut a panel 4 x 5 1/4 so the DSP is a continuous pattern that flows down, then trim the bottom section as needed. Adhere these to a Basic White 4 1/8 x 5 1/4, spacing equally. Adhere the snowflake so it is centered right to left. Add the ribbon: here I used Crinkled Seam Binding ribbon in Whisper White, adhered it under the die cut with a glue dot and secured it on the back with Seal+. Create a bow from the same ribbon and attach it with a glue dot. I added the entire panel to the Misty Moonlight card base (4 1/4 x 11) with liquid glue ~ and the card front was done.

Encircled w/ a Snowflake.2

For the inside, I used the trimmed Harvest Meadow DSP from the card front to add it to a Basic White panel 4 x 5 1/4, then stamped this fun sentiment from the Encircled in Warmth stamp set with Misty moonlight ink. This panel was added to the inside of the card & voila!

Encircled w/ a Snowflake.3

For the envelope, I added more of the Harvest Meadow DSP in the same pattern to the envelope flap and trimmed it to fit. Then on the front of the envelope, I stamped the sentiment in Misty Moonlight ink – again using the Encircled in Warmth stamp set.

This is just an extra fun & easy card, easy to look at and appreciate and quick to create as well. This could be done with various Christmas papers/ colors to give it a total different look. I just may have to do that!

Mini Catalog, please reach out to me – happy to send one to you. Please also use my current host code when ordering: 26QYRFXB I offer my customers a free item from Stampin’ Up! item valued to $10 with your order of $50 and above. Click here to go my store. When the order is over $150, you still receive that free gift from me, but SU! has Stampin’ Rewards that may be used for additional products, so don’t use the host code at that time. If you have questions just let me know. If you would like to be able to order products early from catalogs AND enjoy that 20% discount, join my team now… you may do that here. We have lots of fun and are a creative bunch that encourages & supports one another. Would love to have you!

Thanks for stopping by. May you have a beautiful day. Nothing beats a handmade card!

Inspire. Create. Share.

Stampin’ Up! Peaceful Place SDSP

Hello Monday morning friends!I’ve created a pretty and very easy card for you today using the Peaceful Place SDSP, some Metallic Pearls and Simply Elegant Trim in silver. Let’s take a peek.

3Peaceful Place SDSP.1

This paper is so pretty ~ trees, trees, trees ~ each a little different & more beautiful on each DSP sheet. And… it glistens with silver. This is a very simple card. I’ve layered a panel 4 1/4 x 5 1/2 directly to the Thick Basic White card base. I stamped the sentiment in VersaMark ink using the Heartfelt Wishes stamp set, then embossed it in Silver with the heat tool. I used the paper trimmer to cut a 2 x 4 piece that has the same tree as the SDSP, trimmed it at the bottom with the Tailored Tag Punch then wrapped a length of Simply Elegant Trim around it and secured it in back w/ Seal+. I made a bow out of the same silver trim and adhered it with a glue dot. This was mounted with dimensionals on a piece of Silver Foil 2 1/8 x 4 1/8, trimmed in the same manner. This was added with Seal+ over the same tree for a perfect 3D look. To finish the card front I added three Metallic Pearls in Silver and the card front was done.

For the inside I again used VersaMark ink to stamp the sentiment, this time from the Evergreen Elegance stamp set, sprinkled it with silver embossing powder & heat set it. I considered adding a tree, but I really liked the simplicity of this, so left it with just the sentiment.

Peaceful Place SDSP.4

For the envelope I added another piece of the Peaceful Place SDSP to the flap then stamped the tree from Evergreen Elegance stamp set in Basic Gray. This stamped tree just pulls it all together to make this a nice card/ envelope. And there you have it.
Super pretty SDSP & a super simple card.

Not have a demonstrator so you can order? If you do not have a demonstrator and need an Annual 2021 Catalog OR Jul-Dec 2021 Mini Catalog, please reach out to me – happy to send one to you. Please also use my current host code when ordering: 26QYRFXB I offer my customers a free item from Stampin’ Up! item valued to $10 with your order of $50 and above. Click here to go my store. When the order is over $150, you still receive that free gift from me, but SU! has Stampin’ Rewards that may be used for additional products, so don’t use the host code at that time. If you have questions just let me know. If you would like to be able to order products early from catalogs AND enjoy that 20% discount, join my team now… you may do that here. We have lots of fun and are a creative bunch that encourages & supports one another. Would love to have you!

Thanks for stopping by. May you have a beautiful day. Nothing b eats a handmade card!

Inspire. Create. Share.

Hi Folks – it’s Sunday! Do you hav e your ‘Sunday go to meetin’ clothes laid out? As for me, I do know what I will be wearing :). I enjoy Sundays ~ it’s an opportunity for me to regroup, think about my week and how to be a better person. So, having said all that, are you ready to see my card today? Let me say first – this was so fun to do, I love this Words of Cheer bundle, but true confessions… I used some retired Sale-a-bration paper but you could use any DSP 😳 Here’s the card…

Cheer Fun Fold.1

Isn’t this bright? Let me tell you about the shiny white paper – I cheated! I used the Christmas Cheer Dies and some leftover ‘paper’ from the Wonderful Snowflakes to die cut the holly leaves & stars. I wanted the shine, kind of like foil, to make this stand out. More info…

Basics: Words of Cheer Bundle (includes Christmas Cheer Dies)

  • Die cut the cheer outline from Red Foil sheets
  • Die the letters from Crumb Cake. Adhere letters to the Red Foil die cut
  • Die cut the holly leavers and stars from Wonderful Snowflakes scraps. Adhere holly leaves to the back of the Red Foil die cut
  • Adhere this to a panel of Vellum 1 3/8 x 5 1/4. TIP: I recommend using glue dots to secure holly leaves to the Vellum.

Card cuts:

  • Card base – Garden Green 5 1/2 x 11 scored at 1 3/4, 4 1/4, & 6 3/4
  • Basic White panels -1 5/8 x 5 3/8 (2); 2 3/8 x 5 3/8 (2); 4 1/8 x 5 3/8
  • Coordinating DSP – 1 1/2 x 5 1/4 (2); 2 1/4 x 5 1/4 (2); 1 3/4 x 5 1/4
  • Burnish score lines firmly. see photo below for guide
Cheer Fun Fold.2

Attach papers as shown below. Remember the Cheer for the front of the card!

You can clearly see how I decorated the various panels: the holly leaves were die cut from the leftover Wonderful Snowflakes pieces; the tree is the Pine Tree punch and the ornaments are die cut from Real Red c s & Shimmer Paper with Wink of Stella added for glam (the die came from Christmas Trees Dies); the stars are also from the Cheer Dies and Wonderful Snowflakes paper scraps. There is no sentiment, but plenty of room for writing a precious message.

This is a thick card when closed and held securely by a belly band. To create the belly band: cut a length of Garden Green 1 x 11; cut a length of Basic White 7/8 x 11 and adhere together. Cut a label with the Tasteful Labels Dies from Garden Green & Basic White as shown. Stamp sentiment in Real Red ink using the Words of Cheer stamp set. Die cut holly leaves from garden Green & pine branches from Pear Pizzazz. Adhere as shown. Attach to the belly band with Tear n Tape.

Cheer Fun Fold Addition. belly band & label

This is a thick card when closed and held securely by a belly band. To create the belly band: cut a length of Garden Green 1 x 11; cut a length of Basic White 7/8 x 11 and adhere together. Cut a label with the Tasteful Labels Dies from Garden Green & Basic White as shown. Stamp sentiment in Real Red ink using the Words of Cheer stamp set. Die cut holly leaves from garden Green & pine branches from Pear Pizzazz. Adhere as shown. Attach to the belly band with Tear n Tape.

You can also see in this photo that I covered the front of the card with a panel of card stock – to protect the delicate leaves on the ‘Cheer’ front :O)

Not have a demonstrator so you can order? If you do not have a demonstrator and need an Annual 2021 Catalog OR Jul-Dec 2021 Mini Catalog, please reach out to me – happy to send one to you. Please also use my current host code when ordering: 26QYRFXB I offer my customers a free item from Stampin’ Up! item valued to $10 with your order of $50 and above. Click here to go my store. When the order is over $150, you still receive that free gift from me, but SU! has Stampin’ Rewards that may be used for additional products, so don’t use the host code at that time. If you have questions just let me know. If you would like to be able to order products early from catalogs AND enjoy that 20% discount, join my team now… you may do that here. We have lots of fun and are a creative bunch that encourages & supports one another. Would love to have you!

Thanks for stopping by. May you have a beautiful day. Nothing beats a handmade card!

Inspire. Create. Share.

Stampin’ Up! Stitched Stars in Glory

Whoa – it’s the weekend! What a crazy, hectic week for me… and I haven’t posted in a couple of days because of that ~ but here I am… with a card I hope you’ll like (I like it!) It uses Stitched Stars Dies and I’m a ‘star’ person. I also combined Black Glitter paper & Peaceful Place SDSP. I also splattered some Basic Gray & Smoky Slate using the Stampin’ Blends. They don’t show much, but in person you can tell.

Stitched Starts in Glory.1

,While it’s subdued with grays, it is also sparkly with the Black Glitter Paper & the Silver Foil just makes those big stars pop! I could add some rhinestones, but I don’t really think it needs it – although I know some folks like rhinestones on just about everything! :O) (You know who you are.)

Basic steps:

  • Basic Gray card stock cut 4 1/4 x `11
  • Basic White card stock cut 4 1/8 x 5 3/8
  • Peaceful Place SDSP cut 12 x 5 3/8 (2)
  • Peaceful Place SDSP for crosspiece 3/4 x 3 1/8
  • Die cut stars from Silver Foil Sheets – and there are three
  • Die cut the scrolly swirl of stars from Black Glitter paper, reserve the stars from the die cut.

More detail

  • Splatter the Basic White panel using the Basic Gray and the Smoky Slate Stampin’ Blends
  • Add the side strips of the Peaceful Place DSP to the right & left edges of the Basic White panel. Adhere the center ‘strip’ as a ‘foundation kind of piece.
  • Add this panel to the card front.
  • Adhere the Glitter scrolly swirl of stars at an angle – as shown, with dabs of liquid glue.
  • Adhere the stars: the largest is just an outline and it’s adhered directly to the card.; the next is on several dimensionals; tghe smallest with the added detail has a small dimensional in the center.
  • Add three Black Glitter stars that popped from the swirl when it was die cut ~ and the card front is done!
Stitched Stars in Glory.2

The inside…

  • Die cut a strip of Silver Foil 5/8 x 5 3/8
  • Die cut a strip from the Peaceful Prints SDSP 1/2 x 5 3/8. Adhere to the Silver Foil strip
  • Add strip to the Basic White panel (4 1/8 x 5 3/8)
  • Add more stars from the Black Glitter swirl. Add the single white star that was die cut when I was getting my color scheme figured out (Shimmer Paper)
  • Add the Basic White panel to the inside of the card & DONE!
Stitched Stars in Glory.3

For the envelope I used more of the same Peaceful Prints SDSP to adhere to the envelope flap. I then stamped this delicate star in VersaMark ink and sprinkled White Embossing Powder over it and heat set. This star came from the Tidings of Christmas stamp set. Voila – what do you think? I like it… in fact I like it a lot :O)

Not have a demonstrator so you can order? If you do not have a demonstrator and need an Annual 2021 Catalog OR Jul-Dec 2021 Mini Catalog, please reach out to me – happy to send one to you. Please also use my current host code when ordering: 26QYRFXB I offer my customers a free item from Stampin’ Up! item valued to $10 with your order of $50 and above. Click here to go my store. When the order is over $150, you still receive that free gift from me, but SU! has Stampin’ Rewards that may be used for additional products, so don’t use the host code at that time. If you have questions just let me know. If you would like to be able to order products early from catalogs AND enjoy that 20% discount, join my team now… you may do that here. We have lots of fun and are a creative bunch that encourages & supports one another. Would love to have you!

Thanks for stopping by. May you have a beautiful day. Nothing beats a handmade card.

Inspire. Create. Share.

Stampin’ Up! CLING STAMP SALE and Arrow Fold Card

Good morning! It’s Wednesday and CLING STAMP SALE DAY @ Stampin’ Up! Here’s the scoop… all cling stamps are 15% off until 11:59 PM TONIGHT the 20th – that’s Mountain Time. Here on the East Coast, that would be until 1:59 AM. See the list …HERE! Get your list together… and place that order. Click here to go my store. Remember that with your order of $50 (before tax & shipping) you are able to choose a SU! product of choice valued to $10. Use my current HOST CODE 26QYRFXB to be able to get that benefit. Now is also a perfect time to use that cling stamps purchase toward a STARTER KIT as a demonstrator… WooHoo … what a deal is that! Choose your own starter kit for $99. You may do that here.

And here’s more info about the demonstrator & rewards… Not have a demonstrator so you can order? If you do not have a demonstrator and need an Annual 2021 Catalog OR Jul-Dec 2021 Mini Catalog, please reach out to me – happy to send one to you. Please also use my current host code when ordering: 26QYRFXB I offer my customers a free item from Stampin’ Up! item valued to $10 with your order of $50 and above. Click here to go my store. When the order is over $150, you still receive that free gift from me, but SU! has Stampin’ Rewards that may be used for additional products, so don’t use the host code at that time. If you have questions just let me know. If you would like to be able to order products early from catalogs AND enjoy that 20% discount, join my team now… you may do that here. We have lots of fun and are a creative bunch that encourages & supports one another. Would love to have you!

I’m showcasing another Arrow Fold card today as I have a card c lass tomorrow that is going to make this as a 8 1/2 x 5 1/2 card, but will also make a 4 1/4 x 11 size card with this fun fold. I posted the other card a few days ago and you can see that card here, with all it’s dimensions and glory. Today’s card though…

Arrow Fold 8 1/2 x 5 1/2.1

This card was made with a retired DSP from the recent Sale-a-bration as a FREE product with a $50 purchase. It is called Peaceful Prints. I need lots of Christmas cards and this was a perfect use for this paper. :O) But you may use lots of other Designer Series Papers. Here are details:

Step 1 – Cutting & scoring

  • Card base: Basic Black 8 1/2 x 5 1/2 scored at 4 1/4 for this card. Score on the front panel from the right corner score line to the center point (2 3/4″). Do the same from the score at the left top corner to the center point. Mark 2″ up from the bottom on the short side of the front on both short sides. Score again from the 2″ mark to the center point on both sides of the front panel. Burnish well.
  • Layer 1: Basic White 5 3/8 x 4 1/8,(cut 2) Mark center on the long side on both panels at 2 1/16″. CUT from right corner to center point. Do the same from the left corner to the point. Do this to both Basic White panels. I strongly encourage marking on the back side of the center triangle the top of the triangle for both triangular panels.
  • Layer 2: DSP – Peaceful Prints 5 1/4 x 4. Mark the center point on the bottom of the DSP @ 2″. CUT from the right upper corner to the center point. Do the same from the upper left corner to the center point.

Step 2 ~ Adhering

  • Adhere DSP to correct panels. There will be a Basic White triangular panel for the inside of the card to stamp. There will be an extra set of Basic White corner panels that will not be used.
  • Add corner panels to the INSIDE of the card.
  • Turn in the front corner scores and adhere. See photo…
  • Turn the second score line (the 2″ score) and mark a line to indicate where the glue should be placed. Refer to 1st photo above. Adhere these score lines outward.
  • Add center panels to the FRONT of the card.

Step 3 ~ Decorate Front

  • Cut a 3″ square of Basic White and die cut a scalloped circle.
  • Cut a 2 3/4″ square of Garden Green and die cut a circle. Adhere together.
  • Cut a 2 1/2″ square of Vellum and die cut a circle.
  • Adhere with dimensionals, a Wonderful snowflake to the center of the Vellum circle.
  • Adhere Vellum piece with a bit of glue in the center, to the Garden Green circles.
  • Adhere this Wonderful Snowflake/ circle to the triangle on the front of the card as shown, allowing room for a sentiment banner.
  • Stamp with Garden Green ink the sentiment on a 5/8″ wide strip. The sentiment comes from Snowman Season stamp set. Trim ends with Pick a Banner Punch. Add banner to the front of the card with dimensionals on the extended panels.
Arrow Fold 8 1/2 x 5 1/2

Step 4 ~ Decorate the inside

  • With the remaining Basic White triangular panel (note the top mark on the back!), stamp the sentiment from Snowman Season in Garden Green ink.
  • Stamp snowflakes from Snowman Season stamp set in Memento Black ink
  • Adhere triangular panel to the inside of the card – and the card is done!
Arrow Fold 8 1/2 x 5 1/2, inside

Step 5 ~ the Envelope

  • Stamp the front of the envelope with the very cute dancing snowman in Memento Black ink from the Snowman Season stamp set.
  • Adhere a 2 14 x 6 panel of coordinating Peaceful Prints DSP to the flap, trim to fit & voila… another Christmas Card.
Arrow Fold 8 1/2 x 5 1/2, completed

Isn’t this a fun fold, AND a fun, happy Christmas card? I’m very please with it and think this will make a hit at our card class tomorrow. Maybe we’ll take some photos of their completed cards :O)

REMEMBER 15% OFF CLING STAMP SALE – TODAY ONLY (20TH) UNTIL 11:59 PM MOUNTAIN TIME.

Thanks for stopping by. May you have a beautiful day. Nothing beats a handmade card.

Inspire. Create. Share.

Stampin’ Up! 24 Hr Stamp Sale

The 24 hour Stamp Sale is unbelievable… cling stamps – 15% off. See the list …HERE This sale begins at 12AM – 11:5 9 PM MT Oct 20th – that is TONIGHT. Get your list together… and place that order. Click here to go my store. Remember that with your order of $50 (before tax & shipping) you are able to choose a SU! product of choice valued to $10. Use my current HOST CODE 26QYRFXB to be able to get that benefit. Now is also a perfect time to use that cling stamps purchase toward a STARTER KIT as a demonstrator… WooHoo … what a deal is that! Choose your own starter kit for $99. You may do that here.

And here’s more info about the demonstrator & rewards… Not have a demonstrator so you can order? If you do not have a demonstrator and need an Annual 2021 Catalog OR Jul-Dec 2021 Mini Catalog, please reach out to me – happy to send one to you. Please also use my current host code when ordering: 26QYRFXB I offer my customers a free item from Stampin’ Up! item valued to $10 with your order of $50 and above. Click here to go my store. When the order is over $150, you still receive that free gift from me, but SU! has Stampin’ Rewards that may be used for additional products, so don’t use the host code at that time. If you have questions just let me know. If you would like to be able to order products early from catalogs AND enjoy that 20% discount, join my team now… you may do that here. We have lots of fun and are a creative bunch that encourages & supports one another. Would love to have you!

Now for the card of the day… drum roll here…

Whimsical Trees1

It’s made with The Whimsical Tree stamps & coordinating Dies, with Painted Christmas DSP. LOVE this DSP – and this bundle! This is such a simple and yet classic card to make. I tend to like multiple layers, but you wouldn’t have to do that if you didn’t want to.

Whimsical Trees.2

Basics:

  • Garden Green card stock for the card base: 5 1/2 x 7 1/2 scored at 4 1/4, short side is the front of the card.
  • Basic White: 3 1/8 x 5 3/8 (front panel); 4 1/8 x 5 3/8 (inside panel) + banner
  • DSP – Painted Christmas: 3 x 514 (front panel); 1 x 5 5 1/4 (inside panel)
  • Green Foil sheet: scrap for tree die

Other products used:

  • Banners Pick a Punch
  • Red Rhinestone Basic Jewels
  • Blushing Bride ink

Instructions:

  • Layer panels as shown for the card front
  • Die cut trees with the Christmas Trees Dies. Adhere with liquid glue to the card front
  • Stamp sentiment from the Whimsical Tree stamp set with Blushing Bride ink. Trim one end with the Banners Pick a Punch. Trim other end straight and ev en with the Basic White front panel. Adhere with dimensionals over the tree trunks
Whimsical Trees, inside
  • Inside: adhere DSP panel to the right side of the Basic White piece. Stamp the sentiment from Whimsical Trees stamp set in Blushing Bride ink. Adhere panel to the inside of the card
  • Stamp the very cute tree to the Basic White envelope front from Whimsical Trees stamp set in Blushing Bride ink (there’s a theme going on here 🙂 Adhere Painted Christmas DSP to the flap & trim to fit. DONE!
Whimsical Trees. 1

This is super simple & cute!

Thanks for stopping by. May you have a beautiful day. Nothing beats a handmade card. Inspire. Create. Share.

Remember to SHOP THE CLING STAMP SALE – 15% OFF – THE 20TH (TONIGHT) FROM 12 AM – 11:59 PM MT.See the list …HERE . Click here to go my store. Please also use my current host code when ordering: 26QYRFXB I offer my customers a free item from Stampin’ Up! item valued to $10 with your order of $50 and above. Click here to go my store. When the order is over $150, you still receive that free gift from me, but SU! has Stampin’ Rewards that may be used for additional products, so don’t use the host code at that time.